
 Radiant Heat Floor Design & Installation Mistakes to Avoid
Radiant floor slab disaster diagnosis & prevention

- POST a QUESTION or COMMENT On radiant floor heating problems
Radiant heating system design or installation mistakes that must be avoided.
This article explains how to avoid some fatal mistakes when installing radiant heat in a concrete floor slab by describing an incompetent radiant heat floor installation along with an explanation of why things went wrong and how to avoid these errors.
The workers in the photograph at page top, where our concrete slab was being poured, were not guilty of a thing.
But the contractor who prepared the forms and under-slab insulation placed radiant heat floor tubing too deep in the slab and he omitted proper under-slab insulation. N
The result: the owners ultimately had to abandon the entire radiant heated floor system.
InspectAPedia tolerates no conflicts of interest. We have no relationship with advertisers, products, or services discussed at this website.
- Daniel Friedman, Publisher/Editor/Author - See WHO ARE WE?
How to Really Foul Up a Radiant Heat Concrete Floor Installation - Mistakes to Avoid, Diagnosing & Fixing Radiant Heat Slabs
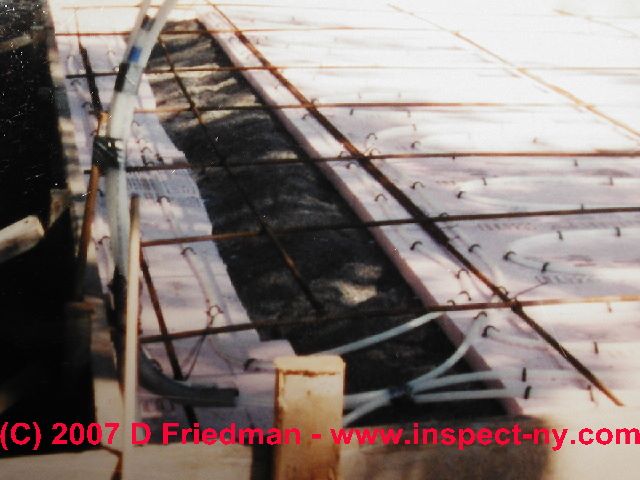 Our contractor (Nightmare-works Construction), didn't want to insulate below the radiant-heat floor slab at all, insisting that "Once you get that dirt heated up below your floor your the earth will stay warm and your home will cost almost nothing to heat."
He was dead wrong - a SNAFU that led to complete abandonment of the heating system he installed.
In the floor installation shown here, the contractor placed the radiant tubing at the very bottom of the slab; additional mistakes included incomplete or missing insulation (see the dirt in our photo just above) and radiant tubing that was in some areas buried under more than 18 inches of concrete!
The result? The building could not be heated above 60°F and in very cold weather not above about 45°F. The radiant heat floor system shown in these photographs had to be abandoned.
How to avoid some really bad mistakes when installing radiant heat in a concrete floor slab. How our contractor ruined the installation our radiant slab heating system, causing its abandonment.
How to place radiant heat tubing at the proper depth in a concrete slab. Building floor slab insulation design advice.
Article Contents
- HEAT LOSS RATE THROUGH SLAB on GRADE
- CODE SPECIFICATIONS for RADIANT HEAT SLABS
- CRITICAL DESIGN DETAILS for RADIANT HEAT FLOORS
- DIAGNOSE RADIANT HEAT FLOOR NOT WORKING
- GAPS in RADIANT HEATED WOOD FLOORS - separate article, gaps caused by running the radiant heat at too-high a temperature.
- RADIANT HEAT SLAB SPECIFICATIONS
- SUCCESSFUL RADIANT HEAT SLAB DESIGN SOURCES
- WHY A BAD RADIANT HEAT SLAB SYSTEM DOESN'T WORK
Original Research Identified Heat Loss Rates Through a Concrete Slab on Grade with Various Insulation Schemes
 The nonsensical view that one can heat up the soil below an building slab on grade and that the soil would magically stay warm forever was put to the test experts when the author was five years old and the contractor was not even a gleam in his daddy's eye.
During February and March 1948, using a specially built, instrumented structure, Harlan Bareither and other experts and students at the University of Illinois Department of Mechanical Engineering conducted careful tests of various slab on grade floor and insulation designs to map heat loss, temperature, and moisture permeation characteristics of nine types of concrete slab subfloor constructions laid on the ground. [4]
Previously, the US National Bureau of Standards had already indicated that the heat loss of a concrete slab (floor) on grade (on the ground) is proportional to the perimeter of the building.
Bareither et als. referred to that work, but because the original testing was in warmer conditions (outside temperature had not been below 35°F. for more than three successive days), they recognized the need to test slab-on-grade floors in still colder conditions - in a climate where the ground is frozen during much of the heating season.
The 1948 heat loss research was important in part because it recognized that the rate of heat transfer from the heated building to the outside (earth and surrounding air) would be greater in proportion to the temperature difference between the heated space and the surrounding soils.
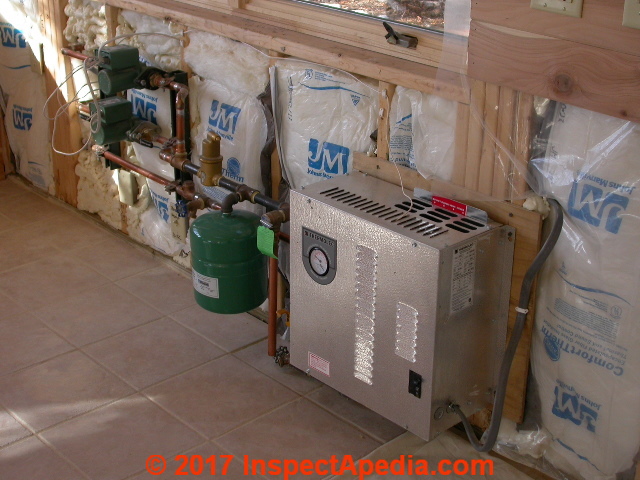
Photo: the radiant heat system that we had to abandon because of improper radiant heat tubing placement (too deep) and improper insulation below the slab (incomplete) includes the Thermolec B10-U electric boiler capable of providing 34,120 BTUH, circulator pumps, expansion tank, and radiant heat controls shown here as well as the entire tubing system.
This research on floor slab heat loss rates confirmed that
- The rate of heat loss from a building
varies by the temperature differences between the heated and un-heated space - the colder climate and frozen ground gave more rapid heat transfer, colder in-building floor temperatures, and thus provided an opportunity to test and measure different floor slab and foundation perimeter insulation schemes.
- The best overall slab on grade performance
"... was obtained by a floor construction in which a two-inch thickness of rigid waterproof insulation extended six inches down parallel to the exposed edge of the floor and [two feet *] back from the exposed edge .... - The heat loss through the insulated floor
was about 70% of that through this uninsulated floor.
Experts commonly cite a 26% drop in radiant heated floor output if tubing is at the bottom rather than the middle or upper portion of a concrete floor slab. Heat loss downwards where insulation under a slab is missing is about 70%! - * The heat loss through an uninsulated floor away from the building perimeter remains constant.
The authors accepted contemporary (1948) building practices that did not attempt to insulate under the entire floor and they pointed out that through the uninsulated center of the floor, the heat transfer rate from the building to the ground beneath, while slower than at the building perimeter, remained constant, forever - directly contradicting our contractor's theory that it was possible to "warm up the earth" and stop losing heat through the floor. [4]
Nightmare-Construction's Insulation Scheme & Radiant Tubing Location Details
One exception to the general order of priorities of where to insulate in buildings concerns homes built with slab-on-grade construction, particularly homes which have used radiant heat in the floor slab.
See details at HEAT LOSS PREVENTION PRIORITIES
The contractor (Nightmare-Works Construction) for a small cabin in the North combined being opinionated and a bully with dismal ignorance of how to construct a properly insulated radiant floor slab. [You know who you are, SB. We hope you'll read this and reconsider your opinions about radiant heat installation.]
See details at SLAB LOG CABIN SIDING - cabin photos and other comments
Not only did the owners have to battle with the bully to put insulation under the entire slab (he thought that Mother Earth would be warming the home from "ground heat" (which is below 40 °F in winter there).
Owners also lost a battle to have the contractor install proper insulation around the slab perimeter with a frost wall before the floor was poured (he insisted on a floating slab with no inside-perimeter insulation plan).
Worst of all, the contractor also pushed the radiant heat tubing so deep into the concrete (ranging from 7" deep to more than 18" deep) that the entire radiant heat system was not usable at all. Running the radiant heat pushed heat faster into the ground than it did up into the building, even with foam insulation under the slab.
We had to abandon the (expensive) radiant floor system and install alternate heating.
The Results of Combined Incomplete Floor Slab Insulation near the Perimeter and "Too-Deep" Radiant Tubing Placement were an Abandoned Heating System
- Unable to heat the building:
Even running the radiant floor heating system full time at the highest boiler settings and control settings allowed we could never heat the building to comfortable temperatures during cold Minnesota winters. - Abandoned radiant floor heat system.
Ultimately we had to completely abandon the radiant heat floor installation, wasting the costs of the boiler, tubing, installation labor, wiring, etc. The building is currently heated by plug-in electric wall heaters, pending a more permanent re-design.
Details about this radiant floor slab heat failure and and research on its cause are provided below.
Also see SLAB INSULATION, RADIANT / PASSIVE SOLAR for a discussion of proper insulation below a heated floor slab.
Critical Design Details for a Radiant Heated Concrete Floor
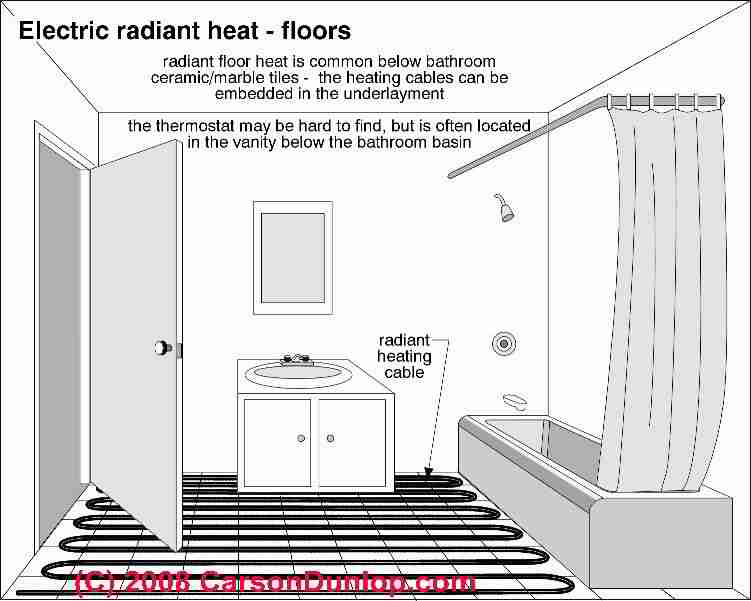 Don't permit your contractor
to make the (many) mistakes this one did. Insist that radiant heating in a poured concrete slab have these attributes:
Don't permit your contractor
to make the (many) mistakes this one did. Insist that radiant heating in a poured concrete slab have these attributes:
- Insulate below the entire floor slab.
Sketch at left courtesy of Carson Dunlop Associates, a Toronto home inspection, education & report writing tool company with whom we have shared information for several decades.
Although the rate of heat loss through the floor slab is slower at the center of the floor than at the building perimeter (of an installation that is not insulated), in cold climates the heat loss through the floor will be continuous will be significantly greater at an uninsulated slab. - Insulate the slab perimeter,
making sure that the insulation design does not rely on foam placed against the slab perimeter and extending above grade up to siding where it will invite termites or carpenter ants into the structure - Place the radiant heat tubing at the industry-recommended depth
down from the surface of the slab.
Typically the maximum depth that tubing should be placed in a concrete floor slab is 2" down from the finished floor surface.
- Supervise:
If you cannot be present at the job site at critical stages in construction, find someone knowledgeable who can inspect for you before the work continues.||
If the installer is simply tying the radiant heat tubing to welded wire reinforcement (WWR) commonly used in slab construction, it is essential that the wire be lifted up to about 2-inches below the top of the slab. A better approach is to support the wire mesh or better still, the radiant tubing itself at the proper depth in the slab using fittings designed for that purpose. - If your contractor is an opinionated bully like ours
who ridicules standards for good workmanship and proper radiant heat floor design, find someone else to do the work.
Most contractors are conscientious and are glad to hear about good design.
Radiant Heat Floor Slab Installation Details vs Design Specifications
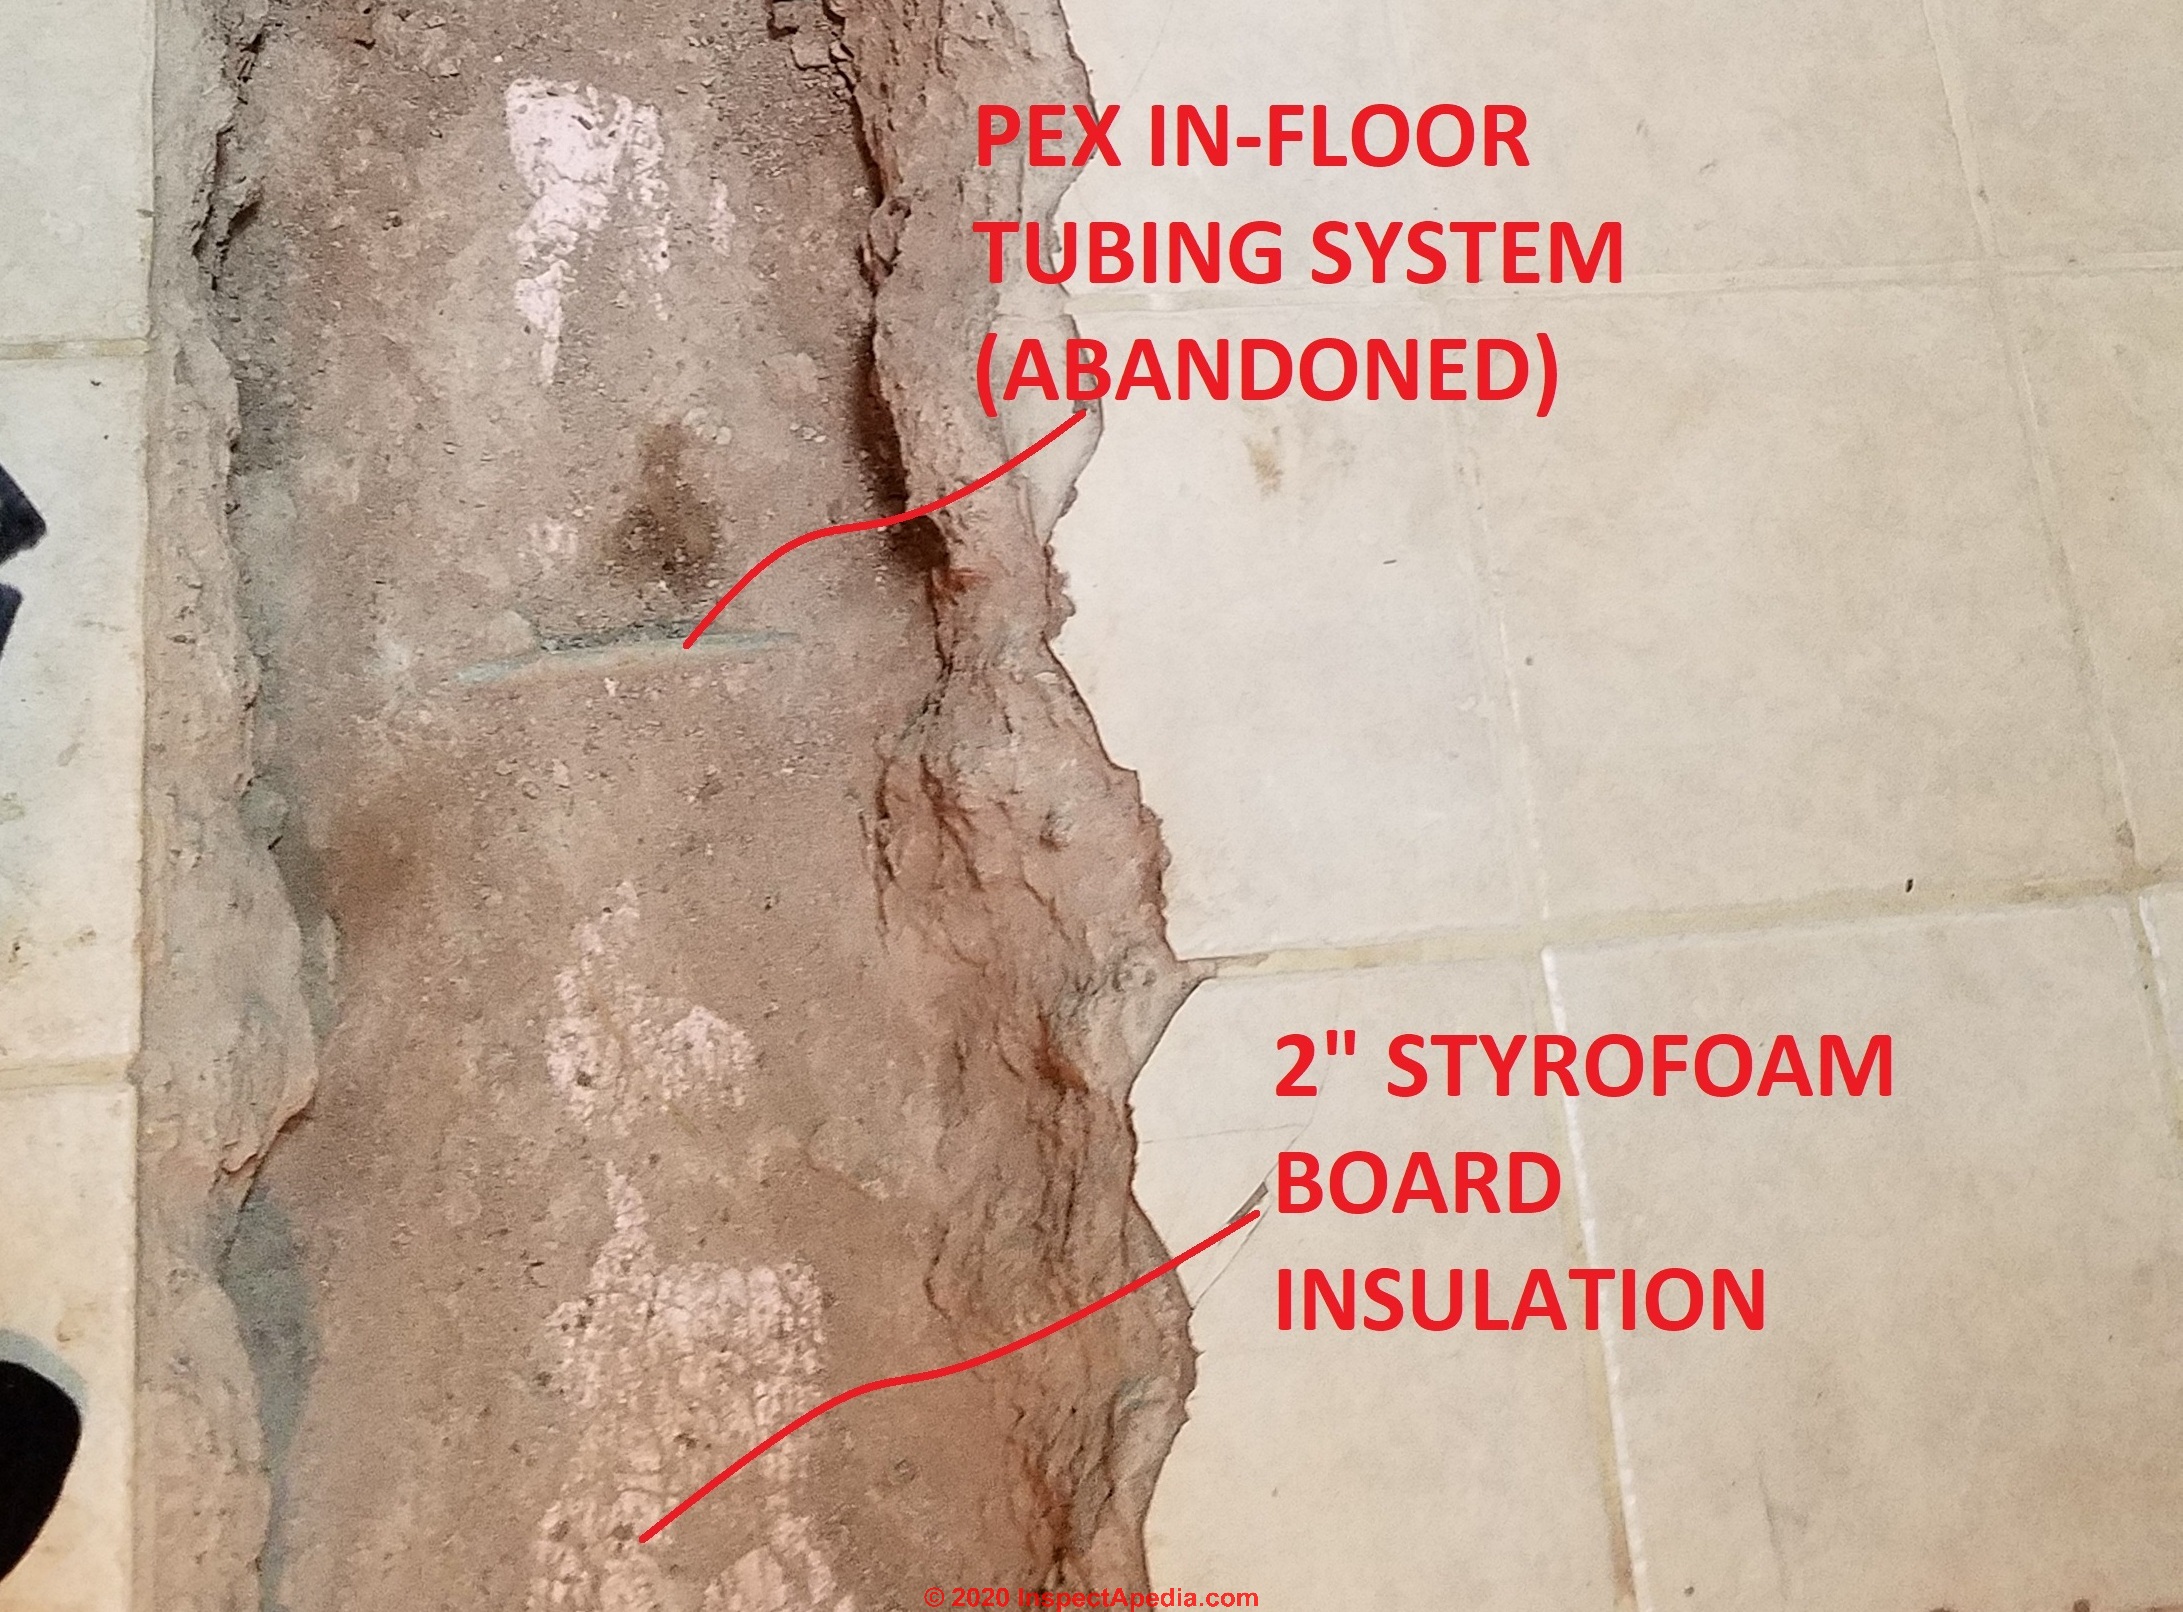 Radiant heat tubing in a concrete slab needs to be closer to the top of the slab than its bottom, normally in the top 2-inches of concrete.
Placing tubing deeper in the slab means, simply-put, that more heat will transfer into the slab and ultimately into the soil below than will be transferred up to the top of the slab and into the occupied space.
Our photos above and below show that the radiant heat system tubing for this improperly-installed system was placed right on top of the Styrofoam insulation intended to be at the bottom of the concrete floor slab.
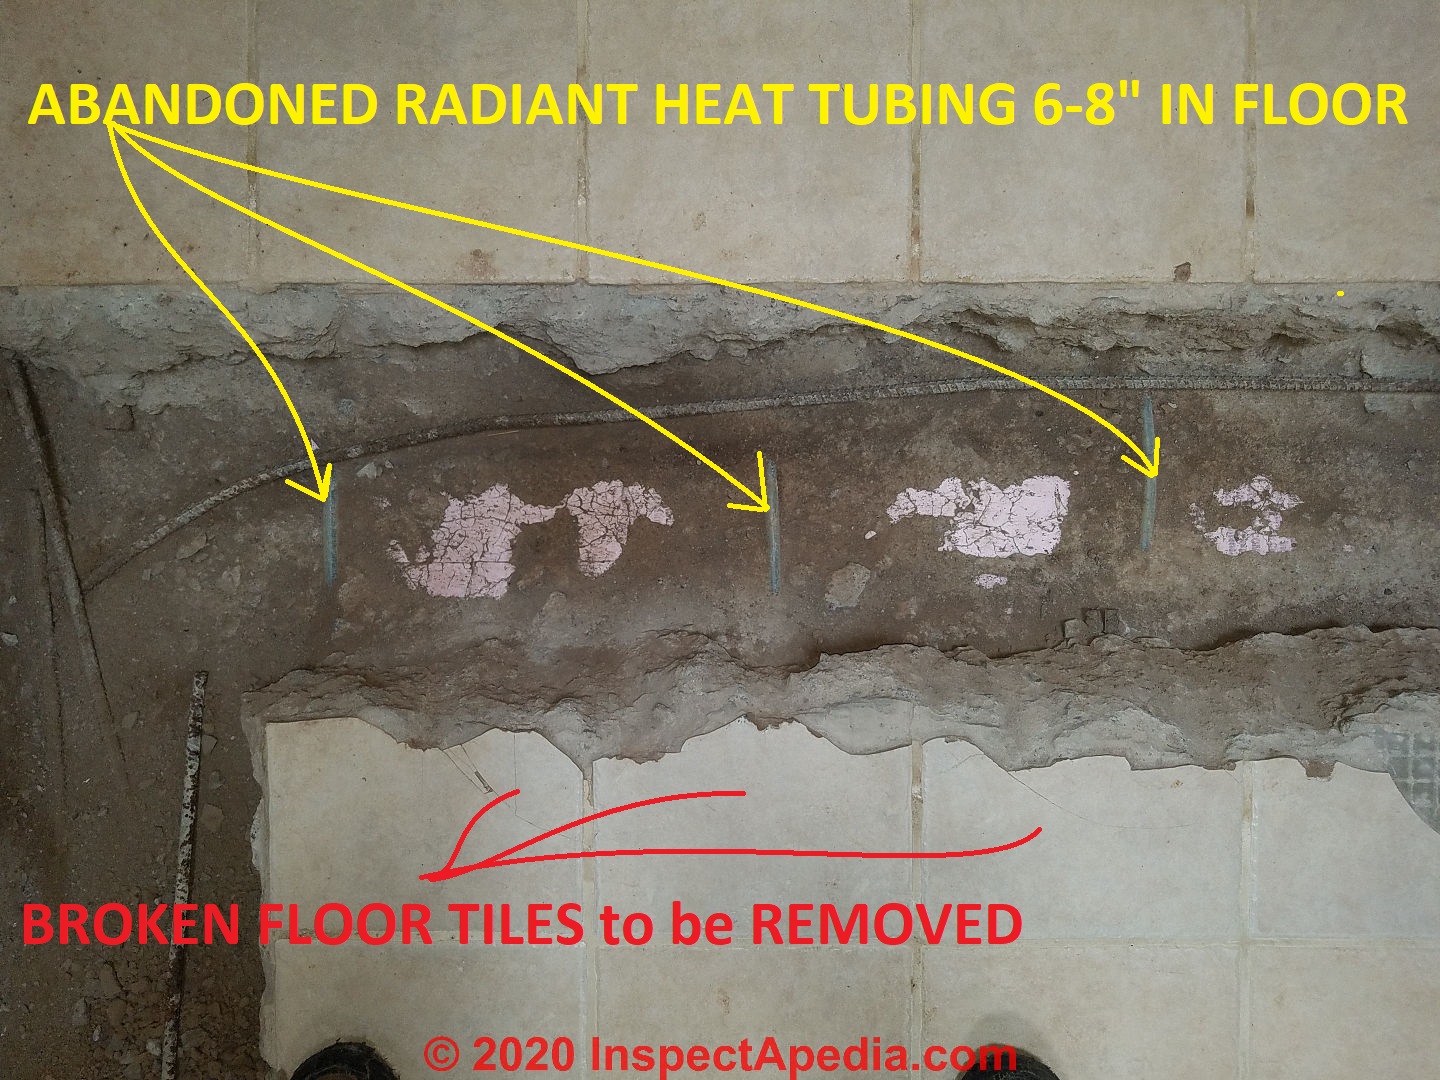
This placed the tubing at varying depths but generally about 7-inches below the finished floor surface, with tubing at some locations near the slab perimeter placed 18-inches deep in the slab!
In fact the tubing was stapled directly to the surface of the Styrofoam insulation.
Re-bar was laid atop the tubing and also at the bottom of the slab. (It should have been roughly mid-slab). Placing concrete atop radiant floor PEX tubing stapled to the foam-board insulation might work IF
- The insulation is adequate
- The concrete slab depth is not great
- The climate is not one of low temperature extremes
That was not the case for the home shown here.
After reviewing photographs taken during installation of the radiant heat floor slab described above, here's what we wrote to the owner and to the contractor:
I am doubtful that we can successfully and economically heat the cabin with radiant in floor heating as the current system is designed and installed, and it is unfortunately the case that the cost-to-cure is prohibitive as the slab would need to be completely replaced with one using proper insulation and tubing placement.
The bully contractor, who originally estimated the monthly heating cost for this small and otherwise well-insulated building, had
said the owners would face winter heating bills of about $30./month based on his prior experience.
Stunning heating bills arrived, exceeding
$400./month or more than ten times the estimated amount. That's when we began digging into the installation details of this project. Literally.
The floor slab and radiant heat tubing had been placed by the contractor while we were unable to attend the jobsite.
When the heating bills were excessive and when the heat, running 24-hours a day for weeks, was unable to raise the interior temperatures above 60°F, the contractor offered to "correct" the problem by installing larger capacity circulator pumps.
The "option" of adding larger pumps for this radiant heat floor was not a proper solution for several reasons:
- Forcing a faster hot water flow
in the radiant tubing would only correct a boiler operating problem if the boiler internal temperature were running too high and causing a shutdown due to the thermal over temperature sensor - this is not what was happening (I measured input and output temperatures) - The boiler was already operating at spec
in that it was producing more than 20 degrees between the input line and output line - so the problem is not flow but rather the inability of the boiler to handle the heat loss through the slab due to the slab tubing placement and insulation design. - Installing a boiler of higher capacity
might permit delivery of more heat to the slab and raise the indoor temperatures and slab surface temp but at a higher heating cost - The current heating costs for this radiant heated floor building were already 10 times above original estimate
if we turn on the radiant floor system run $300. to $440 a month which is 10 times what the contractor originally estimated - doubling these costs by adding a larger boiler or faster water flow is unreasonable. - We didn't have the option of taking advantage of reduced electrical rates
because the electrician sub-contracted by our builder did not install the electrical service to our specifications - leaving out a separate service and meter at the entry point.
The most economical fall back is to install electric baseboard heating or possibly hydronic heating using the existing electric boiler which was installed to pump heated water through the radiant tubing in the concrete floor.
Meanwhile we shut down this unfortunate radiant slab heat system, installed a few portable electric heaters, and given the tight, well-insulated construction, we found we can keep the little cabin comfortable for a fraction of the cost of heating the earth underneath our floor with the contractor's heating installation.
Details of errors visible in photographs taken during and after installation of the radiant floor
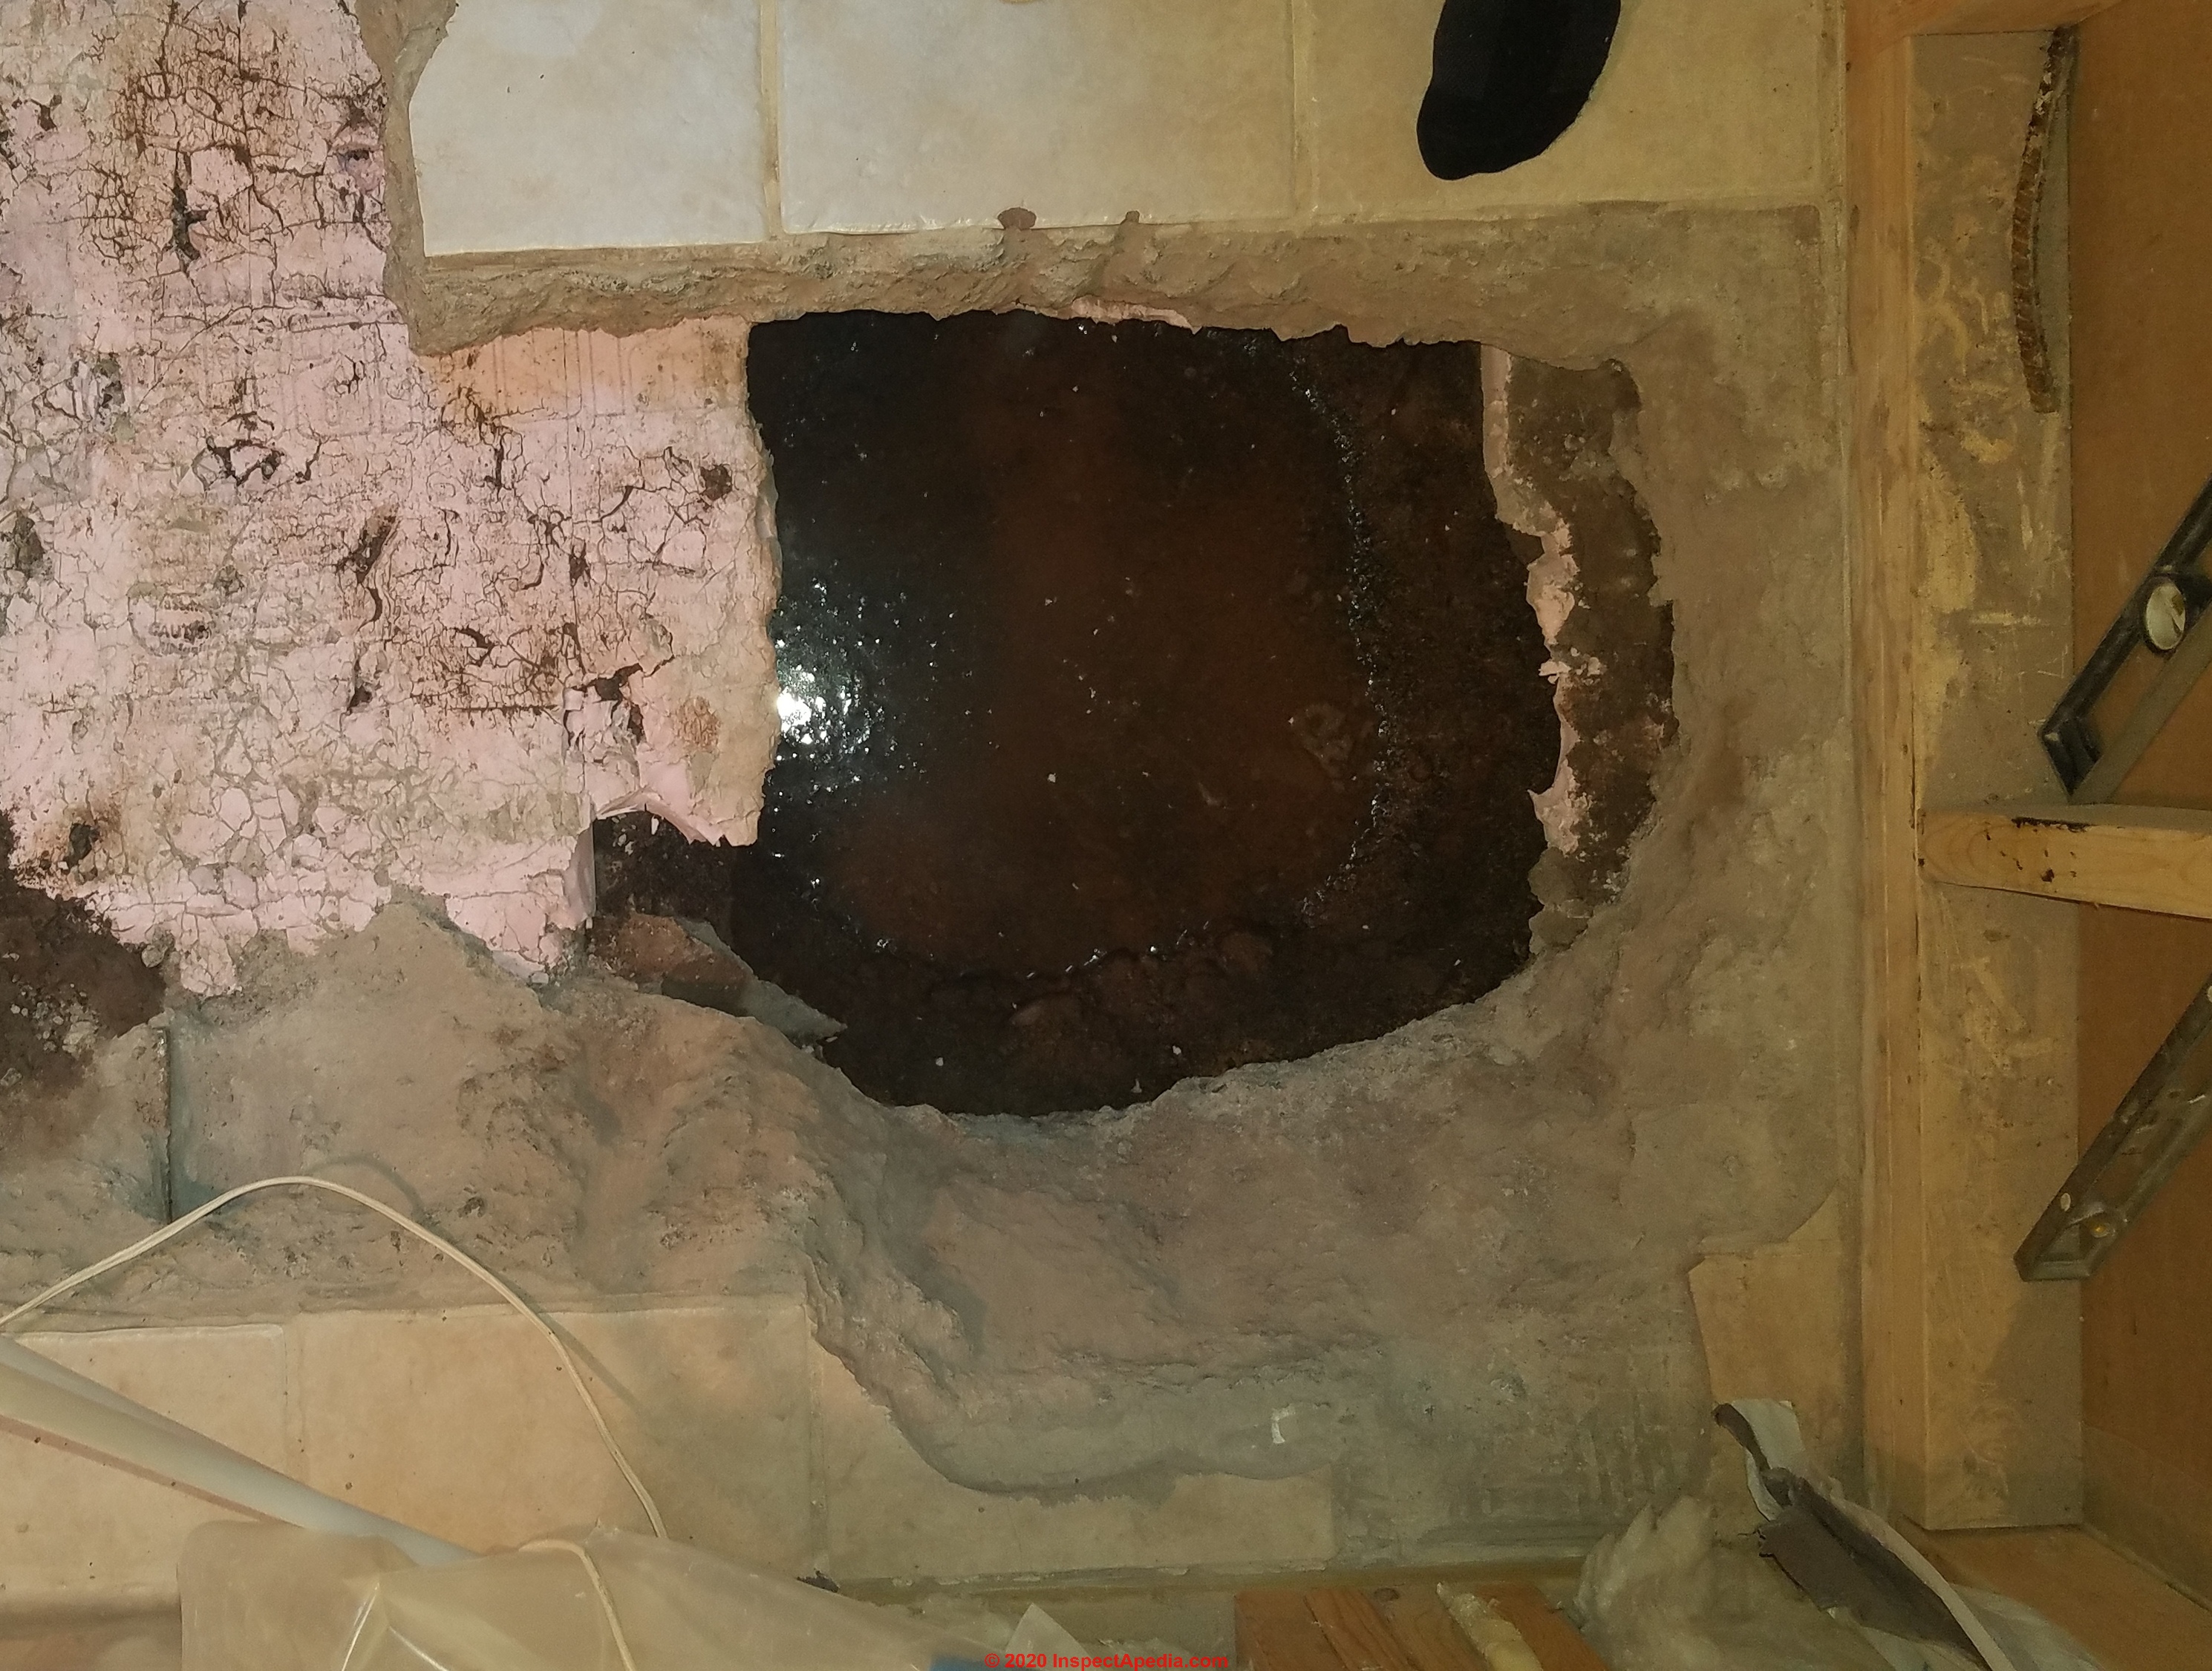
In 2020, observing water leaking up through the slab in this location from below, the floor was opened to permit further investigation. Our photo above shows accumulating groundwater just below the slab insulation. A system to drain off water and prevent water entry of frost damage to the slab was needed.
Our photos above and below were made possible by breaking into the floor slab with a jackhammer, removing concrete to expose the exact details of how and where the radiant heat tubing was installed in this floor - shown below.
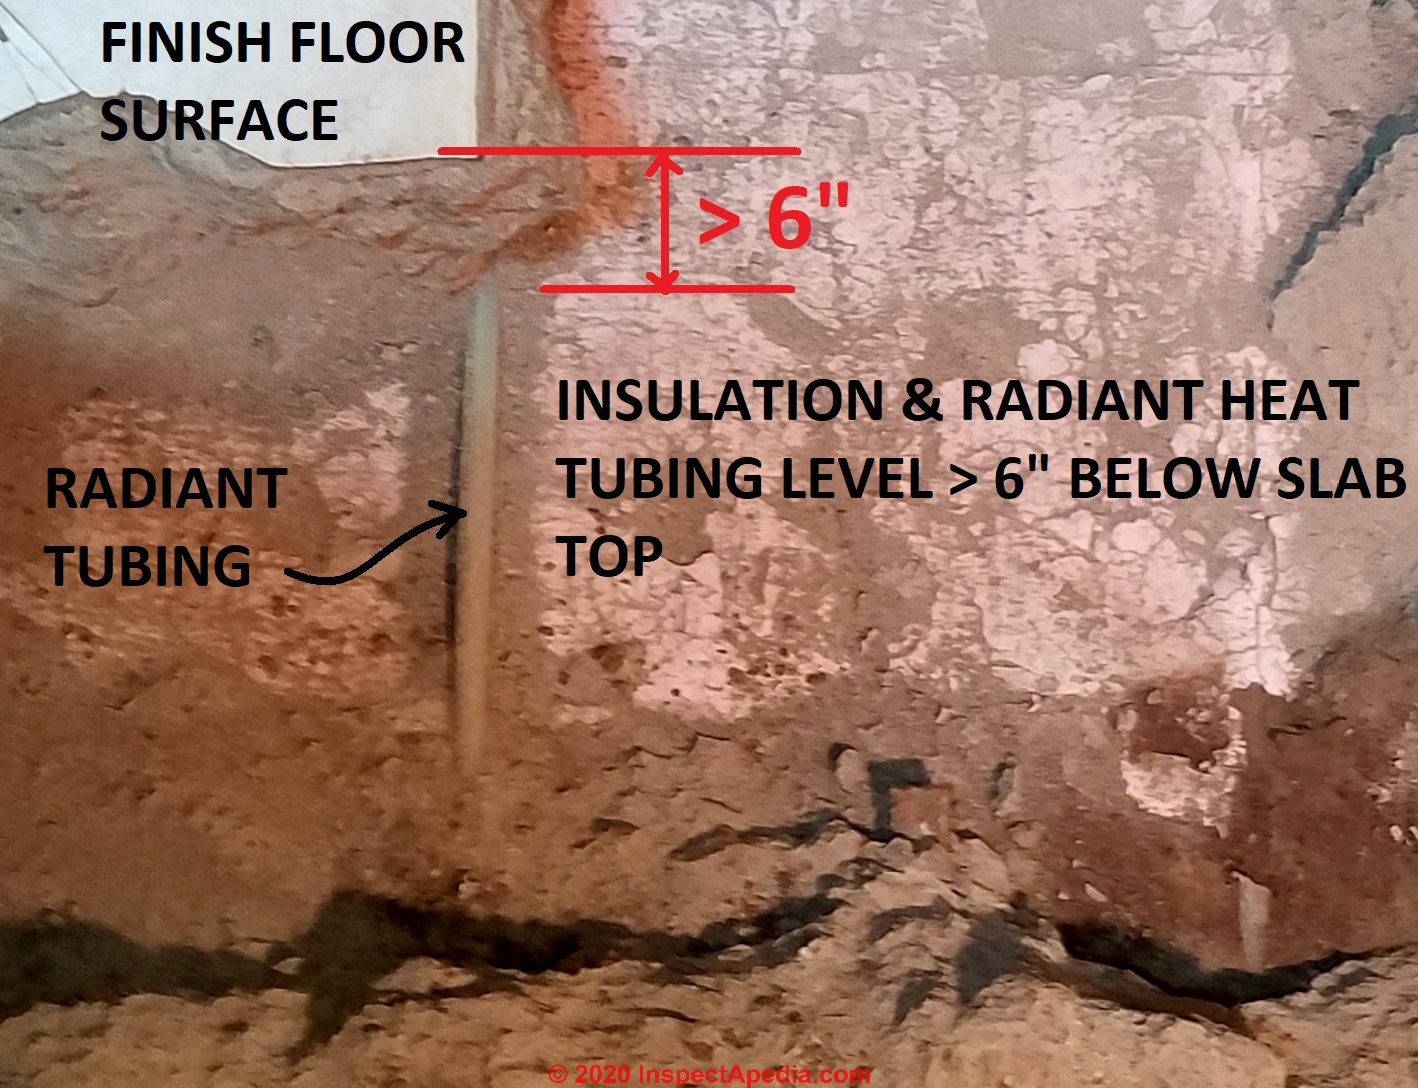 Following this exposure of the tubing and convinced that the radiant heat system could never work properly we removed the boiler intended for use in providing radiant heat and filled in the damaged areas of the floor with new concrete and tile.
Photographs of the slab and radiant tubing installation for the cabin show that the guidelines for radiant heat slab installations were not followed.
- Tubing is at a depth greater than 2"
from the top of the slab, typically at the slab bottom at 6-7 inches down from the floor surface, and at some locations is considerably deeper than that, in some areas more than 18" deep in concrete. - Insulation was omitted around the slab perimeter
and cannot be added outside due to 1. insect damage risk and 2. would not extend below and under the slab edges - Insulation is incomplete within the slab
where tubing installed at a lower level is stepped down from the upper slab level and heat transfer is permitted into the gravel fill below the main slab area. - The installing contractor decided on his own to skip the frost footings
specified for this slab, instead building a "floating slab" that was simply set atop the ground.
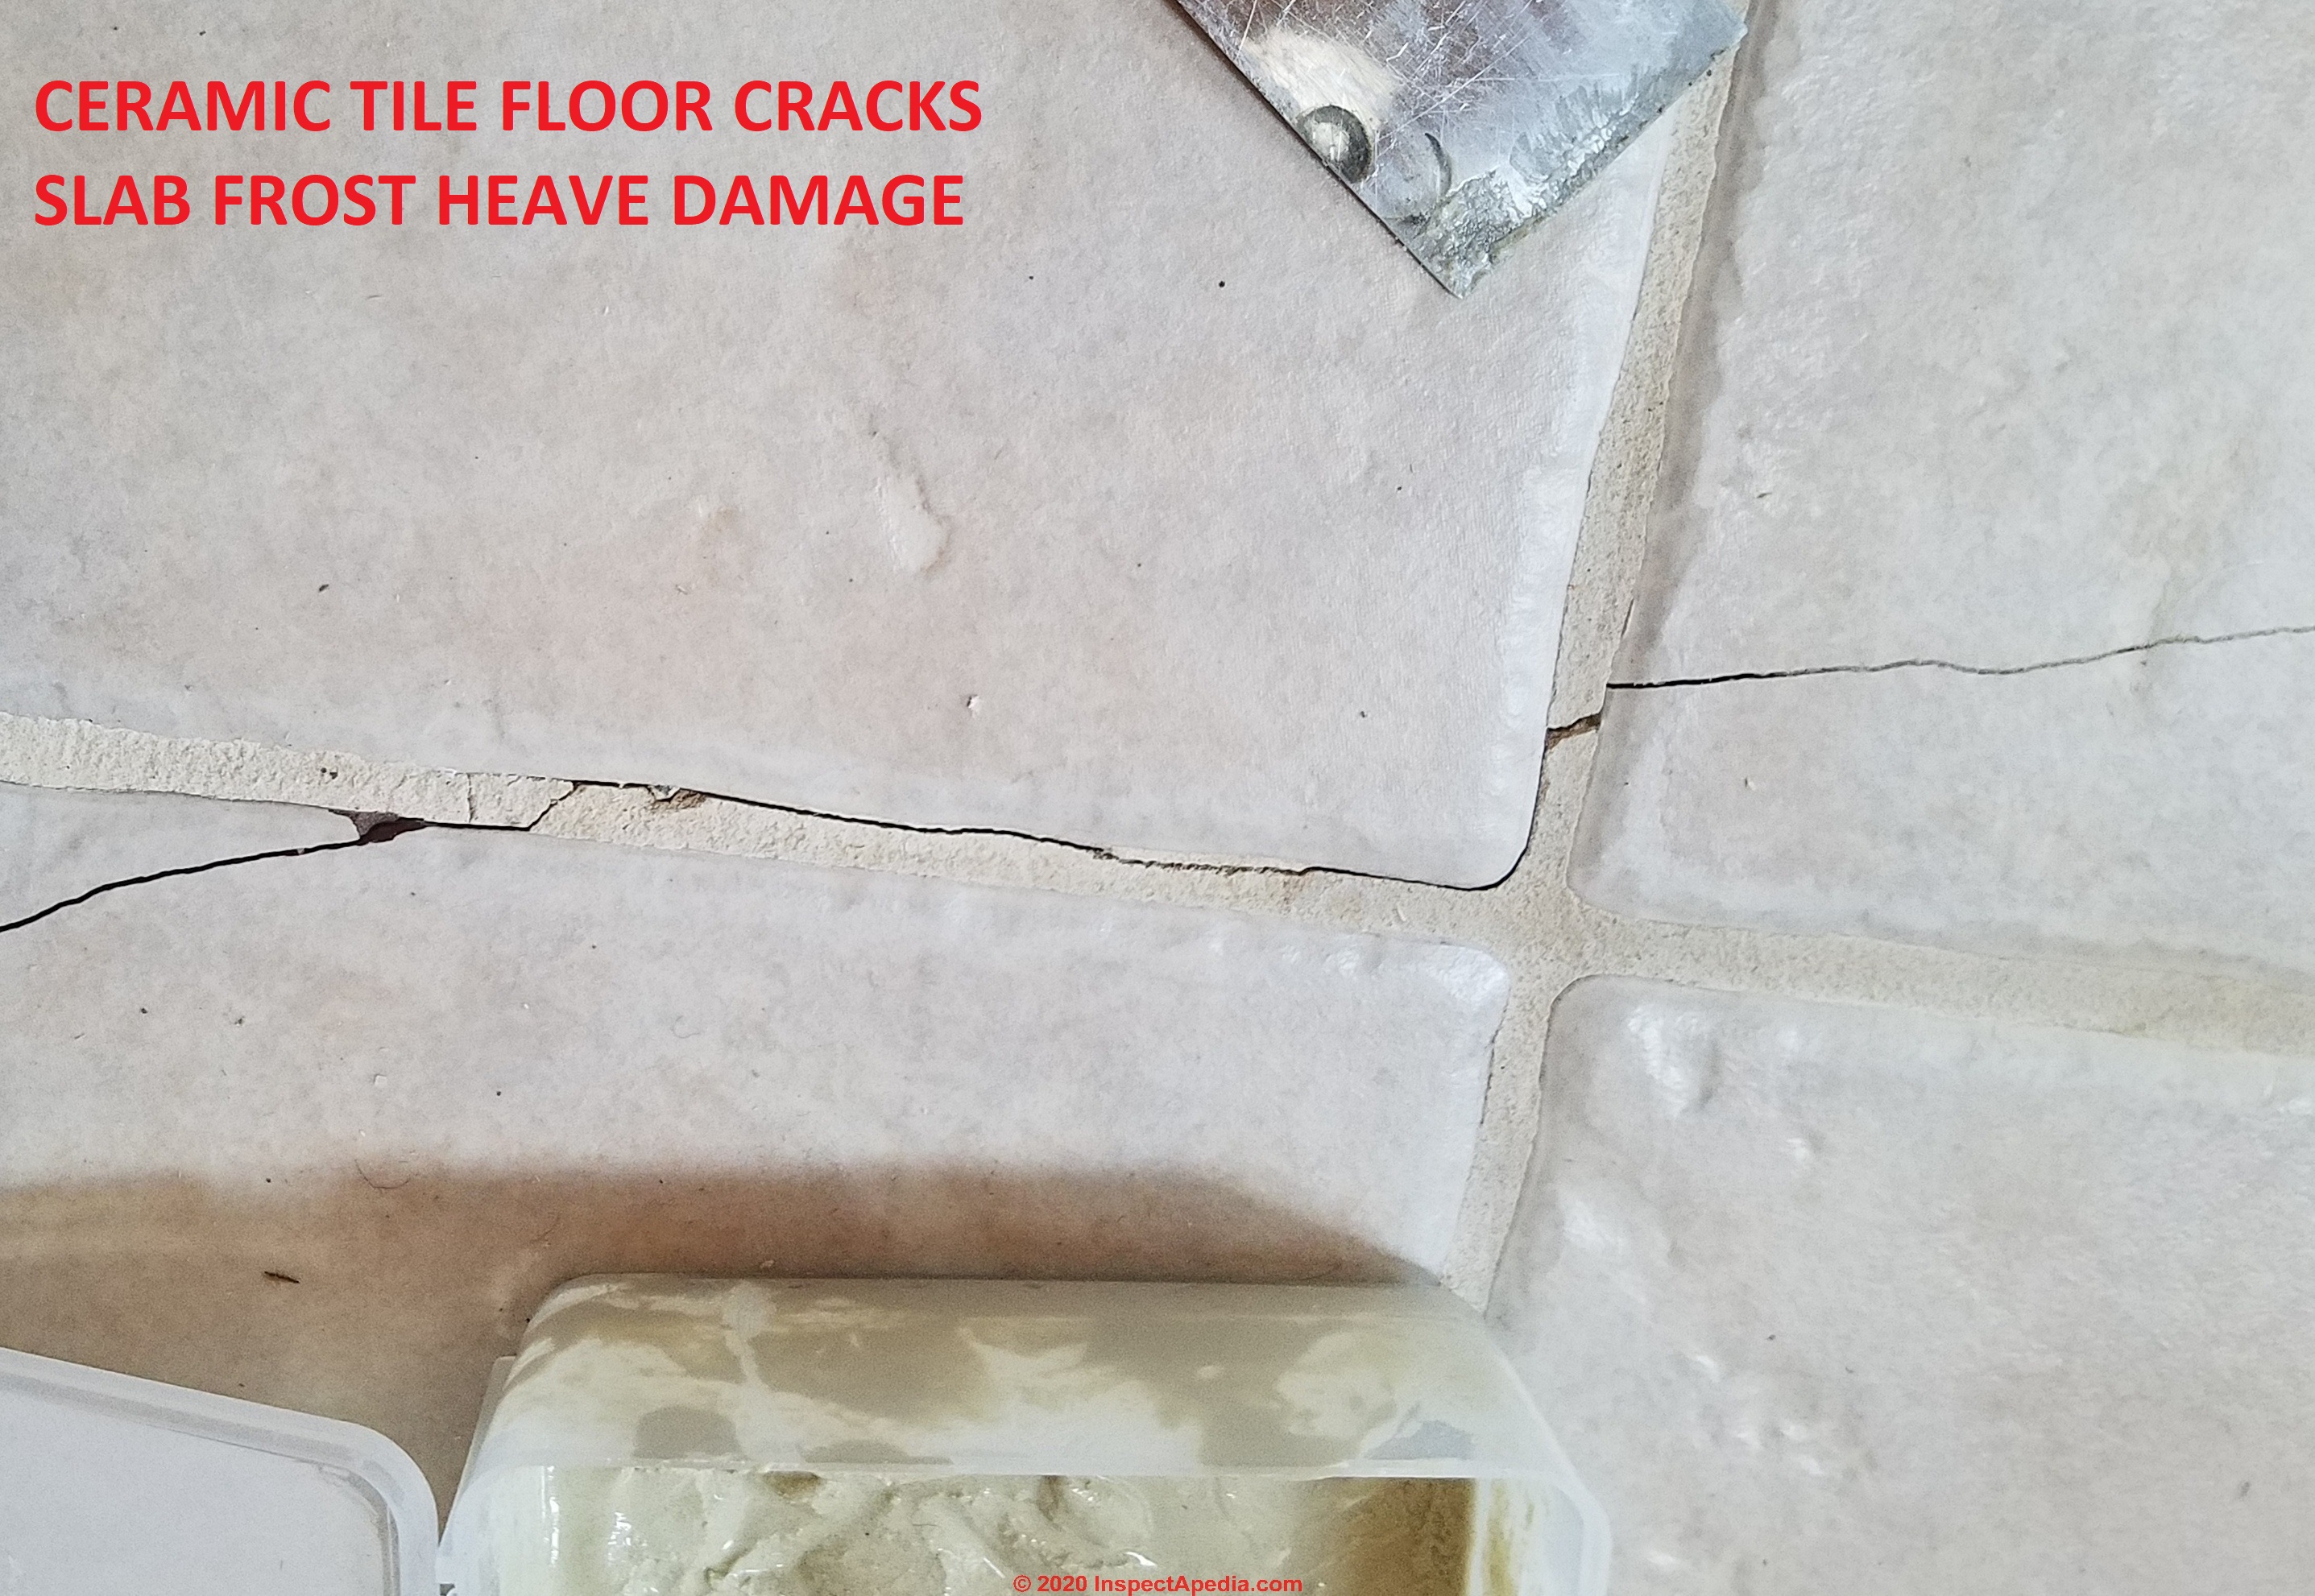
A floating slab can "work" but is more-vulnerable to frost heave, cracking, and damage than a slab supported by footings extending below the frost line.
That risk is exacerbated if the building and the floor slab cannot be kept sufficiently warm during freezing weather. Over the ensuing life of this floor slab cracks have appeared in several locations, fracturing the ceramic floor tile across wide areas and in some locations even chipping the surface of the floor tiles - shown below during a cosmetic repair effort.
Repairs to this cracked ceramic tile floor are illustrated
Discussion of the Above Radiant Slab Heat Performance Case Study: Why the Radiant Heat Slab Didn't Work
James Darling, General Manager of Preferred Heating LLC, in Eagle River, WI commented on this article that the contractor's promise of heating the building for $20. a month was an unreasonable promise not to be relied on - one that could make the article above misleading.
We agreed that the description of the failure of this installation needed some clarification,and added the following information that should be considered:
Actual Heating Costs for the Building Described Above
Keep in mind that this was a small new structure (624 sq.ft.) whose construction details, methods, materials were unusually well documented as a project. So the insulation, air tightness, materials, heating details were known.
The building was super insulated, tiny, airtight, with double-glazing throughout, leading to an expected low heating cost.
If the owner's actual heating bills for the structure had been even five times what was promised for this building that was occupied only part-time, the owners would have been happy. Heating bills weren't the arm-waving promise of $20 per month, they were not $200. per month. They were more.
In fact, the utility cost to heat this tiny cabin resulted in bills that more than doubled the corresponding costs of the nearby 1960's vintage two story large old, comparatively poorly-insulated house on the same property, exposed to the same conditions.
And the exploding heating costs were observed when heating the building well before the coldest part of the heating season.
Heating Capability Limitations of an Improperly-Installed Radiant Floor Slab
The effects of putting the tubing deep into the slab created a problem of heat transfer losses to the ground, not just a matter of longer response time to warm the building. Even if money had been no object, the system simply could not heat the building to an acceptable temperature.
The problem with very deep radiant-heat tubing, combined with incomplete insulation, is that even with just 12 to 18" of concrete above the tubing, heat flowed enough into the ground below the building that
even with the thermostat set to maximum, and running heat continuously for a week solid, in moderately cold weather (in the 40's in Northern Minnesota where in winter it can drop to 20 deg F below zero)
we never ever could get the indoor temperature above 59 to 60 °F. And this was in a new, small, airtight one-story well-insulated building.
even if we had continuous solid foam insulation under the slab, say R-10 for simplicity, if we have enough inches of concrete above, even though the "R" of concrete is much lower than the insulation, it's the total heat resistance by the total inches that comes into play.
If we have enough thickness of concrete above the tubing (Where 1" to 2" tubing depth is the best design and 6" is considered a lot, in this building we are looking at 18" or more at least in many areas, maybe 24").
With radiant tubing at those depths, the concrete begins to offer not just a lag time in heating (Mr. Darling's point) but also an actual resistance to heat transfer until we begin losing at least some heat into the ground.
The contractor and others tried to improve the system's performance by changing the boiler settings from those set by the manufacturer on its integrated circuit control board, upping the circulator size and capacity, checking flow rate through the system, checking the thermostat controls.
What Caused the Failure of This Radiant Floor Heating System?

Our photo shows where we found the radiant heat floor tubing when we later broke open a section of the floor slab.
Radiant heat tubing placed at bottom of slab, under 7 to18" of concrete
Radiant tubing was at the bottom of the slab, in this area more than seven inches down in the concrete, and set atop the foam sub-slab insulation.
Our PHOTO above on this page [Image file] shows that tubing was in some sections more than 18" deep, and adjacent to a large area where sub-slab insulation was simply omitted by the contractor.
We also measured floor temperatures in different areas of the building, mapping clearly where the radiant heat tubing dropped to the bottom of the footing-portion of the monolithic-slab footings!
That deep run, probably combined with the incomplete insulation at the level drop between slab bottom and the integrated footings, were almost certainly the prime cause of the failure of this system to heat the building.
As our reference document(s) below show by calculation and model, ultimately, the heat flow into the ground for tubing really too deep in the slab can be significant, even if there is insulation below all or part of the slab.
In the structure described here, not only was some tubing 12 to 18" or even more below the slab top, the insulation below the slab was incomplete, inviting ready heat flow into surrounding soils.
Despite varying opinion by some radiant floor installers, consumers, and installers as well should be wary of ignoring the advice of the radiant heating design experts and heat transfer engineers about tubing depth in radiant floor slabs shown just below.
Contractor omitted insulation in some areas and placed it still deeper under a thicker slab in others
Worse than too-deep radiant floor heating tubing, in this case, because the contractor put NO insulation at the area of soil where he stepped the slab down to the depth of the monolithic integrated footings, we have heat transfer from some of the tubing through concrete right into the cold soil, not just through concrete up into the room through the ceramic tile floor.
In this egregious error, even worse than putting radiant heat tubing too deep in the slab, insulation was simply omitted where the floating-slab monolithic footings were poured.
The R-value of concrete is roughly .08/inch (US DOE).
The builder located sections of the radiant tubing so that there was about 6" or less of concrete (in the 12" footing section") between the tubing and the cold soil, giving us a heat transmission path (tubing to soil) of R 0.24 or less.
This is a likely area of heat loss at all four sides of the building: where the slab dropped down to form footings.
See INSULATION R-VALUES & PROPERTIES
As an aside the ceramic tile on the finished floor slab was set in mastic - leaving some air spaces and mastic that is a poor conductor compared with tile set in concrete (optimal) - but we doubt that's nearly as important in the system failure in this case.
The contractor opined that "once you heat the soil under the house you'll be fine"
which is mistaken. In Minnesota weather sometimes reaching minus 20°F the earth forms an infinite heat sink.
Proper radiant heat concrete slab design
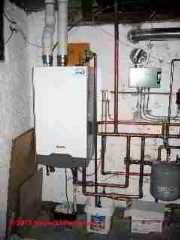
Our photo (left) illustrates a successful radiant heat system installation in Minneapolis, MN - a climate similar to that where we had trouble with the Two Harbors system above.
- Industry Expert Modeling of Effects of Tubing Depth in Radiant Floor Slabs:
An excellent if somewhat techno article on the problems of putting tubing at the bottom of the slab is at
http://findarticles.com/p/articles/mi_m0BPR/is_6_20/ai_102862289/pg_1 [Dead link in 2025 - sorry, we're working on it - Ed.] - The floor construction
in that case is a 4-in, concrete slab sitting on 1-in. (R-5) polystyrene insulation, and covered by 3/8-in, oak flooring. The embedded tubing circuit consists of 1/2-in. PEX tubing spaced 12-in, on center. Several versions of this basic model were developed to simulate tubing at different depths with the slab.
THIS IS NOT OUR SLAB- which is has tubing at 6" deep and along one side where the tubing is deeper, 10-12" or more. We have better insulation but much deeper placement.
Here is a quote from the last page of the article which reports an expert's study of the heat characteristics that change as tubing moves lower than 3/4" from the top of the slab:
QUOTING except for [bracketed comments]
"These results indicate that tube depth does have a nontrivial effect on the thermal performance of a heated floor slab. There is a performance penalty associated with leaving the tubing at the bottom of the slab vs. positioning it near mid-depth of the slab.
The analysis performed was also based on steady state conditions. It doesn't predict the consequences of the longer response times associated with deeper tubing. These could be significant in situations where a building is recovering from a setback condition, or when heat flow from the slab needs to be reduced quickly to accommodate internal heat gains.
Considering the tradeoffs, perhaps it is time we pay more attention to quality control procedures to ensure that performance is not compromised as concrete is poured over radiant tubing circuits.
When future archaeologists dig up the ruins of our buildings several centuries from now, will they ponder why we put the heating tubing at the bottom of the slab? Might they wonder if we didn't know any better?
Would they conclude that some builders of the time were just too lazy to bother lifting the tubing? Thinking back to how ancient Romans used lead piping for water supplies, perhaps those archaeologists will conclude that even after centuries of experience, we still had a hard time doing this pipe thing right.
[FIGURE 4 OMITTED], [FIGURE 5 OMITTED]
Table of heating water temperatures needed with radiant tubing at different depths in the concrete slab
| Table of Insulation Material Properties | ||
| Average water temperatures needed for heat output of 15 and 30 Btuh/sq ft. | ||
| Upward Heat Flux Requirement (Btuh/[ft.sup.2]) | Tubing Depth 2" Below Slab Surface, Average Water Temp. Required °F. | Tubing Depth at Bottom of 4" Slab, Average Water Temp. Required °F. |
| 15 Btuh | 95 °F | 102 °F |
| 30 Btuh | 120 °F | 134 °F (1) |
Notes to the table above
(1) regarding the "134 °F" in the bottom right of the above table:
This is moving down just 2" deeper. We estimate maybe 168 degrees water temperature would be needed at 4" down and
well over 200 deg heating water would be needed in tubing 6" down.
In the slab in our construction project, the critical
tubing, leaving the heating boiler, was placed more than 12" deep in poured concrete.
Heating energy costs will increase consistent with the increase in heating water operating temperature requirements.
Below see our list of RADIANT HEAT DESIGN & INSTALLATION MANUALS
2006 IECC: effectiveness of foundation perimeter insulation and insulation recommendations for radiant-heated floor slab designs
Reader Question from Wenell: I would like to know what the persons that wrote and researched this article thinks about what Montana has on research.
On their web page MONTANA SLAB EDGE INSULATION ANALYSIS FOR 2006 IECC ADOPTION [PDF] There seem to be so many theories on this.
One thing we have found that if the soil conditions are quite damp, there definitely needs to have some type of insulation under the slab.
Another theory I have read is that the heat as it goes down, which it will, some is that it radiates horizontally, which makes insulating the edge quite well. - Wendell Schubloom
Reply: thorough under-slab and perimeter insulation and proper tubing depth are critical for radiant heat floor slab designs
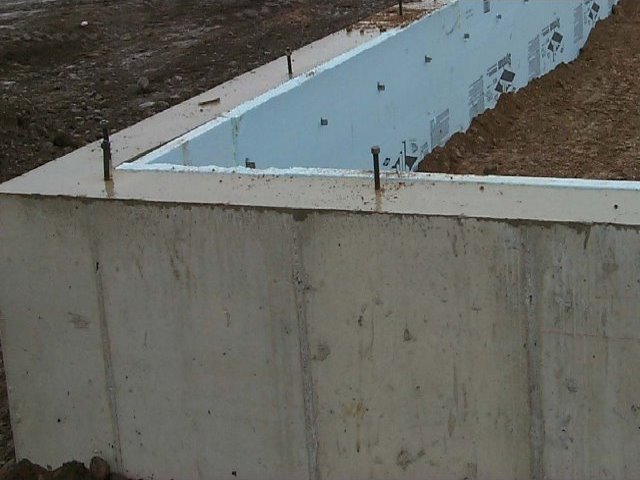 Wendell, there is not actually any contradiction between the Montana (DOE) research you cite above and radiant heat floor slab insulation requirements.
The study you cite does not focus on radiant slab heating designs but or a more narrow question about the benefits of foundation/floor slab perimeter insulation.
The DOE photo (below left) shows a typical Montana construction practice that gives a thermal break between a concrete floor slab (not yet poured) and the exterior foundation wall.
I've read quite a lot of supporting research on slab and slab perimeter insulation for radiant heat flooring, and I have some direct experience with installing radiant heat and more with inspecting radiant heat flooring problems.
Quoting from the conclusions of the Montana DOE-sponsored study you cite, [2] [photo at left showing interior foundation insulation before the slab is poured, U.S. DOE, op cit.]
This study shows that insulating slab edges with R-10 insulation to 4-ft depth along the slab edge saves about 3% annual energy and reduces annual fuel cost by between 1 and 2%. The energy savings vary slightly depending on the insulation configuration and building type.
Although the current installation practice in Montana does not extend the interior footing insulation to the top of the slab, based on empirical data, this study concludes that irrespective of the insulation installation configuration, Montana buildings will save energy by insulating the slab edge with R-10 insulation to a depth of 4 ft.
The payback period could vary from 4 years for small retail commercial buildings to 12 years in small office buildings.
This study, using eQUEST, Version 3.0 simulation modeling, compared full versus partial slab perimeter insulation schemes and found that there was useful energy cost savings even with partial insulation.
The study data includes comparison with fully-insulated slabs too, but most important for our discussion, it does not address radiant-in-floor-slab heating designs that, without full insulation, can find an easier heat flow into the ground than into the building - not what we want to see nor pay for in heating bills. Quoting:
The local practice of insulating the slab footing on the interior allows heat loss along the slab perimeter and thus does not achieve the full savings that could be achieved with full edge insulation configurations, but the savings are still significant.
The risk in misinterpreting the Montana study conclusions above would be to apply them generally to radiant heat floor designs and that to improperly infer that complete under-radiant-heat-floor-slab insulation is not needed in cold climates.
That study makes a general conclusion for all Montana buildings and by no means does the conclusion adequately address radiant in-slab heating system designs.
The fallacious concept held by the contractor in our horror story was that "once you heat up the earth below your building it will start "giving back" heat to the building and you'll be just fine. His theory was nonsense, as both expert advice and actual field experience proved.
The earth in a cold climate like Montana or Minnesota, is for practical and design purposes, an infinite heat sink. A radiant floor slab heating system will, if improperly designed, keep pumping heat into the ground as long as the heat is turned on.
Forever.
We saw this in astronomical heating bills and a cold building interior in the Minnesota home discussed above. Heat always flows, and continues to flow from a warmer material into a cooler material.
Heated the soil beneath a building where insulation was incomplete, inadequate, or omitted, will never reach some magic perimeter after which it stops sending heat into the surrounding soil any more than an ice cube placed into the sea will stop melting because it's "cooled down" the water around itself.
As the principal author of this material I relied largely on the concrete industry and the radiant flooring industry's radiant floor slab design specifications and advice [1] as they, above all, have a huge vested interest in their installations being successful.
There is no doubt that in virtually every radiant-heat-floor-slab design we need continuous insulation under the slab and at slab perimeter, though the appropriate insulation amount might vary depending on the local climate.
The folks who seem to disagree have been people like the bully contractor who himself admitted he had never read instructions, attended a class, nor asked for expert advice.
As is often the case with small contractors in remote areas and without expertise, he was "winging it". Don't try mentioning "thermodynamics" or "heat flow theory" to a bully.
Just how bad an uninsulated, under-insulated, or incompletely insulated floor slab will perform with radiant in-slab floor heating depends on some additional variables: climate, soil moisture (read thermal conductivity as you suggest), and critically, the depth of tubing in the slab. In ALL cases we want the insulation in place.
But in the horrible installation we describe in these articles, the contractor not only provided incomplete and no perimeter slab insulation, he also buried the tubing so deep in the concrete that heat moved much more down into the cold earth than upwards into the occupied space.
There was so much heat loss that we could not get the room temperature up even in cold but not bitter cold weather, and even though the same contractor had done a great job insulating the upper portions of the structure's roof and walls. (He was a framer/carpenter, and should not have attempted radiant slab installation nor tile work.) That's why we had to abandon the whole radiant floor installation.
If the floor slab had been very well insulated, the installation still would not have performed well because of the excessive tubing depth in the slab ( over 12" down in some sections ).
I appreciate the Montana reference and have added it to this article below at references [2].
Comment: Butler Cat radiant floors in the Dakotas, steel buildings, radiant floor heat.
We are in the steel building business so we have a lot of in floor heat done. with the experienced heating people we use, have had no problems.
But the question I have is- in North and South Dakota there is a Cat dealer by the name of ButlerCat.
They have built huge shops and I found out this spring what they do for floor hear.
They place the foam down and put the PEX directly to this and then place 4 to 6" of sand on top before pouring the floor. I ask why and was told if the have any floor problems they can remove any thing need to. They done this on I think four bldg's
What are your thought's
Reply:
Wendell it's a fair question, and I welcome the discussion. But I suspect this may be a case of intelligent people who think things up on their own, make up an explanation that sounds reasonable, but may not know the whole story.
The deeper you put radiant heating tubing in the slab the worse the heating system will perform in delivering heat to the interior. Furthermore, the thermal conductivity of sand is much below that of tubing directly in contact with the concrete slab itself.
The expert sources I found on this want tubing in the concrete and very close to the slab top surface, an inch or two at most down is best.
I agree that if there is enough insulation under the slab and it's well done and complete, in the design (foam, tubing, sand, concrete) you describe you will eventually probably warm the slab upper surface, but consider that there are heat flow rates through insulation too, it's not "heat proof".
With 6" of sand and say nominally 6" of concrete, your tubing is 12" down - way too deep, and furthermore, the first 6" of material (sand) between the tubing and the occupied space, does not quite the same level of thermal conductivity as tubing in contact with solid concrete.
The sources I cite at references below point out that there is heat flow resistance through concrete and sand as well.
So while it may not be intuitively obvious, and while it's true that the thermal conductivity of concrete and even sand (which is not as good as concrete) is greater than insulation, if we have enough sand or concrete above the tubing, and little-enough insulation below the tubing, heat flow down through the insulation can still be significant.
Think of it as "heat flow resistance" through various materials. You can have a more conductive material above the tubing, but if you have a lot of it, the total heat flow resistance can still be significant.
Finally, the supposition that "if they have floor problems they can remove anything they need to" sounds highly suspect to me - it's not thought out. In any case you'd have to chop entirely through the floor slab to get to the tubing below, and meanwhile you are paying in higher heating bills than necessary over the life of the building.
How to Troubleshoot a Radiant Heat Floor That's Not Working
The following unedited discussions, a continuation of RADIANT HEAT MISTAKES, illustrates efforts to track down the reason that a radiant-heat slab system is not heating adequately.
Also see RADIANT HEAT DESIGN FAQs - questions & answers about installing & troubleshooting radiant heating systems
Tips for Investigating a Radiant Heat Floor Slab Design for SNAFUs
- Check the heat source & controls first:
something as simple as improperly adjusted mixing valves, temperature settings, or a poorly-maintained gas or oil fired boiler can be enough to explain unnecessarily high heating costs - Check occupant behaviors:
watch out for occupants who like to sleep with the thermostat set to 80F and their windows open. - Check radiant heat slab plans & photos:
If there were house plans, or better yet, photos of the home during slab construction those would be invaluable. That was how I found out how Nightmare Construction had fouled up the radiant slab I wrote about. - Thermal scanning?
Check the climate: Where is your home - province or state and city? What's its heating zone? Except in quite cold weather, there may not be enough indoor / outdoor temperature difference to benefit from thermal imaging until colder weather arrives.
In cold weather thermal scanning of the floor can show radiant tubing routing, locations, leaks, temperature variations. Measuring actual floor temperatures may give additional data to compare with the floor's design specifications. - No view under slabs:
For radiant heat installed over a framed wood floor there should be access below to inspect the tubing installation and other construction details. But that's not likely to be the case for a radiant-heated floor slab. - Test hole through the slab?
For people buying a home with a radiant-heated slab, I'm doubtful a seller is going to let you cut a hole anywhere indoors. I wouldn't;
The last thing a home seller needs is some fool to bore a hole that cuts a heat tubing or pipe line, or to cut a hole and then bail on the purchase and leave the seller with a holed and stigmatized house for sale. - Excavate the slab from outside?
A seller MIGHT let you excavate under the slab from outside to see what you find - maybe at a corner least likely to suffer from water or runoff when the fill is restored.
Dig down to follow the edge of the slab into the soil then dig out a bit below that to see what you find - and send me those photos if that's allowed. You might promise to restore the soil and even put down sod afterwards.
Watch out: No single hole or inspection point or even four or five of them is going to guarantee that the entire slab was properly insulated.
In the case study starting at RADIANT HEAT MISTAKES some portions of the slab or insulated but the installer left whole sections just exposed to the dirt. We would never have found which sections of insulation were omitted if we haven't had the photos. Similarly his second and fatal radiant heat installation mistake was putting the tubing at the bottom of the slab.
We couldn't see those details without destructive chopping up of the concrete or finding photos taken during construction.
My point is that drilling one inspection hole in a radiant heated floor to examine the insulation scheme and tubing depth, even if you could avoid cutting tubing, wouldn't assure you that there wasn't a problem elsewhere under the floor.
- Look also for clues that the present heating system was inadequate:
did prior occupants put aux heaters of any sort in any location? Compare the home's heating bills with comparable structures in the same area.
For a really bad radiant installation with tubing too deep (common) or incomplete insulation (somewhat common) I abandon the system - painful as that is, as it makes no sense to just pump heat and dollars into the ground all winter.
For a case that can't be fixed above the slab (like air leaks) I'd install an alternative that's least disruptive, such as wall mounted split-system heat pump.
Radiant Heat Slab Installation Manuals, Research, Products, Guides
Now moved to RADIANT HEAT DESIGN & INSTALLATION MANUALS
Thank you to our readers for their generous comments
Thank you for your time, Dan. Sites like this can help a *lot* - we were educated enough to understand what was going on, ask reasonable questions and help with the debugging process, and had a contractor who would work *with* us. As a partnership we got this resolved better and faster. - On 2015-01-03 by Susan -
I really appreciate this site. Lots of great info here. - On 2018-05-22 by Tim
...
Continue reading at RADIANT HEAT TEMPERATURES or select a topic from the closely-related articles below, or see the complete ARTICLE INDEX.
Or see RADIANT HEAT MISTAKES FAQs - questions, comments, arguments posted originally at this page.
Or see these
Recommended Articles
- CARPETING IMPACT on RADIANT HEAT FLOOR
- CERAMIC TILE DAMAGE REPAIR
- FLOOR TILE INSTALL on CONCRETE
- GAPS in RADIANT HEATED WOOD FLOORS - caused by running the radiant heat at too-high a temperature.
- DRIVEWAY & WALK DE-ICING SYSTEMS
- PEX PIPING INFORMATION
- PORTABLE ELECTRIC HEATER FAILURES - what happens when you rely on portable electric heaters for main heat source?
- RADIANT HEAT - home
- RADIANT HEAT AIR BOUND
- RADIANT HEAT CONTROLS
- RADIANT HEAT DEFECTS LIST
- RADIANT HEAT DESIGN & INSTALLATION MANUALS
- RADIANT HEAT INSTALLATION
- RADIANT HEAT MISTAKES
- RADIANT HEAT TEMPERATURES
- RADIANT HEAT TEMPERATURE CONTROL / MIXING VALVES
- RADIANT HEAT TEMPERATURE NIGHT SETBACK
- RADIANT SLAB FLOORING CHOICES
- RADIANT SLAB TROUBLESHOOTING
- RADIANT SLAB TUBING & FLUID CHOICES
- RADIANT SLAB TUBING LEAKS
- SLAB INSULATION, RADIANT / PASSIVE SOLAR
- SOIL R-VALUES
- THERMAL IMAGING, THERMOGRAPHY
- THERMAL MASS in BUILDINGS
- WOOD FLOOR RADIANT HEAT
- WOOD FLOOR RADIANT HEAT DAMAGE
Suggested citation for this web page
RADIANT HEAT MISTAKES at InspectApedia.com - online encyclopedia of building & environmental inspection, testing, diagnosis, repair, & problem prevention advice.
Or see this
INDEX to RELATED ARTICLES: ARTICLE INDEX to RADIANT HEAT
Or use the SEARCH BOX found below to Ask a Question or Search InspectApedia
Ask a Question or Search InspectApedia
Share this article:Try the search box just below, or if you prefer, post a question or comment in the Comments box below and we will respond promptly.
Search the InspectApedia website
Note: appearance of your Comment below may be delayed: if your comment contains an image, photograph, web link, or text that looks to the software as if it might be a web link, your posting will appear after it has been approved by a moderator. Apologies for the delay.
Only one image can be added per comment but you can post as many comments, and therefore images, as you like.
You will not receive a notification when a response to your question has been posted.
Please bookmark this page to make it easy for you to check back for our response.
IF above you see "Comment Form is loading comments..." then COMMENT BOX - countable.ca / bawkbox.com IS NOT WORKING.
In any case you are welcome to send an email directly to us at InspectApedia.com at editor@inspectApedia.com
We'll reply to you directly. Please help us help you by noting, in your email, the URL of the InspectApedia page where you wanted to comment.
Citations & Reviewers
In addition to any citations in the article above, a full list is available on request.
- Steve Bliss's Building Advisor at buildingadvisor.com helps homeowners & contractors plan & complete successful building & remodeling projects: buying land, site work, building design, cost estimating, materials & components, & project management through complete construction. Email: info@buildingadvisor.com
Steven Bliss served as editorial director and co-publisher of The Journal of Light Construction for 16 years and previously as building technology editor for Progressive Builder and Solar Age magazines. He worked in the building trades as a carpenter and design/build contractor for more than ten years and holds a masters degree from the Harvard Graduate School of Education. Excerpts from his recent book, Best Practices Guide to Residential Construction, Wiley (November 18, 2005) ISBN-10: 0471648361, ISBN-13: 978-0471648369, appear throughout this website, with permission and courtesy of Wiley & Sons. Best Practices Guide is available from the publisher, J. Wiley & Sons, and also at Amazon.com - The Radiant Panel Association [Website] Radiant Panel Association - Radiant Professionals Alliance
8512 Oswego Road Suite 180 Baldwinsville, New York 13027 Phone (315) 303-4735 Fax (315) 303-5559 http://www.radiantpanelassociation.org/
www.radiantpanelassociation.org/i4a/pages/index.cfm?pageid=1 offers design guidelines at http://www.radiantpanelassociation.org/i4a/pages/index.cfm?pageid=115 including these insulation R-value and coverage details:
Radiant Heat Application#, Minimum R-Value, and Insulation Coverage
The following insulation alternatives are given for Slab on Grade construction:
Alternate #1 [(Ti-To)x0.125)=R-value, with coverage from perimeter to below frost line ["Ti-To" means we calculate the necessary R-value as (Ratio of indoor to outdoor temperature) x 0.125]
Alternate #2 R-value=5, with coverage 4' horizontal or vertical at perimeter
Alternate #3 R-value=5, with coverage under entire slab and slab edge [this is our preferred design for a cold northern climate]
The Radiant Panel Association offers education and publications in radiant heat design. See radiantpanelassociation.org
Here's their page on hydronic floors:
http://www.radiantpanelassociation.org/i4a/pages/index.cfm?pageid=99 where you'll see some vague "source temperature required" graphs that give relative but not absolute temperatures. - Takagi radiant heat systems: Takagi offers pre-assembled radiant heating system installation packages including for do-it-yourself'ers, and including systems that combine radiant heat flooring with domestic hot water production using a gas-fired tankless water heater.
See takagi.com for more information. "The T-KJr model (gas inputs up to 140,000 BTU per hour) is the smallest unit in the Takagi line-up.
The T-KJr is perfect for light residential (i.e. small apartment units) and radiant heating applications." Also see Tankless Water Heaters. - OPTCO, Basic Hydronic underfloor - thermal storage 8 to 14 hours of control [PDF] this sketch, provided by OPTCO, is not a conventional radiant heating system design - and you'll see that the designer places the tubing too deep for efficient radiant heat delivery to the occupied space. However this design is intended for heat storage, such as in a solar heat storage system.
See PASSIVE SOLAR DESIGN METHOD for more information. - Siegenthaler, John, Modern Hydronic Heating: For Residential and Light Commercial Buildings. John Siegenthaler, Delmar Cengage, 2012
- Siegenthaler, John. Hydronic Radiant-Floor Heating [PDF] (At Fine Homebuilding) FINE HOMEBUILDING (1996): 58-60.- local copy saved as Hyrdonic-Radiant-Floor-Heat-Siegenthaler-1996.pdf
- Siegenthaler, John, Radiant Slab Techniques, [PDF] (at the JLC) Journal of Light Construction, August 1992 - local copy saved as Radiant-Slab-Techniques-Siegenthaler-1992.pdf
- The US DOE page on Radiant heating [DOE Website] unfortunately short on useful details and won't permit the reader to print nor save a copy - retrieved 2025/12/15
Excerpt:
Radiant heating systems supply heat directly to the floor or to panels in the wall or ceiling of a house. The systems depend largely on radiant heat transfer -- the delivery of heat directly from the hot surface to the people and objects in the room via infrared radiation.
Radiant heating is the effect you feel from the warmth of a hot stovetop element from across the room. When radiant heating is located in the floor, it is often called radiant floor heating or simply floor heating. - SOLAR WATER HEATING SYSTEM MAINTENANCE & REPAIR [PDF] , U.S. DOE
- SOLAR WATER HEATING SYSTEM FREEZE PROTECTION [PDF] , U.S. DOE,using antifreeze mixture in solar water heaters (or other freeze-resistant heat transfer fluids), as well as piping to permit draining the solar collector and piping system.
- US DOE, SCALING AND CORROSION IN SOLAR WATER HEATING SYSTEMS [PDF], U.S. Department of Energy.
- US DOE, ACTIVE SOLAR HEATING SYSTEMS [PDF], U.S. Department of Energy
- US DOE, RADIANT HEATING SYSTEMS, [PDF] U.S. Department of Energy
- ABSORPTION HEAT PUMPS & COOLERS [PDF] U.S. DOE
- SOLAR AIR HEATING [PDF] U.S. DOE also referred to as "Ventilation Preheating" in which solar systems use air for absorbing and transferring solar energy or heat to a building
- SOLAR LIQUID HEATING [PDF] U.S. DOE, systems using liquid (typically water) in flat plate solar collectors to collect solar energy in the form of heat for transfer into a building for space heating or hot water heating. The term "solar liquid" is used for accuracy, rather than "solar water" because the water may contain an antifreeze or other chemicals.
- Starr, R. J. Technical evaluation of a solar heating system having conventional hydronic solar collectors and a radiant panel slab.[PDF] Final report. No. DOE/CE/15140-T1. Robert J. Starr, Jon G. McGowna, Bran P. McNiff, Solar Option One Co., Lyndonville, VT and the University of Massachusetts, Amherst MA (USA), 1984. - copy at OSTI - retrieved 2025/12/15, local backup copy saved as Solar-Radiant-Panel-Heat-Starr.pdf
- Azel Technologies controls, temperature gauges & thermostats for radiant heating systems
- i-Link SERIES ZONE CONTROLS (CIRCULATOR PUMP SWITCHING RELAYS ) FOR HYDRONIC / RADIANT FLOOR HEATING SYSTEMS [Website] Quoting: The i-Link series multi-zone circulator pump switching relays simplify wiring for hydronic heating ( radiant floor heating ) systems. With leading edge features and superior product design, i-Link makes installation quick and easy.
- i-Link SERIES ZONE VALVE CONTROLS FOR HYDRONIC / RADIANT FLOOR HEATING SYSTEMS
- UNIVERSAL DIGITAL TEMPERATURE GAUGE: DS-60P - Quoting: The i-Link series Zone Valve Controls simplify the field wiring and yet control up to six zone valves in a multi-zone hydronic radiant heating system.
The contractor friendly Printed Circuit Board eliminates the problem caused by incorrect wiring and saves hours of installation time. There would be no more “messy” look of conventional zone valve installations. - DIGITAL NON-PROGRAMMABLE THERMOSTAT FOR HYDRONIC RADIANT FLOOR HEATING [Website]
Quoting: D-508F digital non-programmable heat only thermostat is designed to control either ambient(air) temperature (A Mode) or floor temperature (F Mode) or a combination of ambient temperature with floor temperature limits(AF Mode).
An auxiliary remote sensor is provided to measure slab temperature in order to control the floor temperature(within maximum and minimum limits in AF Mode) in hydronic radiant floor heating system. It can also be used for sensing the outdoor temperature in A Mode. - DIGITAL PROGRAMMABLE THERMOSTAT FOR HEATING/COOLING & HYDRONIC RADIANT FLOOR HEATING [Website] Quoting: Azel Technologies introduces 500 series electronic programmable thermostat that utilizes the lastest digital technologies for residential and light commercial systems.
D-500 is designed for 24 Vac single-stage heating and cooling systems. D-502F is designed to control the floor temperature in Hydronic Radiant Floor Heating Systems.
The 500 series can accurately control the temperature within one degree. Reliable permanent memory retains the programmed settings in the event of a power failure. In addition, the large, easy to read LCD display with backlit makes the thermostat easy to operate and simple to program. - Azeltec, SOLAR DIFFERENTIAL CONTROL: DST-932, P.O. BOX 53138 Thornhill ON L3T 7R9 Canada Tel: 905-223-5567 Email: info@azeltec.com Web: azeltec.com- Quoting: The DST-932 differential temperature controller is designed for the Solar Heating Systems.
The DST-932 switches on a pump in order to transfer heat from solar collector to a storage tank. The controller reads the temperatures of the storage tank (T1) and of the collector (T2), when this differential temperature (T2-T1) is higher than a set value (dt), it will switch on the pump.
It is possible to limit the maximum temperature of the storage tank and also activate a freeze protection function. By switching to manual mode it allows the test of the heating system by turning the pump ON or OFF. A universal sensor P-01 or P-02(higher temperature range) is supplied with the control. This solid state temperature sensor probe can be extended up to 500 feet.
- Mark Cramer Inspection Services Mark Cramer, Tampa Florida, Mr. Cramer is a past president of ASHI, the American Society of Home Inspectors and is a Florida home inspector and home inspection educator. Mr. Cramer serves on the ASHI Home Inspection Standards. Contact Mark Cramer at: 727-595-4211 mark@BestTampaInspector.com
- John Cranor [Website: /www.house-whisperer.com ] is an ASHI member and a home inspector (The House Whisperer) is located in Glen Allen, VA 23060. He is also a contributor to InspectApedia.com in several technical areas such as plumbing and appliances (dryer vents). Contact Mr. Cranor at 804-873-8534 or by Email: johncranor@verizon.net
- In addition to citations & references found in this article, see the research citations given at the end of the related articles found at our suggested
CONTINUE READING or RECOMMENDED ARTICLES.
- Carson, Dunlop & Associates Ltd., 120 Carlton Street Suite 407, Toronto ON M5A 4K2. Tel: (416) 964-9415 1-800-268-7070 Email: info@carsondunlop.com. Alan Carson is a past president of ASHI, the American Society of Home Inspectors.
Thanks to Alan Carson and Bob Dunlop, for permission for InspectAPedia to use text excerpts from The HOME REFERENCE BOOK - the Encyclopedia of Homes and to use illustrations from The ILLUSTRATED HOME .
Carson Dunlop Associates provides extensive home inspection education and report writing material. In gratitude we provide links to tsome Carson Dunlop Associates products and services.
 |
HOME | ABOUT | ASK a QUESTION | CONTACT | CONTENT USE POLICY | DESCRIPTION | POLICIES | PRIVACY | |
| © 2026 - 1985 Publisher InspectApedia.com - Daniel Friedman | |||||||||