
 Heating System Choice & Installation
Chapter 15 of How to Build Your Dream Home © 2020 InspectApedia.com
- POST a QUESTION or COMMENT about how to identify the architectural style of buildings and building components
This article series provides an updated version of Hubbard Cobb's Your Dream Home, illustrated by Sigman-Ward, first published by Wm. H. Wise & Co. New York, 1950.
From site selection and obtaining financing through each step in construction of a single family home the simple procedures and drawings in this book are still useful for anyone building or repairing a home or other small structure.
InspectAPedia tolerates no conflicts of interest. We have no relationship with advertisers, products, or services discussed at this website.
- Daniel Friedman, Publisher/Editor/Author - See WHO ARE WE?
How to Choose & Install a Heating System
This is Chapter 15 of BUILD YOUR DREAM HOME at InspectApedia.com - online encyclopedia of building & environmental inspection, testing, diagnosis, repair, & problem prevention advice.
This article is also available as HEATING SYSTEM CHOICES for YOUR HOME [eBook] or as a PDF image at THE HEATING SYSTEM [PDF] original page images.
There are relatively few sections of this country where it is possible to get along without some sort of heating system. In the cold northern climates, a good central heating system is as important as any other part of the house.
In fact, real estate agents, banks and others engaged in buying and selling homes attach a good deal of importance to an adequate heating system, and they are certainly right, because few things will ruin a house as fast as a heating system that is not efficient, that fails to make the house comfortable to live in during cold weather, or that never seems to work very well for long periods and requires constant attention. You may not care, or be allowed, to install your own heating system, but that does not mean that you should not put ample time and thought into selecting adequate equipment.
There are two main points that must be decided. First, what type of system to use, and, second, what kind of fuel to burn. There are three main types of heating system in use today. They are warm air, hot water and steam.
Types of Heating Systems
Ductless-Furnace
The simplest type of warm-air heating system is the pipeless furnace. It consists of a furnace that is fired by either gas, coal or oil. At the top of the furnace is a heat drum that is warmed by the fire in the furnace. Cold air circulates around this drum and, when heated, rises through a register and into the room above. As the air becomes chilled, it drops back down to the floor and is drawn down through the edges of the register to be reheated. There is only one register used in this system and it is located in one of the main rooms of the house, usually the living room.
This is a very inexpensive system and is very easily installed. There are no pipes, ducts or registers other than the main one, which is actually a part of the furnace. The only work involved in installation is setting up the furnace and making the hole in the floor for the register.
There are, however, several drawbacks to this kind of system. First of all, it is not very efficient. A large amount of the warm air that flows up through the register remains in the room where the register is located. This means that to get the other rooms in the house comfortable in very cold weather, it is often necessary to have the living room too warm.
Another point is that the heating is more or less uneven. The warm air remains around the ceilings and drops to the floor as it becomes cold. This means that when you are standing up there will be a considerable temperature difference between the air around your head and that around your feet. People who live in homes heated by pipeless furnaces usually complain that their feet are always cold. Another point against the pipeless furnace is the fact that the warm air depends on doors for circulation to the other rooms in the house. When a door is closed, no heat will enter that particular room unless wall registers have been installed.
Also, housewives complain bitterly about the amount of dust and dirt that comes out of the register along with the warm air, and there is no effective remedy for this because it is impossible to install an effective filtering device on a pipeless furnace. Lastly, because it depends entirely on gravity and the fact that warm air rises, a pipeless furnace must be installed in a basement. It cannot, like other types of warm-air heating or hot-water systems, be installed in the utility room unless it is a certain type of pipeless furnace—usually called a space heater—that does not have to be put in a basement.
Space heaters are very compact in design and can be used in the utility room, in an interior wall partition, or hung through the floor from the room above. A fan operated by electricity, is used to force the warm air from these heaters to various points in the house. Good space heaters will work very well in a small compact house. They do not require much space and are fully automatic. In some cases, two heaters are used to provide the necessary amount of heat. But even then, if they are hung through the floor, they do not take up too much space. If you do not plan to use the attic space as living quarters, a good space heater with the required BTU (British thermal unit) output will prove perfectly adequate.
The Gravity Warm-Air System - Octopus Furnaces
A more advanced type of warm-air heating than the pipeless furnace is the gravity system. This employs the same sort of furnace as the pipeless system but metal ducts are used to bring the heat from the furnace to the various rooms in the house. Other ducts and registers are used to return the cold air from the rooms to the furnace for reheating. Before the air is heated, it passes through a filter, which removes any dust or dirt that may have been picked up.
A gravity system when properly installed will prove quite adequate for even two-story homes. The heating is even and the flow of warm air to the various rooms can be governed by opening or closing the individual room registers. But like the pipeless furnace, it must be installed in a basement.
Forced Warm-Air Systems
The most efficient as well as most modern type of warm-air system is the “forced” system. This has little or no resemblance to the old pipeless system. It consists of a furnace that warms the air, an electric blower, and ducts and registers. Air heated by the furnace is forced through the ducts to the various registers.
Additional registers and ducts are used to bring the cold air back to the furnace to be reheated. Filtering devices are used to remove dust and dirt particles from the air, and a humidifying system adds sufficient moisture, when required, so that the air does not become too dry. The heat output to the various rooms in a house can be governed by the dampers in the ducts or at the registers in the rooms.
Because the warm air is forced through the ducts in this type of system rather than just flowing through them by its tendency to rise, a forced warm air heating system does not have to be installed in a basement. It can be installed in the utility room and will give just as good service, or it can be installed at some other point.
If you are looking for the best in warm-air heat, a forced system is your safest bet and will provide excellent heat.
Hot-Water Heating Systems - Heating Boilers
So far we have considered only heating systems where air is heated and sent directly to the rooms in the house.
Now we take up systems in which a medium for heating air is sent to the rooms and the air in the rooms is warmed by circulating around it. In
the case of a hot-water system, technically called hydronic heating systems or hot water heating systems, or heating boilers, hot water is obviously the medium used to warm the room air. The water is heated in a boiler and then flows through one of various devices such as radiators or convectors.
In the rooms, the heat in the water is diffused, either through radiation or convection. The old-fashioned hot-water system consisted of a furnace and a boiler to heat the hot water. From the furnace the water flowed through pipes to the radiators in the rooms. Hot water, like hot air, will rise and, therefore, there was a natural circulation of water through the system, the hot rising and the cold returning to the boiler to be reheated.
This type of system, in which the boiler has to be located below the lowest radiator, is seldom used today.
Modern hot-water heating systems use small circulator pumps to force the hot water through the radiators. This means that the furnace and boiler do not have to be installed in a basement. They can be installed in the utility room. Another improvement in hot-water heating is the replacement of the large bulky radiators with convectors that can be set into walls and take up practical^ no room, or baseboard panels or radiant-heat floor panels set in a concrete-slab floor such as is used in the basic house.
A hot-water system gives very even heat. Moreover, just as soon as the water becomes warm, it begins to warm the room and, therefore, the heating is easily controlled. The main drawback is the fact that the entire system is full of water and if you wish to close the house during the winter or if, for some reason or another, the furnace goes off for a long time, the entire system must be drained.
Steam Heating Systems
As hot water was the medium used to heat the air in a hot-water system, steam is the medium used in a steam system. This system requires a furnace and boiler along with radiators or some other means of allowing the heat to be absorbed by the air in the rooms. Steam systems must be installed in a basement. Another disadvantage is the fact that when the system is turned on, you do not get any heat in the radiators or panels until the water in the boiler reaches 212°, which is the temperature at which steam forms. You do not have quite the same control over a steam system as you do with forced air or hot water because of this very reason. When the water is hot enough to form steam, the radiators are very hot, when the water is below 212°, the radiators are cold.
Once you have made up your mind as to which type of heating system you want to install, the next point that has to be decided on is what sort of fuel you are going to burn and what sort of equipment you are going to burn it in.
Home Heating Fuel Choices
The three main types of heating fuels generally used are coal, oil and gas. As a rule, coal was [in the 1950s] the least expensive, followed by oil and finally gas.
Currently (2019) coal is rarely used as a home heating fuel.
You should not, however, make your choice on this factor alone. In the first place, you may build in a location where, for one reason or another, some type of fuel other than coal may be the least expensive. In the second place, you may find that one kind of fuel is much more readily available than the others.
Even back in 1950 it was noted: In these changing times, it is risky to prophesy that coal, for example, will continue to be the cheapest or most available type of fuel to burn. You will be wise to check with local distributors and find out which fuel is the cheapest in your section.
As far as heating values go, all three fuels will produce excellent results if they are burned in good equipment.
Coal as a Heating Fuel (in the 1950s)
Coal can be used in either hand-fired or automatic equipment. This makes it, from the standpoint of the cost of equipment, the cheapest. A hand-fired furnace is far less expensive than the automatic types that are required for gas and oil. Another point in favor of the hand-fired furnace is that a power failure will not interrupt the heating.
But there are some drawbacks to a hand-fired furnace—even one with various automatic controls. Someone must be on hand at least once a day to add coal and remove some of the ashes. Automatic coal-stokers, however, require very little attention. When they draw the coal from a large bin, about the only maintenance required is the removing of a small accumulation of ashes. Other than that these stokers are completely automatic.
The main drawback to coal as a fuel is the large amount of space required for storage. This can be off-set to a certain extent by building an underground fuel bin outside the basement. Another point in favor of storing the coal outside of the house is that it removes most of the dust and dirt evil and makes the basement more usable.
Oil Home Heating Fuel
Oil is a very satisfactory fuel for the home heating system. It can be stored in tanks located either in the basement or underground outdoors. It is clean and free of any dust and dirt. All oil-burning equipment, with the exception of some small space-heaters, is fully automatic.
Gas Home Heating Fuel
Gas is the cleanest of all fuels to burn. If it were not for its high cost, except in some areas, it would undoubtedly be the best type of fuel to use.
Forced Warm Air Heating System in the Basement
Fig. 1 shows the layout for a forced warm-air heating system when the furnace is located in the basement.
The furnace is installed first and then the hot- and cold-air ducts are run from it to the various outlets in the rooms. Rectangular ducts rather than round ones are used where the ducts pass up through wall surfaces or along ceilings that are to be covered with wallboard.
Warm-air ducts should be installed in interior partitions only. If they are
installed in the exterior walls, they must be insulated to reduce heat loss. The cold-air ducts, on the other hand, can be run through the exterior walls.
The warm-air outlets should be located near interior partitions and they can be either at floor level, in the baseboard or any where up to 6 feet off the floor. The best location in most cases is at baseboard height. This will give you an unbroken floor surface.
Cold-air outlets must be placed at floor level.
Installing a Radiant Heat System

Fig. 1. Location of hot and cold registers in a house heated by forced warm air.
This job must be started before the insulation around the slab where it joins concrete foundation is the same as when only a floor slab is to be poured except that the insulation in this case should extend for at least 3 feet under the floor rather than only 18 inches. See Fig. 2.
Watch out: that 1950's practice of partial insulation is no longer recommended; if you don't want huge heating bills caused by trying to heat the earth under your home, insulate under the entire slab, not just the slab perimeter. See details at RADIANT HEAT MISTAKES.

Fig. 2. Concrete floor slab on the ground showing the heating panels or coils imbedded in the concrete.
The best way to install the panels is to wire them down to the metal reinforcement used in the concrete floor. This will prevent them from moving too much out of position when the concrete is poured. You must remember, however, that there should be from 2" of concrete over the panels, so do not make the first layer of concrete so thick that to get the necessary thickness in the second coat you have to bring the floor higher than you had planned.
Watch out: Keep the radiant heat tubing about 2" below the top of the slab - never deeper. See details at RADIANT HEAT MISTAKES.
In the 1950s the copper coils of the radiant-heating system were laid directly on the gravel and the concrete can be poured over them, but they should not be put in contact with cinders because this will cause them to corrode. The cinders can be coated with a heavy asphalt paint that will effectively insulate the coils.
Fig. 3 shows the panel arrangement for the various rooms in the house. In this case 1/2" tubing is used and it is spaced at 9 inches, but 3/4" tubing can also be used with the same spacing. Either 3/4" or 1" tubing can also be used with 12" spacing.
Sections of tubing must be handled with care so as not to dent or injure them in any way. While the tubing does not have to be laid out perfectly flat, it should have the design shown in the drawing and the indicated number of feet of tubing should be used in each room.
Joints between sections of tubing are made up with soldered fittings and the method employed here is the same as that described for making soldered joints in copper plumbing lines. Each joint must be carefully made because this system is going to be subject to a high pressure and any flaw in the workmanship will show up. Once the system has been installed, it must be tested to make sure that it is perfectly tight at all points.
The usual method of testing is to run water into the system under a pressure of 200 pounds per square inch and leave it in the tubes for four hours. If all joints are tight after this period, you may assume that the tubing has been properly installed.
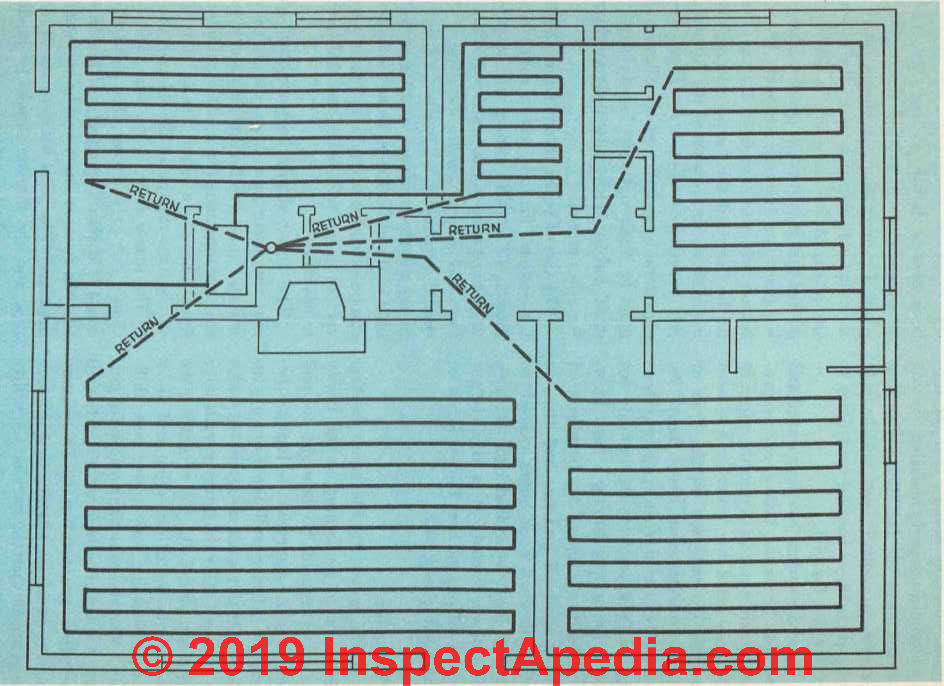
Fig. 3. How copper tubing for the radiant-heat panels in the floor is laid out.
As you will not have the facilities for testing the system yourself, you will have to
get a plumber or heating contractor to do this job for you.
Once the system has been tested and found to be sound, take every precaution possible not to injure the pipes in any way until the concrete has been poured. Do not step on the lines or run a wheelbarrow over them. Be especially careful when spading or hoeing the fresh concrete that you do not strike the copper tubing a hard blow.
After the concrete has been poured and leveled off and has had time to set, build small wood boxes around the ends of the tubing that extend above the concrete or cover them with a larger section of pipe so that they will not be damaged in any way.
The Heating Boiler
If the boiler for the house heating system is to be located in the utility room, it should be brought in and placed in its approximate location before the interior-wall partitions are installed. If this is not done and the boiler is installed after the interior walls have been completed, the job of getting the boiler into the utility room and in its proper location may prove very difficult. Another important reason for getting the boiler in before the inside-wall partitions are installed is that you may have to purchase a boiler that is somewhat larger than the one that the utility room was designed to hold. In this ease.
the size of the utility room will have to be increased slightly so that there will be sufficient room around the heating plant for normal maintenance work.
Another consideration as to the exact size of the utility room will be the type of fuel that is burned. A gas-fired heating plant is extremely compact. An oil burner will run somewhat larger, due to the fact that the burner element is installed on the outside of the furnace. Where coal was used (e.g. in the 1950s) an automatic coal-stoker would require considerably more room as allowance must be made not only for the stoker itself, but for the hopper and container for ashes as well.
The size of boiler recommended here for radiant heating has a rating of 96,000 BTU. This rating will be sufficient not only to take care of the first floor but also to handle the attic if it should eventually be finished off into living quarters. Panel heating is not used in the attic.
Risers from the boiler can be extended up to radiators or convectors in the attic bedrooms and bath to heat them.
The boiler should be positioned so that the stove pipe from the furnace will run in as direct a line as possible to the opening made for it in the chimney flue. The stove pipe should extend through the thimble in the chimney and to the inside face of the flue tile. It should not extend past this point because if it should project into the flue tile, the furnace draft will be seriously impaired. The joint between the stove pipe and the thimble should be made tight with asbestos cement.
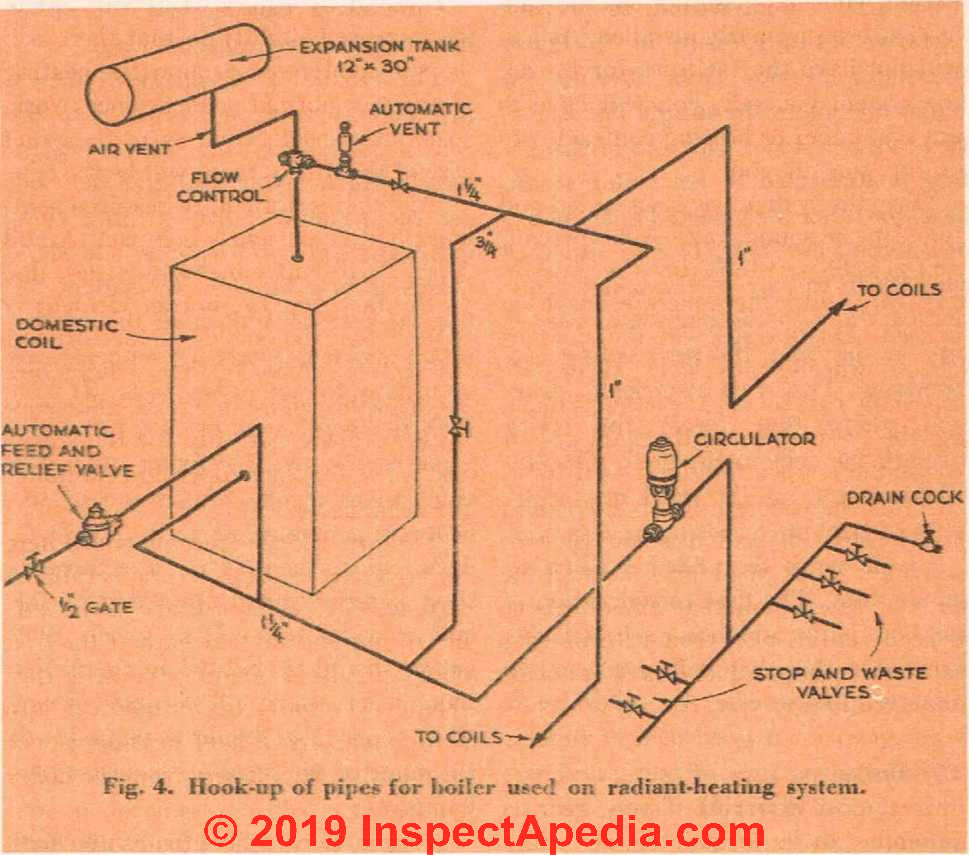
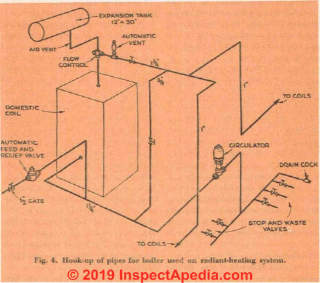
Fig. 4. Hook-up of pipes for hydronic heating boiler used on radiant heating systems.
The stove pipe should be adequately supported by means of metal brackets from the ceiling joists and it should be kept as far as possible from any woodwork. If it -is necessary to run the pipe close to woodwork, cover the wood with a fire-resistant board.
The furnace must sit solidly on the floor in order to prevent any great amount of vibration when automatic equipment such as an oil burner or coal stoker is used. Excessive vibration when the system is working will not only be annoying to the members of the household but in time the pipe connections will loosen up and begin to leak.
Fig. 4 shows the layout for hooking-up the coils to the boiler. The house water supply is brought to the boiler near the base and a gate valve is installed between the supply and the boiler. During the operation of the boiler this valve is left open. Between this valve and the boiler, an automatic feed valve and a relief valve are installed
. The purpose of these is, first, to allow' water from the supply to flow into the boiler when needed and, second, to prevent excessive water pressure in the house plumbing system from flowing in.
From this point, the supply line is carried to a tee fitting. One end of this fitting is connected to the boiler at the base, the other is connected in by means of a second tee fitting to a 3/4" line that runs up to the top of the boiler.
Continuing on with the horizontal run of pipe at the base, the next fitting is a circulator. This is an electrically operated pump that forces the water through the coils in the floor. The circulator is one of the most important parts of the entire heating system, and it is well worth the added expense to get the best.
The first consideration is that both pump and motor are well constructed so that they will give years of uninterrupted service. As this unit will be in operation a good deal of time, a self-lubricating type of pump and motor are most desirable if you wish to eliminate constant maintenance.
Another factor that must he considered is vibration. Excessive vibration during operation on the part of the circulator will be transmitted throughout the entire heating system. The best type of circulator, from this standpoint, has a flexible connection between motor and pump, and the motor is mounted to the pump by means of springs. This arrangement reduces any possibility of vibration.
You will note that the circulator is installed in the return line of the heating system rather than in the supply.
Circulators can be had for either horizontal or vertical mounting.
The circulator is connected into a line that, in turn, is connected to the return lines from the various room-panels. Each return line from the various room-panels is fitted with a stop-and-waste valve.
The purpose of these valves is to allow you to control the flow of hot water through the various rooms and so get varying temperatures according to your own taste. If you wish to keep the bedrooms a few degrees cooler than the living room, the stop valves at the return end of the bedroom panels are partially closed off. This reduces the flow of water through these panels without any effect on the flow of water to the other panels. The valves should be located in the utility room where they will be easily accessible. Each valve should be tagged with the name of the room of the house that it controls.
At some point where the return lines come together, a drain cock should be installed so that the coils can he drained of water when the heating system is closed down during cold weather. Air pressure will be required to clear the lines of all water under these circumstances. The drain cock should, however, be located at a low point in the system.
The next step is to install the 12" x 80" expansion tank. This tank should he installed above the highest point in the system and, therefore, if the attic is ever to be used for living quarters, the expansion tank should be installed above the attic ceiling. It is best to cover the tank in this unheated portion of the house with insulation to eliminate any possibility of water in the tank freezing.
Connected directly under the tank is a special type of vent valve that is used to allow any air that may be in the pipes to escape up into the expansion tank.
From this fitting, the line drops down to the flow control valve. This is a type of check valve that closes off the flow of water through the system when the circulator is not in operation. It is automatic. If it were not for this valve, you would have some circulation of water through the coils regardless of whether the circulator were working or not.
This might not be desirable as it would tend to overheat some of the rooms. The valve can, however, be hand operated so that it will remain in the open position and allow a gravity circulation of water through the coils if this is desirable at certain times of the year.
This check valve, as you will note from Fig. 4, has three openings for lines. One line, as was just mentioned, is connected to the expansion tank. A line at the bottom of the valve is run to the top of the boiler. The third line is connected to the coils. Flow-control valves have the various openings clearly marked so there should be no difficulty in getting the right pipe connected to the proper opening in the fitting.
From the flow-control valve, the flow line is connected to an automatic vent. This vent is necessary in order to remove any air that may collect in the system. Pockets of air in the lines or coils will keep the system from operating properly. A gate valve is installed in the line after the automatic vent.
After the pipe has passed through the gate valve, a tee with a 3/4" opening is connected in. Attached to the 3/4" side is a line that runs back down to the base of the boiler and is connected in to the line that runs from the base to the circulator. A gate valve should be installed somewhere along this line.
The flow line continues off the tee until it is connected into the individual heating coils. Branch lines from the supply to the various coils can be one-inch pipe. These, as well as the other lines, can be copper tubing, which will make the installation work much easier.
You will note from the room-coil layout that there are two branch lines leaving the boiler. One line extends over to the kitchen wall where a tee fitting is installed. One side of this tee is connected tn the living-room panel.
The other side is connected onto the kitchen panel. The second line from the boiler runs directly over to the bathroom and from here on to the two bedrooms. In each case, a return line from the room is brought back to the boiler through the stop-and-waste valves. There is no control valve of this type on the flow side of the lines. You will see, however, that if the return from a particular coil is shut off by means of the stop valve, there can be no flow of water through that particular coil and the water coming from the boiler will by-pass that coil and flow on to another.
Automatic Control System for Radiant Heat
For a radiant-heating system to function properly, it must be equipped with a set of automatic controls. All types of automatic-heating equipment, such as gas, oil burners and coal stokers, are provided with a thermostat that can be set for a desired temperature and that will start the burner or the coal consumption when the temperature inside the house falls below a predetermined point. This is a very simple type of system to install since modern thermostats come as complete units ready to be hooked up to the electrical wiring running to the furnace.
Some thought must be given to the location of the thermostat, however, for a thermostat in the wrong place can decrease the efficiency of the heating system. The best place for a thermostat is on an inside wall four feet or so from the floor level. It should not be located near electric light fixtures because the heat from these fixtures may prevent the thermostat from starting the heating equipment when the room temperature falls below a comfortable point.
At the same time, it should not be installed directly in front of or near outside doors because when the door is opened, a cold blast of air striking the sensitive thermostat will start the heating equipment going.
The best room in the house in which to locate the thermostat is the living room because this is the room where the temperature is most likely to be kept at an even point. The temperature of the air in the kitchen and bath will vary, due to the kitchen range and the hot water from bath or shower.
Most people like to have their bedrooms a few degrees cooler than the rest of the house at night and this eliminates the bedrooms as ideal locations for the thermostat.
Due to the construction of a radiant heating system, the use of a thermostat to turn the furnace off and on is not completely satisfactory. The reason is that it is the temperature of the water in the coils that determines how warm the air in the rooms is and not the temperature of the water in the boiler.
Therefore, the control system for radiant heating must in some wy be able to regulate the flow of water through the lines so that if the water temperature in the boiler is sufficient, this water can be allowed to flow through the coils and heat the air.
This can be accomplished by wiring the circulator into the general control system. With this method, when the thermostat demands additional heat, the circulator will start up to force the hot water in the boiler through the coils. If the temperature of the water is not sufficient to do the job, the furnace will be started up to increase the temperature of the water to the proper degree.
Control systems of this type are available at heating stores and can be easily installed by following the directions provided with them. As some of these units demand special fittings installed in the lines, selection of the control system should be undertaken be-fore the entire system is hooked up. If this is done, you can install the special fittings while the rest of the job of the heating system is under way.
Domestic Hot Water from Boiler
The domestic hot-water supply can be heated by the boiler used for the house heating system. If a storage tank is used, a system such as the one shown in the section of this book on plumbing can be used. If a tankless system is used, an automatic tempering valve must be installed on the boiler to reduce the temperature of the hot water used for the domestic supply to a safe point.
The water inside the boiler used for the house heating system is far above the temperature that is required for domestic use. If no water is used for some time, the domestic supply becomes overheated. The tempering valve is connected to the boiler, to the cold fresh-water line and to the domestic hot-water supply. The openings in the valve for the various pipes are clearly marked.
The valve can be adjusted to furnish hot water at any desired temperature. Once the valve has been set, the mechanism inside the valve will feed enough
cold water into the line to reduce the temperature to the desired degree.
MATERIALS LIST FOR HEATING THE BASIC HOUSE
1 Space-heater with flue pipe, rated at 80,000 BTU
Alternative for house with utility room
1 Steel boiler rated at 96,000 BTU with extended jacket with 200 gallons per hour tankless coil (replaces 30-gal. hot water heater under plumbing materials list).
1 Fill Box
1 Vent Cap 1 Vent alarm
1 12 by 30 Compression tank
1 Airtrol tank fitting
1 Autovent with overflow'
1 l 1/4-inch angle flow control
1 No. 8 dual valve
1 3/8" stop and waste valve
1 Circulator
1000 feet of 3/8" type L copper tubing.
Radiant Heat Installation & Operation & Temperature Guides
- HUD, PPFA, DESIGN GUIDE for RESIDENTIAL PEX WATER SUPPLY PLUMBING SYSTEMS [PDF] (2006) HUD, U.S. Department of Housing & Urban Development, Plastics Pipe Institute, Inc (PPI)
105 Decker Court
Suite 825
Irving, TX 75062
www.plasticpipe.org and Plastic Pipe and Fittings Association (PPFA)
800 Roosevelt Road, Bldg. C, Ste. 312
Glen Ellyn, IL 60137
www.ppfahome.org and Partnership for Advancing Technology in Housing
451 7th Street, SW
Washington, DC 20410
www.pathnet.org and NAHB Research Center, Inc.
400 Prince George’s Boulevard
Upper Marlboro, MD 20774
www.nahbrc.org retrieved 2019/09/20 or\iginal source: https://www.huduser.gov/portal/publications/pex_design_guide.pdf
See Figure 11.2 – Snow and Ice Melt Piping for a Driveway p. 92 - MacNevin, Lance, P.Eng., DESIGN AND INSTALLATION OF HYDRONIC SNOW AND ICE MELTING (SIM) SYSTEMS TO OPTIMIZE PERFORMANCE AND EFFICIENCY [PDF] Plastics Pipe Institute, Inc (PPI) 105 Decker Court Suite 825 Irving, TX 75062 www.plasticpipe.org retrieved 2019/09/20, original source: https://www.modernhydronicssummit.com/wp-content/uploads/sites/3/2017/09/MacNevin-Summit-2017.pdf
- WattsRadiant, RADIANT PEX® INSTALLATION MANUAL [PDF] (2017) Watts Radiant, USA: Tel: (800) 276-2419 • Fax: (417) 864-8161 • WattsRadiant.com Canada: Tel: (905) 332-4090 • Fax: (905) 332-7068 • Watts.ca Latin America: Tel: (52) 81-1001-8600 • Fax: (52) 81-8000-7091 • WattsRadiant.com retrieved 2019/09/20 original source: http://media.wattswater.com/IOM-WR-PAP-PEX-PEXAL-PERT.pdf
...
Continue reading at INTERIOR WALLS & CEILINGS; BUILT-IN FURNITURE - next chapter in this book, or go to book contents at BUILD YOUR DREAM HOME, or select a topic from the closely-related articles below, or see the complete ARTICLE INDEX.
Or see these
Building Heating System Articles
- AFUE DEFINITION, RATINGS
- BOILERS, HEATING - home
- BUILD YOUR DREAM HOME
- CHIMNEY INSPECTION DIAGNOSIS REPAIR - home
- COMBUSTION AIR RULES of THUMB
- CONDENSING BOILERS/FURNACES
- DIRECT VENT INSTALLATION, SNAFUS & SPECS
- DRAFT MEASUREMENT, CHIMNEYS & FLUES
- ELECTRIC HEAT - home
- FIREPLACES & HEARTHS - home
- FURNACES, HEATING - home
- GAS PIPING, VALVES, CONTROLS - home
- HEAT LOSS (or GAIN) in BUILDINGS
- HEATING COST SAVINGS METHODS - home
- HEATING SYSTEMS - home
- HIGH EFFICIENCY BOILERS/FURNACES
- HOT WATER HEATERS
- HVAC SYSTEM TYPES
- OIL TANK PIPING & PIPING DEFECTS
- OIL STORAGE TANKS - home
- PULSE COMBUSTION HEATERS
- RADIANT HEAT - home
- RADIANT HEAT MISTAKES
- RADIATORS for ROOM HEAT - home
- STEAM HEATING SYSTEMS & CONTROLS - home
- THERMOCOUPLE REPAIR / REPLACEMENT
- THERMOSTATS, HEATING / COOLING - home
- WALL-MOUNTED FURNACES
- ZONE VALVES, HEATING
Suggested citation for this web page
HEATING SYSTEM CHOICES for YOUR HOME at InspectApedia.com - online encyclopedia of building & environmental inspection, testing, diagnosis, repair, & problem prevention advice.
Or see this
INDEX to RELATED ARTICLES: ARTICLE INDEX to HEATING SYSTEMS
Or use the SEARCH BOX found below to Ask a Question or Search InspectApedia
Or see
INDEX to RELATED ARTICLES: ARTICLE INDEX to RADIANT HEAT
Or use the SEARCH BOX found below to Ask a Question or Search InspectApedia
...
Ask a Question or Search InspectApedia
Share this article:Questions & answers or comments about how to identify the architectural style of buildings and building components
Try the search box just below, or if you prefer, post a question or comment in the Comments box below and we will respond promptly.
Search the InspectApedia website
Note: appearance of your Comment below may be delayed: if your comment contains an image, photograph, web link, or text that looks to the software as if it might be a web link, your posting will appear after it has been approved by a moderator. Apologies for the delay.
Only one image can be added per comment but you can post as many comments, and therefore images, as you like.
You will not receive a notification when a response to your question has been posted.
Please bookmark this page to make it easy for you to check back for our response.
IF above you see "Comment Form is loading comments..." then COMMENT BOX - countable.ca / bawkbox.com IS NOT WORKING.
In any case you are welcome to send an email directly to us at InspectApedia.com at editor@inspectApedia.com
We'll reply to you directly. Please help us help you by noting, in your email, the URL of the InspectApedia page where you wanted to comment.
Citations & References
In addition to any citations in the article above, a full list is available on request.
- In addition to citations & references found in this article, see the research citations given at the end of the related articles found at our suggested
CONTINUE READING or RECOMMENDED ARTICLES.
- Carson, Dunlop & Associates Ltd., 120 Carlton Street Suite 407, Toronto ON M5A 4K2. Tel: (416) 964-9415 1-800-268-7070 Email: info@carsondunlop.com. Alan Carson is a past president of ASHI, the American Society of Home Inspectors.
Thanks to Alan Carson and Bob Dunlop, for permission for InspectAPedia to use text excerpts from The HOME REFERENCE BOOK - the Encyclopedia of Homes and to use illustrations from The ILLUSTRATED HOME .
Carson Dunlop Associates provides extensive home inspection education and report writing material. In gratitude we provide links to tsome Carson Dunlop Associates products and services.
 |
HOME | ABOUT | ASK a QUESTION | CONTACT | CONTENT USE POLICY | DESCRIPTION | POLICIES | PRIVACY | |
| © 2026 - 1985 Publisher InspectApedia.com - Daniel Friedman | |||||||||