 Basement Heat Loss Guide
Where does heat losses occur & how to stop it
- POST a QUESTION or COMMENT about the locations & rates of heat loss in building basements
- Solar Age Magazine Articles on Renewable Energy, Energy Savings, Construction Practices
Basement heat loss causes & cures.
This article discusses basement heat loss sources, choice of basement insulation materials, best place to install foundation or basement insulation, how to protect exterior foundation insulation from damage.
Also included are sources of foundation insulation covering materials.
InspectAPedia tolerates no conflicts of interest. We have no relationship with advertisers, products, or services discussed at this website.
- Daniel Friedman, Publisher/Editor/Author - See WHO ARE WE?
How & Where to Reduce Basement Heat Losses in buildings
 Sketch at page top and accompanying text are reprinted/adapted/excerpted with permission from Solar Age Magazine - editor Steven Bliss.
"Beat Basement Heat Loss:
proven methods and materials make insulating foundation walls easy and effective" - provided in links to the original document (below) and in updated/expanded web article text just below.
This article, provided in complete, updated form below, explains strategies for reducing building heat loss through basement walls and foundations.
The article gives details about best practices for insulating building foundation walls in cold climates, suggesting foundation insulating materials, where to place foundation insulation, and how to protect it from damage.
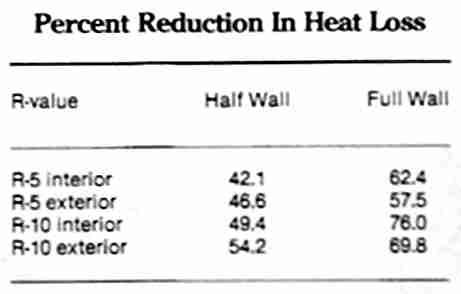
Interesting heat loss research is cited showing that insulating the top half of a foundation wall to R-10 will produce about the same heating cost savings as insulating the full wall to R-5 when compared to an uninsulated wall.
This detail is significant if you are considering the amount, trouble, and cost of excavating outside of a building to insulate its foundation.
The text below paraphrases, quotes-from, updates, and comments an original article from Solar Age Magazine and written by Steven Bliss.
Beat Basement Heat Loss
Proven methods and materials make insulating foundation walls easy and cost-effective.
Foundation walls are big heat losers.
The R-value of an 8-inch concrete wall plus air films is 1.49, less than for double glazing.
And the upper part of the foundation acts like a wick, drawing basement heat to the cold outdoors.
In a well-insulated two story home, basement heat loss will account for 15 to 30 percent of the annual heat load. In a single-story structure, the percentage may be higher.
R-10 perimeter insulation from siding to footing (with one foot of exposed foundation) will cut basement heat loss in a heated basement by about 70 percent.
Payback periods for perimeter insulation are relatively short, typically ranging from two to six years in a 5000 degree-day climate.
Guide to Choosing Materials for Building Foundation or Basement Insulation
You should select an insulation material that withstands the below grade (below ground level) environment - the wetting and vapor drive, and the freeze/thaw cycles.
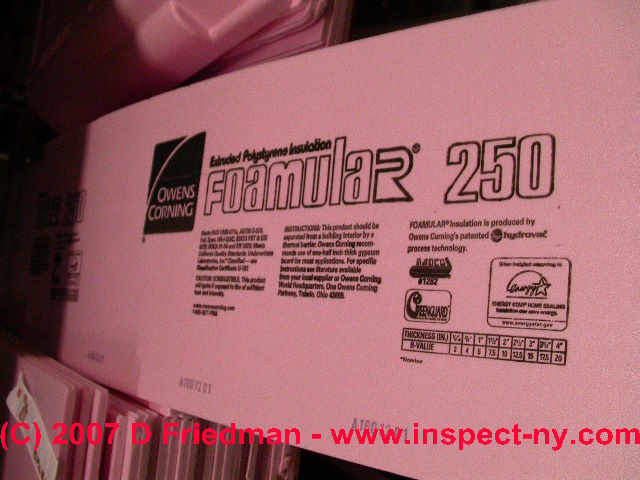
If you plan to leave the material directly exposed to the soil (outside the foundation wall), extruded polystyrene such as Dow's Styrofoam™ or U.S. Gypsum's Foamular™ holds up best and retains most of its original R-value.
Other foundation insulating materials can be used, but they should be protected from direct contact with wet soil by plastic or other barriers.
In Canada,some builders have reported success with burying fiberglass insulation in a pressure-treated plywood box - but beware - if water leaks into that container the insulation will be ineffective.
Where Should Foundation Insulation be placed: inside or outside the foundation wall?
How Much Foundation Insulation Should be Used?
Several arguments favor exterior versus interior insulation of masonry and concrete basement walls.
- First, an exterior job is usually cheaper, since the insulation can be left uncovered - except for above-grade -
see TERMITE SHIELDS vs TERMITICIDE
On the building interior, a good fire retarder, such as 5/8-inch drywall, is required over the foam insulating board to prevent a fire and smoke hazard.
See RIGID FOAM USE INDOORS - Second, if a decent job is done tying the insulation into the building siding, the major air leak at the building sills will be controlled or eliminated.
- Third, the thermal mass of the foundation walls remains available to the building interior, for both heating and cooling benefits.
- Fourth, exterior building insulation protects the foundation from additional stresses caused by insulating, and also from frost pressure (as the insulation may be compressed by freezing, expanding soils).
Deprived of your home's heat, the soil around the foundation will be more prone to frost heaves, particularly damaging to concrete block and stone foundation walls that cannot resist lateral forces. Cracks in the foundation wall may result.
See BUCKLED FOUNDATIONS due to INSULATION?
Foam insulation on the foundation wall exterior can absorb some of this movement.
Backfilling with materials not prone to frost heaves, such as clean granular fill or stone also helps both against frost damage to the foundation wall and also to improve drainage down to the footing drain.
Freeze/thaw cycles can also lead to spalling of the exterior surface of a concrete wall insulated on the building interior.
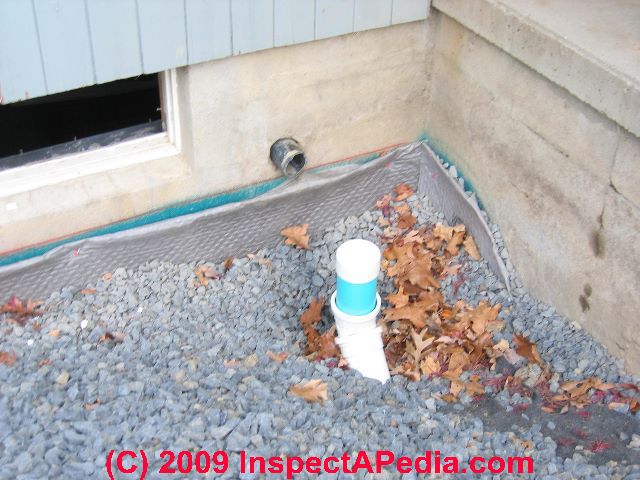
In new construction in cold climates it makes sense to insulate from siding to footing (photo at left, work incomplete, shows improved drainage and foundation waterproofing membrane against the foundation wall, but with an omission of foundation insulation - too bad).
You will get the most out of the insulation material by using a greater thickness on the upper half of the foundation wall than on the lower.
In a building foundation insulation retrofit, stick to the upper half or third of the foundation wall - whatever your budget or your arms (for digging) will tolerate.
Insulating half-way down the an 8-foot foundation wall to R-10 will achieve almost the same results as insulating the entire foundation wall to R-5 (See Percent Reduction in Heat Loss - chart below) with the same amount of material and a lot less digging.
In climates where cooling loads compete with heating, it is best to leave the lower portion of the foundation wall uninsulated to maintain earth coupling.
Percent Reduction in Building Heat Loss with Different Foundation Insulation Schemes
Computer modeling done by Paul H. Shipp, senior engineer at Owens-Corning Technical Center (in the 1980's) showed that insulating the upper half of a foundation wall to R-10 will produce close to the same savings as insulating the full wall to R-5 compared with an uninsulated foundation wall.
The simulation was done for a 1193 square foot single-story house in Columbus, OH (5660 annual heating degree days).
Guidelines for Installing Foundation Insulation
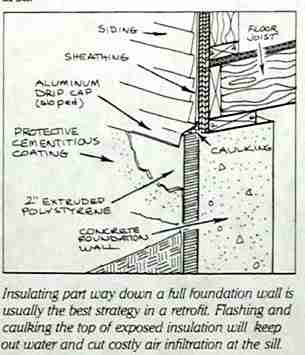
Before you excavate and have to work over a trench, you should prepare the joint where the bottom of the exterior wall siding meets the building insulation. Unless the siding will project a good 1/2-inch beyond the finished insulation, you will need to install a metal flashing or (less durable) a wooden drip cap over the top edge of the insulation board.
Aluminum drip edge (sold for door and window head casings) or J-channel will work here if you can find the right size. Otherwise, a sheet-metal contractor or a siding installer with a metal brake can form a simple metal flashing for you.
If the bottom edge of the siding forms a fairly straight line, a simple wooden drip cap could be used - made by rabbeting and beveling a length of pressure treated wood or redwood - but beware: we have inspected homes where this method was used and the wood rotted, leaking behind the insulation and into the building as wind-driven rain ran down the building walls.
In any case, the drip edge must be sloped to shed water so so that it does not back up to rot the bottom of the siding or flow behind the insulation. In installations where a metal termite shield is desired, that metal may form dual duty as both a drip edge and termite shield. In Squeeze a healthy bead of caulk behind the flashing to cut infiltration at the sill area. (See the illustration at the top of this page).
If the foundation walls are relatively flat, the insulating foam board panels can be secured with a mastic compatible with the type of foam used. The solvents in some mastic adhesives may dissolve the foam board, so go with the foam board manufacturer's recommendations. We prefer mechanical fastening of all exterior work, even if an adhesive is used for backup. In new concrete construction, use masonry nails with a large (1 1/2-inch) washer (or cast a pressure-treated nailer into the foundation wall).
Special anchors for this application, called Fast'ners®, available from Insul/Crete, work well in any concrete or masonry wall. The Fast'ner is a cross between a galvanized nail and an expansion bolt, and hammers into 1/4-inch holes drilled through the insulation into the foundation. Modern TapCon® fasteners rated for outdoor below-grade use, also with suitable washers, may speed this procedure as well. Use a hammer drill or you'll waste a lot of time and masonry drill bits. Starting a few inches below the siding, nail or screw the insulation 16 inches on center both ways down to the grade line (the top of soil backfill).
Make sure you overlap all building corners - at recesses for doors and windows, and at building corners. Research has shown that heat loss is greatest at building corners where the large mass of adjacent earth acts as a heat sink.
You might backfill part way before coating the above-grade portion of the insulating board. When you finish the foundation insulation job, add backfill sloping aggressively (to allow for settlement) away from the building so that water will run away from the structure.
Scandanavian Flared Foundation Insulation Option: An interesting strategy for foundation insulation, borrowed from the Scandinavians, places the insulation vertically down a couple of feet, then out horizontally four to six feet.
Because this interrupts the thermal bridge to the ground surface, it works well for both heating and cooling, and eliminates the problems associated with freezing and frost heaves. While this makes sense thermally, it requires a lot of extra digging in a foundation insulation retrofit job, and plenty of care in installation and backfilling (keep the foam boards sloping away from the building). If the insulation moves over time, creating gaps, much of the benefit will be lost.
Guide to Protecting Foundation Insulation
Using Polystyrene on Foundation Exterior Walls
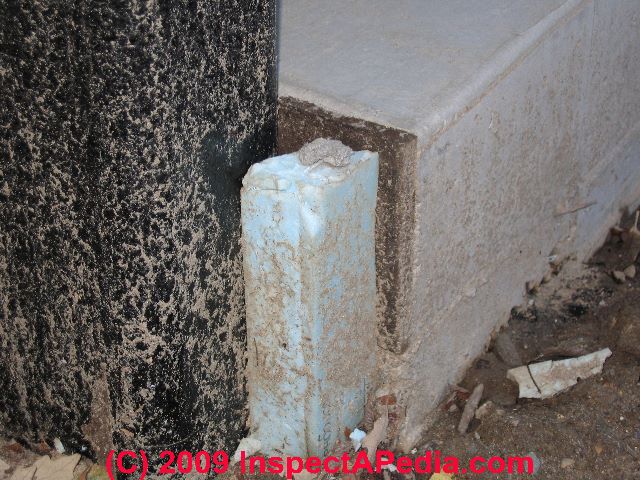
Polystyrene needs to be protected above grade from ultraviolet degradation (sunlight) and from physical damage (weed whackers, lawn mowers, pests). A variety of premixed cement finishes are available for this application. Most use an acrylic or acrylic latex bonding agent (either in the dry mix or added as a liquid); the stronger ones add chopped fiberglass to the cement mixture.
These foundation insulation finish coatings can be applied with a heavy brush or a trowel. Textures can be created, or colors added depending on your taste.
For all of these foundation insulation covering applications, it is advisable to rough up the finish of the insulation board with a wire brush prior to applying the finish. This doesn't take long and will keep the stucco coating from peeling off later.
If the foam insulating board on the foundation wall has been exposed to the weather for a while, make sure that you scrape thorough the dust that will have formed on the surface. One type of Dow's Styrofoam foundation insulation has a thin protective film that must be removed before coating the foam insulation with stucco.
While not all of the suppliers recommend it, it's a good idea to beef up all the seams and nail holes with perforated nylon tape (the sticky type used for drywall and plaster). This will minimize movement and cracks in the foundation stucco coating at these joints. A metal or nylon corner bead makes a neat detail at highly-visible outside corners. A thick coat of fiberglass-reinforced mixture should resist an occasional lawn mower bump or minor hammer blow. Minor impact damage to the stucco coating can be easily repaired with left-over material.
For those who don't like to play in the mud, a neutral gray fiberglass sheet product called Insul-Guard™, from Trend Products, was a good alternative to cement coating when this article was originally written in the 1980's but it appears that that product is no longer marketed.
An "L" on the top of the sheet hooked over the top of the foam board foundation insulation; the bottom is carried just below grade. Vertical joints could be overlapped or joined with PVC moldings supplied by Trend.
In new construction, the installer would nail right through the Insul-Guard and insulation board into the middle of the sill plate. Along with the proper adhesives behind foam board foundation insulation and covering, this will hold the assembly with no additional mechanical fastening up to about 20-inches of exposed foundation wall. Trend also made a 2-inch wide drip cap that is handy in many insulation retrofit jobs. Readers may want to search for similar but updated foundation exterior insulation systems that combine insulation and drainage.
See POLYSTYRENE FOAM INSULATION for a guide to using this material in below-grade applications.
See TERMITE SHIELDS vs TERMITICIDE for a discussion of avoiding insect damage when foam insulating board is used below or at ground level.
See WET BASEMENT PREVENTION for other exterior treatments of building foundation walls to combine foundation insulation with basement waterproofing membranes and drainage systems.
Here we include solar energy, solar heating, solar hot water, and related building energy efficiency improvement articles reprinted/adapted/excerpted with permission from Solar Age Magazine - editor Steven Bliss.
Original article:
- Basement Heat Loss Reduction Guide - PDF document, use your browser's back button to return to this page
- Basement Heat Loss Reduction Guide - PDF document, part 2
...
Reader Comments, Questions & Answers About The Article Above
Below you will find questions and answers previously posted on this page at its page bottom reader comment box.
Reader Q&A - also see RECOMMENDED ARTICLES & FAQs
Comment:
(Apr 17, 2011) Anonymous said:
Thanks, good info.
Question: does foundation wall insulation trap footing water?
Bryan said:
Have their been issues with the inability of footing water to evaporate from the upper outer surface of the concrete wall once its covered? (Nov 21, 2011)
Reply:
Bryan, certainly we don't want water moving through the foundation wall to the building interior, and yes, if you then cover the interior surface of the wall you will probably find that you are collecting condensation in the wall cavity, risking a mold problem or even wet floors, depending on what building materials are used and how much moisture there is.
It's best to fix this problem by getting water away from the building from outside. An alternative that works but is not my first choice is to install an interior basement de-watering system that includes a hard plastic barrier that extends from floor up for the full height of the foundation wall.
Question: is it better to insulate the basement floor or the walls?
Anonymous said:
I have a question about garage/workshop insulation cost effectiveness and priority (wall vs. floor). I'm building a workshop that will occupy about 1/2 of the floor area of a garage that has a concrete slab floor. The other half will remain unimproved for car parking. Because the workshop-area floor is quite sloped, I'm constructing a raised level floor using joists and T&G ply.
As for climate, the house is in San Francisco, so no harsh weather and is up against adjacent houses (4" gaps) so is somewhat shielded from wind along the long (28') side of the garage.
The concrete floor in the to-be-improved area is dry. The garage has no wall insulation -- just the 100-year-old studs and the back side of the exterior cedar siding, with small but significant air leaks that I'm addressing by screwing short lengths of cedar siding to the inside where needed.
The front wall of what will become the workshop has a 4-foot tall, very thick concrete foundation wall because that corner of the garage/basement is inset into the hill. QUESTION:
Would it be better to insulate the concrete floor (which will become essentially inaccessible beneath the new raised floor), or the currently-uninsulated walls?
We are not planning to construct raised wood floor in the roughly half of the garage in which a car is parked -- that will remain bare concrete, just as cold as it's always been.
Cost is (always) an issue, but I do have time (semi-experienced DIY-er but just coming up the learning curve regarding the details of insulation and moisture barriers). I welcome your advice! - (Feb 12, 2015)
Reply:
Anon
IN general the priorities to stop heat loss are
- stop air leaks and drafts
- improve windows and doors
- insulate the roof
- insulate the walls
- insulate the floor
in that order.
The order might be amended for the convenience of construction; that is, we will often make an improvement at an earlier stage in renovations because doing later will be much more costly.
Question: what's the best way to insulate my concrete block basement walls?
ohn said:
I live in the north east and have a cinderblock foundation. My basement is always cold and drafty. What is the best way to insulate the basement walls. The cinderblock cavities are open and partially exposed at the sill plate. (Mar 6, 2015) J
Reply:
Ideed in some homes, usually older ones, the mason may have omitted a solid block cap at the top of a concrete block foundation wall.
You can easily seal these openings against convenction currents and drafts by stuffing a wad of newspaper into the top of the hole, pushing it down into the foundation wall about four inches, then using spray foam to seal the block wall top.
I've found this more labor intensive thant trying to simply seal a board or cap along the exposed lip of the wall but it is also more effective at stopping drafts.
...
Continue reading at BASEMENT HEAT LOSS DETECTION or select a topic from the closely-related articles below, or see the complete ARTICLE INDEX.
Or see these
Recommended Articles
Suggested citation for this web page
BASEMENT HEAT LOSS at InspectApedia.com - online encyclopedia of building & environmental inspection, testing, diagnosis, repair, & problem prevention advice.
Or see this
INDEX to RELATED ARTICLES: ARTICLE INDEX to BUILDING ENERGY SAVINGS
Or use the SEARCH BOX found below to Ask a Question or Search InspectApedia
Ask a Question or Search InspectApedia
Try the search box just below, or if you prefer, post a question or comment in the Comments box below and we will respond promptly.
Search the InspectApedia website
Note: appearance of your Comment below may be delayed: if your comment contains an image, photograph, web link, or text that looks to the software as if it might be a web link, your posting will appear after it has been approved by a moderator. Apologies for the delay.
Only one image can be added per comment but you can post as many comments, and therefore images, as you like.
You will not receive a notification when a response to your question has been posted.
Please bookmark this page to make it easy for you to check back for our response.
IF above you see "Comment Form is loading comments..." then COMMENT BOX - countable.ca / bawkbox.com IS NOT WORKING.
In any case you are welcome to send an email directly to us at InspectApedia.com at editor@inspectApedia.com
We'll reply to you directly. Please help us help you by noting, in your email, the URL of the InspectApedia page where you wanted to comment.
Citations & References
In addition to any citations in the article above, a full list is available on request.
- In addition to citations & references found in this article, see the research citations given at the end of the related articles found at our suggested
CONTINUE READING or RECOMMENDED ARTICLES.
- Carson, Dunlop & Associates Ltd., 120 Carlton Street Suite 407, Toronto ON M5A 4K2. Tel: (416) 964-9415 1-800-268-7070 Email: info@carsondunlop.com. Alan Carson is a past president of ASHI, the American Society of Home Inspectors.
Thanks to Alan Carson and Bob Dunlop, for permission for InspectAPedia to use text excerpts from The HOME REFERENCE BOOK - the Encyclopedia of Homes and to use illustrations from The ILLUSTRATED HOME .
Carson Dunlop Associates provides extensive home inspection education and report writing material. In gratitude we provide links to tsome Carson Dunlop Associates products and services.


