 Building Flashing Types, Installation, Inspection, Repairs
Fantasies about roof flashing: mistakes, leaks, and SNAFUS
- POST a QUESTION or COMMENT about building flashing installation, inspection, leaks, troubleshooting, repairs
Building flashing home page.:
This article series provides details of proper flashing use, materials, installation, inspection & repair on all types of buildings, including roof flashing, wall flashing, window and door flashing, plumbing vents, chimneys etc.
We describe the use of flashing on buildings to prevent leaks, to seal between intersecting building sections or components.
We explain the basic principles of building flashing: why flashing succeeds or fails, and we list the types of flashing materials used on buildings. By links to additional articles on specific building flashing procedures we provide detals about how best to install flashing at all building areas where it is used: foundation, walls, windows, doors, roofs, and roof penetrations such as chimneys & plumbing vents.
InspectAPedia tolerates no conflicts of interest. We have no relationship with advertisers, products, or services discussed at this website.
- Daniel Friedman, Publisher/Editor/Author - See WHO ARE WE?
Guide to Flashing Used on Buildings
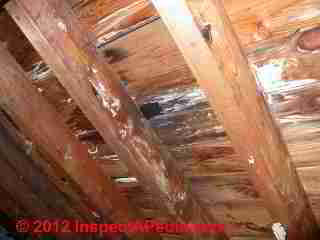
The consequences of a flashing error or omission on a building can cause serious building damage and even injuries or health problems as water intrusion eventually means costly mold contamination, building rot, building insect damage, and in extreme cases collapse of portions of a structure.
Bad deck flashing, for example, has been the cause of more than one deck collapse.
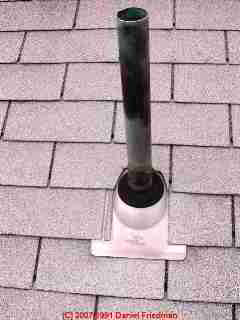
Above we show a plumbing vent stack flashing properly installed on an asphalt shingle roof.
[Click to enlarge any image]
Common Flashing Problem Areas or Mistakes
When we trace leaks on buildings to flashing errors it is often remarkable to see where & how the installer forgot a few basic concepts that explain the use and success or failure of using flashing materials to protect a building against leaks.
Flashing is supposed to redirect water: flashing refers to the use of a material (metal, rubber, plastic, for example) to mechanically intercept water and redirect it back out to the building exterior instead of permitting the water to enter the building structure.
Thanks to Portland Oregon reader JPD for helpful editing, 2016/01/20
Water flows down hill: mostly. So if flashing is improperly positioned, say with an opening facing "up-slope" into the direction from which water originates, it's going to leak.
Top Flashing Fantasies We Find on Buildings
Flashing Fantasy No. 1: the bigger the blob the better the job
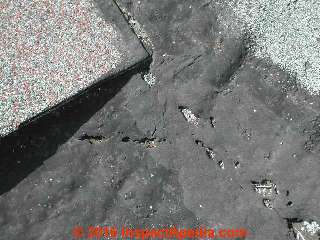
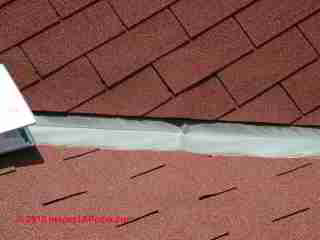
Why we cannot rely on roof flashing cement as a durable repair is illustrated in our photo at left. "The bigger the blob the better the job" does not hold true in this case.
Consider that we have multiple materials all installed in the same spot: roof framing, perhaps 2x10 SPF rafters, plywood or OSB roof sheathing, roofing felt underlayment, roof shingles, perhaps metal valley flashing (not visible here), and then a smear of flashing cement that the repair person fantisized would keep the roof from leaksing.
The variatiion in thermal expansion properties alone could explain why the roof materials tear apart when exposed to cycling sun and temperature changes.
Add the effects of weather and drying out of the flexible components of the roofing mastic or cement and it becomes obvious that reliance on coatings to seal roof component intersections is not going to be reliable. That's why instead we rely on flashing products that, properly installed, handle thermal movements without tearing and leaking. Also
see THERMAL EXPANSION of MATERIALS.
Liquid roof Flashing Installation Details
Technical note: there are indeed "liquid flashing products" such as Firestone's UltraFlash™ system used on modified bitumen & built-up roof installations. These commercial roof flashing approaches are not simply a liquid or mastic application however.
- The roof surface (e.g. around a plumbing vent) is cleaned and sprayed with a primer
- A liquid flashing (sealant) is applied to the roof surface and the surface of the plumbing vent stack pipe
- A fabric (typically fiberglass or polyester fiber mat is wrapped and custom-fitted around the plumbing vent pipe and extended appropriately onto the roof surface
- A second coating of liquid flashing is applied over the fabric
- A third coating of protective mineral granules is applied to the liquid flashing to match the surrounding roof surface.
Flashing fantasy No. 2: Install and forget flashing
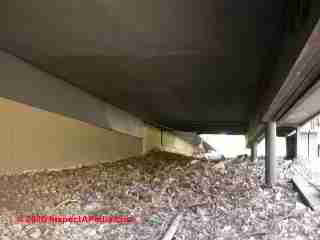
This photo illustrates a different sort of use of flashing at the building foundation: as a termite shield.
Termite shields don't guarantee that termites won't enter the building; rather the shield makes it a little more difficult for the termites to get into the wood structure and forces them to build mud tubes on the inside or outside of the foundation wall where, in theory, somone can notice their presence.
In this installation, where visual access was inconvenient, the termites simply built mud tubes around the termite shield and entered the building unobserved - because nobody troubled to look for them in this awkward area.
Flashing at the building foundation top or between the masonry foundation wall top and the wood sill placed atop the wall is is installed also as a damp-proofing course to stop rising damp in some climates.
Flashing fantasy No. 3: half a (flashing) loaf is as good as a whole
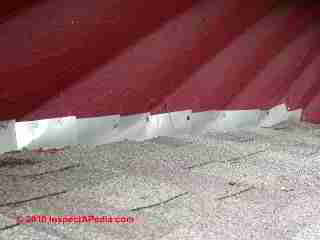
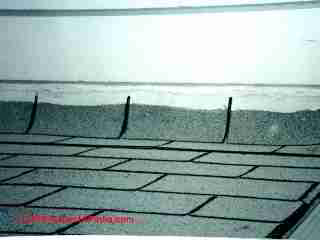
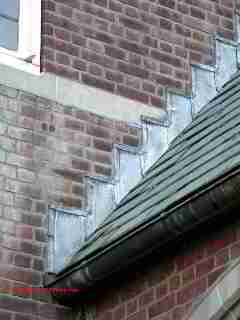
This photo illustrates a common fantasy about step flashing: that we can just tack the flashing upper end to the building side wall and imagine that it will never rain, or that wind-blown rain will never strike the wall and run down behind the upper edge of the flashing.
Counter flashing let into the side of the building wall is what's required. Why was it omitted here? Probably because of the technical difficulty of cutting counter flashing into the surface of an undulating log wall.
But just tacking flashing against the wall is about as unreliable as pasting a bead of caulk or sealing behind the upper edge of the step flashing -this is not a leak-proof, durable installation.
Details are at DORMER SIDE / ROOF FLASHING where we show what goes wrong when counter flashing is omtted along the side of a roof dormer.
Also see WALL-ROOF INTERSECTION FLASHING DETAILS for a description of how flashing should be installed.
Also see PEEL & STICK FLASHING MEMBRANES (as those can help stop leaks in problem areas)
Flashing fantasy No. 4: longer flashing is better
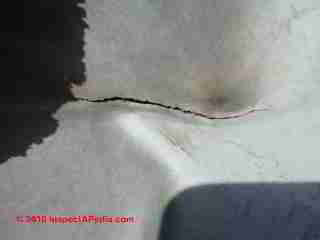
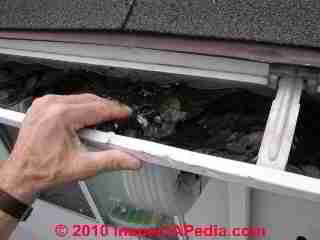
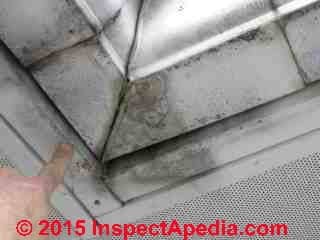
Flashing in a roof valley with nice looking copper or aluminum is so satisfying - wouldn't it be best to make one giant long piece - after all that elimninates joints. Leaks happen at the joints, right?
Well sort-of. But a too-long copper or aluminum valley flashing segment cycles between hot and cold temperatures, flexes, and eventually cracks as these photographs make plain.
See details of proper metal valley flashing installation using clips or edge-trapping roofing nails, detailed at
ROOF FLASHING, ASPHALT SHINGLE VALLEYS
Flashing fantasy No. 5: improvised wall flashing materials are fun and profitable
This photo (above) shows asphalt roof shingles caulked to the building side wall in the role of counterflashing. Will this work? Well yes. Our written warranty would be:
This roof is guaranteed not to leak before our truck leaves the end of your driveway.
Flashing fantasy No. 6: we can just leave the old roof -wall flashing in place when re-roofing
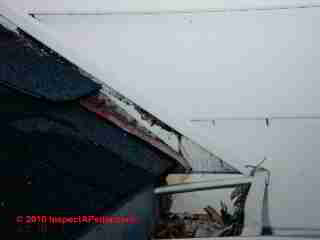 The old roof-wall flashing didn't leak so why not just use it again? Well that's a great idea, sort-of.
First off the length of flashing extending out from the sidewall in this photo is about one-inch: a tiny fraction of what's required.
Second off, the old roof flashing is bent-upwards so if the roof slopes even a teeny bit towards the building wall, or if wind blows rain in that direction, water will run underneath the flashing.
Third off: the new asphalt roof shingles rarely line up exactly with the stepped flashing of the prior roof.
Whatever was he thinking?
Flashing fantasy No. 7: if flashing sticks up, we can just nail the buggers down!
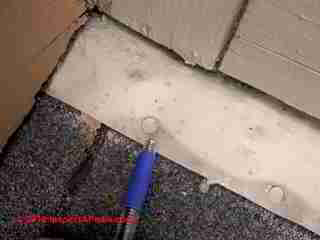
The temptation to nail down recalcitrant roof flashing or counter-flashing is overwhelming. And it looks so neat when you're done.
But every nail puncture through the on-roof flashing is a leak spot, especially in climates where wet snow may end up sitting on the roof surface.
If you are going to go ahead and nail your flashing anyhow, a blob of roof sealant or silicone underneath the flashing at the nail point and atop the nail head on the flashing will at least keep the nailed-flashing from leaking before your truck leaves the end of the driveway.
[ I confess ... I've done this.]
Flashing fantasy No. 8: roof flashing is optional - who needs it anyhow? I mean, isn't the roof supposed to keep the water out?
Our friend Herschel was told by his roofer, the low bidder on the job, that flashing was extra.
So Herschel said "optional?
I don't pay for optional. Leave it off" he ejaculated.
Grinning, the roofer had Herschel sign the contract.
When it rained the roof leaked around the roof chimneys, plumbing vents, valleys, and roof-sidewall abutments.
Everywere.
The attic was a soak-pit. Hell, nobody goes into the attic anyhow. Who cares?
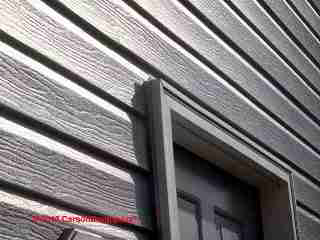
Flashing fantasy No. 9: Vinyl siding is waterproof, right?
Why should we need flashing around windows and doors? I mean, vinyl is obviouslyh waterproof, right?
No. Vinyl siding is not a water barrier on buildings.
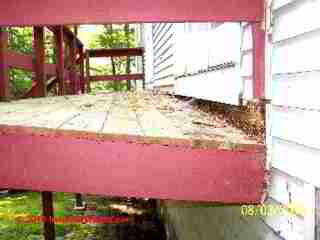
Flashing fantasy No. 10: heck no water goes there anyway, right?
I don't see why we need flashing at the deck ledger board. I mean after all, it's all outdoors anyhow. Water just runs off the deck, right?
No. The deck will rot and collapse as will the wall and ceiling of your finished room below it.
More Roof Flashing Fantasies: No. 11 - The Chimney is usually high on the roof so we don't need to worry about leaks or chimney flashing there, right?
I don't see why we need flashing at the chimney. I mean, after all, it's up there high on the roof, right?
Well, No.
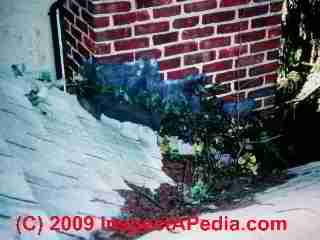
As you can see in our photo above, this chimney is at the lower edge of the roof where the total volume of water runoff is greatest; worse, this chimney, discussed
at FLASHING, CHIMNEY Mistakes & Leaks, has a roof valley running smack into the side of the chimney.
Lots of chimneys exit to the building outside low on the roof not just at the ridge. Our photo shows a chimney next to the roof drain on a low slope building where leaks were recurrent - as discussed
at FLAT ROOF DRAINAGE SYSTEMS.
Or see
UNDERLAYMENT REQUIREMENTS on ROOFS
ROOFING UNDERLAYMENT BEST PRACTICE
Still More Roof Flashing Fantasies: the drip edge goes on whenever I'm in the mood, or never.
No. Install the drip edge flashing along the lower edge and along gable ends as a first step in roofing or re-roofing.
See DRIP EDGE FLASHING for ROOFS for details.
...
Reader Comments, Questions & Answers About The Article Above
Below you will find questions and answers previously posted on this page at its page bottom reader comment box.
Reader Q&A - also see RECOMMENDED ARTICLES & FAQs
Question: are you supposed to caulk the flashing/shingle edge where the wall/flashing and shingles meet?
(Sept 12, 2014) Lynn said:
On a house that has a sunroom roof that is lower than the other roof, are you supposed to caulk the flashing/shingle edge where the wall/flashing and shingles meet?
Reply:
I've seen some roofers apply sealant to shingles there but it's not a durable, lasting nor leakproof measure. Proper flashing and counter flashing are key.
Question: why do we need flashing on buildings?
(July 21, 2015) Anonymous said:
what is the main reason for flashing in building
Reply:
Great question, Anon.
Flashing is used at the intersection of building components such as where a chimney protrudes through a roof, where roof planes meet in a valley, or around plumbing vents protruding through a roof, or at the intersection of a wall and a lower roof surface. In those locations the flashing prevents water from leaking through the roof at the point where something is protruding through the roof.
In concept, flashing must intercept water and direct it back out onto the roof surface where it can drain away.
you'll see some photos and sketches that make the function and placement of flashing more clear.
There you'll see (at the bottom of the article) this sketch that illustrates the placement of metal flashing at the bottom of a wall at the intersection of that wall with a lower roof:
inspectapedia.com/roof/Roof_Wall_Flashings.jpg (sketch). - look at the gray line - the Metal Flashing - in that sketch.
Also see this Chimney flashing sketch inspectapedia.com/roof/0068s.jpg that is discussed
at FLASHING, CHIMNEY MISTAKES & LEAKS
You'll see that where the roof slopes towards the sides of a chimney, if we didn't do *something* water would just pour into the roof and into the building below at that location.
Let me know if my blathering on about flashing left you more confused than ever, or if you have further questions. I want to make this explanation clear to anyone who asks.
...
Continue reading at FLASHING, ASPHALT SHINGLE VALLEYS or select a topic from the closely-related articles below, or see the complete ARTICLE INDEX.
Or see these
Recommended Articles
- BRICK WALL LEAK REPAIRS
- CHIMNEY FLASHING MISTAKES & LEAKS
- CLAY TILE ROOF FLASHING
- CLAY TILE ROOF FLASHING LEAKS
- DECK FLASHING at BUILDING
- DIVERTER KICK-OUT FLASHING
- DRIP EDGE FLASHING for ROOFS
- DORMER SIDE / ROOF FLASHING
- FLASHING on BUILDINGS - home
- FLASHING MEMBRANES PEEL & STICK
- METAL ROOF FLASHING
- PLUMBING VENT FLASHING INSTALLATION
- RAIN SPLASH-UP SIDING DAMAGE - splashback or splash-up water damage to exterior walls
- ROOFING FELT UNDERLAYMENT REQUIREMENTS
- ROOF FLASHING DEFECTS LIST
- ROOF SEALANTS & MASTICS
- ROOF VALLEY FLASHING
- ROOF-WALL FLASHING SNAFU
- ROOF WALL FLASHING DETAILS - also at chimneys
- TERMITE SHIELDS vs TERMITICIDE
- WALL FLASHING at FOUNDATION or SLAB
- WALL FLASHING DETAILS
- WALL to FOUNDATION or SLAB FLASHING
- WINDOW FLASHING & SEALING Guide
Suggested citation for this web page
FLASHING on BUILDINGS at InspectApedia.com - online encyclopedia of building & environmental inspection, testing, diagnosis, repair, & problem prevention advice.
Or see this
INDEX to RELATED ARTICLES: ARTICLE INDEX to BUILDING FLASHING
Or use the SEARCH BOX found below to Ask a Question or Search InspectApedia
Ask a Question or Search InspectApedia
Try the search box just below, or if you prefer, post a question or comment in the Comments box below and we will respond promptly.
Search the InspectApedia website
Note: appearance of your Comment below may be delayed: if your comment contains an image, photograph, web link, or text that looks to the software as if it might be a web link, your posting will appear after it has been approved by a moderator. Apologies for the delay.
Only one image can be added per comment but you can post as many comments, and therefore images, as you like.
You will not receive a notification when a response to your question has been posted.
Please bookmark this page to make it easy for you to check back for our response.
IF above you see "Comment Form is loading comments..." then COMMENT BOX - countable.ca / bawkbox.com IS NOT WORKING.
In any case you are welcome to send an email directly to us at InspectApedia.com at editor@inspectApedia.com
We'll reply to you directly. Please help us help you by noting, in your email, the URL of the InspectApedia page where you wanted to comment.
Citations & References
In addition to any citations in the article above, a full list is available on request.
- Steve Bliss's Building Advisor at buildingadvisor.com helps homeowners & contractors plan & complete successful building & remodeling projects: buying land, site work, building design, cost estimating, materials & components, & project management through complete construction. Email: info@buildingadvisor.com
Steven Bliss served as editorial director and co-publisher of The Journal of Light Construction for 16 years and previously as building technology editor for Progressive Builder and Solar Age magazines. He worked in the building trades as a carpenter and design/build contractor for more than ten years and holds a masters degree from the Harvard Graduate School of Education. Excerpts from his recent book, Best Practices Guide to Residential Construction, Wiley (November 18, 2005) ISBN-10: 0471648361, ISBN-13: 978-0471648369, appear throughout this website, with permission and courtesy of Wiley & Sons. Best Practices Guide is available from the publisher, J. Wiley & Sons, and also at Amazon.com - In addition to citations & references found in this article, see the research citations given at the end of the related articles found at our suggested
CONTINUE READING or RECOMMENDED ARTICLES.
- Carson, Dunlop & Associates Ltd., 120 Carlton Street Suite 407, Toronto ON M5A 4K2. Tel: (416) 964-9415 1-800-268-7070 Email: info@carsondunlop.com. Alan Carson is a past president of ASHI, the American Society of Home Inspectors.
Thanks to Alan Carson and Bob Dunlop, for permission for InspectAPedia to use text excerpts from The HOME REFERENCE BOOK - the Encyclopedia of Homes and to use illustrations from The ILLUSTRATED HOME .
Carson Dunlop Associates provides extensive home inspection education and report writing material. In gratitude we provide links to tsome Carson Dunlop Associates products and services.


