
InspectAPedia® FREE Encyclopedia of Building & Environmental Construction, Diagnosis, Maintenance & Repair |
Question? Just ask us! InspectAPedia
|
 How to Repair Damaged Ceramic Tile
Use color-matched grout to hide cracks & chips or replace entire tiles
- POST a QUESTION or COMMENT about choosing & installing ceramic tile floors in kitchens & bathrooms
Ceramic tile floor or wall chips or cracks can be made much less visible with careful application of color-matched grout as we demonstrate here.
This article series describes how to install ceramic tiles on various floor or wall surfaces.
InspectAPedia tolerates no conflicts of interest. We have no relationship with advertisers, products, or services discussed at this website.
- Daniel Friedman, Publisher/Editor/Author - See WHO ARE WE?
Ceramic Tile Damage Repairs Range from Easy to Horrible
Here we illustrate four levels of damage and steps to repair of cracked or damaged ceramic tiles on floors or walls.
Case 1: Fix a badly chipped or broken ceramic floor tile
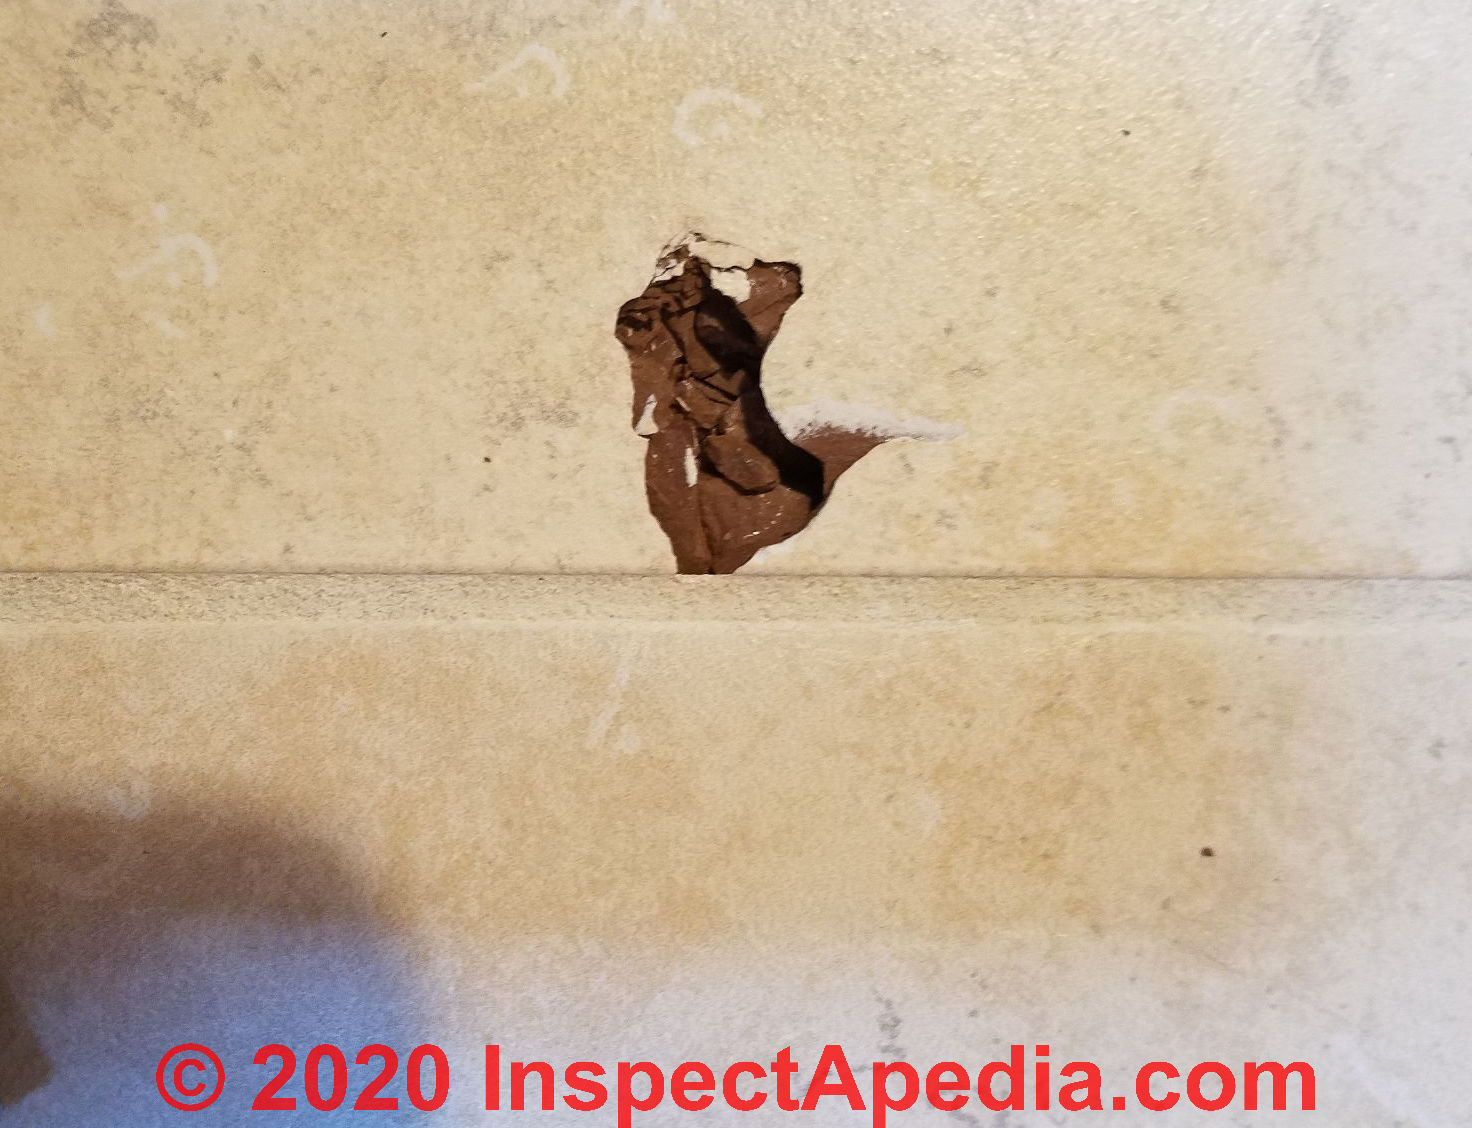
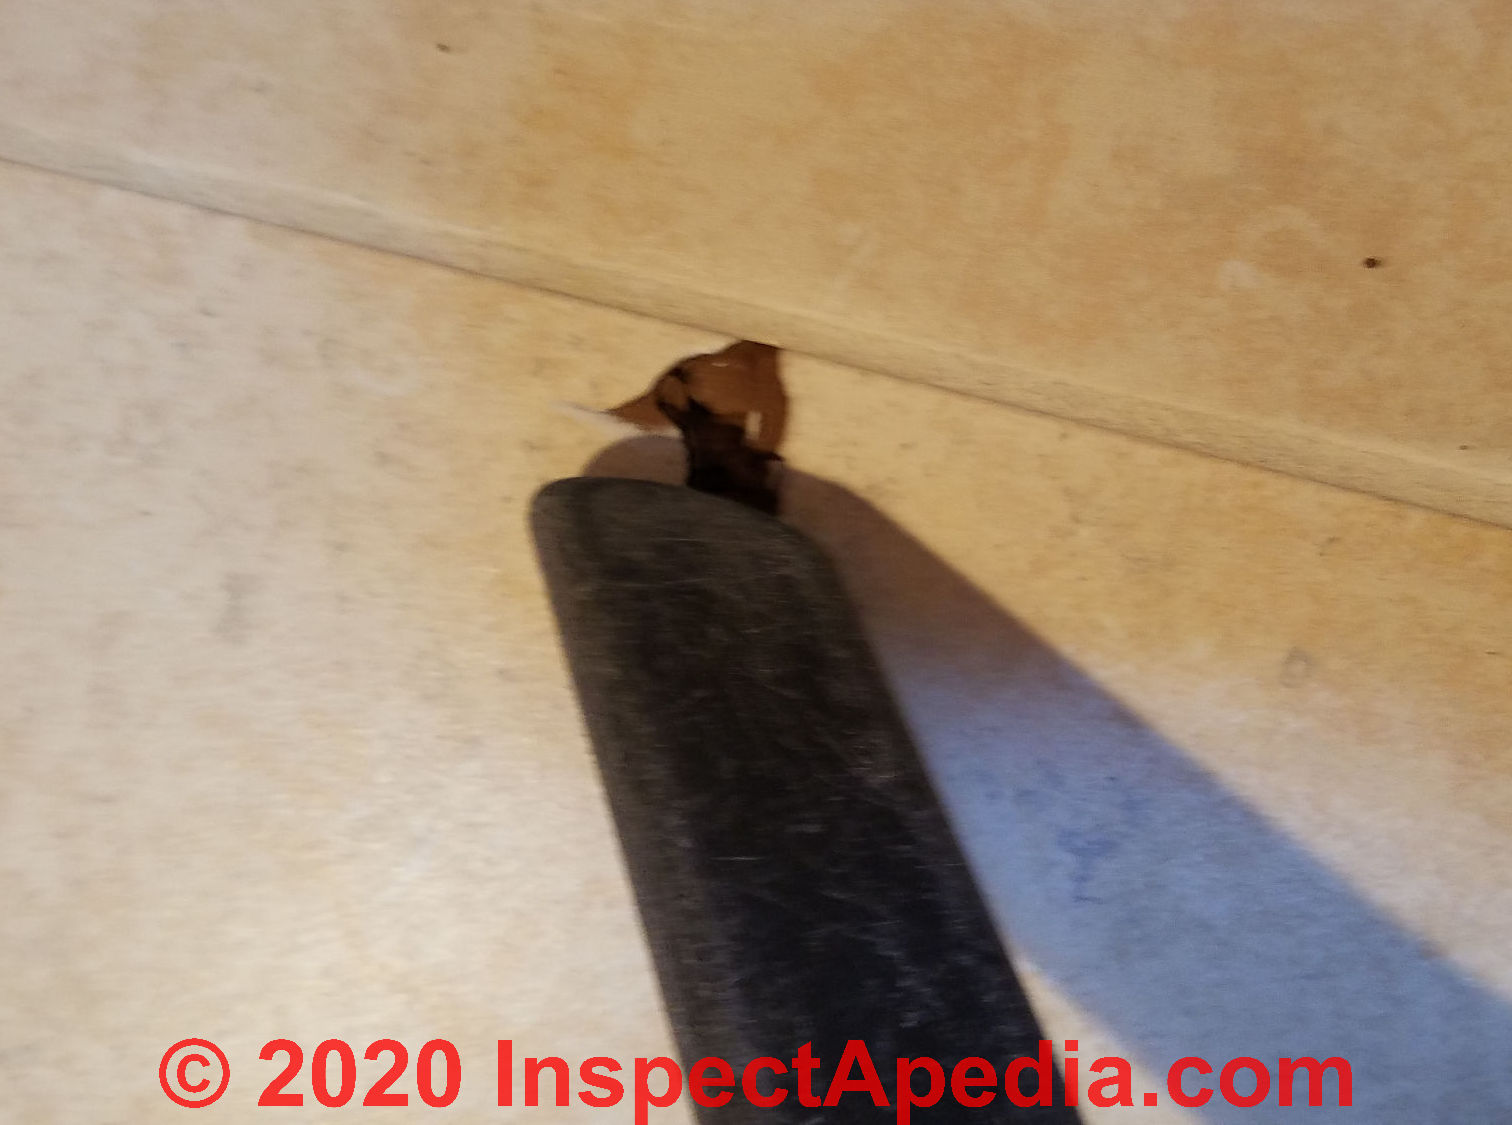
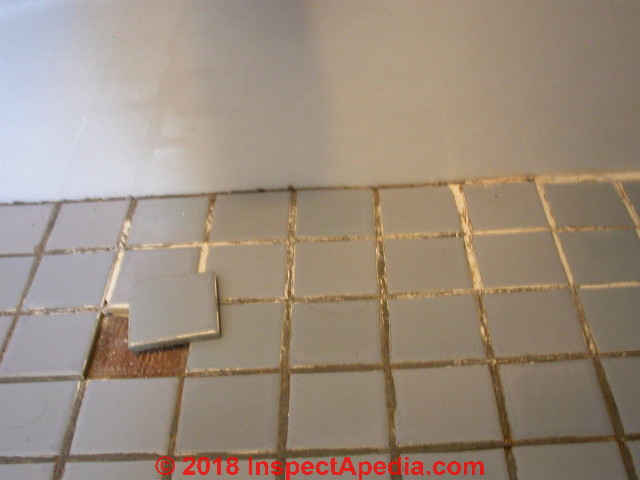
Photo: hole punched into a new ceramic tile floor when the author [DF] dropped his hammer. This damage was easily repaired so as to be barely noticeable.
Just after having installed new floor tiles as part of repair to a badly-damaged ceramic tile floor I climbed my stepladder to put away some tools. And dropped my hammer.
Smack! right into one of the new tiles, punching the hole that we show here. There was that sickening feeling ... perhaps you know it.
[Click to enlarge any image]
Where do we come up with these "how to" articles? Consider what my captain wrote in my Army performance appraisal back in the 1960s:
This young man never makes the same mistake twice ... however it appears that he intends to make them all once.
OK so here is how we repaired this punched out ceramic tile, step by step - leaving the tile in place and filling the damaged hole.
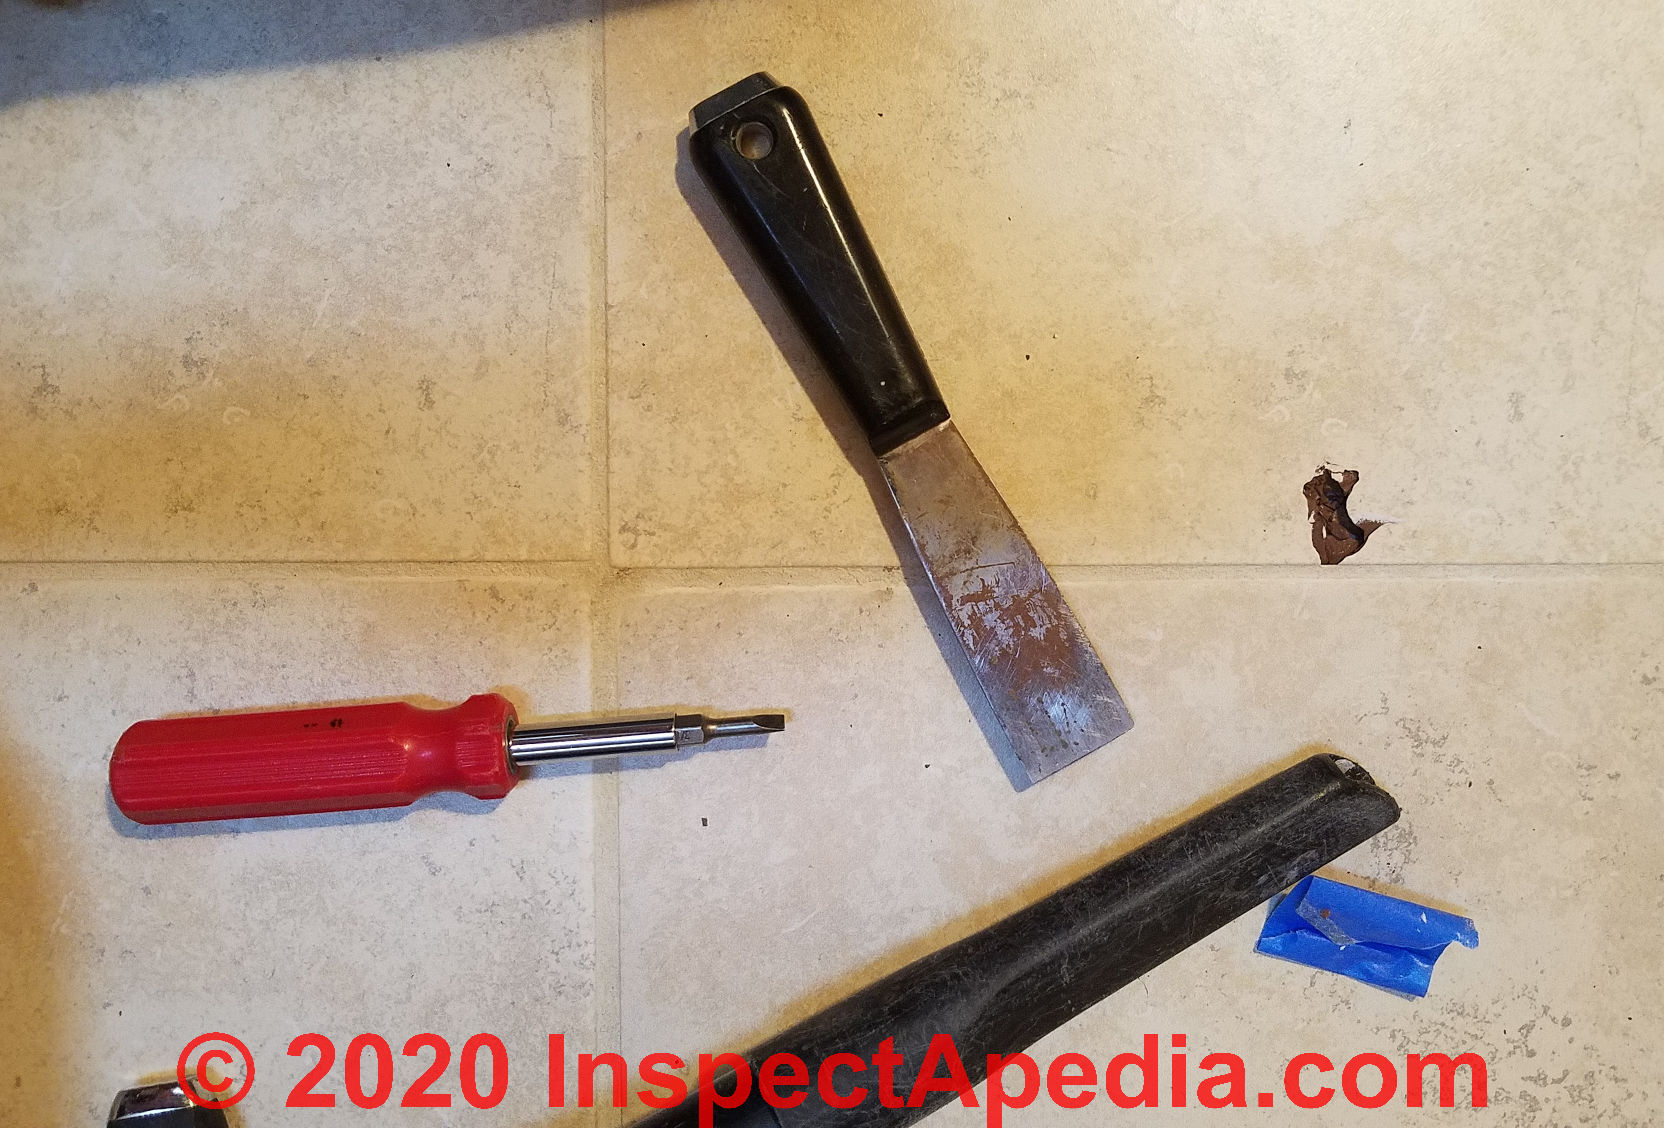
First: What will you need for this repair.
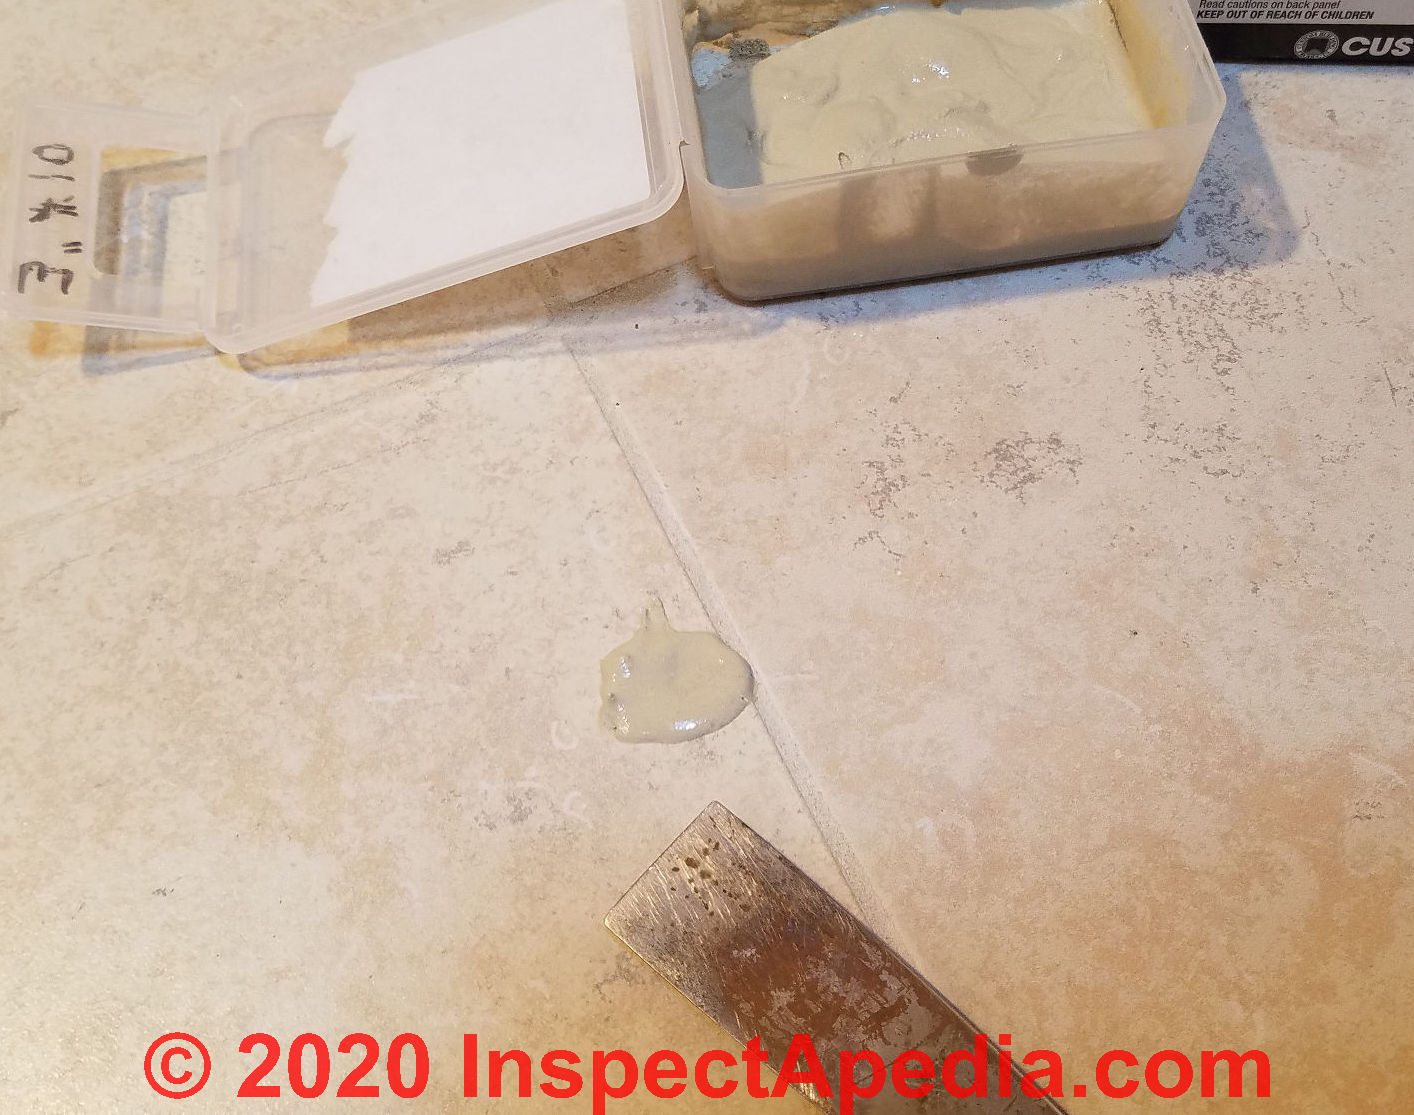
Our photo shows the tools and supplies to fix a hole in a ceramic tile:
It's simple: a small-bladed screwdriver or similar probing tool, a putty knife, and a vacuum cleaner.
The key ingredient in this repair is shown just below: color-matched grout.
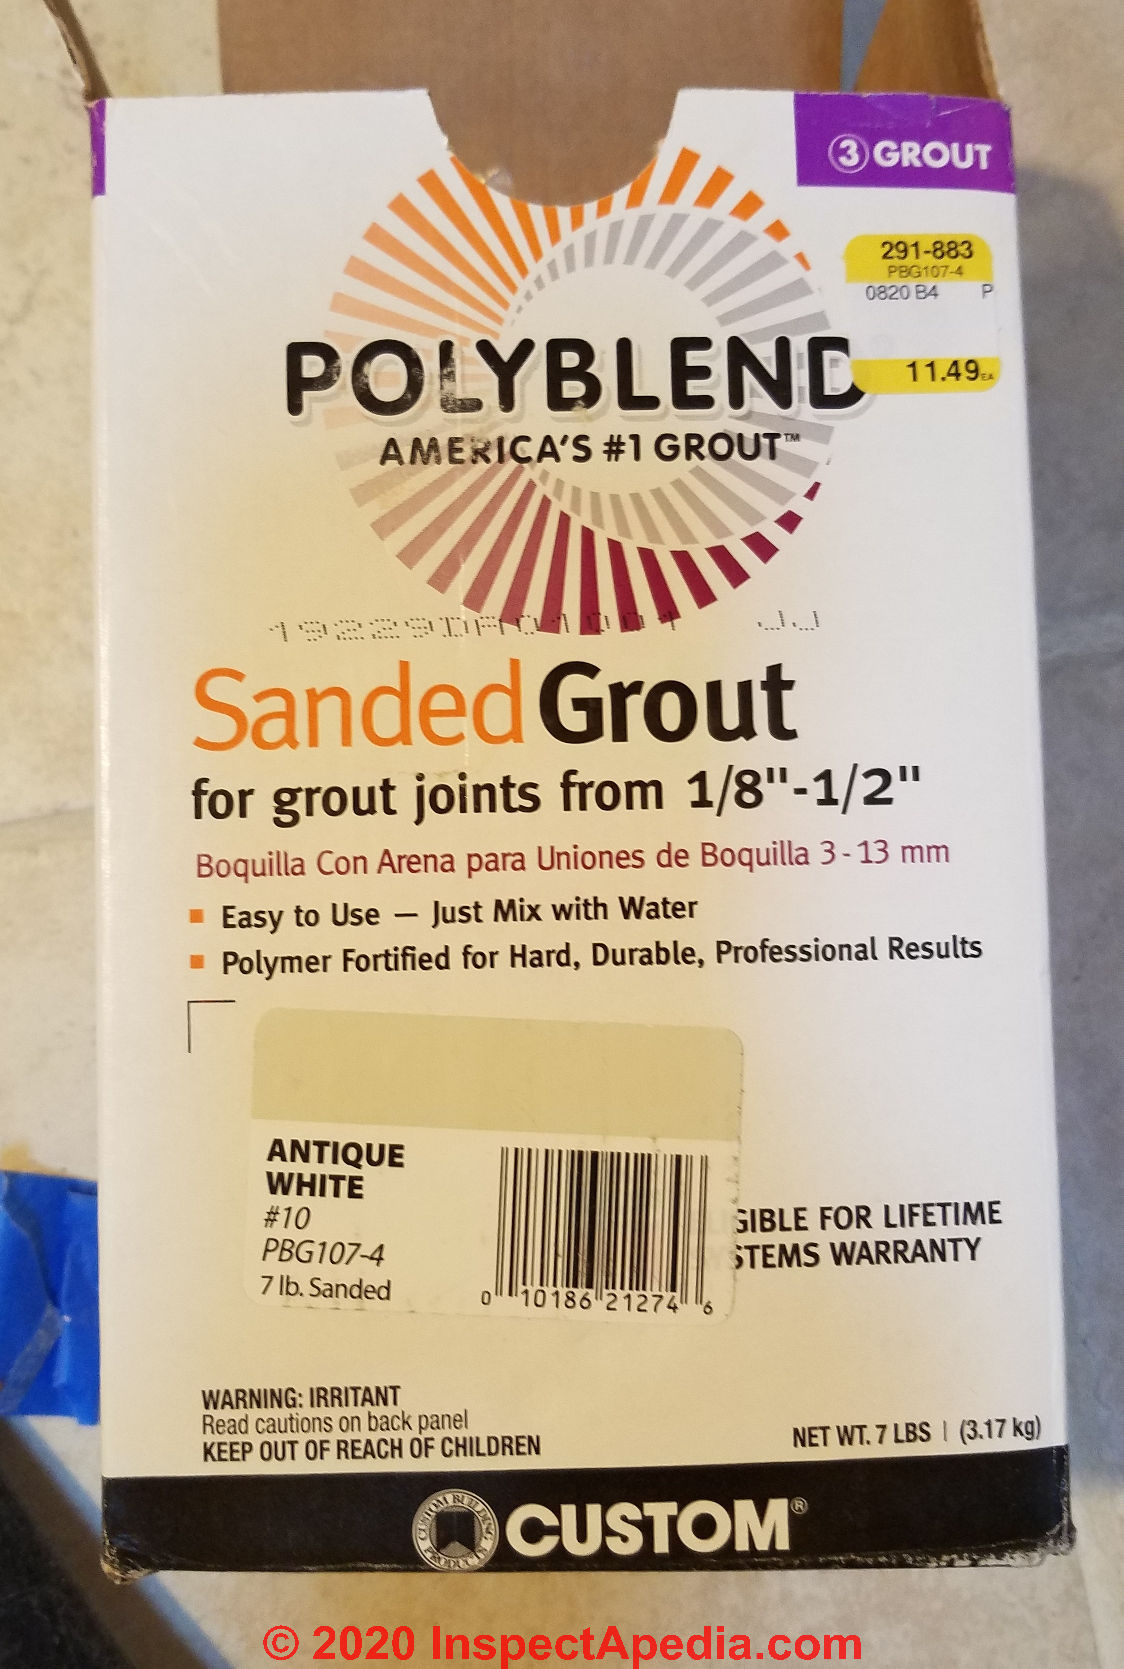
I chose a sanded grout because ... well that's what I could find, but also because these ceramic floor tiles use a matte finish. If the tile to be repaired has a hard shiny surface you'll want a harder, non-sanded, color-matched grout.
The grout color needs to be as close to that of the damaged tile as possible. Luckily for many tiles the color doesn't have to be a perfect match as the tile surface colors have some variation in shading. Keep in mind that this is not a professional-level museum-restoration job, it's a "fill in the hole and hope my partner won't notice" kind of repair.
Polyblend and some other grout products are a bit flexible, which as you'll read later, has special advantages when repairing cracked tiles.
Start by removing loose debris from the area of damaged ceramic tile.
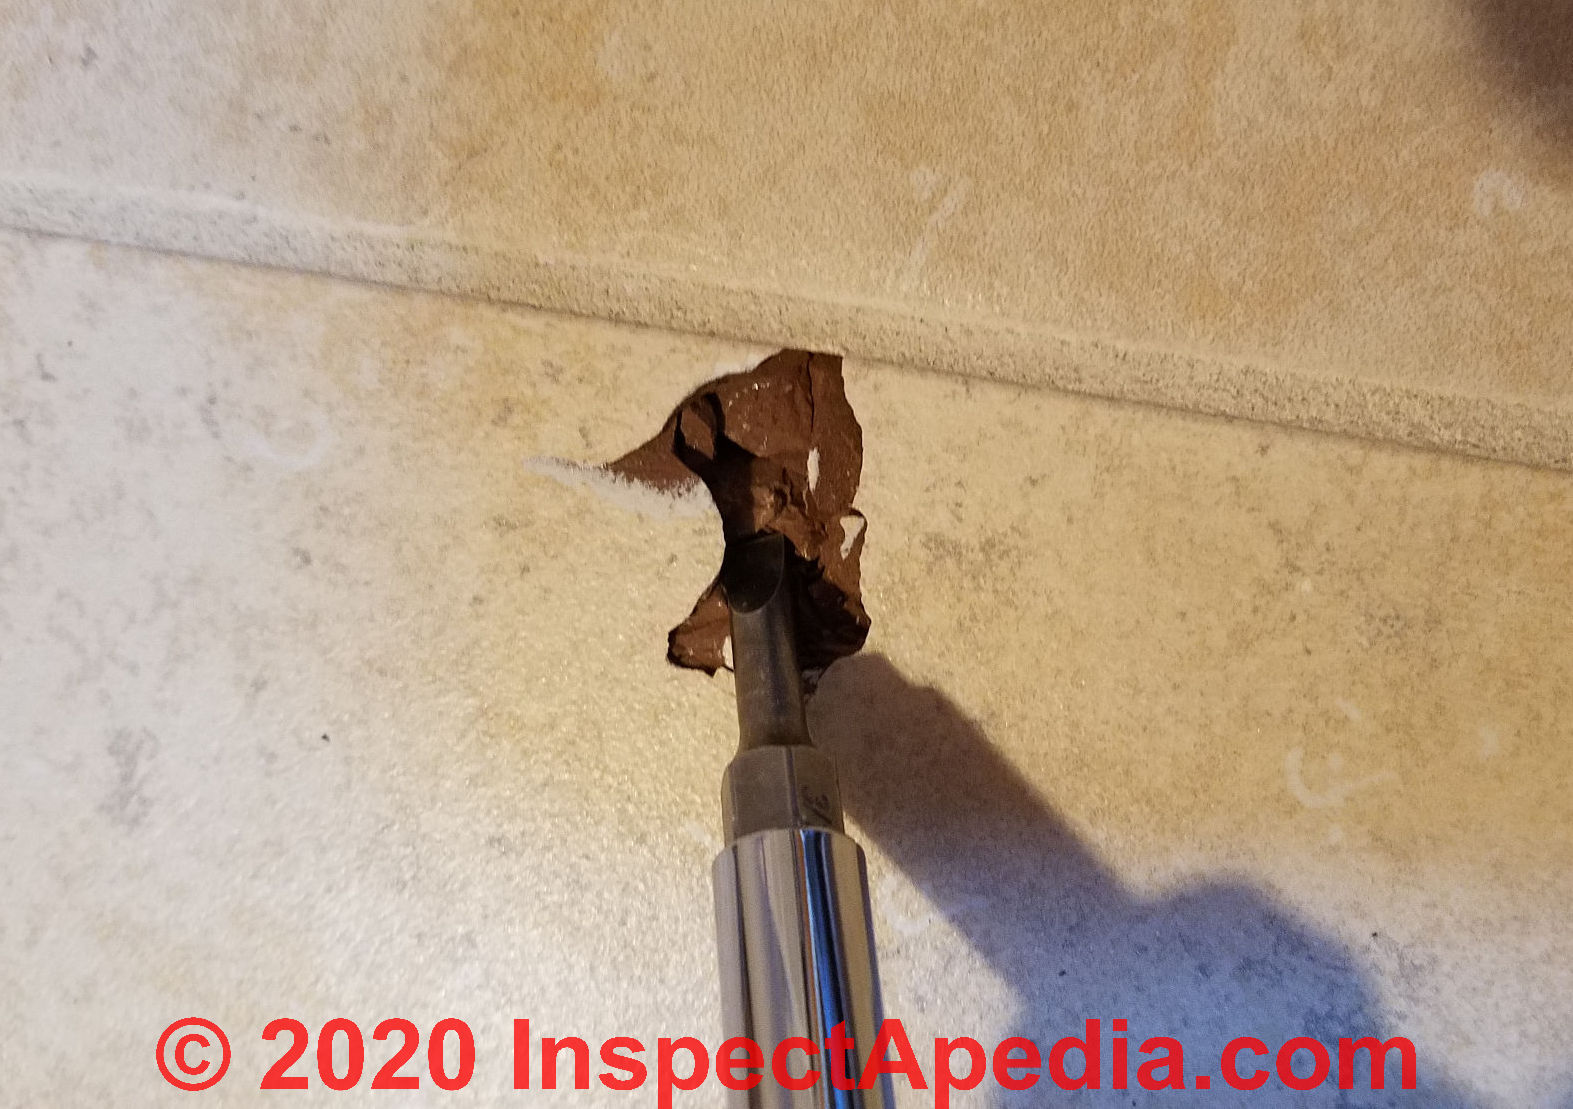
I use a combination of gentle probing and a vacuum cleaner to clean out the damaged area.
Watch out: the actual colored layer forming the top or exposed surface of this floor tile was very thin. Take care not to chip out more of the tile surface and to avoid making the damaged area unnecessarily large.
Watch out: it's also important to remove all of the dust and debris from the repair area before beginning to fill the damaged spot with grout. Otherwise, exposed to normal foot traffic, your repair may fail to adhere to the tile and may pop out.
After vacuuming the damage spot is clean of dust and debris, and also I've left it dry. (Some tile jobs require wetting the tile during installation but IMO this is not necessary for small repair like this one.
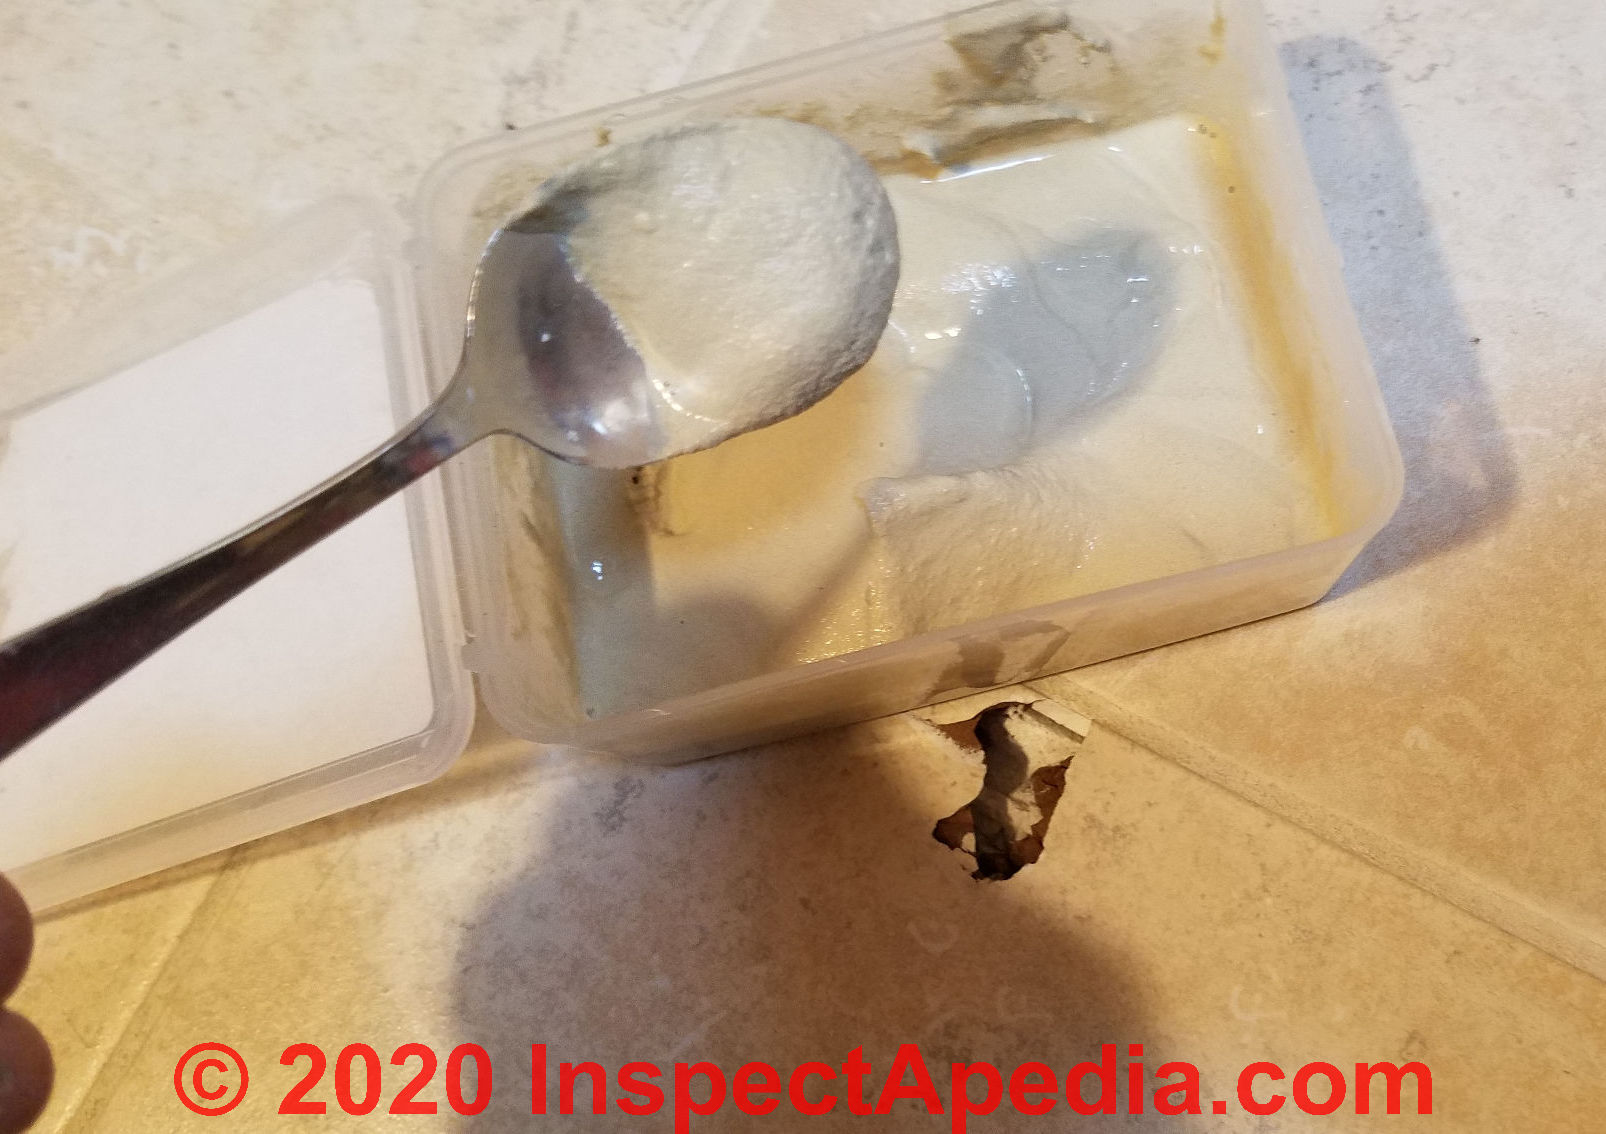
You won't need much grout to fill a small 1-inch hole in a damaged ceramic tile. In fact the grout was the most-expensive purchase of this repair, about $30. U.S. - still enormously less cost and trouble than replacing the whole tile - a step we'll demonstrate later in this article series.
Normally I take care to keep my tile mastic adhesive and my grout pretty dry - avoiding over-watering as too much water weakens the the mix. But in this case I made the grout about as soft as whipped cream - as you can see in the photo.
That's because I wanted it to flow thoroughly into the very irregular broken-out hole that my stupid hammer (and I) had punched into the floor tile.
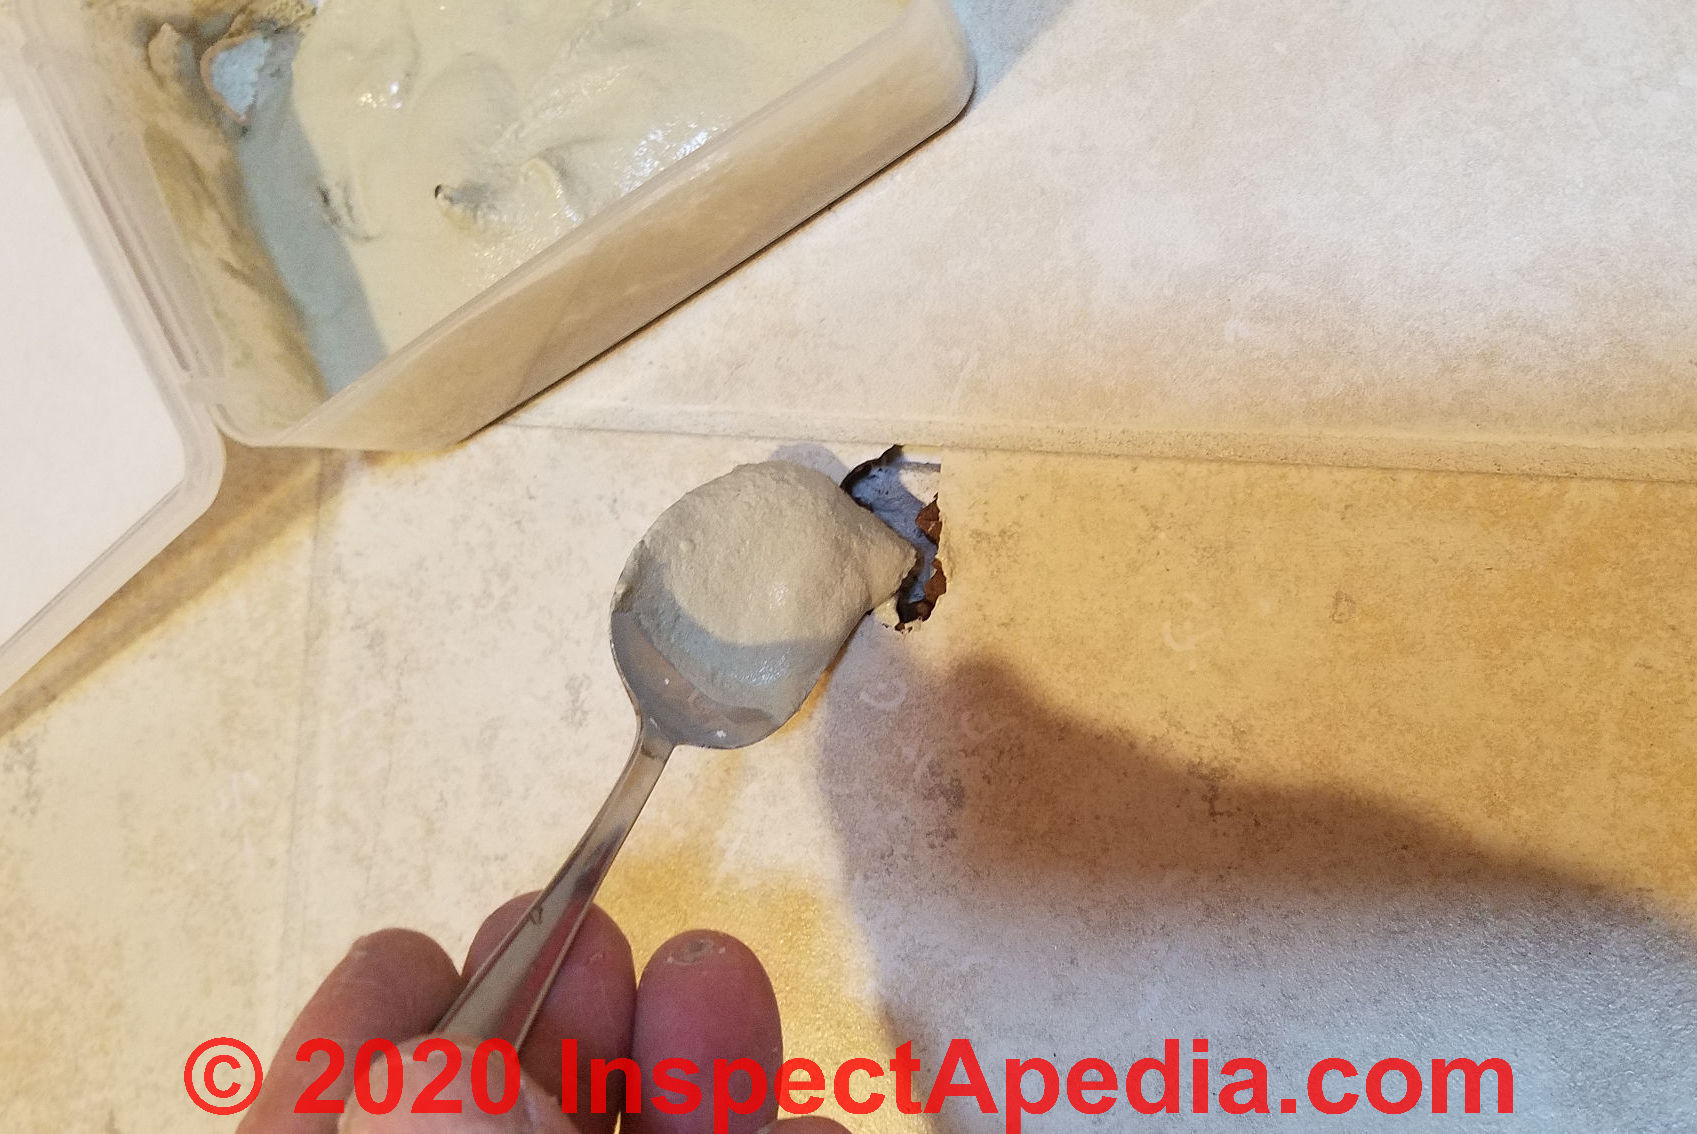
Above: I'm spoon-feeding my soft grout into the cleaned-out area of damage in the ceramic tile floor.
I used the tip of the spoon handle to very gently work the grout into the damage area.
Watch out: if you don't fill the damaged tile area completely there is some risk that your repair may break or crack when it's exposed to foot traffic later.
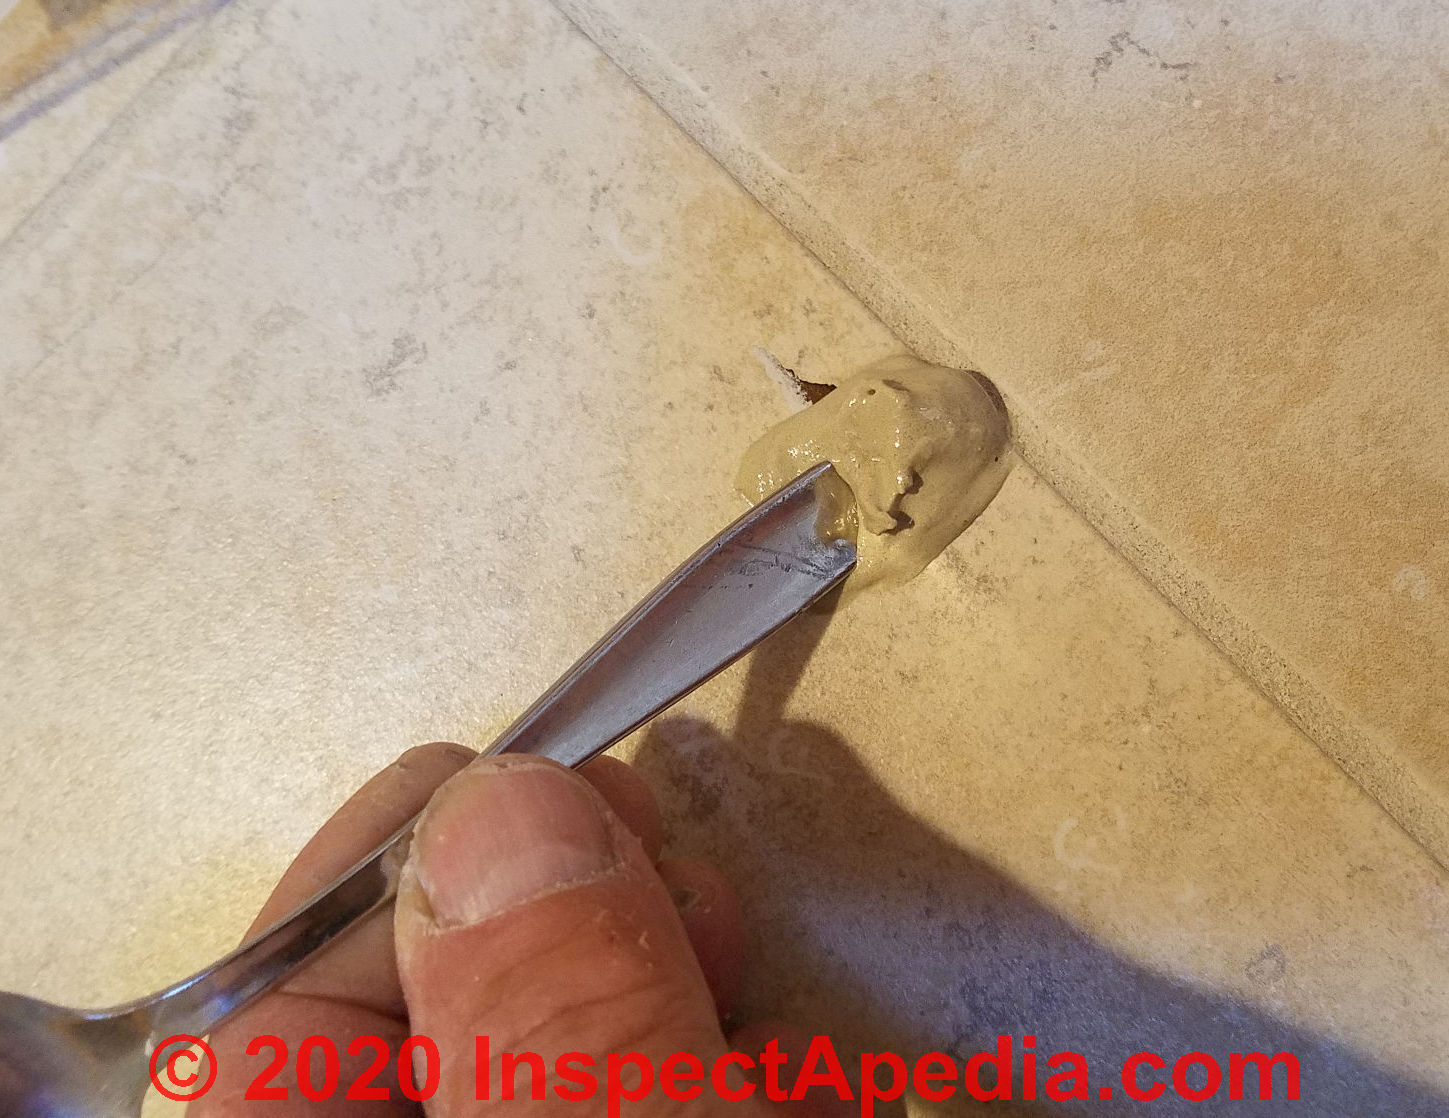
Above: I've used a simple flexible 1-inch putty knife to remove the excess grout from the repair. I leave a little excess grout about 1/8" above the finished floor surface - and will remove the excess after the grout has set.
Below: as the grout is nearly set I use my putty knife to bring the top of the repaired area to just slightly above the finished floor surface.
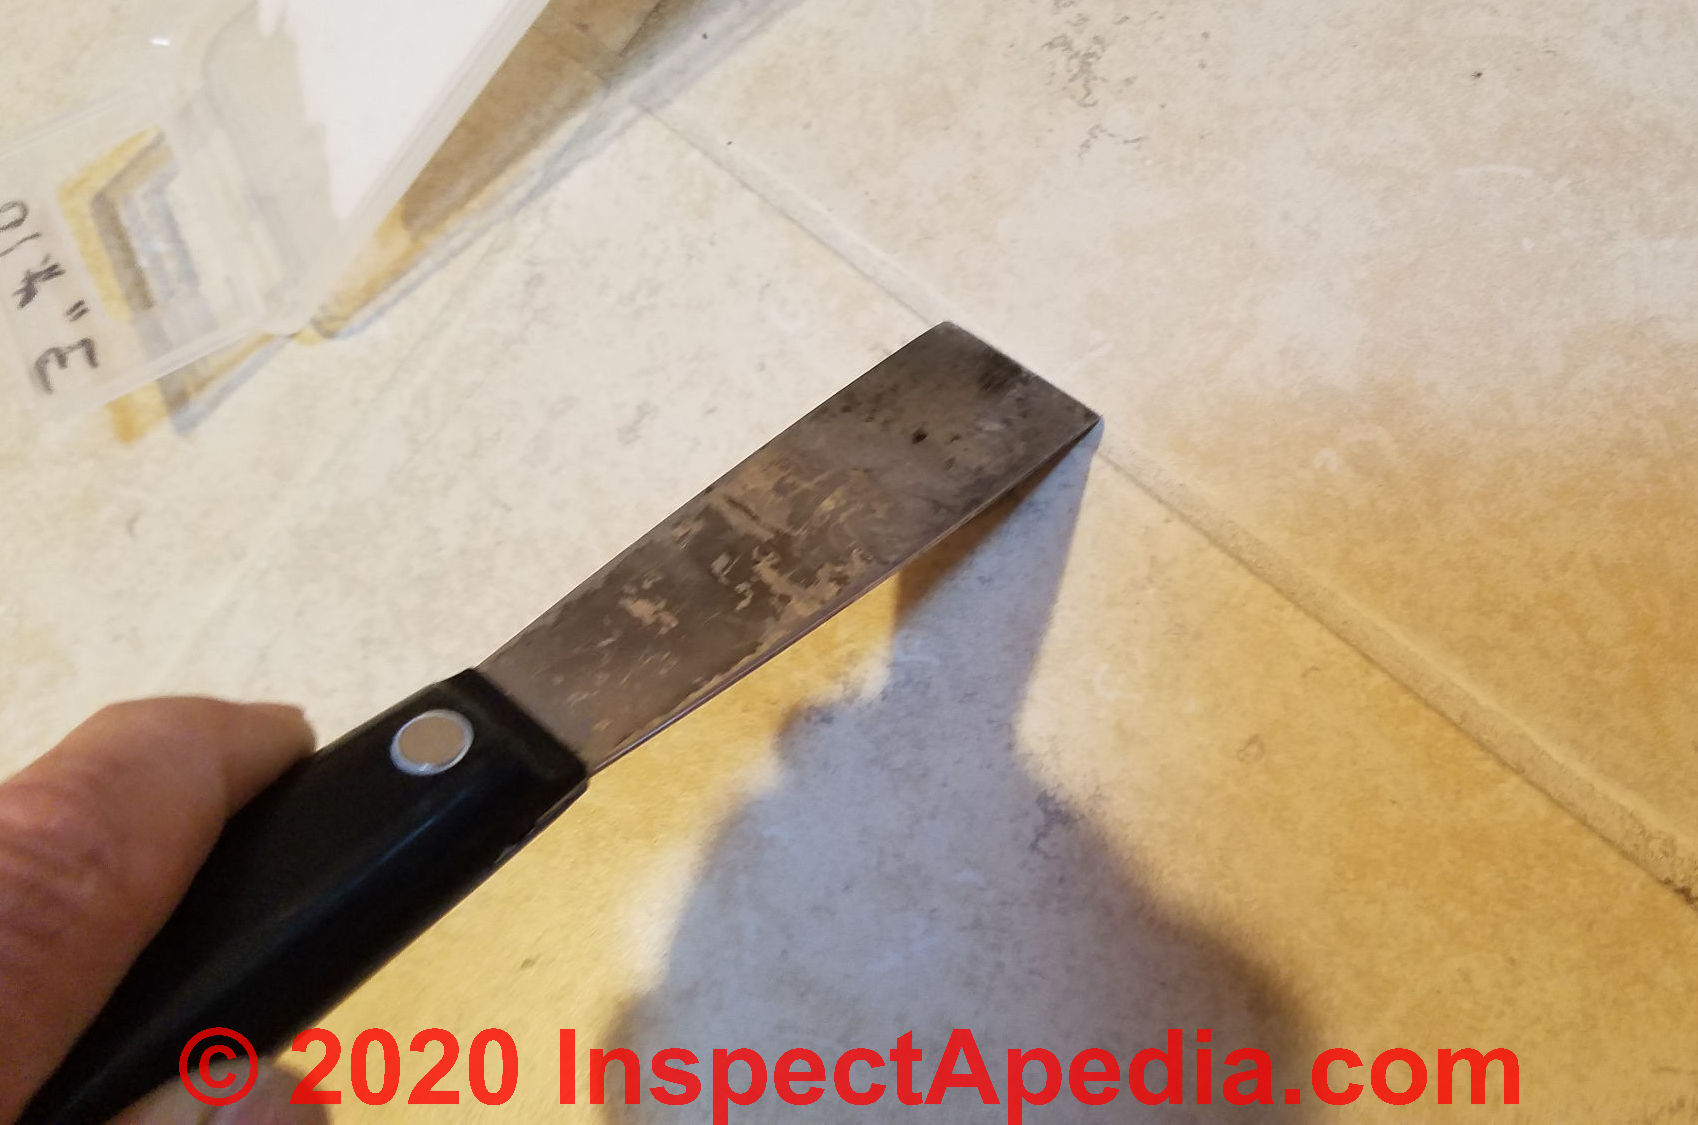
Watch out: less effort is better here. Don't over-gouge during this step or you'll remove too much grout and have to do the repair over.
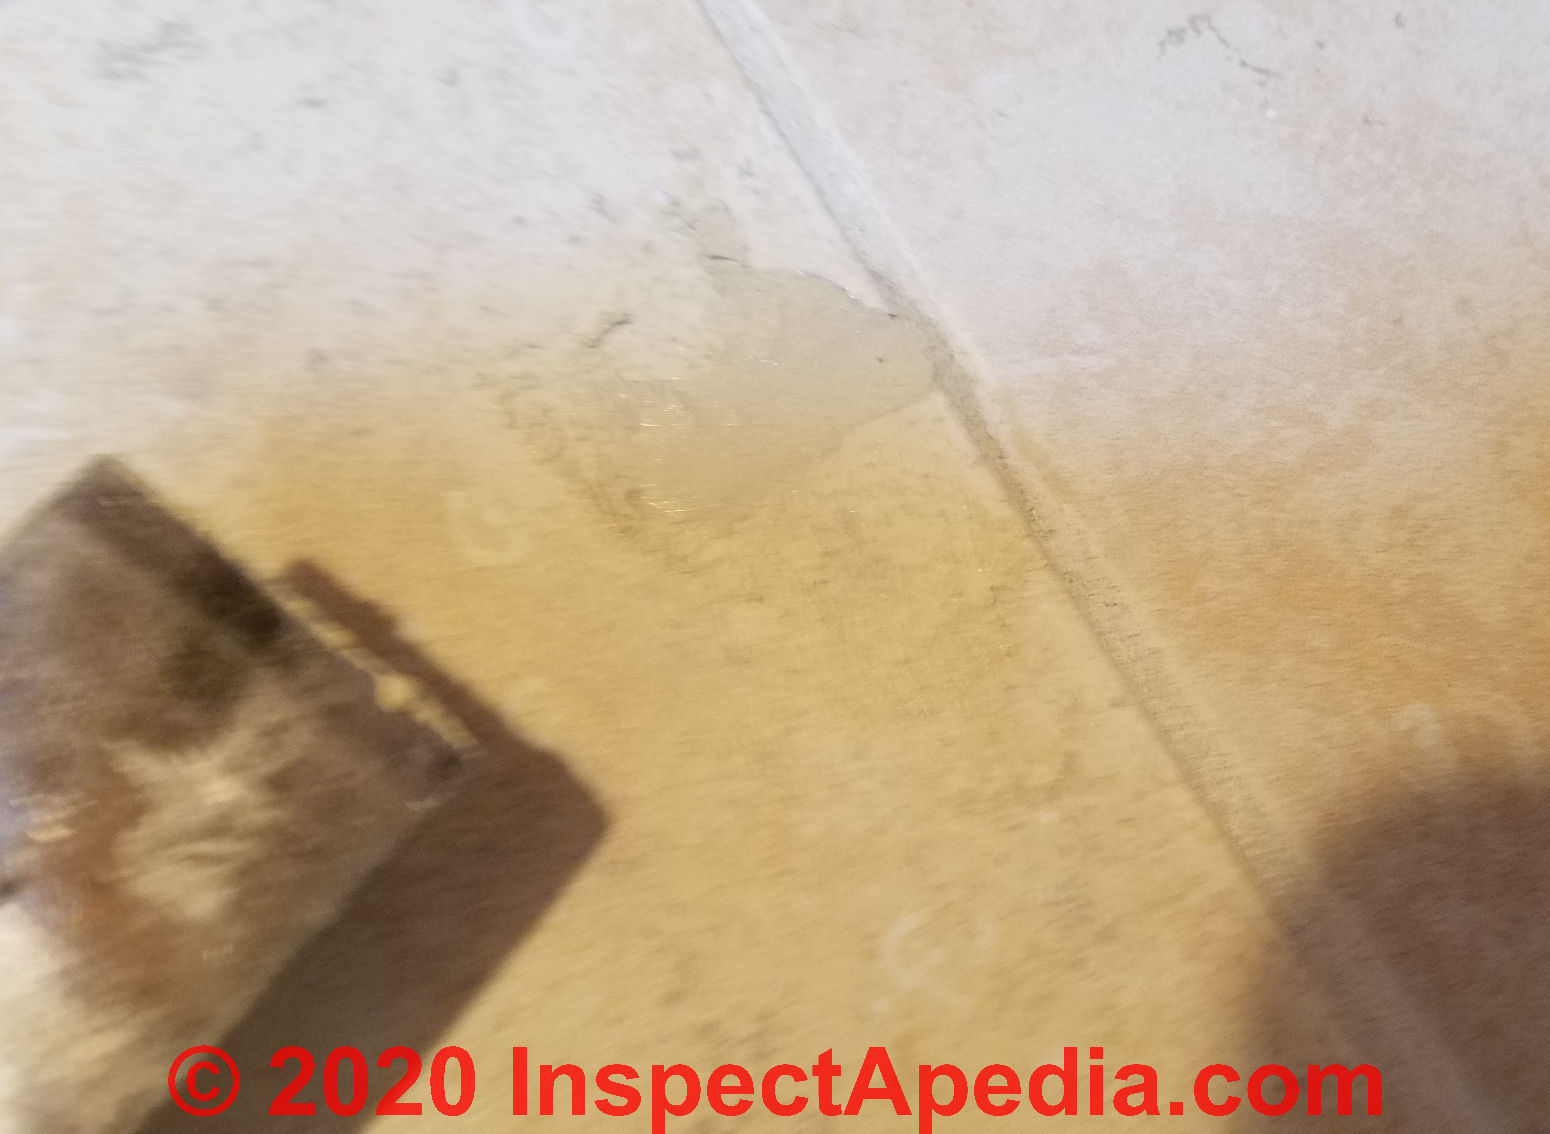
Below you can see how I've left this repair, now ready to let it dry and harden completely.
And below, noting that from just a few feet away the tile repair area is already difficult to see, I've marked it off to protect it from foot traffic while we wait 24 hours for the grout-repair to cure completely.
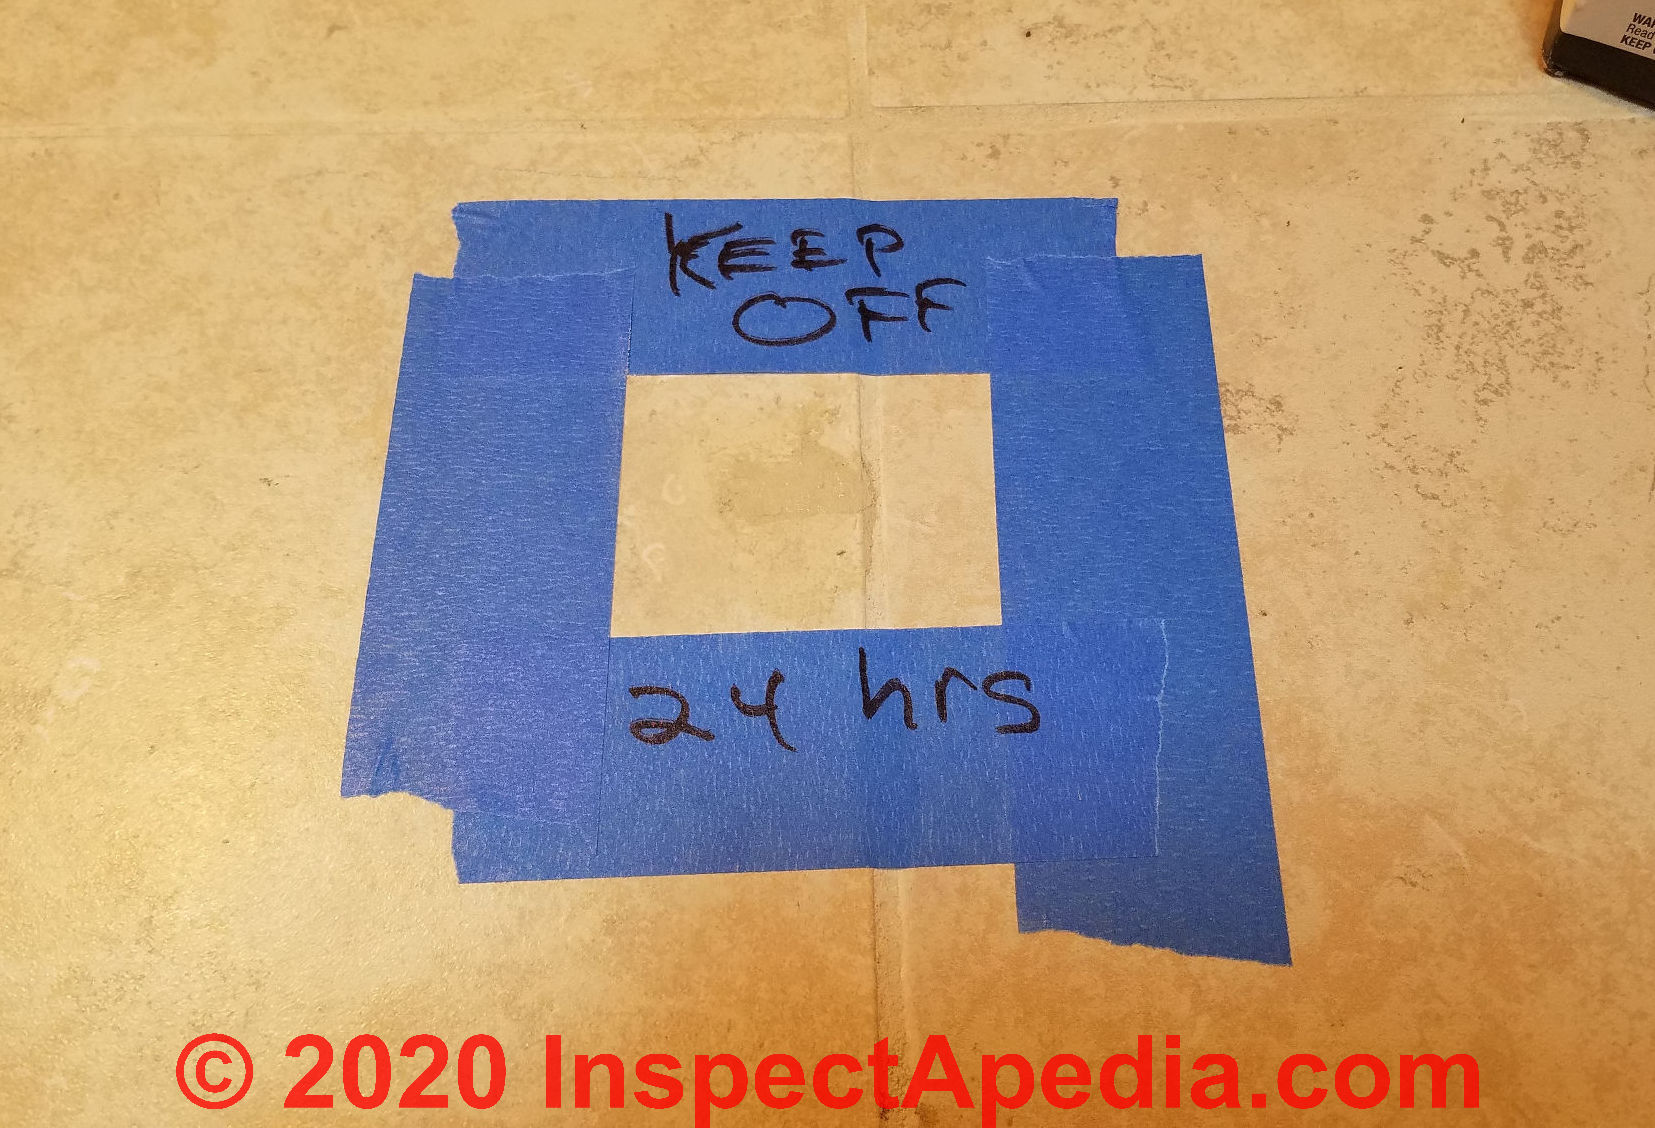
Sure, you could put a box over the work area, too, provided nobody's going to accidentally kick or move the box such that its edge is dragged through the grouted tile.
When the grout was fully hardened we wiped the area with a low-lint cloth, cleaning any excess grout that extended past the actual repair area on the tile surface.
Watch out: during any final polishing of your repaired, grouted ceramic tile, don't over-wipe too close to the repair. These particular tiles sport such a thin finish-skin layer that you don't want to remove enough grout that the colored edges of the tile substrate show thorough the repair.
In fact it'd be smart to leave a millimeter of grout above and a few mm out past the edges of the repair to provider a wear surface.
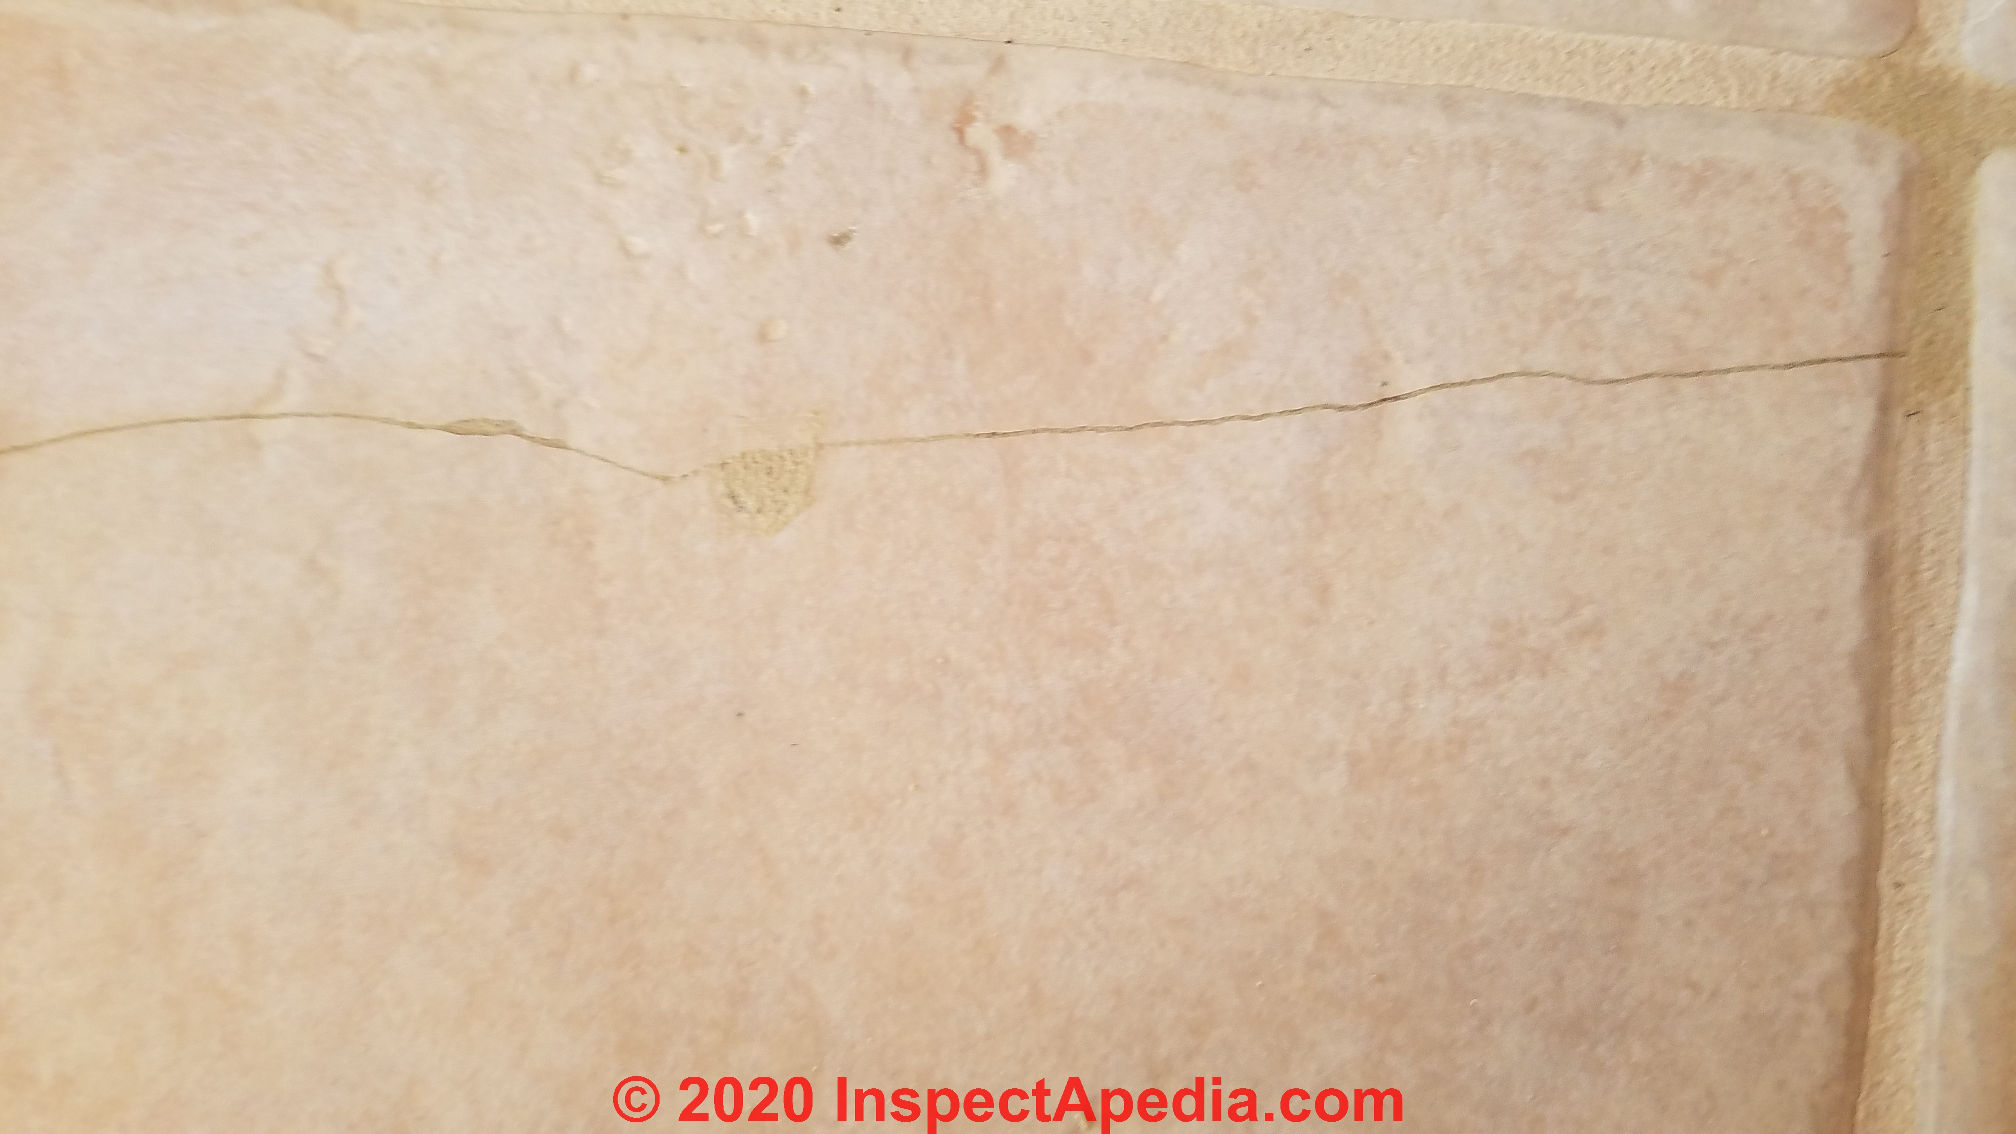
Tile Repair No. 2: Fix Ceramic Floor Tiles Cracks
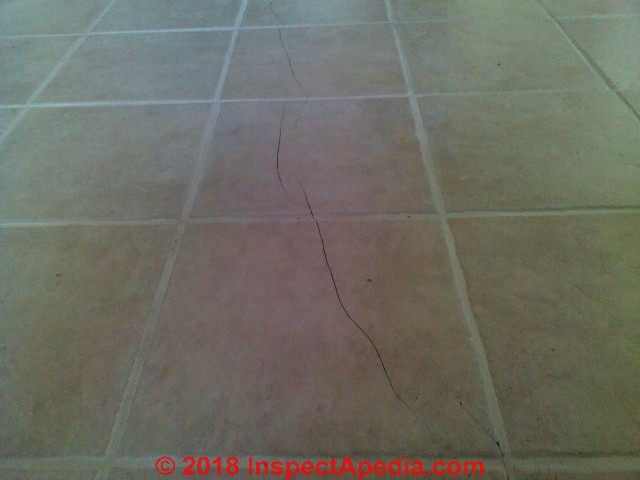
The ceramic floor tile cracks above track a crack in the Northern Minnesota monolithic slab on which the tiles were installed.
The slab was constructed without control joints and the ceramic tile floor was also installed without control joints. Exposed to wide temperature extremes in a small, often un-heated cabin, we were not surprised when these cracks appeared.
This floor was installed by a skilled carpenter whose carpentry and framing are superior, but whose work as a tiler and as a radiant heat slab installer were a failure.
These cracks actually open a bit in very cold weather and close a bit during the warmer months of May through August at this Minnesota building.
Why did these ceramic tile cracks appear in the first place?
- Primarily, the concrete slab was poured without a single control joint.
- In addition there were no control joints (using flexible sealant that matched the grout) anywhere in the floor system of the building.
- And probably in addition, the insulation below the slab was incomplete and un-even.
There were other disappointments in the slab below this floor - you can see some photos of the construction of this concrete slab
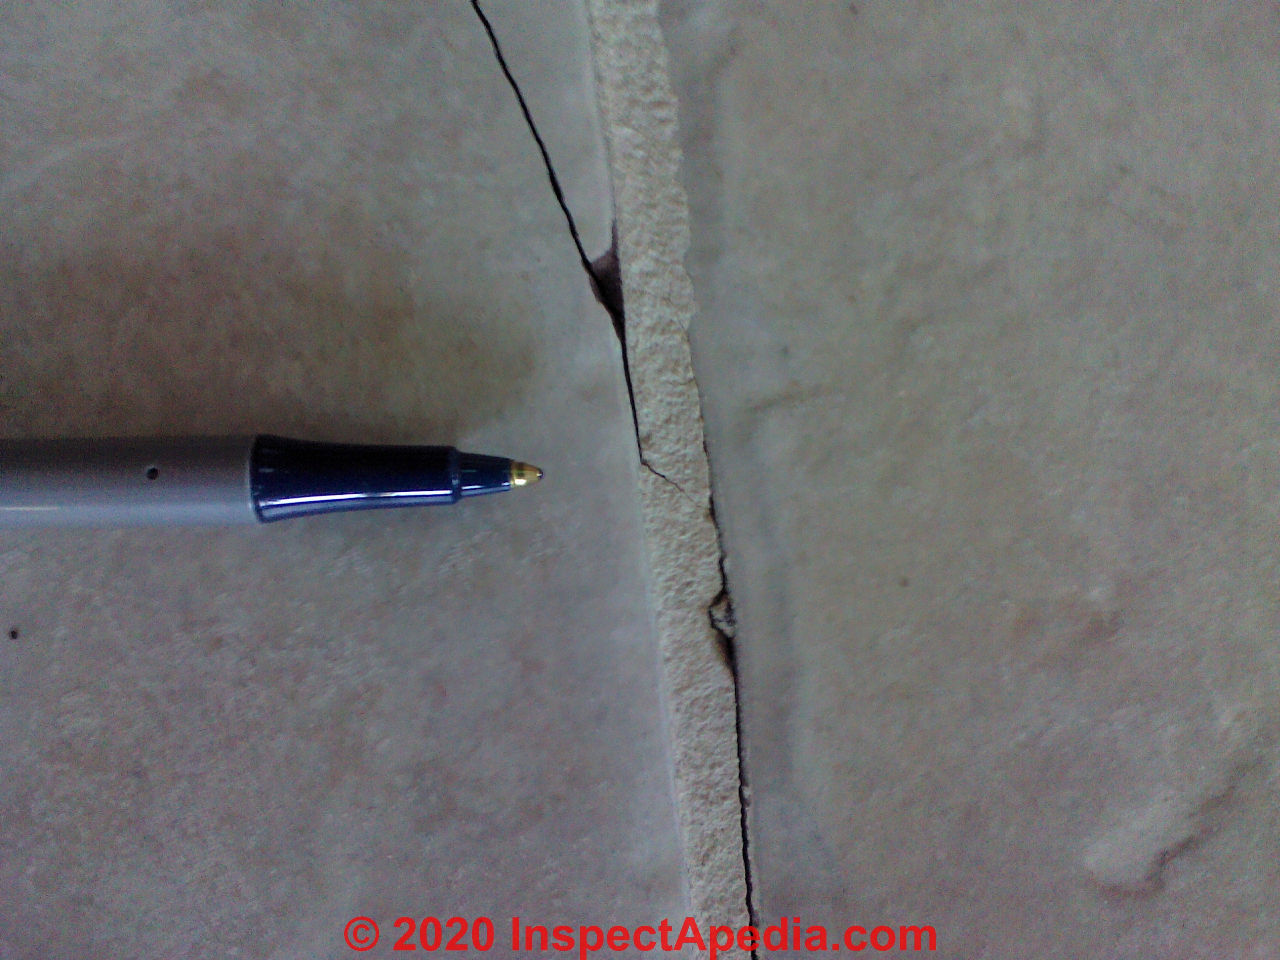
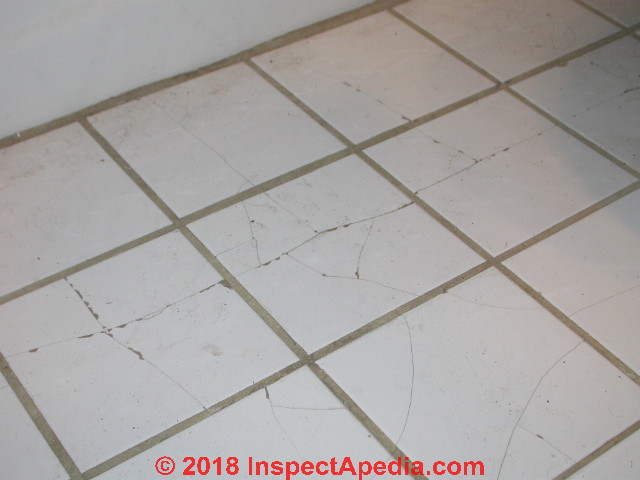
Below we show a closeup of the ceramic tile cracks to be given a cosmetic repair. The crack in this floor meanders along in grout joints but unfortunately also wanders through the tiles themselves.
Below I've mixed my color-matched grout and have vaccumed any dust out of the cracks in the tile floor repair area.
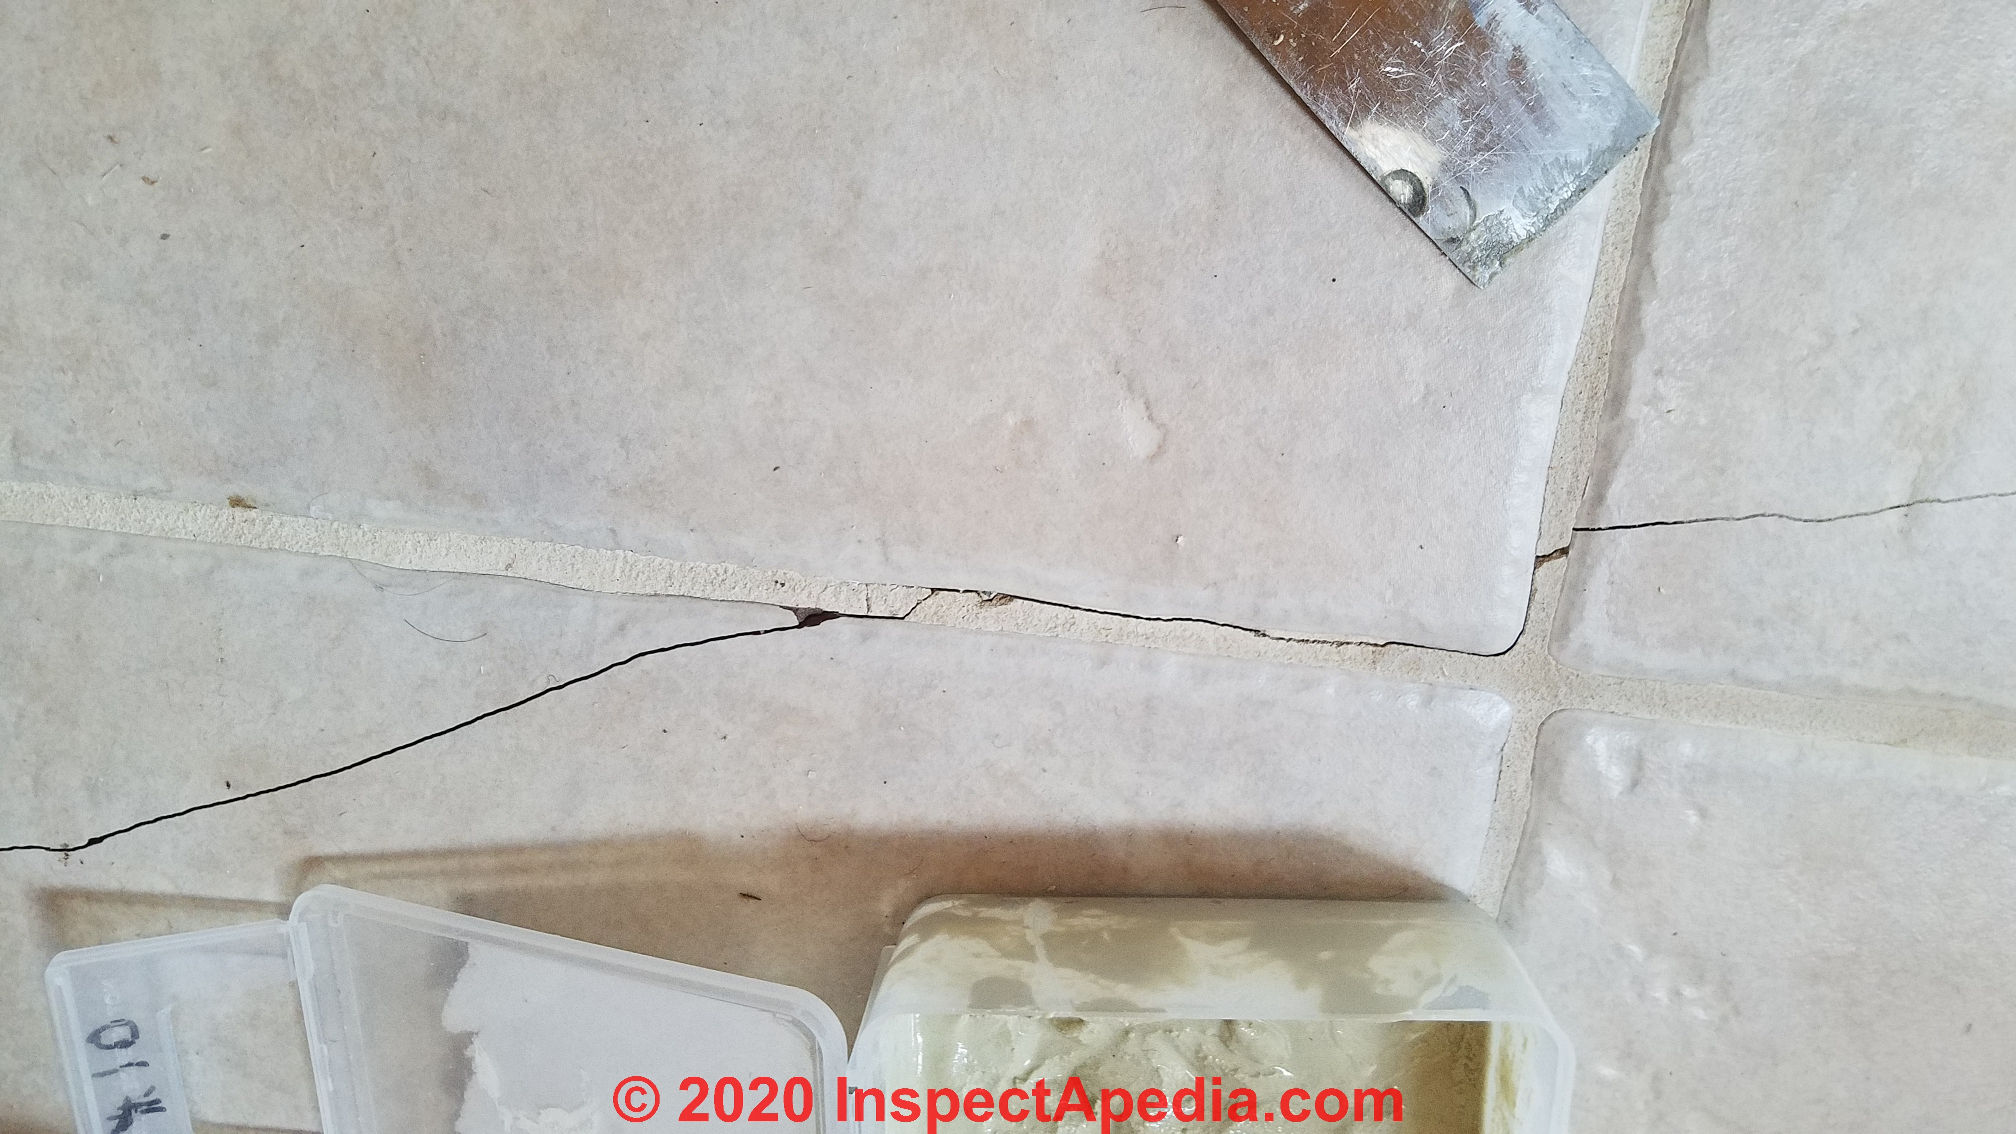
Below: it takes a bit more work to get the grout well down into the crack in a tile floor when the crack is a fine one such as this. Using non-sanded grout would have made the job easier.
Work the grout across the line or axis of the crack in the tile to get it well down into the tile. Otherwise your repair won't be durable.
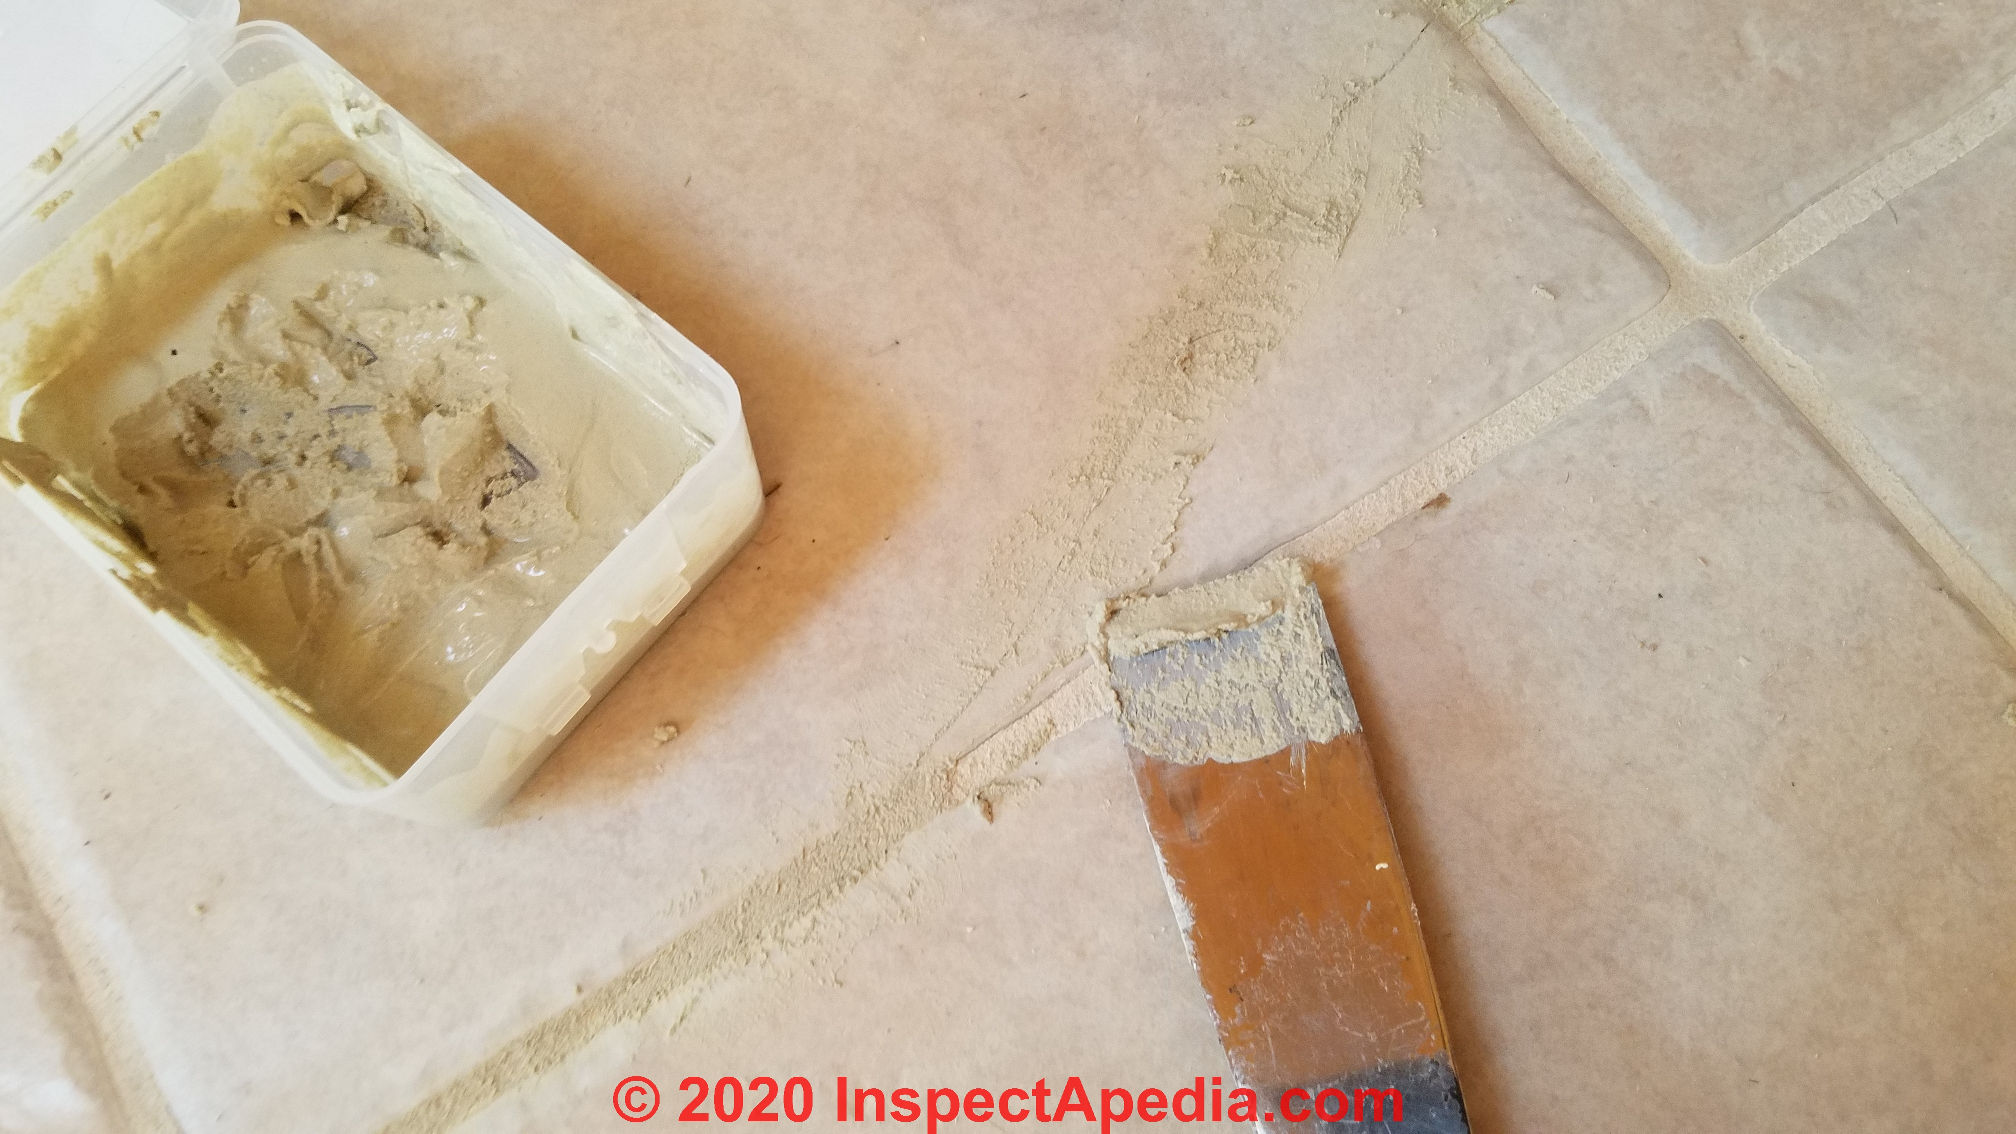
When the grout is fully bedded into the floor cracks, wipe away the excess grout by wiping across the crack and diagonally across the grout joint.

Keep people off of the repaired floor until the grout has fully hardened - about 24 hours.
Above: even while still wet the grout has made a glaring crack across this tile floor almost disappear; "almost".
Case 3: Fix Multiple Broken Floor Tiles: Remove & Replace
At RADIANT HEAT MISTAKES we lament having to abandon a radiant heat floor system that was buried way too deep in the concrete slab - actually as I show here, the radiant tubing was at the very bottom of a slab that ranged from 8" to 18" in thickness.
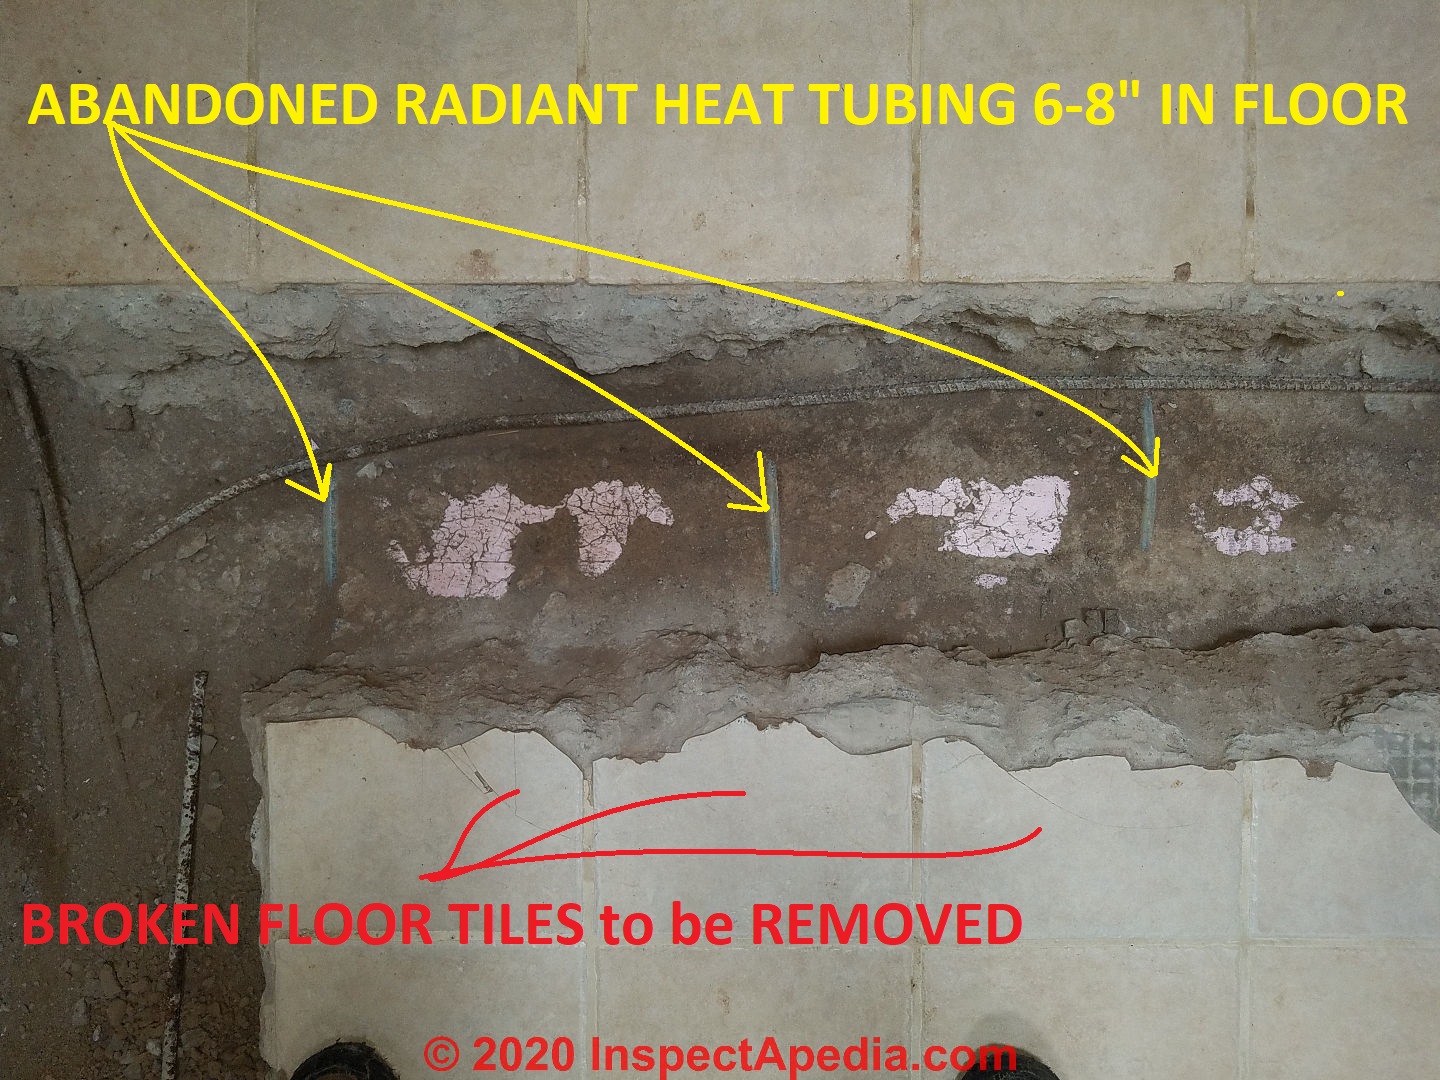
Above we've exposed the original radiant tubing and the pink insulation that was - more or less - below the slab.
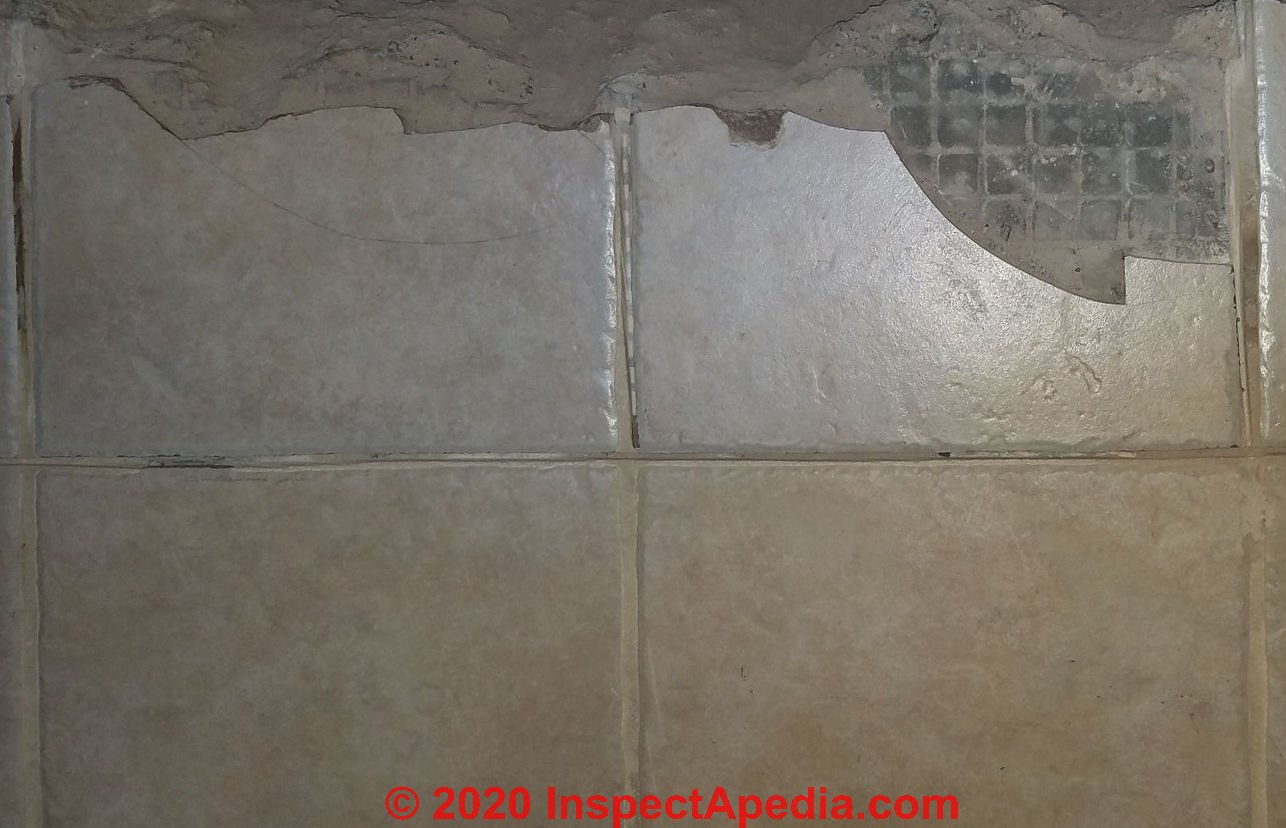
Below we show a closer view of the broken floor tiles that need to be replaced (and-of course the trench filled-in and new concrete placed to level the open floor).
Watch out: trigger warning: removing ceramic tile that is adhered to a concrete slab is a horrible job involving hard physical labor and risk of injury. If you're up for the job it is essential to
- Wear appropriate eye, face, and hand protection against flying shards of sharp ceramic tile, concrete, and debris
-
Wear appropriate respiratory protection (N95 or respirator) to protect against breathing concrete dust
To restore this floor we needed to fill in the trench with concrete to level the floor, then chip out the broken, damaged ceramic tiles, level and prepare the slab surface to accept replacement floor tiles, and finally, install the replacement floor tile and grout it.
 ...
... 
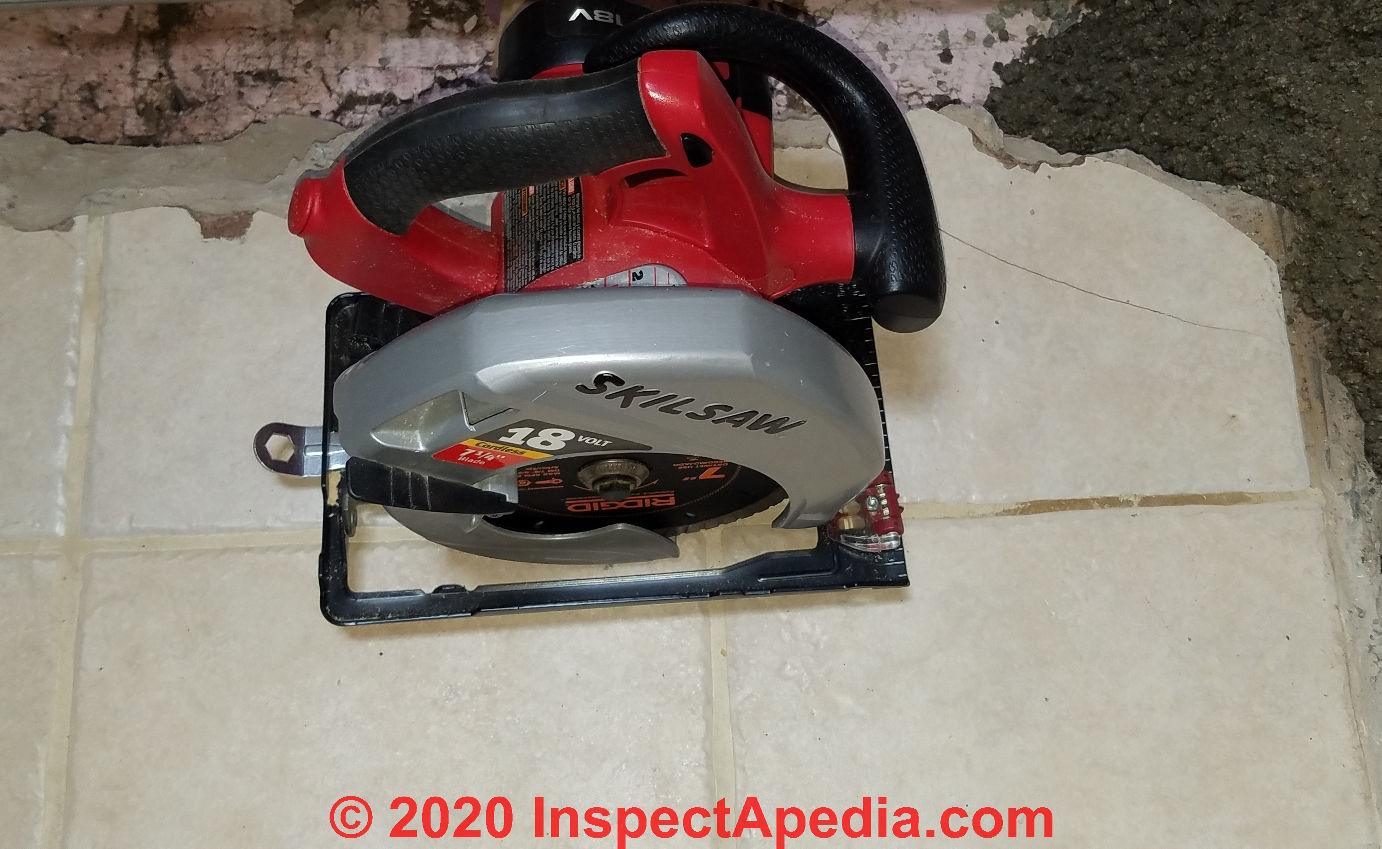
Watch out: do not start banging away trying to chip out broken ceramic floor tiles before cutting a control joint or groove in the tile grout joint between the bad tiles and the good ones that remain.
If you leave out this cut it's virtually certain that as you pound away chipping out the damaged ceramic tile (by hand or by machine) you will be unable to avoid breaking the edges of the previously intact "good" floor tiles. The job will grow ever bigger and tempers grow hot.
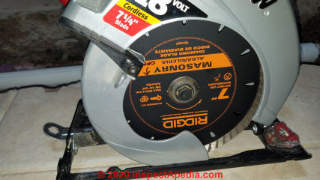
Above: staring with a circular saw into which we've mounted a masonry blade, set the saw blade to cut to a depth equal to the thickness of the damaged ceramic tiles and the adhesive mastic below the tiles.
My close-up photo shows that you need to use a masonry blade; this blade will work in both wet and dry applications. Wet - keeping the saw kerf wet, holds down dust and destroys your circular saw. Dry means you'd better be wearing a respirator.
Run the circular saw along the grout joint, leaving a bit of grout un-disturbed along the edges of the "good" tiles that are to be left alone.
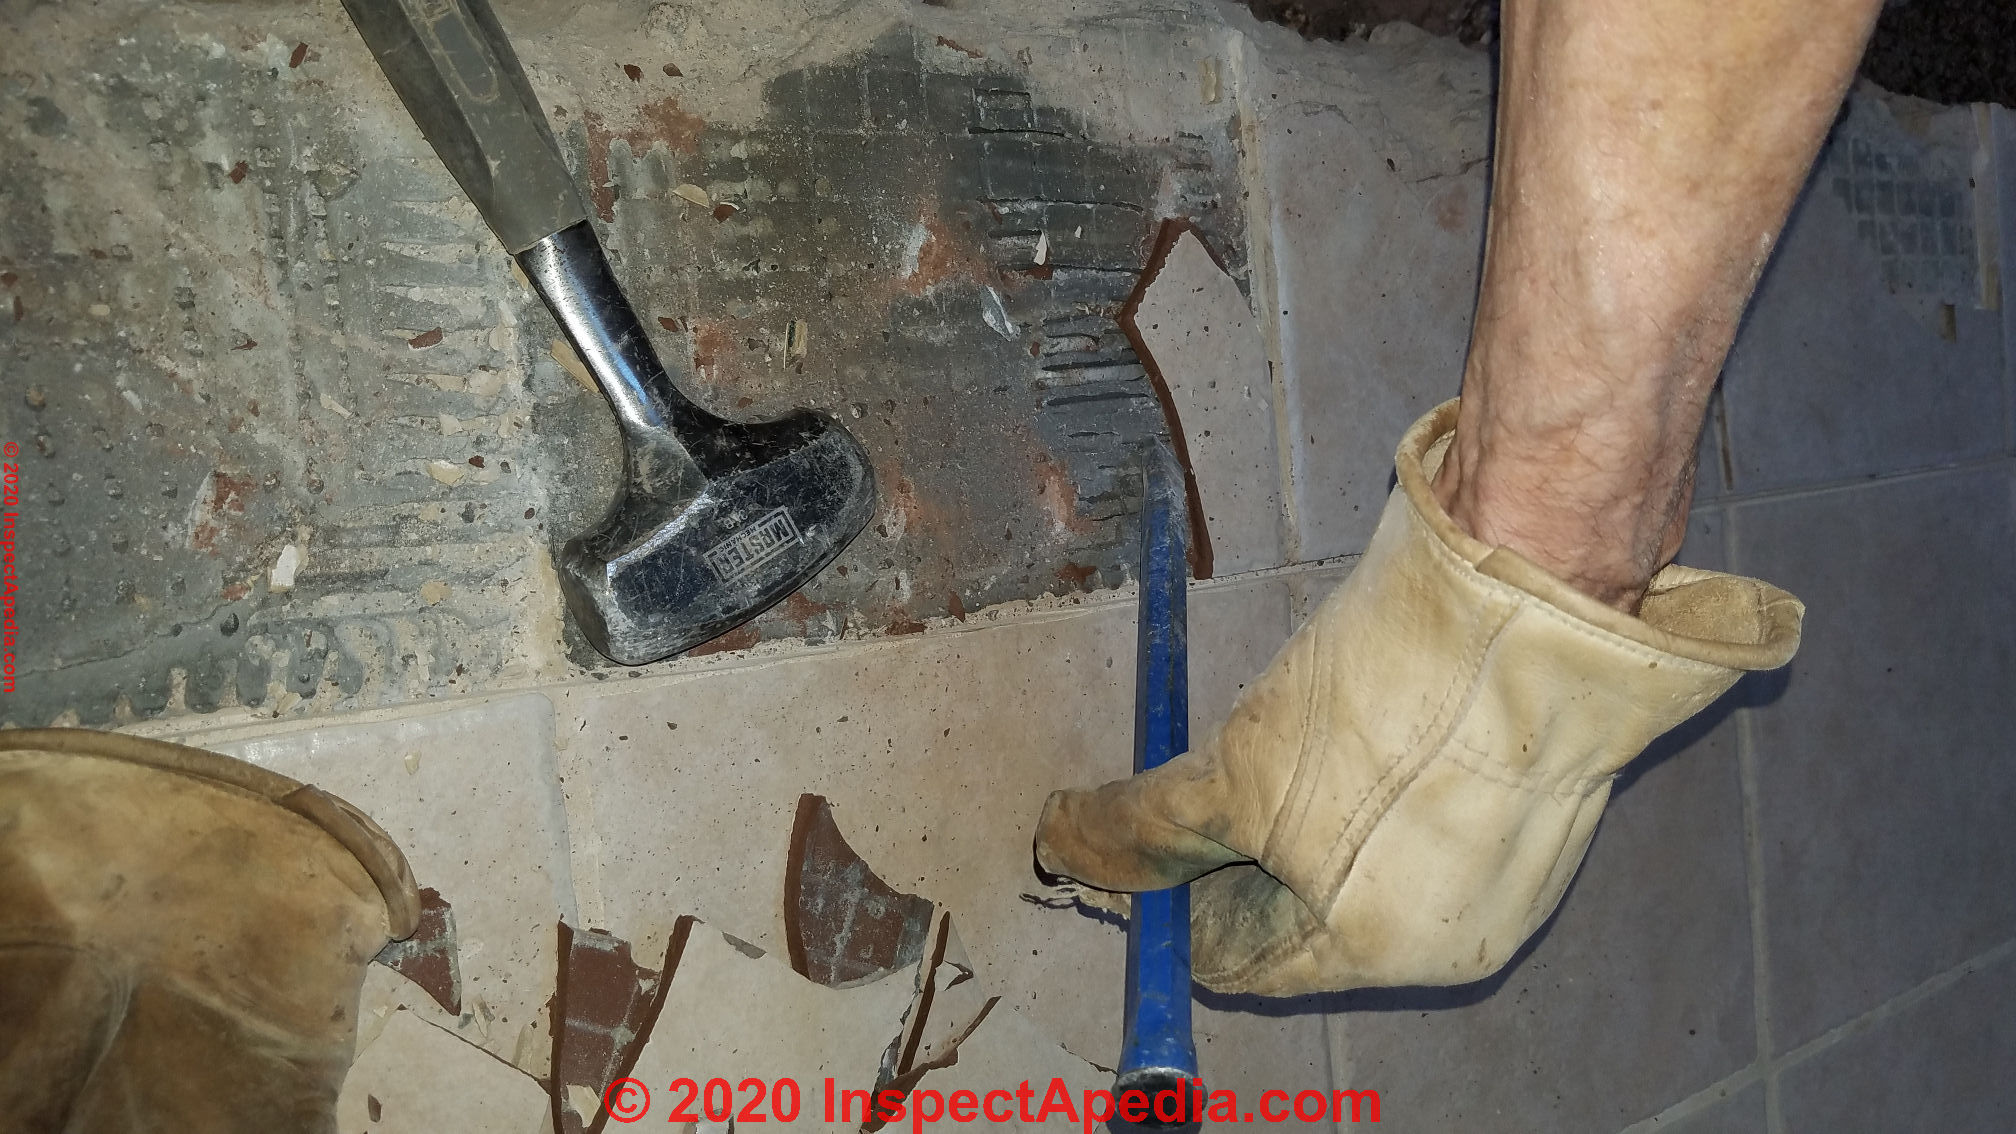
Above: Even with th control joint cut in all of the grout joints surrounding the tiles to be removed, never hammer towards the good floor tiles. Hammer away, or at least slightly away from the good floor to avoid breaking the good tiles.
After the damaged tiles have been broken up and removed, sweep and vacuum the floor to permit a closer inspection and a test fit of the replacement floor tiles.

Above: then test fit all of your replacement floor tiles before mixing the tile mastic adhesive. You can pretty much guarantee that some additional chopping and leveling will be needed on the floor surface for two reasons:
Sufficient of the old tile mastic that remained bonded to the concrete slab must be removed so that the new mastic and replacement ceramic tile will not push the new tile higher than the original floor surface.
Notice that I'm using my level to track the placement of the replacement tiles and to assure that they're a bit below the surface - 1/8" or more - of the remaining-in-place original floor.
That gives about 1/8" or more (more is better) to place the adhesive tile mastic and to level each floor tile as it is set in place.
When you've placed the replacement floor tiles, leveled them with respect to one another and with respect to the original floor, let the tiles and mastic cure for at least the minimum set time specified by your mastic manufacturer.
Watch out: keep foot traffic off of this floor until after the tile mastic is set AND the tile grout has been placed and cured as well.
Had we had replacement floor tiles from the original ceramic tile floor purchase we'd have had a perfect match. But a decade or more had elapsed between the damage to this floor and the work to replace the broken tiles.
We took a sample of broken tile to our tile supplier to find the closest match to the originals as we could obtain.
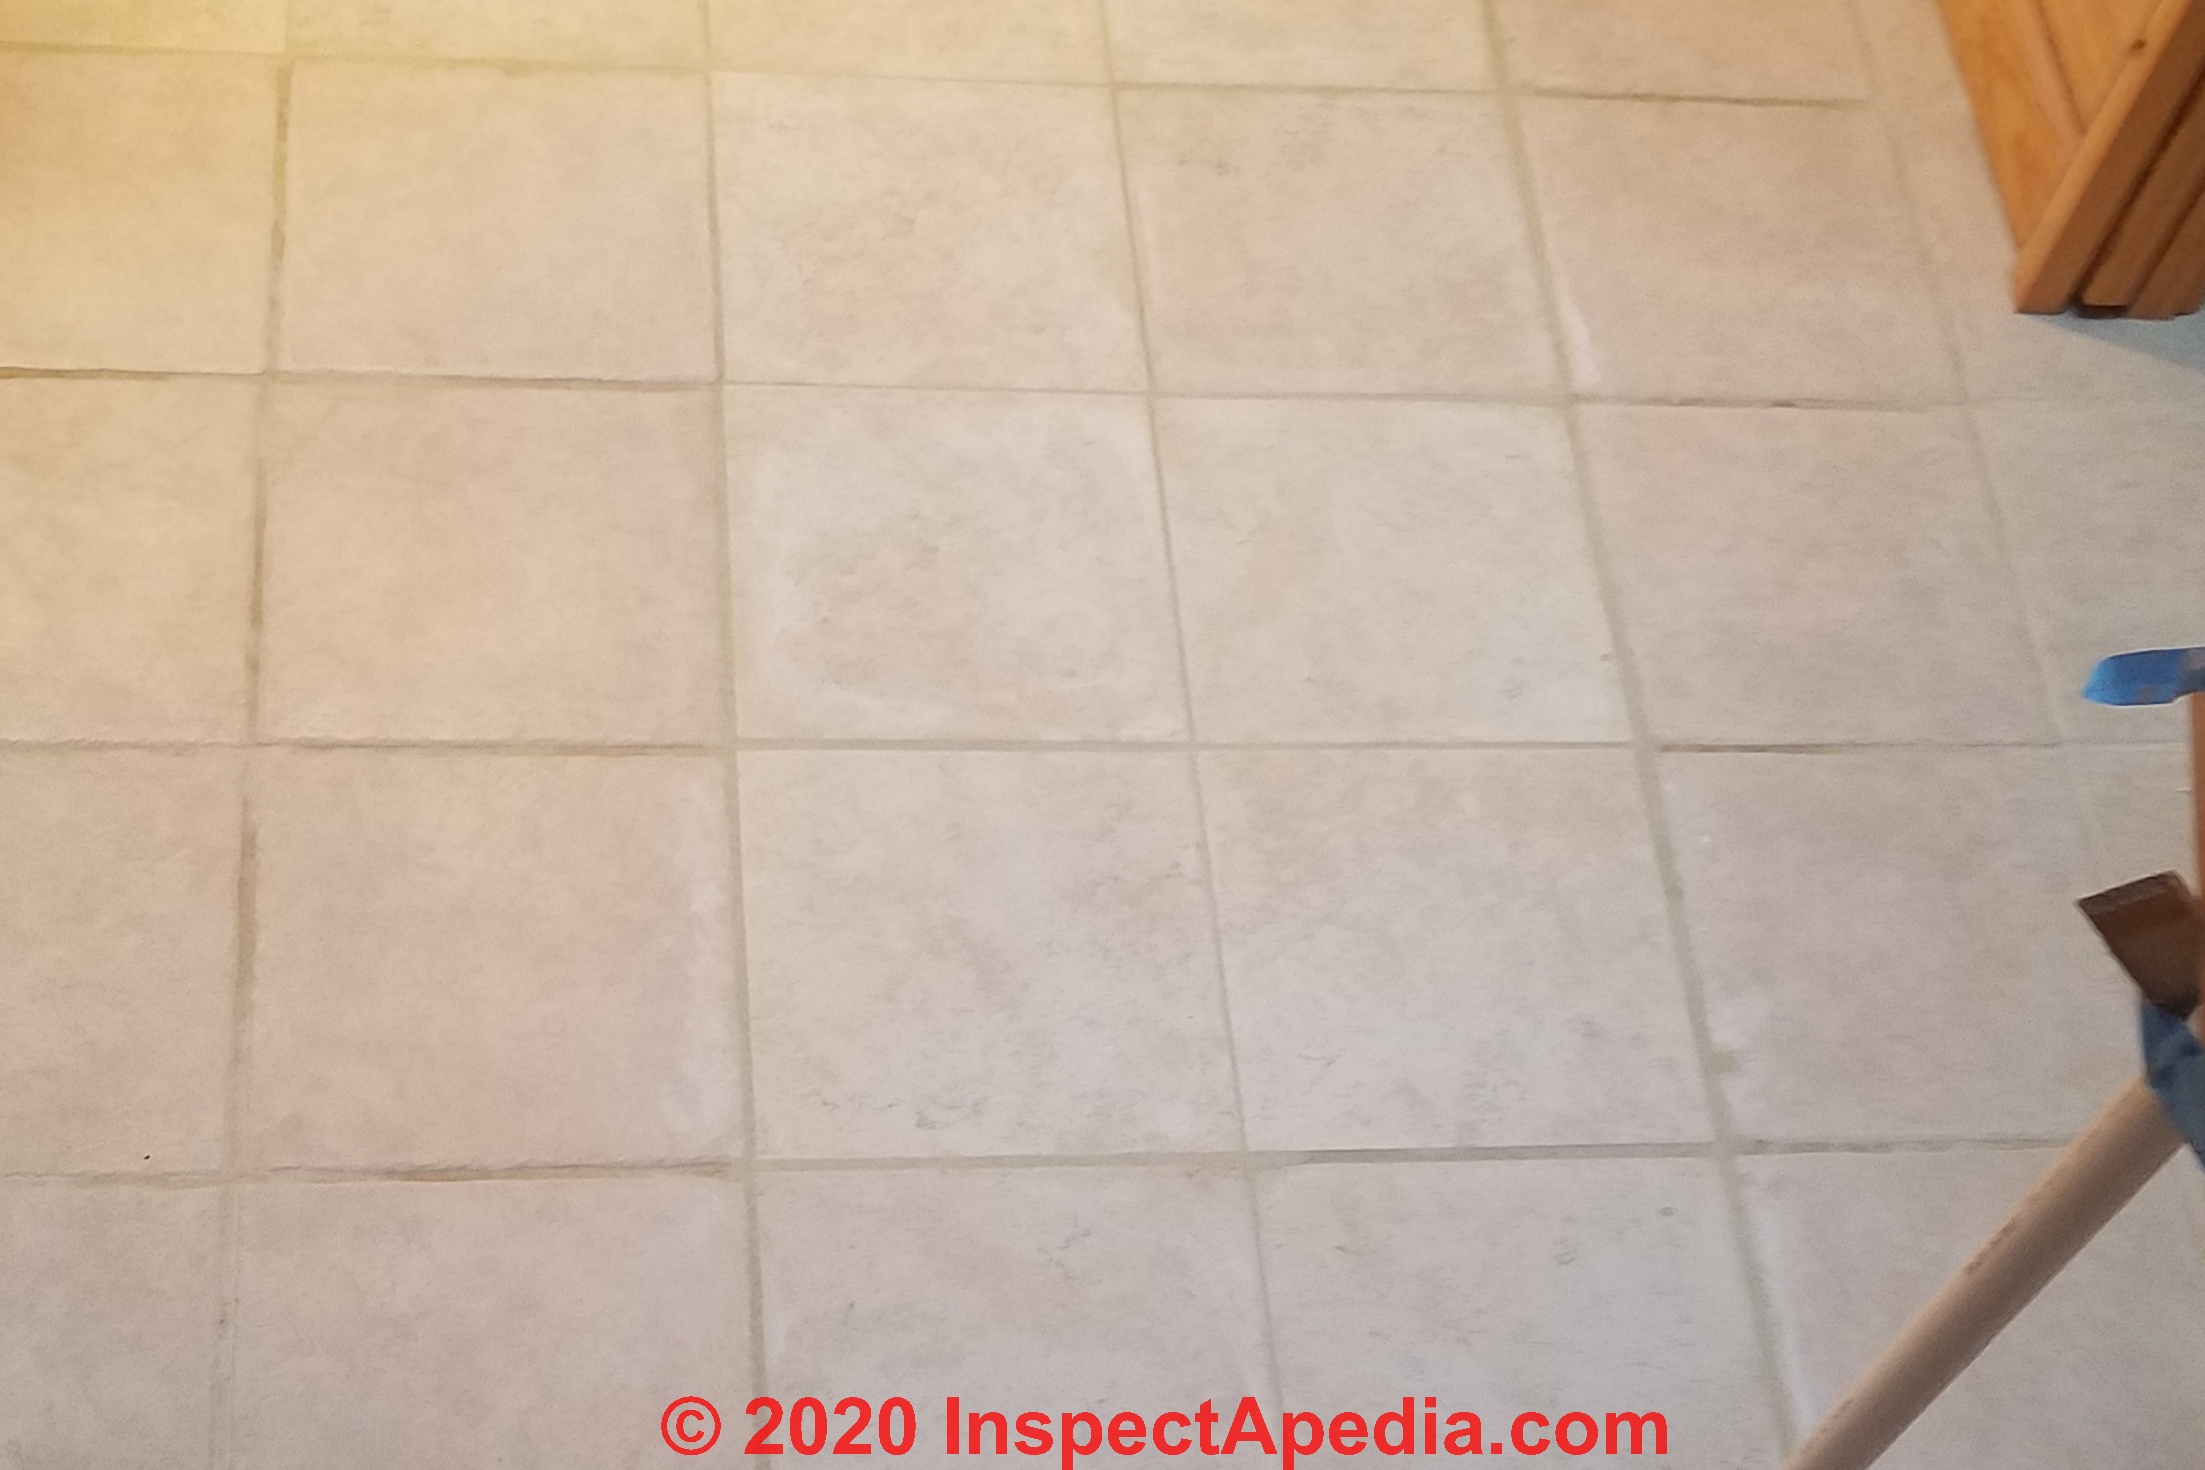
Above you can see our finished floor repair job. It was a good but not perfect match to the original tile floor.
Even if the exact tile pattern had still been in in production (which is rarely the case after a decade) the lot number variation would have meant that the new tiles would not be likely to match exactly the originals.
Case 4: Repair Steps for Other Badly Damaged Ceramic Tile Floors or Walls
 As our friend Steve Bliss has noted, polymer-modified thinset tile mastic and grout can
absorb small amounts of movement, but where more
significant movement is expected, a crack isolation membrane
is the safest approach.
As our friend Steve Bliss has noted, polymer-modified thinset tile mastic and grout can
absorb small amounts of movement, but where more
significant movement is expected, a crack isolation membrane
is the safest approach.
And where a ceramic tile floor or wall has suffered significant damage you will need to
Identify the cause of building movement and decide if the damage was a one-time event or if it is likely to be recurrent or ongoing. If the latter, we need to fix the movement cause or the ceramic tile floor or wall will of course be cracked and damaged again.
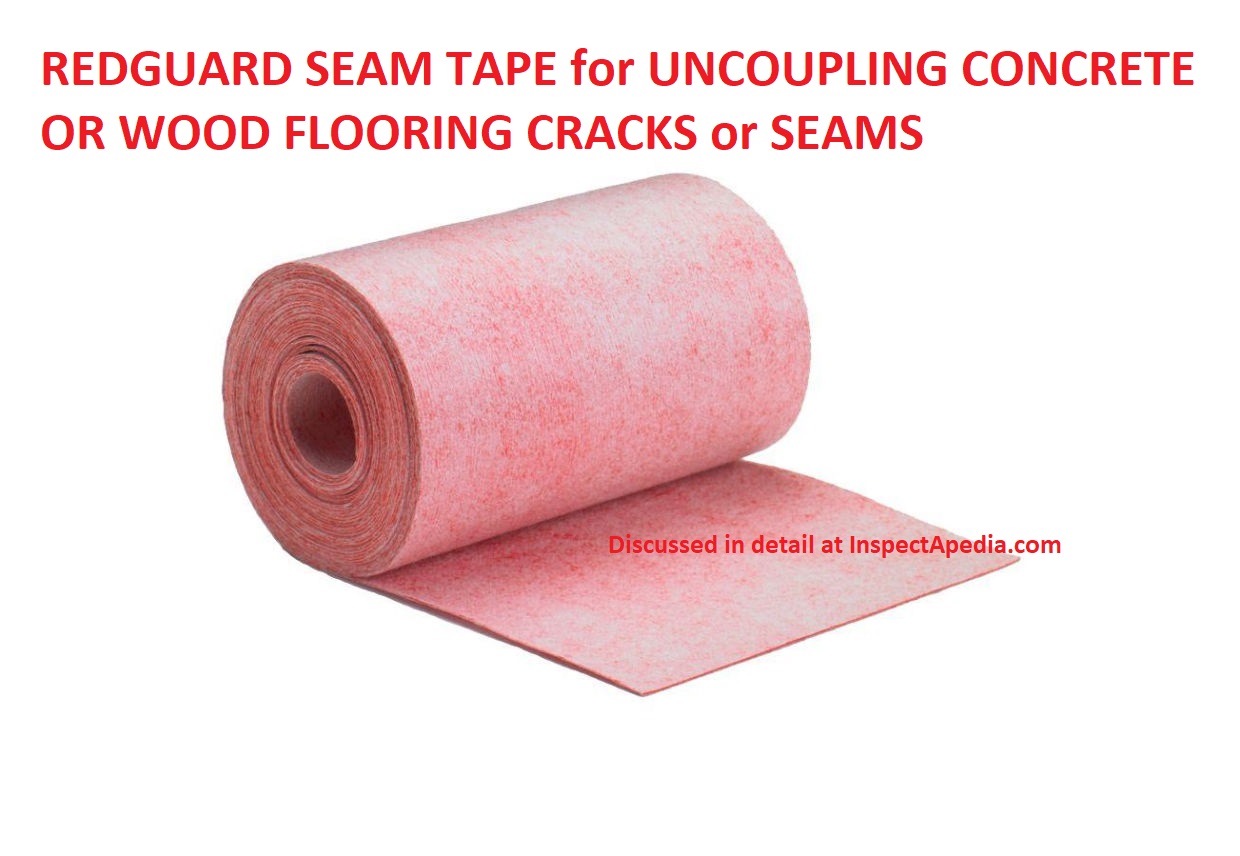
If the building movement is minimal or not ongoing, but there was significant cracking, the best repair would require removing the damaged tiles, filling the crack in the concrete below (or repairing the wood structure if the tile is on a wood floor), followed by the installation of an isolation membrane before the tile is replaced and grouted.
Isolation membranes and seam tapes like the Redguard product shown above are discussed in detail
at FLOOR TILE INSTALL on CONCRETE
Examples of Ceramic Tile Failures on Concrete Slabs
Before considering repairing any of the ceramic tile floors below it's essential to understand the failure mechanism. If we don't correct the underlying cause of tiles cracking or popping up then the repair effort is likely to be wasted.
Floor tiles Popping Loose
Probably the most-common explanation for popping up or loose ceramic floor tiles installed over a wood subfloor is adhesion loss due to water leaks into the floor.
But on concrete thermal expansion and contraction can also loosen floor tiles.
Mark Cramer, a Tampa Florida home inspector, notes that in southern climates that encounter cold weather, such as Florida in the U.S. we may find that tiles installed on a concrete floor slab may pop loose.
We speculate that popping Ceramic tiles in Florida in winter are most-likely due to differences in the coefficients of expansion of the ceramic tiles and the concrete floor and the adhesive between them.
Floor Tiles Fractured by Inadequate Support
Above: multiple fractures in a limited area of ceramic floor tile may be due to damaged subfloor below. You would not expect to see cracks like this in ceramic tile installed over concrete.
If you do the concrete slab is in serious trouble.
If cracks appear throughout the floor and are worse towards the center of the floor we suspect that this is not a concrete slab and that the floor framing and subfloor were not sufficiently stiff to support ceramic tile without flexing.
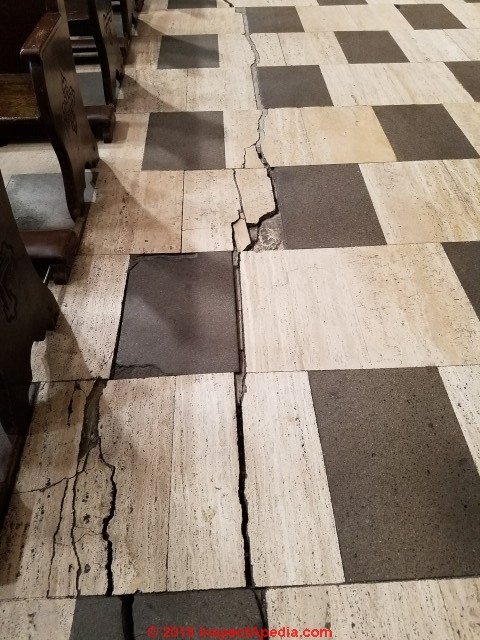
Earthquake Damage to Ceramic Tiles
Below: there is not much that can prevent earthquake damage to ceramic floor tiles, as illustrated by this floor in a cathedral in Mexico City.
Ceramic Tile Damage Repair Restoration Research & Standards
Researchers have ascribed ceramic tile floor failures to poor workmanship, an argument that assumes existing floor tile installation codes and standards, if followed, would prevent such failures.
- ASTM C 482, Standard Test Method for Bond Strength of Ceramic Tile to Portland Cement
- CONTROL JOINT CRACKS in CONCRETE
- Grimmer, Ann E., & Kimberly A. Konrad, PRESERVING HISTORIC CERAMIC TILE FLOORS [PDF] (2022) Preservation Brief 40, U.S. National Park Service, retrieved 2022/10/08, original source: https://www.nps.gov/tps/how-to-preserve/briefs/40-ceramic-tile-floors.htm
- Underwood, Mel, Neil Cichy, and Edward Tuczak. "Failures of Floor and Wall Tile Installations Occur Due to a Lack of Compliance with the Governing Building Code Requirements by Many Professionals Involved in the Installation Process." In Structures Congress 2015, pp. 1786-1797. 2001.
Abstract: Opportunities to investigate numerous floor tile and wall tile installations after they have sustained functionality failures, mainly in south Florida, indicate that there is a level of resistance, a lack of understanding, and/or a lack of awareness of appropriate knowledge imbued by some of the industry professionals, designers, contractors and/or trades performing the tile installations.
Observed failure conditions indicate substantial neglect with respect to requirements documented in the building codes, the ANSI (American National Standards Institute) standards, and/or manufacturer installation instructions. Such literature comprises the tile installation “industry standards”.
Case studies will be described and discussed that include various tile materials such as stone, porcelain and ceramic utilized in various flooring and bathroom wall tile installations that have experienced a failure.
The repeated non-compliance with the appropriate industry standards during the installation process demonstrates a level of neglect that has resulted in failure due to inappropriate construction practices.
This indicates that it has become common for installers to cut corners, as observed by the poor installation techniques and workmanship in the case studies presented herein.
Building code requirements, industry standards and manufacturer instructions often utilized by south Florida industry professionals include: the Florida Building Code; Horizontal Surfaces – an Excerpt from the Dimension Stone Design Manual, 7.1 by the Marble Institute of America; the Tile Council of North America (TCNA) Handbook for Ceramic, Glass, and Stone Tile Installation (2011); and the ANSI A108.01, A108.1A, B and C, A108.02, and A108.5, American National Standards for the Installation of Ceramic Tile.
Additional relevant information also includes select manufacturer instructions and guidelines for various associated materials and components. The historical Southern Standard Building Code and the subsequent South Florida Building Code were the precursor codes and partial basis for the current Florida Building Code.
In research of building codes extending as far back as the 1985 Standard Building Code, tile installation requirements included explicit reference to the ANSI A108 standards as well, and these requirements still exist today in the current Florida Building Code editions.
...
Reader Comments, Questions & Answers About The Article Above
Below you will find questions and answers previously posted on this page at its page bottom reader comment box.
Reader Q&A - also see RECOMMENDED ARTICLES & FAQs
On 2019-06-16 by (mod) - is the floor marble, tile, vinyl?
From your photo that looks like a marble floor but I cannot from the image tell you the name of the exact color nor pattern. Unfortunately, Mitzzy, there are approximately three million varieties of tile patterns and colors found on floors around the world, or even more if one extends the floor age sufficiently far back in time.
How to identify the material in an unknown floor tile
To narrow down your question to a plausible answer you'd start with
- the country, city, and age of the building - that sets an approximate floor under the tile's age and thus some of its possible constituents
- the tile material: marble, vinyl, asphalt
- the building history of construction and renovation - that refines the possible floor materials
- building construction and renovation records to look for specific product names
- examination of the flooring directly, and if extra material is found stored in the building, the flooring packaging and any markings on the floor.
Identifying the brand of flooring from records lets you go right to the manufacturer's catalog to identify the exact floor tile name used by that producer.
On 2019-06-16 by mitzzy
hello i was wondering if you could tell me what kind of tile this is and if there was any chance you could tell me the name of that exact color
IMAGE LOST by older version of Clark Van Oyen’s useful Comments code - now fixed. Please re-post the image if you can. Sorry. Mod.
...
Continue reading at FLOOR TILE INSTALL on CONCRETE or select a topic from the closely-related articles below, or see the complete ARTICLE INDEX.
Or see these
Recommended Articles
- BATHROOM MOLD REMOVAL / PREVENTION
- CEMENT BACKERBOARD INSTALLATION
- CERAMIC TILE, ASBESTOS / LEAD?
- CERAMIC TILE DAMAGE REPAIR
- FLOOR DAMAGE DIAGNOSIS
- FLOOR DESIGNS: KITCHEN & BATH
- FLOOR, STONE, GRANITE, MARBLE, AGGLOMERATE
- FLOOR TILE, CERAMIC for K & B
- FLOOR TILE HISTORY & INGREDIENTS
- FLOOR TILE INSTALL on CONCRETE
- FLOOR TILE SEALERS, CERAMIC, STONE
- TILED WALKING SURFACE SLIP HAZARDS
- FLOOR TILE SETTING COMPOUNDS
- GROUT INSTALLATION, TILE
- RADIANT HEATED FLOOR MISTAKES
- WALL, CERAMIC TILE INSTALLATION
Suggested citation for this web page
CERAMIC TILE DAMAGE REPAIR at InspectApedia.com - online encyclopedia of building & environmental inspection, testing, diagnosis, repair, & problem prevention advice.
Or see this
INDEX to RELATED ARTICLES: ARTICLE INDEX to BUILDING INTERIORS
Or use the SEARCH BOX found below to Ask a Question or Search InspectApedia
Ask a Question or Search InspectApedia
Questions & answers or comments about choosing & installing ceramic tile floors in kitchens & bathrooms
Try the search box just below, or if you prefer, post a question or comment in the Comments box below and we will respond promptly.
Search the InspectApedia website
Note: appearance of your Comment below may be delayed: if your comment contains an image, photograph, web link, or text that looks to the software as if it might be a web link, your posting will appear after it has been approved by a moderator. Apologies for the delay.
Only one image can be added per comment but you can post as many comments, and therefore images, as you like.
You will not receive a notification when a response to your question has been posted.
Please bookmark this page to make it easy for you to check back for our response.
IF above you see "Comment Form is loading comments..." then COMMENT BOX - countable.ca / bawkbox.com IS NOT WORKING.
In any case you are welcome to send an email directly to us at InspectApedia.com at editor@inspectApedia.com
We'll reply to you directly. Please help us help you by noting, in your email, the URL of the InspectApedia page where you wanted to comment.
Citations & References
In addition to any citations in the article above, a full list is available on request.
- Best Practices Guide to Residential Construction, by Steven Bliss. John Wiley & Sons, 2006. ISBN-10: 0471648361, ISBN-13: 978-0471648369, Hardcover: 320 pages, available from Amazon.com and also Wiley.com. See our book review of this publication.
- Our recommended books about building & mechanical systems design, inspection, problem diagnosis, and repair, and about indoor environment and IAQ testing, diagnosis, and cleanup are at the InspectAPedia Bookstore. Also see our Book Reviews - InspectAPedia.
- In addition to citations & references found in this article, see the research citations given at the end of the related articles found at our suggested
CONTINUE READING or RECOMMENDED ARTICLES.
- Carson, Dunlop & Associates Ltd., 120 Carlton Street Suite 407, Toronto ON M5A 4K2. Tel: (416) 964-9415 1-800-268-7070 Email: info@carsondunlop.com. Alan Carson is a past president of ASHI, the American Society of Home Inspectors.
Thanks to Alan Carson and Bob Dunlop, for permission for InspectAPedia to use text excerpts from The HOME REFERENCE BOOK - the Encyclopedia of Homes and to use illustrations from The ILLUSTRATED HOME .
Carson Dunlop Associates provides extensive home inspection education and report writing material. In gratitude we provide links to tsome Carson Dunlop Associates products and services.
 | HOME | ABOUT | ASK a QUESTION | CONTACT | CONTENT USE POLICY | DESCRIPTION | POLICIES | PRIVACY | |
| © 2025 - 1985 Publisher InspectApedia.com - Daniel Friedman | |||||||||