 Split System Air Conditioners & Heat Pump Repair Guide
Refrigerant charge, refrigerant leaks, condensate leaks
- POST a QUESTION or COMMENT about split system air conditioner operation, installation, maintenance, & repair
Repairs to ductless split-system air conditioners:
Diagnosis of lost cooling capacity of a split system air conditioner; how refrigerant is added to a split system air conditioner or heat pump system. Diagnosis & repair of condensate leaks from a split system air conditioning system.
This article series describes split system air conditioning & heat pump systems. We review the major system components, switches & controls, and typical applications for split system cooling systems. We also discuss use of the remote thermostat control, where to find and how to clean the split system air filters, how condensate is disposed-of, and what to check first if your split system air conditioner is not working properly.
InspectAPedia tolerates no conflicts of interest. We have no relationship with advertisers, products, or services discussed at this website.
- Daniel Friedman, Publisher/Editor/Author - See WHO ARE WE?
Diagnosing & Fixing Lost Cooling in a Split System Air Conditioner - Refrigerant Leaks
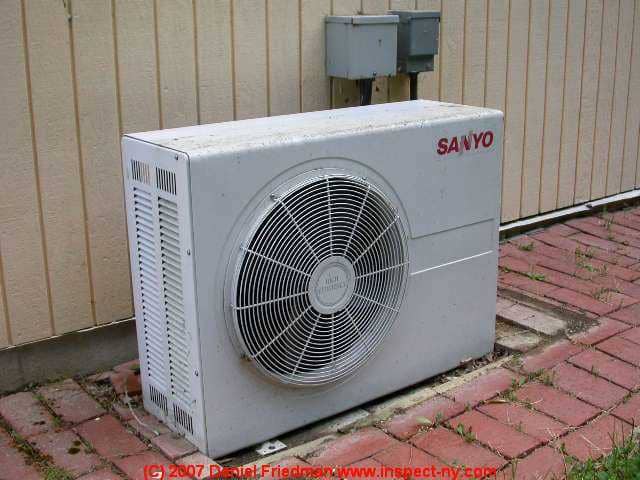
A split system or "ductless" air conditioning (or A/C & heat pump) system dispenses with duct work entirely, using a wall-mounted indoor evaporator/blower unit and a separate outside compressor/condenser (shown above).
In this split system air conditioning design, one compressor/condenser may serve multiple wall-mount indoor units.
Article Contents
- RUNS but AIR IS NOT COOL
- TEST for REFRIGERANT LEAKS
- ADDING REFRIGERANT - methods, how much to add
- IS YOUR TECH RIGHT for the JOB?
- SPLIT SYSTEM REPAIR COSTS - typical
- SPLIT SYSTEM REPAIR MANUALS & REFERENCES
...
Split System Runs but Doesn't Produce Cool Air
When an air conditioning system continues to blow air but that air is not cool, check first whether the outdoor compressor-condenser unit is running.
If the compressor runs but the indoor cooling coil never gets cool a common cause of this lost cooling symptom is that the system has lost refrigerant.
The combination of these two clues was enough to call an air conditioning repair service company company.
This cooling system was located in a home in the Hudson Valley of New York.
AirServ was called to perform the diagnosis and repair.
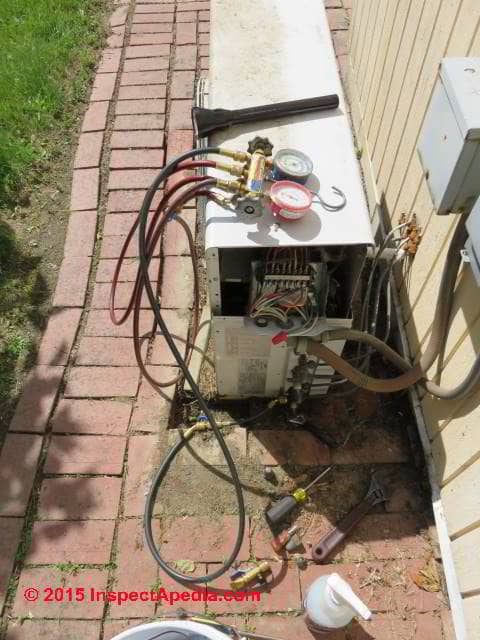
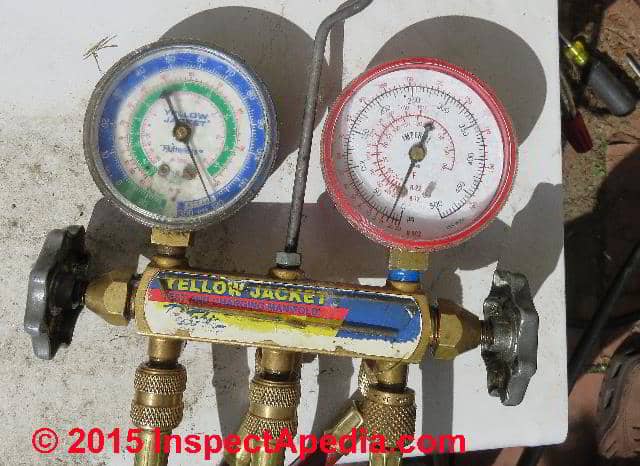
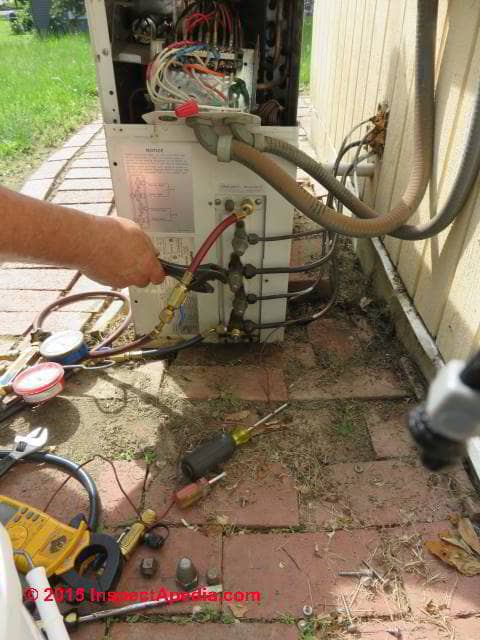
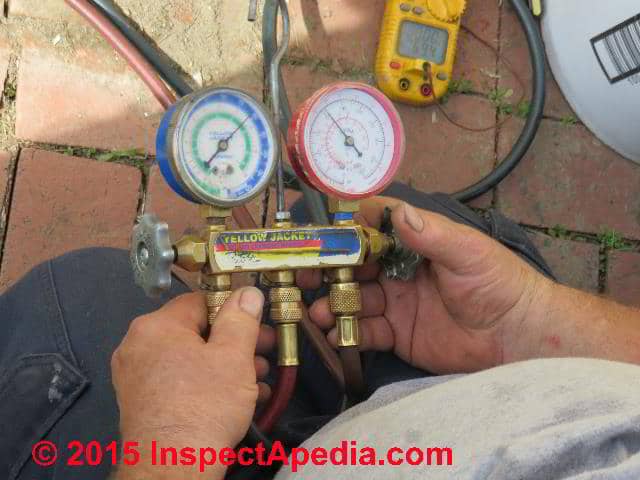
In the photos shown here the AC technician has connected his refrigerant gauge set to the low pressure side of the split system air conditioner's outdoor compressor/condenser unit.
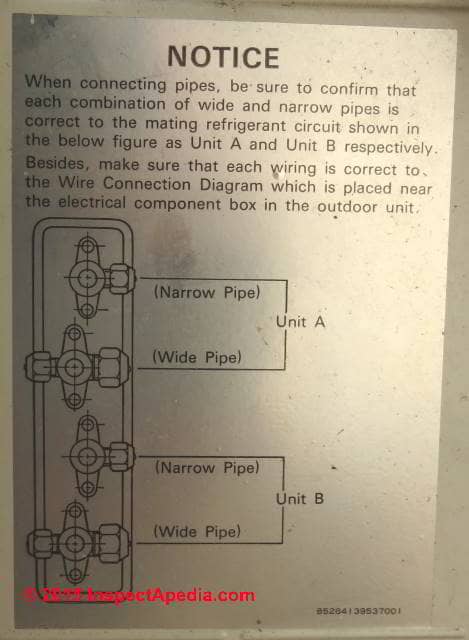
This Sanyo unit supports two separate indoor wall-mounted cooling units and has two separate compressors, receivers, and sets of low and high pressure gauge ports.
Only one of these dual systems was failing to cool so we might infer that only one has a refrigerant leak.
This Sanyo unit contains two complete compressors and refrigeration circuits each serving two separate or individual wall-mounted cooling units indoors.
Sanyo refers to these as "Check Ports" and provides both low pressure side (into the compressor) and high pressure side (out of the compressor) ports for servicing the equipment.
Above left you can see the refrigerant gauge blue (low pressure) hose connected to the low pressure port on this Sanyo compressor/condenser unit.
This lower port was the refrigerant piping circuit connected to the indoor air conditioning unit that was not cooling.
The upper gauge connection in the upper right of this photo is for the second refrigerant piping circuit that served a second wall-mounted indoor air conditioner unit that was indeed cooling.
The service technician may make further measurements, depending on what she or he sees at the site.
For example if the compressor is not running normally or is making humming or clanking sounds a measurement of current draw might be made to check for a failing compressor motor.
Other electrical tests may be appropriate if the equipment simply doesn't run.
At above left the gauge set has been connected to both high and low sides of the compressor unit.
But in this case the indoor air handler or blower unit ran in response to a call for cooling, and outside the compressor/condenser unit motor and fan both ran but the Sanyo system didn't cool.
The technician, after inspecting wiring and controls and the oil stains, connected his refrigerant gauges, checked system high side and low side pressures, connected a thermocouple to the suction line and read the suction line temperature.
...
Tests for Refrigerant Leaks
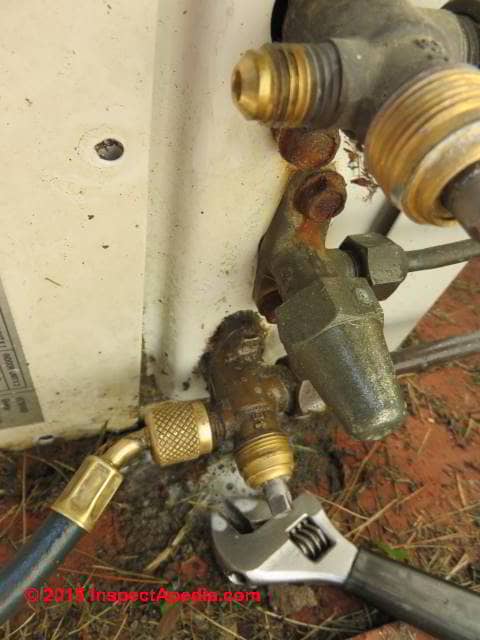
A quick inspection of the outdoor unit showed oil stains on the low pressure refrigerant service valve at the compressor/condenser unit. Because HVAC refrigerant systems often include some oil (for the compressor motor) if there is a refrigerant leak you may see oil stains forming a clue suggesting the leak location.
Notice that white foam on the ground below the low pressure refrigerant connection port and valve?
The service tech has sprayed BigBlu™ soapy leak detector on the valve to see if there was an obvious leak there.
There were no bubbles on the valve but because it was the only oil-stained component and as that oil had appeared over time we suspect the valve or its cap had a slow refrigerant leak.
A soap bubble test at the HVAC compressor unit service valves didn't show up an obvious leak but, then, in a system that took ten years to leak enough R22 refrigerant to lose its cooling capacity the leak was probably very small and might be hard to confirm.
That's why checking for obvious leak signs such as the presence of refrigerant oil on fittings, connections, or refrigerant piping and at coils is a useful step.
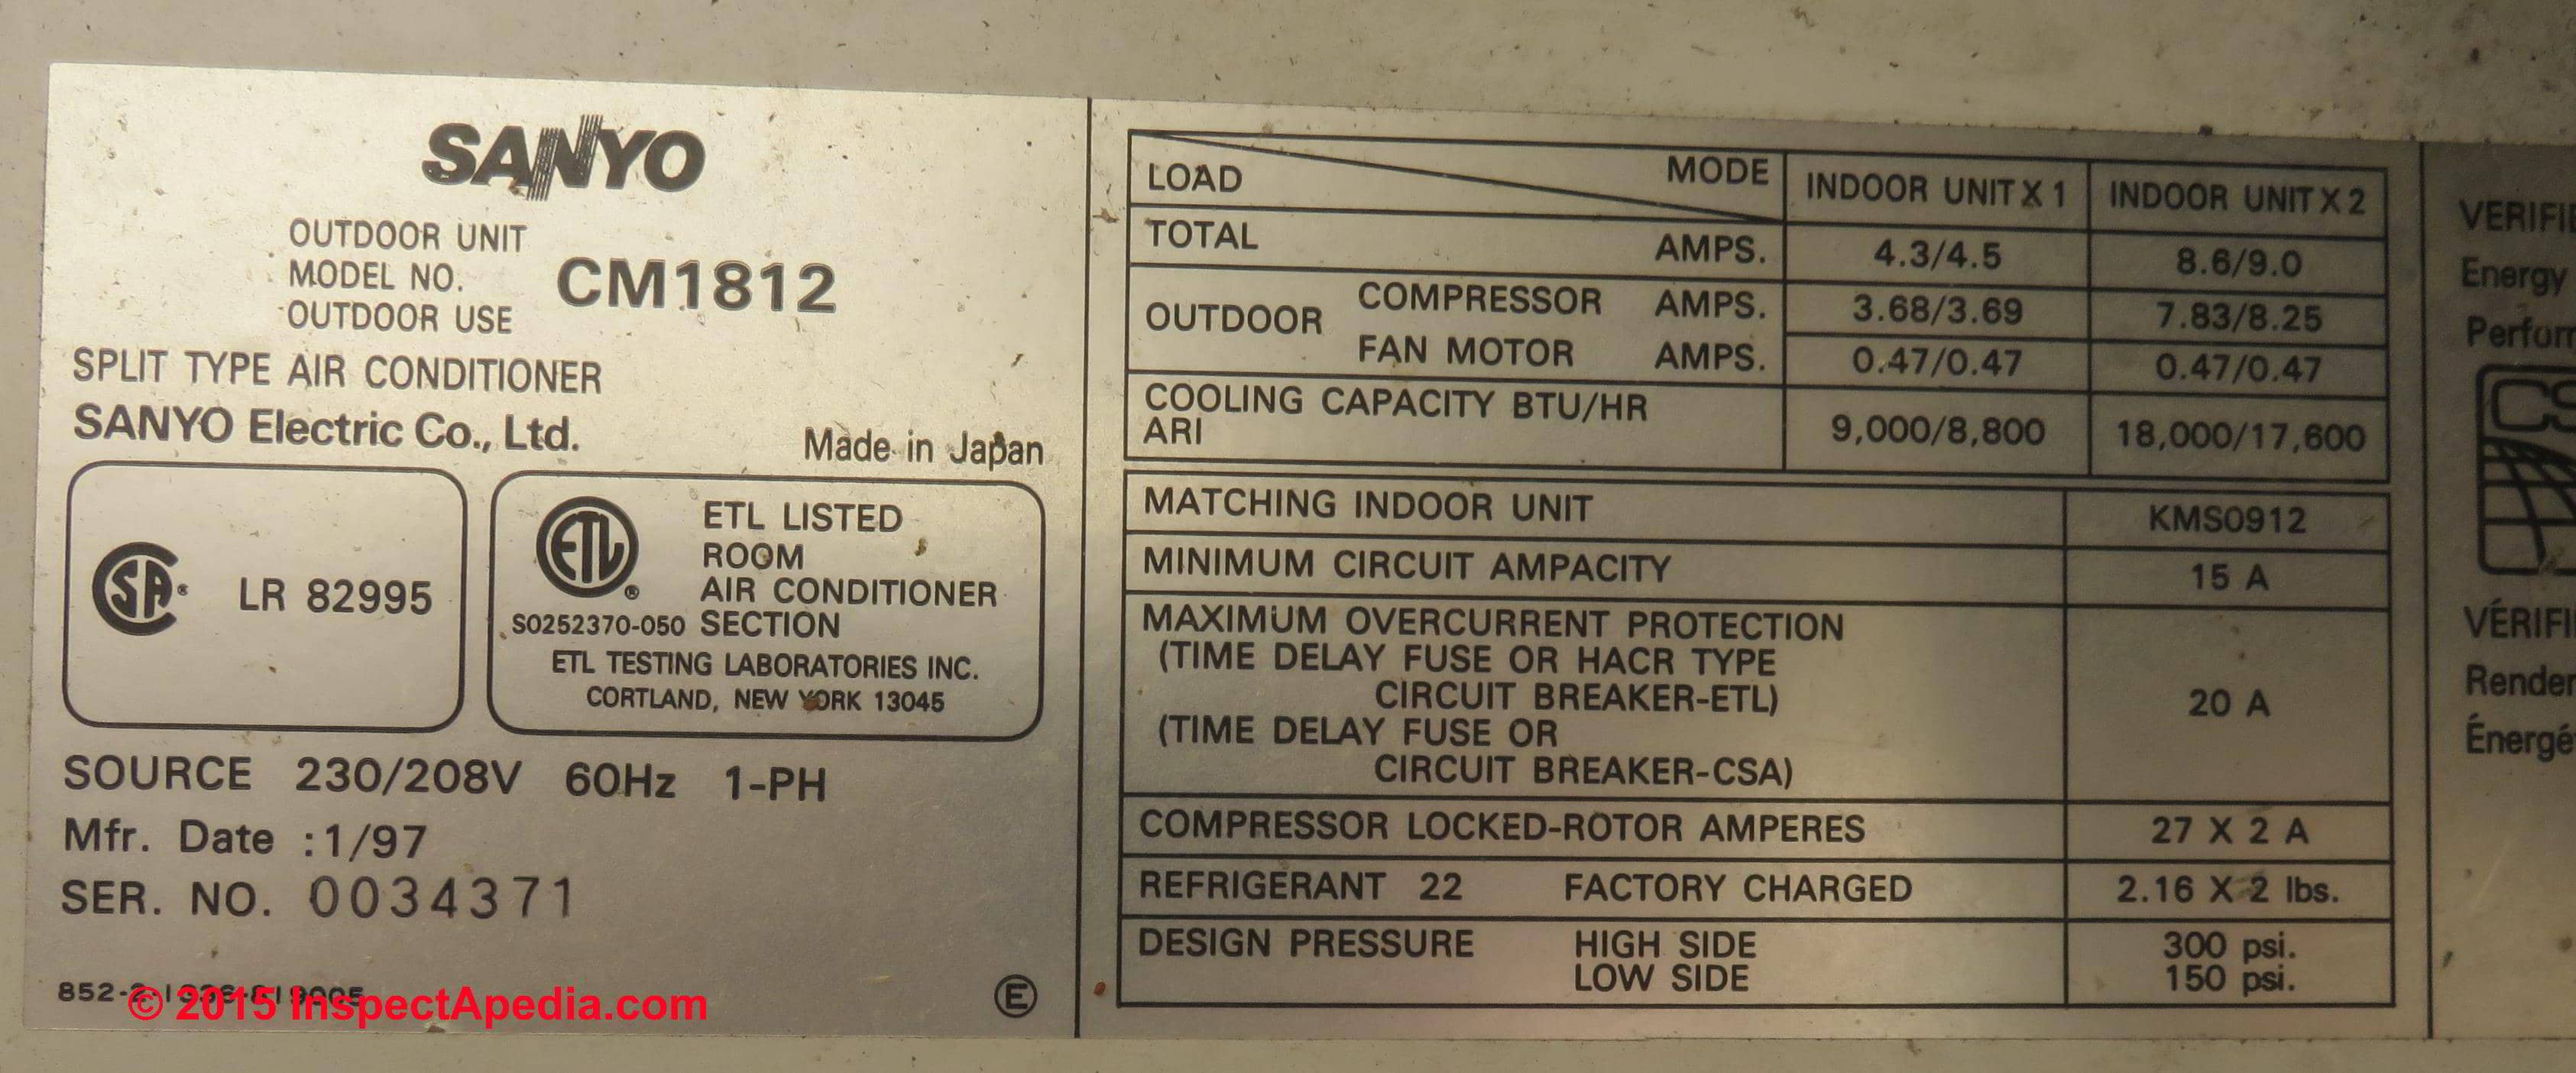
An examination of this Sanyo split system AC compressor data tag [Click to enlarge] gives important additional information including the current draw of the normally-working system in amps, the refrigerant gas used (R-22), and the factory refrigerant charge (2.16 lbs in each of two individual compressor units inside this machine).
Take time to read the data tag and you can avoid some embarrassment.
Watch out: we would have been much happier with this repair if the HVAC technician had either found and fixed a leaky component, cleaned and tightened and inspected again for leaks at the suspect sevice valve, or if he had at least considered using a refrigeration leak sealant product such as the sealants discussed
...
Approaches to Adding a Refrigerant Charge to HVACR Equipment
There are two approaches to charging or adding refrigerant to an air conditioning or heat pump or other refrigeration system: high side charging with liquid refrigerant or low-side charging with refrigerant gas. Using either approach, with the right charging equipment it's possible to measure the quantity of refrigerant or the charge inserted into the system.
Our technician charged the "safe" way on the low side of the system. This approach avoids a risk of liquid-slugging and damaging the compressor.
However no refrigerant quantity was measured and the tech was not sure if the compressor unit design contains a receiver - a container that stores extra refrigerant and that would mean that a proper full-charge would require more total refrigerant than if just the compressor, coils, and refrigerant piping were being re-filled.
Instead the tech simply measured the temperature on the suction line at its point of return to the compressor/condenser unit. This is a reasonable approach to determine that the unit should be cooling again (the suction line gets cold), but it gives no idea about the quantity of charge inserted into the system.
How Much Refrigerant to Add
A perfect service job would leave the system charged with a quantity of refrigerant matching the factory specifications.
For this Sanyo unit that's about 2.16 lbs of refrigerant in each of its two compressor and refrigerant piping loops, possibly a bit more if either of the indoor cooling units was far enough away from the compressor that the volume given by the added length of refrigerant piping requires additional refrigerant.
In the case of long refrigerant piping runs the manufacturer will specify how much additional refrigerant should be added per x meters of piping of Y diameter.
Our AC service tech wasn't going to install a measured refrigerant charge. Instead he simply added refrigerant until the suction line temperature dropped. We'll say more about that later.
The technician connected his refrigerant supply to feed refrigerant gas (note that the refrigerant gas can is upright when adding refrigerant as a gas) into the low side or suction side of the air conditioner's condenser unit while he watched the temperature on the suction line.
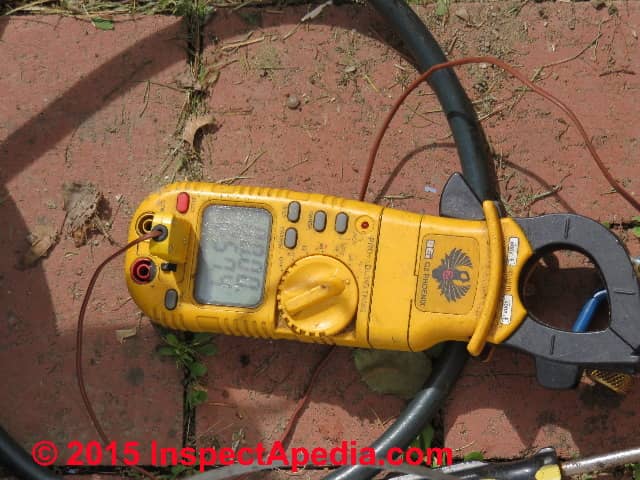
Above is a DMM that includes a temperature sensor probe and at above right the service tech has taped the probe to an area of the suction line just ahead of the compressor unit.
He cleaned the copper refrigerant tubing to provide good thermal contact to the temperature sensor probe and then simply taped the probe in place with electrical tape.
When the temperature on the suction line dropped and the indoor wall-mounted unit began blowing cool air the tech left the refrigerant canister open for a few minutes longer, adding an un-measured quantity of refrigerant to the system before closing the gas supply and removing the gauges.
Here you can see the standard connections for a refrigeration gauge set. The blue hose is connected to the low side or suction line service fitting or gauge port nearest the bottom of the compressor unit.
The red high pressure gauge hose is connected to the appropriate high pressure check port at the compressor.
Watch out: if an air conditioner or heat pump receives "just enough" refrigerant to get it cooling again, and if the refrigerant leak is not repaired, and particularly if the system had a receiver that could have stored a larger quantity of refrigerant but was not charged enough to add refrigerant to the receiver, then the "repair" might be short-lived.
Watch out: OPINION: a better repair would have been the installation of a measured refrigerant charge that filled the receiver in the unit and installed the manufacturer's specified refrigerant charge quantity.
A tech might argue correctly that one can only install an accurately measured refrigerant charge into the AC system by first completely evacuating it, that is, by starting with a known "empty" HVACR system.
So this tech was not just taking a short cut, he was "getting the system cooling" in the shortest, most economical way he could devise.
OPINION: A better repair would also have included finding and correcting the refrigerant leak. We'll say more about that later.
...
Is Your Air Conditioning Repair Company or the Technician Right for the Job?
Most service technicians know to be alert for obvious signs of trouble such as overheated electrical components.
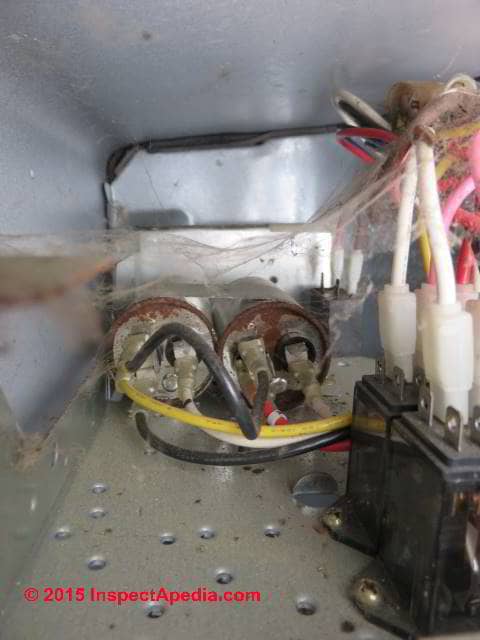
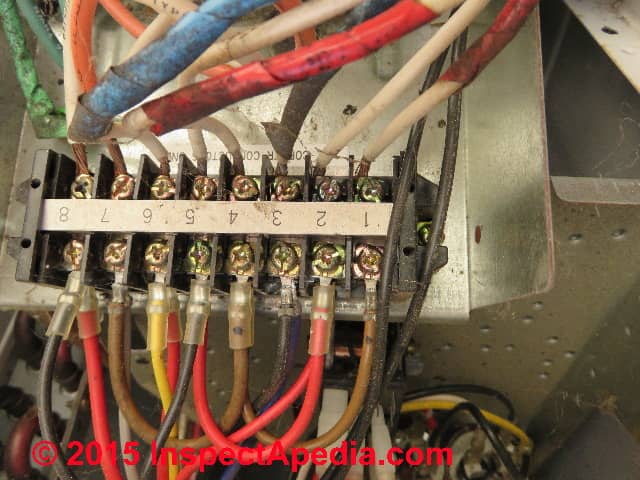
Below are two quick visual checks the service technician may have made at this Sanyo split system air conditioning compressor:
- Check for obviously burned, swollen, or damaged motor start/run capacitors (above left)
- Check for obviously burned or overheated wiring at the unit terminal block (above right)
Watch out: The HVAC repair technician at this job was a perfectly nice guy and was generous about answering questions and about permitting photos of the AC repair selected for this InspectApedia.com article.
But the tech told us at the outset that he hated working on split system units.
If the first remarks made by your service technician are that he hates working on your type of equipment you might take that as a warning that the technician may be really saying he's unfamiliar with the equipment, and that he's warning you that the repair job may not have the best outcome.
Or in fact your HVAC equipment might really be difficult to service. It's certainly true that on some HVAC equipment the components are jammed into a tight space, certainly that's a difference between many commercial-sized refrigeration equipment and home-use air conditioners and heat pumps.
But the key controls, wiring, relays, refrigerant connectors are made readily accessible by the manufacturer.
If your service tech doesn't know how to remove the equipment cover, or if you see him throwing hard-to-replace screws into the bushes rather than kneel down to replace them at the end of the job, in our OPINION that's not very good service.
...
Typical Costs for Air Conditioner or Heat Pump Refrigerant Leak Repairs
For this article and HVAC repair we paid a $350. USD for the insertion of an un-measured, unknown quantity of refrigerant into an older system that had a slow refrigerant leak. A new ten pound canister of R22 refrigerant (required for use in some older obsolete HVACR systems) costs about $180.
Typical HVACR service call costs to repair a refrigerant leak are between $200. and $1,500. USD. depending on where the leak is and what steps are needed to fix it.
In sum, this service call which simply added enough refrigerant (without measurement) to get the AC unit cooling again cost somewhere in the range of a typical cost to actually find and fix the leak. With help from the service tech and at our prodding, together we cleaned the service valves on the outdoor compressor/condenser unit and tightened the valve caps securely. We'll see how soon this leak recurs.
At several InspectApedia articles we advise that it's best to find the leak rather than just keep adding refrigerant to an air conditioning or refrigeration system. The technician's view was that finding and fixing a refrigerant leak was so expensive (more than $1,500. USD) that it's better to just give the system a re-charge.
My view was that I could see oil around one of the service valves and that most likely that was the leak point that needed attention.
Watch out: some HVACR service companies including AirServ in the Hudson Valley of New York (the company who performed the split system air conditioner repairs illustrated here) offer a job pricing system that can be both very fair to consumers at the same time a bit nervous-making. At the time the service call is scheduled the operator explains the following service call pricing:
The service technician will arrive, diagnose the trouble and give you a quote to effect the necessary repairs. When you are told that number you can choose to accept the repair job and cost or you can decline it. If you decline the HVAC repair job cost quote then you will be asked to pay a minimum service call, typically around $75.
It is perfectly fair and right that the HVAC repair company should be paid for their time to come and diagnose your system's trouble should you decide not to continue with the work.
The nervous-making part of this arrangement is that even if a company quotes a high price for the repair you may feel that you have to proceed rather than to pay the service call fee and start all over again with another company. So you might feel roped into an over-charge for a repair job. Having an idea of typical repair job costs can avoid this discomfort.
In the split system air conditioning repair quoted here the price would have been a good one if the work had included a measured refrigerant charge quantity that met the equipment manufacturer's specifications and would have seemed a better deal yet had a leak been found and repaired. In out OPINION the cost was a bit steep for the minimal charge and repair that was actually provided.
...
Split System A/C or Heat Pump IO Manuals & Installation Guides
- GENERIC SPLIT SYSTEM PERFORMANCE LINE AC & HP CONDENSER INSTALLATION INSTRUCTIONS [PDF]
- MANUALS & PARTS GUIDES - HVAC - alphabetical by component and brand
- Lennox air conditioning and heat pump owners manuals for air conditioners, air handlers, furnaces, heat pumps, indoor air quality systems, packaged units, water heaters, zone controls and other controls such as thermostats, are provided by Lennox at http://www.lennox.com/support/manuals.asp
- Troubleshooting Split System A/C or Heat Pump Noises, Fujitsu General America, Inc., 353 Route 46 West, Fairfield, NJ 07004, Tel: (888) 888-3424, Tel-Service hotline: (866) 952-8324, Email: hvac@fujitsugeneral.com, Email service: servicehvac@fujitsugeneral.com , retrieved 8/30/12, original source: http://www.fujitsugeneral.com/troubleshooting.htm [copy on file as Troubleshooting Fujitsu Ductless Mini-Splits.pdf]
- Fujitsu Room Air Conditioner, Wall Mounted Type, Heat & Cool Model (Reverse Cycle) [Heat pump units] Operating Manual, Models: ASU18RLXS ASU24RLXS ASU30RLX (indoor & outdoor units). Fujitsu General America, Inc., 353 Route 46 West, Fairfield, NJ 07004, Tel: (888) 888-3424, Tel-Service hotline: (866) 952-8324, Email: hvac@fujitsugeneral.com, Email service: servicehvac@fujitsugeneral.com , retrieved 8/30/12, original source: http://www.fujitsugeneral.com/PDF_06/Operation Manual/%28OM%29ASU18-24RLX-30RLX.pdf [copy on file as FujitsuASU18-24RLX-30RLX.pdf]
...
...
Continue reading at SPLIT SYSTEM AC REFRIGERANT LEAK RE-CHARGE or select a topic from the closely-related articles below, or see the complete ARTICLE INDEX.
Or see SPLIT SYSTEM AIR CONDITIONERS & HEAT PUMP FAQs - questions & answers posted originally at this page
Or see these
Recommended Articles
- DIAGNOSTIC GUIDE A/C or HEAT PUMP
- COMPRESSOR / CONDENSER REPAIR - home
- REFRIGERANT GASES & PIPING - home
- REFRIGERANT LEAK DETECTION
- SPLIT SYSTEM AIR CONDITIONERS & HEAT PUMPS
- CONTROLS for Split System (Ductless) Air Conditioner Thermostats & Operating Controls
- AIR FILTER MAINTENANCE for Split System Air Conditioner - How to Clean a Split System Air Conditioner Filter
- A/C CONDENSATE DISPOSAL for Ductless or Split System Air Conditioners
- SUPPORT SAFETY WARNING for Wall-Mounted Exterior Air Conditioner / Heat Pump Compressor/Condenser Units or Window Air Conditioner Units
- DIAGNOSE WEAK AIR FLOW from a split system air conditioner or heat pump
- DIAGNOSE INADEQUATE HEATING or COOLING, SPLIT SYSTEM from a split system air conditioner or heat pump
- REMOTE CONTROL THERMOSTAT FIX or REPLACE for an air conditioners or heat pump
- SPLIT SYSTEM AC / HEAT PUMP REPAIRS
Suggested citation for this web page
SPLIT SYSTEM AC / HEAT PUMP REPAIRS at InspectApedia.com - online encyclopedia of building & environmental inspection, testing, diagnosis, repair, & problem prevention advice.
Or see this
INDEX to RELATED ARTICLES: ARTICLE INDEX to AIR CONDITIONING & HEAT PUMPS
Or use the SEARCH BOX found below to Ask a Question or Search InspectApedia
Ask a Question or Search InspectApedia
Questions & answers or comments about split system air conditioner operation, installation, maintenance, & repair
Try the search box just below, or if you prefer, post a question or comment in the Comments box below and we will respond promptly.
Search the InspectApedia website
Note: appearance of your Comment below may be delayed: if your comment contains an image, photograph, web link, or text that looks to the software as if it might be a web link, your posting will appear after it has been approved by a moderator. Apologies for the delay.
Only one image can be added per comment but you can post as many comments, and therefore images, as you like.
You will not receive a notification when a response to your question has been posted.
Please bookmark this page to make it easy for you to check back for our response.
IF above you see "Comment Form is loading comments..." then COMMENT BOX - countable.ca / bawkbox.com IS NOT WORKING.
In any case you are welcome to send an email directly to us at InspectApedia.com at editor@inspectApedia.com
We'll reply to you directly. Please help us help you by noting, in your email, the URL of the InspectApedia page where you wanted to comment.
Citations & References
In addition to any citations in the article above, a full list is available on request.
- Eric Galow, Galow Homes, Lagrangeville, NY. Mr. Galow can be reached by email: ericgalow@gmail.com or by telephone: 914-474-6613. Mr. Galow specializes in residential construction including both new homes and repairs, renovations, and additions.
- [2] Modern Refrigeration and Air Conditioning, A. D. Althouse, C.H. Turnquist, A. Bracciano, Goodheart-Willcox Co., 1982
- [3] Principles of Refrigeration, R. Warren Marsh, C. Thomas Olivo, Delmar Publishers, 1979
- [4] "Air Conditioning & Refrigeration I & II", BOCES Education, Warren Hilliard (instructor), Poughkeepsie, New York, May - July 1982, [classroom notes from air conditioning and Refrigeration andAir Conditioning Technology, 5th Ed., William C. Whitman, William M. Johnson, John Tomczyk, Cengage Learning, 2005, ISBN 1401837654, 9781401837655 1324 pages
- In addition to citations & references found in this article, see the research citations given at the end of the related articles found at our suggested
CONTINUE READING or RECOMMENDED ARTICLES.
- Carson, Dunlop & Associates Ltd., 120 Carlton Street Suite 407, Toronto ON M5A 4K2. Tel: (416) 964-9415 1-800-268-7070 Email: info@carsondunlop.com. Alan Carson is a past president of ASHI, the American Society of Home Inspectors.
Thanks to Alan Carson and Bob Dunlop, for permission for InspectAPedia to use text excerpts from The HOME REFERENCE BOOK - the Encyclopedia of Homes and to use illustrations from The ILLUSTRATED HOME .
Carson Dunlop Associates provides extensive home inspection education and report writing material. In gratitude we provide links to tsome Carson Dunlop Associates products and services.


