 Oven Door Glass Shatter, Cause, Repair, Prevention
A Jenn-Air oven door glass suddenly shattered: Why? How to replace a broken oven door glass
- POST a QUESTION or COMMENT about : diagnosis & repair help for oven door glass or oven door replacement
Broken oven door glass replacement:
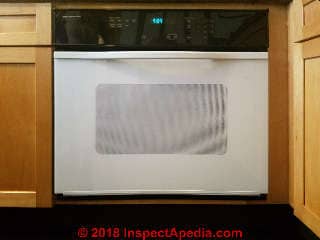
Page top photo: when a Jenn Air oven door glass suddenly shattered and the door front exploded into thousands of fragments we were able to find a white oven door glass replacement and may later install a black oven door glass replacement for this appliance.
This article describes the causes of sudden shattering of a glass-fronted oven door, followed by a detailed step-by step guide to finding and replacing the glass front for an oven door, using a Jenn-Air oven as the model.
We also give temperature measurements obtained at different locations on the front of a glass-faced Jenn-Air built-in electric oven.
InspectAPedia tolerates no conflicts of interest. We have no relationship with advertisers, products, or services discussed at this website.
- Daniel Friedman, Publisher/Editor/Author - See WHO ARE WE?
Oven Door Glass Shatter - Replace - Prevention, Jenn-Air & Other Ovens
 When I pulled slightly upwards and out to open the glass-fronted door of a Jenn-Air electric oven, I was startled by a sudden explosion of glass fragments as the glass front broke into thousands of pieces.
Glass blew mostly onto the floor but we found glass fragments atop the trim over nearby windows and in more-substantial quantity on the countertops above and around the oven.
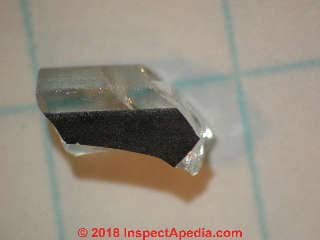
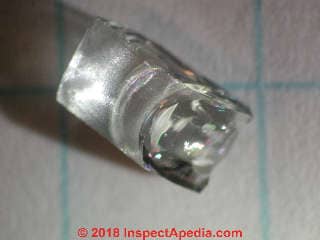
We enlarged glass fragments from our "exploded" Jenn-Air glass-fronted 30-inch electric oven to show both the rectangular nature of most of the fragments and the characteristic concoidal end-fracture that helps identify glass under the microscope.
Watch out: a child or adult whose face happens to be at eye level with the oven door glass when the door breaks could suffer serious injury including to the eyes.
As you can see from my second photograph, not all of the glass fragments are rectangular.
[Click to enlarge any image]
Here we describe both obvious and more subtle causes for the sudden shattering of a glass-fronted oven door.
Possible Contributing Causes to Sudden Oven Door Glass Breakage
It is possible that the sudden oven door glass fracture occurred because of a combination of
- Oven door glass age plus effect of nickel sulfide NiS inclusions used in tempered glass -
See details
at SPONTANEOUS GLASS BREAKAGE NiS - Localized mechanical stress in the oven door glass occurring at oven door handle mount holes in the oven door glass
Later models of oven doors from the same as well as other manufacturers have done away with the use of holes in the glass through which the oven door handle was mounted - Additional thermal stress of the ovcen door glass from repeated use of the high temperature oven self-cleaning feature
Our oven door glass fragment below illustrates that some of the glass shapes are not rectangular and may contain sharper edges.
Other glass particles were much smaller than these bits of glass that I collected from the upper edge of horizontal trim above a nearby window.
Causes of Oven Door Glass Breakage
- Impact breaks oven door glass: speaking with one of the providers of a replacement Jenn-Air oven door glass, the white glass shown at the top of this page, our advisor, G.R. reported that one of his purchasers was repairing an oven door glass broken when her toddler drove his tricycle into the oven front.
- Natural stress points in oven door glass: I spoke with an engineer who had worked in the glass industry about probable causes of oven door glass breakage. He pointed out that on older models of Jenn-Air (and probably other manufacturers') glass fronted ovens, the oven door handle is bolted through the glass.
As you can see in my oven door parts photo above, four holes are cut into the oven door glass of that older Jenn-Air 30-Inch oven. The part number for this oven door glass is Jenn-Air #71001833.
Two holes carry machine-threaded bolts that secure the handle to a metal bracket that sits behind the door glass and inside of the rectangular oven door front frame - marked by the red arrows in the photo.
Blue arrows mark the location of two more oven door handle studs that project into the glass, presumably to stabilize the handle.
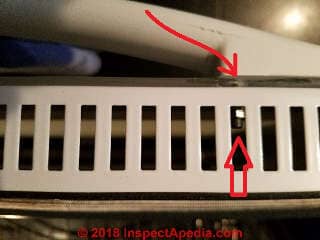
Watch out: as you can see in my photo below, the upper edge of this oven door glass was fractured and damaged even on receipt from the supplier. The edge fracture might be a trivial manufacturing defect, failure to grind the glass edge smooth, but it's rather suggestive that the area of damage, pointed-to by my curving red arrow, occurs exactly and only where the oven door handle bolt penetrates the glass.
We received this Jenn-air replacement oven door front in this condition. The red arrow points to the door handle bolt, just visible through ventilating slots in the door frame top.
This used oven door front was never further-disassembled by the supplier, so it is possible that this fracture originated during the stresses of use by the previous owner, or even during handling of the door during packaging and shipping.
- Stress from repeated high-temperature heating of the oven door glass: several replacement oven door glass suppliers with whom I spoke opined that using the self-cleaning cycle on this electric oven subjects the glass to repeated cycling at very high temperatures, possibly stressing and weakening the tempered glass front.
A few owners as well as repair people with whom we discussed this point said they that after replacing a broken door front they decided to eschew using the self-cleaning feature. We have not asked the manufacturer about this view. - Improper oven door operation: attempting to "lift up" the oven door to completely remove it from the oven, for example during cleaning, torques the bolts through the glass and is likely to break the oven glass.
Watch out: do not attempt to remove a Jenn-Air oven door simply by pulling up on the door handle. You'll be sorry. Instead, to remove the oven door you will need to follow a procedure similar to the door removal steps that we give below in this article. - Use of aggressive scouring powders or pads that scratch the oven door glass may contribute to breakage.
We use only simple glass cleaner or a soap and water solution to clean oven door glass.
- Cleaning the oven door glass while it's hot.
Watch out: do not try to clean an oven door glass when the oven door and its glass are still hot. That's likely to break the glass too.
Using a Jenn-Air 30-Inch Oven without its Front Door Glass
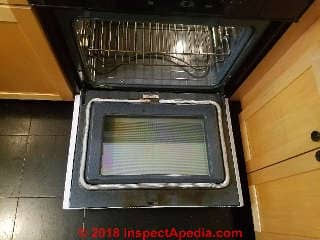
The homeowner elected to continue to use this Jenn-Air oven after the debris from its broken glass front had been thoroughly cleaned away. Considerable cleanup was needed as glass fragments were found all over many kitchen surfaces.
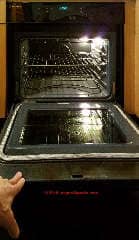
Watch out: If your oven door glass has broken away, the resulting reduction in weight of the door means that it will no longer stay down or fully open on its own. This is a dangerous condition, particularly when the oven is in use and is hot as a flipping-up door might strike and burn someone accessing the oven.
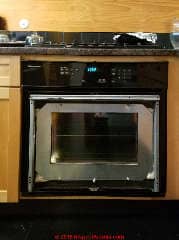
Below is a Jenn-Air 30-inch oven with its door glass front broken away.
If you are continuing to use your oven without its outer glass front be sure that you have help with the door when it must be opened.
Temperature Measurements of the Jenn-Air Oven Door
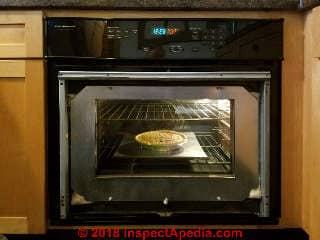
To simulate real-world conditions while performing some simple temperature measurements, we combined this study with the baking and later consumption of an apple pie.
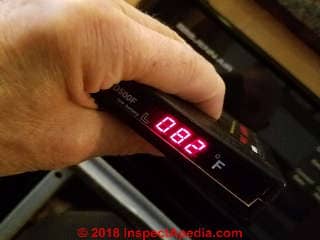
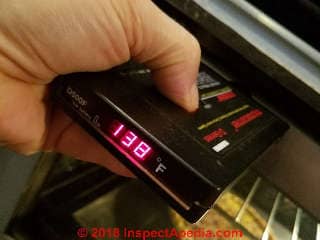
With the oven temperature set to 350°F, using an Exergen™ infra-red scanning thermometer we made approximate temperature measurements all around the oven front door shown above.
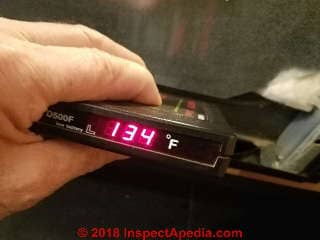
We observed temperatures ranging from 82°F to 138°F at various test points around the oven door front. The lowest temperature was at the oven door upper left corner and the highest temperature we measured was at the oven door top center.
A similar temperature was found at the oven door bottom right corner - below.
Interestingly the highest temperature we measured around the remaining (inner) glass window of this oven door was just 105°F, suggesting that where we were finding higher temperatures there may have been small air leaks out of the oven or differences in heat reflection of various oven metal components and surfaces.
In our opinion, at these temperatures it was safe to continue to use the oven.
Watch out: we cannot promise you that your oven, that we know nothing about, is similarly safe to use.
We discuss the ignition point of the wood at FIRE CLEARANCES, SINGLE-WALL METAL FLUES
and at PYROLYSIS EXPLAINED.
How to Remove the Oven Door from an Older Jenn-Air Oven
 These instructions pertain to the Jenn-Air Oven Model # WW30400B and
Oven door glass Part # is 71001833. The parts and procedures for your oven door, if it's a different brand or model, may differ. Be sure to follow the instructions provided by your oven manufacturer.
Special thanks to Gene Ruffenach, ADEMCO Alarm Applied Sciences, Excelsior, MN, for suggesting the steps in removing and replacing a Jenn-Air oven door outer glass.
Watch out: mishandling the glass-fronted oven door can break the glass and risk serious injury. Failure to properly re-install an oven door may leave the oven unsafe and might risk burns or other injuries.
- Open the oven door
wide and have an assistant hold the door open if it won't stay open on its own.
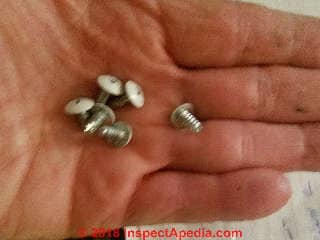
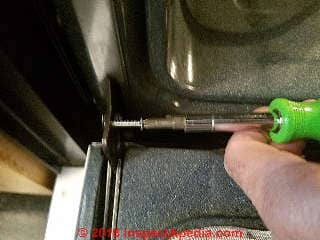
As illustrated in the photo above, at each oven door side hinge, screw in a #6/32 machine screw into the small hole provided by the manufacturer. The screw length can be 3/4" to about 1 1/4". Length is not critical.
These No. 6x32 x 1" machine thread screws may be provided by a thoughtful replacement oven door glass vendor but if not you can easily buy them at your local hardware store.
The screws will hold the door open at a modest angle that will permit removal of the door after additional steps are followed below.
Watch out: take care when releasing the oven door against these screws. These are small diameter screws that are easily bent. Below I'm installing a 6x32 retaining screw into the left side hinge of the oven door.
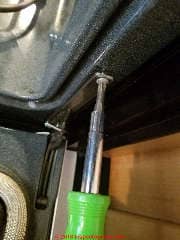
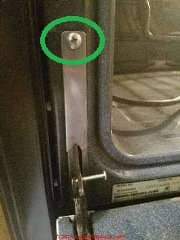
- Remove the top screw from the flat metal retaining clip
at upper edge of the openings at the oven door left and right hinges. Below I'm removing the screw holding the retaining clip at the right side hinge of the oven door.
Then remove the retaining clips - under my thumb.
These retaining clips hold the oven door hinges properly in place during normal use. Removing them will permit you to lift away the oven door from the oven.
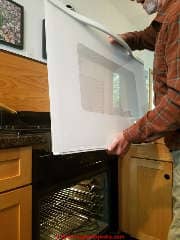
- Lift up and out to remove the oven door.
With the door 3/4 closed and held in place by the special 6x32 screws you installed earlier, grasp the door in the middle of its two sides and lift the door up and out. You may need to wiggle the door slightly .
Watch out: Do not try to lift out the door by the top handle - if your door front and handle are still in place. Doing so will certainly break the oven door glass if it's there. - Place the oven door with its interior side down on a soft towel on a table top
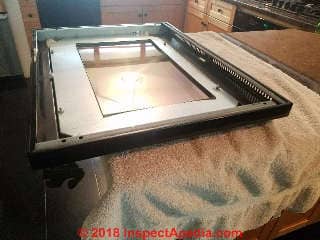
or other suitable working surface. Let the door hinges extend just off of the edge of the table - shown below.
How to Order a Replacement Oven Door or Oven Door Glass
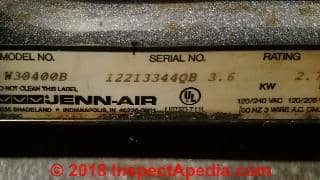
Find the brand and model number of your oven. Usually that data is on a tag affixed to the oven face frame, often near the bottom as shown in our Jenn Air 30" oven photo below.
If you have the instruction or installation / operation (IO) manual for your oven you will find the model number in that document as well. Be sure to note the width of your oven (24" or 30", for example) as often instructions cover more than one oven size.
Your IO manual for your oven will contain a parts explosion that gives the part number for your oven door assembly or for just the oven door front glass. In our photo you can see the model No. W30400B and also the serial No. for this oven.
From the parts manual we found that the part number for this oven door glass is Jenn-Air #71001833. The oven manufacturer or an appliance repair company can also help you specify the correct replacement part number.
We found numerous online and local appliance repair companies offering to perform oven repairs or to provide oven repair parts. However the older the oven the longer you may have to wait for a replacement oven door glass or oven door to appear in a marketplace such as EBay.
We purchased our first replacement Jenn-Air oven door glass via E-Bay from Gene Ruffenach, previous operator of an alarm company in Excelsior MN and a second replacement Jenn Air oven door glass from a separate vendor on E-Bay.
The vendor notes that the same 30-inch floating glass oven door outer door glass fits several Jenn-Air Whirlpool oven models.
To protect their market, EBay doesn't make direct, independent conversation with a vendor easy - all communication has to pass through ebay's secure messaging service.
How to Install the Jenn-Air Replacement Oven Door Front Glass
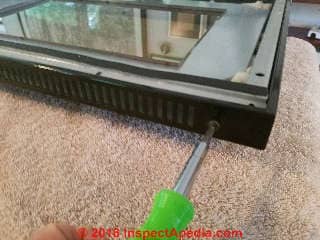
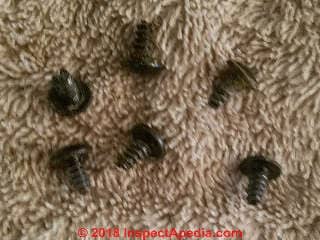
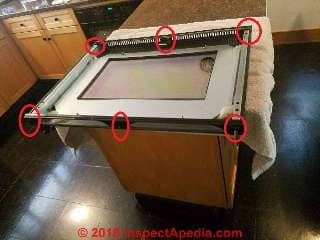
- Remove the six short metal-thread screws (black if your oven door was black, or white if the door was white) found three across the top and three across the bottom of the oven door assembly.
- Gently remove the entire surrounding metal bracket that encloses the oven door assembly.
In my photo the red circles show the six screw locations. You may have to wiggle the frame gently to loosen and free it, especially if my one of my grand-daughters has been baking in your oven without cleaning it.
- Prepare the replacement oven door outer glass and frame assembly.
If your replacement oven door front glass comes already assembled with its own frame you 'll use that one and you'll discard the frame you just removed.
Watch out: do not lift the replacement oven door glass assembly by the handle or you may break the glass.
Otherwise keep the frame you removed as you'll need it to re-assemble the door with its new glass before proceeding with the rest of this step.
Watch out: if you are installing a bare glass-only replacement into the existing oven door outer frame, you will need to insert the oven door handle screws and studs into the holes in the glass top, then screw the handle bolts to the back side of the supporting glass-top bracket.
Below you can see the black metal frame, the silver metal glass support bracket, and the door handle lining up with the bracket holes. The glass itself is not shown here.

Take care not to over-tighten the oven door handle screws or you will break the glass.
Watch out: do not flex the replacement oven door glass frame or you may break the glass.
Clean the interior side of the replacement outer oven door glass. You will never be able to remove any smudges or bits of packing material after assembly. [Photo below]
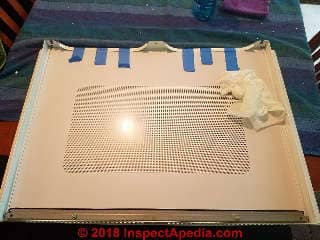
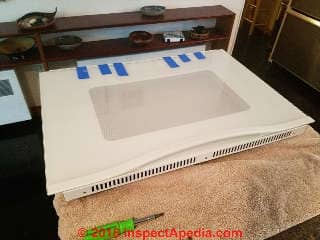
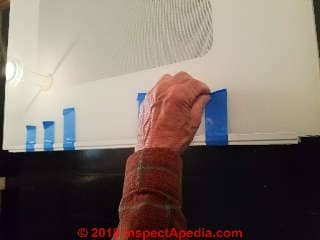
My photo shows that the bottom of the door glass frame is held in place by masking tape. The replacement glass, in its frame, is placed with its interior surface "up" for cleaning. I'm cleaning off styrofoam bits and fingerprints to prepare the glass for assembly.
Watch out: remember to remove this masking tape, at least the tape that is on the door glass interior surface, before the glass and frame are placed over the oven door assembly.
Clean the interior side of the oven door inner-glass - this is also an oven door interior space you won't be able to access once the door has been reassembled. [Photo below]
Watch out: just use ordinary non-abrasive glass cleaner. Do not scour or scrape or scratch oven door glass or it's likely to break when heated.
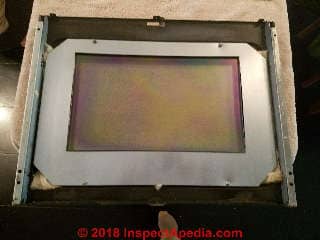
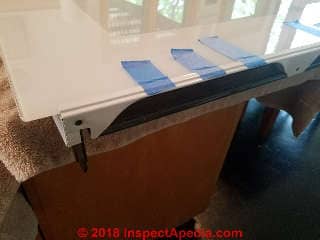
- Slide the oven door outer glass and its frame over the oven door assembly.
Watch out: do not flex the replacement oven door glass frame or you may break the glass.
Take care to assure that the outer door glass frame slides over the outside of the oven door assembly and, of course, that you've got the handle at what's going to be the oven door top.
Our second photo shows that we left the masking tape in place on the outer surface of the oven door glass in order to keep that bottom bracket secured to the glass during re-assembly.
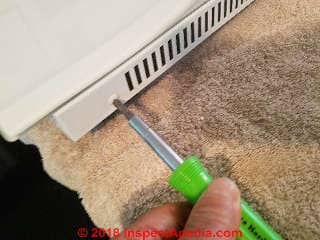
- Insert the six color-matched sheet metal screws that secure the outer oven door glass frame to the oven door body.
Once the outer oven door glass frame is in place over the oven door assembly and when the screws are in place you will, of course, remove the remaining masking tape.
- Return the oven door to the oven, sliding its hinges into their respective slots.
Watch out: take care to lift the oven door only by its outer frame, top and bottom or by its sides, never by the door top handle or you'll be even sorrier than when the door broke the first time.
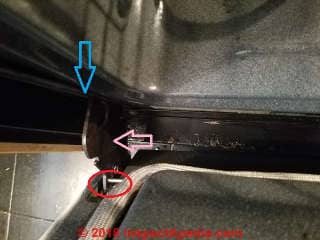
The second photo just below shows the oven door hinge sliding into place in the oven body.
The blue arrow points to the top of the receiving slot in the oven body, the pink arrow indicates the hinge plate that's attached to the oven door, and the red circle shows that the 6x32 screw is still in place holding the hinge in the partly-open position in the oven door.
- Replace the oven door hinge clips by holding the clip in place and restoring the metal screw through the clip top into the oven frame.
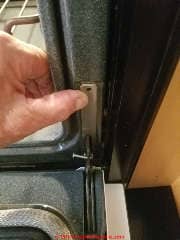
My photos show the right hand clip being put in place (my thumb again) and then the left hand clip with the screw restored to the top opening in the clip (green circle).
- Remove the temporary hinge-opening 6x32 screws [photo below]
- Gently close the oven door. You've finished.
...
...
Continue reading at APPLIANCE DIAGNOSIS & REPAIR - topic home, or select a topic from the closely-related articles below, or see the complete ARTICLE INDEX.
Or see these
Recommended Articles
- APPLIANCE NOISE DIAGNOSIS
- SPONTANEOUS GLASS BREAKAGE NiS - explanation of spontaneous breakage of tempered glass traced to NiS inclusions
Suggested citation for this web page
OVEN DOOR REPAIR / REPLACE, Jenn-Air at InspectApedia.com - online encyclopedia of building & environmental inspection, testing, diagnosis, repair, & problem prevention advice.
Or see this
INDEX to RELATED ARTICLES: ARTICLE INDEX to APPLIANCE REPAIR
Or use the SEARCH BOX found below to Ask a Question or Search InspectApedia
Ask a Question or Search InspectApedia
Try the search box just below, or if you prefer, post a question or comment in the Comments box below and we will respond promptly.
Search the InspectApedia website
Note: appearance of your Comment below may be delayed: if your comment contains an image, photograph, web link, or text that looks to the software as if it might be a web link, your posting will appear after it has been approved by a moderator. Apologies for the delay.
Only one image can be added per comment but you can post as many comments, and therefore images, as you like.
You will not receive a notification when a response to your question has been posted.
Please bookmark this page to make it easy for you to check back for our response.
IF above you see "Comment Form is loading comments..." then COMMENT BOX - countable.ca / bawkbox.com IS NOT WORKING.
In any case you are welcome to send an email directly to us at InspectApedia.com at editor@inspectApedia.com
We'll reply to you directly. Please help us help you by noting, in your email, the URL of the InspectApedia page where you wanted to comment.
Citations & References
In addition to any citations in the article above, a full list is available on request.
- Our recommended books about building & mechanical systems design, inspection, problem diagnosis, and repair, and about indoor environment and IAQ testing, diagnosis, and cleanup are at the InspectAPedia Bookstore. Also see our Book Reviews - InspectAPedia.
- In addition to citations & references found in this article, see the research citations given at the end of the related articles found at our suggested
CONTINUE READING or RECOMMENDED ARTICLES.
- Carson, Dunlop & Associates Ltd., 120 Carlton Street Suite 407, Toronto ON M5A 4K2. Tel: (416) 964-9415 1-800-268-7070 Email: info@carsondunlop.com. Alan Carson is a past president of ASHI, the American Society of Home Inspectors.
Thanks to Alan Carson and Bob Dunlop, for permission for InspectAPedia to use text excerpts from The HOME REFERENCE BOOK - the Encyclopedia of Homes and to use illustrations from The ILLUSTRATED HOME .
Carson Dunlop Associates provides extensive home inspection education and report writing material. In gratitude we provide links to tsome Carson Dunlop Associates products and services.


