 Interior Ceilings
How to Inspect, Diagnose, & Repair Problems in Building Interior Ceilings
- POST a QUESTION or COMMENT about troubleshooting & fixing cracks, sags, loose plaster, & other interior ceiling problems
Ceiling covering choices:
This article describes the major ceiling finishes used in buildings and identifies common problems in, and repair of building interior ceilings and ceiling materials. Information is provided about visual clues of building condition, such as evidence of a history of leaks, as well as evidence of hazardous materials and conditions such as the probable presence of animal allergens, asbestos, or mold.
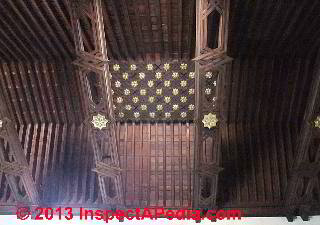
We discuss how to identify and correct various building leaks, moisture, and venting problems such as ice dams, blocked attic ventilation, excessive indoor humidity, how to prevent indoor mold, and how to respond to building floods and similar emergencies. Page top wood ceiling photograph - Tlaxcala, Mexico.
InspectAPedia tolerates no conflicts of interest. We have no relationship with advertisers, products, or services discussed at this website.
- Daniel Friedman, Publisher/Editor/Author - See WHO ARE WE?
Interiors Ceiling Finishes: Types, Defect Recognition, Repair for Building Interiors
[Click to enlarge any image]
The following building interior ceiling finish type descriptions, and interior wall defect descriptions are adapted and expanded from original citations provided courtesy of Carson Dunlop Associates, Home Reference Book, with permission.
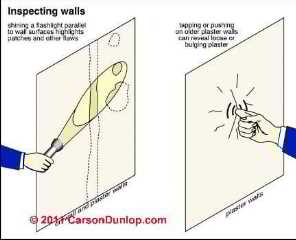
The sketch at left illustrates two simple methods for inspecting interior building ceilings for common defects: use of parallel or oblique lighting (see for details) and tapping. The drawing is provided courtesy of Carson Dunlop Associates and appears in their Illustrated Home.
At USING LIGHT TO FIND MOLD we provide a detailed example and procedures for using lighting to find otherwise hard-to-see building defects.
Also see Best Interior Finish Practices and see Q&A on Building Interiors: Leaks, Stains, Damage, Repairs and see FLOOR DAMAGE DIAGNOSIS and CEILINGS & WALLS, PLASTER TYPES. The photo at page top shows the grid system for supporting a suspended panel ceiling.
Types of Major Ceiling Finishes Described
Ceiling finishes provide a decorative skin to conceal building components.
Ceiling finishes hide structural members, insulation, ductwork, pipes, and wires. Most good ceiling finishes are flat and straight. Surfaces may be smooth or textured and better ceiling finishes are durable.
Some ceiling finishes are versatile, taking decorative finishes such as stain, paint or wallpaper readily.
Ceilings may make a decorating statement, or may be simply background. In some cases, the combustibility of ceiling finishes may be of interest. Below roofs, kitchens and bathrooms, resistance to water damage is an asset.
Plaster / Drywall Wall Materials, Types, Properties
Please see our discussion
at CEILINGS & WALLS, PLASTER TYPES where we provide details about types of plaster ceilings,
and also see our plaster and drywall information
Also see CHINESE DRYWALL HAZARDS.
As we discussed about interior walls,
our AGE of a BUILDING, HOW to DETERMINE article series we explain how you can guesstimate the age of a building by taking a look at its wall construction and finish materials.
Acoustic Ceiling Tiles
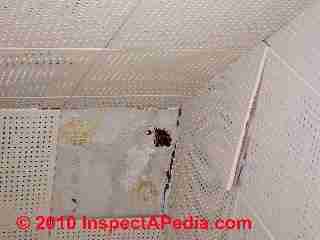
Acoustic ceiling tiles, typically made of fiber board and perforated to improve their acoustic performance, have been popular since the 1950s.
Typically, they are 12 inches by 12 inches and are stapled or nailed to strapping. This type of ceiling tile was often installed when finishing a basement, or was installed over a damaged plaster ceiling.
The tiles have better acoustic properties than plaster and drywall, although they are subject to mechanical damage and water damage, similar to drywall or plaster. Repairs are easy if matching tiles can be found. The tiles can be painted, with some loss of acoustic performance.
Often you will find that acoustic ceiling tiles have been installed on furring strips nailed over an older ceiling that was in poor condition, such as we show in this additional photo where demolition was in process.
See details about asbestos in ceiling products found
at ASBESTOS CEILING TILE IDENTIFICATION.
Suspended Ceilings and Suspended Ceiling Tiles - Properties, Photos
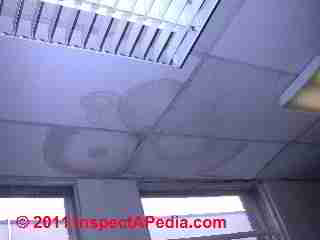
Suspended ceilings or suspended ceiling tiles became popular in North America in the 1960s, and can be made of fiber board or fiberglass, for example. Some have a plastic coating.
Details about suspended ceilings or drop panel ceilings are found
at CEILINGS, DROP or SUSPENDED PANEL
Aluminum & Pressed Tin Metal Ceilings - Properties, Photos
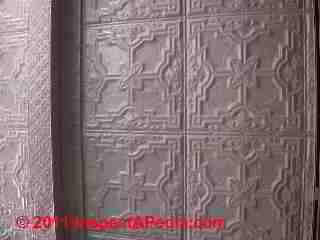
Metal ceilings were typically tin and most often were installed in kitchens, during the late 1800s and early 1900s.
Tin or aluminum embossed or pressed design was often a decorative square pattern intended to simulate ornate plaster ceilings.
This was a fairly durable ceiling system and in some areas has become fashionable again in both nailed or glued ceiling panels as well as in suspended or drop ceiling panels using embossed metal designs.
Details about the history, installation, inspection, troubleshooting & repair of tin ceilings or embossed tin or aluminum ceiling panels, including sources of modern metal ceiling panels are found
at METAL CEILINGS ALUMINUM & TIN.
Angalypta & Lincrusta Ceiling & Wall Coverings
Linocrusta (or Lincrusta) ceilings are also an embossed covering product but the material is leatherette-like material similar to linoleum - these embossed ceiling, wall and frieze coverings are not metal though from a distance one might be confused about what they are.
As we noted
at LINOLEUM & SHEET FLOORING Descendents of Linoleum include Anaglypta and Lincrusta (many writers spell it "Linocrusta or linacrusta", an embossed patterned covering used on walls and ceilings. Linocrusta designs are normally much more flat - the embossed design is in low relief.
Lincrusta (1877) was originally identified by its inventor, Frederick Walton, the inventor of linoleum(1860) as Linoleum Muralis.
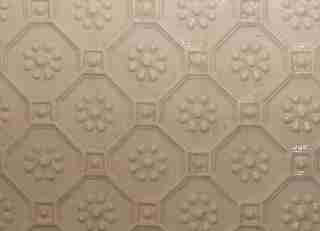
Photo at left: Lincrusta in Byzantine pattern - Wikipedia 11/25/2013
There are also some metal ceiling lookalike products that are actually drop-in panels, typically 2' x 2' or 2' or larger, that are actually a suspended ceiling system. It's easy to spot a metal panel suspended ceiling by looking more closely for its supporting grid.
Lincrusta is a deeply embossed wallcovering. A British invention, it was the brainchild of inventor Frederick Walton who earlier (1860) patented linoleum floor covering. Lincrusta was launched in 1877 and was used in a host of applications from royal homes to railway carriages. The linseed gel continues to dry for many years, so the surface actually gets tougher over time. Many examples [of lincrusta] over a hundred years old can still be found throughout the world.
Lincrusta is made from a paste of gelled linseed oil and wood flour spread onto a paper base. It is then rolled between steel rollers, one of which has a pattern embossed upon it. ] It was originally manufactured in Sunbury-on-Thames ... and is now produced in Lancashire ....
The first production of Lincrusta in the United States was in 1883 in Stamford, Connecticut. - Wikipedia retrieved 11/25/2013
Lincrusta wallpaper and ceiling coverings are still produced, including some products made using original materials and pattern dies, and are available worldwide.
What's the difference between Anaglypta (1887) and Lincrusta (1877) Thomas Palmer produced a more light-weight version of embossed wall and ceiling coverings, solving a weight and stiffness issue with the original lincrusta product. Interestingly and not surprising, Mr. Palmer had previously worked for Mr. Walton.
"Lincrusta became an instant success because it was the first washable wallcovering and appealed to the Victorians because of its sanitary properties as well as its durability and ornate effects.
Originally made on a linen backing, [Lincrusta] was however, quite rigid. Because of this, an employee by the name of Thomas J Palmer invented a similar product which, being made from wood pulp and cotton, was lighter and more flexible. This was to become Anaglypta (from the Greek words 'Ana' (meaning raised) and 'Glypta' (meaning Cameo)).
The Anaglypta brand was purchased from CWV in May of 2012 by Retford Wallcoverings Limited who manufactered Anaglypta products under licence for many years prior to the acquisition" - Wikipedia retrieved 11/25/2013
Where to buy Anaglypta & Lincrusta Ceiling & Wall Coverings & Wallpaper
- Anaglypta
Retford Wallcoverings
Coringham Road Industrial Estate
Gainsborough
Lincolnshire
DN21 1QB, Website: http://www.anaglypta.co.uk, Tel: 01427 616597 Email: enquiries@anaglypta.co.uk, producing angalypta paintable embossed or patterned wallpaper since 1887.
"Anaglypta consists of a range of vinyl and paper paintable textured wallcoverings, produced on traditional paper and paste-the-wall substrates. " - Wikipedia retrieved 11/25/2013 - Lincrusta, CWV limited, Morecambe, Lancashire, England, website: http://www.lincrusta.com, Tel: +44 (0) 1254 222 803. Quoting:
In addition to Lincrusta, CWV Limited also supplies wallcoverings under the world famous Anaglypta, Crown, Coloroll and Vymura brands to retailers and wholesalers internationally. - Lincrusta Wallpaper Direct, website: http://www.wallpaperdirect.com [Dream on if you hope to find out who or where this company actually is - Ed.]
- Also see product sources listed at METAL CEILINGS ALUMINUM & TIN
Stucco/Textured Interior Wall Finishes
Interior stucco is essentially plaster, and is typically installed in a two or three coat process. The finish is often sculpted or worked to provide a decorative appearance. The texturing is done with trowels, sponges, brushes, or other tools to give the desired effect.
Details: See these stucco articles for details:
STUCCO WALL METHODS & INSTALLATION,
and STUCCO OVER FOAM INSULATION (on exteriors),
and STUCCO PAINT FAILURES (on building exterior or interior walls).
Common Interior Ceiling Finish Problems
Water Damaged or Stained Interior Ceilings
As we also discuss
at WALL FINISHES INTERIOR, water damage is one of the most common problems on interior finishes.
Common water sources that show up as ceiling leaks or leak stains include roof leaks, flashing leaks, ice damming, window and skylight leaks, plumbing leaks, leaks from hot water heating systems, and condensation.
Water damage in or on a ceiling may also result from such things room humidifiers or dehumidifiers, and other sources of indoor water or high moisture levels, but the most common source of water damage to ceilings is of course leaks from above.
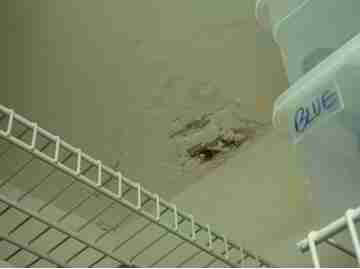
The photo [at left] of water stains on a closet ceiling is discussed along with diagnostic suggestions at Q&A on Building Interiors: Leaks, Stains, Damage, Repairs
When looking into ceiling leak stains, you want to find
- the source of the water,
- whether the problem is still active,
- whether there is any concealed damage
- the cost to correct the water problem if needed, e) and the cost to repair the damaged building materials.
While water damage often looks more serious than it is, a stain such as the one in our photo (above left) might in fact be hiding a larger mold problem or rot or insect damage that were caused by a long-term leak into the structure.
On the other hand, short term exposure to water will not harm many building materials. For an exception
Ceiling (or wall) plaster and drywall however, are easily damaged by water. Stains appear quickly and persist after the problem is solved. The material that can be easily seen is the first material to deteriorate. Mold can develop on the front or back surface of plaster or drywall if it is chronically wet. Mold will not disappear but will go dormant if the moisture source is removed.
Both plaster and drywall ceilings that have been damaged can be readily patched where small damaged areas are noted.
But as we discuss at Q&A on Building Interiors: Leaks, Stains, Damage, Repairs, if there is evidence that a long term leak has been going on, further investigation - a look into the ceiling or wall cavity - may be justified, and if a large mold contamination is found (much more likely on drywall than on plaster) a cleanup is needed.
Dry walling over old plaster or drywall is sometimes done where large areas are damaged.
Watch out: do not just drywall over building ceilings or walls where there has been a long history of leakage or where there is a serious mold problem. Doing so risks covering up a more serious problem that can lead to the need to remove the drywall, clean and fix conditions in the ceiling or wall, and then put it back - doubling the cost of the job.
If you are considering drywalling over an old ceiling or wall where there is evidence of leakage or mold, make a few test cuts into the worst or most-suspect areas to look into the building cavities for damage before proceeding.
See complete details about building water entry beginning
For a complete guide to diagnosing stains on building interiors
see STAIN DIAGNOSIS on BUILDING INTERIORS.
Chinese Drywall Outgassing Hazards at Building Ceilings (or Walls)
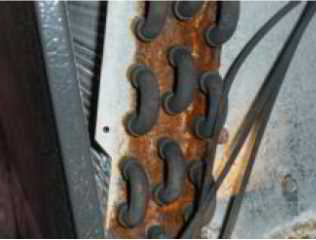
Details are found at at CHINESE DRYWALL HAZARDS, This article describes a corrosive and smelly sulphur outgassing problem that occurs in certain homes built or renovated since 2001. Excerpts are below.
The image of corrosion on a cooling coil that was blamed on Chinese drywall outgassing is provided by the U.S. CPSC.
Cracks or Sags in Plaster or Drywall Interior Ceilings, Diagnosis & Repair
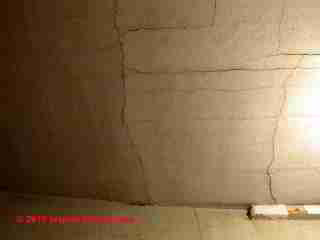
Large sections of ceilings may become loose where plaster has lost many of its keys due to vibration and wear and tear. Where there is danger of plaster falling, this should be corrected promptly. People can be seriously hurt by plaster falling, especially from a ceiling.
A sagging ceiling might indicate that the plaster or drywall is about to fall.
Most interior ceiling or wall cracks are cosmetic. In those cases, patching and monitoring the crack for recurrent or ongoing movement makes sense. Where cracks are accompanied by sagging, at least partial ceiling replacement may be necessary.
Details are
at PLASTER, LOOSE FALL HAZARDS where we illustrate loose plaster and report a case of a catastrophic plaster ceiling collapse.
Sagging plaster ceilings (in our photo above and in Carson Dunlop Associates' sketches below, are traced to broken plaster keys - the protruding plaster that projected through the original plaster wood or metal lath and formed a "key" that held the plaster in place.
Mold on Interior Ceiling Surfaces
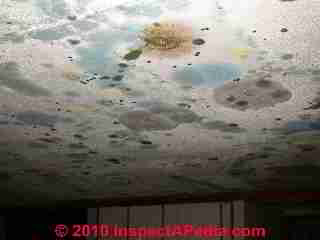
Where there is a large (more than 30 sq.ft.) reservoir of contiguous indoor mold, such as is shown on our moldy ceiling photo below, there are almost certainly health hazards for building occupants. But as we discuss
at Q&A on Building Interiors: Leaks, Stains, Damage, Repairs, small moldy areas may be of no significant health concern and can be cleaned or removed by most homeowners or a handyman who follow simple basic precautions.
We emphasize in all of our notes on indoor mold inspection and testing that a competent inspection for mold contamination begins outside, and should include the entire structure.
An inspection should consider not just current leaks, but stains or construction details making leaks likely, the history of building leaks or moisture problems, or building conditions or features that make water or moisture problems likely in certain areas.
These observations aid in deciding whether or not the risk of a hidden mold problem justifies more in-depth invasive inspection and testing.
But in our photograph (above-left), no inspection is necessary to know that a professional mold cleanup is needed at this building.
Nevertheless, an independent (no conflicts of interest) expert who has no connection with the mold cleaning company, can define the necessary scope of work and can assist later in confirming that the cause as well as the effect of conditions that led to this moldy ceiling have been adequately addressed.
At USING LIGHT TO FIND MOLD we provide a detailed example and procedures for using lighting to find mold on surfaces where mold may be present but where it is not immediately obvious.
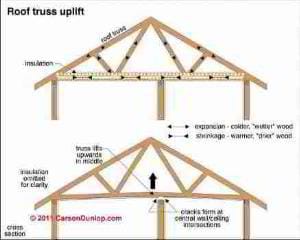
Roof Truss Uplift and Cracks or Ceiling Nail Pops: Details of Truss Uplift Cause and Cure of Interior Wall/Ceiling Gaps or Cracks
Ceiling Nail Pops & Tears at the Wall Top caused by Roof Truss Uplift
Nail pops found in some building ceilings and actual tears or cracks at the wall/ceiling juncture at building walls located under the center of certain roof trusses when moisture & temperature differences between the truss bottom chord and upper members cause the truss to arch.
Details and more illustrations of the roof truss uplift problem are found at
The drawings of roof truss uplift and corrective measures for truss uplift shown here are provided courtesy of Carson Dunlop Associates and appears in their Illustrated Home.
List of Materials Used to Produce Ceiling Tiles & Ceiling Coverings
Also see CEILING FINISHES INTERIOR and CEILINGS, DROP or SUSPENDED PANEL
- ANAGLYPTA CEILINGS & WALLS
- Aluminum (METAL CEILINGS ALUMINUM & TIN)
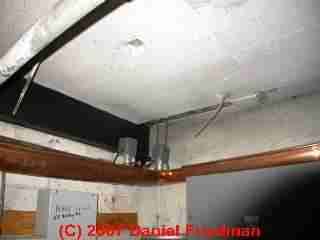
- Asbestos [both in pure tremolite asbestos blocks as fireproofing (photo at left), and as a mixed-in ingredient with other materials such as wood fibers]. (ASBESTOS IDENTIFICATION IN buildings)
See ASBESTOS CEILING TILE IDENTIFICATION (article above) and see CELOTEX ASBESTOS PRODUCTS -. More details on spray-on and other fireproofing products are at ASBESTOS FIREPROOFING SPRAY-On Coatings - Cement-asbestos millboard
- Chipboard
- Copper
- Drywall - see DRYWALL, FIBERBOARD, PLASTER INTERIORS
- Fabrics
- Fiberboard insulating sheathing, wall & ceiling panels - see SHEATHING, FIBERBOARD
- Fiberglass ceiling panels. See FIBERGLASS INSULATION IDENTIFICATION & PROPERTIES and FIBERGLASS HAZARDS
- Glass
- Gypsum - see DRYWALL, FIBERBOARD, PLASTER INTERIORS
- Hardboard - see DRYWALL, FIBERBOARD, PLASTER INTERIORS
- Isocyanurate foam - see POLYISOCYANURATE FOAM and IAQ
- Laminate planks (wood fiber byproducts) [22]
- Leather & faux leather (paper) see LINCRUSTA CEILINGS & WALLS, also see FLOORING MATERIAL AGE and LINOLEUM & SHEET FLOORING
- LINCRUSTA CEILINGS & WALLS
- MDF - medium density fiberboard TRIM, INTERIOR INSTALLATION
- Mineral fibers (not asbestos), such as mineral wool. "Armstrong mineral board ceilings are made of mineral fiber and can include up to 82% recycled content."[22] - See MINERAL WOOL - ROCK WOOL INSULATION
- OSB
- Plaster - see CEILINGS & WALLS, PLASTER TYPES
- Polycarbonate
- Polystyrene
- PVC, rigid (polyvinyl chloride) [22]
- Resin, engineered [22]
- Styrofoam (POLYSTYRENE FOAM INSULATION)
- Terra cotta
- Tile, ceramic
- Tin (METAL CEILINGS ALUMINUM & TIN)
- Vinyl, vinyl-covered
- Wood products, wood fibers, wood pulp, other cellulose or plant fibers
...
Continue reading at CEILING PAINT TEXTURED / POPCORN ASBESTOS or select a topic from the closely-related articles below, or see the complete ARTICLE INDEX.
Or see these
Ceiling Articles
- ANAGLYPTA CEILINGS & WALLS
- CAPE COD ROOF & KNEE WALL INSULATION & VENTILATION
- CATHEDRAL CEILING INSULATION
- CATHEDRAL CEILING INSULATION FAQs
- CATHEDRAL CEILING INSULATION FAQs-2
- CATHEDRAL CEILING VENTILATION
- CEILING FINISHES INTERIOR
- CEILING PAINT TEXTURED / POPCORN ASBESTOS
- CEILINGS, DROP or SUSPENDED PANEL
- ASBESTOS CEILING TILE IDENTIFICATION - 5 Easy Steps to tell if CEILING TILES are likely to contain asbestos
- CEILINGS, PLASTER, LOOSE HAZARDS
- CEILINGS & WALLS, PLASTER TYPES
- CEILING TILES ASBESTOS CONTENT
- CHINESE DRYWALL HAZARDS
- DRYWALL ASBESTOS CONTENT
- DRYWALL CONTROL JOINTS
- DRYWALL CRACK CAUSES & CURES
- DRYWALL FINISH LEVELS
- DRYWALL INSTALLATION Best Practices
- DRYWALL INSTALLATION HORIZONTAL vs VERTICAL
- DRYWALL NAIL POPS & DENTS
- DRYWALL, FIBERBOARD, PLASTER INTERIORS
- FIBERBOARD SHEATHING
- INTERIOR FINISHES: BEST PRACTICES
- LINCRUSTA CEILINGS & WALLS
- METAL CEILINGS ALUMINUM & TIN
- PLASTER TYPES & METHODS in BUILDINGS
- DRYWALL, FIBERBOARD, PLASTER INTERIORS
- PLASTER ASBESTOS CONTENT
- PLASTER BULGES & PILLOWS
- PLASTER DUST EXPOSURE HEALTH HAZARDS
- PLASTER INGREDIENTS, MIX, PROPERTIES
- PLASTER LATH, METAL
- PLASTER, LOOSE FALL HAZARDS
- PLASTER REPAIR METHODS
- PLASTER TYPE IDENTIFICATION
- PLASTERBOARD / DRYWALL EXPANSION COEFFICIENTS
- PLASTER VENEER Best Practices
- STAIN DIAGNOSIS on BUILDING INTERIORS
- TRUSS UPLIFT, ROOF
Suggested citation for this web page
CEILING FINISHES INTERIOR at InspectApedia.com - online encyclopedia of building & environmental inspection, testing, diagnosis, repair, & problem prevention advice.
Or see this
INDEX to RELATED ARTICLES: ARTICLE INDEX to BUILDING INTERIORS
Or use the SEARCH BOX found below to Ask a Question or Search InspectApedia
Ask a Question or Search InspectApedia
Try the search box just below, or if you prefer, post a question or comment in the Comments box below and we will respond promptly.
Search the InspectApedia website
Note: appearance of your Comment below may be delayed: if your comment contains an image, photograph, web link, or text that looks to the software as if it might be a web link, your posting will appear after it has been approved by a moderator. Apologies for the delay.
Only one image can be added per comment but you can post as many comments, and therefore images, as you like.
You will not receive a notification when a response to your question has been posted.
Please bookmark this page to make it easy for you to check back for our response.
IF above you see "Comment Form is loading comments..." then COMMENT BOX - countable.ca / bawkbox.com IS NOT WORKING.
In any case you are welcome to send an email directly to us at InspectApedia.com at editor@inspectApedia.com
We'll reply to you directly. Please help us help you by noting, in your email, the URL of the InspectApedia page where you wanted to comment.
Citations & References
In addition to any citations in the article above, a full list is available on request.
- [13] Brian Greer, "History of Tin Ceilings", Brian Greer's Tin Ceilings, web search 6/30/12, original source: http://www.tinceiling.com/company/historytin.php
- [14] Armstrong Corporation, "Corporate History: a Historical Summary", web search 6/30/12, original source: https://www.armstrongflooring.com/corporate/corporate-history.html
- [15] "Ceilings Pressed in Time", Old House Journal, web search 6/30/12, original source: http://www.oldhousejournal.com/ceillings_pressed_in_time/magazine/1070
- Plastering Skills, F. Van Den Branden, Thomas L. Hartsell, Amer Technical Pub (July 1, 1985), ISBN-10: 0826906575, ISBN-13: 978-0826906571 [purchase at Amazon.com]
- Our recommended books about building & mechanical systems design, inspection, problem diagnosis, and repair, and about indoor environment and IAQ testing, diagnosis, and cleanup are at the InspectAPedia Bookstore. Also see our Book Reviews - InspectAPedia.
- America's Favorite Homes, mail-order catalogues as a guide to popular early 20th-century houses, Robert Schweitzer, Michael W.R. Davis, 1990, Wayne State University Press ISBN 0814320066 (may be available from Wayne State University Press)
- "An Example of Colonial Paneling", Norman Morrison Isham, The Metropolitan Museum of Art Bulletin, Vol. 6, No. 5 (May, 1911), pp. 112-116, available by JSTOR.
- Gypsum Construction Guide, National Gypsum Corporation
- Gypsum Construction Handbook [purchase at Amazon.com] H17, Technical Folder SA920 and PM2, PM3 and PM4, United States Gypsum Company, 125 South Franklin ST., PO Box 806278, Chicago, IL 60680-4124,
- Ice Dam Leaks in building attics and roof cavities, how to inspect for evidence of leaks, identify causes, and correct bad attic ventilation, improper roof venting, and these causes of attic mold or roof structure damage
- Insulation Types, table of common building insulation properties from U.S. DOE. Readers should see INSULATION R-VALUES & PROPERTIES our own table of insulation properties that includes links to articles describing each insulation material in more detail.
- Lath & Plaster Systems, 092300/NGC, National Gypsum Lath and Plaster Systems, National Gypsum Corporation, 800-628-4662 describing National Gypsum's Kal-Kore brand plaster base
- Metal Lath Specifications, Specification for metal lath and accessories, Lath and Plaster from Amico, a lath and plaster accessory producer.
- In addition to citations & references found in this article, see the research citations given at the end of the related articles found at our suggested
CONTINUE READING or RECOMMENDED ARTICLES.
- Carson, Dunlop & Associates Ltd., 120 Carlton Street Suite 407, Toronto ON M5A 4K2. Tel: (416) 964-9415 1-800-268-7070 Email: info@carsondunlop.com. Alan Carson is a past president of ASHI, the American Society of Home Inspectors.
Thanks to Alan Carson and Bob Dunlop, for permission for InspectAPedia to use text excerpts from The HOME REFERENCE BOOK - the Encyclopedia of Homes and to use illustrations from The ILLUSTRATED HOME .
Carson Dunlop Associates provides extensive home inspection education and report writing material. In gratitude we provide links to tsome Carson Dunlop Associates products and services.


