 Cathedral Ceilings Insulation Suggestions for Older Homes
- POST a QUESTION or COMMENT about how to add or retrofit insulation to cathedral ceilings in older homes
Retrofit or add-on cathedral ceiling insulation:
here we provide suggestions for insulating cathedral ceilings on older homes, providing under-roof ventilation for cathedral ceilings while obtaining higher insulation values or R-Values for these areas.
This article describes inspection methods and clues to detect roof venting deficiencies, insulation defects, and attic condensation problems in buildings.
InspectAPedia tolerates no conflicts of interest. We have no relationship with advertisers, products, or services discussed at this website.
- Daniel Friedman, Publisher/Editor/Author - See WHO ARE WE?
Cathedral roof and knee wall insulation & venting air path options in older homes
Article Contents
- Un-Vented Roof Solutions: how to avoid condensation, leaks, attic mold, insulation mold, & structural damage to roof framing when roof venting is not possible
- Cathedral roof and knee wall insulation & venting air path options in older homes
- Hot roof designs: suggestions for un-vented or hard-to-vent building roof cavities. Worries about the "hot roof" un-vented Cathedral Ceiling Designs
- How to detect roof venting deficiencies, attic insulation defects, and attic condensation problems
- Suggestions for Retrofit Addition of Cathedral Ceiling Insulation & Ventilation for Older Homes
- Other Cathedral Ceiling Insulation Tips
[Click to enlarge any image]
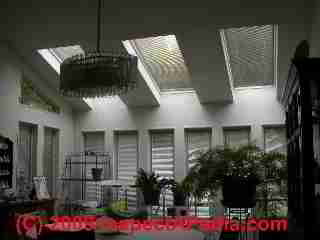
Our page top photo shows a difficult-to-vent cathedral ceiling with multiple skylights.
At INSULATION LOCATION & QUANTITY for ATTICS we discuss the relative benefit of adding insulation to a cathedral ceiling versus building walls in the same area.
At CORRECTING ROOF VENTILATION and
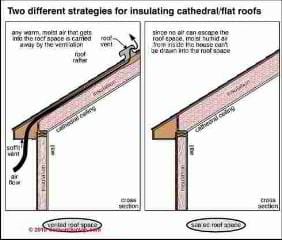
at HOT ROOF DESIGN PROBLEMS we argued that while some experts like the "hot roof" design (right hand design in the sketch at left) that omits attic or under-roof ventilation entirely, that approach risks surprise rot, mold, or insect damage on buildings where leaks and moisture are trapped in building cavities and remain un-noticed.
Some buildings, by their shape or design, simply don't make it easy to install continuous intake venting at the eaves or lower roof edge, or continuous outlet venting along a ridge.
For example, a house which has no roof overhang at all makes intake venting at the eaves difficult. A house with a pyramid roof shape or complex roof shapes makes outlet venting at a ridge difficult.
Sketch (above left) is courtesy of Carson Dunlop Associates shows the two basic strategies for insulating cathedral ceilings and flat roofs.
Worries about the "hot roof" un-vented Cathedral Ceiling Designs
 As explain in our "hot roof" discussion cited just below, we don't have full confidence in the long term durability of "hot roof designs" because any future roof leak into this cavity produces trapped moisture and rot that are often hidden until the damage is extensive.
In particular, using fiberglass insulation in an un-vented cathedral ceiling is most likely to give way to discovery of advanced hidden damage and/or mold over the life of the building, and may give shorter roof shingle life as well as causing higher indoor temperatures than with a vented roof cavity design.
We call this a "hot roof" design because failing to vent the roof from below not only misses a chance to avoid ice dam leaks and condensation damage in cold climates. In hot climates the roof temperature will be much higher on an un-vented roof, resulting in shorter shingle life.
This is less of a concern for slate and similar product roofs less affected by heat.
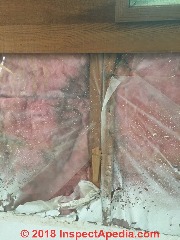
Our photo illustrates water trapped in an un-vented vaulted ceiling from wbhich cedar paneling has been removed.
In 2017 the owner, an InspectApedia.com reader, removed the wood paneling to expose trapped water and moldy insulation.
More photos of this roof leak are
at HOT ROOF DESIGN vs LEAK RISKS
Foam-filled cathedral ceilings may make sense in some cases. In buildings where there is no roof venting anyway, and where ventilation is difficult or impossible to achieve, an un-vented, well insulated "hot roof" can provide a high-R-value ceiling and may be the second-best alternative to preventing ice dam related leaks in cold climates.
Watch out: Be sure to inspect the roof surface from outside for leaks and damage every year and to fix any damage quickly. Examples of trouble with un-vented hot roofs are
Suggestions for Retrofit Addition of Cathedral Ceiling Insulation & Ventilation for Older Homes
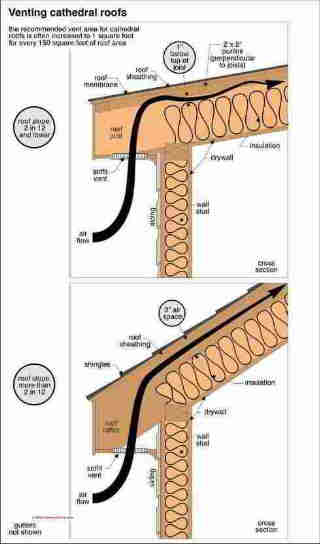
The sketch above is provided ourtesy of Carson Dunlop Associates and shows the two basic strategies for ventilating cathedral ceilings or cathedral roofs.
When renovating an older home whose roof rafters are only 2x6" (really 5 1/2" x 1.5") in dimension, the available space for insulation and ventilation is limited, therefore limiting the options for a combination of good under-roof ventilation and high insulation R-values in the cathedral ceiling. Here are some older home cathedral ceiling roof insulation and ventilation options that you may consider:
Less insulation: Reduce under-roof insulation level to 3 ½” fiberglass (R-11) under the cathedral ceiling (not good energy savings) - not recommended but functional, just poor insulation value.
2 Baffles: Provide double-baffles between the rafters, eaves to ridge (rafters are roughly 24” o.c.) – this solution will leave portions of the roof deck un-vented and risk future mold growth - not a very effective venting solution, especially where we have already had a mold problem
1 Baffle: Provide conventaional thin styrofoam single baffles between the rafters, eaves to ridge – this solution will leave even larger portions of the roof deck un-vented and risk future mold growth - not recommended
An example of a building constructed using the design above as well as comments about its long term performance can be found
High labor: Nail 1” furring along every rafter side, against the roof deck; cut and insert 1” or thicker high-R foam insulation sheets (R-8 per inch) against the furring, giving a 1” or greater air path between the insulation and the roof deck under the cathedral ceiling. (In the knee wall area the insulation is in the floor and on the back of the knee wall).
Fill the remaining space with fiberglass or cellulose.
With 2x6 rafters this will give about an R-19 roof, higher if you use thicker solid foam insulation. This gives the best air path, eaves to ridge, but costs more for the labor to nail furring and cut insulation into pieces to fit between rafters. – works well, costs more.
You can see a schematic for this approach at left. We also discuss this insulation and ventilation approach for cape cod style homes in a comopanion article:
INSULATION LOCATION for CAPES, CRAWLSPACES
Solid Foam: Install solid foam spray-in insulation under the roof – a “hot roof” design.
This eliminates the entire plan of ventilation, gives maximum R-value for the space, probably costs the most, and risks shorter shingle life (hotter roof) and future hidden damage if leaks occur into the roof cavity – works, not a solution we like as we prefer to ventilate roofs for longer shingle life and cooler house in summer.
See HOT ROOF DESIGN PROBLEMS and also
See CATHEDRAL CEILING VENTILATION
When re-roofing from the building exterior: if the roof decking and possibly roof framing have been extensively damaged by leaks it is usually necessary to repair the roof from outside the building. Before replacing roof decking, consider re- decking the roof with insulated structural panels that include eaves to ridge ventilation in their design.
What about adding solid foam high-R insulation on top of the roof when re-roofing? Adding rooftop insulating foam is a common practice on flat roof commercial buildings.
The insulation used in those applications is tapered to provide positive roof drainage to roof drain points as well as to improve the building insulation system and cut energy costs.
We do not consider this a good design for a pitched roof on a residential building as it converts the roof to a "hot roof" design (shorter shingle life, hotter under-roof area in warm weather).
Adding ventilation under a solid-foam insulated pitched roof in order to dry and cool the building interior would, in turn, lose the benefit of the roof top insulation.
Other Cathedral Ceiling Insulation Tips
- Tips for insulating a cathedral ceiling, take care to seal ceiling penetrations such as around light fixtures or ceiling-mounted hard-wired smoke detector. More moisture enters building cavities through these cuts in the ceiling (or wall) drywall than permeates through the drywall itself.
While fiberglass insulation is an excellent and effective product for insulating most building cavities, in areas where there is extra risk of trapping moisture (and thus rot or mold infections) such as crawl spaces and cathedral ceilings where roof venting may be absent or minimal, we prefer to use closed-cell foam insulation products or spray-in icynene foam insulation:
these products can seal the cavity against drafts and they do not as readily pick up moisture nor do they readily form hidden mold reservoirs.
See MOLD in FIBERGLASS INSULATION
and MOLD RESISTANT CONSTRUCTION for details. - Ice and Water Shield: On roofs that are too difficult to vent, a second-best solution is to remove the shingles (or slates) from the lower 3 feet
of those slopes where leaks and ice dams have been recurrent,
install a waterproof but nail-able membrane such as WR Grace's Ice and Water Shield (other product names from other manufacturers) which will prevent any ice dam backup leaks from entering the building.
This is basically a sticky membrane that is applied to the roof decking and through which shingle or slate nails can be nailed back onto the roof; the membrane seals around the nails so that those penetrations do not form leaks during a water or ice backup. - Un-Vented, Hot Roof Designs Indoors, finished attic: Where the attic space is finished with drywall or other ceiling materials installed against the underside of the roof rafters, while we prefer in-floor insulation,
here we'll have to insulate the roof cavity between the rafters.
In cases where there is no under-roof venting system (no soffit intake vents, no ridge vents), a "hot roof" design is followed: the roof cavity between rafters can be filled with insulation, followed by installation of a perfect vapor barrier, followed by finish surface of drywall or whatever else.
Details are
at HOT ROOF DESIGN PROBLEMS - Use of roof de-icing cables or heat tapes to avoid ice dam leaks is described
at HEAT TAPES & CABLES for ROOF ICE DAMS.
While we prefer to avoid ice dam leaks by good building design and good under-roof ventilation, where conditions require stopping ice dam leaks on an existing structure, proper installation of heating cables may be the fastest and cheapest solution.
...
Reader Comments, Questions & Answers About The Article Above
Below you will find questions and answers previously posted on this page at its page bottom reader comment box.
Reader Q&A - also see RECOMMENDED ARTICLES & FAQs
On 2021-09-04 by inspectapedia.com.moderator (mod)
@Parrish Reedy,
Thank you for the discussion; we look forward to hearing further from you.
On 2021-09-04 by Parrish Reedy
@inspectapedia.com.moderator,
Thank you again for your response it adds confidence to what I'm doing. I do not have the attic I forgot to delete that in the drawing. I also have a standing seam metal roof with ice shield. My slope is only 4/12 but we had no leaks over this last winter.
Thank you again for the help.
On 2021-09-03 by inspectapedia.com.moderator (mod)
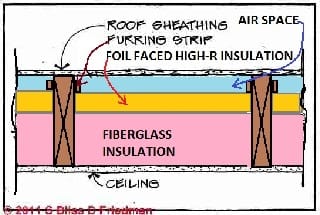 @Parrish Reedy,
Your design looks reasonable to me - though not without any concern for leaks into what looks like an attic space above a flat ceiling; be sure you provide access so that someone can get in there later to inspect from time to time.
From the article above I'm posting again a similar (not identical as we vented it) cathedral ceiling that I built in New York in the 1970s.
Foil-faced High-R was placed between rafters, up against the roof deck. (actually we nailed it atop the rafters and nailed plywood roof decking on top of that, shooting long nails through the insulation and into the rafters - a less labor-intensive approach that avoids pooly-fit cut sections between rafters, but I'm not sure that's the best structure)
Then we filled the roof cavity with un-faced fiberglass batts
We used a 6 mil poly vapor barrier on the warm side - the under-side of the cathedral ceiling rafters and installed dry wallover that. There was only one cut into that ceiling - for a chimney chase. At which we too great care to seal the opening against air leakage.
if I were building it today I'd leave out that poly. as unnecessary and potentially a problem.
I can say that roof and ceiling have performed well. In the ensuing 40 years that I followed the condition of this
home there was never any indication of a problem of moisture in that ceiling. (I haven't been inside since 2010 but at least from outside as I drive by I see the building is still standing. )
A concern that industry experts cite is that most of the air leakage into an insulated cathedral ceiling cavity is at the penetrations, say for light fixtures, smoke detectors or fan mounts - far more leakage there than through the drywall and any vapor barrier.
So avoiding those openings is quite desirable.
Another concern with any hot roof design is the presence of water tight layers in the roof structure - like that sealed, foil-faced foam board - that will obscure indoor evidence of any roof leaks; the result can be gross rot, even structural destruction of such a roof when leaks from above enter the roof cavity and remain un-attended.
At a Journal of Light Construction building conference (Boston 1985) a builder, following a presentation on the wonders of hot roof designs, showed us what happens: the roof was totally rotted to death.
So on hot roofs I prefer to use the best, most bullet-proof roof covering I can. On the last such roof we built (also in NY) we used a tall standing seam metal roof installed over plywood completely covered with ice and water shield.
On 2021-09-03 by Parrish Reedy
@inspectapedia.com.moderator, @inspectapedia.com.moderator,
Thank you for your response, and I was worried about where the location of the vapor barrier is as well.
The Rigid foam has the barrier "Foil" on both sides of the foam.
So it would be roof sheathing, barrier foam barrier , barrier foam barrier, Pink. "The barrier is the foil of the rigid foam".
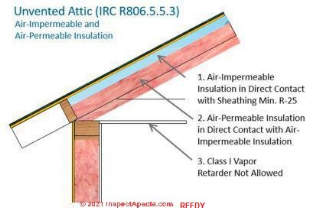
IRC R806.5.5.3
Where air-impermeable insulation is to be installed underneath the roof sheathing, verify that the air-impermeable insulation is to
be a Class II vapor retarder or will have a Class III vapor retarder on the underside
I hope this makes sense, and I'm not over complicating it.
On 2021-09-03 by inspectapedia.com.moderator (mod)
@Parrish Reedy,
Foil is a near-perfect vapor barrier.
It has a perm rating near zero.
And that barrier is even more effective if the foil facing edges are secure or taped or covered.
For other readers:
Perm Ratings (moisture permeability) of vapor barriers range between 0 and 10, where 0 is zero permability.
- Class 1 ( or class I) vapor barriers have a permeability of 0 to 0.1 Perm Rating
- Class 2 (or class II) vapor barriers have a permeability of 0.1 to 1.0 permeability rating.
- Class 2 Vapor barriers are also called Semi-Permeable vapor barriers.
- Class 3 (or class III) vapor barriers or permeable vapor retarders have a perm rating of 1-10.
- Materials that have a perm rating that exceeds 10 should not be used as a vapor retarder - they let too much moisture pass through.
Certainteed.com offers a nice
Definition of Class II Vapour Retarders or Class 2 Vapor Barriers
"Class II vapor retarders have a permeance level between 0.1 perm and 1 perm and are considered semi-impermeable. Examples include unfaced expanded polystyrene, fiber faced polyisocyanurate and asphalt-backed kraft paper facing on fiber glass batt insulation."
Perm Ratings of Common Insulation Facings
- Aluminum foil that is 0.001" thick has a perm rating of 0.01
- Aluminum foil that is 0.00035" thick has a perm rating of 0.05
- 0.0006 inch polyethylene has a perm rating of about 0.06
- 0.004 inch polyethylene has a perm rating of about 0.08
- Conventional fiberglass insulation facing that is a laminate of thin foil to kraft paper has a perm rating of 0.5
- and so meets your requirement for a "class 2" vapor barrier.
I'm unclear on where you're placing this barrier. Don't make a vapor barrier sandwich of 2 barriers or you may trap and accumluate moisture.
In a heating climate your vapor barrier belongs on the warm side of the ceiling or wall.
On 2021-09-03 by Parrish Reedy
Hello I'm about to insulate my unvented cathedral ceiling. Shed Roof constructed with engineered I joist 2x12. Its in zone 6 r49 required. My plan from what I read is 4" of R-Matte r26. this will be 2 sheets of 2" staggered applied directly to the underside of the roof sheathing. Spray foam edges for air tight seal. Then 9" of R30 pink.
There needs to be a class 2 vapor barrier between the rigid and pink. Does the foil face count as the class 2 vapor barrier?
On 2021-08-17 by inspectapedia.com.moderator (mod)
@Albert,
Sounds reasonable provided your "hot roof" sections don't prevent through-venting of the vented roof sections.
An air cavity with no venting isn't doing much for you.
On 2021-08-17 by Albert
Thank you. It was a good learning experience. Bottom line, I will aim for a vented roof design, and wherever there is a height issue I will try the hot roof design ensuring there are no leaks.
On 2021-08-16 by inspectapedia.com.moderator (mod)
@Albert,
Glad to hear you got a confident design.
Whether or not the air space is adequate depends on the inlet and Outlet openings.
10 concept A 3 inch air space should be plenty.
What makes a hot roof design work and what you should be doing in any case is assuring that there are no air leaks into the roof cavity.
On 2021-08-16 by Albert
Thanks. Note taken. Steel reinforcement and new steel posts will take place first (with no roof load), and before anything is removed, precisely to prevent spreading of the walls.
On 2021-08-16 6 by inspectapedia.com.moderator (mod)
@Albert,
I should add that you also need to address the question of preventing the roof load from causing spreading of the walls when you remove the trusses.
On 2021-08-16 by Albert
Hi, Thanks for your prompt response.
The upper truss beams will be reinforced with adjacent steel beams designed by the structural engineer.
Minimum temperature in Winter is 32 F.
Regarding the venting question a) Would a 3" air gap be sufficient for ventilation? b) On the other side , does a hot roof design can prevent condensation? Noted your comment on the amount of insulation.
On 2021-08-16 by inspectapedia.com.moderator (mod)
@Albert,
Thank you for the interesting question and drawing.
I'm afraid I really don't understand the roof structure nor how your roof will be supported.
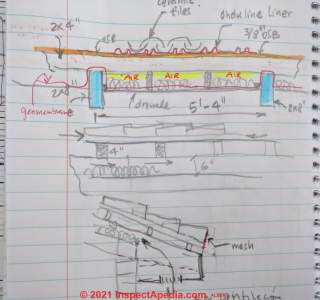 You can't simply go into a truss roof and remove the truss components, add an under layer of OSB sheathing and expect the roof load to be adequately carried by the two by fours that remain.
You may want to have your design reviewed by a structural or civil engineer. Without those steps I'm not sure that your roof is safe nor that you can get a building permit.
About your venting question, it appears that You don't have enough venting space in your design nor have you specified air intake nor are exit points.
And depending on your climate you may find that you don't have sufficient insulation.
As an alternative to venting, you might consider a hot roof design.
You'll find that described in this article series and in the index to related articles.
On 2021-08-15 by Albert
Hi , I intend to convert old roof trusses and attic of an older home into a cathedral roof. The attic will be eliminated, and the height of roof would be 20 feet. OSB panels will act as a roof diaphragm for seismic.
Attached is a sketch I am thinking to implement.
My only concern is if air below the 2"x4" joists at 16" o.c would be sufficient to prevent condensation.
Will air within the joists get stagnant or also have movement to prevent condensation? There will be air openings at the ridge and eave.
On 2021-01-24 by (mod)
Venting the roof space above a finished attic whose sidewalls are kneewalls is indeed possible but you need
- good continuous intake venting along the front and rear eaves or soffits
- good continuous exit venting at the ridge
- baffles or air space over the cathedral ceililng portion of the finished attic
And insulation wants to be up the knee walls not just in the floor and ceiling.
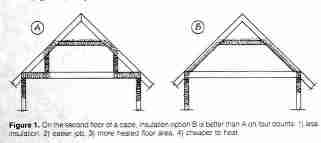
Please take a look at
CAPE COD ROOF & KNEE WALL INSULATION https://inspectapedia.com/Energy/Cape-Cod-Roof-Insulation-Location.php
CAPE COD ROOF VENT or DENSE PACK INSULATE https://inspectapedia.com/ventilation/Cape_Cod_Roof_Ventilation.php
where we discuss the situation in the sketch shown here.
On 2021-01-24 by Warren R
Started walk up attic finishing project in '16, stopped after knee walls framed and baffles installed in rafters.
Floors were already finished, insulated underneath, plywood was run right up to where joists meet the rafters. After I installed the baffles I then cut loose batt insulation into smaller pieces and rolled them and taped them in garbage bags and stuffed in the "open" soffit space.
Rafters are still ventilated due to the baffles but I have been told this should not be done because it's blocking airflow. My thought is that this space is ultimately going to receive insulation anyway, essentially blocking this space anyway. It's been almost 5 years and jumping back into this project. There are no signs that what I have done with the garbage bag experiment has caused any damage.
Question is should I indeed remove those bags? Or am I safe leaving them as is while I install the faced batt insulation into the rafters? We are located in New England so deal with the extreme temperature season changes.
On 2020-07-26 by Jerry
If I am enclosing my cathedral ceiling with insulation and sheet rock do I need to put in ventilation
On 2020-04-28 - by (mod) - 2" of air space under the roof deck is more-effective as a vent path
That's what happens when I try to dictate an answer from my dumb phone.
sorry
I meant,
If you can get two inches of ventilation space between the underside of the roof deck and the top of the insulation, in my experience the venting will be much more effective.
In my view there's just not much air movement up through a 1-inch air space, despite the 16" or 24" horizontal space between rafters.
There are structural insulated panels (SIPS) that can be used to build a hot roof; some SIPS include a (IMO too small) vent space as well.
Another approach is to nail down foil faced foam to the rafter tops, then decking through that, but IMO that's not the best solution as we're putting a vapor barrier on the upper side of the cavity rather than on the room-side.
Another approach is to nail 1x3 furring to rafter sides, cut and fit foil faced foam (thickness of your choice) to give a vent space above the foam, fill the rest with fiberglass, then install the ceiling; it's a labor intensive approach.
A simpler approach is to insulate the roof cavity with enough fiberglass to leave a 2-inch air space above, fed by soffit vents at eaves and ridge vent at ridge, then nail foil faced foam (of your choice, I use 2") onto the rafter undersides, then shoot up the drywall using long screws (mark those rafter locations at the wall top and ridge before you nail up the insulation so it's easier to find a couple of them when hanging the ceiling drywall - then measure to find the remaining rafters if you didn't mark them all.
STRESS SKIN INSULATED PANELS https://inspectapedia.com/Energy/Stress_Skin_Panel_Construction.php
Finally, there's of course the hot roof option: no venting at all.
HOT UN-VENTED ROOF DESIGN SOLUTIONS https://inspectapedia.com/ventilation/Hot_Roof_Problem_Solutions.php
On 2020-04-28 by Matt
That was me again, asking about the terminology. Cheers!
On 2020-04-28 by Anonymous
I don't know what tattoo or sharespace mean? Would you be willing to elaborate?
On 2020-04-27 by Matt
Hi, I really like the concept of furring out 1" and then using a foil faced foam sheathing.
I'm remodeling and have a section of cathedral vault. I've got 7.25" to work with. I am thinking of doing 1" air space, 2" foil face foam, and 3.5" rockwool. That would net an R value around 31. Anything different you would recommend? Also, where might one find 2" foil faced foam sheathing? Thanks!
...
Continue reading at HOT ROOF DESIGN PROBLEMS or select a topic from the closely-related articles below, or see the complete ARTICLE INDEX.
Or see CATHEDRAL CEILING INSULATION FAQs - questions & answers posted originally at this page.
Or see these
Recommended Articles
- CATHEDRAL CEILING VENTILATION
- CAPE COD ROOF & KNEE WALL INSULATION & VENTILATION
- CATHEDRAL CEILING INSULATION
- HOT ROOF DESIGN PROBLEMS
- HOT UN-VENTED ROOF DESIGN SOLUTIONS
- HARD to VENT ROOF SOLUTIONS for HIPS & CATHEDRAL CEILINGS
- CAPE COD ROOF VENT or DENSE PACK INSULATE
- INSULATE ROOF with SOLID FOAM BOARD + AIR SPACE
- INSULATE ROOF with SPRAY FOAM
- INSULATE ROOF with DENSE PACKING
- INSULATION LOCATION & QUANTITY for ATTICS
- PROBLEMS with PARTIAL ROOF VENTILATION
- ROOF FRAMING TIES & BEAMS proper framing of a cathedral ceiling
- ROOF NOISE TRANSMISSION
- ROOF VENTILATION SPECIFICATIONS pros and cons of hot roof designs
Suggested citation for this web page
CATHEDRAL CEILING INSULATION at InspectApedia.com - online encyclopedia of building & environmental inspection, testing, diagnosis, repair, & problem prevention advice.
Or see this
INDEX to RELATED ARTICLES: ARTICLE INDEX to BUILDING INSULATION
Or use the SEARCH BOX found below to Ask a Question or Search InspectApedia
Ask a Question or Search InspectApedia
Questions & answers or comments about how to add or retrofit insulation to cathedral ceilings in older homes.
Try the search box just below, or if you prefer, post a question or comment in the Comments box below and we will respond promptly.
Search the InspectApedia website
Note: appearance of your Comment below may be delayed: if your comment contains an image, photograph, web link, or text that looks to the software as if it might be a web link, your posting will appear after it has been approved by a moderator. Apologies for the delay.
Only one image can be added per comment but you can post as many comments, and therefore images, as you like.
You will not receive a notification when a response to your question has been posted.
Please bookmark this page to make it easy for you to check back for our response.
IF above you see "Comment Form is loading comments..." then COMMENT BOX - countable.ca / bawkbox.com IS NOT WORKING.
In any case you are welcome to send an email directly to us at InspectApedia.com at editor@inspectApedia.com
We'll reply to you directly. Please help us help you by noting, in your email, the URL of the InspectApedia page where you wanted to comment.
Citations & References
In addition to any citations in the article above, a full list is available on request.
- The National Institute of Standards and Technology, NIST (nee National Bureau of Standards NBS) is a US government agency - see www.nist.gov
- "A Parametric Study of Wall Moisture Contents Using a Revised Variable Indoor Relative Humidity Version of the "Moist" Transient Heat and Moisture Transfer Model [copy on file as/interiors/MOIST_Model_NIST_b95074.pdf ] - ", George Tsongas, Doug Burch, Carolyn Roos, Malcom Cunningham; this paper describes software and the prediction of wall moisture contents. - PDF Document from NIST
- Our recommended books about building & mechanical systems design, inspection, problem diagnosis, and repair, and about indoor environment and IAQ testing, diagnosis, and cleanup are at the InspectAPedia Bookstore. Also see our Book Reviews - InspectAPedia.
- In addition to citations & references found in this article, see the research citations given at the end of the related articles found at our suggested
CONTINUE READING or RECOMMENDED ARTICLES.
- Carson, Dunlop & Associates Ltd., 120 Carlton Street Suite 407, Toronto ON M5A 4K2. Tel: (416) 964-9415 1-800-268-7070 Email: info@carsondunlop.com. Alan Carson is a past president of ASHI, the American Society of Home Inspectors.
Thanks to Alan Carson and Bob Dunlop, for permission for InspectAPedia to use text excerpts from The HOME REFERENCE BOOK - the Encyclopedia of Homes and to use illustrations from The ILLUSTRATED HOME .
Carson Dunlop Associates provides extensive home inspection education and report writing material. In gratitude we provide links to tsome Carson Dunlop Associates products and services.


