 Drywall Nail Pops & Cracks
Complete list of causes, cures, prevention of drywall nail or screw pops
Notes on the opposite effect: Drywall nail or screw dimpling or shadowing
- POST a QUESTION or COMMENT about suspended panel ceilings or "drop ceilings" in buildings
Drywall nail pops are explained here, followed by a discussion of drywall nail dimpling or shadowing.
This article discusses the causes, cures, & steps to prevent nail pops - those unattractive mounds or sometimes open "sores" in finished interior drywall ceilings & walls.
We explain why drywall nail pops occur, where they occur, and how they are repaired.
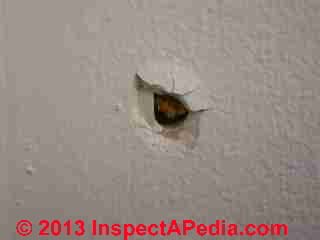
We suggest definitions of closed drywall nail pops and open drywall nail pops such as shown in our page top photo.
Also discussed here: Definition of closed drywall nail pop, open drywall nail pop; impact of arched roof trusses on drywall cracks & nail popping; repair; drywall dents or dimpling (depressions).
In most cases drywall nail pops (out) or dents (in) are a cosmetic defect, though in some locations such as near a center partition below a truss roof, they may indicate interesting structural movement such as arching roof trusses.
We also compare these drywall nail pops with thermal tracking or spots caused by ghosting.
InspectAPedia tolerates no conflicts of interest. We have no relationship with advertisers, products, or services discussed at this website.
- Daniel Friedman, Publisher/Editor/Author - See WHO ARE WE?
Drywall Nail Pops, Breaks, or Dents - Cause, Prevention, Cures
Nail pops in drywall walls or ceilings are usually a minor cosmetic issue that is common in new construction.
On this page we'll tell all about the types, causes, cures, and prevention of nail pops, and we'll include a little warning that while most nail-pops are just a cosmetic issue, on occasion loose or protruding drywall nails or screws could be a sign of more serious building trouble.
Then we describe the causes and cures for drywall dimples or depressions found at these fasteners.
Article Contents
- DRYWALL NAIL POP IDENTIFICATION - open vs. closed = severity & dictate repair needed, causes of drywall nail pops
- DRYWALL NAIL POP CAUSES
- DRYWALL NAIL POP REPAIR METHODS
- DRYWALL NAIL POP PREVENTION
- DRYWALL NAIL DENTS or DIMPLES - cause & repair
- DRYWALL FINISHING LEVELS
- DRYWALL FINISHING GUIDES / MANUALS
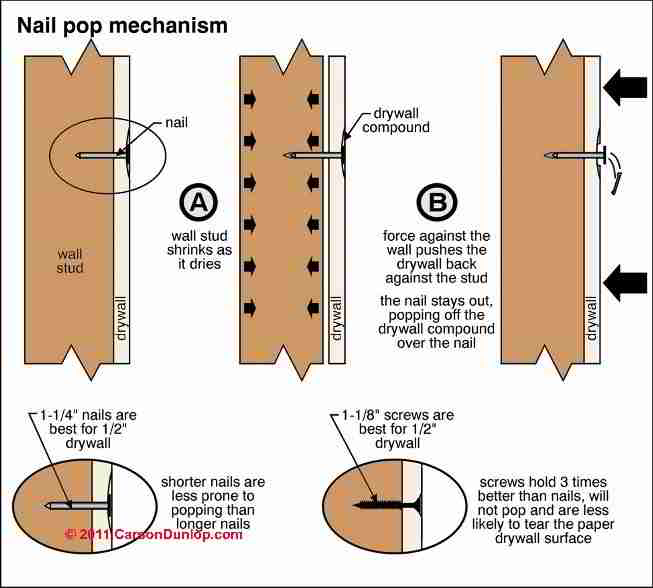
The drawing of nail pops shown here is provided courtesy of Carson Dunlop Associates and appears in their Illustrated Home.
Nail Pops in Drywall: Causes, Prevention, Cure
 Open vs Closed Nail Pop Types vs Ghosting Spots
A catalog of types of drywall nail pops & round ghosting stains
Our photos illustrate types and causes of nail pops in drywall walls or ceililngs.
We start with typical closed nail pops associated with normal wood and material shrinkage - this in a home built in the 1970's and my red arrows point to two round protrusions from the wall surface.
The drywall nail head extends a bit above the surrounding drywall but the paper surface has not torn.
You can see that the original drywall hanger used pairs of drywall nails at each nail location.
In contrast, and uglier, shown just below is an open drywall nail pop in drywall characteristic of material movement.
You'll see that now that the bulge of pushed-up joint compound ("mud") has popped off of the wall or ceiling completely, the actual head of the drywall nail may itself not poke out of the wall.
Still it needs to be re-set.
If I see a lot of rust on the drywall nail I look for a building moisture problem as well.
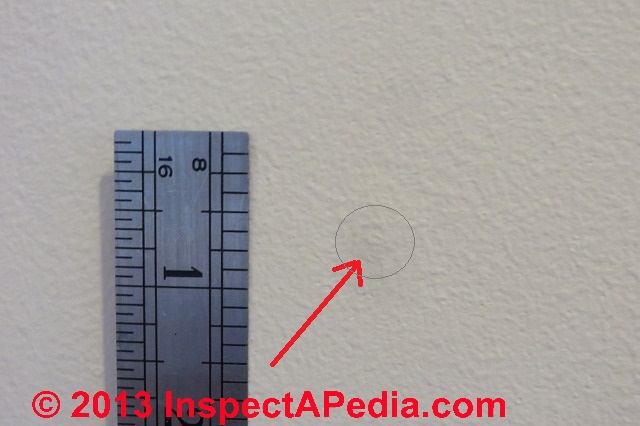
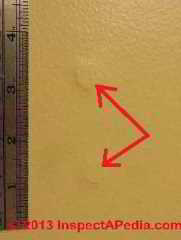
Below is a drywall nail pop that is barely discernable and does not merit special attention.
You can spot even the slightest nail pop or concavity in drywall by careful use of oblique lighting along the drywall surface.
See LIGHT, FLASHLIGHT for MOLD for an illustration of this surface inspection technique.
This closed drywall nail pop shows up as a very slight raised bump that in some lighting may appear darker or lighter than surrounding area. I added a light gray circle so that you can find the spot I'm showing.
Don't confuse a drywall nail pop with the dark spot or shadow that may form at drywall nail or drywall screw locations due to thermal tracking
THERMAL TRACKING BRIDGING GHOSTING, like the soot spots shown above.
Drywall nail pops normally extend above the surrounding surface.
You may see dark spots at drywall nails or screws even though the wall is dead flat, OR you may see these darker spots where drywall nail or screw locations are slightly below the surface of the surrounding wall - discussed
at DRYWALL NAIL DENTS or DIMPLES - cause & repair
Causes of Drywall Nail Pop-Out
Wood Shrinkage-Caused Drywall Nail Pops
As wood studs shrink, nail heads ‘pop’ out from the drywall surface, causing a bump or the blemish on the wall or ceiling. This usually happens only on new work, and only one time.
Repairs are straightforward and are given below
at DRYWALL NAIL POP REPAIR OPTIONS.
Drywall Cracks & Ceiling Nail Pops caused by roof truss uplift
Nail pops found in some building ceilings and actual tears or cracks at the wall/ceiling juncture at building walls located under the center of certain roof trusses when moisture & temperature differences between the truss bottom chord and upper members cause the truss to arch.
Details and more illustrations of the roof truss uplift problem & more steps to prevent drywall cracking & nail pops are found
at TRUSS UPLIFT, ROOF
The drawings of roof truss uplift and corrective measures for truss uplift shown here are provided courtesy of Carson Dunlop Associates and appears in their Illustrated Home.
Other Causes of Drywall Nail Pops
 Above we have described rising roof trusses and wood shrinkage as two most-common causes of drywall nail pops in buildings.
Understanding the cause of any building defect, even an apparently-cosmetic one, is important both in deciding what repair will be effective and in deciding whether or not the defect, in this case nails protruding out from the wall, are actually a telltale sign of some more-serious, even dangerous building condition.
Inadequate or Careless Original Drywall Installation
Using an insufficient number of drywall screws or nails, missing the supporting stud or ceiling joist,using screws that are so short that they have inadequate penetration into the supporting stud or joist, or failing to space the drywall fasteners at the proper interval all can result in loose drywall and drywall nail or screw pops later.
The maximum fastener spacing on walls when no adhesive is used is 8 inches and on ceilings, 7 inches when nails are used.
The maximum drywall fastener spacing when screws are used is 16" o.c. on walls and 12" o.c. on ceilings when no adhesive is used.
Using too many drywall screws can also cause drywall movement, nail pops or worse, complete separation. Screwing in a fastener ever couple of inches, for example, will so fracture the drywall that it is weakened enough to risk a failure.
Over-driving screws or nails both tears the paper surface of the drywall, weakening the connection, and also fractures the gypsum below the nail or screw, leaving the fastener in a softer area of drywall.
Drywall screws or nails set at an angle may also invite protruding and ugly fastener displays.
See DRYWALL INSTALLATION Best Practices for additional nailing and adhesive schedules for drywall installation.
Inadequate Prior Drywall Nail Pop Repair
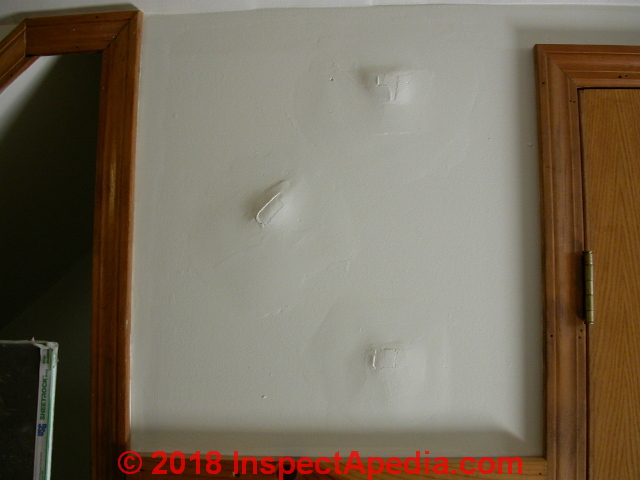
Our photo illustrates impressive protruding blobs of joint compound over three popped drywall fasteners in a small section of wall. This repair was done by simply adding a mound of filler over the nail without setting the nails or screws below the wall surface.
You can see that the result is not pretty.
Set protruding drywall nails, add nails or better, drywall screws, and you are not likely to see nail pops again in that area. If you do then something else is going on with the structure and more investigation would be in order.
Stress Points in Drywall Causing Nail Pops or Cracks
Besides arching roof trusses and thermal or humidity-induced movement, there are natural stress points in any drywall installation such as at inside corners at walls and between walls and ceilings - these are common places where you may see both cracking and nail pops.
DRYWALL INSTALLATION Best Practices includes suggestions for using floating corners and control joints to avoid these issues.
Normal & Abnormal Structural Movement, Flexing, & Drywall Nail Pops
Movement in building walls, ceilings, and even floors (that might push or pull on walls) can cause drywall buckling, cracks, tears, and also nail pops.
Small amounts of building movement associated with changes in temperature and humidity are normal and not threatening. We might find both drywall nail pops and drywall cracking in the same building area.
Watch out: But if you see drywall tearing or cracking further investigation is in order. In cases of significant building movement that has separated structural connections there can be a risk of structural collapse.
If you suspect foundation damage, inspect the foundation for cracking, settling, movement. Inspect the building interior for signs of framing damage, separation, movement, insect damage, leaks, rot. See FOUNDATION FAILURES by MOVEMENT TYPE.
If you suspect framing damage
see FRAMING DAMAGE, INSPECTION, REPAIR.
Long Sections of Drywall Without Control Joints
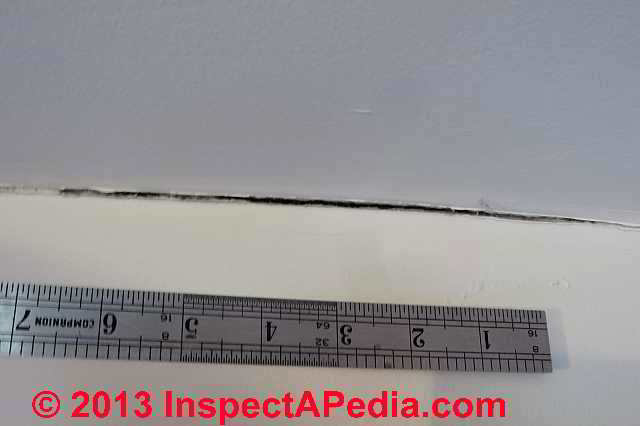
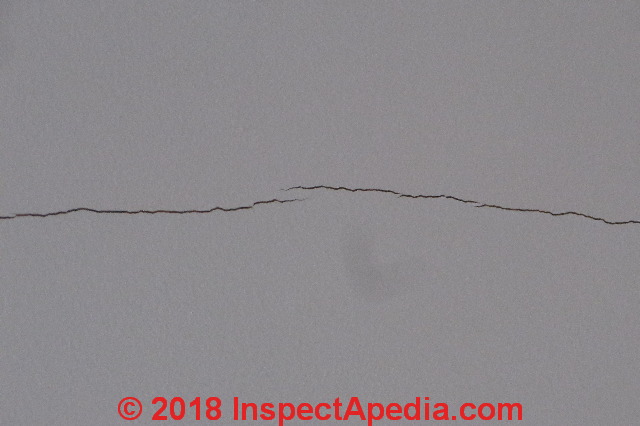 The ceiling drywall crack shown above occurs in a 60-foot long ceiling of a New York home. The ceiling was built with no control joints and cracks regularly in response to variations in temperature and humidity.
This same movement may also show up as drywall screw pops or buttons and tears at the drywall fasteners.
More details are
at DRYWALL CRACKS.
Reader comment: people leaning on walls along stairways may cause drywall nail pops
On stairways and halls especially, and, especially where pairs of drywall nails have been used (1950 to 1980 homes):
The sheetrock to either side of a give nail (or pair) is often actively deflected by passers by pressing (even lightly) over long periods of time, effectively prying the nails out - as this is done damage, to the gypsum immediately surrounding the nail head occurs and so the nail is left protruding from a softened embedment site.
Simply banging the nails in will not always suffice and so I advise a pair of drywall screws be placed at the above and below the original pair to stabilize the site.
- 2018/02/27 Frank De Simone, RRC, Building Enclosure Consultant, Commercial Construction Consulting, Inc., Consulting Engineers & Development Advisors, 313 Congress Street, Boston, MA 02210, USA, Website: www.c3boston.com Tel: (774) 244-1093 Email: fdesimone@c3boston.com
Reply:
Thanks, we've added your observation and hope you'll find some photos to send along.
I've seen similar damage in poorly-fastened drywall around doors in homes tortured by door-slamming occupants.
Nail Pops or "Screw Buttons" in Light-weight Gypsum Wallboard used with water-based low VOC Adhesive
 Gypsum discusses nail pops occurring in light-weight gypsum board in some regions:
In the last two to three years, USG has received a significant number of fastener-related drywall installation complaints in the Mid-Atlantic region (Virginia, Maryland, Pennsylvania, New Jersey and New York).
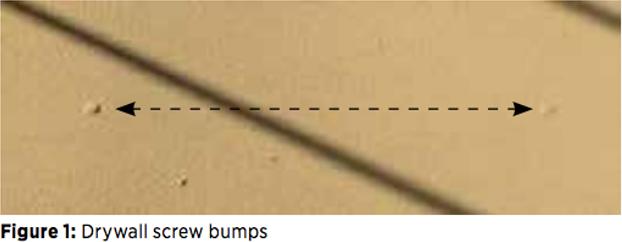
Numerous drywall contractors within this region have reported raised bumps over drywall screws occurring anywhere from a few days to several months after hanging and finishing the drywall as shown in figure 1.
The reports were specific to wood-framed residential construction
finished with 1/2" USG Sheetrock® Brand UltraLight Panels with limited occurrences reported on
5/8" USG Sheetrock® Brand Firecode® Core Gypsum Panels.
- U.S. Gypsum Corporation, USG FASTENER-RELATED DRYWALL INSTALLATION ISSUES & RECOMMENDATIONS [PDF]
The company investigated these complaints, performed testing, and concluded, among other points, this key item:
In summary, the water-based low-VOC drywall construction adhesives failure to cure and reach a dimensionally stable condition prior to finishing is causing screw buttons.
Based on these
findings, it is imperative that the adhesive manufacturer’s application instructions are reviewed
and followed at all times.
...
In order to minimize or eliminate the occurrence of raised protrusions or screw buttons, USG
recommends that the installer confirms that the adhesive has fully cured to ensure the adhesive
has stopped shrinking and stabilized prior to the finishing of wallboard.
Details are in the document we have provided above and again at the end of this article. Note that the USG photo intends to show raised nail pops but the lighting makes those two spots look like depressions or dimples - discussed separately belown on this page.
Drywall Nail Pop Repair Methods
Smash and dash nail pop repair
We [DF] repair nail pops by setting (hammering) the nail about 1/16" to 1/8" below the flush surface of the drywall.
The indentation is filled with joint compound, or if time is short, with Dash Patch™, and the wall is re-painted. It makes sense to wait to repair nail pops until you are planning to paint the building interior.
Screw and smooth nail pop repair
If nail pops have been recurrent you may want to install two drywall screws about 1/2-inch on either side of the popped drywall nail to prevent further movement in this area. You'll want to hammer in the popped drywall nails (gouging them out is possible but makes a much bigger mess).
A hammer with a clean face works fine, or if you're fussy, use a nail set (I don't know anyone who does that). Then screw a drywall screw about an inch away on either side of the bad-behaving drywall nail.
Set the drywall screw just below the drywall surface. Ideally you'll stop before the drywall screw tears the paper surface. If you over-drive a drywall screw so that it has cut below the surface of the paper you have reduced its holding ability.
Then use drywall compound or a Dash Patch or Dash Patch mix with drywall to speed up the smoothing process before re-painting.
Just be sure your drywall screws are fastened into the wood or metal joist or stud, as just screwing into the drywall alone is not effective.
Best Drywall Nail Pop Repair
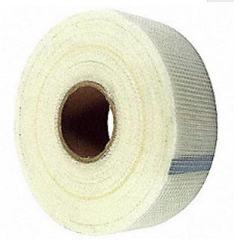
For an open type drywall nail pop in which the nail has torn the surface of the drywall paper, the smash and dash or screw and smooth repairs describe above will be still-more durable if you apply a square of fiberglass mesh drywall tape over the damaged area before applying the joint compound.
How to Prevent Drywall Nail Pops
- Use kiln-dried lumber for framing walls and ceilings.
As Steve Bliss points out at DRYWALL INSTALLATION Best Practices,
" With wet or poor-quality framing, there are bound to be problems in the drywall finish. With dry lumber and proper detailing, however, drywall problems can be kept to a minimum." - Use drywall screws instead of drywall nails. Set the screws just below the drywall paper surface but not so deep as to cut through the paper.
- Floating ceiling-wall & floating corner joints: when hanging drywall on a ceiling supported by the lower chord of roof trusses, review the suggestions
at TRUSS UPLIFT, ROOF, including using clips rather than screws or nails to secure drywall within a few feet of either side of building center partitions that run at right angles to the lower chord of the roof trusses.
The floating corner method can be used to float the ceiling drywall over the center partitions.
Details are at DRYWALL INSTALLATION Best Practices. - Use construction adhesive to minimize drywall movement
Drywall Nail Dents, Dimples or Shadowing
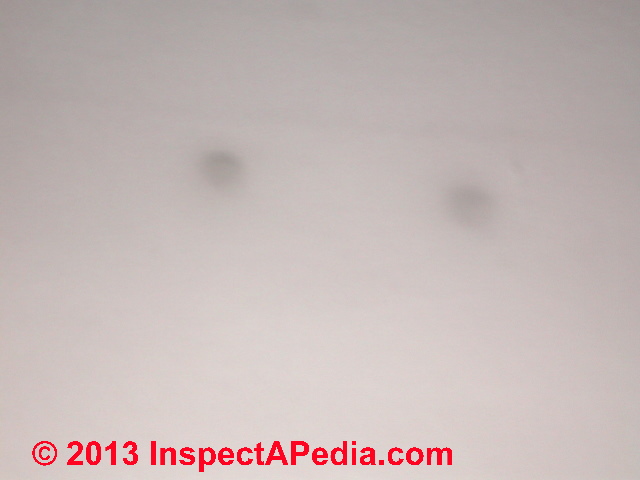 Special thank-you to InspectApedia reader Dean who asked about the opposite problem from nail pops: dimples or dents that appear at drywall nail or screw locations, as we discuss below.
Without careful inspection using a straight edge, we can't be sure if the dark spots shown in this photo, caused by thermal tracking, are flush with the surrounding surface or below it.
If you are seeing a depression at drywall nails or screws we (and Dean) call those drywall nail dimples - whose cause and cure are explained here.
Drywall "Dimples" Cause & & Repair: Question by Dean
I checked out the nail pop section of your site hoping to find what I was looking for. No luck. That just might be due to my not knowing what to call what I'm looking for. I have the opposite problem of a nail pop. I call then nail dimples.
They are always in the ceiling and in a line just like a series of nail pops could be. Since it is a ceiling thing I assume that the nail is holding just fine, but the weight of the drywall is causing the dimples?
I am also guessing maybe there weren't enough nails used to hold the ceiling drywall?
Any idea of what might be causing this and is it just a matter of adding a few screws somewhere in the line of dimples, then filling in the dimples with compound? Thanks! - Dean, 2024/09/15
Answer by InspectApedia Publisher (mod): Drywall dimpling causes, prevention, cure
Thank you for a very helpful question about nail dimples in comparison with nail pops.
I have dealt with this nail dimple phenomenon and even seen it appear on sheetrock that I've installed myself.
And I've seen nail dimples appear both on walls and on ceilings where drywall has been installed.
I think there are several possible causes of these depressions or "dents" or as you so aptly called them, "drywall dimples":
- Inadequate level of drywall finish:
Most common: insufficient joint compound covering drywall nails or screws at time of original installation.
As it dries joint compound shrinks slightly, which is why two or better, three passes of joint compund application and sanding or sponging are required for a smooth flat finished drywall surface. If this is the case at your building these drywall dimples will have been present since original construction.
So why weren't these little dents noticed before? Either they simply were not noticed or thermal tracking may have caused the spots to darken, making them more-obvious.
We explain this phenomenon
at THERMAL TRACKING BRIDGING GHOSTING - Over-driving drywall fasteners?
Another cause of drywall dimples, though less common, can be over driving at the time of original installation combined with cause #1 above, requiring more joint compound filler than the drywall finish worker thought.
If that's the case then the nail dimple will have been there from early on, perhaps showing up when the skim coat of joint compound over the nails was a bit too thin and shrink a bit as it dried.
- Drywall expansion from thermal or moisture changes?
Another more subtle cause of nail dimples (and often cracks too, as we show above) might be high moisture levels in a building that caused the gypsum board to swell slightly or soften slightly.
The expansion of drywall in response to temperature as well as moisture uptake or loss are described by our article
PLASTERBOARD / DRYWALL EXPANSION COEFFICIENTS
where this itation may be of interest - Insufficient fasteners + drywall weight: ceiling dimples?
Your hypothesis about the weight of the drywall causing nail dimples good explain that phenomenon on a ceiling but not likely on a wall and I think is less common.
If the weight of the drywall, combined with insufficient number of fasteners, was leading to the dimples that you describe I would expect to see and have seen myself a bit of sagging between the fasteners.
So if you hold a good straight edge along the ceiling, preferably a 4-ft level or something that's longer and that's dead straight and place it along the nail line you will see if there's any sagging.
And of course in the more extreme case if you can push on drywall and it moves in towards the wall stud or ceiling joist then it is clearly loose and it insufficiently fastened.
I would say if you are drywall nails or screws are more than a foot apart it might make sense to add a second fastener and suitable intervals along the ceiling.
I've worked with some drywall that seem to be abnormally soft and my screws or nails were too often sinking too deeply into the wallboard. In that case I simply put another fastener an inch or two away from the original one.
[19] Plastering, PM 5, Product & Systems Technology, US Gypsum, May 1998, web search 10.5.2010, original source: http://www.usg.com/rc/technical-articles/plaster/ [copy on file as/interiors/Plastering_USG.pdf ] - plastering-technical-guide-veneer-plaster-joint-reinforcement-systems-en-PM5.pdf United States Gypsum Company, 125 South Franklin ST., PO Box 806278, Chicago, IL 60680-4124,
Paraphrasing from this document:
USG uses the term shadowing in this document in describing the visual effect over gypsum board joints caused by the lower moisture absorption rate (take-up) and lower capacity than gypsum base face paper.
Shadowing at joints occurs where veneer plaster is applied over tape joints, requiring a second coat to completely hide the tape, providing a visually uniform surface. USG Advises:
"This [second] cover coat must be allowed to harden and dry before plaster application is started.
Repair for Drywall Dents or Dimples
- Add drywall fasteners: if the drywall fasteners are spaced too far apart you could put your additional fasteners at intervals that are in the middle of the existing nails or screws. I prefer using drywall screws rather than nails, especially for this problem.
Watch out: if the drywall has sagged away from the ceiling simply adding fasteners will not work well: trying to use screws or nails to pull up a sagged drywall ceiling, unless you also use plaster washers, will often lead to the screw simply cutting through the drywall surface rather than lifting it up snug against the ceiling joist.
Plaster washers might work if the sagging is not significant; else you'd need to use a drywall jack to push the drywall up snug against the ceiling joists before adding fasteners. - Proper joint compound finishing at drywall fasteners:
Finish the job with joint compound over each slightly countersunk fasteners in the ceiling.
See DRYWALL FINISHING LEVELS and finish your drywall to at least Level 3.
Let me know what you think. And thanks again for a very helpful question.
Daniel
Five Levels of Drywall Finishing for Gypsum Board Interior Ceilings & Walls
Quoting from USG's "Finishing Drywall Systems",
Five leading industry trade associations
—the Association of the Wall
and Ceiling Industries International (AWCI), Ceilings and Interior Systems
Construction Association (CISCA), Gypsum Association (GA),
Drywall Finishing Council (DWFC) and Painting and Decorating Contractors
of America (PDCA)—
have combined efforts to collectively
adopt a set of industry-wide recommended specifications for levels of
gypsum board finish.
This specification identifies five levels of finishing,
enabling architects to more closely identify the quality of finish
required and allowing for better competitive bidding among contractors.
American Society for Testing & Materials (ASTM) recognized
this specification by including the levels of gypsum board finishing in
ASTM C840.
Key factors in determining the quality level required include:
1. The location of the work to be done.
2. The type and angle of surface illumination (both natural and artificial lighting).
3. The orientation of the panels during installation. (See page 106.)
4. The type of paint or wall covering to be used.
5. The method of application.
Critical lighting conditions, gloss paints and thin wall coverings require a high level of finish, while heavily textured surfaces or those that will be decorated with heavy-gauge wall coverings require less attention to final surface quality. Definitions of the five finishing levels are provided [in table form below]... - [1] U.S. Gypsum (2009)
Drywall / Gypsum Board Finishing Guides, Manuals, Standards
- Armstrong Corporation, CEILING SYSTEMS, DRYWALL GRID SYSTEMS, Hanging & Framing Flat Ceilings [PDF], retrieved 2017/09/15, original source: https://www.armstrongflooring.com/common/c2002/content/files/58873.pdf
- Gypsum Association, GYPSUM BOARD TYPICAL MECHANICAL AND PHYSICAL PROPERTIES (GA-235-10) [PDF], retrieved 2017/09/15, original source: http://www.americangypsum.com/ sites/default/files/documents/GA-235 Gypsum Board Typical Mechanical and Physical Properties.pdf
- IBC 2006 New Jersey, IBC CHAPTER 25 GYPSUM BOARD and PLASTER CODE [PDF] retrieved 2017/09/15, original source: http://www2.iccsafe.org/states/newjersey /nj_building/PDFs/NJ_Bldg_Chapter25.pdf available from http://www2.iccsafe.org/
- Pertinent U.S. Drywall & Ceiling Standards
for the Armstrong Drywall Grid Ceiling System above
as well as for general gypsum board installation & finishing
- ASTM C635, Standard Specification for the Manufacture, Performance, and Testing of Metal Suspension Systems for Acoustical Tile and Lay-in Panel Ceilings
- ASTM C645 Standard Specification for Nonstructural Steel Framing Members
- ASTM C754 Standard Specification for Installation of Steel Framing Members to Receive Screw-Attached Gypsum Panel Products
- ASTM C840 Standard Specification for Application and Finishing of Gypsum Board
- California, City of Los Angeles, RR 25348
- ICC Evaluation Service Report ESR=-1289 (for Armstrong drywall grid system ceiling Systems listed above)
- International Building Code, Continuous Membrane, One Level.Per Section 25.210, single level drywall ceilings are exempt from lateral force bracing requirements when walls are not over 50 feet apart. When walls are over 50 feet apart, the ceiling should be examined for bracing requirements (for Armstrong drywall grid system ceiling Systems listed above).
- U.S. Gypsum Corporation, FINISHING DRYWALL SYSTEMS [PDF], 196pp manual, retrieved 2017/09/15, original source: https://www.usg.com/content/dam/USG_ Marketing_Communications/ canada/product_promotional_ materials/finished_ assets/cgc-construction-handbook-ch05-finishing-drywall-systems-can-en.pdf
- U.S. Gypsum Corporation, GYPSUM BOARD SYSTEMS12th Ed. [PDF], retrieved 2017/09/15, original source: https://www.nationalgypsum.com/resources/ construction-guide/NGCGypWallBoard.pdf
- U.S. Gypsum Corporation, DRYWALL, PLASTER & ACOUSTICAL CEILING INSTALLATION TOLERANCES [PDF], , retrieved 2017/09/15, original source: http://www.usg.com/content/dam/ USG_ Marketing_Communications/united_states/product _promotional_materials/ finished_assets/appendix2.pdf?region=united_states
- U.S. Gypsum Corporation, USG FASTENER-RELATED DRYWALL INSTALLATION ISSUES & RECOMMENDATIONS [PDF] retrieved 2018/02/27, original source: http://www.usg.com/content/dam/USG_ Marketing_Communications/united_states/product _promotional_ materials/finished _assets/usg-fastener -related-drywall-installation-issues-eccomendations-white-paper-WB2757.pdf? region=united_states&lang=english&cat=products,docspecs
...
Reader Comments, Questions & Answers About The Article Above
Below you will find questions and answers previously posted on this page at its page bottom reader comment box.
Reader Q&A - also see RECOMMENDED ARTICLES & FAQs
On 2024-09-15 by InspectApedia Publisher (mod) - Drywall Dimples?
@Dean,
Thank you for the drywall dimple or dent question - please find your question and our detailed reply now above on this page at\
DRYWALL NAIL DENTS or DIMPLES - cause & repair
On 2023-04-23 by Vandna - Nail pops after installing shelving on a wall
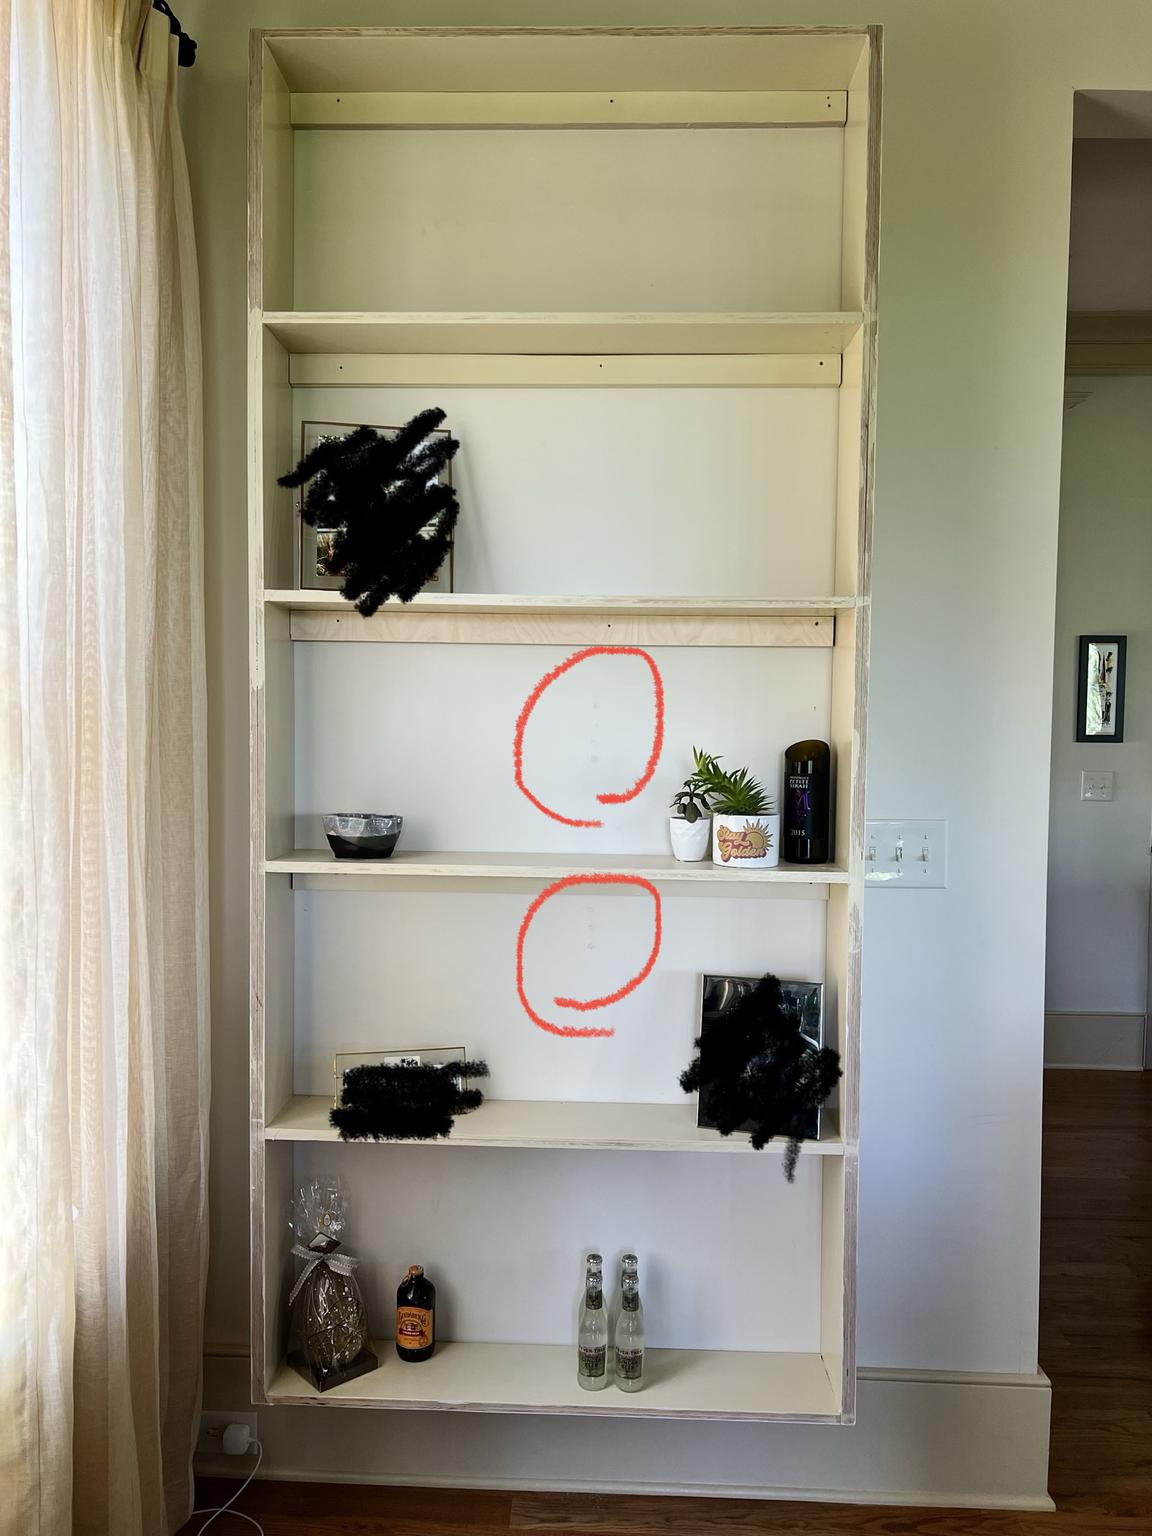
I recently installed a shelf on my wall. The dimensions of the wall are 40 by 88 and it has 4 shelves each about 17in apart.
The shelf is made of plywood. I installed 2” beams under each shelf for support. The unit was installed using 3” wood screws drilled into studs.
The wall is also one side of a residential elevator. It was installed 4 days ago.
This morning we noticed evidence of nail pops as below. Any advice as to what or how to mitigate?
Reply by InspectApedia Editor (mod)
@Vandna,
Provided that the supports that hold up your shelving are themselves secured to studs in the walls, the drywall nail pops are probably a result of pushing on the wall during installation - a cosmetic repair: re-set the nails, re-spackle, re-paint when you're up for it.
But
Watch out: if your shelving was not secured to building framing it may not be safely secured.
Question: could these ceiling drywall nail pops have been caused by activity on the floor above?
I have 2 rows of popped nails in the middle of my ceiling. I believe them to be a direct result of the new owners in the rental unit above this same ceiling.
They recently renovated their unit. moving out all existing furniture, removed carpet and padding and installed a new "click and lock" flooring and had an existing Murphy bed which I've head them slam down and have an adolecent jumping on and off the bed.
I had no problems with the ceiling prior to them moving in. They deny that they caused this problem. I'd like to know if their "banging" could cause this.
Moderator reply:
Yes it could, Sally.
Particularly when the following conditions are true, activity on the floor above can cause ceiling drywall nail pops:
- The ceiling is framed to minimum building standards or less, or even inadequately framed or with joists that are over-spanned, but also even with normal framing if
- There are unusual loads from above such as heavy weight or unsually violent physical activity (my overweight cousins leaping off of their upper bunk bed)
- The damage appears after such physical activity but not before
- The ceiling is secured to the underside of the ceiling joists with nails not screws (though screw pops also occur they're less-likely)
On 2020-01-31 by 6 floor podium wood frame building
Would it be best to start drywall on the top floor or does it matter if we start drywall on first floor?
On 2020-02-04 - by (mod) - no spec on which floor in a building gets drywall first.
I haven't seen a specification on which floor gets the drywall first, but I know there are opinions having to do with building dry-in, interior moisture, avoiding damage to finished areas by working top-down.
On 2019-12-07 1 - by Robert wilson said: Over 800 nail pops in new h ouse
Robert wilson said:
Built a new house in 2009 . After eight years over 800 nail pops . The house was over heated when built over 120 degrees. Would you know the ansewer to this?
Moderator reply:
That's an unusual number of nail pops; I would need to know quite a bit more about the home, construction, materials, moisture levels, type of heat, country, city, climate, time of year, etc. to offer a confident opinion but most-likely we had a combination of wood framing using lumber at a high moisture content followed by rapid dry-out causing wood shrinkage.
This Q&A were posted originally at INTERIORS of BUILDINGS https://inspectapedia.com/interiors/Building-Interiors.php
On 2019-08-15 by Jack Did Roof Work Hammering cause nail pops in cathedral ceiling?
Is it possible that the hammer from installation of a new external Roof could cause nail pops in a cathedral ceiling directly below?
Reply by (mod) - causes of roof noise
Jack
Yes in my opinion, depending on exactly what's causing the roof noise; for example flexing truss bottom chords could cause nail pops in the ceiling below as could a bouncy, under-framed roof subjected to weight loads from snow or people or wind.See ROOF NOISES & SOUNDS - a catalog of roof noises & where they originate
and be sure to see TRUSS UPLIFT, ROOF
and also POPPING SNAPPING NOISE DIAGNOSIS
On 2018-09-09 1 by Stacey Perry
When we purchased our first home, the previous owners hid issues. One I can't figure out how to fix is the spots where the nails show on all exterior facing walls. I've tried cleaning, priming and painting, but they just darken up again. They are not bulging and I don't think they are popped.
The black does not wash off completely and I've used kiltz primer followed by paint only to have them show up again. It's only the screwheads and there isn't any black marking where the studs are. Any idea what this is and if there is a fix?
When we bought the house there were stickers over them, I assumed that since it was an elderly couple, they had been put up for grandkids, now I look back that was an odd assumption. The house was built in 1995.
image lost, please re-post if you can
Reply by (mod) - Kilz primer,
Stacey
Kilz primer, if you used the modern version, is a latex-based paint through which lots of stains may bleed - as is the case for all latex paints. An alkyd primer may perform better; my best results for sealing stains before painting-over them has been with a lacquer primer sealer such as Bin or Enamelac because few stain chemicals will bleed through those.
It's also possible that some nail or screw heads are just too close to the wall surface;
Particularly if there is an indoor moisture source, metal surfaces close to the wall surface may corrode and stain.
You could try hammering the exposed head into the wall, then filling the dent with drywall compound before priming and re-painting.
On 2018-06-19 by fi
hi there, I am realtor and suddenly in the house I am listing which is fully paint recently, nail pops in the upper floor, big round circle happening> why
On 2018-06-19 - by (mod) -
I'd like to help but I would certainly need to know more to make even a wild guess. Perhaps you can attach some photos that show the condition of the nail pops.
On 2015-02-0 by SERENE LEE
Any contractor in Singapore who is able to do patch up in the popped out nail in wall? My house room wall has been popped out nos. Of hole & despite of white clay patching up its still doesn't work. Please advice.
Thank you
On 2015-02-06 - by (mod) -
Serene, sorry but we don't have a specific contractor referral in Singapore. But you might be able to improve the results provided by whomever you hire if you pass on to them the article above - you're welcome to make a printed copy.
Do let me know if further questions arise, or if you like, use our CONTACT link (page bottom) to find our email to send me some photos of the problems in the wall of concern to you - I may be able to comment further.
...
Continue reading at DRYWALL CRACKS or select a topic from the closely-related articles below, or see the complete ARTICLE INDEX.
Or see these
Recommended Articles
- ASBESTOS in DRYWALL
- DRYWALL, FIBERBOARD, PLASTER INTERIORS - home
- ASBESTOS in DRYWALL
- COATING TYPE CEILING & WALL SURFACES: CATALOG OF
- DOMTAR GYPROC ASBESTOS?
- DRYWALL & GYPSUM BOARD COMPOSITION & HISTORY
- DRYWALL CONTROL JOINTS
- DRYWALL CRACK CAUSES & CURES
- DRYWALL FINISH LEVELS
- DRYWALL TYPE IDENTIFICATION STAMPS
- DRYWALL INSTALLATION Best Practices
- DRYWALL INSTALLATION HORIZONTAL vs VERTICAL
- DRYWALL GREEN LOW TOXICITY MAGNESIUM OXIDE MgO
- DRYWALL MOLD RESISTANT
- DRYWALL MOLD TESTING
- DRYWALL NAIL POPS & DENTS
- METAL LATH for PLASTER
- PLASTER TYPES & METHODS in BUILDINGS
- TRUSS UPLIFT, ROOF
- UPSON BOARD
- WALL FINISHES INTERIOR
Suggested citation for this web page
DRYWALL NAIL POPS & DENTS at InspectApedia.com - online encyclopedia of building & environmental inspection, testing, diagnosis, repair, & problem prevention advice.
Or see this
INDEX to RELATED ARTICLES: ARTICLE INDEX to BUILDING INTERIORS
Or use the SEARCH BOX found below to Ask a Question or Search InspectApedia
Ask a Question or Search InspectApedia
Try the search box just below, or if you prefer, post a question or comment in the Comments box below and we will respond promptly.
Search the InspectApedia website
Note: appearance of your Comment below may be delayed: if your comment contains an image, photograph, web link, or text that looks to the software as if it might be a web link, your posting will appear after it has been approved by a moderator. Apologies for the delay.
Only one image can be added per comment but you can post as many comments, and therefore images, as you like.
You will not receive a notification when a response to your question has been posted.
Please bookmark this page to make it easy for you to check back for our response.
Comments
IF above you see "Comment Form is loading comments..." then COMMENT BOX - countable.ca / bawkbox.com IS NOT WORKING.
In any case you are welcome to send an email directly to us at InspectApedia.com at editor@inspectApedia.com
We'll reply to you directly. Please help us help you by noting, in your email, the URL of the InspectApedia page where you wanted to comment.
Citations & References
In addition to any citations in the article above, a full list is available on request.
- [2] "Finishing Drywall Systems", U.S. Gypsum (USG) Corporation [copy on file as USG_Finishing_Drywall_Systems_Ch5.pdf] 2009
- [3] "Sheetrock® All Purpose Joint Compound - Select for professional drywall finishing", Submittal Sheet 09250
- [4] "Quality Drywall Finishing in All Kinds of Weather", USG Folder J-75 (out of print), U.S. Gypsum corporation
- [5] Gypsum Construction Guide, National Gypsum Corporation
- [6] Gypsum Construction Handbook [purchase at Amazon.com] H17, Technical Folder SA920 and PM2, PM3 and PM4, United States Gypsum Company, 125 South Franklin ST., PO Box 806278, Chicago, IL 60680-4124,
- [7] Lath & Plaster Systems [copy on file as /interiors/LathPlaster_Nat_Gypsum.pdf ] - , 092300/NGC, National Gypsum Lath and Plaster Systems, National Gypsum Corporation, 800-628-4662 describing National Gypsum's Kal-Kore brand plaster base
- [8] Metal Lath Specifications, Specification for metal lath and accessories, Lath and Plaster [copy on file as/interiors/Amico_lath-inside.pdf ] - from Amico, a lath and plaster accessory producer.
- [10] Plastering Skills, F. Van Den Branden, Thomas L. Hartsell, Amer Technical Pub (July 1, 1985), ISBN-10: 0826906575, ISBN-13: 978-0826906571 [purchase at Amazon.com]
- [11]
Drywall Finishing Council www.dwfc.org, Members: CertainTeed Gypsum • Freeman Products • Georgia Pacific Gypsum LLC • LaFarge North America • Magnum Products •
National Gypsum Company • Panel Rey SA • Rapid Set Cement • Saint-Gobain, Inc • Sherwin-Williams Company • Solid
Products, Inc. • Southern Wall Products • Trim-Tex, Inc. • United States Gypsum Company • Westpac Materials
- "Joint Compound Drying Time, the Impact of Environmental Conditions", Drywall Finishing Council, Retrieved 8/16/12, original source: http://www.dwfc.org/wp-content/files/2010_03_16_Joint_Compound_Drying.pdf [copy on file as Joint_Compound_Dry_Tmie_DWC.pdf]
- "Jobsite Conditions for Applying Interior Finishing Materials", Drywall Finishing Council, Retrieved 8/16/12, original source: http://www.dwfc.org/wp-content/files/2011_09_16_Interior_Job_Condition_Specifications.pdf [copy on file as Drywall_Finish_Conditions_DWC.pdf ]
- DWFC. Interior Job Condition Specifications For The Application of Drywall Joint Compounds,
Drywall Textures, and Paint/Coatings". Drywall Finishing Council, Incorporated. www.dwfc.org - DWFC. Recommended Specification for Preparations of Gypsum Board Surfaces Prior To Texture
Application, Drywall Finishing Council, Incorporated. www.dwfc.org - GA. GA-214, Recommended Levels of Gypsum Board Finish. Gypsum Association, 6525 Belcrest
Road - Suite 480. Hyattsville, MD 20782 www.gypsum.org - National Gypsum Company. ProForm Brand Drywall Finishing Products Construction Guide,
National Gypsum Company, 2001 Rexford Road, Charlotte, NC, 28211, www.nationalgypsum.com
- [12] The Gypsum Association
www.gypsum.org
- Gypsum Construction Handbook H-17 [purchase at Amazon.com] . USG Corporation, 550 West Adams Street,
Chicago, IL, 60661, www.usg.com
- Gypsum Construction Handbook H-17 [purchase at Amazon.com] . USG Corporation, 550 West Adams Street,
- [13] Painting and Decorating Contractors of America www.pdca.org Smartwood/Rainforest Alliance www.smartwood.org
- [14] "Joint Compounds", United States Gypsum Company, 125 South Franklin ST., PO Box 806278, Chicago, IL 60680-4124, retrieved 8/16/12, original source: http://www.usg.com/interiors/joint-compounds.html [copy on file as Mud_Types_USG.pdf]
- Gypsum Construction Guide, National Gypsum Corporation
- Gypsum Construction Handbook [purchase at Amazon.com] H17, Technical Folder SA920 and PM2, PM3 and PM4, United States Gypsum Company, 125 South Franklin ST., PO Box 806278, Chicago, IL 60680-4124,
- Lath & Plaster Systems, 092300/NGC, National Gypsum Lath and Plaster Systems, National Gypsum Corporation, 800-628-4662 describing National Gypsum's Kal-Kore brand plaster base
- Metal Lath Specifications, Specification for metal lath and accessories, Lath and Plaster from Amico, a lath and plaster accessory producer.
- Plastering Skills, F. Van Den Branden, Thomas L. Hartsell, Amer Technical Pub (July 1, 1985), ISBN-10: 0826906575, ISBN-13: 978-0826906571 [purchase at Amazon.com]
- Plastering, PM 5, Product & Systems Technology, US Gypsum, May 1998, web search 10.5.2010, original source: http://www.usg.com/rc/technical-articles/plaster/
plastering-technical-guide-veneer-plaster-joint-reinforcement-systems-en-PM5.pdf
United States Gypsum Company, 125 South Franklin ST., PO Box 806278, Chicago, IL 60680-4124,
Paraphrasing from this document: USG uses the term shadowing in this document in describing the visual effect over gypsum board joints caused by the lower moisture absorption rate (take-up) and lower capacity than gypsum base face paper. Shadowing at joints occurs where veneer plaster is applied over tape joints, requiring a second coat to completely hide the tape, providing a visually uniform surface. USG Advises: "This [second] cover coat must be allowed to harden and dry before plaster application is started. - Gypsum Construction Handbook [purchase at Amazon.com] H17, Technical Folder SA920 and PM2, PM3 and PM4, United States Gypsum Company, 125 South Franklin ST., PO Box 806278, Chicago, IL 60680-4124,
- In addition to citations & references found in this article, see the research citations given at the end of the related articles found at our suggested
CONTINUE READING or RECOMMENDED ARTICLES.
- Carson, Dunlop & Associates Ltd., 120 Carlton Street Suite 407, Toronto ON M5A 4K2. Tel: (416) 964-9415 1-800-268-7070 Email: info@carsondunlop.com. Alan Carson is a past president of ASHI, the American Society of Home Inspectors.
Thanks to Alan Carson and Bob Dunlop, for permission for InspectAPedia to use text excerpts from The HOME REFERENCE BOOK - the Encyclopedia of Homes and to use illustrations from The ILLUSTRATED HOME .
Carson Dunlop Associates provides extensive home inspection education and report writing material. In gratitude we provide links to tsome Carson Dunlop Associates products and services.


