 Framing Square Brace Table Instructions
How to use the brace tables found on the back of a framing square
- POST a QUESTION or COMMENT about types of roofing materials, installation, inspection, diagnosis, repair, maintenance, & warranties
Here we explain just how to use the brace tables on the back of the framing square tongue.
This article series explains how to make quick use of a framing square and its imprinted data to get some basic roof measurement data like roof pitch or slope, rafter lengths, and end cuts, stair stringer cuts, lengths of braces and other construction measurements.
InspectAPedia tolerates no conflicts of interest. We have no relationship with advertisers, products, or services discussed at this website.
- Daniel Friedman, Publisher/Editor/Author - See WHO ARE WE?
The Brace Triangle Table on the BACK of a Framing Square TONGUE - The Diagonal Scale
The framing square Brace Triangle Table , also referred to as the Brace Rule - is found on the back of the short arm or "tongue" of the framing square.
The 14 calculations or sets of numbers along this table are used for knee bracing or for post bracing in timber framing, and is also referred to as the Diagonal Scale on the Framing Square because the scale is telling us the length of the diagonal of a right triangle whose short arms are of equal length
[Click to enlarge any image]
These calculations are used to build bracing for many situations ranging from structural posts to overhead girders to simple shelf supports.
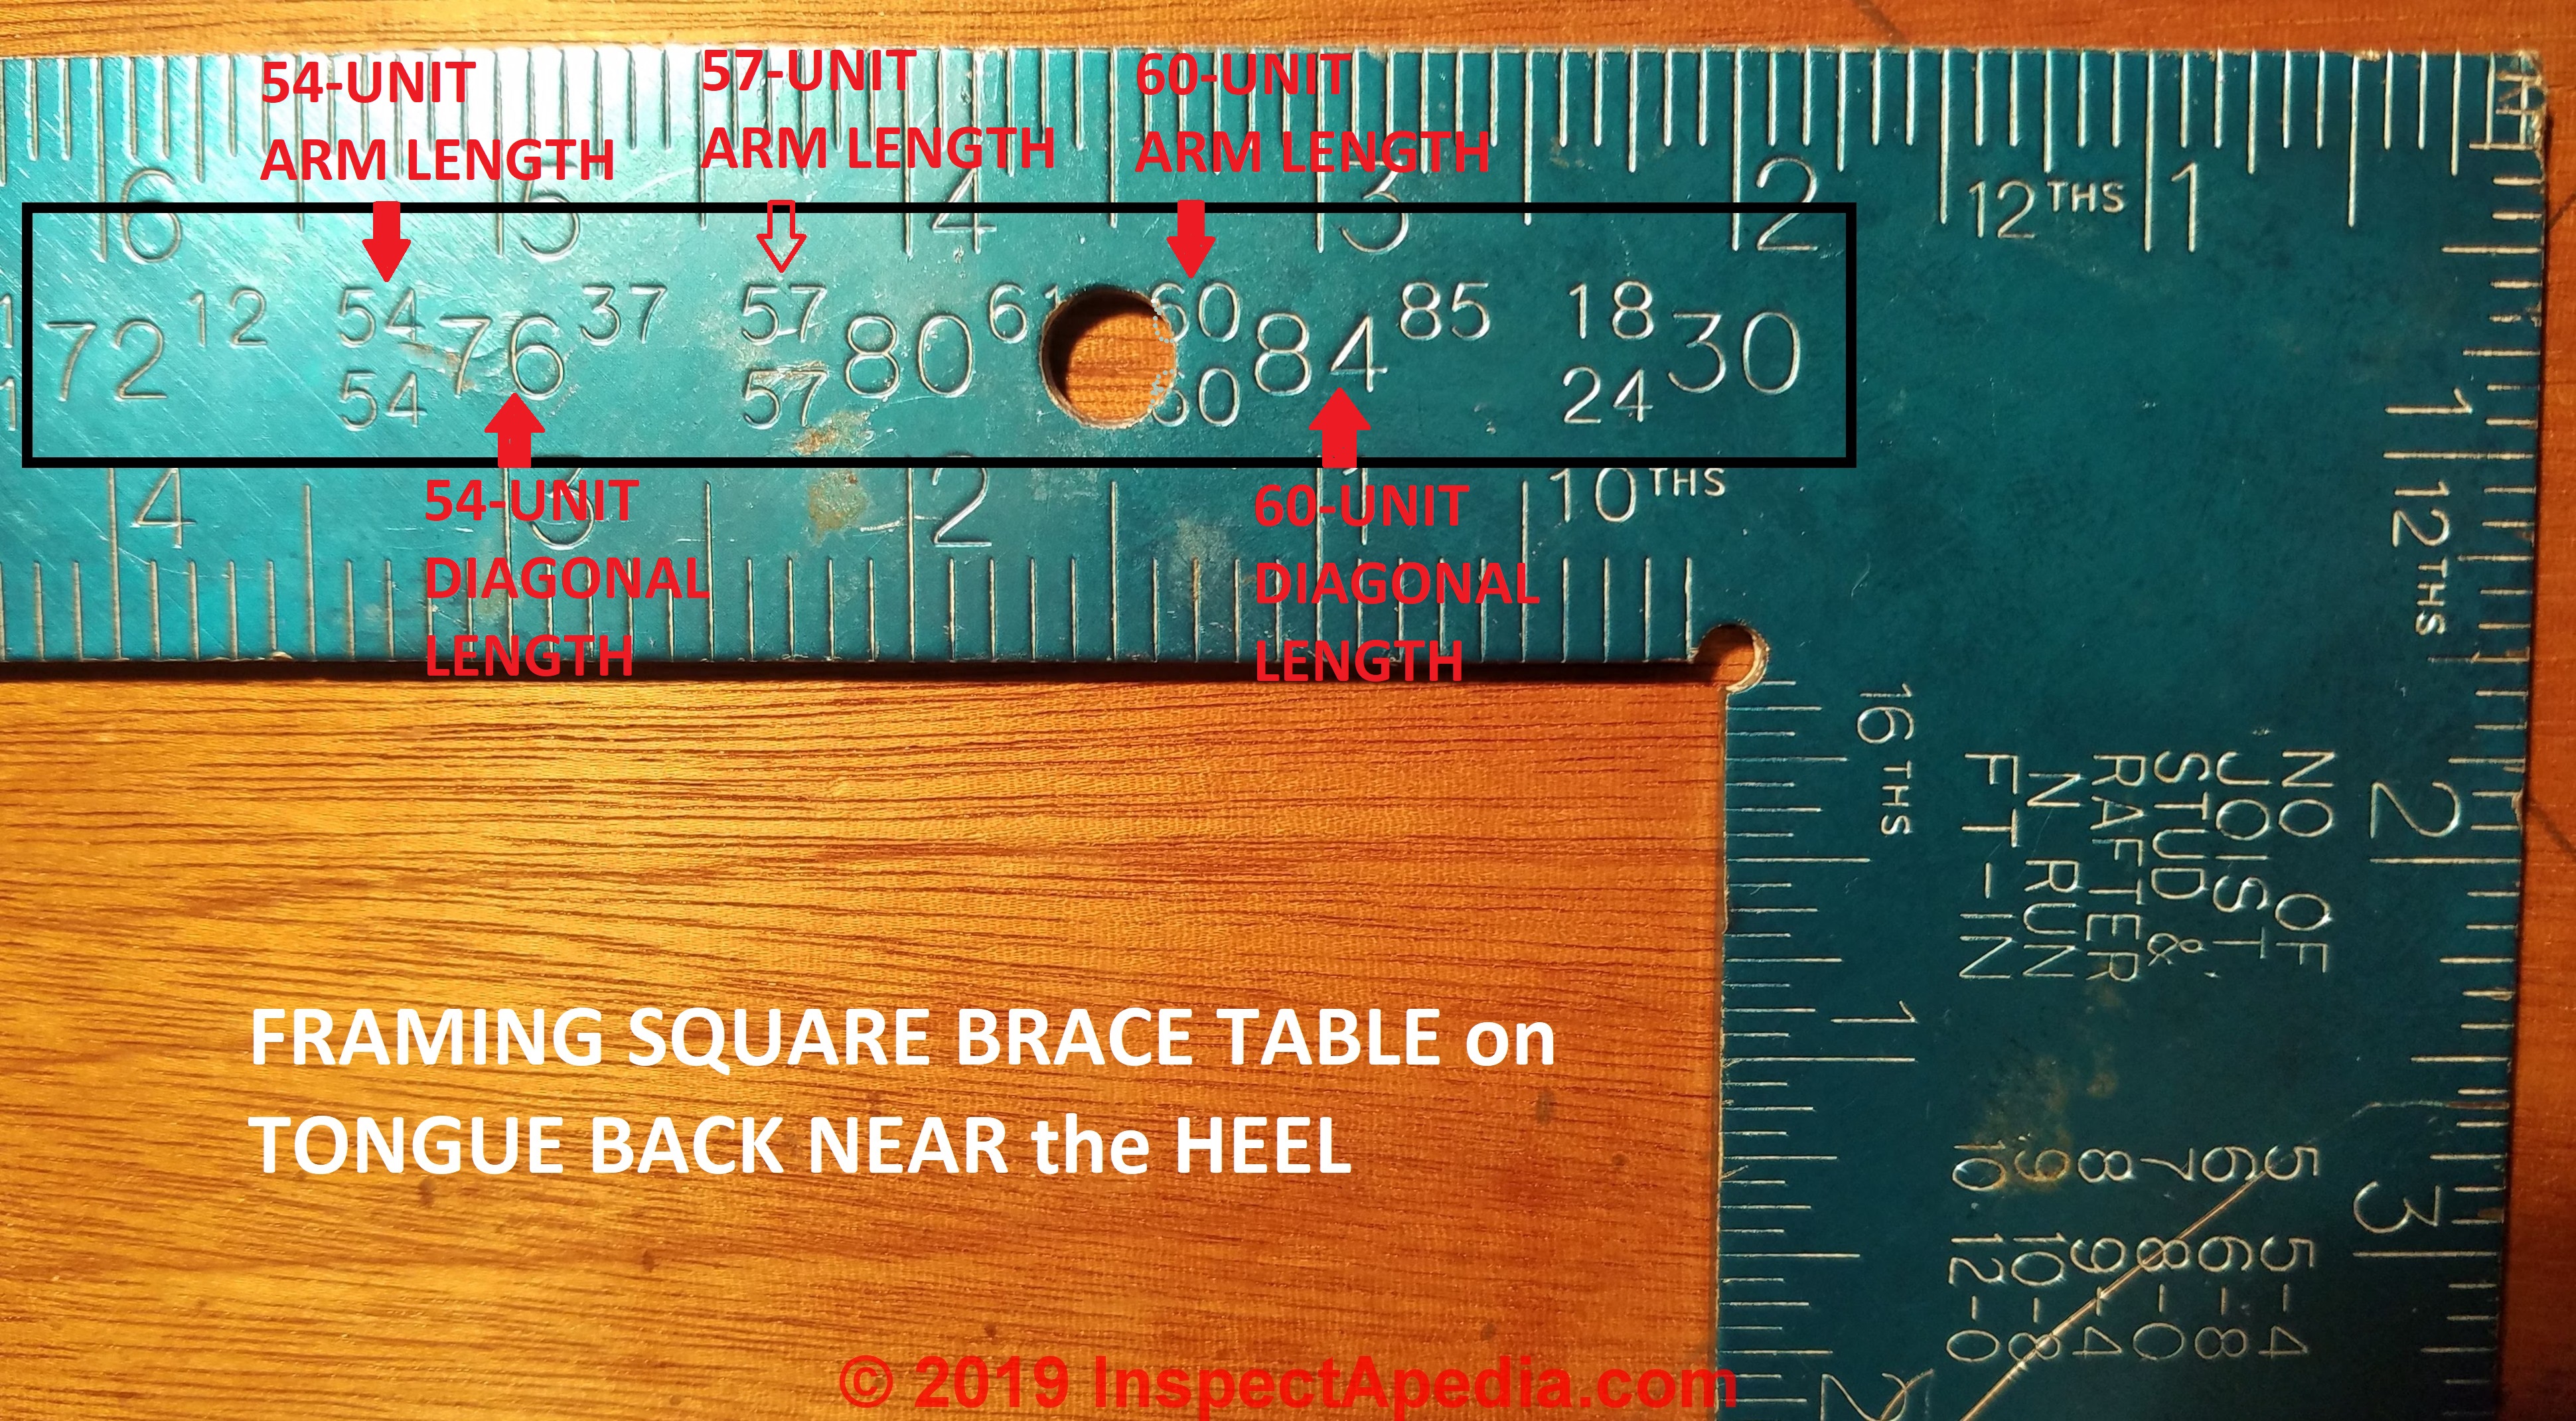
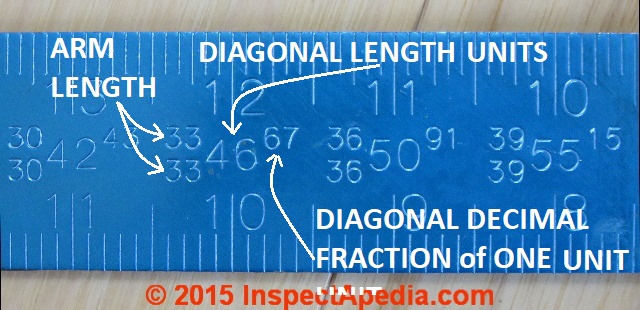
Each brace table entry gives sets of three numbers, two equal numbers - the brace arm lengths, and a third fractional number stamped to the right of the equal number pair - the brace diagonal member that connects to the outer ends of the two brace arms. The brace arms are always the same length.
My black box in the photo shows braces whose right-angle arms are 54/54 units, 57/57 units, or 60/60 units.
(Ignore the right-most 18-24-30 numbers for a minute, we'll discuss that special case later).
Examples read right off of the framing square brace table:
- a 54-unit long pair of arms at right angles to one another will require a diagonal or hypotenuse member that is 80.61 units long.
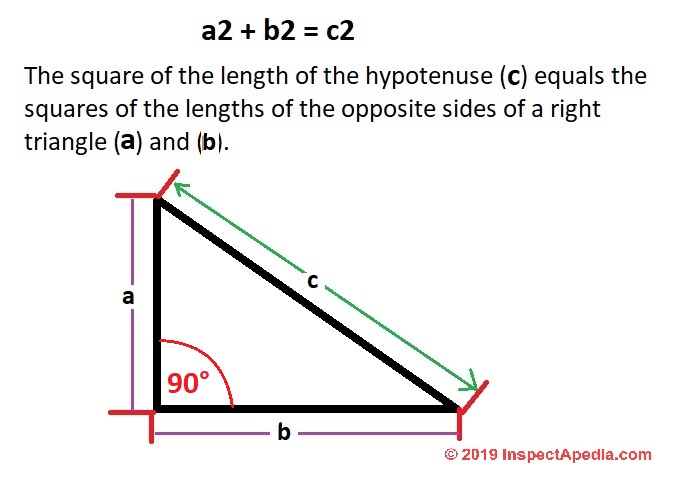
The math behind these calculations is simple: for any right triangle
a2 + b2 = c2 - the square of the length of the hypotenuse (c) equals the squares of the lengths of the opposite sides of a right triangle (a) and (b).
So given two 54 unit length arms we calculate the length of the diagonal as follows:
(542 + 542) = c2 or the length of the diagonal squared.
(2,916 + 2,916) = 5,832 = c2 or the length of the diagonal squared.
Square-Root of 5,832 (ok so I used my calculator) = 76.37 units in length - magic: that's what our framing square told us without having to resort to math or a calculator.
A quick look at two more brace lengths to the right of 54 we see:
- a 57-unit long pair of arms at right angles to one another will require a diagonal member that is 80.16 units long.
- a 60-unit long pair of arms at right angles to one another will require a diagonal that is 84.85 units long.
Your "units" can be mm, inches, feet, or furlongs (that's a really big brace however).
Why not just nail, screw or bolt the two brace arms together and then cut the diagonal to "fit" between their ends?
Well you can try that but you will most likely NOT end up with a perfect right angle or perfectly square brace corner.
On the other hand, if you follow the framing square brace table unit measurements your brace will form a perfect square every time.
The following elaboration of use of the brace table on the framing square is adapted with minor edits and additions from a U.S. Navy carpentry guide:
The brace table sets forth a series of fourteen equal runs and rises for every three units interval from 24/24 (at the far end of the framing square tongue back under the top 15" scale marking) out to 60/60 (near the right end of the tongue back close to the framing square's heel), together with the brace length, or length of the hypotenuse, for each given run and rise.
The table can be used to determine, by inspection, the length of the hypotenuse of a right triangle with the equal shorter sides of any length given in the table.
The "hypotenuse" is simply the mathematical name for the angled line formed between the two straight arms of any right triangle - the arms themselves meet at a right angle or at 90°.
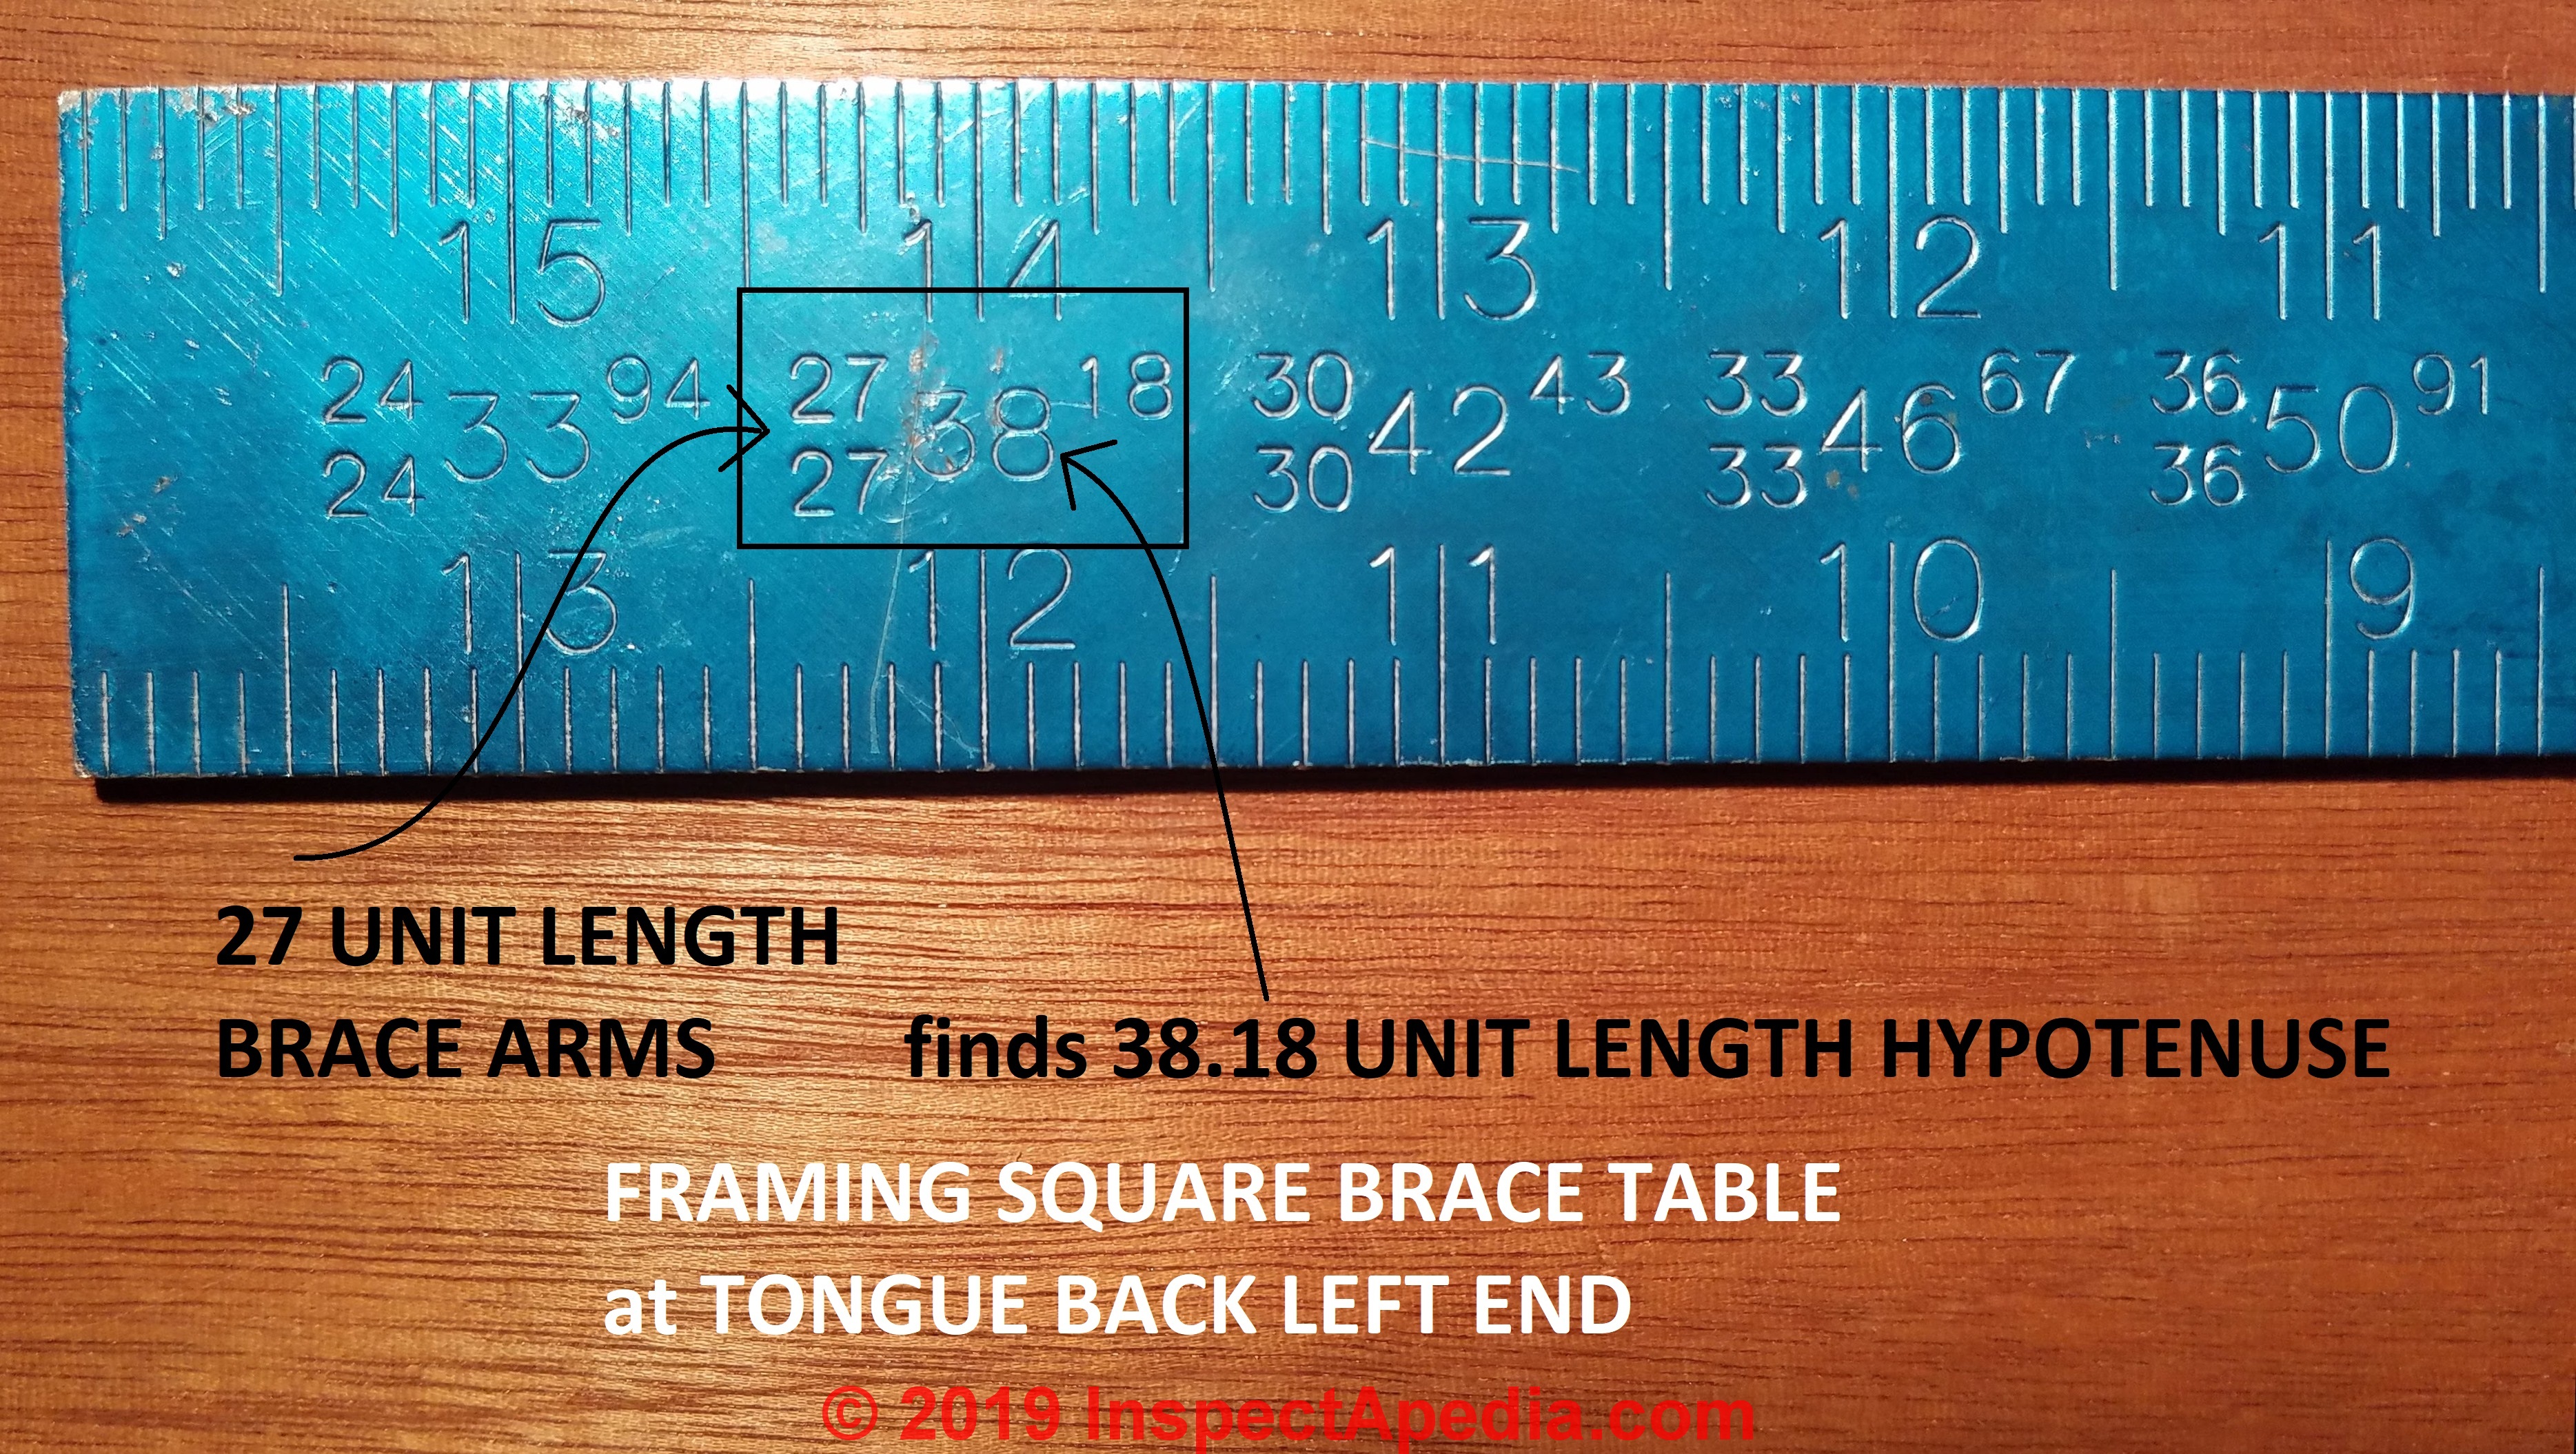
For example, in the segment of the brace table shown in our photo just below, you can see that the length of the hypotenuse of a right triangle with its with two sides 27 units long is 38.18 units;
two sides 30 units long is 42.43 units; and so on. By applying simple arithmetic, you can use the brace table to determine the hypotenuse of a right triangle with equal sides of practically any even unit length.
Example: Suppose you want to know the length of the hypotenuse of a right triangle with two sides 8 inches long.
The brace table shows that a right triangle with two sides 24 inches long has a hypotenuse of 33.94 inches.
Since 8 amounts to 24/3, a right triangle with two shorter sides each 8 inches long must have a hypotenuse of 33.94 ÷3, or approximately 11.31 inches.
Suppose you want to find the length of the hypotenuse of a right triangle with two sides 40 inches each. The sides of similar triangles are proportional, and any right triangle with two equal sides is similar to any other right triangle with two equal sides. The brace table shows that a right triangle with the two shorter sides being 30 inches long has a hypotenuse of 42.43 inches.
The length of the hypotenuse of a right triangle with the two shorter sides being 40 inches long must be the value of x in the proportional equation 30:42.43::40:x, or about 57.57 inches.
Notice that the last item in the brace table, the one farthest to the right in Figure 10-80, gives you the hypotenuse of a right triangle with the other proportions 18:24:30.
These proportions are those of the most common type of unequal sided right triangle, with sides in the proportions of 3:4:5.\
Source: excerpted from U.S. Navy, ROUGH CARPENTRY [PDF] NAVEDTRA, Framing Sills, Framing Floors, Framing Walls, Framing Roofs, Using the Framing Square, Laying out and Installing Roofs, Roof Trusses, Framing Stairs, retrieved 2019/09/10, original source: http://navybmr.com/study%20material/14043a/14043A_ch10.pdf
Details of using this 6-8-10 rule as a neat trick to square-up any structure or to be sure that your deck side rim joists are at a perfect right angle (square to) the building, are
at 6-8-10 RULE to SQUARE UP ANY STRUCTURE with more
at FRAMING TRIANGLES & CALCULATIONS
How to read the fractional number or superscript number to the right of the pairs of brace arm lengths
For example, looking once more at the back of the tongue of your framing square find at the triplet 33 33 46.67.
The 46 is given in the biggest size and above and to its right is a smaller 67.
Read the 46 as whole units and the 67 as decimal fraction of one unit.
This brace measurement number triplet tells us that for a 33" brace the hypotenuse of that triangular member will be 46.67" long on its outer or longer side.
Now I know that no carpenter has a tape that measures in hundredths of inches. A rough carpenter will round these decimal fractions off to something she can understand.
The framing square engineers considered this problem and gave us a pretty good solution - the Conversion Table of Inch Fractions in 32nds, 16ths, & 8ths into Decimal Fractions on a Framing Square Blade Back discussed
at FRAMING SQUARE DIVISION WARNINGS - 16ths, 12ths, 10ths, 8ths on various scales: watch out!
Special Case in the Brace Table on a Framing Square: the 3-4-5 axiom or 6-8-10 axiom for Finding a Right Angle
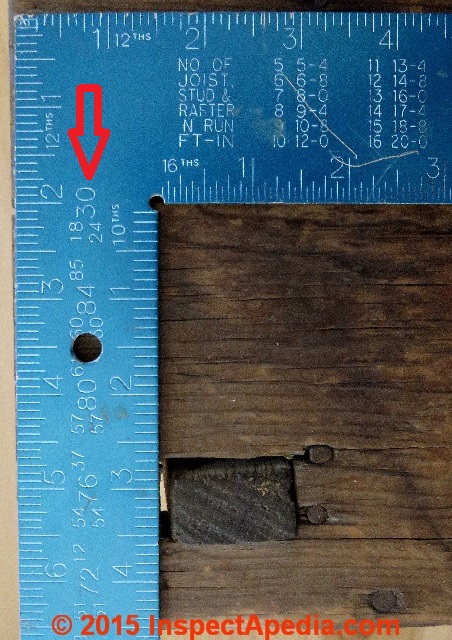
Here is a photograph of the back of the framing square heel.
Click to enlarge the framing square photo and you will see in the square's back inside corner the numbers 18 & 24 next to a large 30 (red arrow), referring to the 3-4-5 rule or as I learned it the more accurate 6-8-10 rule that give measurements of the three sides of a triangle you can use to make any pair of abutting framing members into a perfect 90 degree angle.
For example that's how we lay out a porch or deck frame to be sure it's square and at right angles to the house.
If we do NOT make the deck square to the house, cutting the remaining joists and girders will be hell because their lengths will vary - and to anyone with an eye your deck will show it was made by a beginner.
The 18-24-30 shown there are simply the products of multiplying 3-4-5 by 6 to apply the rule to longer lengths.
Details of using this 3-4-5 rule aka the 6-8-10 rule useful for squaring up any framed structure by simply making three length measurements are found
at FRAMING TRIANGLES & CALCULATIONS
How to Make Your Own Perfect Framing Square by using the 3-4-5 Rule
An early steel framing square, perhaps the first in the U.S., was made in Vermont in about 1818 by Silas Hawkes who made his first framing square out of steel saw blades. One of the appealing features of Silas Hawkes' Steel Carpenter's Square, whose US Patent, was issued in 1819, was that provided it was manufactured at a perfect right angle or 90°, the square stayed square.
Prior to steel framing squares carpenters made up their framing tools and guides necessary to mark right angles on wood, to build stairs, to cut rafters, out of wood. Those fellows made their own tools - usually as an apprentice project that followed the construction of one's first wooden toolbox.
The carpenter took advantage of the 3-4-5 rule to measure off that critical 5" or if doubled, 10" that, once found between the two blades of their square, would assure that it was made at a perfect right angle. Though some of these wooden framing squares were made out of beautiful hardwood, it was difficult, however, to be sure that the square stayed square as it got banged about.
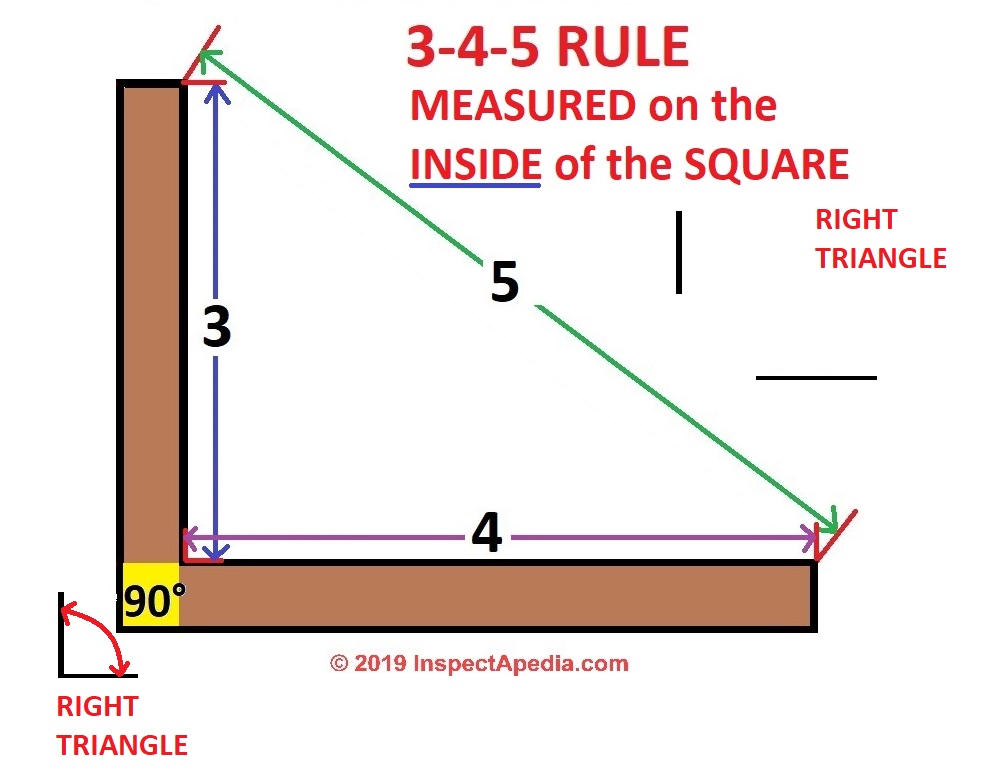
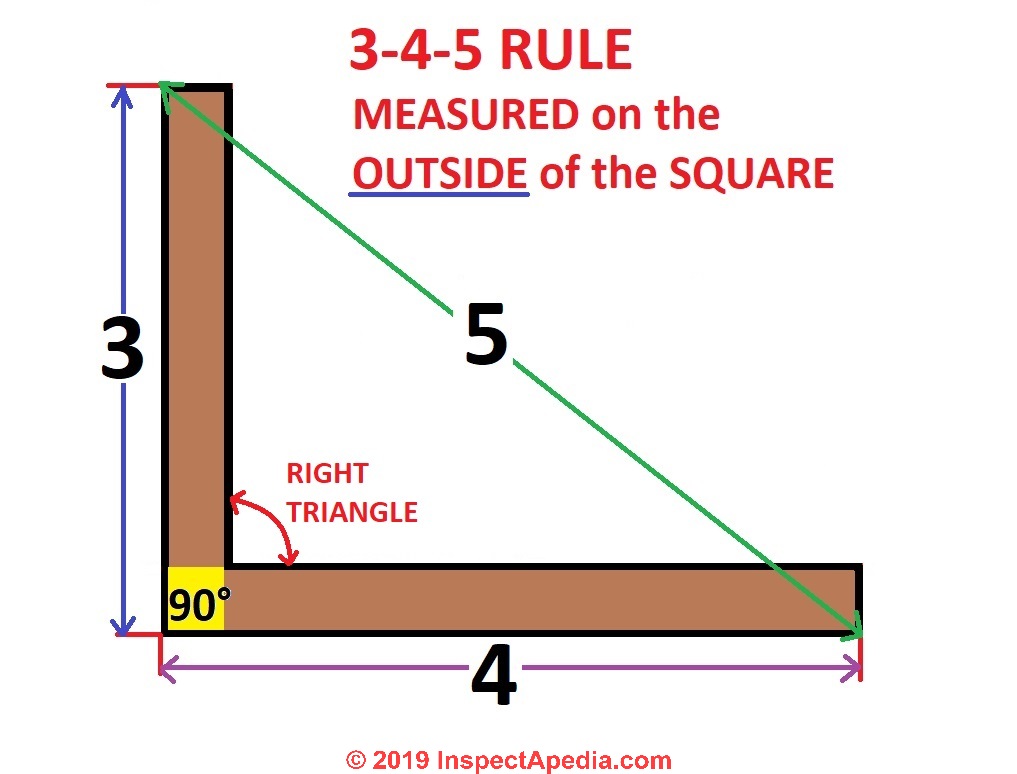
Simply put: if you want to build your own wooden framing square with a perfect 90° angle, all you need to know is that if one arm is 3 inches long and the other arm, intended to be set at a perfect right angle to the first is cut 4 inches long, then the distance between them will be exactly 5 inches.
Watch out: as our second perfect right triangle drawing below illustrates, it is critical that you measure the diagonal (the triangle's hypotenuse) from the proper corners of your DIY framing square. If your 3-unit and 4-unit arm measurements are made on the inside of the arms then your diagonal measurement is made from the inside corners.
But if you are cutting and building your square so that your measurements are made on the outside of the square's two arms, then your diagonal must be measured from the outside too.
Details of using the 6-8-10 rule and how to check your results are
at USE the 6-8-10 RULE to SQUARE UP ANY STRUCTURE - detailed step by step procedure - it's easy!
Details of how we check a modern steel framing square to be sure it's a true right angle and how to fix it it it's slightly off are found
at FRAMING SQUARE TRUING PROCEDURE
...
Continue reading at FRAMING SQUARE USER'S GUIDE - topic home, or select a topic from the closely-related articles below, or see the complete ARTICLE INDEX.
Or see these
Recommended Articles
- 6-8-10 RULE to SQUARE UP ANY STRUCTURE
- FRAMING SQUARE USER'S GUIDE
- FRAMING SQUARE PARTS DEFINED
- FRAMING SQUARE TABLES LIST
- FRAMING SQUARE RAFTER LENGTHS
- FRAMING SQUARE for BIRDS MOUTH CUT
- FRAMING SQUARE OCTAGON TABLE
- FRAMING SQUARE BACK TABLES
- FRAMING SQUARE BRACE TABLE
- FRAMING SQUARE N JOISTS RAFTERS N RUN FT-IN
- FRAMING SQUARE ESSEX BOARD MEASURE
- FRAMING SQUARE DIVISION WARNINGS
- FRAMING SQUARE COLOR & MATERIALS
- FRAMING SQUARE DETERMINES ROOF SLOPE
- FRAMING SQUARE for STAIR BUILDING
- FRAMING SQUARE-UP 6-8-10 RULE
- FRAMING SQUARE TRUING PROCEDURE
- FRAMING SQUARE HOW-TO MANUALS
- FRAMING TRIANGLES & CALCULATIONS
Suggested citation for this web page
FRAMING SQUARE BRACE TABLE at InspectApedia.com - online encyclopedia of building & environmental inspection, testing, diagnosis, repair, & problem prevention advice.
Or see this
INDEX to RELATED ARTICLES: ARTICLE INDEX to BUILDING ROOFING
Or use the SEARCH BOX found below to Ask a Question or Search InspectApedia
Ask a Question or Search InspectApedia
Try the search box just below, or if you prefer, post a question or comment in the Comments box below and we will respond promptly.
Search the InspectApedia website
Note: appearance of your Comment below may be delayed: if your comment contains an image, photograph, web link, or text that looks to the software as if it might be a web link, your posting will appear after it has been approved by a moderator. Apologies for the delay.
Only one image can be added per comment but you can post as many comments, and therefore images, as you like.
You will not receive a notification when a response to your question has been posted.
Please bookmark this page to make it easy for you to check back for our response.
IF above you see "Comment Form is loading comments..." then COMMENT BOX - countable.ca / bawkbox.com IS NOT WORKING.
In any case you are welcome to send an email directly to us at InspectApedia.com at editor@inspectApedia.com
We'll reply to you directly. Please help us help you by noting, in your email, the URL of the InspectApedia page where you wanted to comment.
Citations & References
In addition to any citations in the article above, a full list is available on request.
- Spence, William P. (2000). Constructing Staircases Balustrades & Landings. Sterling Publishing. ISBN 0-8069-8101-6.
- [1] "How to Measure Angles with a Ruler", South Dakota School of Mines and Technology, Website: http://www.mcs.sdsmt.edu, http://www.mcs.sdsmt.edu/tkowalsk/portfolio/downloads/pub_HowToMeasureAngles.pdf retrieved 10/26/2013, copy on file.
- "Choosing Roofing," Jefferson Kolle, January 1995, No. 92, Fine Homebuilding, Taunton Press, 63 S. Main St., PO Box 5506, Newton CT 06470 - 800-888-8286 - see http://www.taunton.com/FineHomebuilding/ for the magazine's website and for subscription information.
- Our recommended books about building & mechanical systems design, inspection, problem diagnosis, and repair, and about indoor environment and IAQ testing, diagnosis, and cleanup are at the InspectAPedia Bookstore. Also see our Book Reviews - InspectAPedia.
- Best Practices Guide to Residential Construction, by Steven Bliss. John Wiley & Sons, 2006. ISBN-10: 0471648361, ISBN-13: 978-0471648369, Hardcover: 320 pages, available from Amazon.com and also Wiley.com. See our book review of this publication.
- Decks and Porches, the JLC Guide to, Best Practices for Outdoor Spaces, Steve Bliss (Editor), The Journal of Light Construction, Williston VT, 2010 ISBN 10: 1-928580-42-4, ISBN 13: 978-1-928580-42-3, available from Amazon.com
- In addition to citations & references found in this article, see the research citations given at the end of the related articles found at our suggested
CONTINUE READING or RECOMMENDED ARTICLES.
- Carson, Dunlop & Associates Ltd., 120 Carlton Street Suite 407, Toronto ON M5A 4K2. Tel: (416) 964-9415 1-800-268-7070 Email: info@carsondunlop.com. Alan Carson is a past president of ASHI, the American Society of Home Inspectors.
Thanks to Alan Carson and Bob Dunlop, for permission for InspectAPedia to use text excerpts from The HOME REFERENCE BOOK - the Encyclopedia of Homes and to use illustrations from The ILLUSTRATED HOME .
Carson Dunlop Associates provides extensive home inspection education and report writing material. In gratitude we provide links to tsome Carson Dunlop Associates products and services.


