
 How to Build Deck or Porch Stairs
9 Steps show how to layout & cut the stair stringer, frame the landing, attach the stringer, attach risers & treads
- POST a QUESTION or COMMENT about deck stair or access stair construction codes & specifications
Deck & porch stair construction guidelines: this article series explains critical safe-construction details for decks and porches, including avoiding deck or porch collapse and unsafe deck stairs and railings.
Part 2 of this article which is given below provides 9 step by step details for laying out and cutting the stair stringer, attaching the stair stringers to the deck or porch, cutting and installing stair treads & risers.
InspectAPedia tolerates no conflicts of interest. We have no relationship with advertisers, products, or services discussed at this website.
- Daniel Friedman, Publisher/Editor/Author - See WHO ARE WE?
Steps in the Construction of Deck & Porch Steps or Stairs
A Beginner's Guide to Building Correct Deck or Porch Stairs & Landings
Step 1. Get the Tools You'll Need to Layout the Deck Stairs + Stair Gauges, also referred to as Stair Lugs, Nuts, or Spuds.

For a stair to be safe from structural collapse and to be adequately stiff, the stair stringers supporting the steps must be strong, accurately cut, and well secured at the top and bottom.
To cut good stair stringers, you need a pair of stair gauges (photo at left) and a framing square (photo below left) to which the stair gauges are attached to hold a constant rise and run dimension.
You can find these standard tools at any well-stocked home improvement store or lumberyard.
We are assuming you already have basic carpentry tools like a circular saw, hand saw, hammer, drill, bit drivers for construction screws, and clamps large enough to straighten & hold in place recalcitrant stair treads during stair assembly.
Clamps can also be helpful in positioning and securing stair stringers to the deck rim joist.
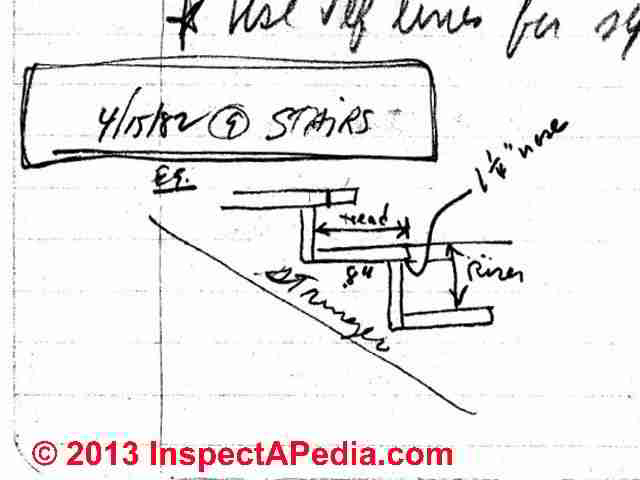
Step 2: Make a Drawing of the Stairs to Show Rise, Run, Layout
Stringer layout is quick and easy once you understand the basic principles. First you must establish the rise and run of the stair.
Watch out: if you have not already made careful measurements and a drawing of your stairs, stop and do so. Measure twice before making any cuts.
If you haven't already done so you may need to visit
STAIR RISE & RUN CALCULATIONS.
Stair rise measurement note: as with all stairs, the top and bottom landing surfaces must be "finished" in that no more layers of flooring or decking are to be installed before you establish the final dimensions.
That way, you can get an accurate measurement of the total rise, which is the only way to calculate accurate stair dimensions. For an already-constructed exterior deck or porch the total rise is measured from the walking surface of the deck/porch to the top of the stair bottom landing at the end of the stair run.
Don't be intimidated, it's easier than you think. there you'll see that you will divide the total rise height in inches by a reasonable individual step riser height (say 7"), see what's left over, and adjust the actual rise height to come out even.
If you don't know how strong or how many stair stringers you'll need,
see STAIR STRINGER SPECIFICATIONS.
Step 3: Buy the Lumber & Hardware You'll Need for the Deck or Porch Stairs
You will need two or more stair stringers, typically pressure treated 2x12 lumber to support the stairs, and you'll need stair tread material, typically 2x10 treated lumber; you can purchase pre-cut stair treads of the proper width but it's certainly trivial to cut your own as well.
If your deck stairs will use closed risers you'll need treated 2x lumber to cut those as well.
Lumber yard tip: your stair construction will be easier if you take care to choose stair stringer lumber that is straight, flat, not bowed or twisted. We cut up and use our twisted framing lumber as bridging.
We also buy stringer lumber longer than the exact minimum length that we're going to need - providing an allowance for cutting off any end splits as well as trimming and leveling of the stairs.
How to Use pre-cut Stair Stringers or Pre-Built Stair Assemblies
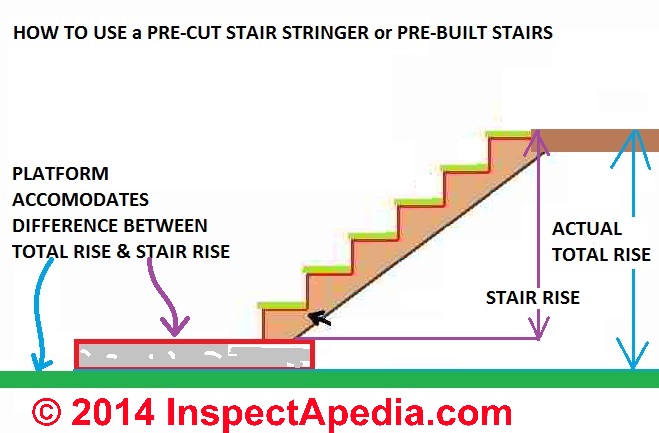
What about buying pre-cut stair stringers? That approach is fine if the total stair rise matches within 1/4" the total rise given by the pre-cut stair stringer or if you can make a stair-landing adjustment (often possible with outdoor stairs) as we describe here:
[Click to enlarge any image]
Using a pre-cut stringer or a pre-built set of stairs works well IF the total stair rise at your job is equal to or a bit greater than the total stair rise afforded by the stringer or stair set, IF you can correct the difference by the height or thickness of the stair bottom landing.
Watch out: don't waste your money on a pre-cut stair stringer nor pre-built stair if you are just going to nail it up willy-nilly, leaving an uneven final step riser height at stair top or bottom - that's a trip hazard: you don't want to end up with uneven stair riser heights just to make use of a pre-cut item.
Fasteners for the deck stairs
Use only galvanized nails or galvanized or stainless steel structural screws for deck and stair assembly. You may be tempted to use drywall screws or other non-structural fasteners just because they are on-hand. Don't do it - you risk a subsequent deck collapse. If you need help choosing the proper fasteners for your stairs see these articles:
- CONNECTORS, FASTENERS, TIES - Hangers, Brackets, & Connectors
- FRAMING AGE, SIZE, SPACING, TYPES
- FRAMING CONNECTORS & JOIST HANGERS
- FRAMING FASTENERS, NAILS, SCREWS
- FRAMING FASTENERS, NAILS, SCREWS FAQs
Step 4: How to Use the Framing Square to Mark Stair Stringer Rise & Run Cuts or Tread Cleat Locations

Use the long, wide blade on the framing square for the run and the short, narrow blade for the rise.
Attach the stair gauges (photo above left) to the outside edges of the square at the appropriate dimensions. At left my framing square is shown with the stair gauges marking run (on the long blade) and rise (on the short blade).
Why do we use stair gauges attached to the framing square? Because if you don't it's unlikely that your stair tread cut run and rise markings will be consistent - I, for one, don't want to trip and fall down your stairs.
Our photo and sketch below show exactly how to place your framing square, equipped with the stair gauge clips, to mark off the rise and run cuts along a stair stringer.

In the photo atbove the yellow line marks the approximate bottom cut for the stair stringer, but as we discuss below, we make the stair stringer top and bottom cuts last in order to scribe the stair stringer bottom to the exact profile of the landing platform and in order to decide exactly how we are attaching the stringer top to the deck or porch rim joist.

Because the landing platform may not be perfectly level or smooth, the final stringer bottom cut may not be exactly along the yellow line shown in our photo at above left.
Measurement tip: the depth of the run and rise notches cut into the stringer will be less than the stair tread depth: the tread nose will project beyond the face of the riser.
Also see FRAMING SQUARE USER'S GUIDE for details about how to use a framing square.
Don't over-notch the stair stringer
Watch out: depending on the angle of your stairs you may find that the framing square will make such deep notches into the stringer that very little material is left to actually support the stairs.
If your stairs were being built with stringers secured to walls on both sides of the steps the notching may not be an issue.
[Click to enlarge any image]
But for a typical outdoor deck stair that's not likely to be the case. If you see you're starting with a 2x10 but ending with just about 3" of stringer remaining to support your stairs this is no good. Here are some solutions to avoid a stair stringer that is too weak.
- Go to a larger dimension lumber (2x12 would have been where I'd have started anyway).
- Use doubled or reinforced stringers
- Add intermediate supporting posts beneath the stair
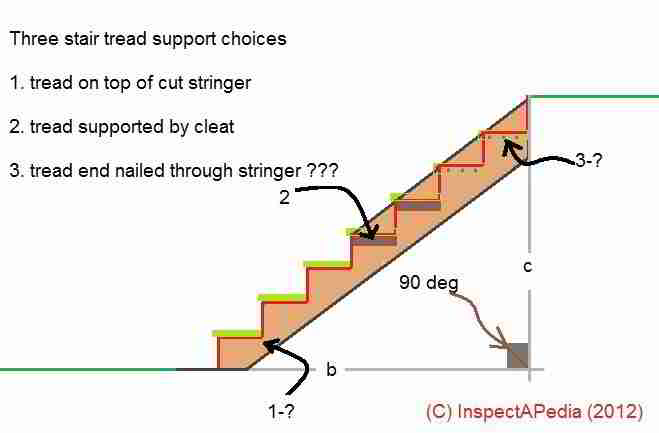
- Skip the whole notching idea and use a solid stringer with cleats properly secured to the stringer inner face - illustrated just below along with some warnings.
- Review your stair design for angle, total rise, total run to be sure you are using the board width correctly, not over-notching.
Alternative to Notched Stringers: Lay Out Solid Stair Stringers Using Tread Supporting Cleats
 To mark the tread location along the inner side of solid stringers, set the corner of the square flat on the stringer along the crown side of the stringer and with the stair gauges against the edge. Mark the outside edges of the square.
Slide the square down so that it aligns with the previous mark and lay out the next step, until all the steps are laid out.
Since we are not going to be making rise and run cuts, instead this line marks the bottom surface of the stair tread, which is to say it also marks the location of the top edge of our stair cleats.
Watch out: be sure that the cleats used to support stair treads on solid stringers are of adequate thickness, using rot resistant pressure treated wood, and adequately secured to the stringer sides.
Never rely on stair treads supported only by nailing or screwing into the edges of the tread through the stringer. More than once we have seen such treads split, collapse, and risk serious injury.
We use construction screws, pre-drilling if necessary, and providing there is space without splitting the wood, we use four fasteners per cleat. Stair treads are then screwed down through the upper surface of the tread into the upper edge of the cleat.
On some stairs we may also drill and screw through the outside of the stringer into the edges of the stair tread in addition to cleating.
Watch out: also for poorly-chosen stair cleats or failure to pre-drill pilot holes for the stair tread cleat mounting screws. Splits in the cleat (shown below) can lead to sudden stair tread collapse and serious injury.
The stair collapse shown below illustrates what can happen. Imagine if as well the stair treads had been supported just by nails through the stringer side.
As the stair tread breaks benath your foot, your ankle is ripped open by the rusty nails protruding through the stringer side. Work alone, walk those stairs, rip your ankle, bleed to death. Well maybe.
Step 5: Finish the Stair Stringer Layout & Cut the First (Pattern) Stair Stringer
Deck stairs built with cut stringers are strong, and they may be easier to build than you imagine. Stairs with cut stringers are usually designed so that the top tread is on the same level as the deck surface, rather than one step down.
Our rough sketch from carpentry school (left) shows how the treads and risers will eventually sit atop your notched stair stringer. The advantage of this method is that it is easier to attach the stringers to the deck, since they will be resting against a rim joist or an end joist. But this approach also results in a longer run for the stairs, which may not be possible if you are squeezed for space.
[This approach can make it easier to attach the stringer but we don't prefer this design. Usually we build stairs in which the first stair tread is one step down from the deck or porch surface.]
If you need to build stairs with the first tread resting below the deck surface, you will probably need to use a hangerboard (discussed below) though depending on deck framing member depth, the stringer may rest adequately against the deck rim joist.
1. Layout & Mark the Stair Stringer to Show Step Tread & Riser Locations
In terms of stringer layout, the first approach calls for an equal number of risers and treads; the second, using a hangerboard, will result in one more riser than tread on the stairs.
Figure out the total rise and run of your stairs
If you have not already done so, always begin building stairs by taking measurements and figuring the total stair rise (height) and run (length).
With that data we can establish the unit (individual step) rise and unit run,
(STAIR RISE & RUN CALCULATIONS)
then set the stair gauges on the framing square.
Set the board for the first stringer across a pair of sawhorses. If there are any splits in the end of the board, cut the board to eliminate them. You bought lumber long enough to do this, right?
Framing tip: before marking stair stringers (or other framing lumber) sight along the 2x lumber to determine how it is curved. Most likely your lumber is not dead straight.
Layout your pattern and cut marks so that the arch of the stair stringer will face upwards (convex) when the stringer is later placed into position. Be sure to use the same plan for the remaining stringers later. If you have more than two stair stringers to cut, mark your first or pattern stringer in pencil (PAT) so you'll be sure to always use the same pattern. This avoids creeping errors in your layout cuts.
The object here is to lay out and cut one stringer, then use that stringer as a template to mark the others. Place the framing square along the crown side of the stringer with the corner resting on the board, as shown, and the stair gauges flush against the edge.
Mark along the outside of the square. Slide the framing square along the board until it aligns perfectly with the previous mark, then mark again. Continue until you have marked the stringer for all riser and tread cuts.
2. Establish the Top and Bottom Cut Lines on the Stair Stringer
When you have finished laying out the stringer for risers and treads, extend the line for the plumb cut at the top. To create the plumb cut line at the top, extend the riser line to the bottom of the stringer. If the stringers will be installed beneath overhanging decking, add the overhang amount to the length of the stringer..
You also need to shorten the bottom of the stringer by the thickness of one tread. When set in place, the stringer should be cut off but often not exactly at this line. Instead we use a compass to scribe the stringer bottom cut to match the landing platform precisely.
Instead of a compass some builders set a piece of the tread stock along the bottom line and draw another line across the stringer.
In our photo (above-left, the yellow line marks the approximate final cut of the stair stringer bottom.
Trimming the Stair Stringer Bottom Riser Cut to Fit to the Bottom Surface
Shorten the bottom of the stringer by the thickness of one tread (but as you will read below, we defer this cut until we have scribed the stringer to the platform). Set a piece of tread stock (typically a 2 X 6) along the bottom cut-off line and draw another line or as we prefer, use a compass to make this mark more precisely. Cut the stringer along this line and the plumb cut line.
3. Cut the First Stair Stringer and mark it "PAT" for Pattern
After taking care to get the layout right, do not rush through the job of cutting. Clamp the stringer to your sawhorses.
With a circular saw, cut the top of the stringer along the plumb cut line and the bottom along the level cut line.
Framing tip: measure twice, cut once. When using the power saw to cut along the rise and run lines marked on the stair stringer, leave enough of the pencil line that you can be sure that you are being consistent in your cuts from one step to the next.
Then set the stringer in its intended position against the deck. Check that the tread lines are level and that the riser height is identical on the top and bottom steps. If you detect a problem, go back and check your measurements and calculations. If the stringer looks good, clamp I back onto the sawhorses and continue cutting.
Avoid Over-Cuts When Using a Circular Saw
Watch out: avoid over-cutting notches in framing lumber when using a circular saw. Over-cuts unnecessarily weaken the lumber, in this case a stair stringer, and depending on where they occur, they are also unsightly.
Saw cutting tip: when using a circular saw to cut notches in a stair stringer (or other notches in lumber) take care not to over-cut by pushing the saw past the cut line on the upper surface of the wood. Instead, stop cutting when the near-edge of the circular blade first touches the cut mark (solid blue saw blade in our illustration below), then finish the notch-cut with a hand-saw.
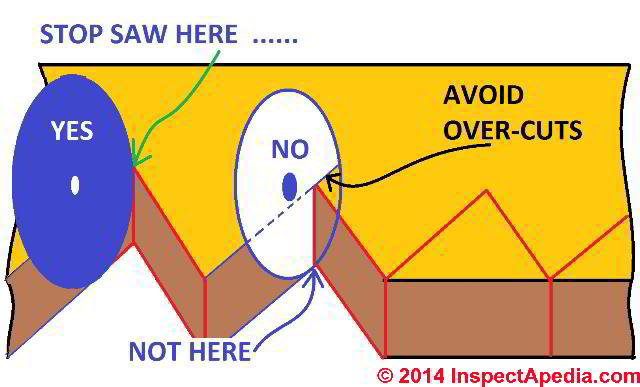
If you push the circular saw past the cut line on the upper surface of the lumber so as to complete the cut line on the bottom of the lumber (white saw blade in our illustration above) you will over-cut the upper surface of the lumber as we show in our illustration.
Step 6: Complete Cutting the Stair Stringer Pattern & Use It to Cut Remaining Stringer(s)

1. Finish the Stair Stringer Cuts
Framing tip: Don't over cut with the power saw - remember that blade is round and is cutting further on one side of the lumber than on the other.
We stop the cut at the intersection of the two pencil lines and finish the cut with a handsaw. Cutting beyond this line with the power circular saw will weaken the stringer and your job will also look amateur.
With a a handsaw, finish cutting along the layout lines. Once all cuts have been made, set the stringer in place along the deck and check the fit one more time. The stringer should rest flat on the landing pad and against the deck joist, with the tread cuts level and the riser cuts plumb.
Framing tip: also delay in cutting off the extra lumber at the top of the stair stringer - that last riser height. You may find that you need it during mounting and securing the stringer to the deck or porch rim joist.
On an interior stair and at some decks and porches, eventually we're going to reduce the first riser by the thickness of the tread material since there is no "tread" on the floor or landing platform itself, while on all other risers the individual step total rise height is going to be increased by the thickness of the tread as well.
2. Mark the Other Stringers
If your stairs end on a flat level platform as they should, additional stair stringers are cut using the first one as a pattern.
Watch out: double check that your pattern stair stringer has been cut correctly before using it to mark additional stringers. Check that the rise and run are correct and that those cuts are identical on every step. Remember to place the subsequent stringers arch-up matching the original arch of your pattern stringer.
If you are satisfied with the fit of the first cut stringer, clamp it on top of another piece of stringer stock, making sure that the bottom edges are perfectly aligned.
Mark the bottom piece by tracing along the cuts with a pencil. Use the first stringer as a template to lay out any additional stringers.
Step 7: (If Needed) Framing an exterior stair landing
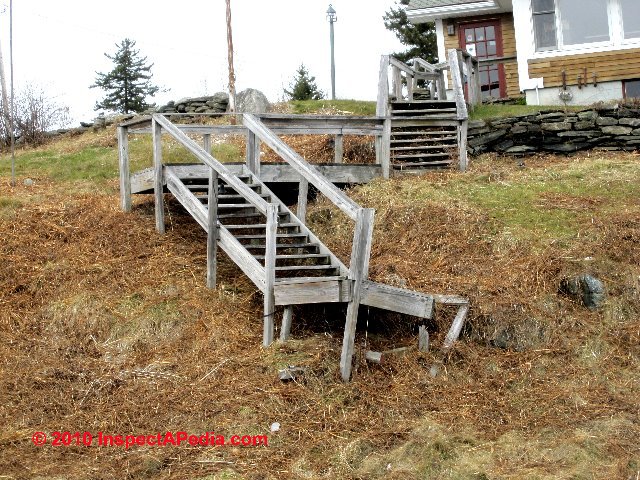
If you have to build stairs to a high deck or stairs that have to ascend a hillside to reach a deck or building (photo at left), you may need to add a landing midway up. Building codes often limit the total span of stringers to 16 feet, so you may have no choice in the matter. Stairs with a landing also look better than stairs with long, straight stringers, and adding a land-ing allows you to change directions with the stairs.
Designing stairs with a landing is not much more complicated than designing straight stairs. Determine the total rise, then calculate a suitable rise and run for each step. The landing should be supported by four posts resting on individual concrete footings and piers.
Build it so that the finished surface rests at the height of one of the planned treads. Then cut and install the stringers for the upper and lower sections of the stairs, as shown in the illustration. Be sure to plan the size of the landing to allow for a section to support the upper stringers.
That is, if you want a finished landing surface that is 3 feet square, and the bases of the stringers take up 1 foot, you should build a landing that is 3 feet by 4 feet.
See Stairway landings for details.
Step 8: Attach the stair stringers to the deck, landing or porch

Stringers should be installed straight and square against the deck and properly spaced apart from each other.
You may want to make a layout on the joist as a guide. If you are planning to cut treads to a specific width, move the outside stringers in just enough to allow the treads to overhang the sides.
Set each stringer against the deck so that its top is flush with the top of the joist.
Then use angle brackets to attach the stringers to the joist.
Metal angle brackets are the best connectors for attaching stringers to the deck.
Place the brackets at the inside of the stringers, where they will not be visible once the treads have been installed.
Incidentally, most exterior porch or deck stairs abut the deck perimeter or rise alongside the deck to abut a deck landing. But on occasion we have built stairs that enter up through the floor if a (usually much larger) deck.
I don't recommend that design if it can be avoided as framing is more complex (you'll have to frame the stair opening and headers in the deck floor structure) and also because you're giving up deck space.
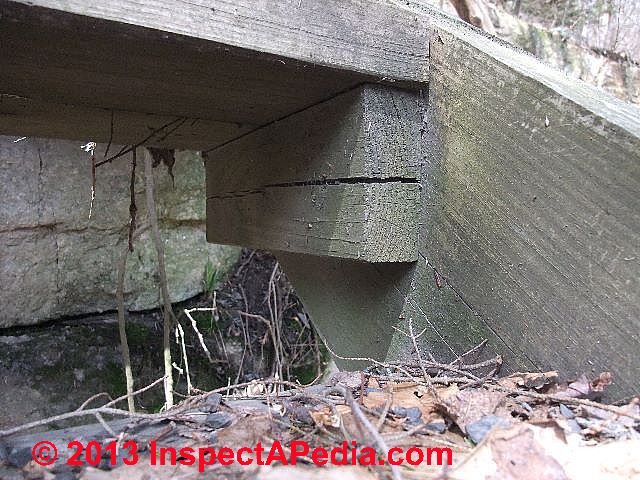
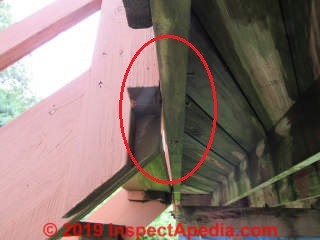
In our stair detail photo (above left) it looks as if the stair stringer was screwed or bolted to the supporting landing post from the inside of the stringer. I'm not sure there was enough roof for a solid connection here.
I (DF) took this photo of deck steps at our Green Cabin project to illustrate how a simple stair stringer can abut the rim joist of a deck.
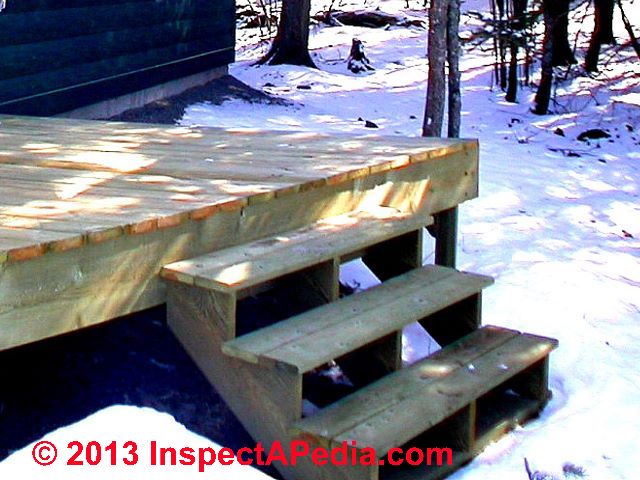
We had just enough bearing surface to use structural fasteners both into the stringer from the back side of the rim joist as well as additional fasteners through the outside of the stringers into the deck structure.
I could have also used a hanger board (discussed immediately below).
How to attach stair stringers using a hangerboard
When you want or need to set the first tread a step down from the deck, you will probably discover that the stringer does not rest against much of the joist. In that case, add a hangerboard, which is a carpentry term for an extra board to provide a solid nailing surface for stringers.
In most cases you should be able to use a 2 x 4 or a 2 x 6 for the hangerboard; the only guideline is that it must be big enough for the stringer to rest on it.
The hangerboard does not have to be too conspicuous; just cut the board long enough to accommodate the outside stringers. Attach 2x4 cleats to the inside of the rim joist or the end joist at each stringer location.
Then fasten the hangerboard to the cleats. Now you can attach the stringers as you would to an outside joist.
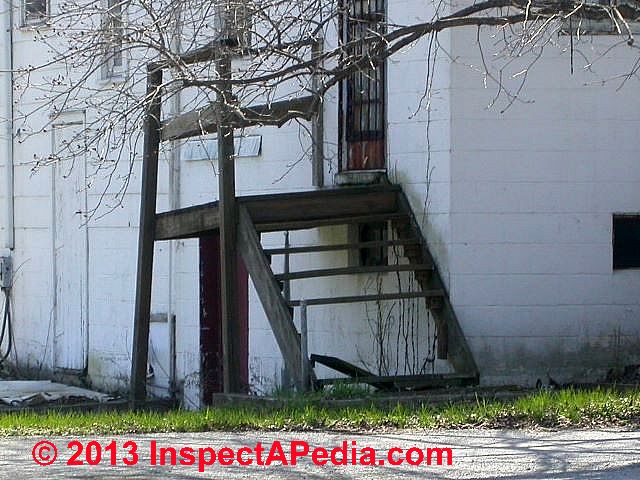
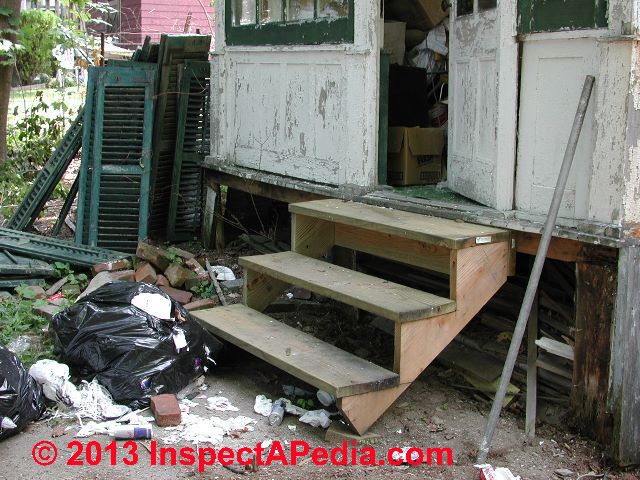
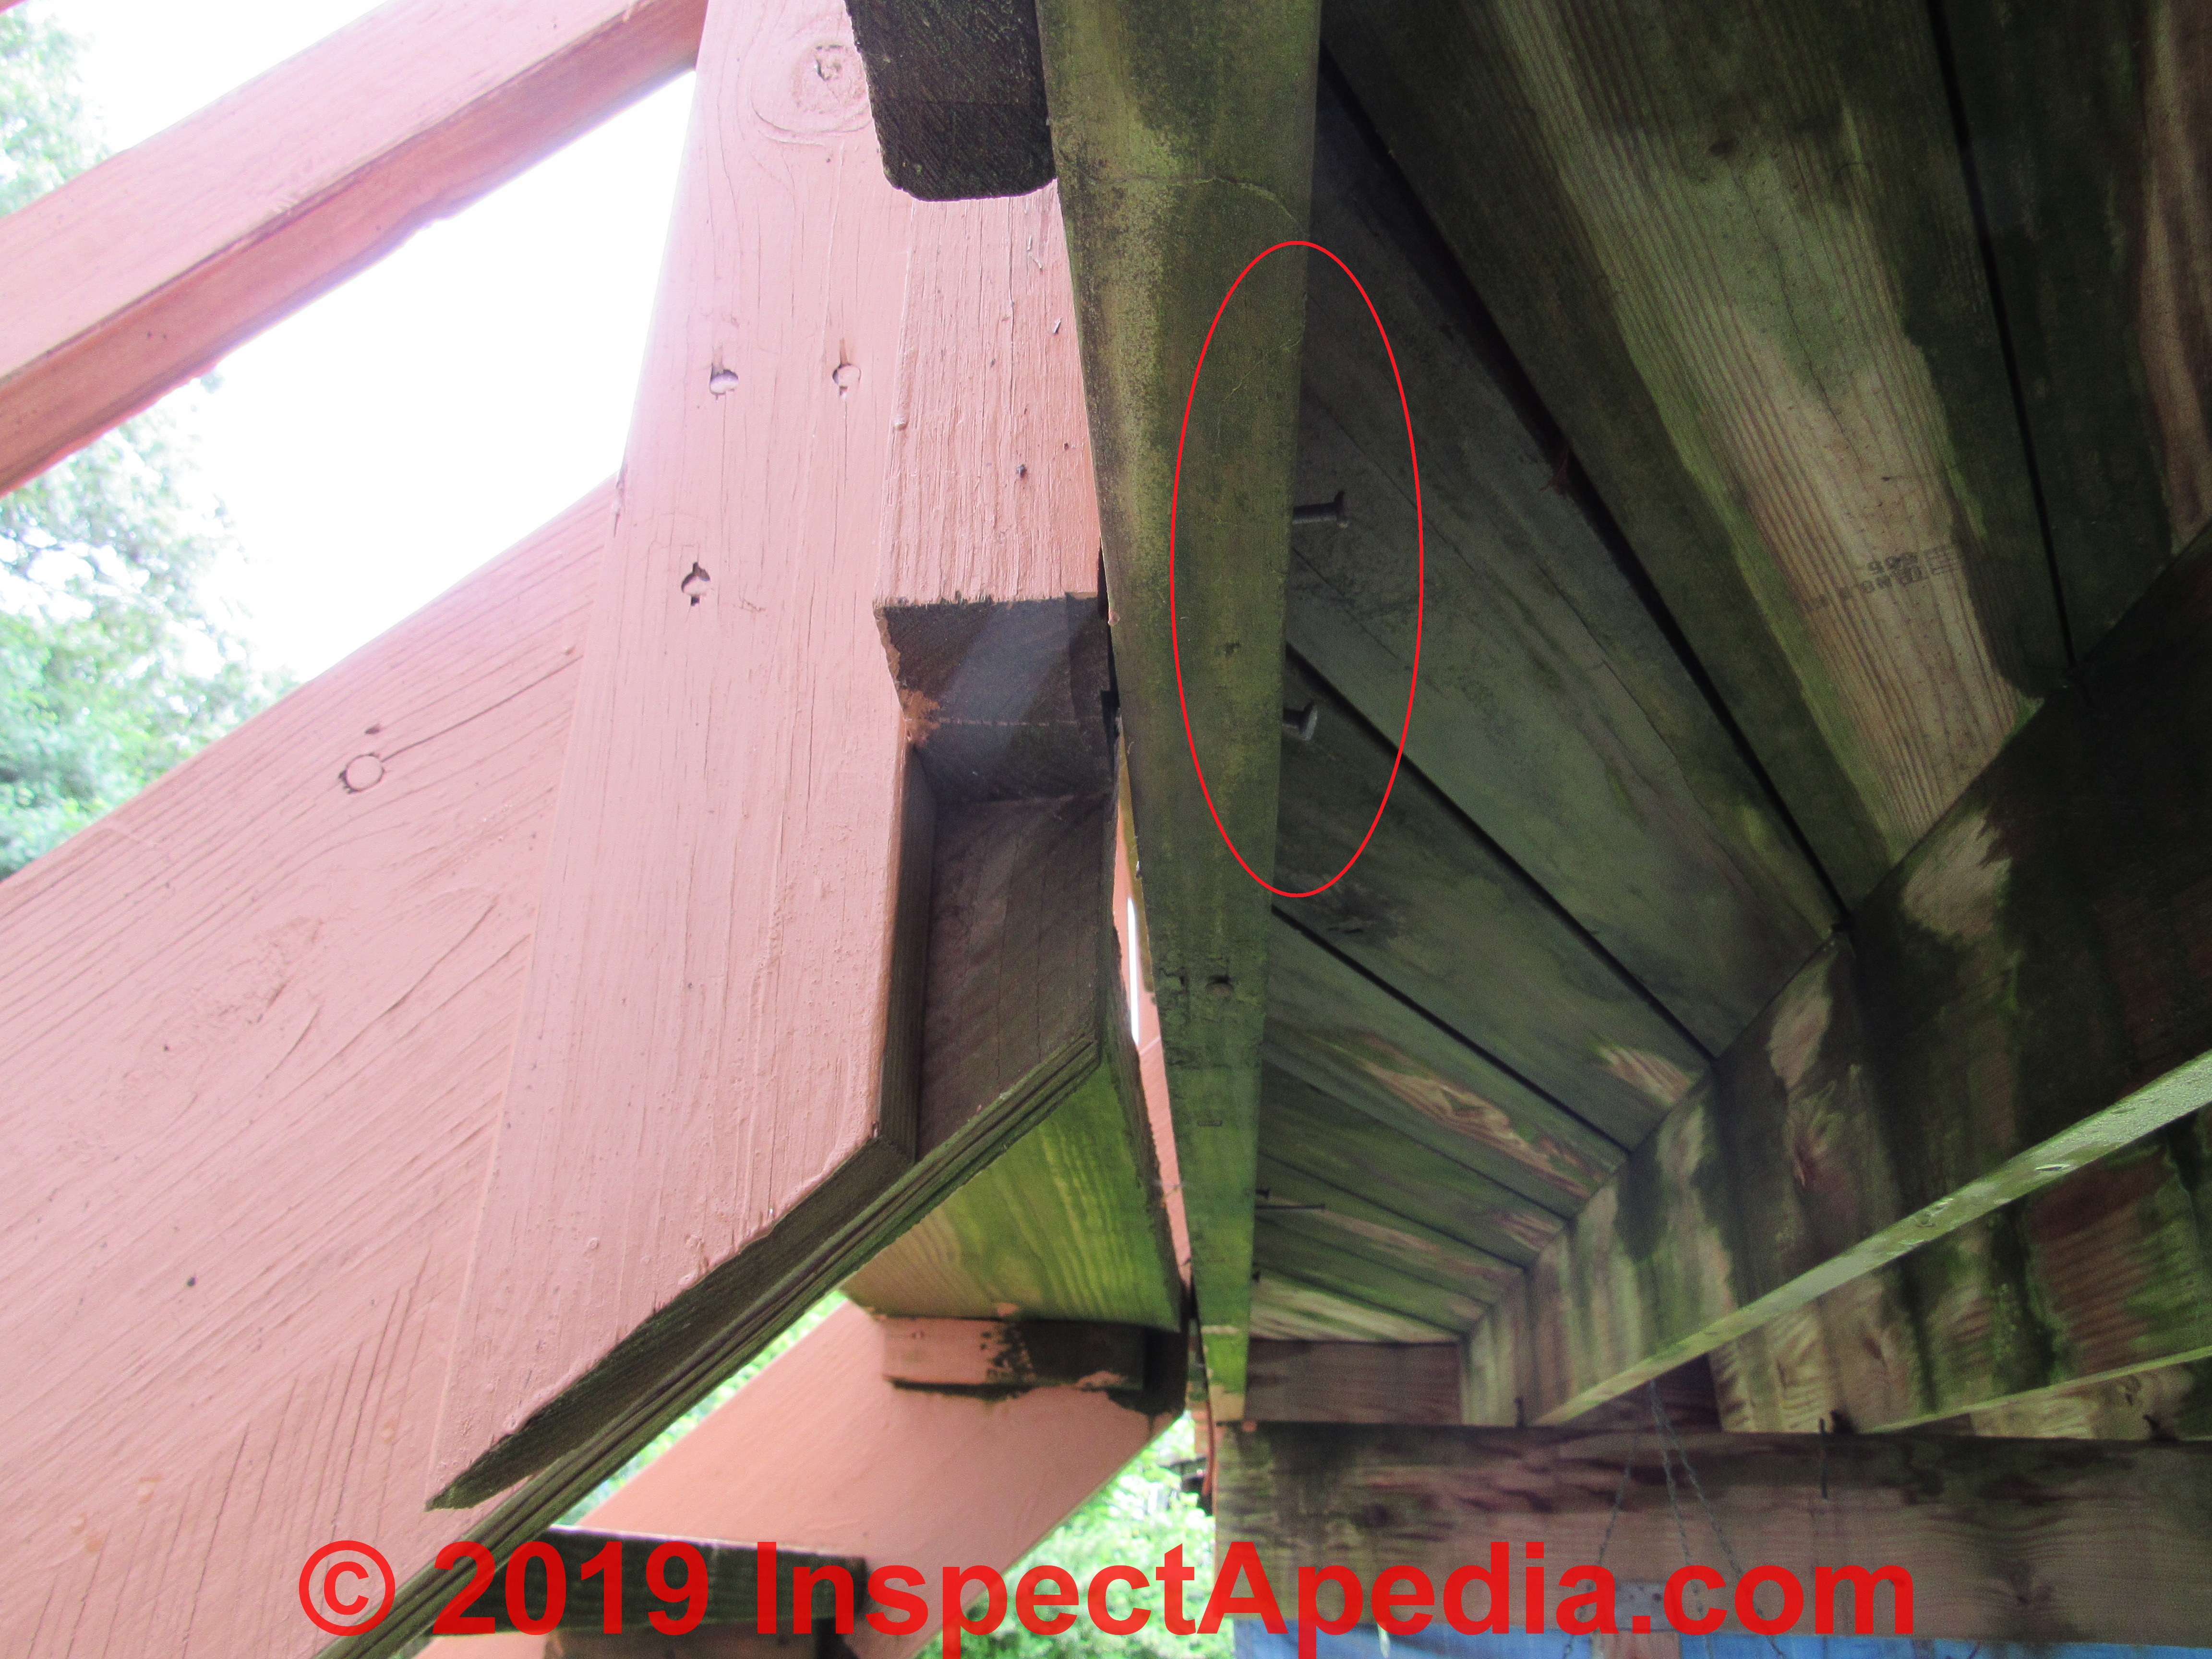
In the horrible porch entry stairs shown at above left we nevertheless can see a variation on stair stringer hanger-board installed - it's about the only thing decent you can say about this stair fiasco.
Because only a small portion of these ugly stair stringers rested against the horrible porch rim joist, the builder secured a hanger board against and extending down from the porch structure. The stair stringers are secured to the hanger board ends and in this stair the top tread is also nailed down into the upper edge of the hanger board.
Square Up and Level the Stringers Before Attaching Stair Risers & Treads
With the stringers attached to the deck, check that the bottoms are evenly spaced. Use a framing square to make sure that each stringer is square with the joist at the top. Attach a temporary brace to the fronts of the stringers to hold them in place while you secure the bottoms of the stringers.
Unless the landing platform is dead level you will want to use a compass to scribe the final cut-off line on the bottom of the stringer to fit the landing platform. This adjustment is why we did not cut off the first stair tread thickness earlier.
Attach Stair Stringers to the Landing Pad
The easiest way to attach stringers to a concrete pad is with angle brackets. The brackets can be secured to the stringers with screws, but you will need self- tapping concrete screws for the connection with the pad.
These screws require that you first drill pilot holes; check with the manufacturer for the recommended size of masonry bit. Keep the angle brackets on the insides of the joists, where they will be concealed.
If your stair stringer is terminating at a wood-framed landing you'll be able to use structural framing screws or fasteners at that location.
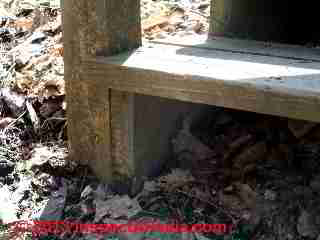
In our stair detail photo at left these outdoor stairs end at dirt, with no landing pad. These steps were installed along a hiking trail on the Mohonk Mountain House trail system in the Hudson Valley of New York.
The stair stringer bottom end is secured to the inside surface of a treated 4x4" post that supports both the stair bottom and the handrailing. Even if the steps terminate on a landing (as required by code in most locations), it's still a good idea to secure the stair stringer at its bottom, not just at its top.
This doubles the protection against stringer and stairway movement or separation from the deck or landing to which it rises.
Step 9: How to install stair risers and treads on the stringers

If you are installing risers as well as treads, cut the risers to size. Risers should be installed flush with the stringers, and the bottom riser needs to be cut narrower than the others by the thickness of a tread. Attach risers with screws or nails driven into each stringer.
How Many Risers & Treads Do I Need?
When your stringer pattern has been laid-out you can just count right on that component. In my preferred design you need one less tread than the number of risers. That is, for example, if you have 7 risers you will need 6 treads (if as I prefer, the 12th riser ascends to the deck surface.
Now cut the treads to length, allowing for a 1-inch overhang on each side. For drainage, leave a gap of about 1/8 inch between the riser and the tread and, if you are using two boards for each tread, a comparable gap between the boards.
Allow the treads to overhang the risers by at least 1 inch. Secure the treads with screws and nails secured into each stringer.
Using stair brackets When building stairs that rely on metal brackets to support the treads, you need to lay out both end stringers.. Instead of cutting the stringers, however, install brackets along the layout lines. Be sure to choose brackets that are sized for the tread material you are using and attach them with fasteners recommended by the manufacturer.
Note that you can use solid stringers and brackets only on the two sides. If you require additional stringers to support the treads, they will have to be cut.
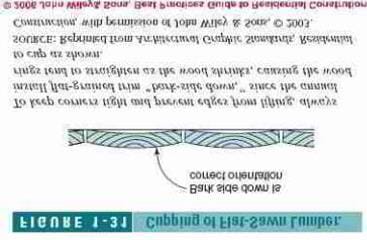
Stair tread placement tip - bark side up: We were taught to place wood stair treads with the bark side up. And we argued with Steve Bliss about which way boards tend to cup. Research shows that more often Steve was right and I ought not to have edited his original photo. Bark side down was his advice.
Bottom line: based on later research, I'd put wood outdoor stair treads bark side down unless the tread is already visibly cupped - in that case put the board "concave" side down.
Details about this construction safety tip are at BARK SIDE UP on DECKS & STEPS.
Original sketch edited with "corrected" text and flipped - adapted from the original sketch provided by S. Bliss, Best Practices in Residential Construction. Edited by InspectAPedia.
Stair Riser Installation Tips
If your stairs include closed risers, install the risers before installing the stair treads.
Use a compass to scribe the first enclosing riser to fit perfectly against the landing platform.

Make sure that the stringer surfaces on which the treads are going to rest are level. If your cuts were imperfect you might need a small shim.
Stair Tread Cutting Tip: to help keep the stair stringers straight we make sure that each tread is cut exactly correctly, measuring in from the tread edge to the stringer for a consistent distance at the front and rear of each tread on each step. If necessary use an inside wedge or an outside clamp to align the stair treads perfectly before nailing them in place.
We use galvanized 6d finishing nails to nail each riser to the back of the lower stair tread (again if you are using enclosed risers) and we work our way up the stairs from the bottom, installing riser, then tread, etc.
Stair Tread Nailing Tip: Especially when are nailing near the end of tread boards, you may want to pre-drill the treads to avoid splitting (and weakening) the material.
This article series includes excerpts or adaptations from Best Practices Guide to Residential Construction (Steve Bliss, J Wiley & Sons) , by Steven Bliss, courtesy of Wiley & Sons. Also see our BOOK REVIEW of that book.
...
Reader Comments, Questions & Answers About The Article Above
Below you will find questions and answers previously posted on this page at its page bottom reader comment box.
Reader Q&A - also see RECOMMENDED ARTICLES & FAQs
 Question: do you agree with how I reported these attachment of these deck stairs?
We once discussed about attachment of stairs to deck and you mentioned if I come across a picture I should sent it to you -please see attached.
The following recommendation I received from one of my mentors:
"The stair stringers are toe-nailed into a single joist, of which span was not determined. This is substandard for the stringer connection detail.
Corrective action recommended:
-The deck joist should be doubled, or at least blocked behind contact from stringers.
-The proper framing connector and fastener on each stringer must be used."
- 2018/-6/04 D.K. home inspector, by private email
Reply: be sure to make safety hazards clear
In my OPINION the discussion of span is irrelevant and in my opinion ads confusion to the inspection report Point. You're not an engineer no one expects you to be discussing spans and loads.
Watch out: It's also my opinion that failure to make the simple remark that the steps that you observed are unsafe because they're not properly and safely secured to the structure is failure to make the main and most critical point.
Steps that are not properly secure to the structure can collapse resulting in serious injury.
I can tell you from experience that when a collapse actually happens people are going to say that they didn't really understand that the inspection report was referring to something that was important and dangerous and needed to be addressed immediately.
You can see an article about this at inspectapedia titled DECK COLLAPSE Case Study
Reader reply:
Thank you for your comments. As I didn't yet send off the report I will definitely mention that "unsafe and failure" issue.
Moderator reply:
Thank you I'm so grateful that you're not offended when I put in my two cents. Working together definitely is good for both of us. Having dealt with one catastrophic deck collapse involving an inspection Clyde a very careful to make sure both that the client gets it or understands the point and second that I've put it clearly and in writing so there's no argument later.
...
Continue reading at RAILINGS, DECK & PORCH or select a topic from the closely-related articles below, or see the complete ARTICLE INDEX.
Or see these
Recommended Articles
- DECK BUILDING & CARPENTRY TOOLS
- FRAMING SQUARE USER'S GUIDE for the parts of a framing square
- STAIR STRINGER SPECIFICATIONS
- STAIR STRINGER DEFECTS
- DECK & PORCH CONSTRUCTION - home
Suggested citation for this web page
DECK STAIR BUILDING DETAILS at InspectApedia.com - online encyclopedia of building & environmental inspection, testing, diagnosis, repair, & problem prevention advice.
Or see this
INDEX to RELATED ARTICLES: ARTICLE INDEX to STAIRS RAILINGS LANDINGS RAMPS
Or use the SEARCH BOX found below to Ask a Question or Search InspectApedia
Ask a Question or Search InspectApedia
Share this article:Try the search box just below, or if you prefer, post a question or comment in the Comments box below and we will respond promptly.
Search the InspectApedia website
Note: appearance of your Comment below may be delayed: if your comment contains an image, photograph, web link, or text that looks to the software as if it might be a web link, your posting will appear after it has been approved by a moderator. Apologies for the delay.
Only one image can be added per comment but you can post as many comments, and therefore images, as you like.
You will not receive a notification when a response to your question has been posted.
Please bookmark this page to make it easy for you to check back for our response.
IF above you see "Comment Form is loading comments..." then COMMENT BOX - countable.ca / bawkbox.com IS NOT WORKING.
In any case you are welcome to send an email directly to us at InspectApedia.com at editor@inspectApedia.com
We'll reply to you directly. Please help us help you by noting, in your email, the URL of the InspectApedia page where you wanted to comment.
Citations & Reviewers
In addition to any citations in the article above, a full list is available on request.
- [1] The Staircase (two volumes), John Templar, Cambridge: the MIT Press, 1992
- Steve Bliss's Building Advisor at buildingadvisor.com helps homeowners & contractors plan & complete successful building & remodeling projects: buying land, site work, building design, cost estimating, materials & components, & project management through complete construction. Email: info@buildingadvisor.com
Steven Bliss served as editorial director and co-publisher of The Journal of Light Construction for 16 years and previously as building technology editor for Progressive Builder and Solar Age magazines. He worked in the building trades as a carpenter and design/build contractor for more than ten years and holds a masters degree from the Harvard Graduate School of Education. Excerpts from his recent book, Best Practices Guide to Residential Construction, Wiley (November 18, 2005) ISBN-10: 0471648361, ISBN-13: 978-0471648369, appear throughout this website, with permission and courtesy of Wiley & Sons. Best Practices Guide is available from the publisher, J. Wiley & Sons, and also at Amazon.com - Decks and Porches, the JLC Guide to, Best Practices for Outdoor Spaces, Steve Bliss (Editor), The Journal of Light Construction, Williston VT, 2010 ISBN 10: 1-928580-42-4, ISBN 13: 978-1-928580-42-3, available from Amazon.com
- Manual for the Inspection of Residential Wood Decks and Balconies, by Cheryl Anderson, Frank Woeste (Forest Products Society), & Joseph Loferski, October 2003, ISBN-13: 978-1892529343,
- Best Practices Guide to Residential Construction, by Steven Bliss. John Wiley & Sons, 2006. ISBN-10: 0471648361, ISBN-13: 978-0471648369, Hardcover: 320 pages, available from Amazon.com and also Wiley.com. See our book review of this publication.
- Stephenson, Elliott O., THE ELIMINATION OF UNSAFE GUARDRAILS, A PROGRESS REPORT [PDF] Building Standards, March-April 1993
- Slips, Trips, Missteps and Their Consequences, Second Edition, Gary M. Bakken, H. Harvey Cohen,A. S. Hyde, Jon R. Abele, ISBN-13: 978-1-933264-01-1 or ISBN 10: 1-933264-01-2, available from the publisher, Lawyers & Judges Publishing Company,Inc., www.lawyersandjudges.com sales@lawyersandjudges.com
- The Stairway Manufacturers' Association, (877) 500-5759, provides a pictorial guide to the stair and railing portion of the International Residential Code. [copy on file as http://www.stairways.org/pdf/2006%20Stair%20IRC%20SCREEN.pdf ] -
- Slips, Trips, Missteps and Their Consequences, Gary M. Bakken, H. Harvey Cohen, Jon R. Abele, Alvin S. Hyde, Cindy A. LaRue, Lawyers and Judges Publishing; ISBN-10: 1933264012 ISBN-13: 978-1933264011
- Steps and Stairways, Cleo Baldon & Ib Melchior, Rizzoli, 1989.
- The Staircase, Ann Rinaldi
- Common Sense Stairbuilding and Handrailing, Fred T. Hodgson
- The Art of Staircases, Pilar Chueca
- Building Stairs, by pros for pros, Andy Engel
- A Simplified Guide to Custom Stairbuilding, George R. Christina
- Basic Stairbuilding, Scott Schuttner
- The Staircase: History and Theories, John Templar, MIT Press 1995
- Steps and Stairways, Cleo Baldon & Ib Melchior, Rizzoli, 1989.
- "The Dimensions of Stairs", J. M. Fitch et al., Scientific American, October 1974.
- In addition to citations & references found in this article, see the research citations given at the end of the related articles found at our suggested
CONTINUE READING or RECOMMENDED ARTICLES.
- Carson, Dunlop & Associates Ltd., 120 Carlton Street Suite 407, Toronto ON M5A 4K2. Tel: (416) 964-9415 1-800-268-7070 Email: info@carsondunlop.com. Alan Carson is a past president of ASHI, the American Society of Home Inspectors.
Thanks to Alan Carson and Bob Dunlop, for permission for InspectAPedia to use text excerpts from The HOME REFERENCE BOOK - the Encyclopedia of Homes and to use illustrations from The ILLUSTRATED HOME .
Carson Dunlop Associates provides extensive home inspection education and report writing material. In gratitude we provide links to tsome Carson Dunlop Associates products and services.
 |
HOME | ABOUT | ASK a QUESTION | CONTACT | CONTENT USE POLICY | DESCRIPTION | POLICIES | PRIVACY | |
| © 2026 - 1985 Publisher InspectApedia.com - Daniel Friedman | |||||||||