
InspectAPedia® FREE Encyclopedia of Building & Environmental Construction, Diagnosis, Maintenance & Repair |
Question? Just ask us! InspectAPedia
|
 Framing Square Test & Repair
How to check and fix a framing square that's not a perfect 90°

- POST a QUESTION or COMMENT about types of roofing materials, installation, inspection, diagnosis, repair, maintenance, & warranties
How to test and fix a framing square if you think it's not giving perfectly straight cuts and lines.
A framing square provides numerous tables and aids that solve many carpentry and framing problems. But perhaps its most-common use is to draw a straight line at right angles to a board or piece of siding or metal in order to make a straight or "square" cut across the board end.
If your square cuts are inconsistent or not square, here you will find the causes and cures for that aggravation.
InspectAPedia tolerates no conflicts of interest. We have no relationship with advertisers, products, or services discussed at this website.
- Daniel Friedman, Publisher/Editor/Author - See WHO ARE WE?
Is Your Framing Square Square?
 Are your "square cuts" really square? Why not?
If like I have done you've often used your framing square as a saw guide, you may notice that your "square cuts" are not always perfectly square.
If the ends of your boards are not square across there are several probable causes in order of likelihood:
- Your lumber was curved and you didn't notice it - hold the board edge up and sight along its edge for a quick check. If the lumber is curved holding your square's long side or blade along the lumber won't give a 90-degree end cut.
- You were careless: You didn't hold the framing square blade or tongue tightly along the side of the board you were cutting - oops.
- Your saw blade is whacked out of adjustment or the saw shoe or saw guide has been damaged. I once drove my pickup right over my Milwaukee worm-drive saw. Amazingly the saw seemed to survive perfectly well, but a few cuts later I saw I needed to straighten the shoe.
- Your framing square itself is not true. This may seem rare but our carpenter's helper, assigned to mark out square cuts on a batch of deck joists cut every joist out of square. We found that her framing square, a .... shall we say inexpensive model bought offshore from that country who's been subject of a trade war ... was in fact out of square.
Here we show how to check if your framing square is square or true: a perfect 90° and if it's not we have a tip on making it true.
How can you suspect that either you're not handling your tools accurately or your framing square or saw guide is not a perfect 90° angle? Here's what I do.
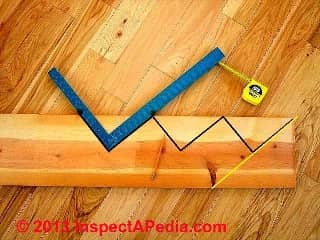
Follow the text together with a look at my drawing just above.
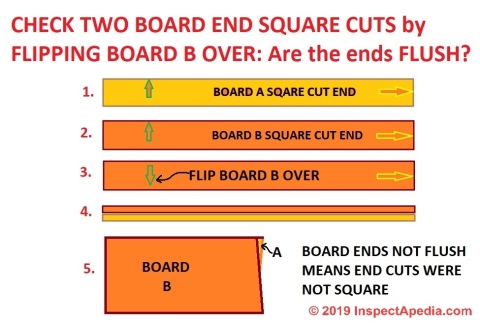
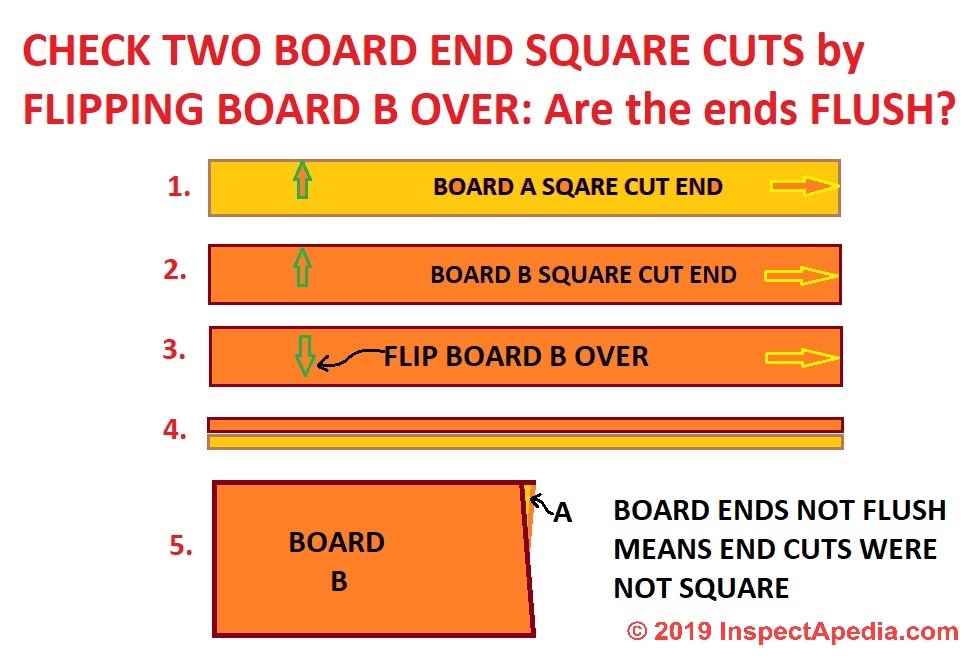
5 Steps with Two Boards Test your Square End Cuts for Squareness
- I use my framing square or saw guide to take my best shot at making a square end cut on board A.
- I do the same thing again, making a square end cut on board B.
- Then I flip board B over so that what was its "bottom" surface is facing up, keeping both board ends oriented otherwise the same way.
- Then I put board B atop board A and feel along the board sides to make them dead straight atop one another.
- Then I push the two board ends to be as flush to one another as possible.
If the board ends are not dead smooth across after flipping board B over and putting it atop A, then my straight cuts are not straight.
How to Use a Board & a Pencil to Check and True-Up your Framing Square to a Perfect 90° angle
OK so your end cuts are not square and you're convinced it's not you and not your saw. Let's test the framing square itself to confirm that it is or is not perfectly square and true.
Find a dead straight board that's 8" or wider; you can use plywood, paneling, or any wood material that has a dead straight edge; you can check the edge straightness if you've got a good quality 4-foot level or metal saw guide that's already straight.
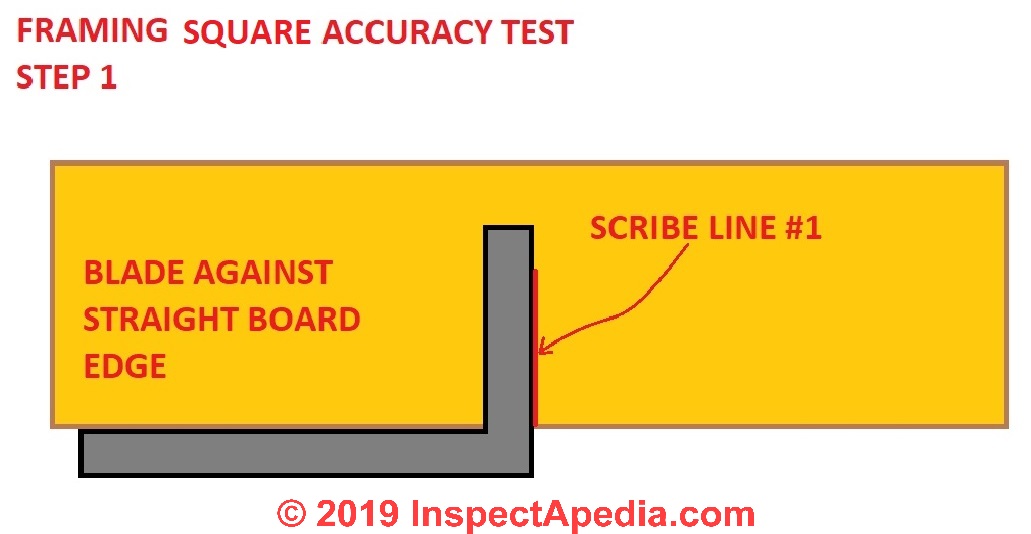
- Scribe test line #1: As we show above, put the blade (the long arm) of your framing square along the board's edge and scribe a thin but clear line along the tongue.
- Flip the Framing Square Over

- Scribe test line #2: as shown just above, draw the same line again at the same point on the lumber, again using a thin, sharp pencil.
- Compare the Two Test Lines: are they atop one another or dead parallel?
We illustrate three possible results below.
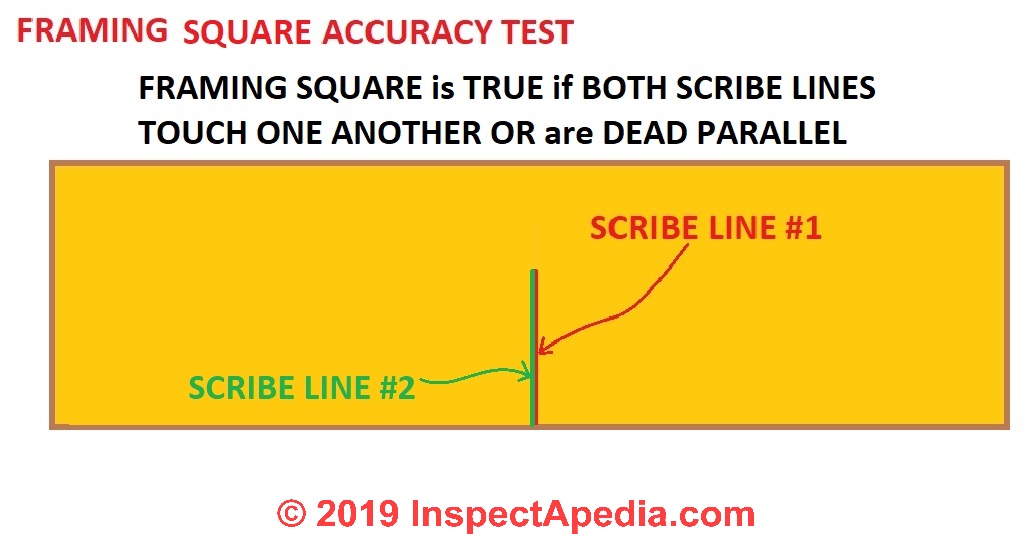
Case 1: (above) the two scribed lines are dead parallel or atop one another: the framing square is true or a perfect 90° angle inside the framing square heel
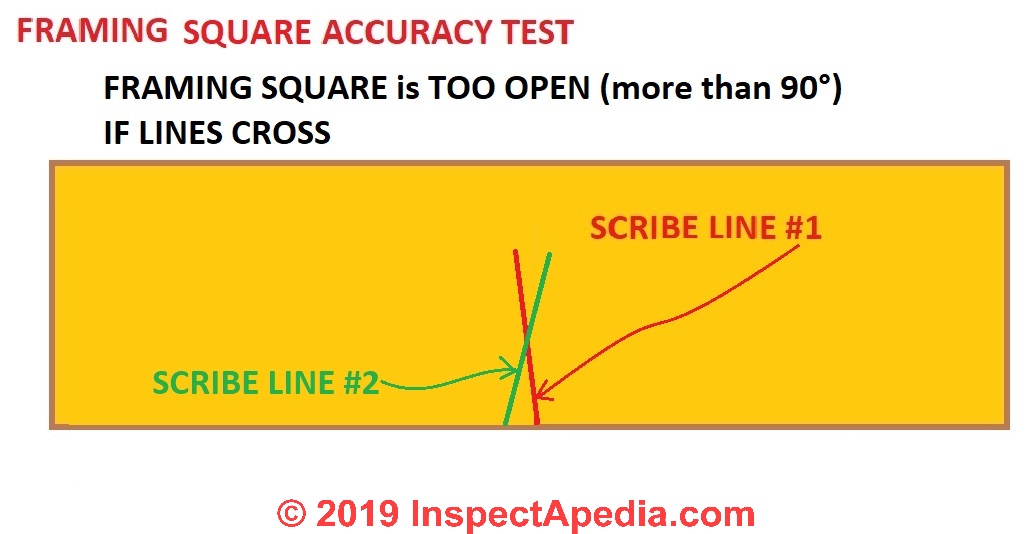
Case 2: (above) if the lines cross then the square is too "open" - its inner angle is actually MORE than 90°
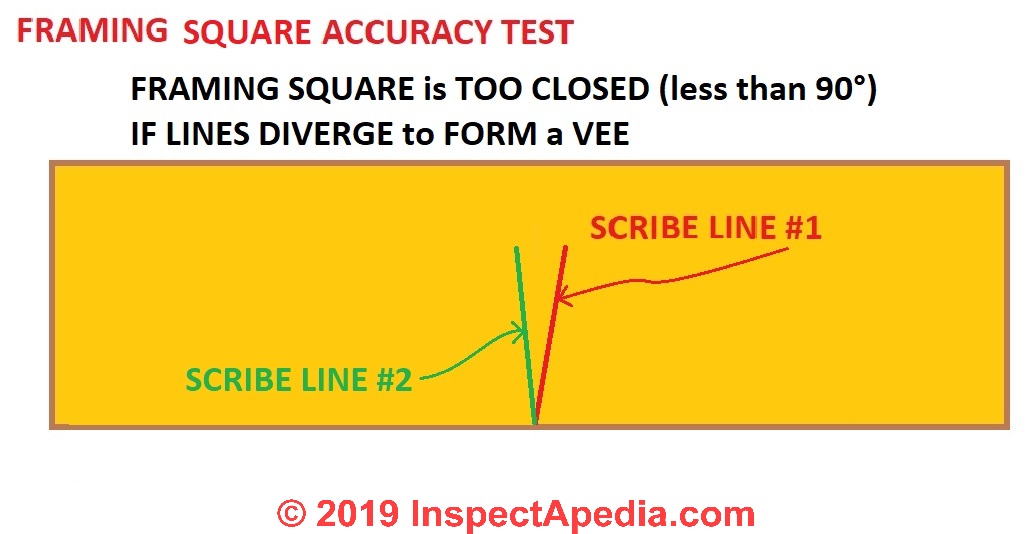
Case 3: (below) If the two lines form a Vee then the square is too "closed" - its inner angle is LESS than 90°
Believe it or not, since the error is likely to be very small, you can usually true up your framing square using a nice heavy hammer and a center punch.
Watch out: do NOT make these adjustments before you've run your framing square accuracy check test a couple of times, since if your lines were not drawn carefully the problem could, again, be you, not your square.
How to True Up a Framing Square that is too open or too closed

To CLOSE UP a framing square that is too open (heel's inside angle MORE than 90°) punch 3-4 dents along the OUTER THIRD of the framing square heel as shown by the yellow dots and orange text and arrow in our sketch.
To OPEN UP a framing square that is too closed (heel's inside angle is actually LESS than 90°) punch 3 or 4 dents along the INNER THIRD of the framing square heel as shown by the green dots and green text and arrow in our sketch. Obviously this punching is easier and more-effective on an aluminum framing square but it'll work on a steel square too.
Check the framing square's trueness again and whack away on the square's heel's other side if more adjustment is needed.
An alternative to pinging the heel of your framing square to open or close it using a center punch is to set the heel on an anvil and whack the outer corner (to open up the heel) or inner corner (to close up the heel) using an iron mallet. I'd reserve that pounding for cases of larger framing square errors.
...
Continue reading at FRAMING SQUARE USER'S GUIDE - topic home, or select a topic from the closely-related articles below, or see the complete ARTICLE INDEX.
Or see these
Recommended Articles
- FRAMING SQUARE USER'S GUIDE
- FRAMING SQUARE PARTS DEFINED
- FRAMING SQUARE TABLES LIST - what's on the front & back?
- FRAMING SQUARE RAFTER LENGTHS - 6 tables on the blade front
- FRAMING SQUARE for BIRDS MOUTH CUT
- FRAMING SQUARE OCTAGON TABLE - tongue front
- FRAMING SQUARE BACK TABLES - 6 tables
- FRAMING SQUARE BRACE TABLE - tongue back
- FRAMING SQUARE N JOISTS RAFTERS N RUN FT-IN - blade back
- FRAMING SQUARE ESSEX BOARD MEASURE - blade back on older squares
- FRAMING SQUARE DIVISION WARNINGS - 16ths, 12ths, 10ths, 8ths on various scales: watch out!
- FRAMING SQUARE COLOR & MATERIALS - black gets hot
- FRAMING SQUARE DETERMINES ROOF SLOPE - neat tricks
- FRAMING SQUARE for STAIR BUILDING
- FRAMING SQUARE-UP 6-8-10 RULE
- FRAMING SQUARE TRUING PROCEDURE
- FRAMING SQUARE HOW-TO MANUALS
- FRAMING TRIANGLES & CALCULATIONS
Suggested citation for this web page
FRAMING SQUARE TRUING PROCEDURE at InspectApedia.com - online encyclopedia of building & environmental inspection, testing, diagnosis, repair, & problem prevention advice.
Or see this
INDEX to RELATED ARTICLES: ARTICLE INDEX to BUILDING ROOFING
Or use the SEARCH BOX found below to Ask a Question or Search InspectApedia
Ask a Question or Search InspectApedia
Try the search box just below, or if you prefer, post a question or comment in the Comments box below and we will respond promptly.
Search the InspectApedia website
Note: appearance of your Comment below may be delayed: if your comment contains an image, photograph, web link, or text that looks to the software as if it might be a web link, your posting will appear after it has been approved by a moderator. Apologies for the delay.
Only one image can be added per comment but you can post as many comments, and therefore images, as you like.
You will not receive a notification when a response to your question has been posted.
Please bookmark this page to make it easy for you to check back for our response.
IF above you see "Comment Form is loading comments..." then COMMENT BOX - countable.ca / bawkbox.com IS NOT WORKING.
In any case you are welcome to send an email directly to us at InspectApedia.com at editor@inspectApedia.com
We'll reply to you directly. Please help us help you by noting, in your email, the URL of the InspectApedia page where you wanted to comment.
Citations & References
In addition to any citations in the article above, a full list is available on request.
- Spence, William P. (2000). Constructing Staircases Balustrades & Landings. Sterling Publishing. ISBN 0-8069-8101-6.
- [1] "How to Measure Angles with a Ruler", South Dakota School of Mines and Technology, Website: http://www.mcs.sdsmt.edu, http://www.mcs.sdsmt.edu/tkowalsk/portfolio/downloads/pub_HowToMeasureAngles.pdf retrieved 10/26/2013, copy on file.
- "Choosing Roofing," Jefferson Kolle, January 1995, No. 92, Fine Homebuilding, Taunton Press, 63 S. Main St., PO Box 5506, Newton CT 06470 - 800-888-8286 - see http://www.taunton.com/FineHomebuilding/ for the magazine's website and for subscription information.
- Our recommended books about building & mechanical systems design, inspection, problem diagnosis, and repair, and about indoor environment and IAQ testing, diagnosis, and cleanup are at the InspectAPedia Bookstore. Also see our Book Reviews - InspectAPedia.
- Best Practices Guide to Residential Construction, by Steven Bliss. John Wiley & Sons, 2006. ISBN-10: 0471648361, ISBN-13: 978-0471648369, Hardcover: 320 pages, available from Amazon.com and also Wiley.com. See our book review of this publication.
- Decks and Porches, the JLC Guide to, Best Practices for Outdoor Spaces, Steve Bliss (Editor), The Journal of Light Construction, Williston VT, 2010 ISBN 10: 1-928580-42-4, ISBN 13: 978-1-928580-42-3, available from Amazon.com
- In addition to citations & references found in this article, see the research citations given at the end of the related articles found at our suggested
CONTINUE READING or RECOMMENDED ARTICLES.
- Carson, Dunlop & Associates Ltd., 120 Carlton Street Suite 407, Toronto ON M5A 4K2. Tel: (416) 964-9415 1-800-268-7070 Email: info@carsondunlop.com. Alan Carson is a past president of ASHI, the American Society of Home Inspectors.
Thanks to Alan Carson and Bob Dunlop, for permission for InspectAPedia to use text excerpts from The HOME REFERENCE BOOK - the Encyclopedia of Homes and to use illustrations from The ILLUSTRATED HOME .
Carson Dunlop Associates provides extensive home inspection education and report writing material. In gratitude we provide links to tsome Carson Dunlop Associates products and services.
 | HOME | ABOUT | ASK a QUESTION | CONTACT | CONTENT USE POLICY | DESCRIPTION | POLICIES | PRIVACY | |
| © 2025 - 1985 Publisher InspectApedia.com - Daniel Friedman | |||||||||