
InspectAPedia® FREE Encyclopedia of Building & Environmental Construction, Diagnosis, Maintenance & Repair |
Question? Just ask us! InspectAPedia
|
 Rafter Bird's Mouth Cut
Framing square rafter layout for notch at wall top
- POST a QUESTION or COMMENT about building framing, framing squares, rafter layout, roof construction
How to use a framing square to lay out the birds mouth cut on a rafter.
This article series explains how to use a framing square and in companion articles we give examples just about every possible way to figure out any or all roof, stair, or other building framing dimensions and measurements including problems such as figuring the roof area, width, length, and roof or stairway slope, rise, run, and unit rise in inches per foot.
InspectAPedia tolerates no conflicts of interest. We have no relationship with advertisers, products, or services discussed at this website.
- Daniel Friedman, Publisher/Editor/Author - See WHO ARE WE?
Roof Framing: Location of the Bird's Mouth Cutout in the Rafter
 Here we explain how to be sure you're using the correct rafter line length to locate the plumb cut portion of the bird's mouth, followed by marking the horizontal or level cut line for the resting surface of the rafter on the wall top plate.
Take care when measuring, locating, and marking the birds' mouth cutout at the rafter's lower section where the rafter sits astride the top plate.
[Click to enlarge any image]
The upper end of a rafter rests against the ridge board in modern framing or against an opposing rafter's plumb cut in antique framing.
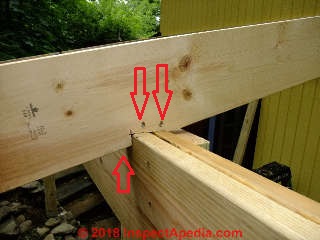
Where the lower segment of a rafter sits on the wall top plate, or in our example shown at the top of this page, atop a built-up beam for a porch roof, a notch or bird's mouth cut is made to provide nailing surfaces to connect the rafter to the wall top or girder top.
How to Locate the bird's mouth cut
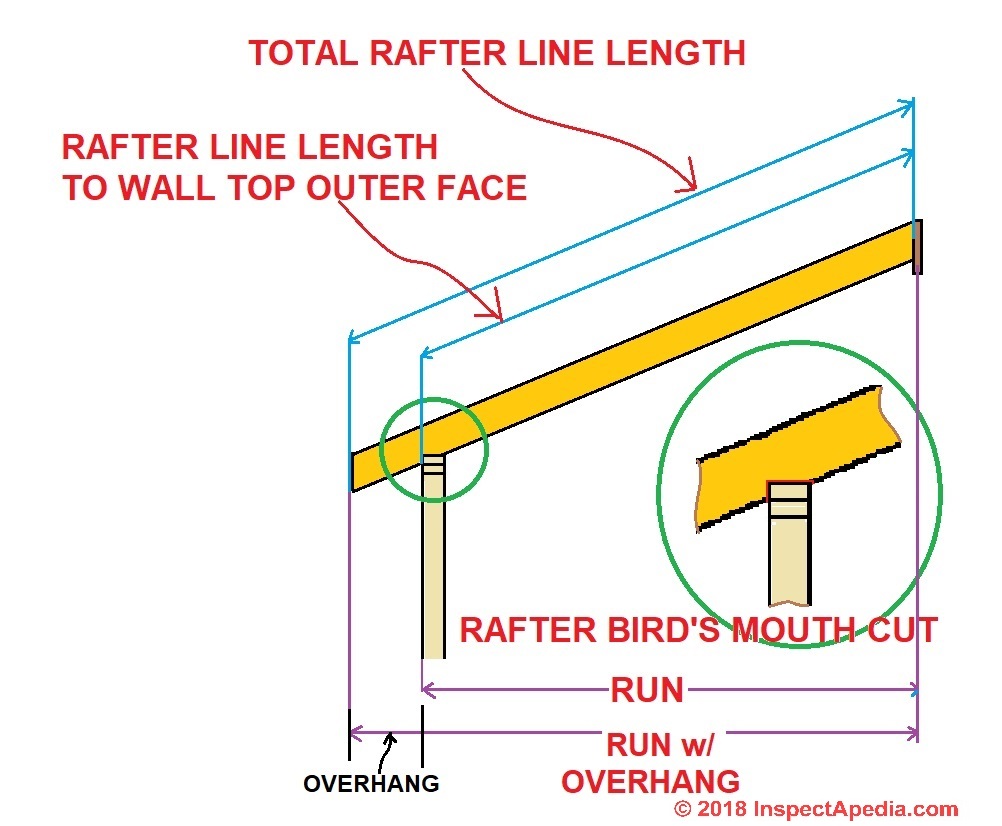
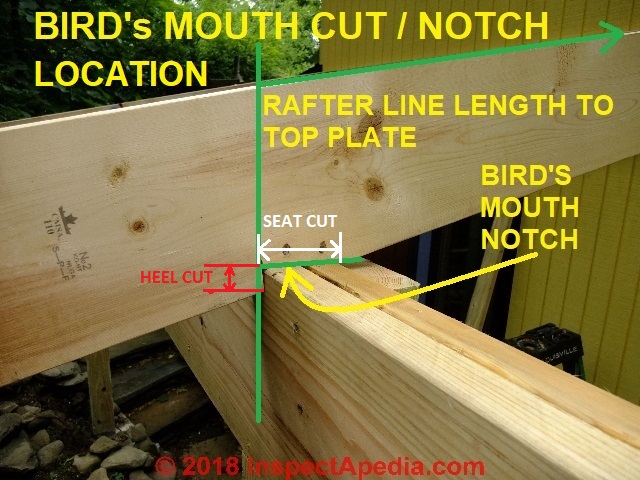
The rafter's line length, measured from the face of its plumb cut to the outer edge of the wall top plate is in fact the exact location of the plumb-notch cut into the lower portion of the rafter where it will sit on the top plate.
Using our earlier Example 1: 18/12 roof slope with a 10-foot horizontal run distance (center of ridge to outer face of wall top plate) we used the framing square to calculate the rafter line length:
Rafter Line Length ridge to top plate outer face = 216.3" / 12 = 18.025 ft.
Now we must shorten that length by half the thickness of the ridge board (using 2x lumber that is really 1 1/2" thick for the ridge board) then we shorten that rafter line length by 3/4".
The accurate rafter line length from the face of the ridge board to the outer face of the wall top plate will then be:
Bird's Mouth Heel Cut Location ( 216.3" - 0.75") = 215.55" or 17.96 ft. rafter line length, which could be rounded to 18 feet exactly since nobody can see 4 hundredths of an inch along their tape measure.
 That's the corrected rafter line length distance from ridge board face to outer face of the wall top plate and that tells us where to make bird's mouth notch to nail the rafter to the top plate.
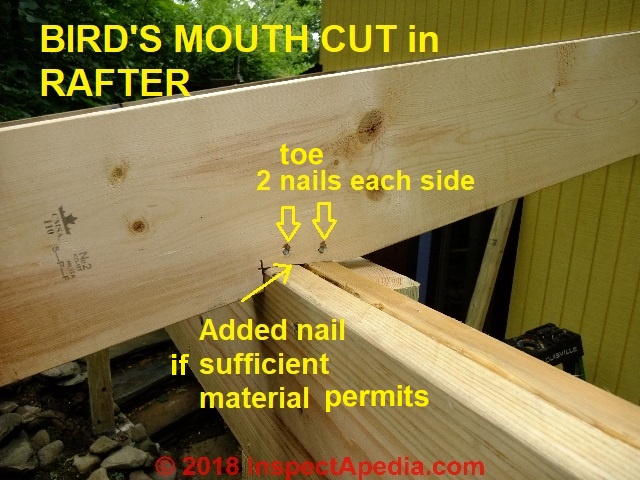
The vertical (plumb) cut or HEEL CUT (shown in red in my photo) will be 18 ft. from the upper end of the rafter - measured along the rafter's under-side in this case, just for convenience.
Watch out: You could also measure the location of the heel cut from the rafter outermost end by measuring the horizontal roof overhang distance, but I do not recommend that approach. First off, the plumb cuts are better left until all of the rafters are in place on the roof, using a chalk line to get the plumb cuts in a dead straight line - making the fascia board fit nicely.
Second even if the plumb cuts at the rafter's lower end have already been made, small variations in rafter length and effects of bowed or arched rafters will throw off your birds mouth location.
The face of the heel cut should - in a perfect world - just touch the face of the top plate or girder as we're going to nail through the heel cut into the girder, typically using an 8d common nail on each side.
My measaurements will place the mating vertical face of our actual bird's mouth cut a smidgen out past the vertical face of top plate - the rafter will slip into place as if master carpenter Bernie Campbalik had cut it himself.
(Bernie did not cut the rafter shown here, I did.)
The depth of the HEEL CUT or "plumb cut" is important. The length of the SEAT CUT is not critical and will be determined by the heel cut depth or where it ends in the rafter. In my OPINION the depth of the heel cut in my photo is a bit shallow, but there it is.
Watch out when figuring your roof ridge height and roof slope. Making the birds mouth either drops the whole rafter down vertically by the depth of the heel cut OR it will increase the roof slope if you keep the ridge-board end of the rafter at its original height. I may be missing something but I've not seen this detail mentioned in carpentry texts.
The SEAT CUT of the rafter (shown in white in the photo) is made at right-angles to the heel cut - i.e. parallel to the ground or "level". We're also going to nail thorugh both side]s of the seat cut into the top plate. 10d common is typcial.
Our photo above shows a bird's mouth notch in a porch rafter sitting atop the outer girder - equivalent in location and rafter measurements to setting a rafter atop the wall top plate of a building wall.
Mark, thencut the bird's mouth notch in the rafter
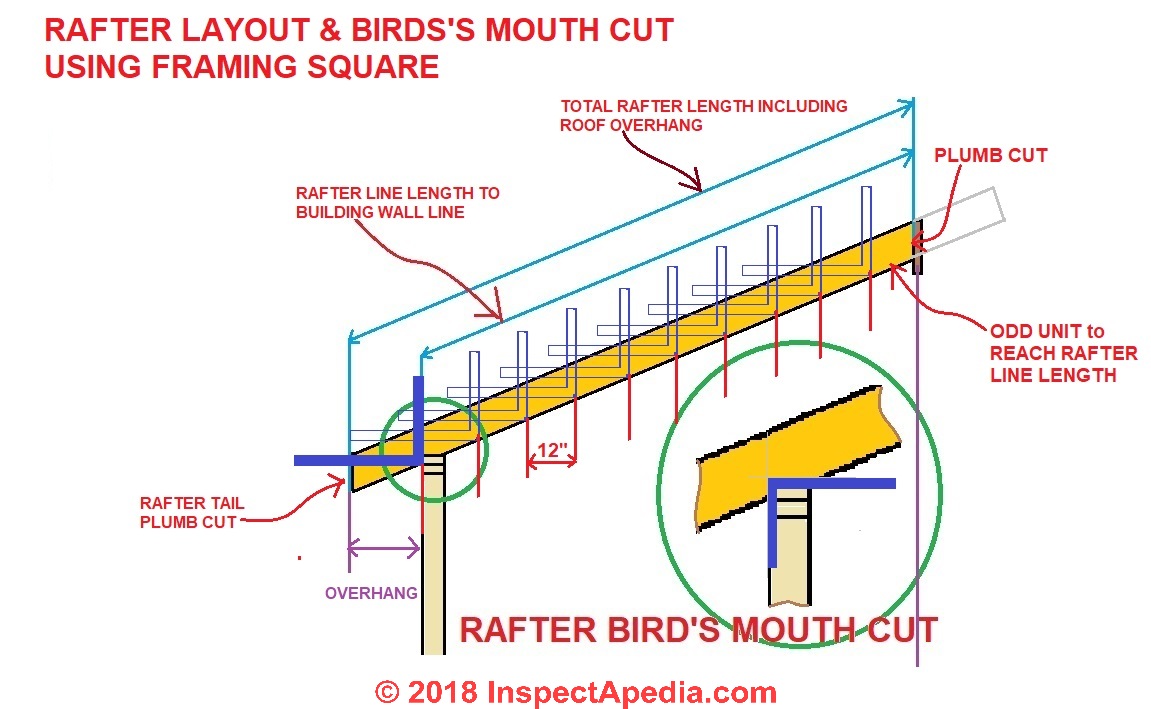 In the green circled area of our sketch we enlarge the drawing to show how the framing square is placed on the rafter to mark the bird's mouth cutout.
Use the framing square to draw the seat cut - the horizontal (parallel to the ground) line to meet the flat surface of the top of the wall plate.
Use the square to draw the vertical cut into the rafter. [Click to enlarge any image]
In a properly-cut bird's mouth, the length of the horizontal or level line (below my two red arrows in the page top photo) should be about equal in length to the width of the top plate.
The actual design of the bird's mouth cut will vary in both length and depth according to the width of the top plate, the angle of the roof, the design of the roof overhang and also the use of framing connectors.
In my porch roof rafter photo above, the bird's mouth notch wanted to be rather shallow, an effect of a rather low-slope roof.
In the sketch we show how the framing square is used to lay out the rafter length, plumb-cuts, and the bird's mouth notch at the wall top.
Make the pattern rafter and test-fit it
Make one rafter that has the bird's mouth cut in place and extends out past that for your roof overhang, test fit it in place, and mark it PAT for pattern rafter to use in cutting its sisters.
In my photo above the green rafter line length is from the plumb cut face (or ridge board face) to the plumb-cut face of the bird's mouth notch.
Watch out: be sure to make all measurements along the same edge of the rafter: you can measure the line length to the bird's mouth cut along the top of the rafter or along the bottom, but don't set your tape at the rafter top at one end and pull to the rafter bottom at the other end or your measurement will be wrong (and too short).
How to Skip the Bird's Mouth Cut Entirely
I don't recommend simply resting the bottom edge of the rafter on the wall top and trying to nail it in place there. You'll find there is too little wood-to-wood structural contact to make a good connection.
Details about the nailing requirements at the birds mouth are at TOE NAILED FRAMING CONNECTIONS.
But there are options for skipping the birds mouth notch.
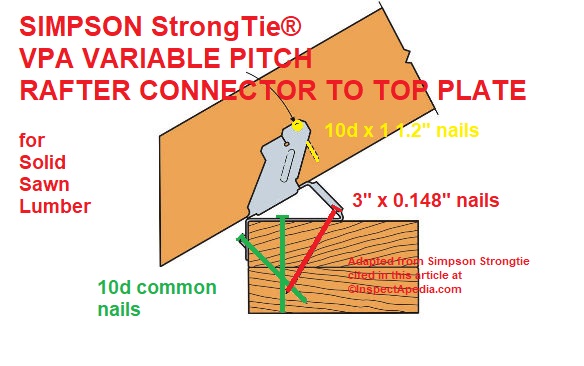
In that Toe Nailing article we describe use of several types of steel framing rafter-tie connectors such as the use of Simpson's VPA rafter tie to connect the rafter to the wall top - eliminating the requirement for a bird's mouth notch.
...
Continue reading at FRAMING SQUARE USER'S GUIDE - topic home, for an explanation of all of the framing square tables & how to use them, or select a topic from the closely-related articles below, or see the complete ARTICLE INDEX.
Or see these
Recommended Articles
- CALCULATE RISE & RUN from SLOPE
- CLAY TILE ROOF SLOPE
- FOLDING RULER ROOF SLOPE CALIBRATION
- FRAMING SQUARE BRACE TABLE
- FRAMING SQUARE-UP 6-8-10 RULE
- FRAMING SQUARE USER'S GUIDE
- FRAMING TRIANGLES & CALCULATIONS
- LOW SLOPE ROOFING
- ROOF AREA CALCULATIONS
- ROOF ARCHITECTURAL STYLES
- ROOF BENDING, SAGGING, COLLAPSE
- ROOF FRAMING TIES & BEAMS
- ROOF MEASUREMENTS
- ROOF SLOPE CALCULATIONS
- ROOF SLOPE DEFINITIONS
- ROOF SLOPE TABLE, TYPES, WALKABILITY
- STAIR RISE & RUN CALCULATIONS
- TOE NAILED FRAMING CONNECTIONS
Suggested citation for this web page
FRAMING SQUARE for BIRDS MOUTH CUT at InspectApedia.com - online encyclopedia of building & environmental inspection, testing, diagnosis, repair, & problem prevention advice.
Or see this
INDEX to RELATED ARTICLES: ARTICLE INDEX to BUILDING ROOFING
Or use the SEARCH BOX found below to Ask a Question or Search InspectApedia
Ask a Question or Search InspectApedia
Try the search box just below, or if you prefer, post a question or comment in the Comments box below and we will respond promptly.
Search the InspectApedia website
Note: appearance of your Comment below may be delayed: if your comment contains an image, photograph, web link, or text that looks to the software as if it might be a web link, your posting will appear after it has been approved by a moderator. Apologies for the delay.
Only one image can be added per comment but you can post as many comments, and therefore images, as you like.
You will not receive a notification when a response to your question has been posted.
Please bookmark this page to make it easy for you to check back for our response.
IF above you see "Comment Form is loading comments..." then COMMENT BOX - countable.ca / bawkbox.com IS NOT WORKING.
In any case you are welcome to send an email directly to us at InspectApedia.com at editor@inspectApedia.com
We'll reply to you directly. Please help us help you by noting, in your email, the URL of the InspectApedia page where you wanted to comment.
Citations & References
In addition to any citations in the article above, a full list is available on request.
- Falconer, John (1925). Ednie, John (editor), ed. The Steel Square. Carpentry and Joinery. Vol. V. Gresham.
- Lanham, Wm. The Steel Square. Bath: E. A. Lovell.
- Rogers, Jim, "The Framing Square Story", [web article], The Forestry Forum, retrieved 2016/04/23, original source: http://www.forestryforum.com/board/index.php?topic=9362.0
This artice discusses use of the framing square in timber framing applications. - Siegele, H.H. (1981). The Steel Square. Sterling Publishing. ISBN 0-8069-8854-1.
- [1] "How to Measure Angles with a Ruler", South Dakota School of Mines and Technology, Website: http://www.mcs.sdsmt.edu, http://www.mcs.sdsmt.edu/tkowalsk/portfolio/downloads/pub_HowToMeasureAngles.pdf retrieved 10/26/2013, copy on file.
- "Choosing Roofing," Jefferson Kolle, January 1995, No. 92, Fine Homebuilding, Taunton Press, 63 S. Main St., PO Box 5506, Newton CT 06470 - 800-888-8286 - see http://www.taunton.com/FineHomebuilding/ for the magazine's website and for subscription information.
- Our recommended books about building & mechanical systems design, inspection, problem diagnosis, and repair, and about indoor environment and IAQ testing, diagnosis, and cleanup are at the InspectAPedia Bookstore. Also see our Book Reviews - InspectAPedia.
- Best Practices Guide to Residential Construction, by Steven Bliss. John Wiley & Sons, 2006. ISBN-10: 0471648361, ISBN-13: 978-0471648369, Hardcover: 320 pages, available from Amazon.com and also Wiley.com. See our book review of this publication.
- Decks and Porches, the JLC Guide to, Best Practices for Outdoor Spaces, Steve Bliss (Editor), The Journal of Light Construction, Williston VT, 2010 ISBN 10: 1-928580-42-4, ISBN 13: 978-1-928580-42-3, available from Amazon.com
- In addition to citations & references found in this article, see the research citations given at the end of the related articles found at our suggested
CONTINUE READING or RECOMMENDED ARTICLES.
- Carson, Dunlop & Associates Ltd., 120 Carlton Street Suite 407, Toronto ON M5A 4K2. Tel: (416) 964-9415 1-800-268-7070 Email: info@carsondunlop.com. Alan Carson is a past president of ASHI, the American Society of Home Inspectors.
Thanks to Alan Carson and Bob Dunlop, for permission for InspectAPedia to use text excerpts from The HOME REFERENCE BOOK - the Encyclopedia of Homes and to use illustrations from The ILLUSTRATED HOME .
Carson Dunlop Associates provides extensive home inspection education and report writing material. In gratitude we provide links to tsome Carson Dunlop Associates products and services.
 | HOME | ABOUT | ASK a QUESTION | CONTACT | CONTENT USE POLICY | DESCRIPTION | POLICIES | PRIVACY | |
| © 2025 - 1985 Publisher InspectApedia.com - Daniel Friedman | |||||||||