 Drywall Expansion Joints
Use of drywall control joints or expansion joint products prevents cracks in long-run ceilings & walls
- POST a QUESTION or COMMENT about the requirements, standards, & installation specifications for drywall movement control joints
Drywall control joints or gypsum board expansion joints are used to control cracking in gypsum board ceilings & walls.
This article discusses expansion & contraction of drywall / gypsum board and the drywall control joint or expansion joint products used to prevent these problems in building interiors.
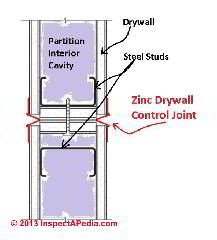
We cite drywall expansion joint installation specifications, applicable construction standards, and we list product sources for buying drywall expansion joint products in the U.S., Canada, the U.K., Australia, New Zealand and other locations. Sketch at page top: plasterboard expansion joint in a partition wall using zinc control joint strips and metal studs. [CLICK TO ENLARGE any image].
InspectAPedia tolerates no conflicts of interest. We have no relationship with advertisers, products, or services discussed at this website.
- Daniel Friedman, Publisher/Editor/Author - See WHO ARE WE?
Drywall Movement Control Joints
 What is a Drywall or Plasterboard Expansion Control Joint?
Gypsum wallboard, also referred to as drywall, gypsum board, and in the U.K. as plasterboard, will expand or contract, resulting in movement caused by variations temperature, moisture, or both of these influences at once.
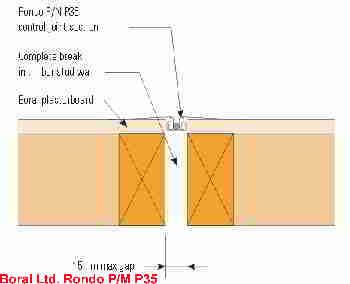
Illustration at left: Boral's Rondo P/N P35 control joint shown in section view. - Boral Ltd., Australia. Contact information for Boral is provided below. [CLICK TO ENLARGE any image]
Where larger areas are involved (30 feet or about 10 meters in one or more directions), or where "T", "U", or "I" intersections of drywall-covered ceilings or floors meet, this movement can cause unsightly cracking that becomes a cosmetic issue and potentially a functional problem as well if the cracking results in building air leaks.
Drywall cracking can occur of course for other reasons such as building movement, damage, flexing, framing defects, settlement, or frost heaves as we list at DRYWALL CRACKS.
A drywall "expansion strip" (actually intended to control for both expansion and contraction) functions just as expansion joints in concrete - we don't prevent movement, we simply control where it's forces would show up.
Drywall expansion joints are made of plastic (vinyl), or zinc strips with a "Vee" groove in the center and flanges that are taped to the otherwise abutting edges of drywall ceiling or wall panels.
The drywall expansion joint control strip's flanges are attached to the surface of the drywall with drywall screws, nails (ick), or spray adhesive, or in one product case, adhesive tape.
Some of these products partly hide the depth of the U or Vee with a plastic (or caulk) material that remains flexible. But the expansion joint does not disappear - it remains visible in the surface.
Watch out: Do NOT try taping and applying drywall mud over the expansion joint. You can paint over it however.
Drywall movement control joints can take several forms
- A drywall expansion joint product or more accurately named, a drywall or plasterboard control joint is installed to provide a cosmetically-finished edge and surface that accommodates movement without damage between sections of drywall.
These products are referred to by a variety of names: drywall expansion joint, drywall control joint, drywall expansion bead, plasterboard control joint, zinc control joints, vinyl plastic control joints for gypboard, and similar terms.
All of the plasterboard control joint products we reviewed for this article require that framing (wood or metal studs or equivalent) be installed on either side of the control joint with a suitable gap between them. - Floating drywall sections: Drywall movement may be provided for by using floating drywall corner techniques at partition or ceiling abutments.
A similar approach is taken to prevent drywall cracking at the ceiling to partition wall over building center partitions that run orthogonal to the direction of roof trusses.
See TRUSS UPLIFT, ROOF - Open gaps: Drywall may be installed leaving a gap between drywall sections, typically by installing a drywall edge finish product on the open ends or edges of the material - a detail that may not be cosmetically acceptable in many locations.
Or the gap may be covered by trim (in which case I recommend nailing trim as we would in board and batten siding construction, with fasteners penetrating only one side of the gap or being nailed to a stud, joist, or rafter over which such a gap is centered.
How Much Does Drywall Expand or Shrink & How Much Plasterboard Movement does a Control Joint Handle?
Depending on the individual drywall control joint product design and materials (width and plastic vs zinc metal) expansion control joints for plasterboard can handle up to about 4/10" of horizontal movement due to thermal or moisture-related expansion or contraction.
The required joint width between the abutting drywall panels ranges depending on the specifications of the drywall expansion control strip's manufacturer, typically somewhere between 1/4" and 1" in width.
- Coefficient of expansion of drywall due to temperature variation: 0.0162
- Coefficient of expansion of drywall due to moisture level changes: 0.0072
Where are Drywall Expansion Joints Needed?
Drywall control joints, referred to in some products and literature with the misnomer "drywall expansion joints" are used prevent cracking in gypsum wallboard.
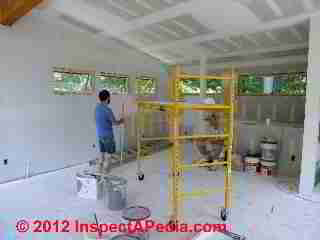
Photo at left: in this 24 x 27 foot building area no drywall control joints were required. The longest un-broken section of drywall was less than 27 feet in its longest dimension.
Most standards and manufacturer's recommendations specify that drywall control joints should be installed
- Walls: In long expanses of walls or partitions at 30-foot intervals, with the expansion joint extending from floor to ceiling.
In case it is not obvious, you do not need to provider a drywall control joint in long walls that are themselves broken up by floor-to-ceiling openings such as windows or doors if the resulting un-broken areas are under 30 feet. - Ceilings: in long expanses of ceilings at 30-foot intervals, with the drywall expansion joint extending the full width of the ceiling, from partition wall to partition wall.
Technically, according to expert sources like National Gypsum, drywall movement control joints are recommended at intervals of 30 feet. But to cover themselves and because there are certain stress points that occur in less than 30 ft. some text says "30 feet or less". - Doorways: at doorjambs, also extending from door head to ceiling for door openings that do not themselves extend the full wall height from floor to ceiling.
- Intersections of rectangular areas such as where a large room ceiling intersects with a hallway ceiling form a natural and recommended location for an expansion joint.
- Residential construction: while control joints in drywall are not
commonly used in residential construction, they are a good
idea in surfaces over 30 feet long or at changes in floor
level, such as stairway walls.
On a stairway wall, locate the control joint at the top of the first-floor wall where the top plate meets the ceiling joists. The 1/4-inch joint can be painted with the wall and left as a reveal. Another option is to omit the metal control joint and simply leave a small gap between the upper and lower drywall, and cover the joint with wood trim.
Adapted & expanded from INTERIOR FINISHES: BEST PRACTICES - Other key locations for plasterboard expansion joints are at irregular intersections between expanses of ceilings and walls, such as at the I-joint, T-joint or U-joint formed were ceilings are continuous across openings between rooms or areas of rooms divided by partition walls.
Watch out: Even if control joints do not appear to be specified they are often covered by reference specification. Carefully read PART 1, GENERAL, Paragraph 1.02 REFERENCES, of the Gypsum Board specifications.
More than likely, the architect has referenced either ASTM C 840, The Standard Specification for Application and Finishing of Gypsum Board; GA-216, the Gypsum Association Recommended Specification for Application and Finishing of Gypsum Board; or both.
The requirement for control joints is addressed in both of these documents. - National Gypsum, Kutcher retrieved 2013
It is less common to find drywall movement control joints in residential construction except where regular building movement is anticipated. And for the record, drywall does not just "expand", it moved - meaning it may expand or contract in response to changes in both temperature and humidity.
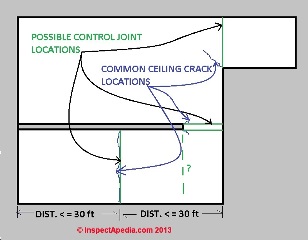
Our sketch at left [click to enlarge] shows examples of common stress points in drywall ceilings and suggests where control joints might be included to avoid cracks in the ceiling plasterboard.
Depending on the distances involved, the control joint we show in the center of the long ceiling expanse at the sketch bottom might have been placed at the end of the partition wall.
There has been nearly endless argument about drywall movement even among experts (such as at the Journal of Light Construction) who take the trouble to dig up the thermal and hygrometric coefficients of expansion/contraction (given as various values including both 9.3 x 10⁻⁶ in/in °F and as 16.2 x 10⁻⁶ mm/(mm°C) for temperature changes and as 6.5 x 10⁻⁶ in./in/%RH and as 7.2 x 10⁻⁶ mm/mm/%RH for moisture variation).
The coefficients of expansion & contraction of gypsum board as temperature or moisture vary are discussed in detail
at
PLASTERBOARD / DRYWALL EXPANSION COEFFICIENTS.
A reasonable argument is that these movement coefficients pertain to "un-fixed" drywall. When you shoot 50 drywall screws through a 4x8 foot piece, movement is constrained, stresses are distributed over its 32sqft area, and do not all appear as actual movement at the edges of the material.
Some sources also correctly point out that if drywall movement is a particular worry in a structure we ought to be sure to properly control the indoor environment's humidity and temperature.
Some drywall hanging sources I reviewed point out that movement control joints may be needed at problem-prone locations regardless of the total building dimensions; for example we always separate the wings of "L", "U", and "I" areas of drywall and we may separate other stress points.
Here is are quotations from various sections of a detailed specification from National Gypsum Company's Gypsum Board Systems, 12th Ed.
Where long, continuous runs of this wall system are employed, control joints must be provided every 30' or less
5. CONTROL JOINTS To compensate for the effect of structural movement on large ceiling areas, control joints in the Ceiling/Soffit Board are recommended.
These should be E-Z Strip Expansion Joints. Install E-Z Strip with 1/2" min. staples 6" o.c. Use additional staples if necessary for snug contact with board. Install joints no more than 30' apart and, if possible, to coincide with expansion joints in the roof above.
Control joints may be installed to intersect light fixture or other openings where stresses are usually concentrated. Wings of “L”, “U”, and “I” shaped areas should always be separated.
Gypsum board joints at openings should be located so that no end joint will align with edges of openings unless control joints will be installed at these points. End joints should be staggered, and joints on opposite sides of a partition should not occur on the same stud.
How are Drywall Expansion Joints Installed?
The 1/4-inch expansion joint gap can be painted with the wall and left as a reveal. Another option is to omit the metal or plastic plasterboard control joint and simply leave a small gap between the upper and lower drywall, and cover the joint with wood trim.
But simply leaving an open gap between sections of drywall across the expanse of a ceiling or wall may be unsightly and just not acceptable in many situations.
Adapted from INTERIOR FINISHES: BEST PRACTICESPRACTICES
Useful References for Control Joint Details in Drywall, Gypsum Board & Plasterboard Installation
- Boral Plasterboard (Australia), "Boral Plasterboard Installation Manual", August 2007, PB103, Tel: 1800-811 222 (in Australia), Email: tecassist@boral.com.au, Website: www.boral.com.au, ACT: 7 Barrier St, Fyshwick 2609, Tel: 02 6280-4243. Other Boral Plasterboard offices are in New South Wales, Northern Territory, Queensland, South Australia, Tasmania, Victoria, Western Australia, and the company has an export department.
- British Gypsum Co., "Gyproc Control Joint, Products Plasterboard Accessories", Website: www.british-gypsum.com.
- George M. Kutcher, Jr., "Don't Overlook Control Joints in Drywall Construction", National Gypsum Company, Tel: 1-800-NATIONAL, www.nationalgypsum.com, retrieved 12/10/13, original source: http://www.nationalgypsum.com /resources/tech-talk-controljoint.htm
- National Gypsum Company, "Gypsum Board Systems", 12th Ed., (2000), (Gold Bond® brand gypsumboard products), website: http://www.nationalgypsum.com
- "Design Essentials for Controlling Movement Induced Stresses in Building Materials", Winstone Wallboards, Ltd., Winstone Gypsum, Dec. 2009, Winstone Wallboards Ltd
219 Opawa Road
PO Box 1983
Christchurch
New Zealand
Phone: +64-3-332-3159, and Winstone Wallboards Ltd
37 Felix St
PO Box 12-256
Penrose
Auckland
New Zealand, Tel: +64-9-633-0100, Email: gypsum@gib.co.nz, Toll free: 0800 475 475.
Note: per Winstone: for large ceilings, AS/NZS 2589 specifies that all sheet end butt joints are backblocked (to reinforce the joint where such joints are not meeting over a ceiling joist). [This is a reinforcement detail for unsupported butt joints, not a wallboard movement control joint detail. The company's article does recommend that installers insert control joints at the junction of wallboard ceilings at hallways vs large open spaces - Ed. ]
Where to Buy Drywall / Plasterboard Expansion Control Joint Products & Accessories
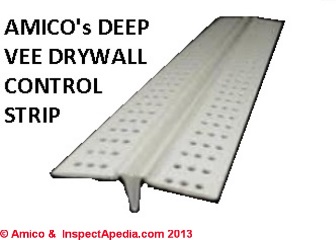
- Amico Vinyl Bead Accessories, (Gibraltar Industries), Alabama Metal Industries Corporation, 3245 Fayette Avenue, Birmingham, AL 35208 Phone (205) 787-2611 • (800) 366-2642 • Fax (205) 786-6527 www.amico-vinyl.com - illustrated at above left.
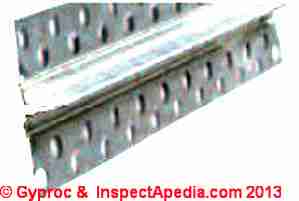
- British Gypsum (in the U.K.) Gyprock Control Joint, www.british-gypsum.com. The Gyproc control joint is a pre-formed galvanised metal strip 47mm wide x 2048mm long used to form joints in drywall systems to accommodate expansion or contraction up to 7 mm, illustrated at above right.
- Phillips Manufacturing for an example of this product (considered a drywall accessory) The Phillips 093 E-Z Strip® Vinyl Expansion Control Joint provides the installation specifications; other literature refers to this product as the Phillips' gripSTIK 093 E-Z Strip Expansion Control Joint
- Plastic Components Inc., Control Joint (2027-16), http://www.plasticomponents.com, Tel: 800-327-7077
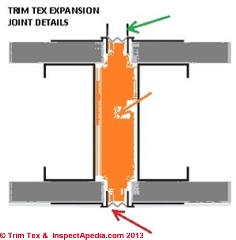
- Trim-Tex Products Co., http://trim-tex.com, "Hideaway Expansion Bead" (recycled PVC), shown below. The Trim-Tex drywall expansion joint product (illustration adapted from Trim-Tex product literature) includes masking (green arrow) and breakaway tabs (red arrow) that are removed before final sanding and painting.
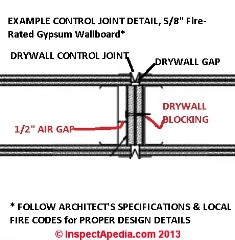
In our adaptation of the Trim-Tex data (below left), the orange area describes a drywall-covered partition wall cavity space that may need to be filled with a fire-retardant material where fire-stopping is required at the drywall expansion joint opening. - Trim-Tex® and other drywall control joint product manufacturers emphasize that the installer should check with and follow approved architectural drawings, specifications, and local fire codes. Illustrations shown here are not to scale.
National Gypsum's illustration of a similar drywall control joint (below right) shows that the installer simply filled the joint space or backed it with doubled segments of solid drywall placed on edge. Both illustrations are using typical 2 1/2" steel studs, 5/8" fire rated drywall such as National Gypsum's Fire-Shield gypsum wallboard, and include warnings that air spacing and finish details must comply with the architect or engineer's specifications, drawings, and local fire codes.
- W.M. Simpson Co., Website: http://wmssimpson.com distributes Amico's Vinyl Drywall Control Joint "Deep Vee" with removable tape "designed to help relieve stress in large areas of drywall or veneer plaster installations. Perforations and ridges on all surfaces that receive finishing compound or veneer assure excellent adhesion. Provides a 1/16” ground."
- Winstone Wallboards, Ltd., Winstone Gypsum, Dec. 2009, Winstone Wallboards Ltd 219 Opawa Road PO Box 1983 Christchurch New Zealand Tel: +64-3-332-3159, and Winstone Wallboards Ltd 37 Felix St PO Box 12-256 Penrose Auckland New Zealand, Tel: +64-9-633-0100, Email: gypsum@gib.co.nz, Toll free: 0800 475 475.
Really?: Flexo-Tech in India or someone promoting that company has hacked into some articles (builder chicks) on drywall expansion joints to post referrals to themselves. Flexo-tech produces flexible hoses and similar assemblies - nothing in the company's website resembles a drywall product. Don't waste your time there.
Causes & Types of Cracks in Drywall, Plasterboard, Gypsum Board Walls & Ceilings
This discussion has been relocated to a separate article.
For details see DRYWALL CRACKS
Applicable Standards for Drywall Movement Control Joints
- ASTM D 3678
- ASTM C 1047
- ASTM D 4216-99
- Canadian Codes [pending CSA citations]
- ASTM C 473, the most comprehensive gypsum board standard specifies the flexural strength of gypsum panels, specifies the allowable water absorption and maximum deflection in humidified gypsum board for interiors, for ceiling board, and for exterior gypsum soffit board. This standard also specifies the minimum nail pull resistance for gypsum board and als specifies gypsum board panel core, end, and edge minimum hardness.
- ASTM C 840
- ASTM C 844
- ASTM C 1396 specifies the minimum effective modulus of rupture (MOR) for gypsum panels
- ASTM E 330 (procedure A) specifies the negative wind load resistance for 4x8 panels of treated-core gypsum sheathing with no joints, applied parallel to wall studs
- ASTM E 695 specifies the impact resistance for gypsum board
- Gypsum Association GA -216
- Gypsum Association GA -234 (Fire-Resistant Applications)
- Gypsum Association GA-235-10 provides the most comprehensive collection of the mechanical and physical properties of gypsum board and cites relevant ASTM standard specifications.
- Australian Standard AS2311–1992 The Painting of Buildings (when painting plasterboard walls & ceilings)
Where are Drywall / Gypsum Board or Plasterboard Control Joints Needed? How are they Installed?
Reader Question:
I read your “Best Practices…..Drywall…”. Very informative. However, I was trying to find some info on expansion joints in drywall. Specifically, where can I find a detail or general guidelines for installing expansion joints in residential wood-framed walls and ceilings.
Does the joint need to be on framing or between framing or does it matter. I’ve searched the internet and found only commercial steel building details.
I have both 2x ceiling joists and open web joists composed of 2x4’s. So I could attach an expansion joint to a 1 ½ “ surface in some rooms and to a 3 ½” surface in other rooms. Ceiling framed at 16” spacing and walls at 24”.
How about attaching expansion joints along ladder framing between joists? I’m using ½” gyp board on walls, 5/8” gyp on ceilings. In short, do I want to put the joint on the framing or between it? If I put the joint between framing on the ceiling, will it sag? - J.W. 12/8/2013
Reply:
John, if you can add a few building details (photos would be helpful) such as overall dimensions and type of structure that would help me research & comment more accurately.
Reader follow-up:
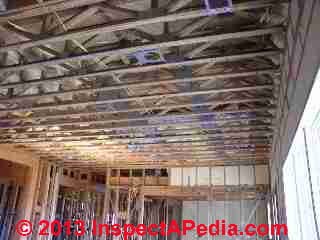
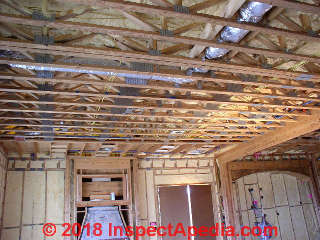
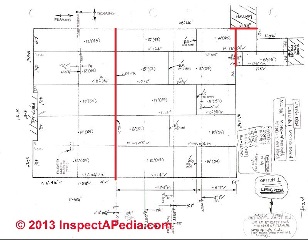
Attached are the following pictures [shown above - Ed.] 1) Living Room ceiling looking west. 2) Living Room Ceiling looking east. 3) Sketch of ceiling with dimensions and proposed drywall and Expansion Joint layout - shown immediately above. [Click to enlarge this or any image and to see more detail]
The proposed expansion joint is 11’-10 ¼” from the east end (centered on a 2x4 chord of an open web truss). Note that ladder framing is installed on the East end of the room where framing changes direction. Drywall seams will cross the ladders.
The building is wood framed. Some ceiling/floor joists are open web trusses. Some are 2x’s. All spaced at 16” O.C. I have a different location that I had planned on putting the EJ on a series of ladder framing. Will that work OK? Does it matter how close to the EJ the drywall attachment screws are? e.g. is it ok to screw right up close to the EJ, or should you back off a few inches for the first screw? J.W.
Reply:
If I understand your drawing correctly, there is indeed a ceiling dimension of continuous drywall close to or even longer than 30 ft. in your layout - you have marked the long dimension on your sketch as 28' 2 1/4" (which would not require a control joint per the 30-foot rule).
OPINION: I'm not an expert, but I have marked on your illustration where from studying the manufacturer's recommendations I would put the expansion joints as follows:
- If you intend to put a full-width expansion joint in this ceiling, you'd place the first one is just where you show it - a red line in our annotated version of your sketch. By the 30-foot rule, this expansion joint is "optional" as you show a total rectangle length of 28' 2 1/4".
- In any event, you might want a second drywall movement control joint where the large rectangle of your living room ceiling abuts the extension marked "hallway" and the second extension formed by what looks like a hallway to a "Stored Stair Ceiling" area (the second, shorter red line). "L" type extensions off of rectangular ceilings are discussed in the literature as a very common gypsum board cracking point.
Product Sources for drywall control joint materials as well as installation specifications are given above
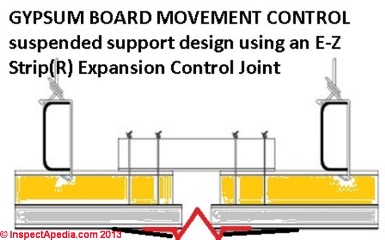
What you want is a product like the E-Z strip expansion joint (Phillips, U.S.) or a similar product from any of the suppliers listed in the article above. National Gypsum's sketch shows it is installed mid-span between joists or studs and is secured to a backer.
Sketch at left adapted from E-Z Strip® drywall expansion joint control strip product literature shows drywall in gray, supported ceiling in yellow, and C-type metal studs or joists suspended on either side of the expansion joint. [Click to enlarge].
Note that the expansion joint (properly a movement control joint for plasterboard) is not placed over a stud, rafter or joist but rather between framing members spaced typically about 1/4" to 1" apart depending on the drywall movement control joint product installation instructions.
Phillips and the other product manufacturers whose specifications I reviewed all require framing behind the drywall movement control strip:
Framing: The framing behind the expansion control joint should not be continuous. In partitions, place two studs spaced approximately 3/8 ” to 1/2 ” apart, where the joint occurs. This allows each leg of the joint to be attached over separate studs.
You asked how sagging would be prevented if the expansion bead is in between two ceiling joists - the framing spacing requirements of the product installation specs I can find all say there are no unsupported control joints.
I'm not sure that all of drywall expansion joint control strip manufacturers specify that it must be attached over a pair of spaced studs or joists; there may be floating products that simply adhere to the drywall surface, but none of the expansion bead or expansion control joint drywall products I reviewed made that claim.
Reader follow-up:
Thanks Daniel for all the great info and references. However, I’m still having trouble understanding why control joints are installed as some of the literature shows. I’m referring to control joints in this text as EJ (expansion joint).
My understanding of the EJ installation is that the EJ itself should be tied only to the drywall (typically with staples), and not tied to the underlying support (whether that be joists, or added framing at close spacing). See Philips and Trim-Tex for example.
But, I’m trying to understand why it would be bad to have the joint directly on top of a framing member for my case.
The only reasons I can come up with are:
1) A “V” groove type joint might have a “V” deeper than the drywall thickness. But this is not the case for the ones I looked at.
2) Attachment of abutting drywall ends to the 1 ½”edges of 2x joists or studs along the parallel direction is not good in any case (screws too close to edge, etc). But, in my case, I’m attaching to a 2x4 on its 3 ½” side (the bottom chord of the truss). So, I have plenty of room to screw the drywall to the chord.
3) A sliding-type EJ (male/female) could possibly be impeded from movement if placed directly on a piece of framing. Note that Philips says this type of joint that they sell is mostly for plaster work anyway. 4) Maybe the EJ details are intended for a different type of building construction than mine.
In my case, the reasoning for adding close-spaced additional framing to meet EJ details eludes me. The manufacturer assumes (in some cases requires/recommends) that “the framing behind the expansion control joint should not be continuous”.
Even if you put in extra lumber between my wall studs or between ceiling joists to meet the EJ installation recommendations, it’s still just one big wall or ceiling with the individual components all tied together. My wall studs are all tied together by top and bottom plates.
My ceiling joists are tied together at 2 ends (at the walls), and also tied together intermittently throughout with 2x6 purlins. So, adding another piece of lumber is not going to make this a two piece system, ie. the EJ would not straddle two independently expanding masses.
The only way I can see an EJ helping my ceiling is to put one along the east and/or west ends (between wall and ceiling—along the parallel framing sides).
I understand that drywall is really tied down with screws across the whole big surface of a room or ceiling as you mentioned, which gets us into the discussion of constrained vs unconstrained movement.
The drywall is tied down to the framing at every joist, every 16”. So the drywall can’t slide to an EJ that’s placed mid-room anyway.
Any differential expansion between drywall and framing is restrained between each 16” joist, so it can’t be a cumulative differential expansion.
Note that some folks successfully repair cracks in existing drywall by grinding out a space/groove in the cracked joint and installing a V expansion joint. Others, as you mentioned, just leave a gap between the two sheets and cover it with a piece of trim (attached to one side only). In both cases, the joint is on framing and the drywall is attached to that framing. And, it apparently works. So, how is that any different than just putting an EJ there in the first place?
I agree that temperature and humidity should be controlled, but real-world folks open their windows during the shoulder seasons. Builders have no control over how clients operate their buildings.
Also, temperature and humidity are difficult to control during the building phase.
So, I took a poll.
Supplier engineering/tech service guys said:
1) #1 thinks in-between framing is better, but either way is OK.
2) #2 does not t think the extra framing is necessary either, but is still researching it.
3) #3 does not know and is still researching it.
My current drywall sub said:
1) Put the EJ on the framing in the living room (i.e. on the bottom of the truss chord).
2) Put the EJ on ladder framing in other rooms that have 2x ceiling joists
3) Why? “always did it that way”.
One drywall expert:
1) He furs out his ceilings with 1x4’s. So he just easily puts in an extra 1x4 to meet the typical EJ detail.
2) OK, so what if he used a 1x6 instead of 2- 1x4’s and put the EJ centered on the 1x6? How would the EJ know the difference? How would the system react any differently?
So, in a nutshell, I’m suggesting that in my case:
There appears to be no cumulative differential expansion between drywall and framing.
The ceiling and attached drywall moves as a unit. Any EJ usage should be provided at the wall/ceiling junction; not mid span.
please accept my apologies if this sounds argumentative. That’s not my intent. I appreciate all that you folks do in educating us all. I’m just trying to educate myself and do it right the first time.
I am seeking to understand why it should be done a certain way. Occasionally in the building profession, the crafts are adrift in myth, misunderstanding, and misinformation (e.g. did you know that hot water freezes faster than cold water?....hmmm…really?).
A common response to questioning a sub’s method is “that’s what we always do” (but with no understanding of why, or if there is a better way, or does it apply in all cases). Yes, I know you can’t argue with success. But my experience is that a claimed success sometimes just means that the sub never found out that there was a problem a year or more down the road.
Reply:
I genuinely appreciate the discussion, J. - none of us has a corner on all knowledge and the more polite discussion we have the better off we might be.
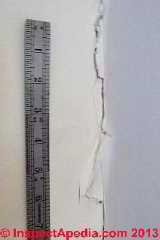
My own view about using these expansion joint (EJ) products came from reading the best industry/expert sources I could find, not from my personal experience, except for some experience with long runs of drywall that did indeed crack, as I've illustrated in the EJ article DRYWALL CONTROL JOINTS at InspectApedia. The citations of my original sources are at the end of the article.
I've learned a lot from fellows with a lot of field experience, but for matters like the EJ topic it is important to read what the manufacturers have to say. These are the people who have a lot at stake in the success of their product.
I realized that the manufacturer is not always right - for example when covering up a failed product such as the FPE circuit breaker and panel, but still they, along with industry and technical associations are the sources with which to begin.
Arm-Waving Opinions by Smart People
OPINION: Too often our fellow construction and trades people have vigorously strong opinions but have never even read the instructions on the box. I call this the "IBM'er Problem" (as I was among them for a long time and have license to kid).
You have someone smart who says to herself "Geez, I can figure this out" and reasons out what appears to be a coherent argument. But perhaps by limited experience or lack of exposure to literature on the topic, she doesn't know that there are things she doesn't know. An IBM friend built a deck. He knew he was smart and figured he could figure out how to build a deck.
He looked up joist spans and railing heights and cut and assembled his deck - it was cut as if by razor blades, every joint and board was perfect.
And beautiful. But he never read nor even thought about reading about structural connectors and fasteners. It just didn't occur to him. The whole deck was constructed with interior-use drywall screws.
After a couple of years in the Northeast the rusted screws broke and the deck collapsed.
Opinions based on "I've Always Done It That Way"
OPINION: one can but be exhausted as well by fellows who argue "I've always done it that way".
That's at least as weird as my IBM buddy. Maybe you've always done it wrong ? How many of your jobs have you gone back to five or ten years later to see what happened to your work?
Consulting on window rot on a log home I saw that all of the windows were installed improperly - according to the log manufacturer's spec.
The builder told me he'd been building log homes for nine years and never had a problem. I asked which was his first log house.
"Mine" he said. It was built nine years before. We drove over to his house. I walked around to the rear wall, in a shaded spot, reached out and grabbed a window sill and ripped the whole thing off of the house with one hand. It was completely rotted. The builder had not happened to ever look back at the trail behind.
How & Why Expansion Control Joints in Drywall Work
It appears from my research that the reasoning behind using an expansion joint centered between spaced framing with the vee-joint between them is something like this: The space between the two framing members forms a completely free gap.
The Vee-joint material is connected to drywall edges on either side of the gap, and the vee projects into the gap.
As the drywall expands or contracts, the bottom of the vee flexes and stretches or compresses the flexible filler in the vee, transferring the force of expansion or contraction to movement in the vee and its compressible/stretchable filler without tearing or disturbing the edges of the drywall itself - that is, this expansion joint (EJ) design allows for movement in the drywall without cracking a taped seam or joint - the EJ is flexing as needed, absorbing the stresses.
Splitting Up Drywall Movement across a Control Joint or Expansion Joint
If on the other hand we put the same vee-joint between two abutting drywall edges that meet over a single framing member, that means that both abutting drywall edges will be fastened to the same solid member.
The effect is having no expansion joint (EJ) at all. Consider the distribution of horizontal movement forces in expanding or contracting drywall in this theoretical example.
Drywall expansion / contraction forces are distributed 50:50 across the open control joint space
If we have a 60-foot ceiling split into two 30-foot long drywall ceiling segments that abut at an expansion joint built as the industry prescribes, each segment ends at an independent framing member spaced by a gap from its neighbor, the gap being closed by the flexible Vee control joint. The total movement force of the 60 feet of ceiling is split 50:50 between the two segments.
Each drywall segment boundary ends on a framing member that can be pushed or pulled by expansion or contraction forces without transmitting those forces to its neighbor.
The amount of movement force at the segment ends is absorbed between them by the Vee control joint.
Drywall expansion / contraction forces are combined 100% on a single framing member when there is no control joint framing space
But if instead we nail or screw the abutting ends of the two 30-foot segments of ceiling into the same individual framing member then the force is no longer split 50:50 into two independently moving framing members
. Instead all of the 60-foot length force is concentrated on a single framing member.
When the Vee control joint between the drywall edges and both drywall edges are all secured to the same individual framing member, in this case a ceiling joist, then the combined force is far more likely to cause ridging or tearing forces that either exceed what the vee joint can absorb, or that causes ridging or tearing where the edge fasteners of the two adjoining drywall segments are secured to the joist.
Why?
Because the joist cannot move laterally. The forces from the two drywall segments are pushing towards one another on the same joist.
Drywall expansion / contraction forces when there is no control joint at all
If we have no EJ at all, the stresses that would have moved the edge of one abutting drywall segment say 1/8" and that would have moved its abutting segment of drywall another 1/8" combine to squash 1/4" of force or movement if expanding, or to pull 1/4" of tearing movement if the drywall is shrinking. This will certainly open a taped joint.
If we have an EJ but put it between the abutting drywall segments but over a single solid wood member, because each drywall segment is nailed into the same member, the EJ is not free to absorb the resulting forces of compression or tension (expanding drywall or shrinking drywall). The edges of the EJ will tend to pop or tear over the surface of the drywall just as the taped joint would have above.
In sum, for long drywall runs over 30ft (which I suppose is not a precise number as building, materials, and site conditions vary) the pros recommend an EJ framed as described, free floating.
Why do some drywall hangers get away with improper control joints or no control joints at all?
OPINION: Why might some fellows have put up a 40 ft. ceiling or wall and never seen it crack and thus think EJs aren't needed? Lots of reasons. Not every building is identical in humidity range, temperature range, framing materials, fasteners, and other variables. The fact that drywall can tear or ridge or pop nails does not mean that in every case it will do so.
Also the extent to which movement in drywall is constrained by its fasteners may vary among installations, fasteners, fastener intervals, and other installation details such as differences in lateral flexing of framing members made of different materials: wood studs and joists may resist horizontal movement differently from metal studs and joists and those different from wood I-Trusses or web trusses.
So I guess we could say you might get away with no EJs at all, or you might get away with an EJ that is not installed according to the best practices and it might help - a little - to avoid ridging or cracking.
But if we want the best chance of no tears, ridges, or cracks, for larger drywall runs it makes sense to follow what the industry and manufacturers say.
...
Reader Comments, Questions & Answers About The Article Above
Below you will find questions and answers previously posted on this page at its page bottom reader comment box.
Reader Q&A - also see RECOMMENDED ARTICLES & FAQs
On 2019-11-22 - by (mod) -
Josh
Thank you for asking the question is it gives us a chance to clarify. The general guidelines for drywall control joibts, as we also give in the article above,
are:
Where larger areas are involved (30 feet or about 10 meters in one or more directions), or where "T", "U", or "I" intersections of drywall-covered ceilings or floors meet,
So by that guideline a 40-foot length of drywall should have won control joint. You wouldn't necessarily be smart to put it at the end of 30 feet to isolate the last 10 ft. Better design would be to put it near the middle over an appropriate joint.
As with many construction guidelines if the bad thing that we are worried about happened 100% of the time then people would be more rigorous about these standards. The fact is that the temperature and humidity and construction details will of course vary from one site to another. What that means is that you may have a problem with unsightly cracking in drywall at longer or shorter intervals and that is a good argument for putting in the control joint
On 2019-11-22 by Josh
It's been a while but i thought I remembered it stating that control joints were to be 30' OC in any wall greater than 40 or 50'. So if the wall was only 40 or 50' long it wouldn't require a CJ. Can you tell me if that is still the case? Did it change over the years, if so about when? Or am I just remembering wrong?
On 2018-08-10 by Mike B.
Why is drywall mud breaking off of my expansion joints
On 2017-09-27 - by (mod) - dimensions & lenghts of drywall screws or nails
John,
We do not staple drywall to studs, though I've seen some discussion of that idea among drywall hangers.
Attachment [of drywall] shall be in accordance with IRC Table R702.3.5. g. That table specifies either drywall nails or drywall screws.
The length of the drywall screw or nail required depends on the thickness of the drywall being installed.
For example, for 1/2" drywall, use 13 gage, 1 3/8ths inch long, 19/64" head; 0.098" diameter, 1 1/4" long, annular-ringed; 5d cooler nail, 0.086" diameter, 15/8" long, 15/64" head;
or gypsum board
nail, 0.086" diameter, 1 5/8" long, 9/32" head.
Concerns with using staples to hand drywall include the ability of the staple head to provide enough surface area to carry the weight of the drywall, especially on a ceiling.
However some drywall installers use staples to position the drywall initially, speeding its placement, followed by installation of drywall screws.
If you are asking about using staples for roof shingles:
Using any roof shingle fastener, nail or staple, into 1/2" plywood sheathing requires that the point of the staple protrude through the plywood on the inside - giving thus a full 1/2" of grip of plywood on the full-round shank of the fastener.
Staples or nails that are shorter than that risk shingle blow-off. The depth of the staple you need to use will vary depending on what you're shingling-over. For example if shingling over an existing layer of shingles you need a longer staple.
See ASPHALT SHINGLE INSTALLATION
On 2017-09-27 16:16:40.057912 by john
Can you staple o93 on an how long of staples
John74941357@att.net
On 2016-06-08 by TONY
On a commercial building lets say 13' from slab to deck. There will be an acoustical ceiling at 9'A.F.F. Does the 093 expansion joint need to go full height to the deck or can it go just 6" above the acoustical ceiling?
On 2016-03-26 - by (mod) - problems with drywall buckling or damage due to expansion
Mike:
If you are seeing problems with drywall buckling or damage due to expansion you can cut in an expansion joint by centering a thin-bladed power saw over the center of a joist. Use a carbide-tipped blade, wear safety glasses, mask, etc. Snap a chalk line or draw a straight cut line up the center of the stud (or ceiling joist).
Set the saw blade to the thickness of the drywall plus 1`/16" to be sure you're through the paper backing without cutting into the wood or metal framing.
Watch out for flying metal fragments when your carbide blade hits a drywall screw or nail: or find and remove those fasteners first.
On 2016-03-26 by Mikehaase50@gmail.com
Existing building that never had expansion joints put in the walls when built how to install new ones
...
Continue reading at DRYWALL CRACKS or select a topic from the closely-related articles below, or see the complete ARTICLE INDEX.
Or see these
Recommended Articles
- DRYWALL, FIBERBOARD, PLASTER INTERIORS - home
- ASBESTOS CEMENT CEILING & WALL PANELS
- ASBESTOS in DRYWALL
- ASBESTOS-DRYWALL REMEDIATION / REMOVAL
- ASBESTOS-SUSPECT DRYWALL ENCAPSULATE in PLACE
- BEAVERBOARD
- BESTWALL DRYWALL ASBESTOS
- CELOTEX DRYWALL ASBESTOS
- CELOTEX HISTORY & PRODUCTS
- CHINESE DRYWALL HAZARDS
- COATING TYPE CEILING & WALL SURFACES: CATALOG OF
- DOMTAR GYPROC ASBESTOS?
- DRYWALL & GYPSUM BOARD COMPOSITION & HISTORY
- DRYWALL CONTROL JOINTS
- DRYWALL CRACK CAUSES & CURES
- DRYWALL FINISH LEVELS
- DRYWALL TYPE IDENTIFICATION STAMPS
- DRYWALL INSTALLATION Best Practices
- DRYWALL INSTALLATION HORIZONTAL vs VERTICAL
- DRYWALL GREEN LOW TOXICITY MAGNESIUM OXIDE MgO
- DRYWALL MOLD RESISTANT
- DRYWALL MOLD TESTING
- DRYWALL NAIL POPS & DENTS
- FIBERBOARD CEILING & WALL COVERINGS
- FIBERBOARD PANEL REPAIR
- FIBERBOARD SHEATHING - home
- GYPSUM BOARD GYP ROCK SHEATHING
- GYPSUM BOARD PLASTER LATH SYSTEMS
- HARDBOARD BATHROOM & KITCHEN PANELS
- HOMASOTE HISTORY & PRODUCTS
- IGNIFUGE GYPSUM BOARD ASBESTOS?
- MASONITE & HARDBOARD CEILING & WALL COVERINGS
- METAL LATH for PLASTER
- NATIONAL GYPSUM DRYWALL ASBESTOS?
- NU-WOOD PANELS
- PAPERBOARD PRODUCTS CONTENTS
- PANELING, WOOD & WAINSCOTING
- PICTURE HANGING NAILS
- PLASTER TYPES & METHODS in BUILDINGS
- PLASTER INGREDIENTS, MIX, PROPERTIES
- PLASTERBOARD / DRYWALL EXPANSION COEFFICIENTS
- SACKETT BOARD
- SHEATHING, GYPSUM BOARD
- STAIN DIAGNOSIS on BUILDING INTERIORS
- TRUSS UPLIFT, ROOF
- UPSON BOARD
- WALL FINISHES INTERIOR
- WOOD LATH for PLASTER or STUCCO
Suggested citation for this web page
DRYWALL CONTROL JOINTS at InspectApedia.com - online encyclopedia of building & environmental inspection, testing, diagnosis, repair, & problem prevention advice.
Or see this
INDEX to RELATED ARTICLES: ARTICLE INDEX to BUILDING INTERIORS
Or use the SEARCH BOX found below to Ask a Question or Search InspectApedia
Ask a Question or Search InspectApedia
Try the search box just below, or if you prefer, post a question or comment in the Comments box below and we will respond promptly.
Search the InspectApedia website
Note: appearance of your Comment below may be delayed: if your comment contains an image, photograph, web link, or text that looks to the software as if it might be a web link, your posting will appear after it has been approved by a moderator. Apologies for the delay.
Only one image can be added per comment but you can post as many comments, and therefore images, as you like.
You will not receive a notification when a response to your question has been posted.
Please bookmark this page to make it easy for you to check back for our response.
Our Comment Box is provided by Countable Web Productions countable.ca
Citations & References
In addition to any citations in the article above, a full list is available on request.
- Boral Plasterboard (Australia), "Boral Plasterboard Installation Manual", August 2007, PB103, Tel: 1800-811 222 (in Australia), Email: tecassist@boral.com.au, Website: www.boral.com.au, ACT: 7 Barrier St, Fyshwick 2609, Tel: 02 6280-4243. Other Boral Plasterboard offices are in New South Wales, Northern Territory, Queensland, South Australia, Tasmania, Victoria, Western Australia, and the company has an export department.
- British Gypsum Co., "Gyproc Control Joint, Products Plasterboard Accessories", Website: www.british-gypsum.com.
- George M. Kutcher, Jr., "Don't Overlook Control Joints in Drywall Construction", National Gypsum Company, Tel: 1-800-NATIONAL, www.nationalgypsum.com, retrieved 12/10/13, original source: http://www.nationalgypsum.com/resources/tech-talk-controljoint.htm
- National Gypsum Company, "Gypsum Board Systems", 12th Ed., (2000), (Gold Bond® brand gypsumboard products), website: http://www.nationalgypsum.com
- George M. Kutcher, Jr., "Don't Overlook Control Joints in Drywall Construction", National Gypsum Company, retrieved 12/10/2013, original source: http://www.nationalgypsum.com/resources /tech-talk-controljoint.htm
- "Design Essentials for Controlling Movement Induced Stresses in Building Materials", Winstone Wallboards, Ltd., Winstone Gypsum, Dec. 2009, Winstone Wallboards Ltd
219 Opawa Road
PO Box 1983
Christchurch
New Zealand
Phone: +64-3-332-3159, and Winstone Wallboards Ltd
37 Felix St
PO Box 12-256
Penrose
Auckland
New Zealand, Tel: +64-9-633-0100, Email: gypsum@gib.co.nz, Toll free: 0800 475 475.
Note: per Winstone: for large ceilings, AS/NZS 2589 specifies that all sheet end butt joints are backblocked (to reinforce the joint where such joints are not meeting over a ceiling joist). [This is a reinforcement detail for unsupported butt joints, not a wallboard movement control joint detail. The company's article does recommend that installers insert control joints at the junction of wallboard ceilings at hallways vs large open spaces - Ed. ]- Cracking and Building Movement, Dickinson & Thornton, 2006
- BRANZ Bulletin 418 July 2001 ’Providing for Thermal and Moisture Movement’
- Cracking and Building Movement, Dickinson & Thornton, 2006
- NZS 3602 Timber & Wood Based Products for use in Building
- Wood Processing Newsletter SCION July 2003 Simpson & Turner
- ‘A Field Study of moisture performance of roofs etc.’ Technical Report 127. 1994 Cunningham et al
- ‘Plasterboard Peaking and Cracking under Timber R of Trusses’ 1999 - Prof H Robert Milner, BE, MEngSc, PhD, FIEAust, AIWSc and CY Adam, BE, MEngSC Monash Engineering Timber Centre, Monash University, Australia
- ‘Walls & Ceilings’ Magazine ‘Drywall Cracking on a Global Scale’ By Greg Campbell March 9, 2001 ix AS/NZS2589 2007 – Gypsum Linings - Application & Finishing
- "Gypsum Board Typical Mechanical And Physical Properties (GA-235-10)", (2010) Gypsum Association, 6525 Belcrest Road, Suite 480, Hyattsville MD 20782, retrieved 12/11/2013, original source: http://www.gypsum.org/wp/wp-content/uploads/2011/11/GA-235-10.pdf
- [1] Eric Galow, Galow Homes, Lagrangeville, NY. Mr. Galow can be reached by email: ericgalow@gmail.com or by telephone: 914-474-6613. Mr. Galow specializes in residential construction including both new homes and repairs, renovations, and additions.
- [2] "Finishing Drywall Systems", U.S. Gypsum (USG) Corporation [copy on file as USG_Finishing_Drywall_Systems_Ch5.pdf] 2009
- [3] "Sheetrock® All Purpose Joint Compound - Select for professional drywall finishing", Submittal Sheet 09250
- [4] "Quality Drywall Finishing in All Kinds of Weather", USG Folder J-75 (out of print), U.S. Gypsum corporation
- [5] Gypsum Construction Guide, National Gypsum Corporation
- [6] Gypsum Construction Handbook [purchase at Amazon.com] H17, Technical Folder SA920 and PM2, PM3 and PM4, United States Gypsum Company, 125 South Franklin ST., PO Box 806278, Chicago, IL 60680-4124,
- [7] Lath & Plaster Systems [copy on file as /interiors/LathPlaster_Nat_Gypsum.pdf ] - , 092300/NGC, National Gypsum Lath and Plaster Systems, National Gypsum Corporation, 800-628-4662 describing National Gypsum's Kal-Kore brand plaster base
- [8] Metal Lath Specifications, Specification for metal lath and accessories, Lath and Plaster [copy on file as/interiors/Amico_lath-inside.pdf ] - from Amico, a lath and plaster accessory producer.
- [9] Plastering, PM 5, Product & Systems Technology, US Gypsum, May 1998, web search 10.5.2010, original source: http://www.usg.com/rc/technical-articles/plaster/
[copy on file as/interiors/Plastering_USG.pdf ] -
plastering-technical-guide-veneer-plaster-joint-reinforcement-systems-en-PM5.pdf
United States Gypsum Company, 125 South Franklin ST., PO Box 806278, Chicago, IL 60680-4124,
Paraphrasing from this document: USG uses the term shadowing in this document in describing the visual effect over gypsum board joints caused by the lower moisture absorption rate (take-up) and lower capacity than gypsum base face paper. Shadowing at joints occurs where veneer plaster is applied over tape joints, requiring a second coat to completely hide the tape, providing a visually uniform surface. USG Advises: "This [second] cover coat must be allowed to harden and dry before plaster application is started. - [10] Plastering Skills, F. Van Den Branden, Thomas L. Hartsell, Amer Technical Pub (July 1, 1985), ISBN-10: 0826906575, ISBN-13: 978-0826906571 [purchase at Amazon.com]
- [11]
Drywall Finishing Council www.dwfc.org, Members: CertainTeed Gypsum • Freeman Products • Georgia Pacific Gypsum LLC • LaFarge North America • Magnum Products •
National Gypsum Company • Panel Rey SA • Rapid Set Cement • Saint-Gobain, Inc • Sherwin-Williams Company • Solid
Products, Inc. • Southern Wall Products • Trim-Tex, Inc. • United States Gypsum Company • Westpac Materials
- "Joint Compound Drying Time, the Impact of Environmental Conditions", Drywall Finishing Council, Retrieved 8/16/12, original source: http://www.dwfc.org/wp-content/files/2010_03_16_Joint_Compound_Drying.pdf [copy on file as Joint_Compound_Dry_Tmie_DWC.pdf]
- "Jobsite Conditions for Applying Interior Finishing Materials", Drywall Finishing Council, Retrieved 8/16/12, original source: http://www.dwfc.org/wp-content/files/2011_09_16_Interior_Job_Condition_Specifications.pdf [copy on file as Drywall_Finish_Conditions_DWC.pdf ]
- DWFC. Interior Job Condition Specifications For The Application of Drywall Joint Compounds,
Drywall Textures, and Paint/Coatings". Drywall Finishing Council, Incorporated. www.dwfc.org - DWFC. Recommended Specification for Preparations of Gypsum Board Surfaces Prior To Texture
Application, Drywall Finishing Council, Incorporated. www.dwfc.org - GA. GA-214, Recommended Levels of Gypsum Board Finish. Gypsum Association, 6525 Belcrest
Road - Suite 480. Hyattsville, MD 20782 www.gypsum.org - National Gypsum Company. ProForm Brand Drywall Finishing Products Construction Guide,
National Gypsum Company, 2001 Rexford Road, Charlotte, NC, 28211, www.nationalgypsum.com
- [12] The Gypsum Association
www.gypsum.org
- Gypsum Construction Handbook H-17 [purchase at Amazon.com] . USG Corporation, 550 West Adams Street,
Chicago, IL, 60661, www.usg.com
- Gypsum Construction Handbook H-17 [purchase at Amazon.com] . USG Corporation, 550 West Adams Street,
- [13] Painting and Decorating Contractors of America www.pdca.org Smartwood/Rainforest Alliance www.smartwood.org
- [14] "Joint Compounds", United States Gypsum Company, 125 South Franklin ST., PO Box 806278, Chicago, IL 60680-4124, retrieved 8/16/12, original source: http://www.usg.com/interiors/joint-compounds.html [copy on file as Mud_Types_USG.pdf]
- Gypsum Construction Guide, National Gypsum Corporation
- Gypsum Construction Handbook [purchase at Amazon.com] H17, Technical Folder SA920 and PM2, PM3 and PM4, United States Gypsum Company, 125 South Franklin ST., PO Box 806278, Chicago, IL 60680-4124,
- Lath & Plaster Systems, 092300/NGC, National Gypsum Lath and Plaster Systems, National Gypsum Corporation, 800-628-4662 describing National Gypsum's Kal-Kore brand plaster base
- Metal Lath Specifications, Specification for metal lath and accessories, Lath and Plaster from Amico, a lath and plaster accessory producer.
- Plastering Skills, F. Van Den Branden, Thomas L. Hartsell, Amer Technical Pub (July 1, 1985), ISBN-10: 0826906575, ISBN-13: 978-0826906571 [purchase at Amazon.com]
- Plastering, PM 5, Product & Systems Technology, US Gypsum, May 1998, web search 10.5.2010, original source: http://www.usg.com/rc/technical-articles/plaster/
plastering-technical-guide-veneer-plaster-joint-reinforcement-systems-en-PM5.pdf
United States Gypsum Company, 125 South Franklin ST., PO Box 806278, Chicago, IL 60680-4124,
Paraphrasing from this document: USG uses the term shadowing in this document in describing the visual effect over gypsum board joints caused by the lower moisture absorption rate (take-up) and lower capacity than gypsum base face paper. Shadowing at joints occurs where veneer plaster is applied over tape joints, requiring a second coat to completely hide the tape, providing a visually uniform surface. USG Advises: "This [second] cover coat must be allowed to harden and dry before plaster application is started. - Gypsum Construction Handbook [purchase at Amazon.com] H17, Technical Folder SA920 and PM2, PM3 and PM4, United States Gypsum Company, 125 South Franklin ST., PO Box 806278, Chicago, IL 60680-4124,
- In addition to citations & references found in this article, see the research citations given at the end of the related articles found at our suggested
CONTINUE READING or RECOMMENDED ARTICLES.
- Carson, Dunlop & Associates Ltd., 120 Carlton Street Suite 407, Toronto ON M5A 4K2. Tel: (416) 964-9415 1-800-268-7070 Email: info@carsondunlop.com. Alan Carson is a past president of ASHI, the American Society of Home Inspectors.
Thanks to Alan Carson and Bob Dunlop, for permission for InspectAPedia to use text excerpts from The HOME REFERENCE BOOK - the Encyclopedia of Homes and to use illustrations from The ILLUSTRATED HOME .
Carson Dunlop Associates provides extensive home inspection education and report writing material. In gratitude we provide links to tsome Carson Dunlop Associates products and services.


