
InspectAPedia® FREE Encyclopedia of Building & Environmental Construction, Diagnosis, Maintenance & Repair |
Question? Just ask us! InspectAPedia
|
 Roof Drip Edge Dimensions
Profiles, metals, sizes, types, thicknesses

- POST a QUESTION or COMMENT about sizes and dimensions of roofing drip edge
Roof drip edge flashing profiles, types, metals, dimensions & sizes. We also discuss differences in effectiveness of roof drip edge of different profiles or designs.
This article series discusses all of the topics and common questions about roof drip edge flashing. See Article Series Contents list below.
InspectAPedia tolerates no conflicts of interest. We have no relationship with advertisers, products, or services discussed at this website.
- Daniel Friedman, Publisher/Editor/Author - See WHO ARE WE?
Roof Drip Edge Flashing at Roof Eaves & Gable Ends
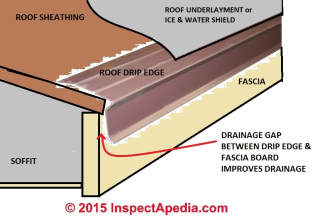
 Roof drip edge flashing serves multiple functions on a building, the foremost of which is to assist water in leaving the roof edge with minimum damage to other building components by directing the water off of the roof and into the gutter.
[Click to enlarge any image]
Without this detail water leaving the roof edge wants to run down building fascias, soffits, and walls, sometimes even entering and damaging the structure.
The drip edge also gives us a nice straight edge with which to align roof shingles, slates or other roofing material.
Drip edge varies in dimensions but typically the flange that nails to the roof surface is about 2.5" wide and the vertical edge that directs roof runoff down and away is about 1.5" in depth.
Lengths of drip vary but typically it's sold in ten foot lengths (120").
Drip edge flashing is sold in various metals including
- Aluminum drip edge
- Copper drip edge flashing
- Steel drip edge flashing - galvanized or galvalume
- PVC and possibly in other vinyl or plastic forms
The sketch above illustrates the end-profile of roof drip edge flashing and shows its placement on the roof. Usually you won't see much of drip edge as it's under the roof shingles, under the underlayment, and behind the roof gutter.
Article Series Contents
- ROOF DRIP EDGE DIMENSIONS & SIZES - you are on this page
- ROOF DRIP EDGE COLOR CHOICES
- ROOF DRIP EDGE PLACEMENT / LOCATION
- ROOF DRIP EDGE INSTALLATION on NEW or RE-ROOF JOBS
- ROOF DRIP EDGE INSTALLATION INSTRUCTIONS & CODES
- ROOF DRIP EDGE INSTALLATION MISTAKES
- ROOF DRIP EDGE ALTERNATIVE: FASCIA WRAP?
Roof Drip Edge Dimensions / Sizes
 Currently (2023) when we combine profiles, metals, dimensions, and thicknesses as well as special purpose drip edge shapes, there are over one thousand possible drip edge choices for residential and commercial buildings.
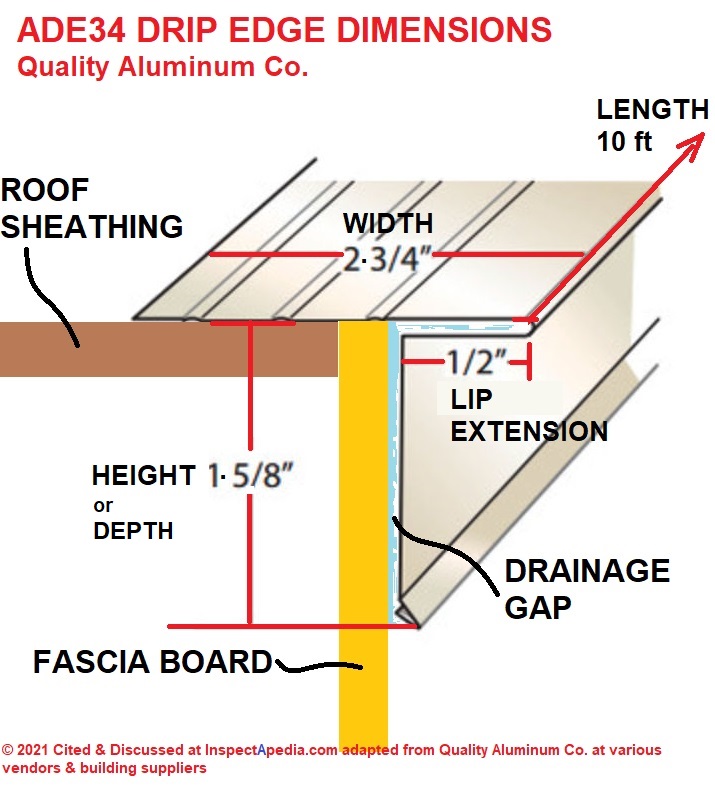
For a less overwhelming view of drip edge, our sketch shows the most-common or "standard" dimensions of roof drip edge used in North America:
- Drip edge length: 10 ft.
- Drip edge width: 2 3/4", sold in varying widths up to at least 6" to cover gaps or to assure that the nailing surface reaches sufficiently onto the roof deck.
- Drip edge height: 1 5/8", or "depth" also sold in a very wide range of dimensions up to several inches.
- Drip edge lip extension: 1/2", also referred to as "drip leg", availble in sizes from 1" to 2"
- Recommended drainage gap: 1/4" (approx) spaced off of the fascia board
- Minimum extension of drip edge up the roof decking: 2" [IRC R905]
- Minimum drip edge end laps: 4", offset by at least 6 ft.
- Drip edge fastening interval: 12"
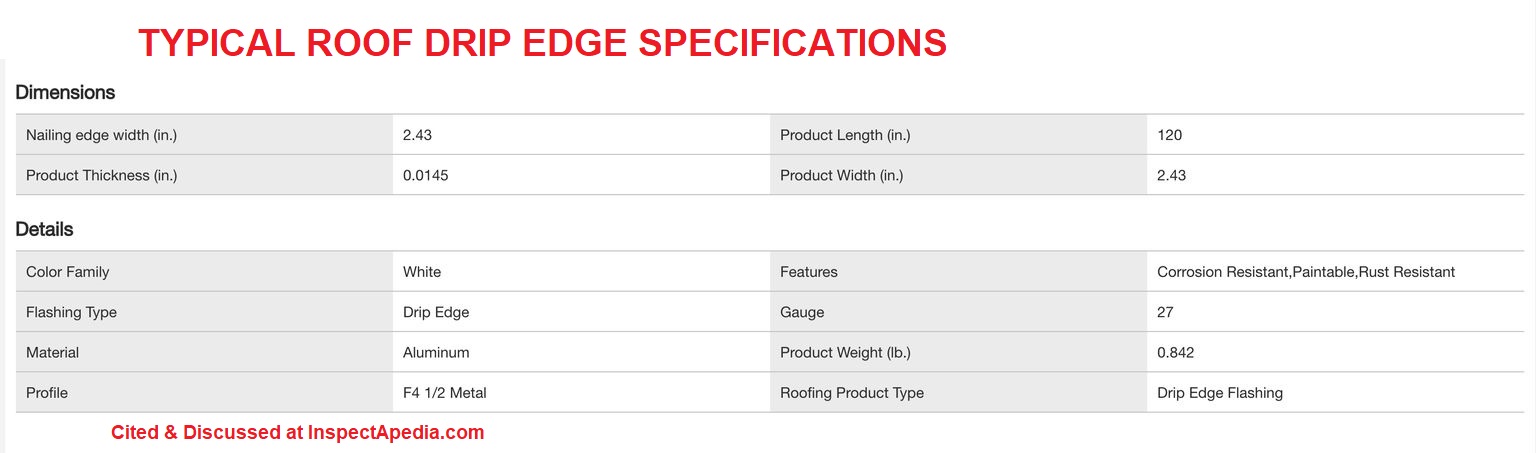
- Typical drip edge metal thickness: Steel: 0.010" & 0.013", Aluminum: 0.012", 0.019" & 0.024"
But roof drip edge is available in nearly fifty different profiles, sizes, and shapes to meet the requirements of different roof types, slopes, and other roofing needs.
[Click to enlarge any image]
Roof Drip Edge Profile Choices & Effectiveness
The three most general description of roof drip edge profiles is given by Iko, cited below.
Iko describes the following most-common drip edge types:

- Type C "L" - Profile (shown above, adapted from Berger, cited below)
This is the classic “L”-shaped drip edge, sometimes called “L style.” This drip edge is bent to a 90-degree angle and has a lower flange at the bottom.
Watch out: in our OPINION this Type "C" or "L-Profile" drip edge, though permitted, is rarely as effective in directing water off of the fascia of a sloped-roof building as is the type "D" or "T-Profile" drip edge cited next.
Type C profile roof drip edge works well on low slope and flat roofs, particularly where an underlying roof membrane such as EPDM extends over the roof edge and into the roof gutters, as we illustrate for an EPDM roof just below.

While there are a great many other roof drip edge dimensions and profile details, you can get a general idea of the drip edge profile choices from the six Type C roof drip edge profile examples shown just below. are excerpted from Berger Building Products' catalog cited here.

Below: A better roof drip edge for sloped roofs.

- Type D "T" - Profile (shown above, adapted from Iko, cited below)
This profile of drip edge is shaped like a “T,” with a lower flange at the bottom. Sometimes it is called drip metal, “D-metal” or “T style.”
The Asphalt Roofing Manufacturers Association (ARMA) prefers this "T" Profile drip edge profile to Type C because it keeps the water further away from the fascia.
However, Type C is still acceptable according to most building codes.
Note: research we read on the most-effective drip edge profiles names the presence of a bent over or doubled "hem" at the bottom edge of drip edge as among the most-effective design details that encourage water to drip off of the edge of the flashing rather than running down the building fascia or walls. - Ed. - Type F "Extended Leading Edge Profile"
This is an extended drip edge that has a longer leading edge, which is useful when installing new drip edges over existing shingles or on rake edges. This profile is frequently called “F style” or “gutter apron.” - IKO 2023, cited in detail below.
Watch out: in our opinion, any drip edge that will be installed so that its lower edge hangs over a vertical board or siding should include the bottom lip bent outwards as is shown in all of the examples above.
Otherwise the drip edge will send water running down that vertical space, shortening the life of the building trim or flashing and risking leaks into the structure.
Specialty roof drip edge profiles also include models that provide intake venting for roofs that have no overhang or soffit to give that service. Those details are
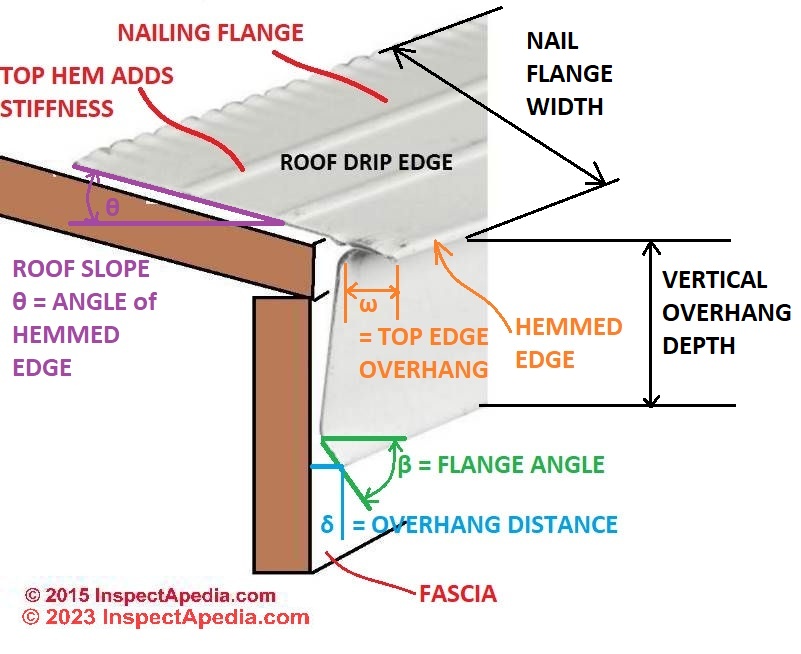
Six Factors in Successful Sloped Roof Drip Edge Profile
Referring to the sketch shown just above on this page you can see what are in our opinion some key factors that determine the ability of a drip edge flashing's profile to provide successful direction of water off of a roof edge:
- Top nailing flange
of sufficient width to reach nailable roof decking, labeled in red in our drawing.
If the nailing flange is too narrow and if roof decking does not extend fully over the upper edge of the fascia board, it may be impossible to nail the drip edge to the roof deck reliably, or impossible to provide adequate fascia gap (item 6 below) - Hems or ridges parallel to the roof edge
impart drip edge stiffness, helping keep it flat on the roof deck, also labeled in red in our drawing - A hemmed edge that projects out
some distance ω past the vertical face of the drip edge, the first point at which water is directed to drip off of the roof rather than running down the fascia - orange in our illustration - A down sloped angle θ for the nailing flange and upper hemmed edge of the drip edge.
The slope angle is normally equal to the roof slope itself that imparts its slope to the top edge overhang with its hemmed edge. This slope helps direct water to drip off of the hemmed edge, illustrated in purple in our sketch - An angled bent-out flange at the bottom
of the "vertical" portion of the drip edge, at sufficient flange angle β, green in our sketch. - Providing a gap or space between the fascia and the near-vertical portion of the drip edge -
the overhang distance δ in blue in our sketch
Need Wider Roof Drip Edge For Some Installations?
On 2021-08-26 by inspectapedia.com.moderator - standard roof drip edge dimensions - need to be increased for some installations
@steve,
Thank you for those helpful added details on increasing the roof drip edge width (per my sketch shown here) when the roof edge is extended by a wood strip.
Indeed if the drip edge isn't wide enough and if there are gaps at the very edge of the roof sheathing where it meets the fascia, a 2 3/4" wide drip edge may not give enough metal to nail up into the roof sheathing.
For other readers, Steve's "Length" [see his comment below] does not refer to the 10-foot long dimension of drip edge [shown in my sketch] but rather he's referring to what I call the on-roof width or wide flange that must lie on the roof sheathing surface and extend up under the first course of shingles.
That flange provides a base for nailing the drip edge to the sheathing.
A vertical drip edge lip extends down roughly 1 5/8" and as Steve points out, should not be set tight against the fascia board or water may run behind the gutter and down the fascia, inviting leaks and rot.
I'm editing a sketch to explain these details and will add that here.
On 2021-08-26 by steve
@danjoefriedman, the length of the drip edge is determined by the construction of the fascia trim and the requirement in the code that the drip edge extend at least 2 inches up the deck
. If there is a 3/4" thick fascia board and a 3/4" x 3/4" wood drip on the fascia the minimum length would be 2" + 3/4" + 3/4" = 3-1/2" It is best to also allow for a gap between the end of the deck and the fascia board so it could add another 1/8" or 1/4" to the 3-1/2" dimension above.
On 2021-07-09 by (mod) - wider drip edge flange needed? Wider or "deeper" in which dimension? + IRC Roofing Code on Drip Edge
 @Kelvin,
Sure, thanks for asking about the necessary width of the nail flange of roof drip edge flashing.
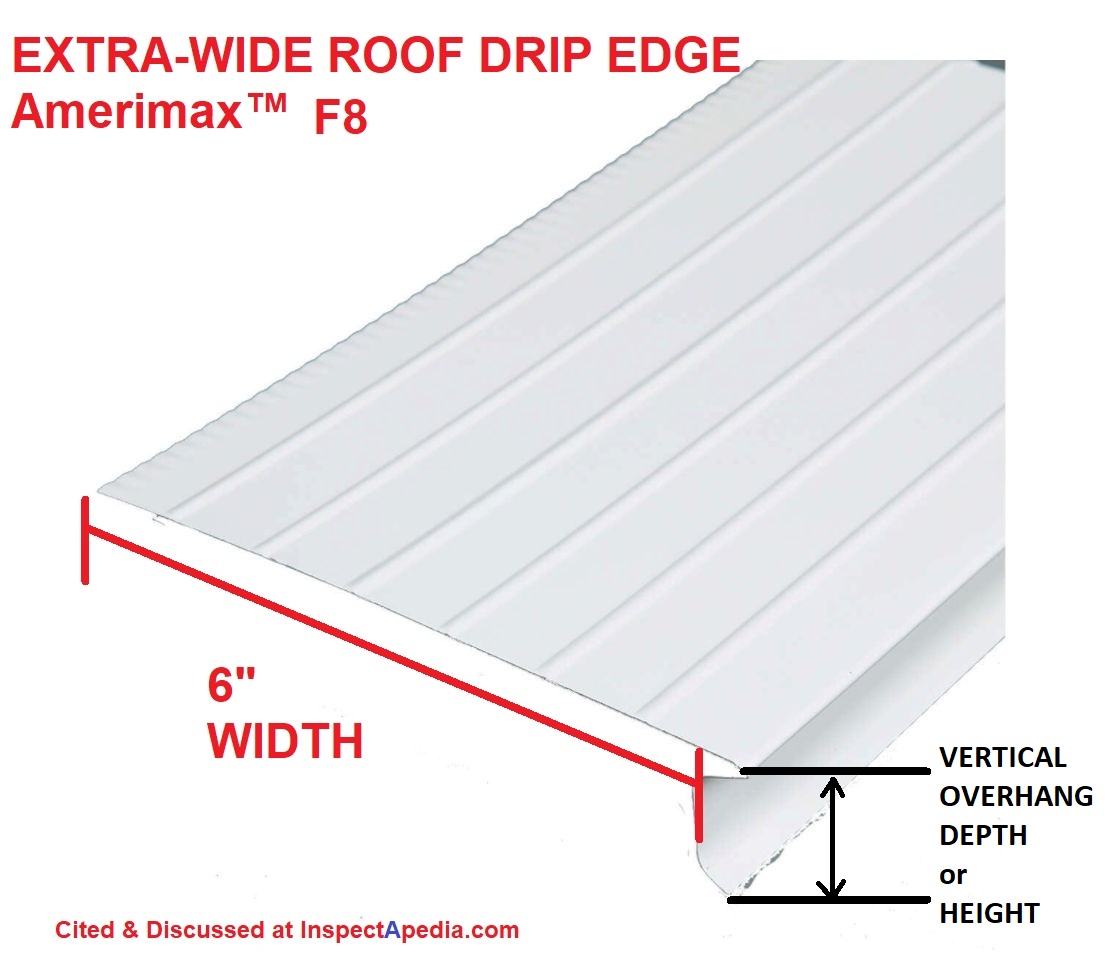
First let's be clear there are two different key dimensions:
Width of the drip edge nailing flange shown in our sketch just above (6" marked in red), and "depth" or "height" of the vertical lip on drip edge flashing, shown in black lines and text in our annotated image above from Amerimax.
Some roofers and drip edge manufacturers assert that drip edge helps prevent wind-driven rain from entering a building structure at the roof edges of eaves or gable ends.
More-accurately, strong winds striking the vertical walls of a building create up-drafts of wind-blown rain that can be pushed up under the vertical lip of drip edge where, depending on the roof eaves or gable end structure, water might enter the building soffit or wall. A longer vertical lip of drip edge, two to four inches, might reduce this leak risk.
Really? What we've read on this was principally the opinion of some writers at roofing companies. I haven't found confirming, authoritative, scholarly research and will welcome that contribution from any of our readers.
In my OPINION, a larger vertical lip might help water from entering at gaps between the roof deck and the upper edge of a fascia board on a gable end or roof eaves or soffit, but for water that wants to blow up under the lower course of shingles, an impermeable barrier under the shingles and over both the roof deck and the top of the drip edge flashing is what's needed to seal that area from roof edge leaks.
What do the codes say? Typical roofing codes require that the nailing flange extend no less than 2" up the roof deck, but as we note on the page above, that's bot always wide enough to provide a nailed connection to a roof deck that stops short of the fascia. That's a different issue, not a wind-driven rain leak concern per-se.
There are extra-wide roof drip edge products available where more on-roof nailing reach is needed, such as this 6" wide drip edge product from Amerimax.
And Union Corrugating sells a 5 3/4" wide drip edge product that has a height or in some specifications "depth of" 1 1/2".
Texas adopts the 2015 IRC International Residential Code, Here is an excerpt from the Texas Roofing Code, Chapter 9: Roof Assemblies:
R905.2.8.5 Drip Edge
A drip edge shall be provided at eaves and rake edges of shingle roofs.
Adjacent segments of drip edge shall be overlapped not less than 2 inches (51 mm).
Drip edges shall extend not less than 1/4 inch (6.4 mm) below the roof sheathing and extend up back onto the roof deck not less than 2 inches (51 mm).
Drip edges shall be mechanically fastened to the roof deck at not more than 12 inches (305 mm) o.c. with fasteners as specified in Section R905.2.5.
Underlayment shall be installed over the drip edge along eaves and under the drip edge along rake edges.
---
The 4-inch drip edge width you cite doesn't appear in the code. So the next time ... it's said that you need 4-inch drip edge ... help us both out by asking the speaker for their source.
---
There are, however, 4-inch end-lap requirements elsewhere in the roofing code, such as in the description of how asphalt shingle felt underlayment must be overlapped:
"End laps shall be 4 inches and shall be offset by 6 feet."
and for MAXIMUM ULTIMATE DESIGN WIND SPEED, Vult ≥ 140 MPH,
"Same as Maximum Ultimate Design Wind Speed, Vult < 140 mph except all laps shall be not less than 4 inches."
and other flashings do cite a 4-inch requirement:
R905.2.8.3 sidewall flashing
base flashing against a vertical sidewall shall be continuous or step flashing and shall be not less than 4 inches (102 mm) in height and 4 inches (102 mm) in width and shall direct water away from the vertical sidewall onto the roof or into the gutter.
---
and
---
R905.3.8 flashing
At the juncture of roof vertical surfaces, flashing and counterflashing shall be provided in accordance with this chapter and the manufacturer's installation instructions and, where of metal, shall be not less than 0.019 inch (0.5 mm) (no. 26 galvanized sheet gage) corrosion-resistant metal.
The valley flashing shall extend not less than 11 inches (279 mm) from the centerline each way and have a splash diverter rib not less than 1 inch (25 mm) in height at the flow line formed as part of the flashing. sections of flashing shall have an end lap of not less than 4 inches (102 mm).
---
that could be where someone heard about a 4-inch requirement;
note that all of those are discussing "end lap" - none are discussing drip edge width, for example i started with a code citation discussing overlapping roofing underlayment as various underlayment segments are placed onto the roof;
of course your local southeast Texas building code official is the final legal authority. >
On 2021-07-09 3 by Kelvin - wider drip edge needed in hurricane zones?
Hey everyone. So, I have a question. I live in South East Texas and as you know its hurricane central down here.
So its said that down here if you live in a Texas windstorm area that your drip edge needs to be 2x4 vs 2x2 for everywhere else.
Can anyone share with me code requirement that states that . I would greatly appreciate it.
Roof Drip Edge Function & Profile Effectiveness Research
- Berger Building Products ROOF DRIP EDGE TRIM CATALOG [PDF] (2010) Berger Building Products, Inc., 805 Pennsylvania Blvd., Feasterville PA 19053 USA
- See our complete list of drip edge installation instructions found
at ROOF DRIP EDGE INSTALLATION INSTRUCTIONS & CODES [Web article] - GAF EdgeMetal DRIP EDGE TYPES COMPARISON CHART [PDF] GAF Roofing, retrieved 2023/02/05, original source: https://www.gaf.com/
This chart compares GAF's models of drip edge, coping, and fascia covders in metal and PVC. - GAF EverGuard Drip Edge perimeter edge metal data sheet [PDF] GAF Roofing - retrieved 2023/02/05, original source: https://www.gaf.com/
- Hickey, Sandra. 073113-ASPHALT SHINGLES [PDF] (2014) In Division 07 - Thermal and Moisture Protection, Chapter 5 - Technical Construction and Renovation Materials, at University of New Hampshire University of New Hampshire Scholars' Repository, retrieved 2023/02/05, original source: https://core.ac.uk/download/pdf/72048431.pdf
Excerpts:
E. Rake Drip Edges: Install rake drip edge flashings over underlayment and fasten to roof deck.
F. Eave Drip Edges: Along all eves and rakes drip edges to be minimum 0.024” mill finish aluminum sheet, brake formed to provide 5” roof rack flange, and 1 1/2” fascia flange with 3/8” drip at lower edge. Furnish in 8’ or 10’ lengths. 1. Install eave drip edge flashings below underlayment and fasten to roof sheathing. - Iko, DRIP EDGE INSTALLATION [PDF] IKO Global IKO Commercial CANADA: 1-855-456-7663 USA: 1-888-456-7663 IKO has multiple locations in the U.S. and Canada. retrieved 2019/09/11 original source: https://www.iko.com/na/pro/building-professional-tools/learn-about-roofing/guide-to-drip-edges-for-shingle-roofs/
- Saneinejad, S., H. Doshi, and M. Horvat. "Test method to study the water shedding effectiveness of drip-edge of metal flashing." In Research in Building Physics and Building Engineering, pp. 411-417. CRC Press, 2020.
ABSTRACT
A study involving observations of building cladding has shown that flashing plays an important role in controlling water flow over vertical faces. A literature survey revealed that the requirements for the drip portion of the metal flashing are at best inconsistent and at worst non-existent.
The investigation of construction practices revealed that the construction of the drip portion of the metal flashing varied between projects.
The impact of such varied practices on the water shedding effectiveness of the flashing was determined by conducting an experimental study.
This paper describes the test method that was developed to study the water shedding effectiveness of metal flashing. It also discusses the variables that are considered to impact drip-edge performance. Results of the performance of different flashing configurations using the test method are presented.
Test results indicate that small variations in the geometry of the drip can have a significant impact on the water shedding characteristics of the flashing.
This test method shows potential to be used as a standard for comparing the performance of drips used in modern cladding systems. - Saneinejad, S. and Doshi, H. 2006. "Testing of metal flashing for water-shedding effectiveness" Chapter 8 in
Research in Building Physics and Building Engineering, 1st Ed. CRC Press, eBook ISBN9781003060826
ABSTRACT
A study involving observations of building cladding has shown that flashing plays an important role in controlling water flow over vertical faces. A literature survey revealed that the requirements for the drip portion of the metal flashing are at best inconsistent and at worst non-existent.
The investigation of construction practices revealed that the construction of the drip portion of the metal flashing varied between projects. The impact of such varied practices on the water shedding effectiveness of the flashing was determined by conducting an experimental study.
This paper describes the test method that was developed to study the water shedding effectiveness of metal flashing. It also discusses the variables that are considered to impact drip-edge performance. Results of the performance of different flashing configurations using the test method are presented.
Test results indicate that small variations in the geometry of the drip can have a significant impact on the water shedding characteristics of the flashing. This test method shows potential to be used as a standard for comparing the performance of drips used in modern cladding systems.
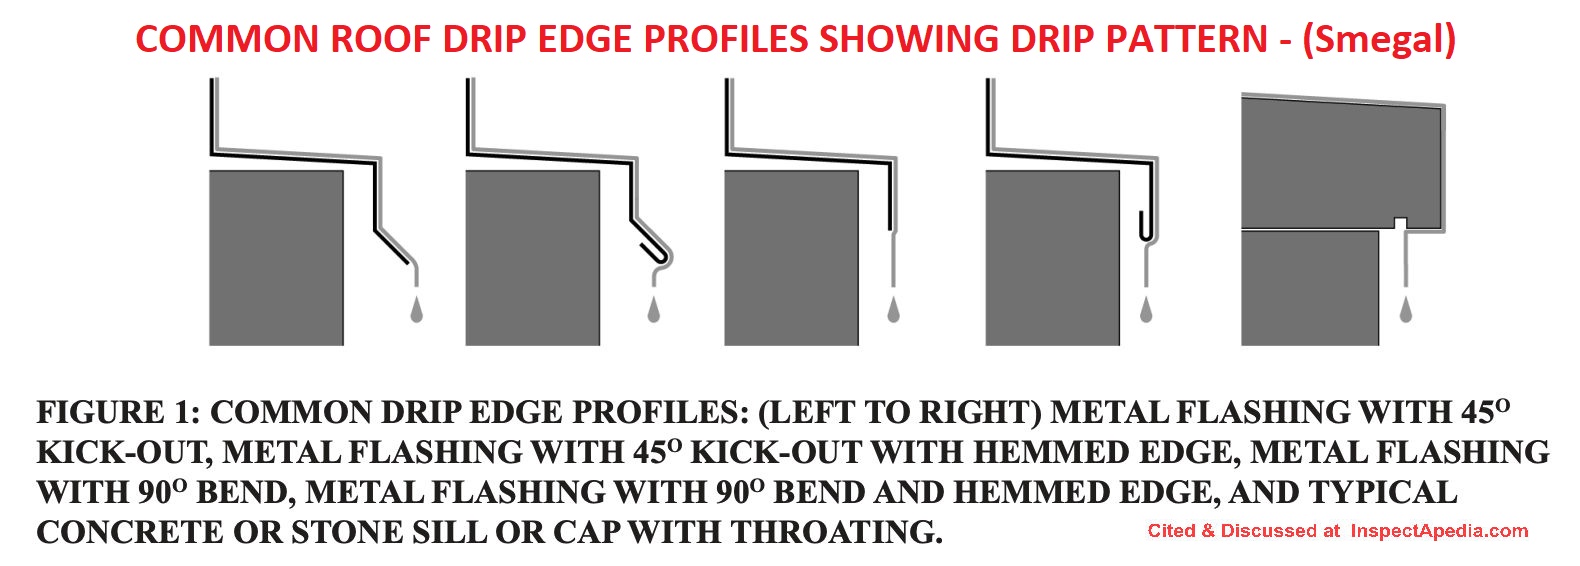
Watch out: Above, excerpted from Smegal, 2014, notice that absolutely every one of these drawings that shows water dripping "successfully" off of a roof show some projection or gap between the bottom of the dripo edge and the building fascia. Yet we still find many roofers nailing the fascia such that its vertical or down-lip is tight against the fascia board.
- Smegal, J., A. Lukachko, J. Straube, and T. Trainor. QUANTITATIVELY EVALUATING THE EFFECTIVENESS
OF DIFFERENT DRIP EDGE PROFILES [PDF] In Proceedings of the 14th Canadian Conference on Building Science and Technology, Toronto, Ontario Canada, pp. 89-99. 2014.
ABSTRACT
Proper rainwater management is one of the key factors ensuring long-term durability of a building.
Drip edges should be specified in key locations on nearly every building to help deflect water from the exterior surface of a wall assembly, thereby reducing moisture-related issues such as freeze thaw of masonry, staining of the cladding, and potential long term erosion of historical materials.
For these reasons, it is important to understand the effectiveness of different drip edge geometries at minimizing concentrated water deposition on the cladding. An experimental test apparatus and program was designed to compare the effectiveness of different drip edge materials, profiles and overhang distances with respect to the distribution of water on the wall below the drip edge.
Following the testing it was clear that increasing the protruding distance of the drip edge from the surface of the wall does generally decrease the concentration of water on the wall, but the most significant reductions in water on the surface of the wall was a result of the angle of the drip edge and the geometry of the drip edge.
Vertical drip edges are often specified because of the aesthetic quality but can result in the highest concentration of water on the wall, even at distances thought to minimize the water shed to the wall surface.
CONCLUSIONS
An experimental test apparatus and program was designed to compare the effectiveness of different drip edge materials, profiles and overhang distances with respect to the vertical distribution of water on the wall below the drip edge.
Key findings were:
Whether or not the edge of the drip edge was hemmed had the greatest impact on the shedding of water from the surface of the wall. This impact was greater for the thick 12 gauge drip edge than for the thinner 20 gauge drip edge.
The larger 45 mm (1.8 in) overhang had greater measured water shedding capability when compared to the 20 mm (0.8 in) overhang, in every test but one.
Adding a 45° kickout also increased the percentage of water shed from the apparatus compared to the 90° vertical drip edge.
The thinner 20 gauge drip edge generally had improved vertical distribution compared to the 12 gauge, but 20 gauge is thin enough that it would require a hemmed edge to provide strength and rigidity to the drip edge profile on a building.
There was no water collected in any of the troughs during the test of the stone sill with a small (8°) slope at 20mm (0.8”) overhang distance. The water was more distributed horizontally with the stone sill, meaning the water had less velocity over the drip edge than the metal drip edge profiles, and there was a reduced concentration horizontally on the cladding. - Straube, J. 2006. Rain control in buildings. Building Science 013. http://www.buildingscience.com/ documents/digests/bsd-013-rain-control-in-buildings
...
Reader Comments, Questions & Answers About The Article Above
Below you will find questions and answers previously posted on this page at its page bottom reader comment box.
Reader Q&A - also see RECOMMENDED ARTICLES & FAQs
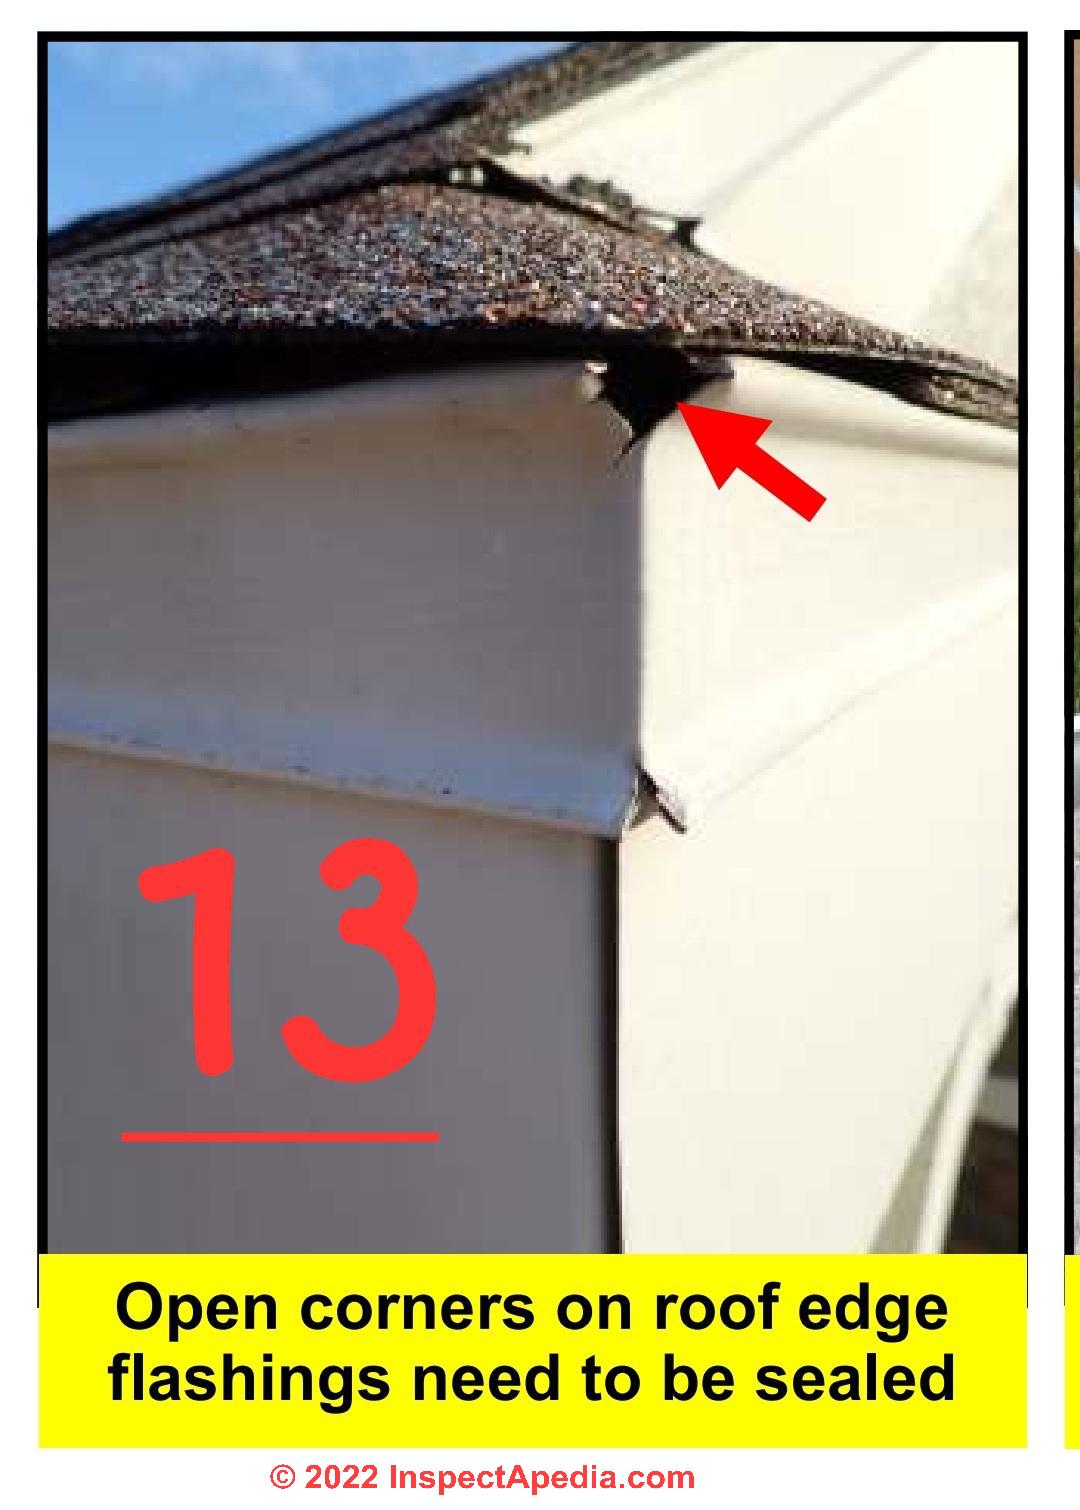
On 2021-11-24 by Inspectapedia Com Moderator (mod) - no need to remove shingles to repair flashing
@Christine claxton,
You certainly should not have to tear off roof shingles in order to either add a bit of additional flashing at the roof corner and / or insert a color matched sealant into those openings so the water doesn't leak behind the drip edge nor into the fascia.
On 2021-11-24 by Christine claxton
Can this just be covered or do shingles have to be torn off? thanks
On 2021-06-16 by cora
@inspectapedia.com.moderator,
thank you
On 2021-06-15 by inspectapedia.com.moderator (mod) - concern for using drip edge to keep squirrels out of roof
@cora,
We need to take care of here to avoid the trap of micromanaging.
If you over-specify to the roofer she/he will do exactly what you say and then disclaim any responsibility for any unsatisfying result.
So the right thing to do is to name the problem and ask the roofer for suggestions for solving it.
If I were doing such a roof I expect that it would be trivial to install some flashing, wrapping any openings, before I put the drip edge on.
I certainly would not be relying on the drip edge to do a job for which it's not designed.
But we're going to leave that to your roofer to solve.
Let me know what your roofer suggests and attach a photo or two, you can attach one photo to each comment.
On 2021-06-15 by cora
@inspectapedia.com.moderator,
Thank you for the advice. The problem is that if a gap exists because of the way the roof decking and fascia board were installed, what can the roofer do to address this when putting on the new roof?
Unless the wood has to be replaced (and I hope that not much needs to be as it was all replaced 22 years ago with the last roof replacement and lumber is so expensive now!) what can be done?
On 2021-06-15 by inspectapedia.com.moderator (mod)
@cora,
Drip edge is not intended to be a rodent shield but rather to direct roof runoff into the gutter rather than down the fascia board.
But your roof and fascia and soffit might have been built with gaps that enticed squirrels into your attic.
And some roofs, without a roof overhang or soffit, use special venting products to admit air into the lower roof edge as part of the attic or under-roof venting system.
Discuss these with the roofer to be sure that no rodent-openings are left when the new roof is installed.
On 2021-06-15 by cora
@mak.church,
Thank you for the response. Years ago my attic was invaded by flying squirrels. I had no drip edge so it was put on by the pest control company. Idk how thick the flashing (that is what they called it) is.
I am going to be getting a new roof and the roofer said he will be removing the drip edge and putting on new. (I didnt quite understand his explanation for wanting to remove it, but it seems that is just what he does.) I don't want to exchange something thicker for something thin and weak which may be bent and then allow for an animal to get behind.
On 2021-06-15 by mak.church (mod)
@cora,
OPINION:
Thank you for the added detail and the clarification. You're, of course, quite right that there is some variation in the thickness of the metal used for drip edge and other flashings.
It will be obvious to any of us that thicker metal is more resistant to being bent. In our view, and having install drip edge flashing on buildings for over 40 years, those variations in thickness in residential application at least are not functional.
The thinner metals are of course a little easier to nail in place, but the events that bends drip edge such as falling tree limbs will bend any drip edge of any thickness.
Our view is that it is the width of the drip edge and both horizontal and vertical directions that may make a difference in some applications. That's particularly true on lower slope roofs, or where the roof decking doesn't come all the way to the outer edge of the fascia board and we need a wider drip edge flange in order to be able to nail the drip edge to the deck. That's why it's not thickness.
On 2021-06-15 by cora
@mak.church,
Thank u for responding. I am not referring to width. I do see some brands (for example Quality Edge) which makes thicknesses in .016 and .019
On 2021-06-15 by mak.church (mod)
@cora,
There is no meaningful variation in the THICKNESS of drip edge metal. There may be some variations in the WIDTH which perhaps is what you meant. This image shows typical dimensions from AmeriMax cited at Home Depot. Also read this section in the above article:
Roof Drip Edge Flashing at Roof Eaves & Gable Ends
[Click to enlarge any image]
On 2021-06-15 by inspectapedia.com.moderator (mod) - How thick do you recommended aluminum drip edge be?
@cora,
All of the drip edge dimensions are given on the page above. Please take a look.
On 2021-06-14 by cora
How thick do you recommended aluminum drip edge be?
On 2021-06-15 by inspectapedia.com.moderator (mod)
@sandy,
I need to understand more what's going on with your squirrel problem.
Drip edge on a roof Edge is not normally a location invaded by squirrels.
On 2021-06-14 by sandy
Is F4 or F5 drip edge thick enough to keep squirrels out?
On 2021-03-22 by (mod) - typical drip edge dimensions
@Phillip Bullough,
In the article above we state:
Drip edge varies in dimensions but typically the flange that nails to the roof surface is about 2.5" wide and the vertical edge that directs roof runoff down and away is about 1.5" in depth. Lengths of drip vary but typically it's sold in ten foot lengths (120").
Common drip edge dimensions, excluding the 1/4" bent-out lip on the vertical drop of the drip edge, include:
3" x 1" (on-roof width and fascia drop width)
3" x 1 1/2"
3" x 2"
3" x 3" (on-roof width and fascia drop width)
Typically sold in ten-foot lengths
You'll see more roof drip edge flashing dimensions and profiles in the roof drip edge installation guides given as PDF downloads in the article above.
On 2021-03-22 by Phillip Bullough
What sizes of drip edges over fascia are available?
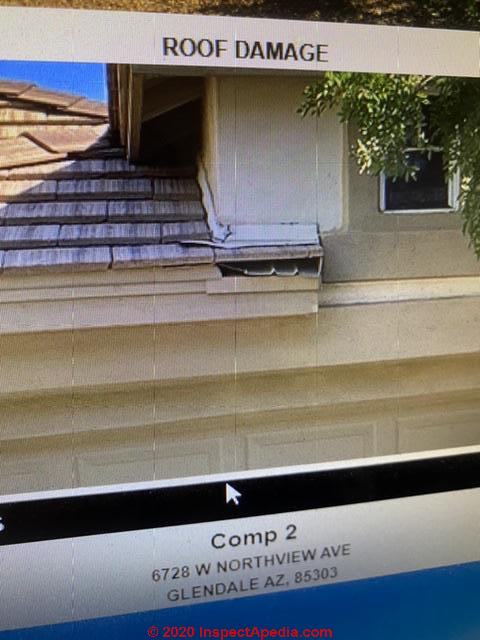
On 2020-05-13 - by (mod) -
James
I can give a better answer you can clarify what you mean by "this"
- which part of your photo is the subject of the question?
If the photo is from a home inspection I'm disappointed that your inspector was so vague. The photo I see what looks like some odd green opening at the top of the fascia board which is the vertical front of the soffit or eave or overhang of your roof.
On 2020-05-13 by James Calhoun
Can anyone tell me what this is called
...
Continue reading at ROOF DRIP EDGE COLOR CHOICES or select a topic from the closely-related articles below, or see the complete ARTICLE INDEX.
Or see DRIP EDGE FLASHING for ROOF FAQs - questions & answers about the right way to install roof drip edge flashing, posted originally at this page.
Or see these
Recommended Articles
- DIVERTER KICK-OUT FLASHING
- DRIP EDGE FLASHING for ROOFS - home
- ROOF DRIP EDGE DIMENSIONS & SIZES - you are on this page
- ROOF DRIP EDGE COLOR CHOICES
- ROOF DRIP EDGE PLACEMENT / LOCATION
- ROOF DRIP EDGE INSTALLATION on NEW or RE-ROOF JOBS
- ROOF DRIP EDGE INSTALLATION INSTRUCTIONS & CODES
- ROOF DRIP EDGE INSTALLATION MISTAKES
- ROOF DRIP EDGE ALTERNATIVE: FASCIA WRAP?
- FLASHING on BUILDINGS - home
- ROOFING FELT UNDERLAYMENT REQUIREMENTS
Suggested citation for this web page
DRIP EDGE FLASHING for ROOFS at InspectApedia.com - online encyclopedia of building & environmental inspection, testing, diagnosis, repair, & problem prevention advice.
Or see this
INDEX to RELATED ARTICLES: ARTICLE INDEX to BUILDING FLASHING
Or use the SEARCH BOX found below to Ask a Question or Search InspectApedia
Or see
INDEX to RELATED ARTICLES: ARTICLE INDEX to BUILDING ROOFING
Or use the SEARCH BOX found below to Ask a Question or Search InspectApedia
Ask a Question or Search InspectApedia
Try the search box just below, or if you prefer, post a question or comment in the Comments box below and we will respond promptly.
Search the InspectApedia website
Note: appearance of your Comment below may be delayed: if your comment contains an image, photograph, web link, or text that looks to the software as if it might be a web link, your posting will appear after it has been approved by a moderator. Apologies for the delay.
Only one image can be added per comment but you can post as many comments, and therefore images, as you like.
You will not receive a notification when a response to your question has been posted.
Please bookmark this page to make it easy for you to check back for our response.
IF above you see "Comment Form is loading comments..." then COMMENT BOX - countable.ca / bawkbox.com IS NOT WORKING.
In any case you are welcome to send an email directly to us at InspectApedia.com at editor@inspectApedia.com
We'll reply to you directly. Please help us help you by noting, in your email, the URL of the InspectApedia page where you wanted to comment.
Citations & References
In addition to any citations in the article above, a full list is available on request.
- "The Uses and Performance Requirements of Steep-Slope Roof Underlays in North America and the United Kingdom", Robert J. Booth, Keith Roberts, Proceedings of the North American Conference on Roofing Technology, p. 112-118 - Web Search 07/12/2010. This scholarly article cites 33 research articles on the role of roofing underlayments.
- "Unvented Roofs, Hot-
Humid Climates, and
Asphalt Roofing Shingles
Research Report - 0306
Feb-2003
Building Science Corporation", Building Science Corporation, 30 Forest Street,
Somerville, MA 02143
Quoting from the article abstract: "When constructing unvented roofs with asphalt shingles in hot-humid climates, a vapor barrier must be installed between the asphalt shingles and the roof deck." - Web Search 5/21/2010 - NRCA Roofing & Waterproofing Manual, 5th Edition, National Roofing Contractors Association, 10255 W. Higgins Road Suite 600 Rosemont, IL 60018-5607 Telephone: (847) 299-9070 Toll Free: (866) ASK-NRCA (275-6722), e-mail: info@nrca.net. - http://www.nrca.net/rp/pubstore/details.aspx?id=243&c=9
- Asphalt Shingle Roofing [Inspection & Installation Guide], Coon Rapids Minnesota, Coon Rapids City Hall 11155 Robinson Drive Coon Rapids, MN 55433 763-755-2880, - Web search 07/12/2010 City Website - http://www.ci.coon-rapids.mn.us/ Contact the City of Coon Rapids at 763-755-2880
- Oakridge Pro30™ shingle installation instructions for Owens Corning Oakridge® PRO 30™ fiber glass-based asphalt shingles - Web Search 07/12/2010
- Best Practices Guide to Residential Construction, by Steven Bliss. John Wiley & Sons, 2006. ISBN-10: 0471648361, ISBN-13: 978-0471648369, Hardcover: 320 pages, available from Amazon.com and also Wiley.com. See our book review of this publication
- Eric Galow, Galow Homes, Lagrangeville, NY. Mr. Galow can be reached by email: ericgalow@gmail.com or by telephone: 914-474-6613. Mr. Galow specializes in residential construction including both new homes and repairs, renovations, and additions.
- Steve Smallman, Raleigh, NC, Email: steve@stevesmallman.com, Website: http://stevesmallman.com/ - Quoting: Steve Smallman Property Inspections (SSPI) inspectors have performed or supervised over 25,000 inspections since we introduced home inspections to the Triangle area in 1980. Mr. Smallman is a contributor to InspectApedia.com and has commented on or provided information on plumbing traps, commercial FPE electrical panels and DIY Tests of FPE equipment,, roofing underlayment, and building exteriors.
- Our recommended books about building & mechanical systems design, inspection, problem diagnosis, and repair, and about indoor environment and IAQ testing, diagnosis, and cleanup are at the InspectAPedia Bookstore. Also see our Book Reviews - InspectAPedia.
- Problems in Roofing Design, B. Harrison McCampbell, Butterworth Heineman, 1991 ISBN 0-7506-9162-X (available used)
- Roofing The Right Way, Steven Bolt, McGraw-Hill Professional; 3rd Ed (1996), ISBN-10: 0070066507, ISBN-13: 978-0070066502
- In addition to citations & references found in this article, see the research citations given at the end of the related articles found at our suggested
CONTINUE READING or RECOMMENDED ARTICLES.
- Carson, Dunlop & Associates Ltd., 120 Carlton Street Suite 407, Toronto ON M5A 4K2. Tel: (416) 964-9415 1-800-268-7070 Email: info@carsondunlop.com. Alan Carson is a past president of ASHI, the American Society of Home Inspectors.
Thanks to Alan Carson and Bob Dunlop, for permission for InspectAPedia to use text excerpts from The HOME REFERENCE BOOK - the Encyclopedia of Homes and to use illustrations from The ILLUSTRATED HOME .
Carson Dunlop Associates provides extensive home inspection education and report writing material. In gratitude we provide links to tsome Carson Dunlop Associates products and services.
 | HOME | ABOUT | ASK a QUESTION | CONTACT | CONTENT USE POLICY | DESCRIPTION | POLICIES | PRIVACY | |
| © 2025 - 1985 Publisher InspectApedia.com - Daniel Friedman | |||||||||