
InspectAPedia®FREE Encyclopedia of Building & Environmental Construction, Diagnosis, Maintenance & Repair |
Question? Just ask us! InspectAPedia
|
 Roof Drip Edge Flashing Installation
For New or Re-roof Jobs
Do we really need drip edge?
Does it need to be spaced off the fascia?
- POST a QUESTION or COMMENT about including drip edge flashing in new roof installations as well as in re-roof jobs.
This article discusses the installation of roof drip edge flashing on a new or a re-roofing job.
This article series discusses all of the topics and common questions about roof drip edge flashing.
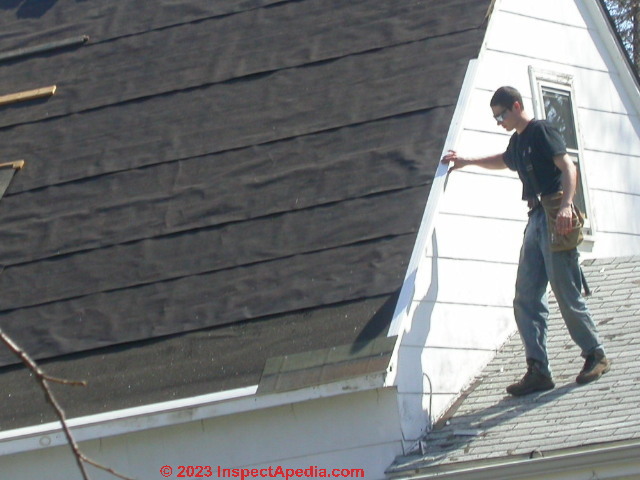
Page top photo: the roofer is installing drip edge along the gable end of a new roof in Poughkeepsie, New York. The author has inspected, installed and repaired roofs and roof flashings for over four decades.
InspectAPedia tolerates no conflicts of interest. We have no relationship with advertisers, products, or services discussed at this website.
- Daniel Friedman, Publisher/Editor/Author - See WHO ARE WE?
Instal Drip Edge on a New Roof or Re-Roofing Job
 Without functioning drip edge flashing, water leaving the roof edge wants to run down building fascias, soffits, and walls, sometimes even entering and damaging the structure.
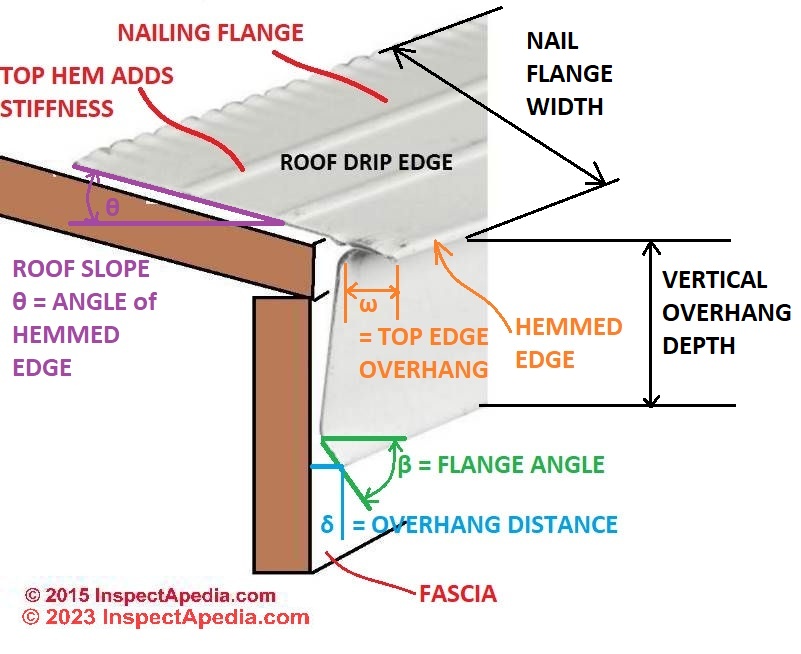
Our illustration just above shows illustrates the end profile of roof drip edge flashing on a new roof and shows its placement on the roof.
On a new roof, the drip edge will be nailed right to the roof deck, integrated with ice and water shield or roofing underlayment, before the first shingle course goes on.
On a re-roof job, if the old shingles are torn off down to the bare roof deck, most likely you'll be getting new drip edge as well.
On a re-roof job, if new shingles are being installed as another layer, the roofer might or might not need to install drip edge, depending on the condition of and amount of projection of the existing drip edge and shingle layer.
But in general, adding a new drip edge atop the lowest edge of existing shingles is still a good practice, giving extra spacing of the drip edge vertical lip out from the fascia board, helping to assure, even further, that roof runoff falls into the roof gutters or eave troughs, not behind them.
Once the shingles are installed, you won't see much of drip edge as it's under the roof shingles, under the underlayment, and behind the roof gutter.
But you can still see the vertical edge of the drip edge and you can confirm that it is properly spaced off of the fascia board.
Watch out for these two most-common roof drip edge mistakes:
- Omitting the drip edge entirely:
water runs down the roof fascia board, not into gutters, damaging the building - Drip ege installed without sufficient spacing
away from the fascia board - the "OVERHANG DISTANCE" shown in our sketch should be about 1/4".
Details for Drip Edge on a New Roof or Re-Roofing Job
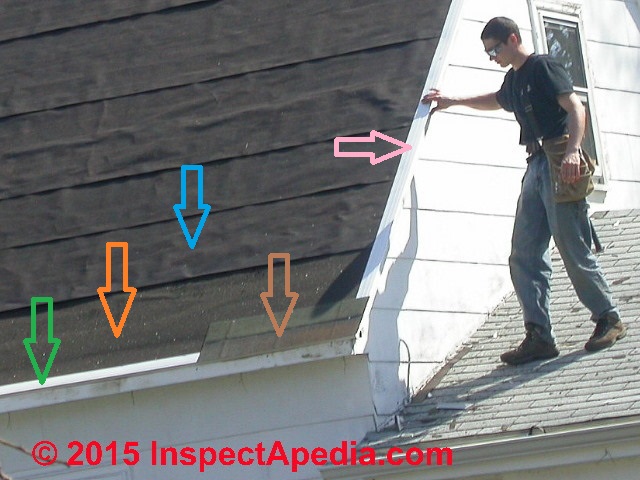 Our photo illustrates several details of roof drip edge, eaves flashing, and gable end flashing at an asphalt-shingle re-roof job we documented in Dutchess County, New York.
From left to right our colored arrows point out the following details:
- Roof Eaves Drip Edge - Green arrow:
Points to the white aluminum drip edge installed at the lower roof edge. Drip edge is also sold in brown, black and some other colours.
Drip edge flashing directs roof runoff away from the roof fascia and edge and into gutters or at least not down the fascia board (if no gutters are installed) and it is recommended by roofing standards, manufacturers, and experts.
Space the drip edge away from the roof fascia:
I like to install the drip edge so that the inner surface of the vertical lip of the drip edge is about 1/4" proud (away from) the surface of the fascia board.
Even though the outwards bend of the lower edge of the vertical lip of the drip edge is intended to send water away from the building, this added 1/4" space improves that performance, avoiding the travel of water back up under the drip edge by capillary action where it then wants to drivel down the fascia.
This space also reduces the chances that an idiot installs the roof gutters on top of rather than up under the drip edge - another detail that can cause trouble.
See BACKFLOWING GUTTERS for more about gutters installed on top of rather than up under the drip edge lip.
Also
see GUTTER INSTALL ERRORS for more examples of what happens if the gutter is installed over rather than behind the drip edge.
Nail the drip edge
to the roof sheathing at roughly 18-24" spacing intervals using roofing nails.
- Ice & Water Shield - Orange arrow:
Points to the installation of ice and water shield along the lower roof eaves - protecting against ice dam leaks that are common on unvented roofs in cold weather or snow climates.
Install the ice and water shield membrane so that it laps securely over and bonds to the surface of the drip edge.
The membrane does not have to extend fully to the outer edge of the drip edge flashing, but it should be on top of the upper surface of the drip edge in a best-practices roofing installation.
Otherwise as we repeat just below, some water is going to run under the drip edge rather than be directed off of the roof surface.
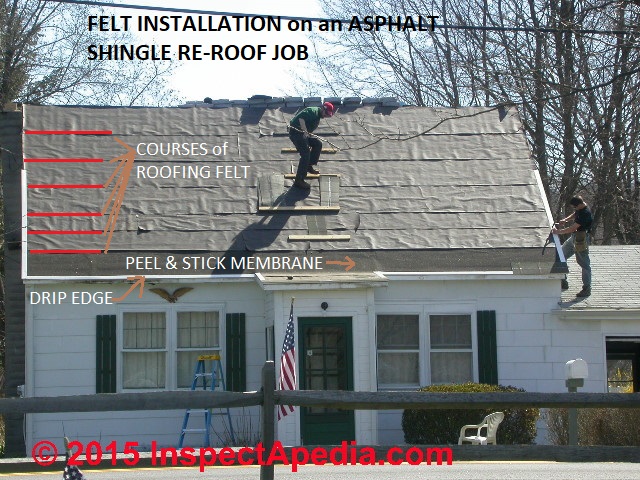
Watch out: if the roof is not using peel-and-stick eaves flashing membrane (ice and water shield), you will use roofing felt in this location. In that installation the lower edge of the felt must be on top of, not underneath the drip edge.
That is, the drip edge flashing is the first item installed onto the roof sheathing (or atop old shingles in a multi-layer shingle re-roof job). If you install the drip edge on top of the felt, any condensation or water running down the roof surface between shingles and felt will run underneath the drip edge, down the fascia, and perhaps into the building soffit or walls - not a nice thing.
See PEEL & STICK FLASHING MEMBRANES
and also
See ICE DAM PREVENTION on ROOFS - Felt Underlayment - Blue arrow:
Points to the first course of 15# roofing felt on this roof.
The lower edge of the felt is overlapped 3-4" on top of and over the upper edge of the lower course of ice and water shield. - Shingle Course - Brown arrow:
Points to the first shingle course, doubtless installed as a reference point for this roof job.
Install the starter course (normally a 3-tab shingle installed upside down or a solid asphalt strip) so that its low edge is parallel to the drip edge and extends no more than 1/4" past the drip edge itself.
Watch out: Longer overlaps of asphalt shingles past the drip edge will hang over into the gutter, will send roof runoff off of the roof rather than into the gutter, and will eventually crack, break, and look gross.
See OVERSHOOTING GUTTERS
Just below we illustrate shingles installed with too much overhang into the gutter.

- Gable-End Drip Edge - Pink arrow:
At the right of the roof along the gable end we see more drip edge being used to flash the roof gable end fascia / trim and roof edge.
I prefer to install the gable drip edge under the felt though that detail is less critical than at the lower roof edge or eaves.
When understanding all metal flashings on buildings it makes sense to consider the direction in which water wants to flow: normally "down" (though small up-flows occur by capillary action).
It is a fundamental axiom of roof flashing and materials that all materials should be installed in a position such that any water that enters the roof or flashing system is directed back out onto the roof surface - to daylight, not into the roof layers or structure.
I suspect this roofer argues that the over-felt installation reduces the chances of felt blow-off before the shingles are in place.
Shown below: roofing white drip edge on a re-roof job.
...
Reader Comments, Questions & Answers About The Article Above
Below you will find questions and answers previously posted on this page at its page bottom reader comment box.
Reader Q&A - also see RECOMMENDED ARTICLES & FAQs
Do you need to replace drip edge on a re-roof?
Do you need to replace drip edge on a re-roof? - On 2021-05-24 by beth
Reply by (mod) - no
@beth,
Not if it's in good shape and properly-placed.
On 2021-04-24 by Erik - are old nail or screw holes in the drip edge nailing flange a problem?
Is it ok to install gutters with drip edge that have screw holes in it from the previous gutter installation?
Reply by (mod) -
@Erik,
Yep; it's OK as long as the holes are in the upper portion of the drip edge now covered by the first shingle course. Those will end up under the starter course and the first shingle course and ought not be a leak issue.
Of course if you see a screw hole in any flashing in a location where you expect trouble, put a dab of sealant (silicone is ok) there.
Drip edge has humps in several places - poor workmanship?
Our drip edge has humps in several places. Is this a settling issue or more likely poor workmanship ? - On 2021-04-21 by Amoyo
Reply by ( (mod) -
@Amoyo,
In my experience a wavy drip edge like the case you describe usually occurs during installation; if the roof edge itself is not dead straight (a common situation) and if the installer pushes the outer edge of the drip edge too tightly against the edge of the roof during installation, it can produce the humps and bumps you mention.
Take a look also at the down-facing bend of the drip edge to be sure that it will send water into the gutter and not behind it.
What should the Minimum length of a Piece of Drip edge be and should it not lay flat
What should the Minimum length of a Piece of Drip edge be and should it not lay flat - On 2020-02-20 by Chuck
Reply by (mod) -
If you're asking about the horizontal length I don't think that's critical Factor at all. You need the piece to be long enough to be adequately nails to the roof deck.
And where multiple pieces of drip edge are used, you might overlap the ends an inch or two.
Of course a drip edge should be flat on the roof deck. If it's not that I suspect it was not properly nailed or was bent or damaged during installation. Slightly out of perfect flat probably isn't going to make a noticeable difference.
...
Continue reading at ROOF DRIP EDGE INSTALLATION INSTRUCTIONS & CODES or select a topic from the closely-related articles below, or see the complete ARTICLE INDEX.
Or see these
Recommended Articles
- DIVERTER KICK-OUT FLASHING
- DRIP EDGE FLASHING for ROOFS - home
- ROOF DRIP EDGE DIMENSIONS & SIZES
- ROOF DRIP EDGE COLOR CHOICES
- ROOF DRIP EDGE PLACEMENT / LOCATION
- ROOF DRIP EDGE INSTALLATION on NEW or RE-ROOF JOBS - you are on this page
- ROOF DRIP EDGE INSTALLATION INSTRUCTIONS & CODES
- ROOF DRIP EDGE INSTALLATION MISTAKES
- ROOF DRIP EDGE ALTERNATIVE: FASCIA WRAP?
- FLASHING on BUILDINGS - home
- ROOFING FELT UNDERLAYMENT REQUIREMENTS
Suggested citation for this web page
ROOF DRIP EDGE INSTALLATION - NEW or RE-ROOF JOB at InspectApedia.com - online encyclopedia of building & environmental inspection, testing, diagnosis, repair, & problem prevention advice.
Or see this
INDEX to RELATED ARTICLES: ARTICLE INDEX to BUILDING FLASHING
Or use the SEARCH BOX found below to Ask a Question or Search InspectApedia
Or see
INDEX to RELATED ARTICLES: ARTICLE INDEX to BUILDING ROOFING
Or use the SEARCH BOX found below to Ask a Question or Search InspectApedia
Ask a Question or Search InspectApedia
Try the search box just below, or if you prefer, post a question or comment in the Comments box below and we will respond promptly.
Search the InspectApedia website
Note: appearance of your Comment below may be delayed: if your comment contains an image, photograph, web link, or text that looks to the software as if it might be a web link, your posting will appear after it has been approved by a moderator. Apologies for the delay.
Only one image can be added per comment but you can post as many comments, and therefore images, as you like.
You will not receive a notification when a response to your question has been posted.
Please bookmark this page to make it easy for you to check back for our response.
IF above you see "Comment Form is loading comments..." then COMMENT BOX - countable.ca / bawkbox.com IS NOT WORKING.
In any case you are welcome to send an email directly to us at InspectApedia.com at editor@inspectApedia.com
We'll reply to you directly. Please help us help you by noting, in your email, the URL of the InspectApedia page where you wanted to comment.
Citations & References
In addition to any citations in the article above, a full list is available on request.
- NRCA Roofing & Waterproofing Manual, 5th Edition, National Roofing Contractors Association, 10255 W. Higgins Road Suite 600 Rosemont, IL 60018-5607 Telephone: (847) 299-9070 Toll Free: (866) ASK-NRCA (275-6722), e-mail: info@nrca.net. - http://www.nrca.net/rp/pubstore/details.aspx?id=243&c=9
- Asphalt Shingle Roofing [Inspection & Installation Guide], [PDF] Coon Rapids Minnesota, Coon Rapids City Hall 11155 Robinson Drive Coon Rapids, MN 55433 763-755-2880, - Web search 07/12/2010 City Website - http://www.ci.coon-rapids.mn.us/ Contact the City of Coon Rapids at 763-755-2880
- Oakridge Pro30™ shingle installation instructions [PDF] for Owens Corning Oakridge® PRO 30™ fiber glass-based asphalt shingles - Web Search 07/12/2010
- Asphalt Roofing Residential Manual from ARMA the Asphalt Roofing Manufacturers Association Website https://www.asphaltroofing.org/product/residential-asphalt-roofing-manual/ ,
- In addition to citations & references found in this article, see the research citations given at the end of the related articles found at our suggested
CONTINUE READING or RECOMMENDED ARTICLES.
- Carson, Dunlop & Associates Ltd., 120 Carlton Street Suite 407, Toronto ON M5A 4K2. Tel: (416) 964-9415 1-800-268-7070 Email: info@carsondunlop.com. Alan Carson is a past president of ASHI, the American Society of Home Inspectors.
Thanks to Alan Carson and Bob Dunlop, for permission for InspectAPedia to use text excerpts from The HOME REFERENCE BOOK - the Encyclopedia of Homes and to use illustrations from The ILLUSTRATED HOME .
Carson Dunlop Associates provides extensive home inspection education and report writing material. In gratitude we provide links to tsome Carson Dunlop Associates products and services.
 |
HOME | ABOUT | ASK a QUESTION | CONTACT | CONTENT USE POLICY | DESCRIPTION | POLICIES | PRIVACY | |
| © 2026 - 1985 Publisher InspectApedia.com - Daniel Friedman | |||||||||