 Kickout Flashing on Roofs
Diverter Flashing assures proper drainage at roof-wall, gutter, chimney or or other leak-risk spots
- POST a QUESTION or COMMENT about building kick-out flashing or diverter flashing installation, inspection, leaks, troubleshooting, repairs
What is a kick-out flashing or diverter flashing, why is it used and how is it installed?
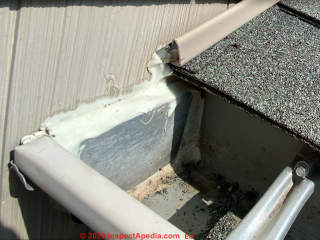
Page top photo: this particular diverter flashing installed at the bottom of roof-wall flashing and intended to divert water or kick-out water into the gutter is not installed correctly, and during rain or melting snow it sends water running down the wall at the end of the gutter.
We discuss this installation in more-detail below.
This article series provides details of proper flashing use, materials, installation, inspection & repair on all types of buildings, including roof flashing, wall flashing, window and door flashing, plumbing vents, chimneys etc.
InspectAPedia tolerates no conflicts of interest. We have no relationship with advertisers, products, or services discussed at this website.
- Daniel Friedman, Publisher/Editor/Author - See WHO ARE WE?
Diverter Flashings Used on Buildings
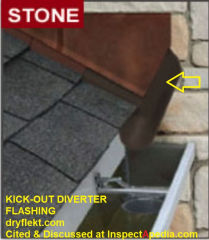 A kickout or diverter flashing is an extra section of metal or vinyl flashing that is installed to direct water away from a potential problem area such as where a lower roof-edge gutter end abuts a building side-wall or where a roof valley's water flow volume is so great that it over-shoots a gutter.
Kick-out flashing directs rainwater into rain gutters where it can be carried away from the structure. Kick-out flashing, also referred to as diverters, can be fabricated on site using sheet metal but these can be undersized and may have unsealed seams that allow leakage.
Prefabricated kick-out flashings are available as seamless, molded plastic pieces or metal with welded seams.
These materials would be installed by roofers in coordination with house wrap and siding installers. This task should be included in the contract for the appropriate trade depending on the workflow at the specific job site. - BASC, U.S. DOE, cited below.
Step flashings and kick-out diverters are required in the 2009 and 2012 IRC (R703.8) and 2015 and 2018 IRC (R703.4; R903.2.1).
The proper installation of a diverter flashing in this location is to set it in place during the roof installation, using the diverter flashing assembly as the first section of step flashing along the roof-wall intersection.
Some kickout flashing installation instructions put the roof-portion of the flashing below the first shingle course, others such as the kickoutflashing.com instructions below, put the flashing atop the first shingle course.
The diverter flashing shown here is produced by DryFlekt, Tel: 877-985-1010 Web: https://www.dryflekt.com/
Kick-out Flashing Installation Details
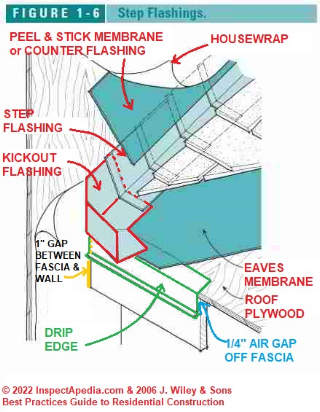
Below, from WALL FLASHING DETAILS is an illustration from Steve Bliss' Best Construction Practices, we see a sketch of the proper installation of a kickout flashing.
The first shingle course, then, will go atop the kick-out flashing and eaves membrane (ice and water shield) that is in-turn put down atop the upper flange of the roof drip-edge.
Below on this page we provide links to several kick-out flashing installation guides, building codes and standards.
Pre-fab metal or plastic kick-out flashing products are sold by building supply stores and online vendors as well as directly from some of the kickout / diverter flashing manufacturers themselves.
Left-hand vs Right-hand Kickout Flashing
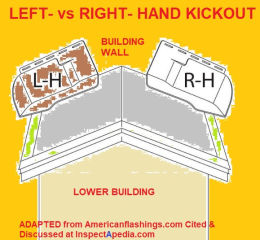
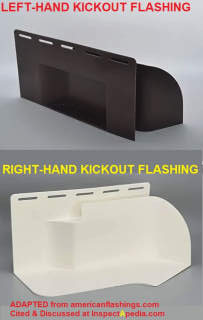
Watch out: when buying a pre-fab kickout flashing take note of whether the roof slope is left-hand or right-hand, as illustrated by American Flashing Co's kickout flashing drawing and illustrations shown here, adapted by InspectApedia.
Face the main building wall against which a lower roof is constructed. Then your left-hand will indicate the left-hand slope.
These same left- and right- diverter or kickout flashing types are applicable when flashing the left-side or right side of a chimney.
Damage from Leaks where Kick-out or Diverter Flashing Is Needed
Can the kickout diverter flashing be destroyed ?
1. Can the kickout diverter flashing be destroyed by wind or rain and how can you tell that this has happened?
2. What damage would this do to the roof if this has happened? - On 2017-01-19 by Bibi A -
This Q&A were posted originally
Kickout Flashing - Diverter Flashing Proper Installation vs roof flashing "destroyed by wind" ?
@Bibi:
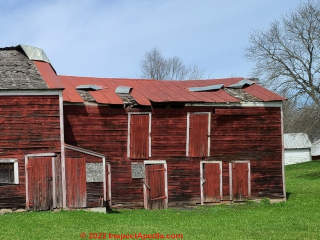
Absolutely, metal components can be blown off of a roof IF they are not sufficiently fastened down or if there were installation errors OR if there was unusual weather such as a hurricane or tornado or severe wind-storm.
I'm not sure how rain could damage metal flashing on a roof but maybe a combination of water under or behind flashing and frost can damage the installation - if you're in a freezing climate.
My photo is not of kickout or diverter flashing but shows what happens when wind gets under metal roof components - using an antique barn in Poughkeepsie, New York, as an example.
I could offer more specifics if you post a photo of your diverter flashing.
Watch out: the kick-out flashing has to be properly-installed and nailed to work. In DryFlekt's illustration above on this page, notice that the brown kick-out flashing upper segment is tucked behind the copper counter-flashing on the stone wall.
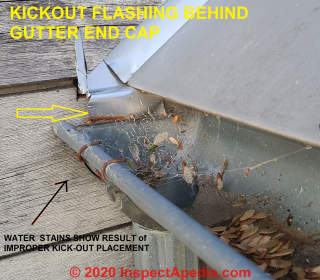
Below is an example of a diverter or kick-out flashing used at a gutter end on a home in Tivoli, New York. I think this kickout flashing installation is improper: the vertical aluminum tab runs behind the gutter end cap rather than into the gutter.
So some of the water running down the roof-wall abutment may go behind the gutter end cap and down the building wall.
The damage done to your home if the flashing is displaced or leaks? Well as Mark Cramer says, ... it depends.
If water enters the roof structure or building walls there's risk of mold contamination in the short term and rot or insect damage in the long run.
Kickout Flashing Codes, Products & Installation Guides
- 2009 International Residential Code (IRC)
Section R703.8 Flashing.
Excerpt:
Approved corrosion-resistant flashing to be applied shingle-fashion to prevent water from entering into wall cavities or from penetrating into building structural framing components. Self-adhered flashing must comply with AAMA 711. Flashing at exterior window and door openings must extend to the surface of the exterior wall finish or to the water-resistive barrier. Corrosion-resistant flashings should be installed:
Exterior and window door openings and extend to the exterior wall finish surface or water-resistive barrier
At intersection of chimneys or other masonry construction with frame or stucco walls, with projecting lips on both sides under stucco copings
Under and at ends of masonry, wood, or metal copings and sills
Continuously above all projecting wood trim
Where exterior porches, decks, or stairs attach to a wall or floor assembly (wood-frame construction)
At wall and roof intersections
At built-in gutters. - 2012 IRC
International Residential Code, Section R703.8 Flashing.
Approved corrosion-resistant flashing to be applied shingle-fashion to prevent water from entering into wall cavities or from penetrating into building structural framing components. Self-adhered flashing must comply with AAMA 711. Flashing at exterior window and door openings must extend to the surface of the exterior wall finish or to the water-resistive barrier. Flashing must be installed at the following locations:
Exterior window and door openings In accordance with fenestration manufacturer’s installation and flashing instructions or in accordance with the flashing manufacturer’s instructions. Where instructions or details aren’t provided, pan flashing is to be installed at the sill of exterior window and door openings and must be sealed or sloped to direct water to the surface of the exterior wall finish or water-resistive barrier.
Openings using pan flashing must also incorporate flashing or protection at the head and sides. Per the flashing design or method of a registered design professional.
Under other approved methods. Exterior and window door openings and extend to the exterior wall finish surface or water-resistive barrier At intersection of chimneys or other masonry construction with frame or stucco walls, with projecting lips on both sides under stucco copings Under and at ends of masonry, wood, or metal copings and sills Continuously above all projecting wood trim Where exterior porches, decks, or stairs attach to a wall or floor assembly (wood-frame construction.
At wall and roof intersections
At built-in gutters. - 2015, 2018, and 2021 IRC
Section R703.4 Flashing.
Approved corrosion-resistant flashing to be applied shingle-fashion to prevent water from entering into wall cavities or from penetrating into building structural framing components. Self-adhered flashing must comply with AAMA 711. Fluid-applied membranes shall comply with AAMA 714. Flashing must be installed at wall and roof intersections and at built-in gutters.
Chapter 9 Roof Assemblies, Section R903.2. Flashing is required at wall and roof intersections and to divert water away from where the eave of a sloped roof intersects a vertical sidewall. Where flashing is metal, the metal shall be corrosion resistant with a thickness of not less than 0.019 inch (26-gauge galvanized sheet).
Retrofit: 2009, 2012, 2015, 2018, and 2021 IRC
Section R102.7.1 Additions, alterations, or repairs. Additions, alterations, renovations, or repairs shall conform to the provisions of this code, without requiring the unaltered portions of the existing building to comply with the requirements of this code, unless otherwise stated. (See code for additional requirements and exceptions.) - 2020 Florida Residential Code
R903.4.2 One- and two-family dwellings and private garages.
When gutters and leaders are placed on the outside of the buildings, the gutter and leaders shall be constructed of metal or approved plastic for outdoor exposure with lapped, soldered or caulked joints and shall be securely fastened to the building with a corrosion resistant fastening device of similar or compatible material to the gutters or downspouts. - BASC, "Step and Kick-Out Flashing at Roof-Wall Intersections" Building America Solution Center, Office of Energy Efficiency & Renewable Energy, U.S. Department of Energy, Forrestal Building
1000 Independence Ave. SW
Washington DC 20585 USA, Web: https://basc.pnnl.gov/ - retrieved 2022/05/09 original source: https://basc.pnnl.gov/resource-guides/step-and-kick-out-flashing-roof-wall-intersections#edit-group-scope
Content:
Scope
Install step and kick-out flashing at all roof-wall intersections to protect walls from water intrusion and install boot or collar flashing at all roof penetrations to protect roofs from leaks.
Install corrosion-resistant flashing pieces that are overlapped shingle fashion.
Extend step flashing at least 4 inches up the wall from the roof deck and at least four inches out along the roof deck (IRC 2015) and integrate the flashing with the drainage plane above (for example, overlap house wrap over it).
If metal, the flashing should be made of galvanized steel at least 0.019-inches thick (IRC 2015).
Install roof felt prior to installing the step and kick-out flashing.
Install house siding over the step flashing, ending at least one inch above the roof surface.
Install shingles over the portion of step flashing on the roof.
When installing metal or rubber membrane roofs, use continuous flashing rather than pieces of step flashing.
Install kick-out flashing at the end of a roof-wall intersection to divert water away from the wall and into gutters. Ensure that the kick-out flashing is large enough to handle expected storm water flows.
Install boot or collar flashings around all roof penetrations and properly integrate with roof membranes and shingles above and below the penetration. - American Flashings Co., KICK-OUT FLASHING INSTALLATION DRAWING [image file] J'D Out Kickout Flashings, American Flashing, 1590 Newaygo Rd., Bailey, MI 49303 USA - retrieved 2022/05/09, original source: https://www.americanflashings.com/jd-out-flashing
- DryFlekt, Tel: 877-985-1010 Web: https://www.dryflekt.com/
- ENERGY STAR Certified Homes, Version 3/3.1 (Rev. 09), Water Management System Builder Requirements
3. Water-Managed Roof Assembly.
3.1 Step and kick-out flashing at all roof-wall intersections, extending ≥ 4” on wall surface above roof deck and integrated shingle-style with drainage plane above; boot / collar flashing at all roof penetrations.12
Footnote 12) Intersecting wall siding shall terminate 1 in. above the roof or higher, per manufacturer's recommendations. Continuous flashing shall be installed in place of step flashing for metal and rubber membrane roofs.
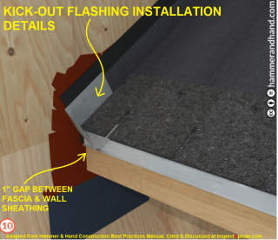
Above: an illustration of some of the best-practices details when installing kick-out flashing,from Hammer & Hand's manual cited in detail just below.
- Hammer & Hand Constr, KICKOUT FLASHING BEST PRACTICES [PDF] Hammer & Hand Construction, 1020 Southeast Harrison Street Portland, OR 97214-4709 (503) 232-2447 and 2450 6th Ave. S #100 Seattle, WA 98134 (206) 397-0558 USA, Website: https://hammerandhand.com/ - retrieved 2022/05/09, original source: https://hammerandhand.com/best-practices/manual/6-roofs/6-1-kick-flashing/
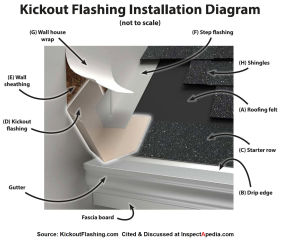
Above: Kickout flashing installation details from KickoutFlashing - PBZ in Lititz PA, cited below. Note that this illustration shows a "left-hand" or "left slope" roof kickout flashing.
- Kickout Flashing PBZ, KICKOUT FLASHING INSTALLATION DIAGRAM [PDF] Kickout Flashing by PBZ, 295 Wood Corner Rd, Lititz, PA 17543 USA, Tel: 717-738-7365 Web: kickoutflashing.com - retrieved 2022/05/09, original source: https://www.kickoutflashing.com/wp-content/uploads/2017/03/KOF_InstructionDiagram_2017_web.pdf
...
Reader Comments, Questions & Answers About The Article Above
Below you will find questions and answers previously posted on this page at its page bottom reader comment box.
Reader Q&A - also see RECOMMENDED ARTICLES & FAQs
On 2023-07-26 by InspectApedia Publisher (mod) - Add flashing & counter flashing at siding abutment to gutter end and add diverter flashing at roof-wall
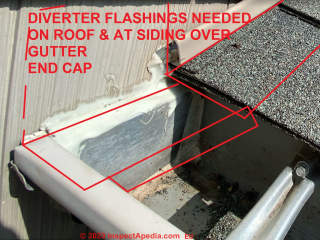 @Ed,
@Ed,
You will want to read two of our articles to fix the leaky siding & J-channel & gutter end in your photo:
See
VINYL SIDING INSPECTION & REPAIR
https://inspectapedia.com/exterior/Vinyl_Siding_Inspection.php where we explain the proper use of J-channel and its installation
more-specifically
VINYL SIDING J-CHANNEL MISTAKES Cause Costly Building Damage
And you probably want to install
- Diverter flashing at the lower edge of the roof at the wall
a proper kickout or diverter flashing - up under the siding and out into the gutter rather than sending water down the wall along that caulked butt joint between gutter end cap and wall.
See the article above on this page, where we moved this discussion - we welcome your further photos, questions, comments - best posted on that page.
and also
- Siding flalshing at the gutter end
Flashing under the siding and extending out over the gutter end cap where presently you are relying on a blob of sealant
On 2023-07-26 by Ed
J-channel is allowing water behind the siding, how to divert the water away?
This Q&A were originally posted at HOW TO CONTACT InspectApedia.com
...
Continue reading at DORMER SIDE / ROOF FLASHING or select a topic from the closely-related articles below, or see the complete ARTICLE INDEX.
Or see these
Recommended Articles
- BRICK WALL LEAK REPAIRS
- DECK FLASHING at BUILDING
- DRIP EDGE FLASHING for ROOFS
- DIVERTER KICK-OUT FLASHING
- DORMER SIDE / ROOF FLASHING
- VINYL SIDING J-CHANNEL MISTAKES - sometimes adding a kickout flashing can fix
- FLASHING on BUILDINGS - home
- RAIN SPLASH-UP SIDING DAMAGE - splashback or splash-up water damage to exterior walls
- ROOF FLASHING DEFECTS LIST
- ROOF VALLEY FLASHING
- ROOF WALL FLASHING DETAILS - also at chimneys
- WALL FLASHING DETAILS
- WALL to FOUNDATION or SLAB FLASHING
Suggested citation for this web page
DIVERTER KICK-OUT FLASHING at InspectApedia.com - online encyclopedia of building & environmental inspection, testing, diagnosis, repair, & problem prevention advice.
Or see this
INDEX to RELATED ARTICLES: ARTICLE INDEX to BUILDING FLASHING
Or use the SEARCH BOX found below to Ask a Question or Search InspectApedia
Ask a Question or Search InspectApedia
Try the search box just below, or if you prefer, post a question or comment in the Comments box below and we will respond promptly.
Search the InspectApedia website
Note: appearance of your Comment below may be delayed: if your comment contains an image, photograph, web link, or text that looks to the software as if it might be a web link, your posting will appear after it has been approved by a moderator. Apologies for the delay.
Only one image can be added per comment but you can post as many comments, and therefore images, as you like.
You will not receive a notification when a response to your question has been posted.
Please bookmark this page to make it easy for you to check back for our response.
IF above you see "Comment Form is loading comments..." then COMMENT BOX - countable.ca / bawkbox.com IS NOT WORKING.
In any case you are welcome to send an email directly to us at InspectApedia.com at editor@inspectApedia.com
We'll reply to you directly. Please help us help you by noting, in your email, the URL of the InspectApedia page where you wanted to comment.
Citations & References
In addition to any citations in the article above, a full list is available on request.
- In addition to citations & references found in this article, see the research citations given at the end of the related articles found at our suggested
CONTINUE READING or RECOMMENDED ARTICLES.
- Carson, Dunlop & Associates Ltd., 120 Carlton Street Suite 407, Toronto ON M5A 4K2. Tel: (416) 964-9415 1-800-268-7070 Email: info@carsondunlop.com. Alan Carson is a past president of ASHI, the American Society of Home Inspectors.
Thanks to Alan Carson and Bob Dunlop, for permission for InspectAPedia to use text excerpts from The HOME REFERENCE BOOK - the Encyclopedia of Homes and to use illustrations from The ILLUSTRATED HOME .
Carson Dunlop Associates provides extensive home inspection education and report writing material. In gratitude we provide links to tsome Carson Dunlop Associates products and services.


