
InspectAPedia®FREE Encyclopedia of Building & Environmental Construction, Diagnosis, Maintenance & Repair |
Question? Just ask us! InspectAPedia
|
 Roof Drip Edge Flashing Placement
Location for drip edge at eaves & gable ends
- POST a QUESTION or COMMENT about where roofing drip edge is needed
This article discusses the proper placement and location of roof drip edge flashing.
Is drip edge flashing needed?
We explain where drip edge flashing should be installed, in what position, and we describe the placement of drip edge flashing beneath roofing underlayment or ice and water shields & shingles or other roof coverings.
This article series discusses all of the topics and common questions about roof drip edge flashing. See Article Series Contents list below.
InspectAPedia tolerates no conflicts of interest. We have no relationship with advertisers, products, or services discussed at this website.
- Daniel Friedman, Publisher/Editor/Author - See WHO ARE WE?
Roof Drip Edge Placement Details Avoid Gutter Back-Flow Leaks
 Roof drip edge flashing serves multiple functions on a building, the foremost of which is to assist water in leaving the roof edge with minimum damage to other building components by directing the water off of the roof and into the gutter.
[Click to enlarge any image]
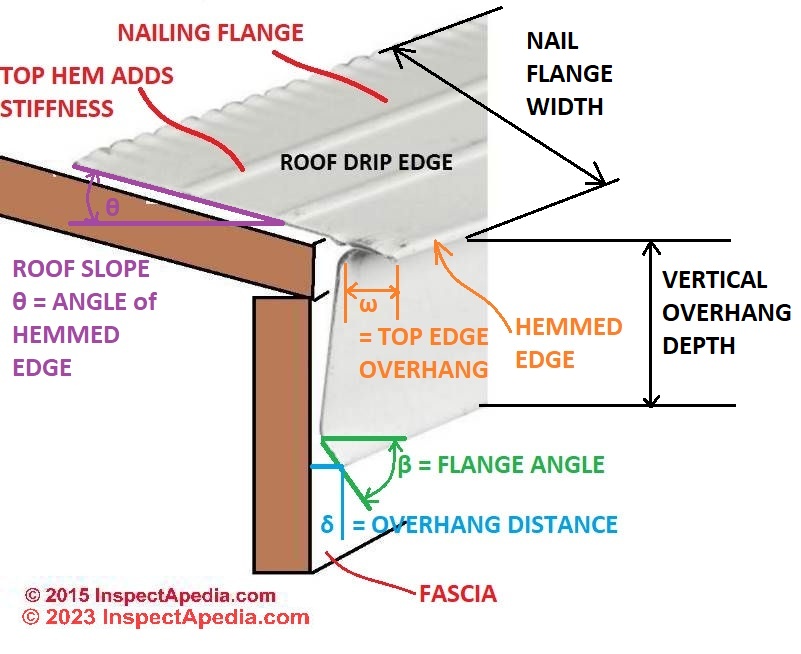
The sketch above illustrates the end-profile of roof drip edge flashing and shows its placement on the roof. Usually you won't see much of drip edge as it's under the roof shingles, under the underlayment, and behind the roof gutter.
Watch out: A misplaced or poorly designed drip edge flashing sends water behind gutters rather than into them, risking rot or leaks into the building with possibly some costly and troublesome problems like insect attack or mold contamination.
Article Series Contents
- ROOF DRIP EDGE DIMENSIONS & SIZES
- ROOF DRIP EDGE COLOR CHOICES
- ROOF DRIP EDGE PLACEMENT / LOCATION - you are on this page
- ROOF DRIP EDGE INSTALLATION on NEW or RE-ROOF JOBS
- ROOF DRIP EDGE INSTALLATION INSTRUCTIONS & CODES
- ROOF DRIP EDGE INSTALLATION MISTAKES
- ROOF DRIP EDGE ALTERNATIVE: FASCIA WRAP?
Where Should Roof Drip Edge Flashing Be Placed?
[Click to enlarge any image]
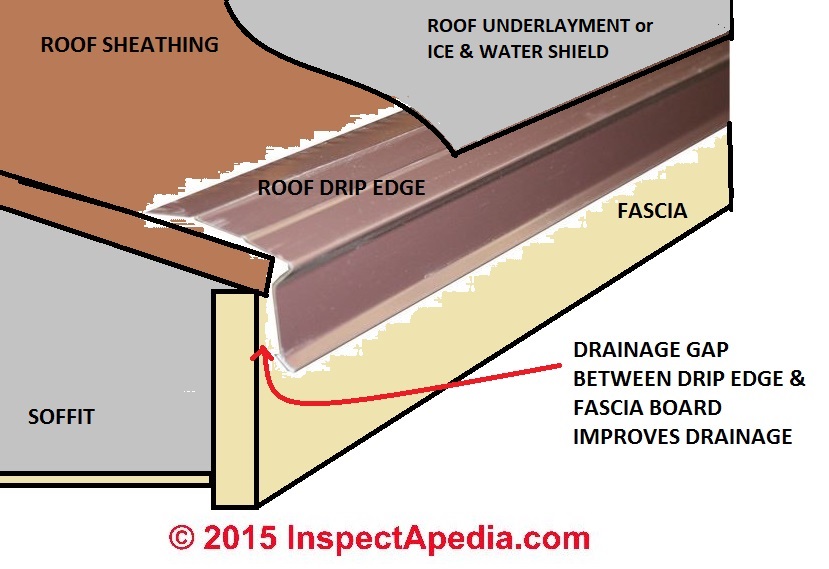
Our illustration above shows proper placement of the roof drip edge atop the roof sheathing - before installation of roofing felt or ice & water shield and spaced a bit away from the fascia board to improve its drainage.
Thanks to my carpentry teacher Bernie Campbalik for this tip.
Use a Furring Strip to Improve Drip Edge Drainage
Some roofing manufacturers such as IKO suggest installing a furring strip to make sure that the drip edge is spaced well out from the fascia.
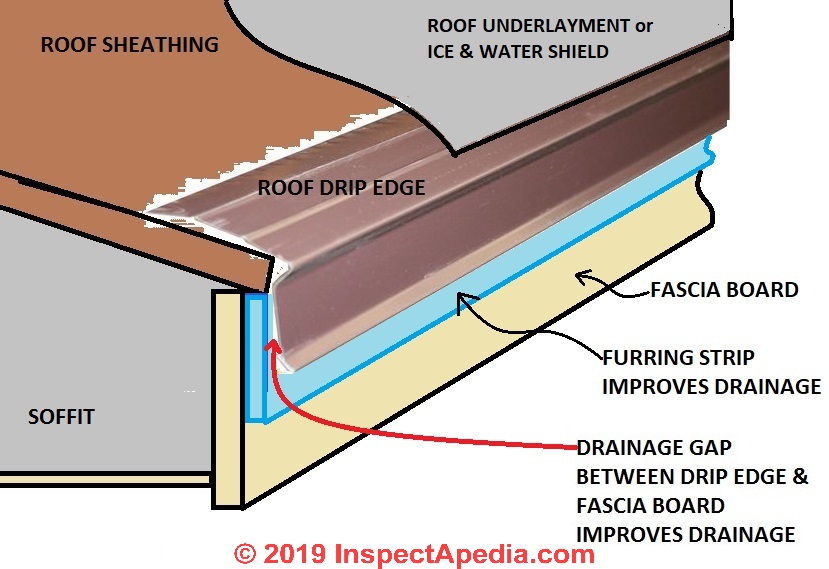
If using a Type C drip edge, you can install a furring strip to increase its performance. A furring edge is a strip of one-by-two wood you install on the vertical surface of the house just beneath the roof’s edge. When you install the drip edge over this strip, it keeps the lower flange further from the home’s siding, which helps to keep water further from the home. (IKO 2019)
In the sketch above the furring strip is shown in blue.
Nail the furring strip to the fascia board near the fascia top - tight under any extending of roof decking (usually absent); the Drip edge will be installed 1/8" proud of (away or out from) the furring strip in best practice or may be installed tight against the furring strip (reduces the life of the furring strip by rot).
The gutter (not shown) will be secured to the fascia board (yellow) with the gutter high-end up tight against the under-side of the furring strip.
Performance of drip edge where no gutters are installed
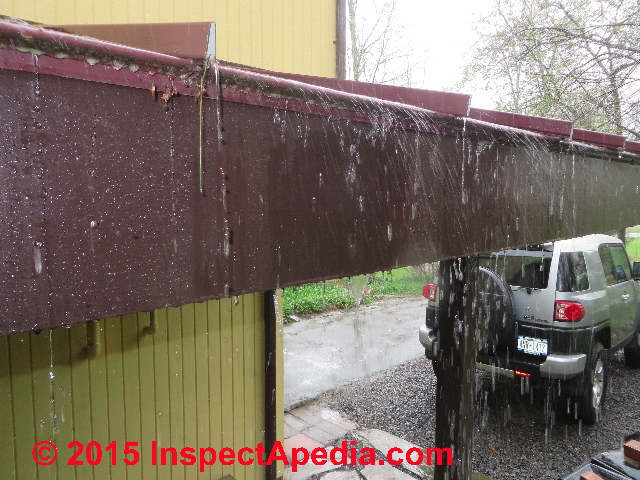
But where no gutters are installed you might want to see what happens to water running off of the roof edge where a drip edge is installed.

Our photo above shows what we ask of roof edges:
if there is no gutter, water leaves the edge and zooms out into space away from the building.
If there is a gutter, water leaving the lower roof edge is directed into the gutter, not behind it, not down building walls, not where we don't want it to go.
The brown drip edge in the photo above is properly installed and is doing its job. Most of the roof runoff is going off the roof not down the fascia board.
...
Reader Comments, Questions & Answers About The Article Above
Below you will find questions and answers previously posted on this page at its page bottom reader comment box.
Reader Q&A - also see RECOMMENDED ARTICLES & FAQs
Reader question: leave space between drip edge and fascia
I keep seeing again and again and again to leave room between the fascia and the drip edge.
My question. I have a 10/12 pitch roof.
Does the top of the T have to have that gap of more than 1/4"... (can't scroll up right now to verify) or is this meaning that when I put on a 10/12 pitch roof, and the TOP of it is 1/4" out... the bottom of the drip edge is against the back of the fascia but that is ok?
Or, do I need to put in the T edge and have the top out at least 1/4".. and then ALSO bend it so that the bottom part is ALSO 1/4" out when installed?
I've looked at photos and pictures and videos, and I still cannot glean. On the eaves this is most an issue with a 10/12 pitch which would put the bottom to the fascia against it even if the top is at least 1/4" out.
On the rakes, not much of a problem as the bottom would also be 1/4" out from the fascia? I hope I'm clearer than dirt on this and my question! Thanks.
I'm looking at the code and it appears to be saying that the length of the flange at the bottom needs to be at least 1/4".
I'm talking about the spacing of the T and the inside of the top of the T, and the space at the bottom of the flange with the little curve (I think that entire flange has to be 2" in my area per code... gonna look
but I can't find any codes as to how far to distance out the top and bottom of the drip edge from the fascia, which is what I'm trying to learn and discuss as my roofer is saying should be taught to the fascia. Thanks! 2022-07-31 by Susan
Moderator reply:
@Susan
Take a look at the illustration at the top of this page.
The gap that we're discussing is an air gap between the inside surface of the downwards flange part of the drip edge and the outer face of the fascia board.
The object of that space is to prevent water from running off the bottom edge of the drip edge and down against the face of the fascia board - which it wants to do by capillary action.
Water running down the fascia board wants to rot the fascia and it wants to run behind the gutter rather than into it.
By spacing the drip edge out a bit from the fascia (1/4" is enough) water drips mostly off of the lowest edge of the drip edge and down into the gutter.
Reader question: How close should the new sheathing be to the fascia board?
I had 3/8 plywood installed over 1x8 existing boards on 5.12 slope. How close should the new sheathing be to the fascia board? Thank You! 2022-05-21 by Maria Alvarez
Mod reply:
@Maria Alvarez,
You need at least an inch of the drip edge material that's going to be nailed onto the roof overlap on to nailable plywood. In other words if the plywood stops too short of the facial you won't be able to nail the drip edge. However there are brutish products with a wider flange if your plywood seems to stop a bit short.
If you can do so safely and without falling off of a ladder or the roof, Post a photo with a ruler on the roof so we could take a closer look.
Reader question: need appropriate spacing for drip edge flashing
I am trying to find if drip edge should be installed tight against the fascia (what ARMA and roofing manufacturers say) or ¼ (what you say) or ½ inch (what This Old House says) and who would be the authority on this.
I asked Owens Corning and they said they got all their information from ARMA. I asked ARMA and they said it is whatever the shingle manufacturer specifies.
I want to know if anyone has actually done research and tested to determine what is best or is it just what their grandfathers told them?
My roofer used 1 3/8 x 1 3/8 drip edge and nailed it directly into the top edge of LP SmartSide fascia (code says 2 inch nailed to roof deck). Now 1 ½ years later, I have rot at multiple areas. I have included 2 pictures of the same area.
Do you know where the idea that drip edge should be tight or away from fascia came from? (I believe it should be away because of surface tension). 2021-09-11
by Anonymous
Mod reply:
Anonymous:
I welcome the discussion and I would much like to see photos (I'm not likely to click on a Medieval barber video) of the damage,
but please help me out by reading our material carefully and also looking at our source citations.
At our article DRIP EDGE FLASHING for ROOFS
we do not, as you suggest, claim that the "right" spacing is 1/4", we say
Drip edges shall extend not less than 1/4 inch (6.4 mm) below the roof sheathing and extend up back onto the roof deck not less than 2 inches (51 mm).
That's from the model building code, the IRC. R905.2.8.5 Drip Edge
Let's start by being clear on why we want the spacing.
Good roof drip edge installation practice includes spacing of the vertical lip 1/4" to 1/2" off the fascia board; it's not just what our grandfathers told told us, it's also "code" and it's in some, though not all installation instructions for roof shingles, roof flashings, and drip edge installation guides.
But basic, simple observation as well as history and experience do count for something.
For over 100 years people who install and repair roofs or who repair building exteriors, and in more recent decades, since the 1980s, home inspectors, have observed that when the vertical lip of the drip edge is tight on the fascia we get
- fascia rot
- water running behind gutters and down the fascia, sometimes entering the soffit and even the building exterior wall
- roof runoff missing the gutter increases the occurrence of wet basements or crawl spaces, with concomitant building damage
Why do Many Roofers Install Drip Edge Tight Against the Fascia?
In my OPINON the reasons I find drip edge tight on the fascia are
- installer has no experience with building performance over time
- it's easier to get the drip edge straight when we make it tight
- the roofer purchased a narrow-width drip edge, perhaps not suitable for an asphalt shingle roof, and in addition the roof sheathing may have been set back slightly from the edge or back of the fascia board.
As a result, unless the drip edge is nailed tight against the fascia there is not enough drip edge flange width to nail to the roof sheathing or decking.
[solution: use or add a wider flange drip edge that gives 2" or more of space so as to be sure to catch the roof deck]In the late 1970s at carpentry and roofing school our instructor, Bernie Campabalik, taught that spacing should be no less than 1/4" and 1/2" is better, precisely to avoid the problems we cite above. His opinion at the time didn't cite code, it cited his 50 years of field experience.
The article we have on this topic, cited above, explains why we need this space, illustrates what happens when it's missing, and cites supporting model building codes and other sources.
Sure you might find still other sources or other OPINONS who argue for no space, but my goodness, the evidence is in the results.
I'm not sure what factual or research-basis there would be for arguing against spacing the drip edge off of the fascia board. In my OPINION when you find someone who ducks the question or who obfuscates is giving a reply that they think is safe for them and that avoids stepping on someone's toes. But that advice may not be the best for the building.
Even someone with no roof drip edge installation experience can surely see the evidence of the need for this spacing in our photos as well as in the field.
Luckily the worst doesn't happen at every roof installation. Just sometimes. In my OPINION if the worst always happened the problem would be more-widely known, but there would still be some improper drip edge installations, just from lack of experience and lack of training and failure to read the instructions "on the box".
OPINION: IF an installer doesn't follow best practice, installs tight drip edge, and then later the building suffers damage and the building owner complains, and IF the installer would rather not eat the cost of repair, s/he may , quite understandably, look for a source or guide that lets him/her off the hook.And especially in a contemporary world where "alternative facts" and conspiracy theory are very popular, the result may not be so great for the building or its owners.
Bottom line: use a clearance gap when installing drip edge, or retrofit drip edge by adding more with the clearance gap where the present drip edge is too tight;
OPINION: Fix the leaks and rot promptly enough to avoid more-expensive rot and mold or insect damage to the building, and argue about who should have done what later.
Reader question: is the space necessary if fascia was unclad wood?
If the fascia is clad in alum, is the space between eave drip and fascia still necessary as if fascia was unclad wood? 2021-07-20 by George R Barnett
Mod reply:
@George R Barnett,
Well I agree that cladding the fascia reduces although it doesn't eliminate the risk of rot, I still would prefer to have the water drip off the building rather than run down the fascia board. I have a nice collection of photos of algae and slime growing on such surfaces.
Also. we still have the concern that we want the roof runoff water to run into the gutter not behind the gutter.
Reader question: Why doesn't the Drip edge extend in to the Gutter
Why doesn't the Drip edge extend in to the Gutter, or in lieu of that, ... Why isn't it recommended to install flashing from under the bottom edge of the Drip Edge, down in to the Gutter? 2019-09-02 by David DeBord
Mod reply:
It can at the gutter's high end,
If drip edge is installed spaced out from the fascia as we illustrate here, and if gutter is properly secured to the fascia, roof runoff water will drip into the gutter without more flashing.
Reader question: does the water barrier go over or under the drip edge flashing
We are replacing the roof of my shed. We are replacing it with metal corrugated roofing. My question is does the water barrier go over or under the drip edge flashing. Most everything I have read is about shingled roofs, not metal corrugated roofing.
Thanks for your help! And do the nailers for the corrugated roofing go on before the moisture barrier? Thanks again. 2019-08-05 by Rose
Mod reply:
Thanks for the helpful question, Rose.
While I've seen drip edge installed atop the underlayment or moisture barrier on a roof deck, best practice is to nail the drip edge on first, then carry the underlayment or water barrier atop the drip edge roof nailing flange.
That avoids the chance of sending water under the drip edge and thus into the edge of the roof sheathing where it'll make trouble: first mold then rot, and ultimately a possible leak into the interior or into the soffit or fascia of the building.
I've updated one of our sketches to show (in gray) the roof underlayment or ice and water barrier going atop the roof sheathing AND atop the drip edge. It doesn't have to go all the way to the very edge of the roof drip edge - within 1/4" is probably ok.
Reader followup:
Thanks for your help, the image is very clear now! This should be my last question, I hope. We are putting on a sealed metal corrugated roof, do we install the purlins before or after the moisture barrier? Thanks again, you are awesome for sharing your knowledge!
...
Continue reading at ROOF DRIP EDGE INSTALLATION on NEW or RE-ROOF JOBS or select a topic from the closely-related articles below, or see the complete ARTICLE INDEX.
Or see these
Recommended Articles
- DIVERTER KICK-OUT FLASHING
- DRIP EDGE FLASHING for ROOFS - home
- ROOF DRIP EDGE DIMENSIONS & SIZES
- ROOF DRIP EDGE COLOR CHOICES
- ROOF DRIP EDGE PLACEMENT / LOCATION - you are on this page
- ROOF DRIP EDGE INSTALLATION on NEW or RE-ROOF JOBS
- ROOF DRIP EDGE INSTALLATION INSTRUCTIONS & CODES
- ROOF DRIP EDGE INSTALLATION MISTAKES
- ROOF DRIP EDGE ALTERNATIVE: FASCIA WRAP?
- FLASHING on BUILDINGS - home
- ROOFING FELT UNDERLAYMENT REQUIREMENTS
Suggested citation for this web page
ROOF DRIP EDGE PLACEMENT & LOCATION at InspectApedia.com - online encyclopedia of building & environmental inspection, testing, diagnosis, repair, & problem prevention advice.
Or see this
INDEX to RELATED ARTICLES: ARTICLE INDEX to BUILDING FLASHING
Or use the SEARCH BOX found below to Ask a Question or Search InspectApedia
Or see
INDEX to RELATED ARTICLES: ARTICLE INDEX to BUILDING ROOFING
Or use the SEARCH BOX found below to Ask a Question or Search InspectApedia
Ask a Question or Search InspectApedia
Try the search box just below, or if you prefer, post a question or comment in the Comments box below and we will respond promptly.
Search the InspectApedia website
Note: appearance of your Comment below may be delayed: if your comment contains an image, photograph, web link, or text that looks to the software as if it might be a web link, your posting will appear after it has been approved by a moderator. Apologies for the delay.
Only one image can be added per comment but you can post as many comments, and therefore images, as you like.
You will not receive a notification when a response to your question has been posted.
Please bookmark this page to make it easy for you to check back for our response.
IF above you see "Comment Form is loading comments..." then COMMENT BOX - countable.ca / bawkbox.com IS NOT WORKING.
In any case you are welcome to send an email directly to us at InspectApedia.com at editor@inspectApedia.com
We'll reply to you directly. Please help us help you by noting, in your email, the URL of the InspectApedia page where you wanted to comment.
Citations & References
In addition to any citations in the article above, a full list is available on request.
- "The Uses and Performance Requirements of Steep-Slope Roof Underlays in North America and the United Kingdom", Robert J. Booth, Keith Roberts, Proceedings of the North American Conference on Roofing Technology, p. 112-118 - Web Search 07/12/2010. This scholarly article cites 33 research articles on the role of roofing underlayments.
- NRCA Roofing & Waterproofing Manual, 5th Edition, National Roofing Contractors Association, 10255 W. Higgins Road Suite 600 Rosemont, IL 60018-5607 Telephone: (847) 299-9070 Toll Free: (866) ASK-NRCA (275-6722), e-mail: info@nrca.net. - http://www.nrca.net/rp/pubstore/details.aspx?id=243&c=9
- Asphalt Shingle Roofing [Inspection & Installation Guide], Coon Rapids Minnesota, Coon Rapids City Hall 11155 Robinson Drive Coon Rapids, MN 55433 763-755-2880, - Web search 07/12/2010 City Website - http://www.ci.coon-rapids.mn.us/ Contact the City of Coon Rapids at 763-755-2880
- Oakridge Pro30™ shingle installation instructions for Owens Corning Oakridge® PRO 30™ fiber glass-based asphalt shingles - Web Search 07/12/2010
- Our recommended books about building & mechanical systems design, inspection, problem diagnosis, and repair, and about indoor environment and IAQ testing, diagnosis, and cleanup are at the InspectAPedia Bookstore. Also see our Book Reviews - InspectAPedia.
- Best Practices Guide to Residential Construction, by Steven Bliss. John Wiley & Sons, 2006. ISBN-10: 0471648361, ISBN-13: 978-0471648369, Hardcover: 320 pages, available from Amazon.com and also Wiley.com. See our book review of this publication.
- In addition to citations & references found in this article, see the research citations given at the end of the related articles found at our suggested
CONTINUE READING or RECOMMENDED ARTICLES.
- Carson, Dunlop & Associates Ltd., 120 Carlton Street Suite 407, Toronto ON M5A 4K2. Tel: (416) 964-9415 1-800-268-7070 Email: info@carsondunlop.com. Alan Carson is a past president of ASHI, the American Society of Home Inspectors.
Thanks to Alan Carson and Bob Dunlop, for permission for InspectAPedia to use text excerpts from The HOME REFERENCE BOOK - the Encyclopedia of Homes and to use illustrations from The ILLUSTRATED HOME .
Carson Dunlop Associates provides extensive home inspection education and report writing material. In gratitude we provide links to tsome Carson Dunlop Associates products and services.
 |
HOME | ABOUT | ASK a QUESTION | CONTACT | CONTENT USE POLICY | DESCRIPTION | POLICIES | PRIVACY | |
| © 2026 - 1985 Publisher InspectApedia.com - Daniel Friedman | |||||||||