 Flat Roof Leak
Sealant Application
Flat Roof Leak
Sealant Application
How to apply roof sealants & coatings to stop roof leaks
- POST a QUESTION or COMMENT about how to apply roof sealant to repair leaky flat or low slope roofs
Flat & Low Slope Roof leak repair:
This article describes the steps in applying the sealant for repair of a leak in a flat or low sloped roof.
InspectAPedia tolerates no conflicts of interest. We have no relationship with advertisers, products, or services discussed at this website.
- Daniel Friedman, Publisher/Editor/Author - See WHO ARE WE?
Find & repair leaks in a flat or low sloped roof
 Article Series Contents:
- FIND THE LEAKS IN A FLAT ROOF - separate article
- PREPARE TO REPAIR THE LEAKS - separate article
- APPLY ROOF SEALANT OR COATING
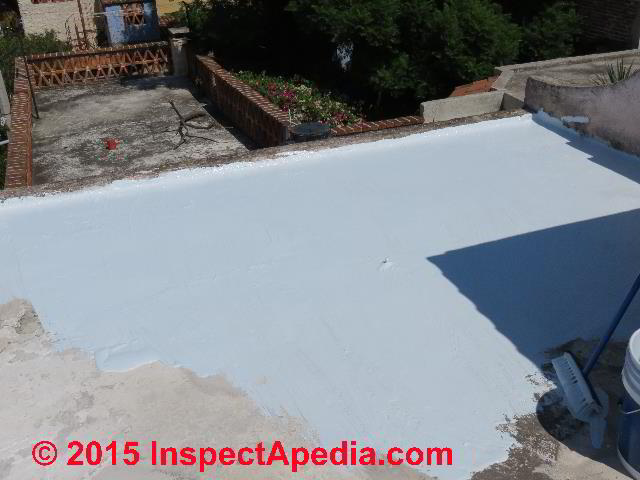
The concrete roof described in this article is a nearly flat roof sloping slightly (less than 1" in 12") to a roof drain in one corner.
This roof was constructed atop a home in San Miguel de Allende, in Guanajuato, Mexico in 2000. The flat roof leak diagnosis and sealant application to stop roof leaks described here were performed in 2015.
[Click to enlarge any image]
Flat and low slope concrete roofs on homes and other buildings are widely used in many areas of Mexico, the Southwestern U.S., Morocco, India, Australia and many other parts of the world where the roof surfaces are exposed to intense sunlight and often high temperatures.
...
Applying the Roof Sealant Paint or Coating
Watch out: Inspect the roof surface very carefully everywhere, on hands and knees, to be double sure you have not left any un-sound roof coating or loose areas that need more scraping and cleaning.
And do not start applying roof sealant coatings if you are not confident that your roof will have adequate drying time before any incoming rainy weather.
Watch out: sweep again before you start pouring out roof coating. You may be surprised how much more dirt and debris you'll collect.
Watch out: plan your work sequence, starting at the area of the roof most distant from your ladder or exit point.
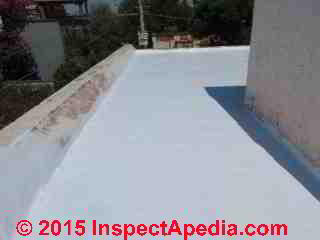
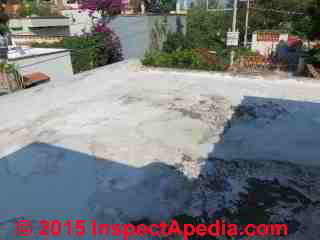
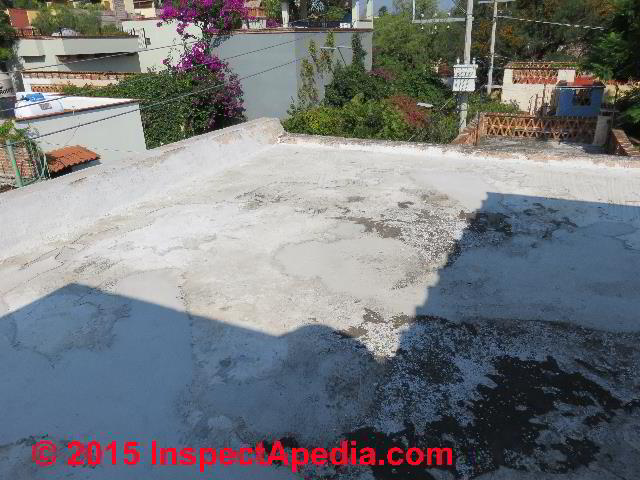
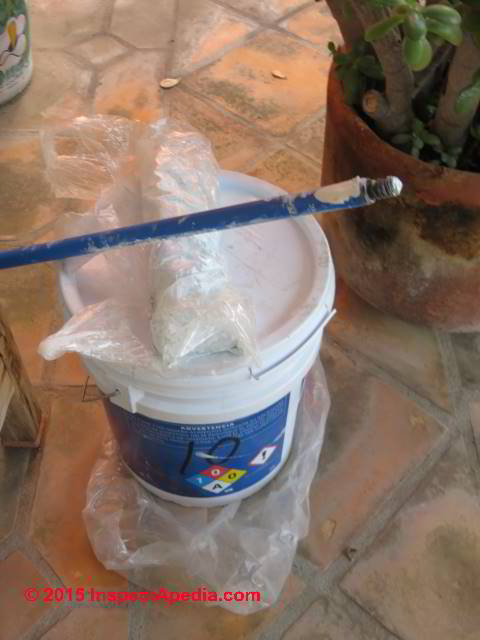
Above you can see we've poured out a dollop of our roof coating material and have begun to spread the roof sealant.
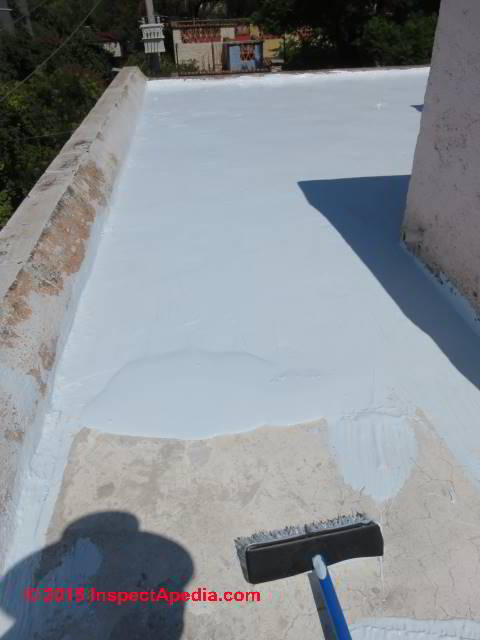
Take extra care to seal the juncture of roof surface with any parapets on a concrete roof. I'm using a disposable long-handled brush that makes the application of roof sealant faster and more comfortable. If you try this with a little paint brush you'll be sorry.
I'm pulling a thick roll of roof sealant in front of the brush edge (below).

If I don't see that I've got that leading roll of sealant on the front edge of my brush I know I need to pick up more from the poured out coating. As the sealant is applied I stop and brush sealant into the joint of roof top and parapet wall, and I inspect for any bubbles, cracks, or pits that are forming voids in the coating.
If necessary I brush back and forth a few strokes to be sure these are completely closed and sealed.
Watch out: pay attention to where you are standing and walking on the roof at all times.
On a commercial roof job in the U.S., OSHA will require safety barriers that are typically eschewed by small painting contractors on residential roof projects. It is particularly easy to step backwards off of a roof or to lose your balance, step into wet paint, and slip to your death.
Don't do that.
When my first roof sealant work area has been coated I step back (Watch out: don't step back off of the roof or you die) to inspect the work again for voids or defects.
It's important to make these checks while you can still reach with your long-handled brush into the work area to apply more coating if necessary. You don't want to ever walk into the wet paint - that's another way to slip and fall off of the roof besides looking like an idiot with paint on your shoes.
Watch out: in hot sun this is a good point to remember to stop and take a drink of water.
It's easy to suffer from sunstroke when working on a hot roof and in turn easy to then fall off of the roof. Be sure to consume any drinks or snacks before you've opened the container of roof sealant (as we warned above).
If you think I'm being an old maid take a look at construction accident statistics: falls from roofs are among the most common causes of injury or death in construction.
Falls from roofs cause between one tenth and one third of all construction fatalities! (U.S. CDC 2000 and U.K. HSE 2014).
Preparing to Leave the Newly-Coated Flat Roof
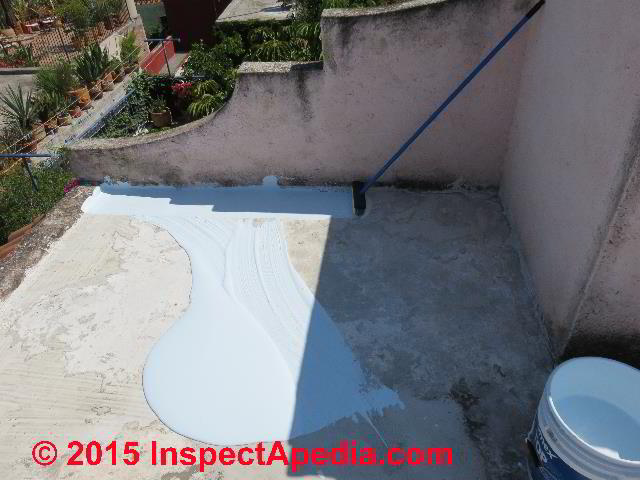
Above you can see that I've painted myself over to my roof exit point. This area also happens to be near the roof drain and best of all it happens to be directly over the areas of roof leakage shown in our interior photo at the start of this article.
I finished spreading roof sealant with great care, working from the top of my access ladder to complete the job.
At above right you can see the roof drain opening. I took extra care with sealant at the abutment of the roof surface and roof parapets in this area because this was over the area of roof leaks.
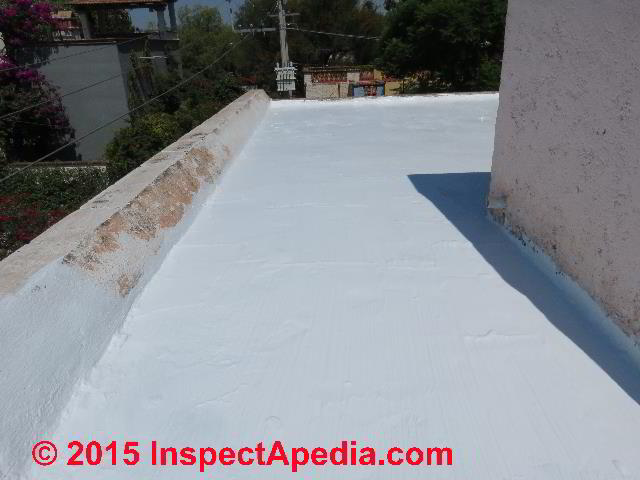
At above left our first roof sealant coating has been completed. You note that I did not paint all of the parapet wall - something to correct when the roof is dry or when applying the second roof coating layer.
Below you'll see that I store the roof coating paint brush in a heavy plastic bag so that it won't harden before we need it for the second roof coating layer.
Please don't leave that long paint brush brush handle on the floor where I'll step on it, slip and break a leg, or the roof's second coating could be delayed for quite some time.
Applying the Second Coat of Flat Roof Sealant
When the flat roof sealant coating had dried for several days we were ready to apply the second coat recommended by Comex, the roof coating manufacturer.
But it rained.
We waited for an additional three days of dry weather, then inspected the roof surface and found that it was dry and hard enough to walk on even in the areas of thick coating.

Comex advises that the second or top coat of roof sealant be applied in a direction orthogonal to the original coating - that is, opposite or across the original coating brush-on direction.
If you've used a long-handled coarse roof paint brush you'll see why: the brushed coating will often show areas of raised ridges in the original coating direction.
Brushing across those ridges for the second roof sealant application will improve the quality and smoothness of the top coat.
Inspect the first roof sealant coat for thin areas, pinpoint holes or voids, or for visible cracks that telegraphed through the coating. Be sure that these leak-suspect areas are given a sound, smooth, uniform coating of sealant.
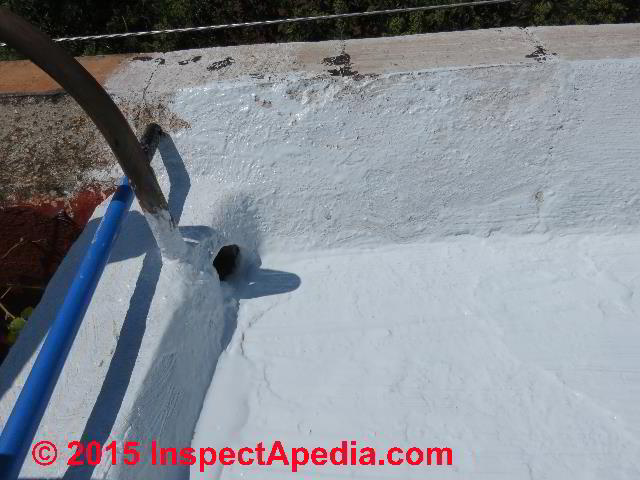
Also pay careful attention to a final seal at any junctures of roof surface and parapet walls.
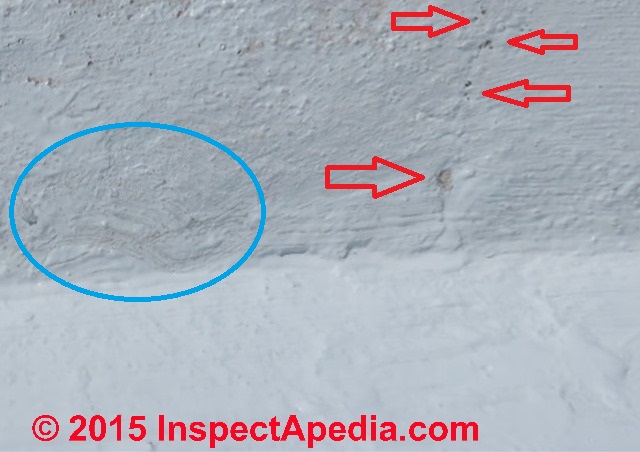
In our photo at above left you'll see that close inspection of the first roof sealant coating showed that I had left small voids in and around the course of a crack in the parapet wall. The second coat is an opportunity to seal that area (red arrows) and thus to reduce the chances of roof leaks at that point. You'll also see an area (in the blue oval) where the roof sealant coating was a bit thin.
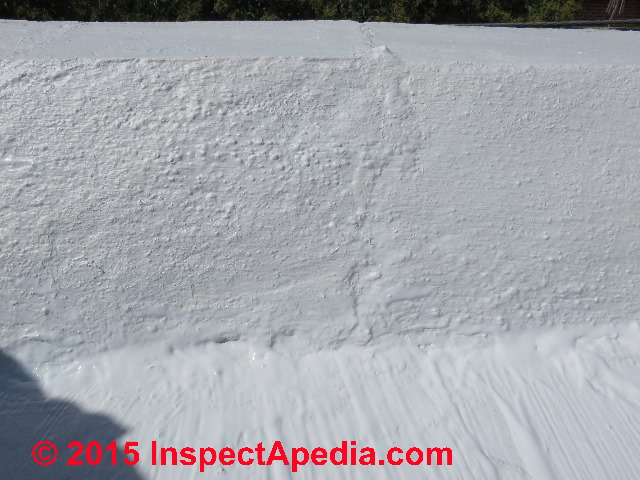
Below is the same roof area after my second coat of roof sealant paint.
[Click to enlarge any image]
It's worth taking the time to be a bit careful and compulsive now about roof sealant coating rather than to have to do the job over again or spend time looking for that little hole or crack you neglected to repair and seal the first time.
...
Reader Comments, Questions & Answers About The Article Above
Below you will find questions and answers previously posted on this page at its page bottom reader comment box.
Reader Q&A - also see RECOMMENDED ARTICLES & FAQs
On 2022-11-26 by Anonymous
We have a frame home with stucco-covered parapets that have failed to a point of leaking into the inside of the home.
I am told by two roofers that the parapets are not to code in that they do not have parapet wall coping caps and drip flashing. The top of the parapet wall is strictly stucco and doesn’t have drip flashing.
Until early spring when they can be reconstructed, both roofers suggested to temporarily wrap the tops and sides of the parapet walls with a tarp cut into strips and adhering them to the stucco using an appropriate adhesive. I have a nephew who is willing to do the temporary wrap.
I visited your site’s section: https://inspectapedia.com/BestPractices/Exterior_Construction_Adhesives.php.
There is a wealth of comprehensive information about adhesives and their properties. What remains unclear is what is the appropriate adhesive that works in the following factors:
1. Stucco: has a very rough finish – roofer called it Spanish lace/skip trowel.
Point: lots of gaps
2. Temperature: November/December day temperature mid-40’s to 50 and nights 25 to 30 degrees:
Point: Effect on adhesion/setting
3. Temperature/Clamping Time: There are very wide temperature differences between day and night times
Point: Is there an adhesive that can be applied via a caulking gun for quick application and quick setting during the “warmth” of the day? What detriment is there for the adhesive’s exposure to overnight freezing temperatures?
I would really appreciate whatever help you can offer
On 2022-11-26 by InspectApedia (Editor)
@Anonymous,
It would help me comment if I could see some photos of the installation in question. Without knowing anything about your home I have to give a general answer.
In general, in my OPINION, NO simple sealant or caulk is a good fix for roof or parapet leaks, though in a pinch I might use silicone on a clean dry surface, applying it very carefully so as to be sure it is properly in contact with the surfaces without openings or voids.
Silicone adhesive-sealant can be applied at a remarkably wide temperature range from about 20 degF up to 120 degF.
It's best to apply when no rain is expected for 24 hours though in fact Silicone can tolerate wetting pretty soon after application.
Example specifications/instructions for applying silicone and that discuss temperature ranges include
Pecora Corp, Technical Bulletin #190Sealant Application Temperature / Guidelines(Silicone, Urethane, and Latex Sealants) [PDF] - retrieved 2022/11/26, original source: https://www.pecora.com/wp-content/uploads/2015/12/PEC-190-Sealant-Application-at-High-Temperatures1.pdf
copy at InspectApedia at
https://inspectapedia.com/exterior/Silicone-Sealant-PEC-190-Application-Instructions.pdf
What's really needed is a thorough inspection of the building to set repair priorities focused on
1. things that are Dangerous
2. things causing rapid, expensive Damage
3. things that just Don't work or don't work at acceptable reliability and that are needed to occupy the structure
(Dan's 3 "Ds" of setting building repair priorities)
Check for hidden mold caused by roof leaks
Even if you are confident that there are no such issues other than parapet leaks, still you should inspect very thoroughly for water damage and hidden mold that could become a health risk for you or others.
Follow the water: the course of leakage - and if necessary make one or two small 2" x 4" test cuts through drywall at a ceiling or lower wall where the leak risk is most-suspected. Inspect the cavity side of the drywall and the interior of the wall or ceiling cavity for mold. If it's clear then an outside leak-stop fix may be all that's needed.
Best repairs for a leaky parapet wall
A proper leaky parapet wall repair probably would need removal of some of the stucco to install proper roof flashing. You might ask the roofers for more details about what's needed and where exactly the leaks are occurring.
I don't know what your roofing material is nor if these are steep, low-slope or flat roofs - those affect how you proceed to repair such a roof parapet wall. For example if it's an EPDM or rubber roof, a roofer might
1. run EPDM up the parapet wall and secure it in place with a wood or metal strip, sealing those to the wall surface
When silicone is used along with a mechanically fastened strip (as we'd do on a low-slope or flat roof meeting a parapet wall) "clamping time" that you asked about isn't an issue.
and
2. inspect and fix any leaks in the parapet itself, especially the parapet top but also its sides. A good parapet design has a top that overhangs its walls to give a drip edge rather than sending water down the parapet walls.
But all of that is of course more cost (and more durable) than a band-aid approach of blobbing on sealant.
We describe (and you might want to read) parapet wall leak problems in three places (I need to combine these into a new parapet wall article)
FLAT ROOF LEAK REPAIR - you are on this page
FLAT ROOF MOISTURE & CONDENSATION
BRICK FOUNDATIONS & WALLS - where we also discuss brick parapet wall damagePlease keep me posted on how things progress, and send along photos or additional details (building country & city & age or age of the item in question) if you can. Such added details can help us understand what's happening and often permit some useful further comment. What we both learn may help me help someone else.
...
Continue reading at LEAKY ROOF DIAGNOSIS & REPAIR or select a topic from the closely-related articles below, or see the complete ARTICLE INDEX.
Or see FLAT ROOF LEAK REPAIR FAQs - questions & answers about finding leaks in flat and low slope roofs and how to fix them
Or see these
Recommended Articles
- BUILT UP ROOFS
- CONCRETE ROOFING
- DEFECTS LIST - ROOF LOW SLOPE
- EPDM, RUBBER, PVC ROOFING
- EPDM ROOF COATING REPAIRS
- EPDM ROOF LEAK REPAIRS
- EPDM ROOF SEAM REPAIR TAPE
- FLAT ROOF DRAINAGE SYSTEMS
- FLAT ROOF LEAK REPAIR
- FLAT ROOF MOISTURE & CONDENSATION
- LOW SLOPE ROOFING
- LOW SLOPE ROOF CONVERSION
- MEMBRANE & SINGLE PLY ROOFS
- MODIFIED BITUMEN ROOFING
- MODIFIED BITUMEN ROOF DEFECTS & ROOF LIFE
- ROLL ROOFING, ASPHALT & SBS
- ROOF LEAK DIAGNOSIS
Suggested citation for this web page
FLAT ROOF LEAK REPAIR SEALANT at InspectApedia.com - online encyclopedia of building & environmental inspection, testing, diagnosis, repair, & problem prevention advice.
Or see this
INDEX to RELATED ARTICLES: ARTICLE INDEX to BUILDING ROOFING
Or use the SEARCH BOX found below to Ask a Question or Search InspectApedia
Ask a Question or Search InspectApedia
Share this article:Questions & Answers diagnosing & repairing leaky roofs
Try the search box just below, or if you prefer, post a question or comment in the Comments box below and we will respond promptly.
Search the InspectApedia website
Note: appearance of your Comment below may be delayed: if your comment contains an image, photograph, web link, or text that looks to the software as if it might be a web link, your posting will appear after it has been approved by a moderator. Apologies for the delay.
Only one image can be added per comment but you can post as many comments, and therefore images, as you like.
You will not receive a notification when a response to your question has been posted.
Please bookmark this page to make it easy for you to check back for our response.
IF above you see "Comment Form is loading comments..." then COMMENT BOX - countable.ca / bawkbox.com IS NOT WORKING.
In any case you are welcome to send an email directly to us at InspectApedia.com at editor@inspectApedia.com
We'll reply to you directly. Please help us help you by noting, in your email, the URL of the InspectApedia page where you wanted to comment.
Citations & References
In addition to any citations in the article above, a full list is available on request.
- "Slips & trips and falls from height in
Great Britain, 2014" [PDF] , Health and Safety Executive, Health and Safety Executive
Redgrave Court
Merton Road
Bootle
Merseyside
L20 7HS U.K., - retrieved 9 Aug 2015, original source: http://www.hse.gov.uk/statistics/causinj/slips-trips-and-falls.pdf
Excerpt: falls from height were the most common cause of fatalities, accounting for nearly three in ten (29%) fatal
injuries to workers (RIDDOR); - U.S. CDC, "Worker Deaths by Falls, A Summary of Surveillance Findings and Investigative Case Reports", [PDF] U.S. DEPARTMENT OF HEALTH AND HUMAN SERVICES,
Public Health Service,
Centers for Disease Control and Prevention,
National Institute for Occupational Safety and Health,
September 2000, retrieved 9 August 2015, original source: http://www.cdc.gov/niosh/docs/2000-116/pdfs/2000-116.pdf
Excerpt: Based on the NTOF surveillance data, falls from elevations were the fourth leading cause of occupational
fatalities from 1980 through 1994. The 8,102 deaths due to falls from elevations accounted for 10% of all
fatalities and an average of 540 deaths per year. - Our recommended books about building & mechanical systems design, inspection, problem diagnosis, and repair, and about indoor environment and IAQ testing, diagnosis, and cleanup are at the InspectAPedia Bookstore. Also see our Book Reviews - InspectAPedia.
- Best Practices Guide to Residential Construction, by Steven Bliss. John Wiley & Sons, 2006. ISBN-10: 0471648361, ISBN-13: 978-0471648369, Hardcover: 320 pages, available from Amazon.com and also Wiley.com. See our book review of this publication.
- In addition to citations & references found in this article, see the research citations given at the end of the related articles found at our suggested
CONTINUE READING or RECOMMENDED ARTICLES.
- Carson, Dunlop & Associates Ltd., 120 Carlton Street Suite 407, Toronto ON M5A 4K2. Tel: (416) 964-9415 1-800-268-7070 Email: info@carsondunlop.com. Alan Carson is a past president of ASHI, the American Society of Home Inspectors.
Thanks to Alan Carson and Bob Dunlop, for permission for InspectAPedia to use text excerpts from The HOME REFERENCE BOOK - the Encyclopedia of Homes and to use illustrations from The ILLUSTRATED HOME .
Carson Dunlop Associates provides extensive home inspection education and report writing material. In gratitude we provide links to tsome Carson Dunlop Associates products and services.
 |
HOME | ABOUT | ASK a QUESTION | CONTACT | CONTENT USE POLICY | DESCRIPTION | POLICIES | PRIVACY | |
| © 2026 - 1985 Publisher InspectApedia.com - Daniel Friedman | |||||||||