
 Electric Circuit Breaker Replacement
How to replace a circuit breaker - 11 steps
- POST a QUESTION or COMMENT about electrical circuit breaker troubleshooting or replacement
Electrical Circuit Breaker Replacement
This article describes in detail the steps that an electrician or trained electrical worker follows in replacing a bad circuit breaker or installing a new one in an electrical panel.
We include photos and warnings to help avoid common mistakes when installing a breaker and we include safety warnings throughout the discussion.
InspectAPedia tolerates no conflicts of interest. We have no relationship with advertisers, products, or services discussed at this website.
- Daniel Friedman, Publisher/Editor/Author - See WHO ARE WE?
Steps in Replacing an Electrical Circuit Breaker
 This article describes the typical steps that may be taken by a qualified electrician or electrical worker who is adding or replacing a circuit breaker in an electrical panel.
Watch out: Replacing a circuit breaker is not technically difficult, and the steps might perhaps be performed by a person familiar with electrical work, electrical test tools, and basic hand tools. However replacing a circuit breaker is inherently dangerous, both to the person performing the work and to the building occupants if the work is not performed correctly.
And electrical work performed by other than a licensed electrician may be illegal. In many jurisdictions only a licensed electrician is permitted to perform electrical installation or repairs.
[Click to enlarge any image]
Fatal Shock Hazard Warning: Inspecting or attempting to change electrical components in an electrical risks serious burns or other injuries you or to others or even death by electrocution. Do not remove the cover from an electrical panel to expose live wires and connections and do not attempt to touch or repair circuit breakers or electrical wiring unless you are properly trained and equipped.
We describe common safety hazards and procedures for people who are simply inspecting an electrical panel beginning at ELECTRIC PANEL INSPECTION SAFETY.
When Should an Individual Circuit Breaker Be Replaced?

On occasion a single circuit breaker may be damaged from a mechanical cause, corrosion, or another cause.
If you are confident that the problem is specific to a single breaker, it may be reasonable to purchase and install a compatible replacement circuit breaker from the same manufacturer at the same ampacity or current rating.
Watch out: if you are replacing a circuit breaker because of rust or corrosion in the electrical panel be sure to read CORROSION in ELECTRICAL PANELS .
When Should the Entire Electrical Panel and All Circuit Breakers Be Replaced?
 Our photo shows a Zinsco brand circuit breaker that has blown out or burned through its molded case and whose bus bar contacts are badly burned and corroded.
Watch out: there multiple issues with this electrical panel: first it may not be possible to even see this failure without opening the panel, removing the cover, and removing the circuit breaker, unless power has been interrupted.
Second, because all evidence to date indicates that innate fabrication and design defects make this a frequent failure for this electrical panel brand, replacement of the burned breaker would be a mistake. Independent tests show that replacement breakers are likely to fail as well.
Third, the connecting electrical bus in the panel itself is almost always found to be burned and damaged when this failure is observed. You would not be successful replacing even a reliable breaker (there is none) in that location.
This is an example of discovery of an electrical panel that should be replaced entirely. Other problem-brands of unreliable breakers are discussed in a list we give just below.
A circuit breaker that does not reliably trip off when there is a short circuit or an overcurrent is unsafe. Yet over many years the breaker may never be called-upon to do its job because the circuit it monitors has simply never had an overcurrent or short circuit occur.
An analogy is that you are riding around in your car wearing a seatbelt that has, out of your view, been cut through to a single thread. The seat belt seems to be just fine and you feel safe. That's because you haven't yet been in a crash.
At CIRCUIT BREAKER RELIABILITY TESTS you can see independent test results showing a dramatic difference in safe performance among a variety of major circuit breaker and electrical panel brands. If your electrical panel and circuit breakers are one of the poor-performing brands, even if you have not yet experienced a problem you should consider replacing the panel.
In addition the historical performance of several known brands of older electrical panel should be replaced including the following:
- CHALLENGER ELECTRIC PANELS
- CIRCUIT BREAKERS RE-CONDITIONED USED
- FPE Stab-Lok® : FIRES WAITING TO HAPPEN
- MURRAY CIRCUIT BREAKER HAZARDS
- MURRAY SIEMENS Recall
- PRIVATE BRAND/ EMI FPE PANELS
- PUSHMATIC - BULLDOG PANELS
- UBI FPE CIRCUIT BREAKER TEST RESULTS
- ZINSCO CIRCUIT BREAKER TEST REPORT
Typical Steps in Replacing a Circuit Breaker
 Fatal Shock Hazard Warning: Inspecting electrical components and systems risks death by electrocution as well as serious burns or other injuries you or to others. Do not remove the cover from an electrical panel to expose live wires and connections unless you are properly trained and equipped.
At ELECTRIC PANEL INSPECTION we describe common defects that can be determined simply by visual inspection.
Also see our complete list of safety articles at SAFETY for ELECTRICAL INSPECTORS - home.
Step 1: Turn off all electrical power to the panel
Anyone with any sense will be sure that electrical power in the electric panel is OFF before removing the cover for inspection or for circuit breaker installation or replacement.
If there is a separate, external power switch for the main panel turn that to OFF.
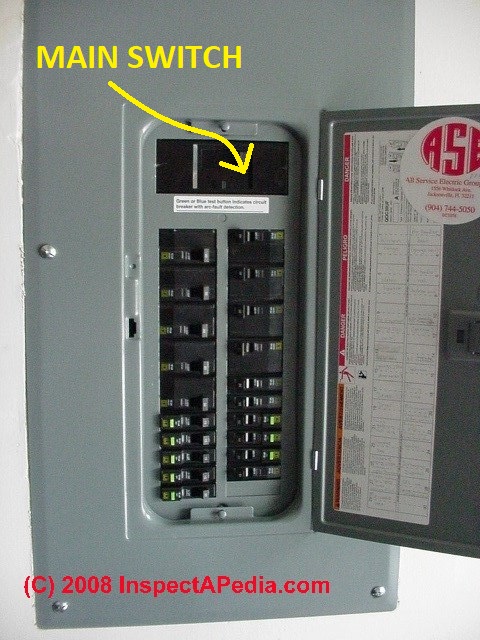
At the electrical pane itself, if there is a main switch, or more than one main switch, turn the main circuit breaker(s) OFF - there may be more than one breaker labeled MAINS.
Or if the panel is a fuse/breaker combination panel, pull out the main fuse blocks. Details about main disconnect switches for electrical panels are at MAIN ELECTRICAL DISCONNECT.
Watch out: you may be turning on or off building equipment that you don't want to interrupt such as life-safety equipment, breathing apparatus (in some homes), as well as air conditioners and refrigerators.
Watch out: if the circuit breaker is loose and wobbling in its mount in the electrical panel it is unsafe. It may simply need to be re-mounted or pushed into position inside the panel, or a mounting screw may be loose, or the panel may be damaged.
See CIRCUIT BREAKER MAIN or FUSE TEST for a discussion of the hazards in dropping electrical power at the panel.
Step 2: Remove the electrical panel cover
Watch out: if electrical power is not really off, simply removing the panel cover itself can be dangerous, even fatal. Installation of a new or replacement circuit breaker requires removing the electrical panel cover - not something you should attempt if you are not trained in safe electrical repairs as touching a live connection in the panel can shock or kill you.
There can also be subtle hazards such as an electrical panel screw that has pierced a live wire or a spring-loaded electrical panel cover that, when removed, can allow loose circuit breakers to move, causing an electrical arc explosion. It's not just theory. An electrician was killed by just such an event.
See more advice at ELECTRICAL PANEL COVER REMOVAL
Details are at SAFETY for ELECTRICAL INSPECTORS
Step 3: Confirm that electrical power is really off
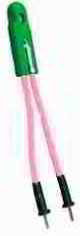 Once shocked twice shy - if you've survived. With the panel cover removed to expose electrical power connections, many electricians us a simple neon tester like the tool shown here to confirm that power to a circuit or device is actually OFF.
Watch out: unless power into the panel to be worked-on is controlled by a separate switch box, even when the main fuse is pulled or the main circuit breaker in the panel is in the OFF position, live electrical wires are entering the panel from the electrical meter.
You can be shocked or killed touching or inserting any tool into an electrical panel. If you are not trained and equipped to do so, don't try it.
The only way that all electrical power into a main electrical panel can be turned off when there is no separate external main switch is by having the electric utility company pull the meter or drop electrical power at the service entry.
Many electricians use a simple neon tester to check that a wire or circuit or connector has been powered OFF.
Other experts may us a VOM (voltmeter) or DMM (digital multimeter) to perform this test using the Voltage scale.
Touching the leads between a "hot" circuit breaker connector or bare electrical wire tip and ground (120V) or between two wire connectors on a 240V breaker 240V will light the neon light if power is present.
Touching the leads to the terminal screws at the main power terminals in a panel will also tell you - if you are not killed by having touched a live connector yourself - that the panel is recieving power.
Watch out: before relying on any test device to determine if power is off, test the device at a known power source to be sure it is working properly.
See TOUCHING ELECTRICAL EQUIPMENT
Also see ELECTRICAL PANEL INSPECTION SAFETY
Step 4: Remove the circuit breaker to be replaced
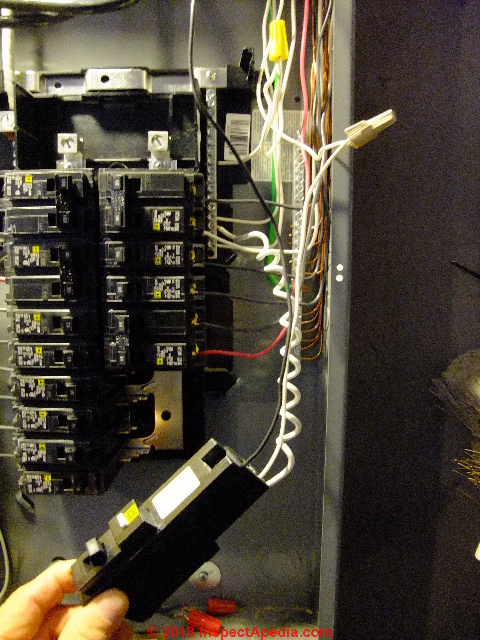 Switch the breaker to be removed to the OFF position and pull it out of its slot in the panel.
In the electrical panel one end of a circuit breaker is clipped to an electrical bus bar that supplies power.
The other end is often held in place by a steel clip into which a recess in the breaker end was inserted.
The breaker end that was clipped to the bus bar is what needs to be pulled up or out first. Then the breaker will slide out of position and can be lifted away.
In sum: Except for breakers held in place by a screw, most circuit breakers are removed by pulling up on one end, often the end closer towards the outside edge of the panel. Pull up to feel the breaker come un-clipped from its connection in the panel.
In the photo I'm holding an AFCI-type circuit breaker after un-snapping it from its position in a Square-D electrical panel.
As you we explain below, this type of breaker will have two wires connected to screw terminals on the breaker (hot and neutral) and its own permanently-attached white wire that must be dis-connected from the neutral bus in the panel.
But most circuit breakers will simply have one (120V breakers) or two (240V breakers) hot wires connected to the breaker.
Step 5. Remove the circuit wire from the old circuit breaker
Holding the disconnected circuit breaker firmly with one hand, use a screwdriver to loosen the screw terminal that holds the circuit wire in place in the breaker terminal.
With the screw loose, pull the circuit wire out of the circuit breaker terminal.
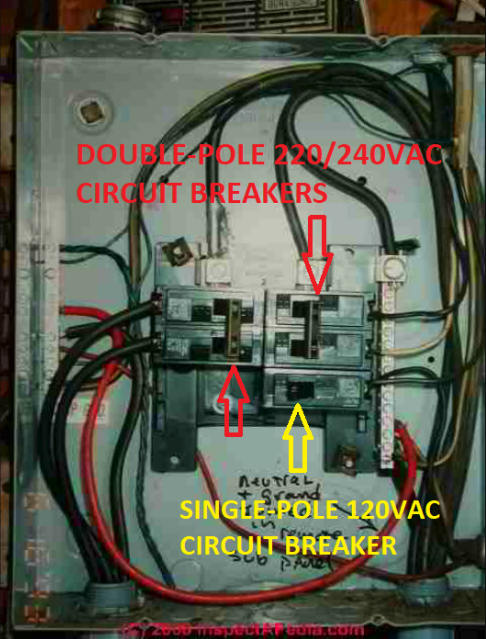
If the circuit breaker was a single pole 120-volt unit it will have just one wire connected (see exceptions below).
If the circuit breaker was a double pole (two switches or double-width breaker) it is a 240V breaker and will have two hot wires (usually one black, one red) connected to each of two screw terminals on the breaker.
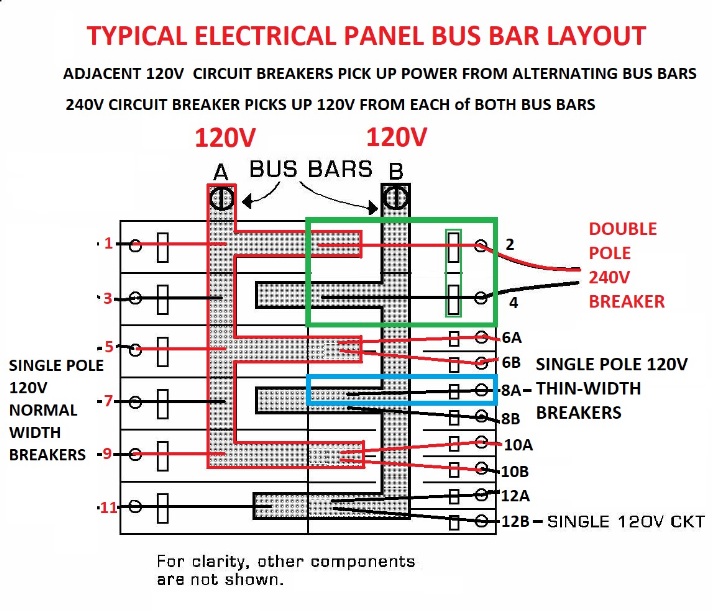
Above: our sketch illustrates how double pole circuit breakers obtain 240Volts: picking up two separate 120V sources from alternating bus positions in the electrical panel.
You can see that when full-width breakers are being used, such as at upper right in the sketch as well as all of the left side breakers, any pair of breaker positions will pick up power from two different bus bars.
While you have that circuit wire disconnected, inspect the end of the electrical wire(s). If a wire end is cut, squashed, corroded has been damaged in any way you will need to clip off the damaged end and strip back insulation to permit the wire to connect to the replacement or new breaker.
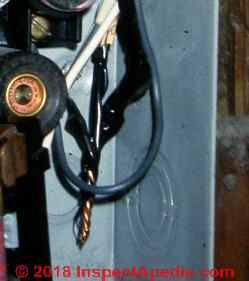
Watch out: if you find overheated, burned electrical wires like the ones shown in our photo below, there have been unsafe conditions in the panel and building's electrical wiring system.
The cause of overheating must be determined and corrected before you can think that the electrical wiring and panel are safe.
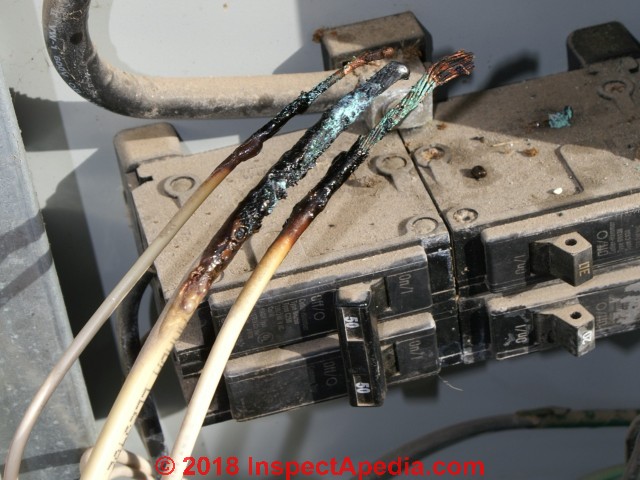
When the overheat problem has been diagnosed (probably a circuit breaker that did not trip in response to overcurrent) and addressed, the burned wire end and insulation need to be cut off and the wire stripped anew.
Exceptions to number of wires on circuit breakers: AFCI and GFCI circuit breakers
A GFCI or AFCI circuit breaker, because it is monitoring the neutral wire in the circuit as well a the hot wire, will have three wires connected to it even if it's just a 120Volt single pole breaker. Follow the installation wiring details given by the manufacturer.
Our photo below shows a Square-D AFCI - Arc Fault Circuit Interrruptor type circuit breaker.
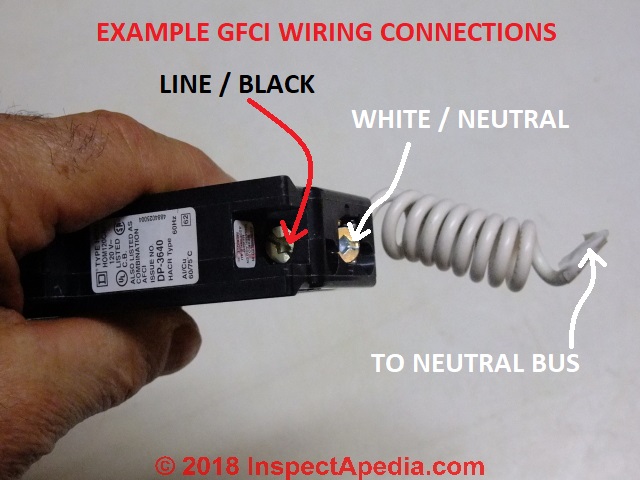
On these special circuit breakers you will see three wires: circuit hot, circuit neutral, and AFCI neutral-bus connector.
You will need to disconnect all three wires. Details of AFCI wiring are at HOW TO INSTALL & TEST AFCIs
Also you may want to see AFCIs vs. GFCIs - what's the difference?
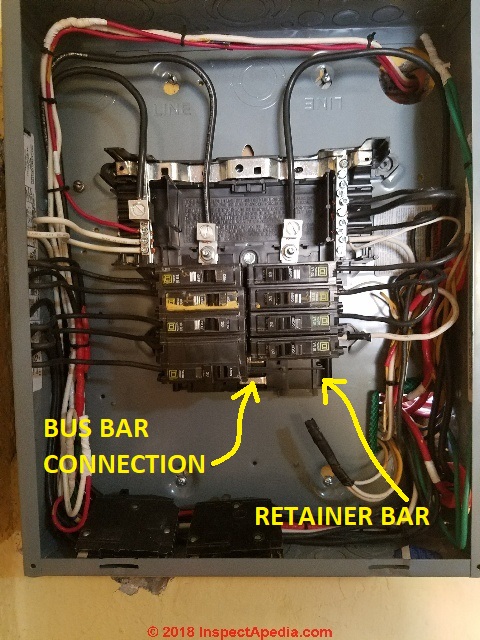
Step 6. Plug the new circuit breaker back into the proper slot in the electrical panel
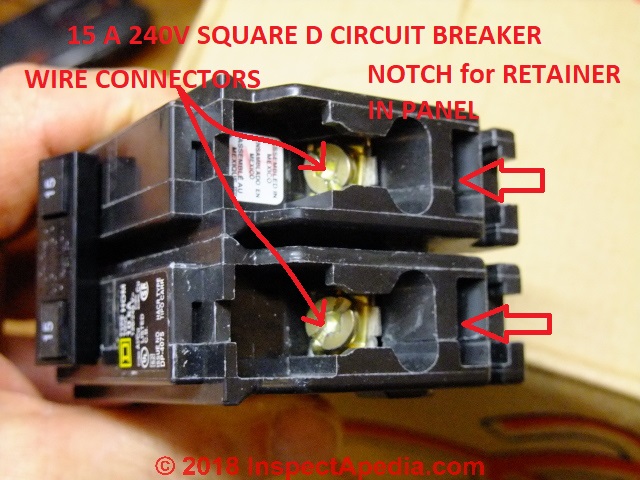
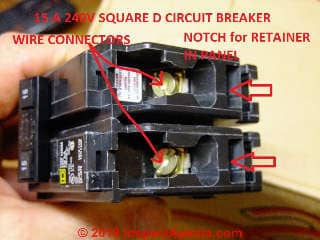
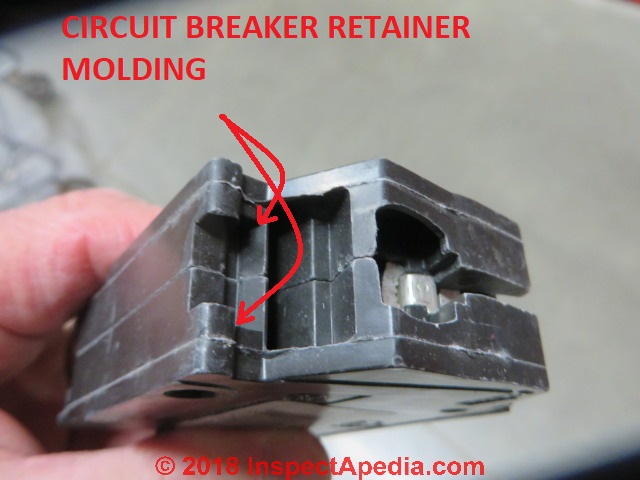
Above: the notch molded into the circuit breaker body is to fit into the retainer bar or clip in the electrical panel first, then you push the connector-clip end down onto the bus bar.
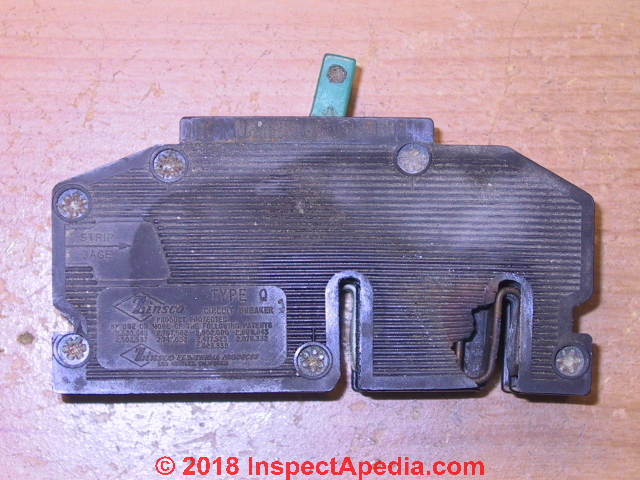
Below: the under-side of the same circuit breaker.
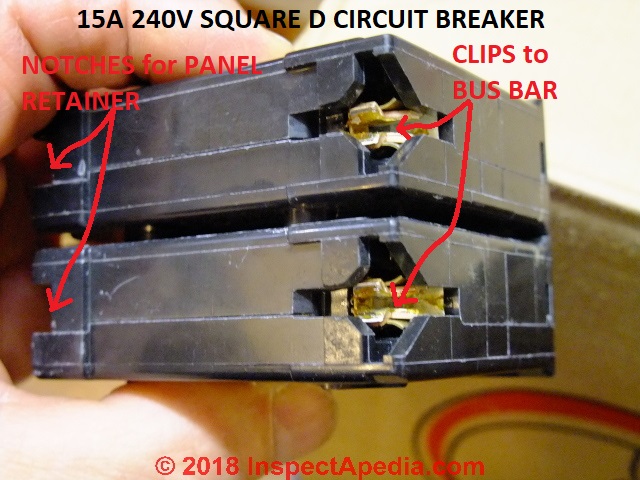
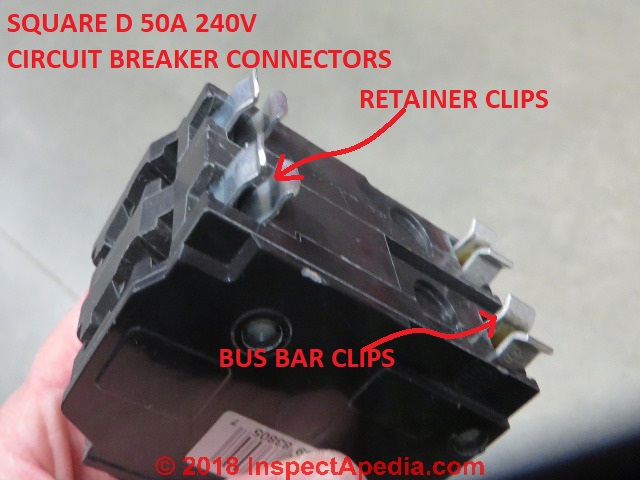
Photo above: On this Square D-brand 240-V double pole circuit breaker bottom surface you can see the connector clips that will connect to the bus bars in the electrical panel.
Photo below: here is a closer look at the retainer lugs shaped into the end of a molded-case circuit breaker. The retainer is what will be inserted under a steel retainer bar or clip in the electrical panel first when the breaker is being inserted.
Below: in a different circuit breaker retainer design, this double-pole 240V 50-A Square D circuit breaker uses metal clips: one pair clips onto a raised retainer lip in the electrical panel and the other pair at the other end of the breaker will clip onto bus-bars in a Square D electrical panel like the panel shown next below.
Leave the breaker switched to its OFF position.
To connect wires to a new circuit breaker you'll need to loosen its terminal screw enough that the new stripped wire end can be pushed into the connector. Do this now.
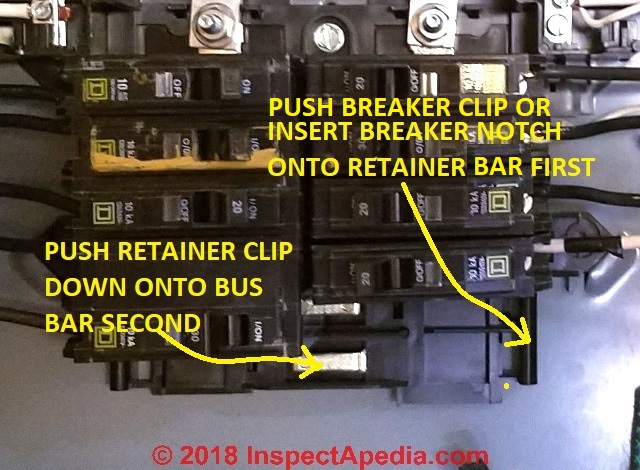
Then push the circuit breaker back into place in the electrical panel by reversing the procedure you used at step 4.
Watch out: it is essential to first insert the end of the circuit breaker that slips under a retainer in the panel and then second push the breaker down to connect its clip-on connector to the electrical bus. If you just push the breaker clip onto the bus without having inserted the other end of the breaker under the retainer in the panel, the circuit breaker will be loose and unsafe.
You can usually tell that the breaker has been properly inserted because its outer face will be flush with other circuit breakers in the panel. If the breaker is clipped to the bus but its other end sticks up above its neighbors, then it has not been inserted properly.
Step 7. Connect the circuit wire to the new, replacement circuit breaker
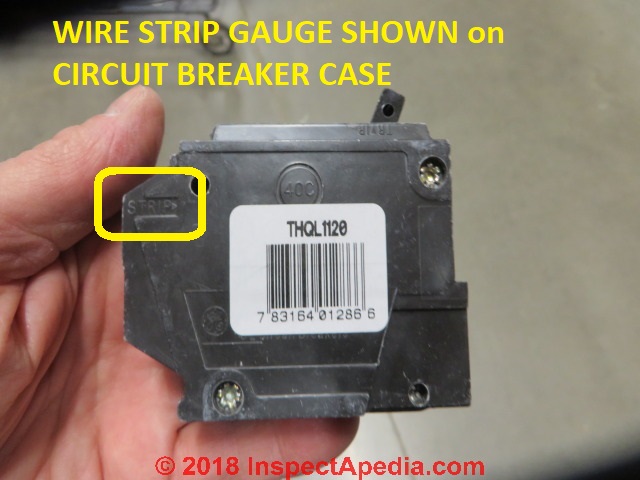
Above: in the yellow box you can see the wire strip gauge indicator provided by the manufacturer of this molded case circuit breaker. [Click to enlarge any image]
Good electrical practice is to strip off just enough insulation to fully insert the wire into the screw terminal: typically that's about 1/2". There may be a wire strip gauge marked on the breaker.
Insert the clean stripped wire end into the terminal on the circuit breaker and tighten the screw firmly down against the electrical wire.
I usually give a tug on the wire to be sure that it is pinched securely in the terminal.
Check that the circuit wire is routed neatly and smoothly in the panel and to the breaker. You can recognize professional electrical work in a panel by neatness and by observing that all of the wire bends are rounded and smooth.
A sharp right-angle bend in an electrical wire can weaken it and lead to an unsafe condition, broken wire, or circuit failure.
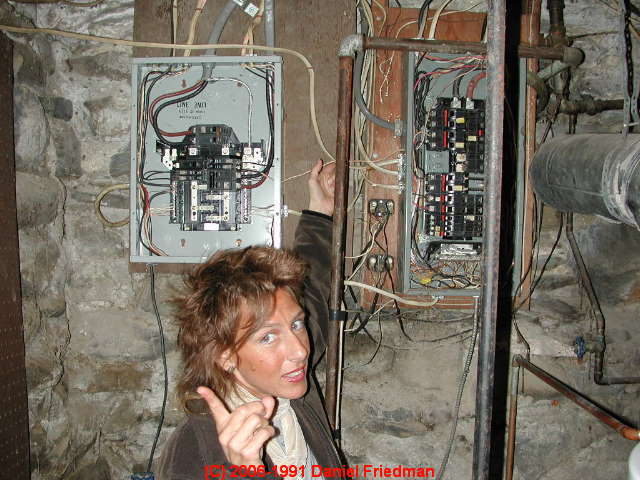
Above: neatness counts as does avoidance of sharp bends in electrical wires as shown in the panel above. Missing are twist-on connectors to cap the wire splices that the electrician has just wrapped in electrical tape.
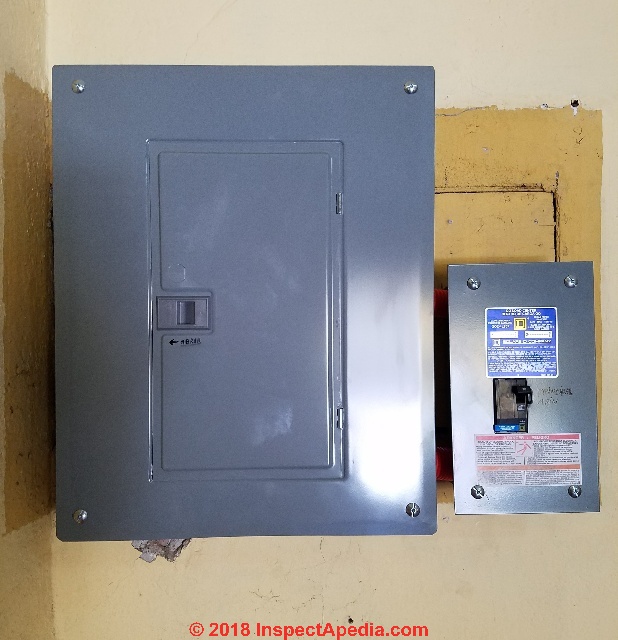
Notice that the main power switch for this panel is not found inside the panel. In our photo below you'll see that a separate main switch is used for this electrical system.
Step 8. Inspect the panel interior
Double check in the panel for other disturbed wires, loose circuit breakers, or a twist on connector that you knocked off leaving a bare wire splice exposed.
Above: in this fuse panel we observed that live bare wires spliced together were un-protected by a twist-on connector. These wires could easily be touched or could touch the panel enclosure - very unsafe conditions.
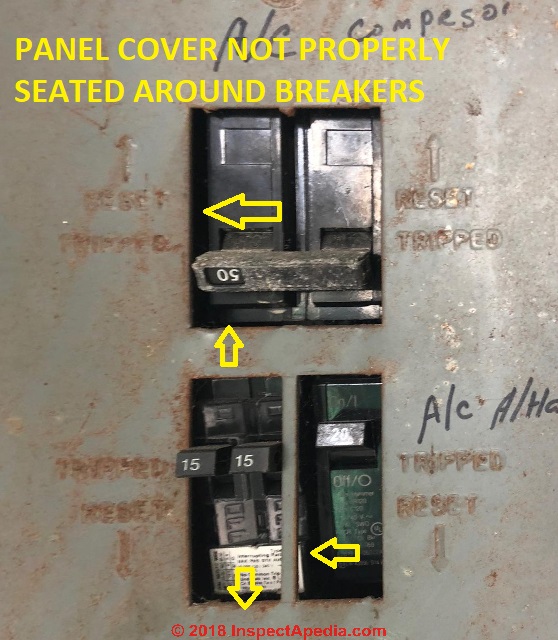
Step 9. Replace the electrical panel cover
Place the electrical panel cover in position, taking care that the cut-out openings for the circuit breakers fit neatly around the circuit breaker edges. If the panel cover is askew you may see that some breakers are being pushed further into the panel while others are not properly secured in their openings in the cover front.
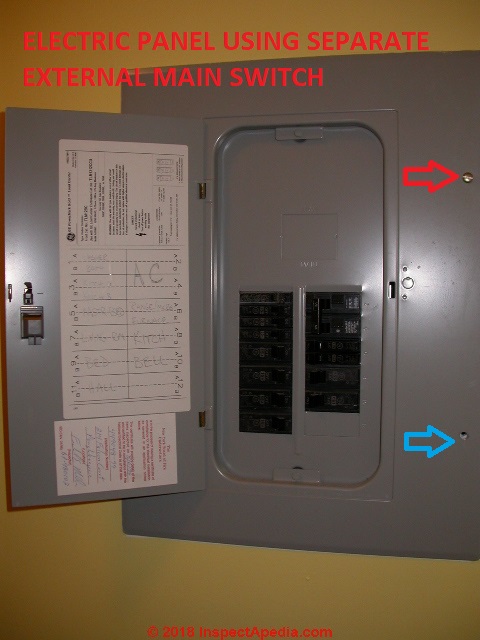
Holding the cover in place with one hand, start a screw in a convenient hole in the panel cover, taking care not to cross-thread the screw. Turn the screw in but don't try to make it fully tight.
In my photo the red arrow shows the first cover screw installed loosely to permit alignment when installing the remaining cover screws.
For electrical panels whose face incorporates both the panel cover and hinged access door, when positioning the panel cover I have the hinged door in the open position so that I can be sure that the breakers are fitting properly into the cutout / knockout space.
Install the remaining screws in the panel cover.
Then tighten all of the cover screws securely in place.
Below: an example of an electrical panel not properly-installed.
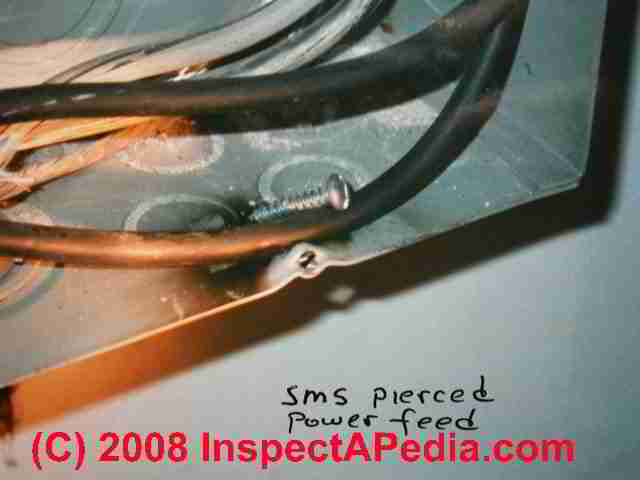
Watch out: if you have lost one of the electrical panel cover screws, do NOT replace it with a sharp pointed sheet metal screw - as is tempting.
Below we illustrate a subtle panel cover hazard: a sheet metal screw had been used to replace the proper panel cover screw; the pointed screw tip pierced the service entry wires causing an arc burn and presenting a shock hazard.
Step 10. Restore electrical power to the panel
Turn the main circuit breaker(s) back on, or if there was an external separate main switch, return that to the ON position.
Step 11. Turn on the new circuit breaker
Move the circuit breaker toggle switch from OFF to ON.
If by chance the circuit breaker was in tripped position and you need to re-set it to ON, see details at CIRCUIT BREAKER RESET STEPS.
...
Continue reading at CIRCUIT BREAKER RELIABILITY TESTS or select a topic from the closely-related articles below, or see the complete ARTICLE INDEX.
Or see these
Recommended Articles
- AFCIs ARC FAULT CIRCUIT INTERRUPTERS
- BLOWN FUSE REPLACEMENT
- CIRCUIT BREAKER FAILURE RATES
- BACK-WIRED ELECTRICAL DEVICES
- BRYANT ELECTRICAL PANEL AGE & PROPERTIES
- Classified CIRCUIT BREAKER WARNING
- FEDERAL PIONEER PANEL SAFETY
- FEDERAL PACIFIC FPE HAZARDS - home
- FPE FAILURE FIELD REPORTS
- MURRAY CIRCUIT BREAKER HAZARDS
- MURRAY SIEMENS Recall
- PUSHMATIC - BULLDOG PANELS
- SIEMENS MURRAY Recall
- SPLIT BUS ELECTRICAL PANEL HAZARDS
- SQUARE-D AFCI RECALL 2004
- SQUARE-D COUNTERFEIT BREAKER RECALL
- TEST MAIN BREAKERS & FUSES
- UBI FPE CIRCUIT BREAKER TEST RESULTS
- ZINSCO CIRCUIT BREAKER INDEPENDENT TESTS
- ZINSCO CIRCUIT BREAKER TEST REPORT
- CIRCUIT BREAKER / FUSE INSPECTION
- CIRCUIT BREAKER LOCKS
- CIRCUIT BREAKER HANDLE TIES
- CIRCUIT BREAKER MAIN or FUSE TEST
- CIRCUIT BREAKER REPLACEMENT
- CIRCUIT BREAKER RESET STEPS
- CIRCUIT BREAKERS RE-CONDITIONED USED
- CIRCUIT BREAKER RELIABILITY TESTS
- CIRCUIT BREAKER SIZE for A/C or HEAT PUMP
- GFCI PROTECTION, GFCI CODES
- GFCI DEVICE SELECTION & WIRING
- GFCI TEST PROCEDURES
- MOBILE HOME ELECTRICAL GFCI DIAGNOSIS
Suggested citation for this web page
CIRCUIT BREAKER REPLACEMENT at InspectApedia.com - online encyclopedia of building & environmental inspection, testing, diagnosis, repair, & problem prevention advice.
Or see this
INDEX to RELATED ARTICLES: ARTICLE INDEX to ELECTRICAL INSPECTION & TESTING
Or use the SEARCH BOX found below to Ask a Question or Search InspectApedia
Ask a Question or Search InspectApedia
Share this article:Questions & answers or comments about unsafe electrical circuit breakers and types or modes of circuit breaker failures.
Try the search box just below, or if you prefer, post a question or comment in the Comments box below and we will respond promptly.
Search the InspectApedia website
Note: appearance of your Comment below may be delayed: if your comment contains an image, photograph, web link, or text that looks to the software as if it might be a web link, your posting will appear after it has been approved by a moderator. Apologies for the delay.
Only one image can be added per comment but you can post as many comments, and therefore images, as you like.
You will not receive a notification when a response to your question has been posted.
Please bookmark this page to make it easy for you to check back for our response.
IF above you see "Comment Form is loading comments..." then COMMENT BOX - countable.ca / bawkbox.com IS NOT WORKING.
In any case you are welcome to send an email directly to us at InspectApedia.com at editor@inspectApedia.com
We'll reply to you directly. Please help us help you by noting, in your email, the URL of the InspectApedia page where you wanted to comment.
Citations & References
In addition to any citations in the article above, a full list is available on request.
- ..
- "Electrical System Inspection Basics," Richard C. Wolcott, ASHI 8th Annual Education Conference, Boston 1985.
- "Home Wiring Inspection," Roswell W. Ard, Rodale's New Shelter, July/August, 1985 p. 35-40.
- "Evaluating Wiring in Older Minnesota Homes," Agricultural Extension Service, University of Minnesota, St. Paul, Minnesota 55108.
- In addition to citations & references found in this article, see the research citations given at the end of the related articles found at our suggested
CONTINUE READING or RECOMMENDED ARTICLES.
- Carson, Dunlop & Associates Ltd., 120 Carlton Street Suite 407, Toronto ON M5A 4K2. Tel: (416) 964-9415 1-800-268-7070 Email: info@carsondunlop.com. Alan Carson is a past president of ASHI, the American Society of Home Inspectors.
Thanks to Alan Carson and Bob Dunlop, for permission for InspectAPedia to use text excerpts from The HOME REFERENCE BOOK - the Encyclopedia of Homes and to use illustrations from The ILLUSTRATED HOME .
Carson Dunlop Associates provides extensive home inspection education and report writing material. In gratitude we provide links to tsome Carson Dunlop Associates products and services.
 |
HOME | ABOUT | ASK a QUESTION | CONTACT | CONTENT USE POLICY | DESCRIPTION | POLICIES | PRIVACY | |
| © 2026 - 1985 Publisher InspectApedia.com - Daniel Friedman | |||||||||