 Septic Tank & Drainfield Build & Install
Sewer pipe installation
Septic tank installation
Septic drainfield installation
Chapter 13 of How to Build Your Dream Home © 2020 InspectApedia.com

- POST a QUESTION or COMMENT about how to identify the architectural style of buildings and building components
This article series provides an updated version of Hubbard Cobb's Your Dream Home, illustrated by Sigman-Ward, first published by Wm. H. Wise & Co. New York, 1950.
InspectAPedia tolerates no conflicts of interest. We have no relationship with advertisers, products, or services discussed at this website.
- Daniel Friedman, Publisher/Editor/Author - See WHO ARE WE?
Sewer Piping & Sewage Disposal Installation
 Plumbing The House Sewer Pipe

The cast-iron soil pipe should extend for at least one section (5 feet) beyond the house.
After this, you can use contemporary ABS or PVC plastic sewer piping, cast-iron soil pipe or [obsolete] vitrified-clay pipe to carry the waste to the public sewer line or to a private onsite septic system [or, now obsolete, a cesspool].
Clay sewer pipe [no longer recommended] is the least expensive, but it has the drawback that seepage through the pipe joints will attract tree roots, which in time will at many homes clog up the line. This danger can be reduced by installing copper washers inside each joint.
The copper will kill any tree roots that come in contact with it.
Clay pipe can be joined with cement mortar. The sections are placed together and oakum is packed into the bell to prevent the mortar from getting into the line. The mortar is then worked into the joint, either by hand or using a joint runner.
Cast-iron soil pipe can be joined with caulked joints or with special threaded joints. ABS or PVC pipe (more modern alternatives) as well as properly-installed cast iron pipe will last 20-40 years or longer. (The original text said "indefinitely" which was perhaps a bit optimistic.)
If you are building your home on a lot where there is a near-by city sewer line, you do not have much to worry about as far as sewage-disposal goes.
There will probably be a slight charge involved for opening up the main so that your line can be attached and you may find that you will not be able to lay the sewer pipes from your house to the main yourself, but your worries are few compared to those of building in outlying districts where each house must have its own private sewage-disposal plant.
This is a section of Chapter 13 of BUILD YOUR DREAM HOME at InspectApedia.com - online encyclopedia of building & environmental inspection, testing, diagnosis, repair, & problem prevention advice.
See details about sewer piping at SEWER LINE SPECIFICATIONS
Cesspools & Septic Tanks
 There are two types of private sewage-disposal systems that you could use in the 1950s. One is the cesspool and the other is the septic tank.
Of the two, the septic tank is by far the superior, and in many localities it is the only system that may be used.
Building a Cesspool
The cesspool is more or less out of date today, and its main advantage was the fact that it is a very simple and inexpensive system to install. It consists of a large hole in the ground that is lined on the inside with rocks or concrete blocks set up without mortar.
The sewage from the house flows into this tank and the liquids pass through the openings in the rocks or blocks and are absorbed into the earth. The top of the cesspool is provided with a tightly fitting concrete lid to keep out insects and vermin.
The first great drawback to this type of system is that it can easily contaminate wells or near-by water supplies. The liquids that are absorbed into the ground are by no means pure and slowly but surely the earth around the cesspool becomes contaminated.
Even when the cesspool is below a well, there is still a chance that, due to rock formations, the seepage from the cesspool will reach the water supply.
Cesspools are of little use in ground that is low-lying and wet because the earth will not absorb the liquids from the cesspool and you will have to have it pumped out repeatedly. In essence, it won't work.
Watch out: a cesspool may successfully dispose of sewage effluent into the surrounding soil, but because most of the disposal is occurring at a depth greater than two feet there is little oxygen to support one of the two bacteria types (aerobic bacteria) needed to break down the sewage pathogens. As a result a cesspool will not successfullly treat sewage effluent. That means that sewage effluent can flow into and contaminate nearby wells or waterways.
See details at CESSPOOLS - home
Also see CESSPOOL SAFETY WARNINGS
Septic Tank & Drainfield Systems
 The septic tank works on ail entirely different principle from the cesspool.
The waste from the house flows into a watertight tank. It remains there for twenty-four hours or so while the bacteria reduce many of the solids to a liquid state.
We call this effluent holding time - a necessary interval to permit grease and floating solids to coagulate at the top of the septic tank and other sludge to settle to the bottom.
At the end of this interval, the liquids - claified effluent - flow out of the tank into a leaching field made of drain-tile. These tiles are placed fairly near the surface (usually 24" or less, deeper in cold climates) and this allows air to get to the bacteria needed to break down sewage pathogens and also to permit a portion of the liquid effluent to evaporate.
There are several misunderstandings about a septic tank.
In the first place, not all the solids that enter the tank are reduced to a liquid state and flow out into the tile field. More than 50% of these solids remain inside the tank as sludge. In time the sludge will accumulate to such a degree that the tank will not operate properly until it has been pumped out.
Second, the liquids that flow out of the tank are by no means pure. The tank should never be allowed to empty out into streams, lakes or rivers as it will contaminate them.
You can build your own septic tank, but you may find that the ones of metal or concrete that are ready-made are more practical for your purposes. Building a property functioning septic tank is quite a job. Ready-built tanks are not expensive and will give good service. Some of them come complete with the tile for the disposal field.
See details at SEPTIC TANKS - home
also
See the basics of septic system design at SEPTIC SYSTEM DESIGN BASICS - home
Building a Cesspool
Note:Cesspools are no longer permitted and are not recommended for nearly all situations. The text that follows, from 1950, is retained to give a history of how cesspools were constructed.
If [in 1950] you find that it is practical to use a cesspool rather than a septic tank, your first job is to locate it as far as possible from any wells or other sources of water. It should be at least 100 feet from any well. The size of the cesspool will depend upon the soil conditions and the number of members in the household.
For the average family and in average soil, a cesspool 7 feet deep and about 7 feet in diameter should be sufficient. Actually, you will have to dig down a little deeper than 7 feet so that when the lid is on top of the cesspool, you can cover it with topsoil for planting.
After the hole and a trench for the line from the house to the cesspool have been dug, the job of lining the avails is undertaken. If there is a lot of native stone around, you can use it and it will be perfectly adequate. The trick, however, is to build so that as you go up, the tank becomes smaller in diameter.
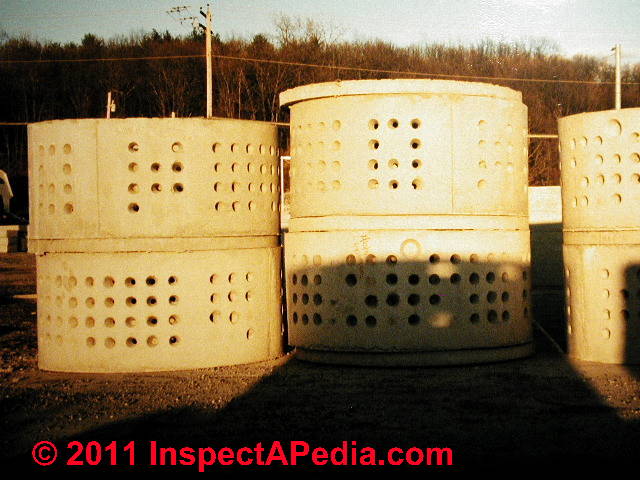
This is necessary in order to provide a small opening for the cover. Ordinary concrete blocks are much easier to work with than stones. If you wish, you can get special masonry blocks made for cesspools. They are put together with a tongue-and-groove joint and have holes in them to allow liquids inside the tank to flow out.
The line from the house to the cesspool should be laid with a slight downward pitch (1/8" to 1/4" per foot of horizontal distance).
Building Your Own Septic Tank
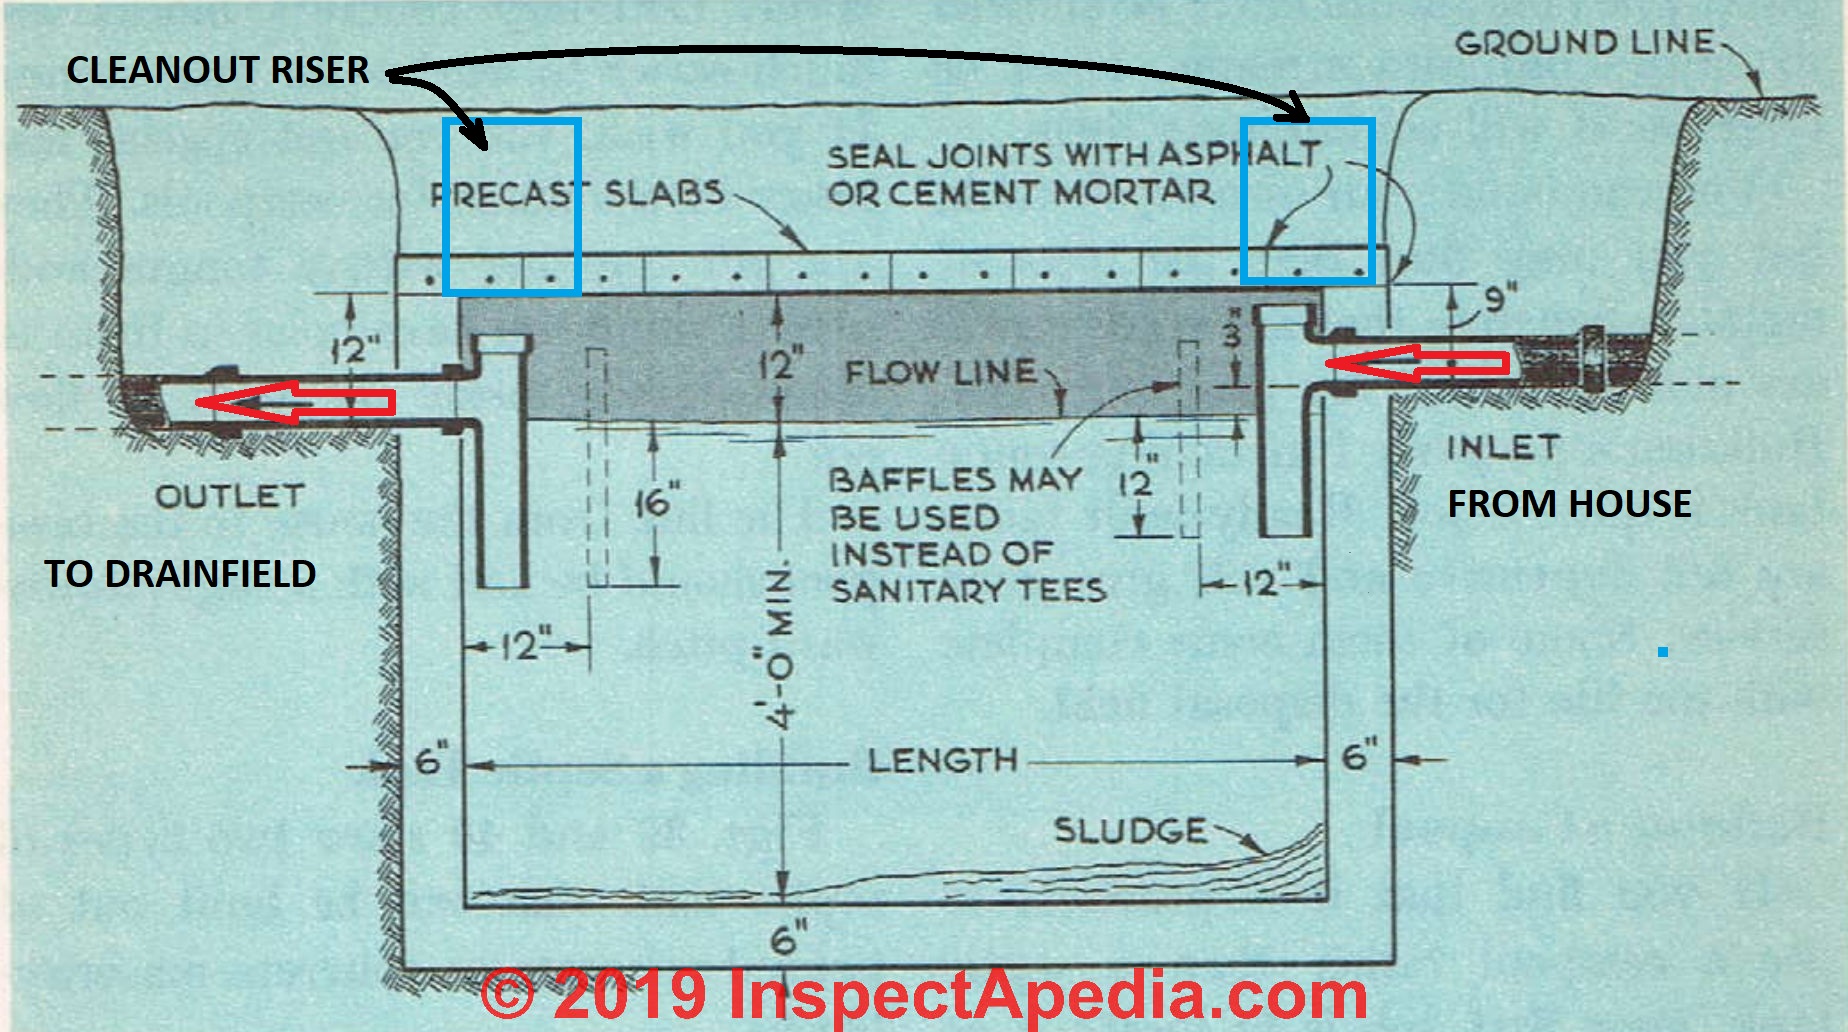
Fig: 39. Detail of the construction of a single-chamber septic tank. Note: this drawing is slightly askew. The septic tank bottom should be as level as possible and the outlet opening will be a few inches lower than the inlet pipe. . We never want the outlet to be above the inlete to the tank.
Note: home made septic tanks can be very dangerous - risking collapse and a fatality if someone falls-in; in addition if the tank is under-sized it's likely to lead to early septic system failure. We recommend use of concrete or plastic or fiberglass septic tanks available from local plumbing and septic suppliers - Ed.
Figs. 39 (above) and 40 (below) show two types of septic tank that can be built out of poured concrete or concrete masonry-blocks.
The tank shown in Fig. 39 is by far the easier one to construct, and it will provide a very satisfactory means of sewage-disposal except in locations where the disposal field is limited in size or where the soil is very tight.
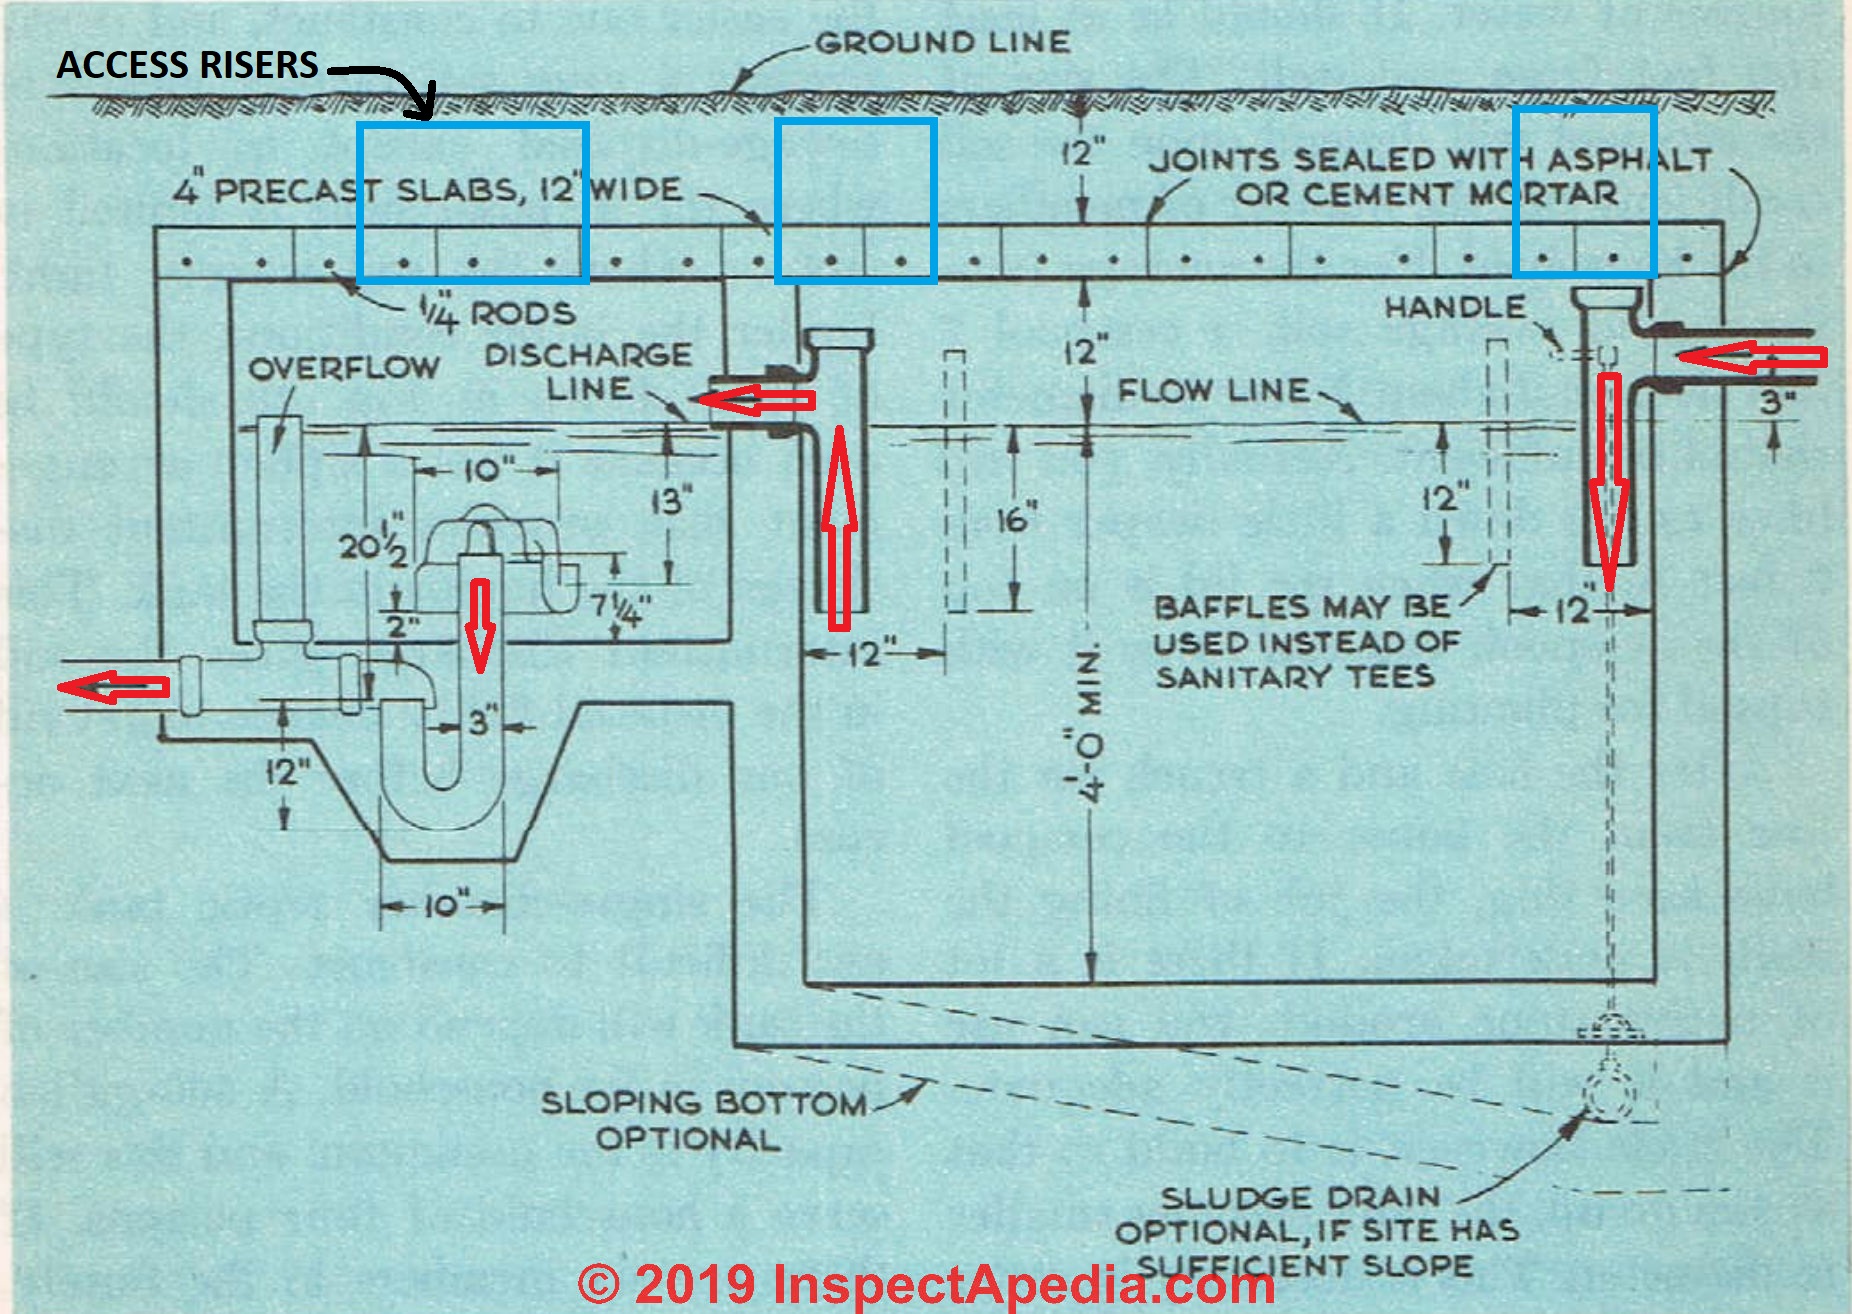
Fig. 40. A septic tank with a dosing chamber or pumping chamber. The pump moves effluent to the disposal field. A dosing system sends effluent from the tank to the disposal field at periodic intervals or based on an effluent level float control. A simple effluent pump, not a dosing system, moves effulent to a disposal field that may be up-hill from the septic tank.
Under the latter conditions, the type of tank shown in Fig. 40 should be used because it has a siphon arrangement that provides intermittent discharge of the liquids in the tank. This intermittent discharge gives the soil in the disposal field a chance to get rid of one discharge before the next occurs.
The single-chamber septic tank is not difficult to construct. The size of the tank will depend on the number of persons in the household. A 500-gallon capacity is the minimum, and this will serve a household of four persons
If there are six members in the family, the size should be increased to 600 gallons. For a 500-gallon tank, the width should be S', the length S' and the depth 5'. The inlet should be 9" below the top of the tank and should be fitted with a sanitary tee. The outlet line to the disposal field is placed 12" below the top and this also has a sanitary tee.
Note: Current building and plumbing standards require larger septic tanks for most homes in most of the world. Typically a 1,000 gallon tank or larger will be required, adding support for our recommendation of purchase of a pre-fabricated septic tank. We retain the original author's home-made septic tank text for interested readers.
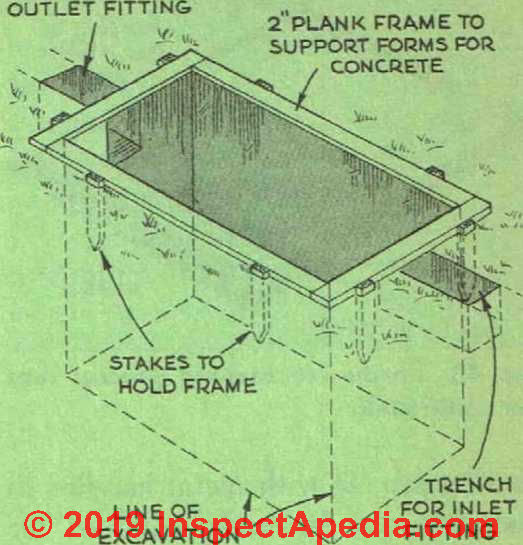
Fig. 41. Laying out a septic tank for an owner-built septic tank. Be sure to check with your building department for permits and approvals of the septic tank design, size, location, materials.
Fig. 41 shows how the tank is laid out on the site before the excavation work is done. Forms for the tank should be constructed sufficiently level and solid so that they will not be forced out of place by the weight of the concrete. See Fig. 42.
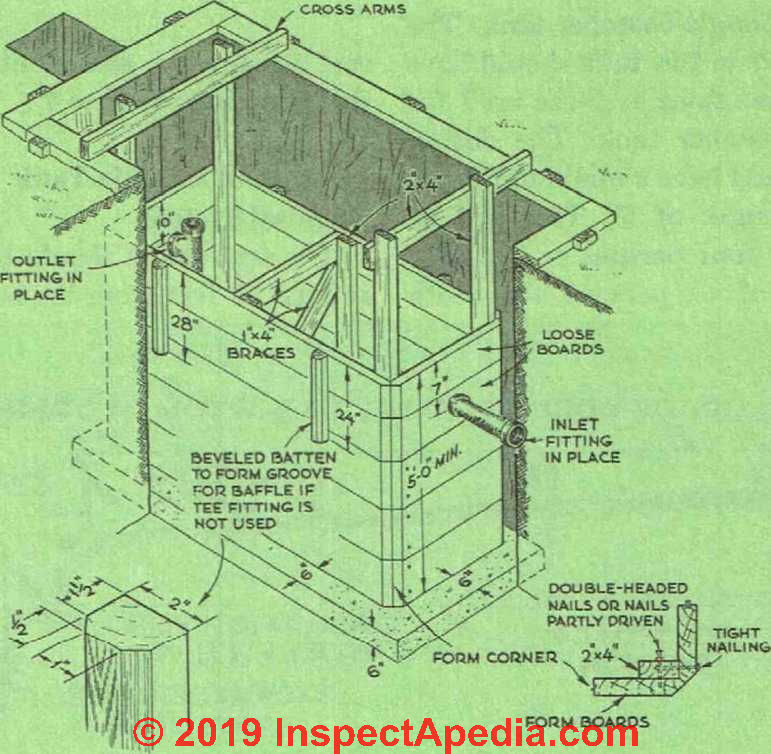
Fig. 42. Construction of forms for septic tank.
Fig. 43 (below) shows how the top of the tank can be cast in sections out of concrete, complete with metal handles so that they can be easily removed for cleaning the tank.
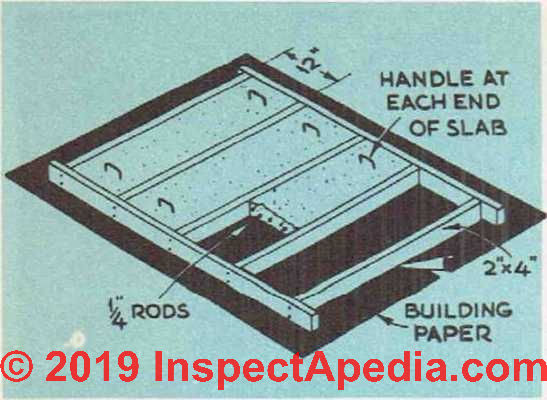
Fig. 43. Forms for making precast tops for septic tank. Note: the original illustration above does not provide convenient septic tank cleanout access covers and risers, instead requiring the user to remove a large heavy concrete section of septic tank cover. The larger opening is unsafe, increasing the risk of a fatal fall into the septic tank. A better design provides a suitable opening, perhaps 2x2' over the septic tank inlet and outlet to permit inspection and pumping / cleaning.
Building a septic tank with siphon or effluent pumping chamber is somewhat more complicated than building the single-chamber tank. The large chamber in this tank should have the same dimensions as those used for the single-chamber tank. The dosing chamber should have a minimum width of 3' and length of 6'.
This will be adequate for four persons or less. For a household of six persons, the width can remain the same but the length should be increased to 7'.
See details about how to specify the required size of a septic tank at SEPTIC TANK SIZE - home
Watch out: because an improperly-built or installed septic tank can kill someone, be sure to review SEPTIC TANK SAFETY - home
Laying Out a Septic-Tank Disposal System
The septic tank should be positioned at least 50 feet from the house proper.
See details all of the required septic tank and drainfield clearance distances at CLEARANCE DISTANCES, SEPTIC SYSTEM - home
ABS or PVC plastic or cast iron pipe can be used to connect the tank to the house drainage system. [We do not recommend using clay pipe nor "orangeburg" pipe.]
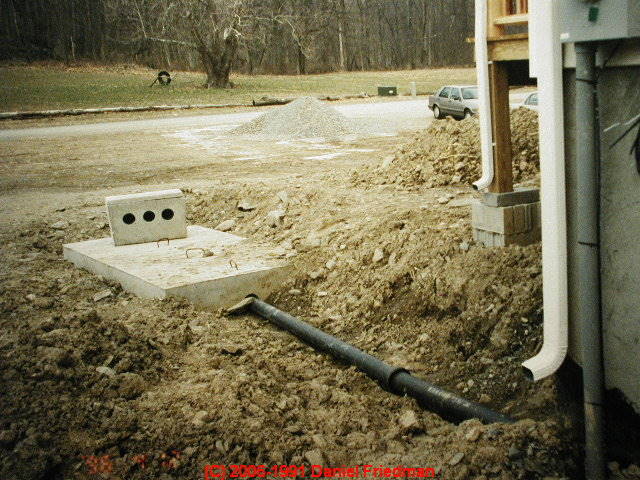
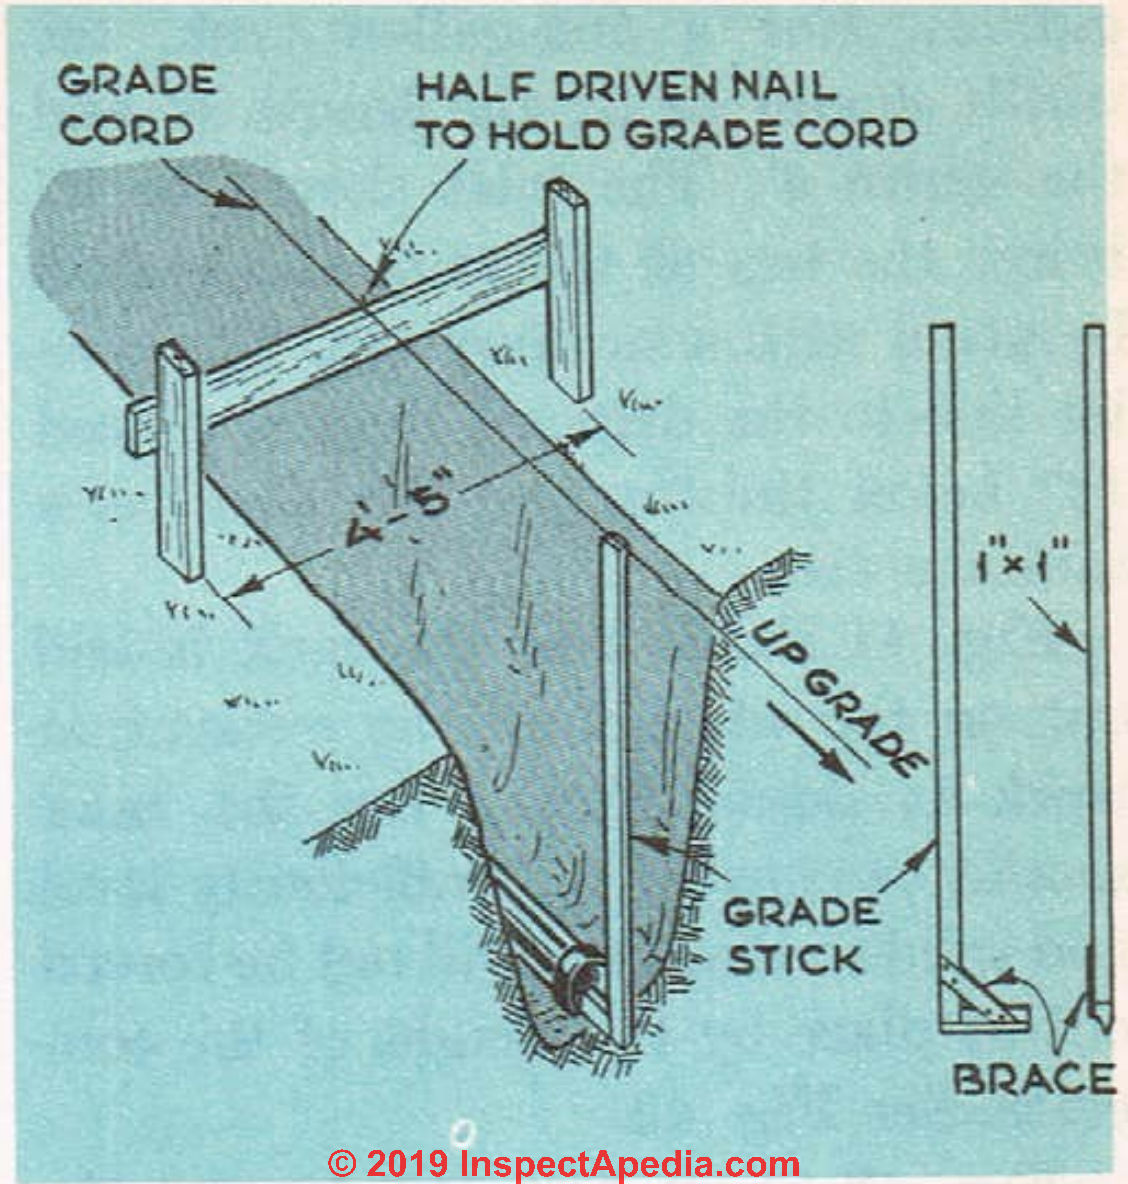
Fig. 44. Laying sewer soil pipe. A simple grade stick is used to insure that each pipe has the proper amount of pitch or slope down to the septic tank.
The first section of tile can be joined to the cast-iron (or other) soil pipe extending from the house with cement mortar or with a fitting designed for the pipe materials involved, which is also used for the following sections of sewer line pipe.
But for cast iron sewer piping, be sure that you pack oakum into the bell ends first to prevent the mortar from seeping into the line, and make your connections as tight as possible because if you do not, you will be troubled with tree roots that get into the sewer line and clog it up.
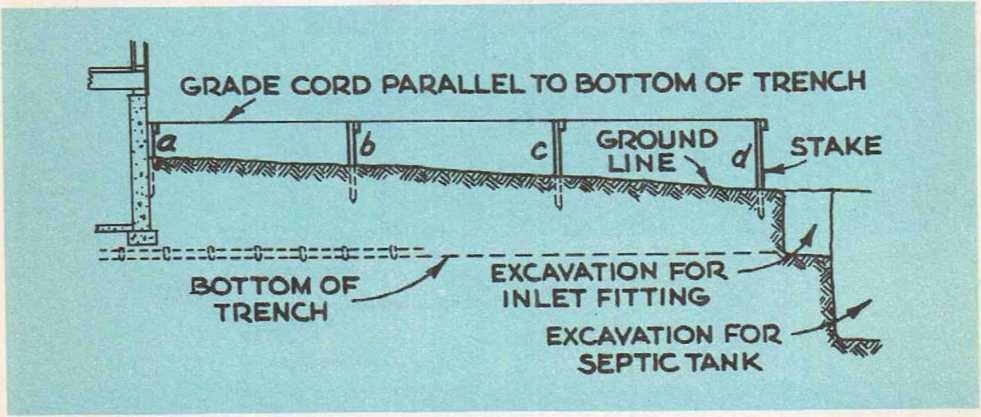
Fig. 45. Use of grade cord to get the proper pitch to the sewer line.
The septic tank cannot be constructed in accordance with the plans given earlier in this section. From the outlet side of the tank, a line of soil-pipe with sealed joints is run for about 15 feet. This line, as well as the line from the house, should have a slight downward pitch.
The house line should be pitched 1" in every 10", while the line coming out the outlet side of the septic tank should be pitched 1" for every 20".
(Some standards require 1/8" to 1/4" drop per horizontal foot of run.) See Figs. 44 and 45. The end of the outlet line from the septic tank is connected to a distributing box
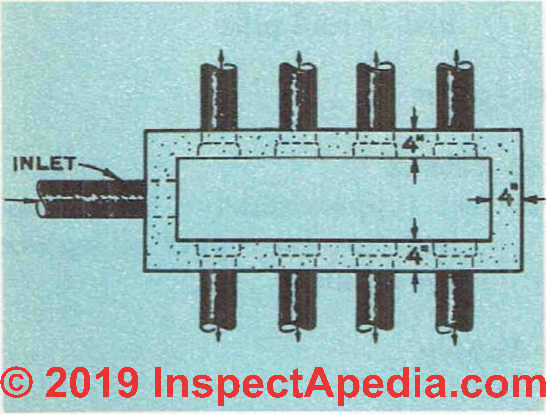
Fig. 46. A distribution box made out of concrete.
The D-box or Distribution Box receives septic effluent from the septic tank and distributes it among drainfield lines where ultimately the effluent is drained into the soil for further processing by soil bacteria. Synonyms for drainfield include septic leach field, soakaway bed, leaching bed.
Details of septic effluent distribution boxes or D-boxes are at D-BOX INSTALL REPAIR - home
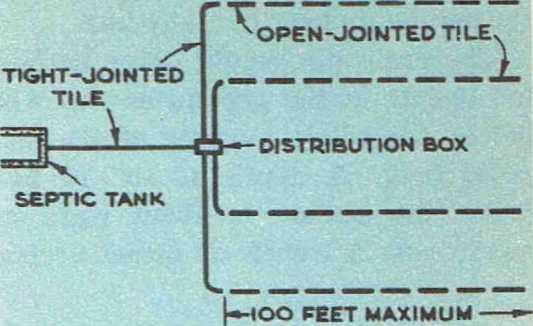
Fig. 47. Suggested layout for septic tank distribution field.
as shown in Fig. 46. This box can be constructed with extra openings that arc plugged for the time being but can be opened up at some future date if additional lines in the disposal field are required. The feed lines coming out of the distributing box should be pitched 1" for every 20", and it should be made with caulked joints.
Fig. 47 shows the arrangement for a disposal field on level ground. The number of feet of tile and the number of branches will depend on soil conditions and on the number of persons in the household.
For the average-size household and where the soil is not too sandy or clayey but is medium as far as drainage goes, there should be four branches to the line and the total number of linear feet of 4" drain-tile should be about 350.
The septic disposal field can be made with ordinary 4" clay tile with open joints [common in the 1950s but currently NOT recommended - limited life] or you can use special perforated drain pipes that come in standard 4-foot lengths.
Each branch of the line should be given a slight slope (1/8" /ft), but this should not be over 6" to every 100 feet, the maximum length of any line.
The drain-tile should never be laid too deeply in the ground as this will defeat the whole purpose of the disposal field.
A depth of 18" to 24" below the surface is about right in most cases. A trench six inches deeper than this should be dug and a layer of gravel 6" deep put down for the tile to rest upon. Pieces of tar paper are placed over the joints between the tile sections, which are then covered with another layer of gravel. Finally, straw is placed on top of the gravel and the soil is put back.
We give clearance distances for septic tanks and drainfields in a link cited earlier in this chapter.
Details of septic drainfield location are at SEPTIC DRAINFIELD LOCATION
Details of septic drainfield size are at SEPTIC DRAINFIELD SIZE
Also see these typical SEPTIC SYSTEM DRAWINGS
...
Continue reading at SEPTIC SYSTEM INSPECT DIAGNOSE REPAIR - home, or see the complete ARTICLE INDEX.
Or see these SEPTIC SYSTEM INSTALLATION FAQs - questions & answers posted originally on this page
Or see these
Recommended Articles
- BUILD YOUR DREAM HOME
- D-BOX INSTALL REPAIR
- DRAIN & SEWER PIPING - home
- SEPTIC CLEARANCE DISTANCES
- SEPTIC SYSTEM DESIGN BASICS - home
- SEPTIC SYSTEM DESIGN MANUAL - Online
- SEPTIC SYSTEM INSPECT DIAGNOSE REPAIR - home
- SEPTIC TANK DESIGN DEPTH
- SEPTIC TANK, DRAINFIELD INSTALLATION
- SEPTIC TANK CONCRETE
- SEPTIC TANKS, FIBERGLASS / PLASTIC
- SEPTIC TANKS HOME MADE SITE BUILT
- SEPTIC TANK INSTALLATION - home
- SEPTIC TANKS, STEEL
- WASTEWATER TREATMENT BASICS
Suggested citation for this web page
SEPTIC TANK, DRAINFIELD INSTALLATION at InspectApedia.com - online encyclopedia of building & environmental inspection, testing, diagnosis, repair, & problem prevention advice.
Or see this
INDEX to RELATED ARTICLES: ARTICLE INDEX to SEPTIC SYSTEMS
Or use the SEARCH BOX found below to Ask a Question or Search InspectApedia
Or see
INDEX to RELATED ARTICLES: ARTICLE INDEX to BUILDING ARCHITECTURE
Or use the SEARCH BOX found below to Ask a Question or Search InspectApedia
Ask a Question or Search InspectApedia
Share this article:Questions & answers or comments about how to identify the architectural style of buildings and building components
Try the search box just below, or if you prefer, post a question or comment in the Comments box below and we will respond promptly.
Search the InspectApedia website
Note: appearance of your Comment below may be delayed: if your comment contains an image, photograph, web link, or text that looks to the software as if it might be a web link, your posting will appear after it has been approved by a moderator. Apologies for the delay.
Only one image can be added per comment but you can post as many comments, and therefore images, as you like.
You will not receive a notification when a response to your question has been posted.
Please bookmark this page to make it easy for you to check back for our response.
IF above you see "Comment Form is loading comments..." then COMMENT BOX - countable.ca / bawkbox.com IS NOT WORKING.
In any case you are welcome to send an email directly to us at InspectApedia.com at editor@inspectApedia.com
We'll reply to you directly. Please help us help you by noting, in your email, the URL of the InspectApedia page where you wanted to comment.
Citations & References
In addition to any citations in the article above, a full list is available on request.
- Our recommended books about building & mechanical systems design, inspection, problem diagnosis, and repair, and about indoor environment and IAQ testing, diagnosis, and cleanup are at the InspectAPedia Bookstore. Also see our Book Reviews - InspectAPedia.
- In addition to citations & references found in this article, see the research citations given at the end of the related articles found at our suggested
CONTINUE READING or RECOMMENDED ARTICLES.
- Carson, Dunlop & Associates Ltd., 120 Carlton Street Suite 407, Toronto ON M5A 4K2. Tel: (416) 964-9415 1-800-268-7070 Email: info@carsondunlop.com. Alan Carson is a past president of ASHI, the American Society of Home Inspectors.
Thanks to Alan Carson and Bob Dunlop, for permission for InspectAPedia to use text excerpts from The HOME REFERENCE BOOK - the Encyclopedia of Homes and to use illustrations from The ILLUSTRATED HOME .
Carson Dunlop Associates provides extensive home inspection education and report writing material. In gratitude we provide links to tsome Carson Dunlop Associates products and services.
 |
HOME | ABOUT | ASK a QUESTION | CONTACT | CONTENT USE POLICY | DESCRIPTION | POLICIES | PRIVACY | |
| © 2026 - 1985 Publisher InspectApedia.com - Daniel Friedman | |||||||||