 How to Install Copper Pipe Flare Fittings
Chapter 13 of
How to Build Your Dream Home
© 2022 InspectApedia.com
- POST a QUESTION or COMMENT about how to identify the architectural style of buildings and building components
This article series provides an updated version of Hubbard Cobb's Your Dream Home, illustrated by Sigman-Ward, first published by Wm. H. Wise & Co. New York, 1950.
Here we've added copper pipe flare fitting tools and methods current through 2024.
From site selection and obtaining financing through each step in construction of a single family home the simple procedures and drawings in this book are still useful for anyone building or repairing a home or other small structure.
InspectAPedia tolerates no conflicts of interest. We have no relationship with advertisers, products, or services discussed at this website.
- Daniel Friedman, Publisher/Editor/Author - See WHO ARE WE?
How to Install Flared Copper Pipe Fittings
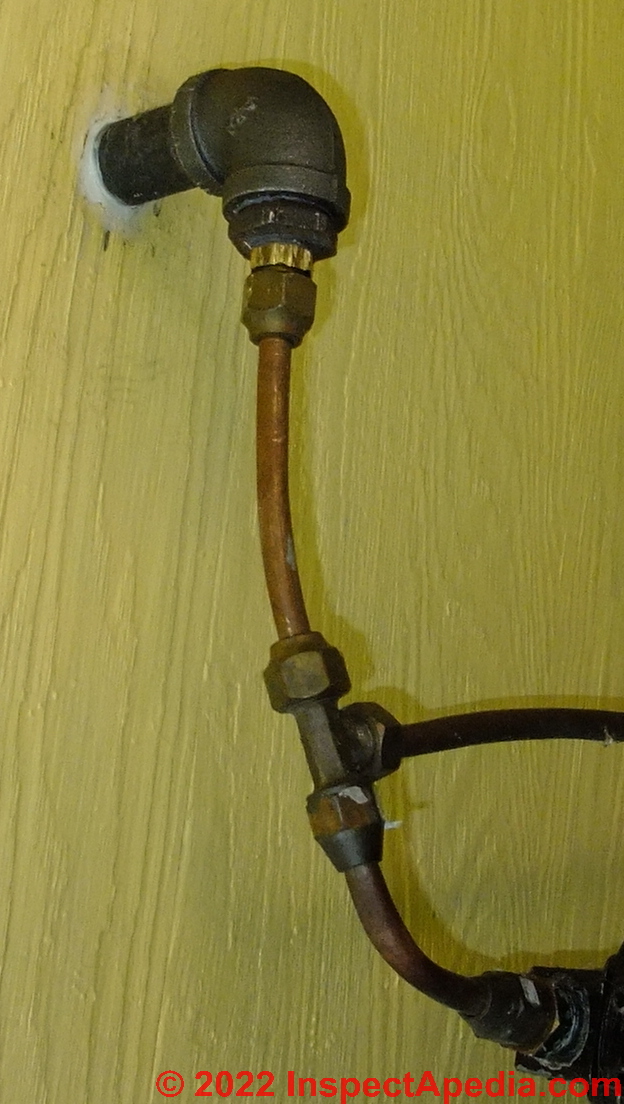
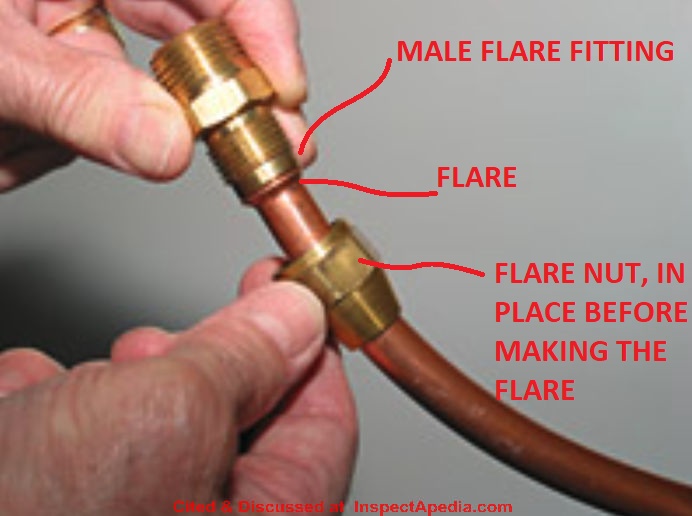
 Here we discuss how to make copper pipe or copper tubing connections using flare fittings like the male flare connector end shown here.
Using a special flaring tool the soft copper tubing or piping is actually spread open or flared at its end in order to mate with the female end of the flare fitting connector shown in our photograph.
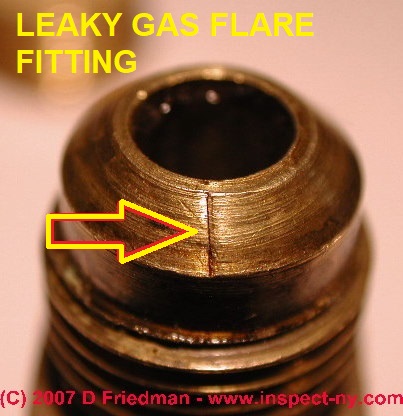
Watch out: defects in flare fittings used on flexible copper tubing can result in gas leaks out of gas piping, and in the case of oil piping such as for oil-fired heaters, flare fitting defects result in both oil leaks out of the system and air leaks into the system.
Our photo shows a line across the mating face of the male flare fitting - that caused a small gas leak that was hard to find.
This is a section of Chapter 13 of BUILD YOUR DREAM HOME at InspectApedia.com - online encyclopedia of building & environmental inspection, testing, diagnosis, repair, & problem prevention advice.
This article series provides an updated version of Hubbard Cobb's Your Dream Home, illustrated by Sigman-Ward, first published by Wm. H. Wise & Co. New York, 1950.
The link above provides versions of each chapter as a web page, as an ePub, and in the original form as a PDF file.
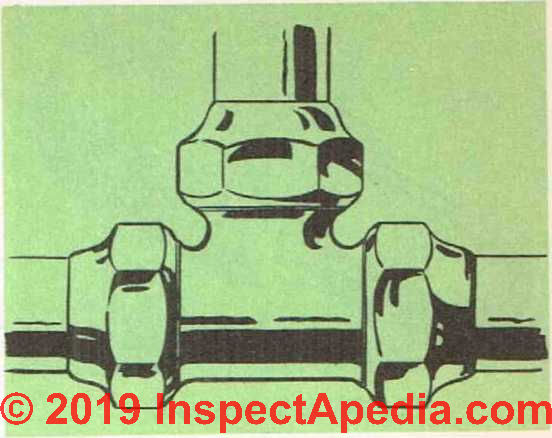
Fig. 17. A completed flared fitting.
The other method of making up joints in copper tubing (besides soldering or crimping discussed
is to use the flared fitting. See Figs. 17 and 18.
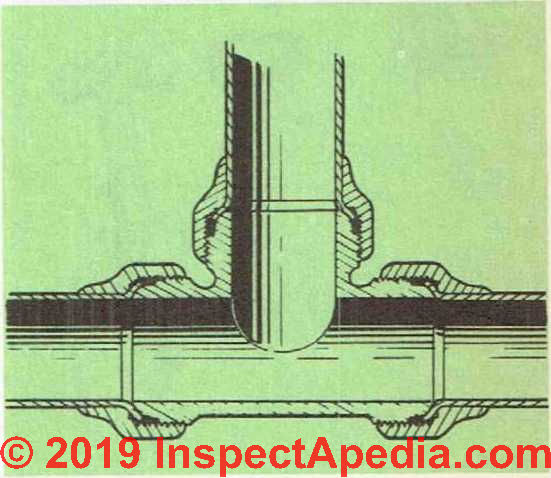
Fig. 18. The interior view of a flared fitting.
After cutting the tube, which is done in the same manner as for soldered fittings, the first step is to slip a sleeve nut on the section of tubing. See Fig. 19.
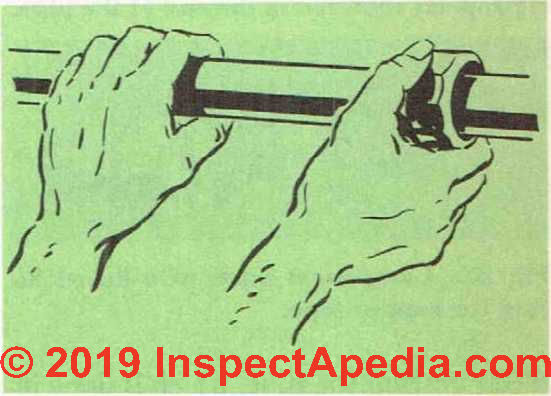
Fig. 19. Slip the union nut over the pipe before you flare the pipe.
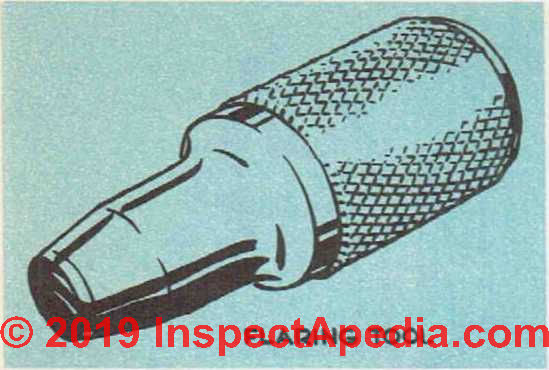
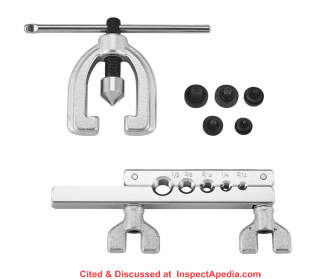
Fig. 20. A flaring tool, shown above, is also referred to as a copper swaging tool. A similar tool can be used to swage or expand the end of copper pipe to make a slip joint connection that is soldered instead of using a flare fitting.
Note: while flaring tools like the one shown above are still used in some applications, below we show more-contemporary and much-easier-to-use copper tubing flaring tools.
Basic Steps in Making a Copper Tubing or Pipe Flare Joint Connection
With a bit of care it's easy to make flare joints, following the instructions that come with even an inexpensive flaring tool like the one I'll show below (less than $30. U.S.)
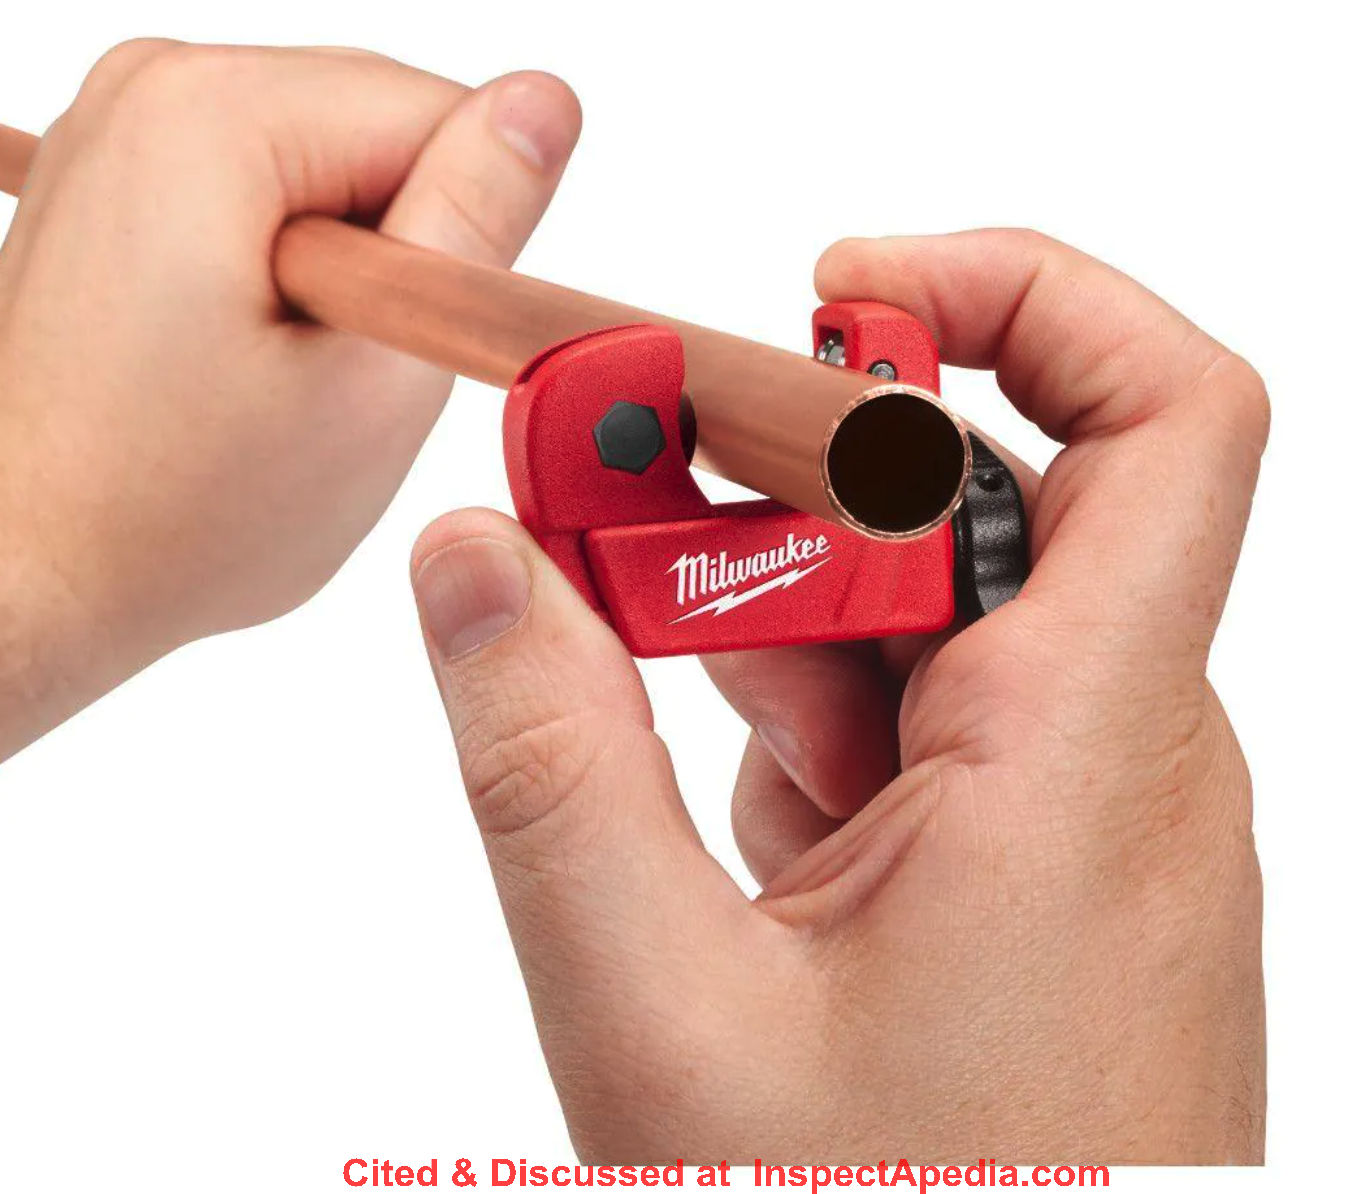
It's best to use a copper tubing cutter to make a clean cut of copper tubing or pipe.
First, here is a copper tubing cutter from Milwaukee.
[Click to enlarge any image]
Below, using an image from Milwaukee Tools, we illustrate this tubing cutter in-use.
After cutting the copper tubing, be sure to clean the edges of the tubing, both exterior and interior, before making the flare, otherwise your flare will be irregular and risks leaking - a dangerous mistake when installing gas piping.
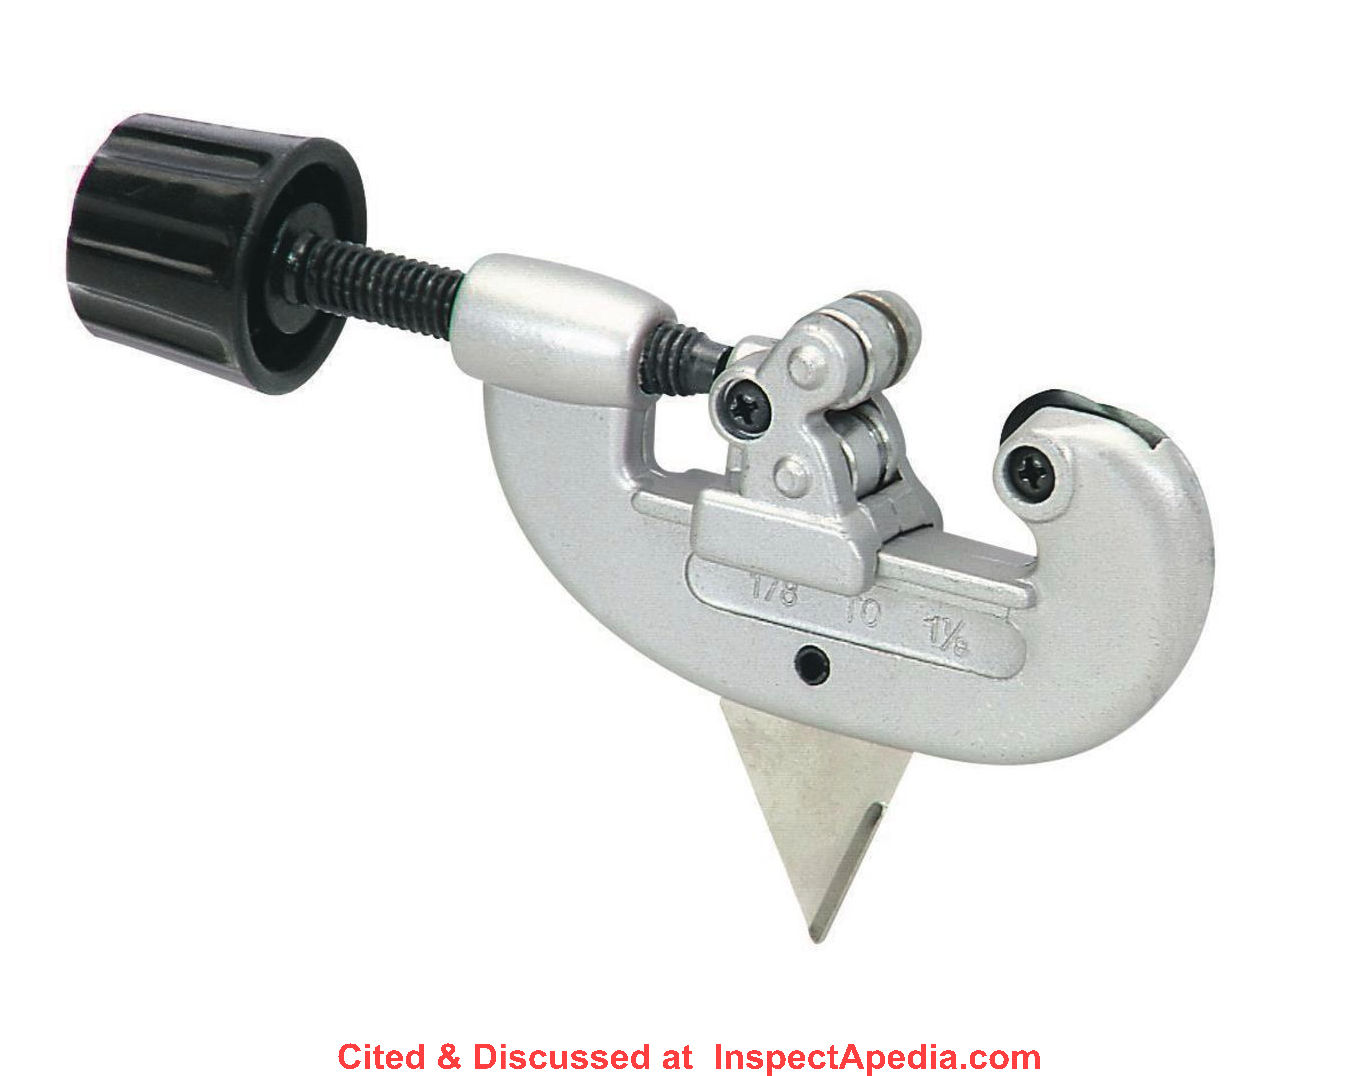
Most tubing cutters include a retractable triangular blade used to trim out / off the burr left inside of the tubing - be SURE to do this before making the flare joint else your joint is likely to be un-even and leaky, risking an LPG explosion or fire.
Below is an example of another tubing cutter that shows the triangular blade you'll need to use to deburr or ream the interior of copper tubing after it has been cut.
A similar cutter used to de-burr both the copper pipe or tubing interior and exterior is shown below. This tool includes an outer reamer and an inner reamer. This example is made by Doact - properly-named a pipe hamfer tool or tubing burr removal tool or de-burring tool. Cost about $9.00 U.S.
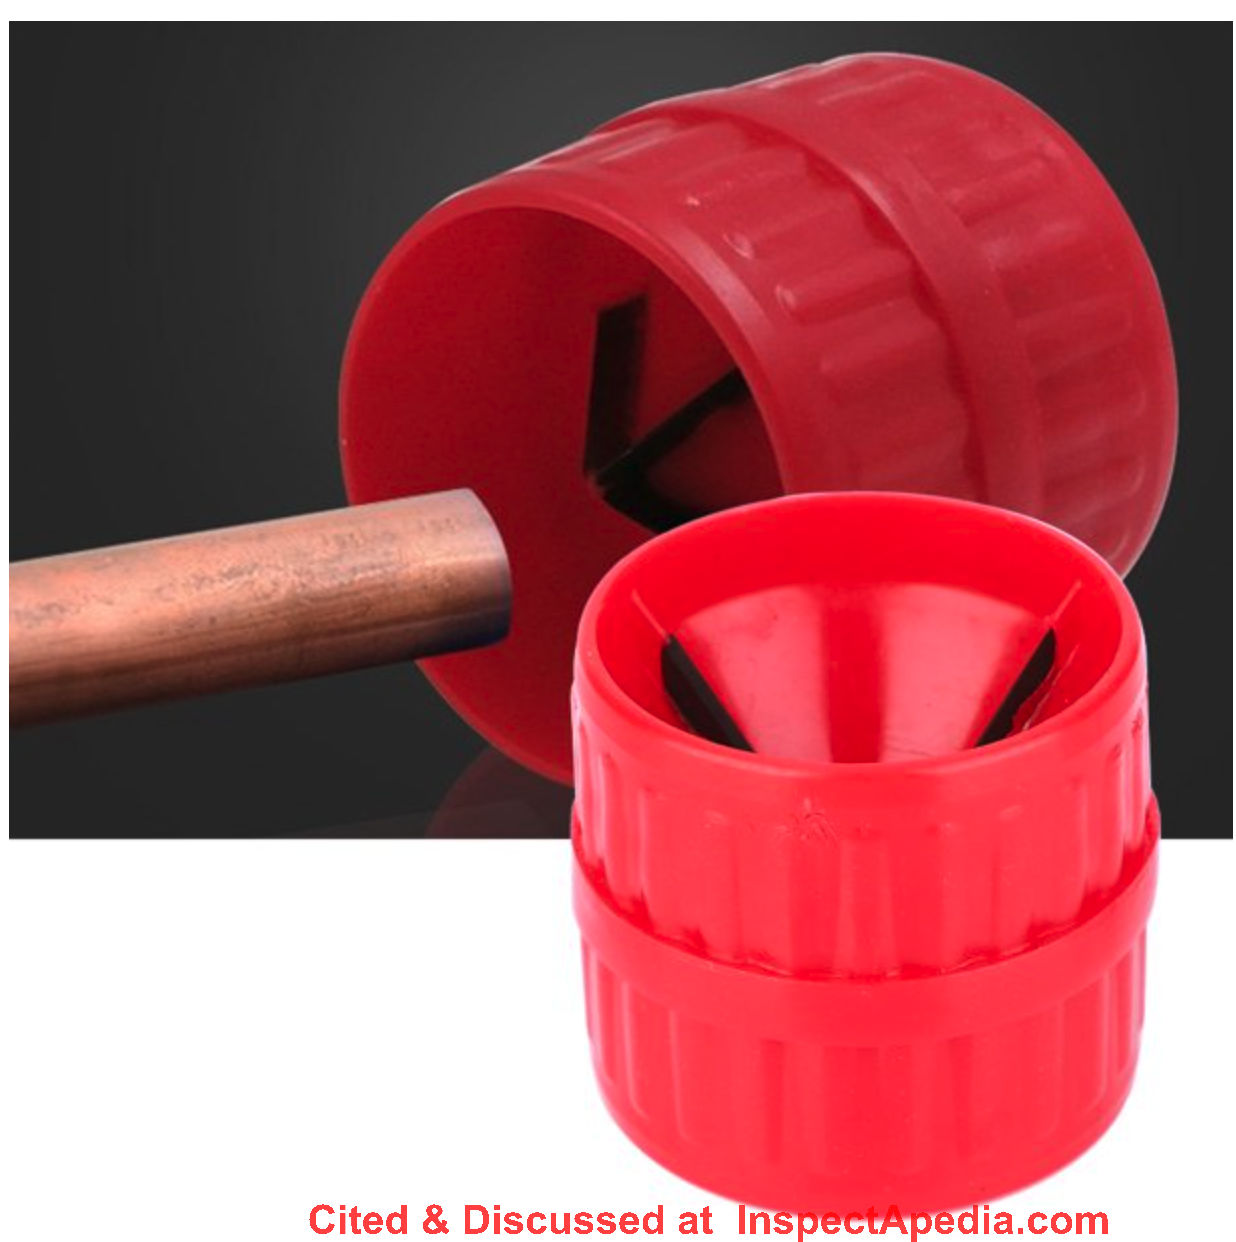
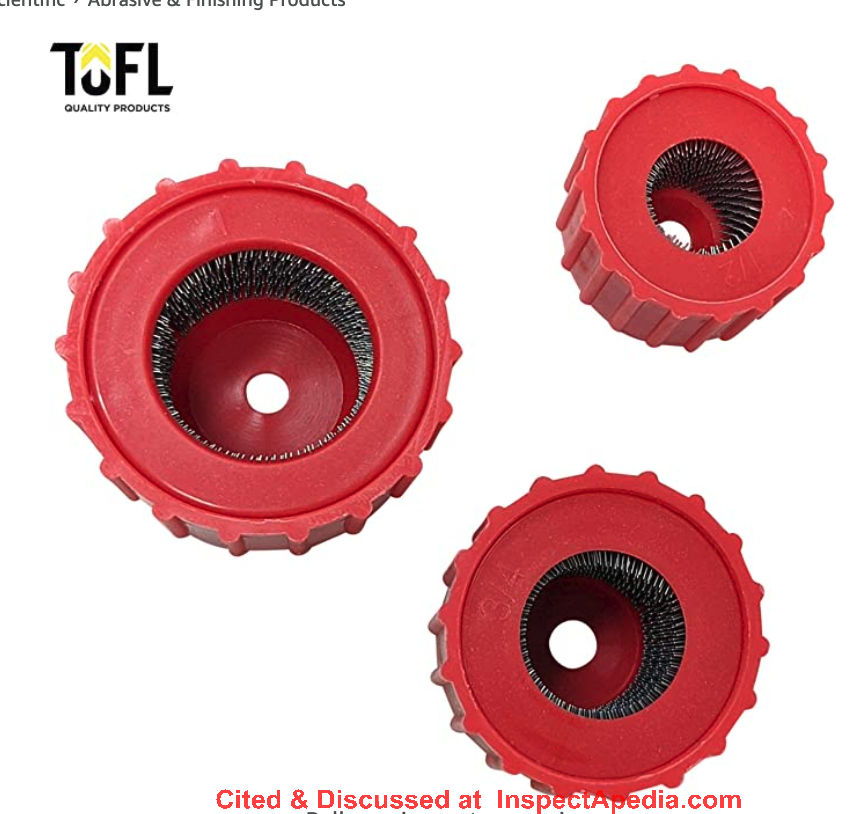
I then use very fine sandpaper or steel wool to remove any oxide from the tubing exterior before making the flare. Or you can buy the special tool sold to clean off the end of copper tubing - one of those is shown below.
Below: tools used to clean the end of copper tubing, especially important before soldering. This copper tubing cleaner is made by Tofl tools.
Then slide the flare fitting over the tubing,
Then make the flare using a copper tubing/pipe flaring tool like the one shown below.
Watch out: remember to slide the flare nut fitting over the tubing before you make the flare - else you won't be able to get the fitting on, you'll need to cut off the flared-end and start-over.
The tubing is pinched in the die and you screw down the flaring head to gradually flare out the tubing.
Inspect the result to be sure there are no nicks or cuts in the mating surface of the flare fittings.
The illustration below, showing the flare nut down on the tubing, the copper flare, and a male flare fitting in the top of the image is adapted from the Copper Development Association, Inc., cited below.
Copper Flare Joint References
- Copper Development Association, FLARED JOINTS GUIDE [PDF] adapted from Copper Development Association, Inc., Questions? https://support.copper.org , Contact: Luis J. Lozano, Technical Consultant, Phone: 212-251-7227
Website excerpt:
Copper Development Association Inc. (CDA) is a U.S.-based, not-for-profit association of the global copper industry, bringing together the North American copper and copper alloy semis fabricators and global copper mining and production industries. CDA is committed to promoting the proper use of copper materials in sustainable, efficient applications for business, industry and the home.
Fax: 860-621-5364 Email prefix: luis.lozano - retrieved 2022/12/18, original source: https://www.copper.org/applications/plumbing/cth/cth_8flrdjts.html - FLEXIBLE GAS PIPING DESIGN GUIDE and INSTALLATION INSTRUCTIONS [PDF] this general guide from OmegaFlex shows installation details for gas piping using some alternative materials.
Below we continue with Dream Home's original text on making copper flare joints.
Tip: buy a hand-operated copper tubing flaring tool to make nicer flare joints and reserve the swaging or flaring tool shown here for making direct pipe to pipe soldered joints without flare fittings.
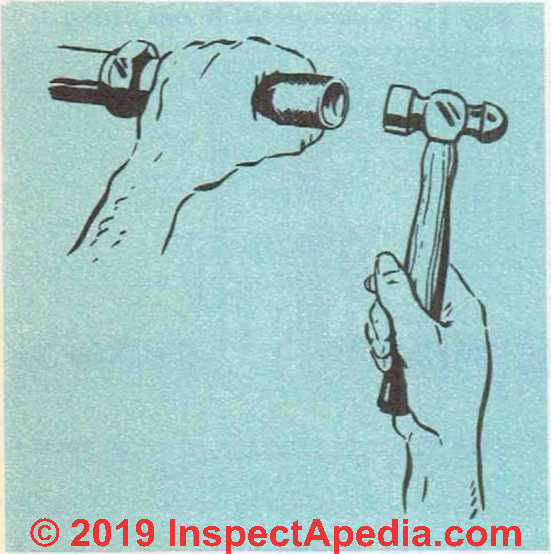
Fig. 21. Make sure that the flaring tool is properly centered in the end of the pipe.
Next, the end of the tubing is burred and then flared out with a flaring tool.
See Fig. 20. This tool must correspond in size to the tube. Put a few drops of oil on the tool and then carefully center it over the end of the tube. Using a hammer, strike the flaring tool until the end of the tubing has been flared out to the outside diameter of the flaring tool. See Fig. 21.
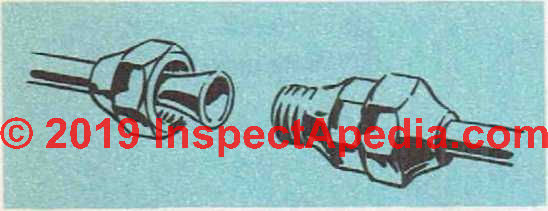
Fig. 22. Component parts of a flared fitting for copper pipe.
Now the flared end of the tube is placed (See Fig. 22) over the fitting and the sleeve nut is run up and tightened with a wrench. See Fig. 23.
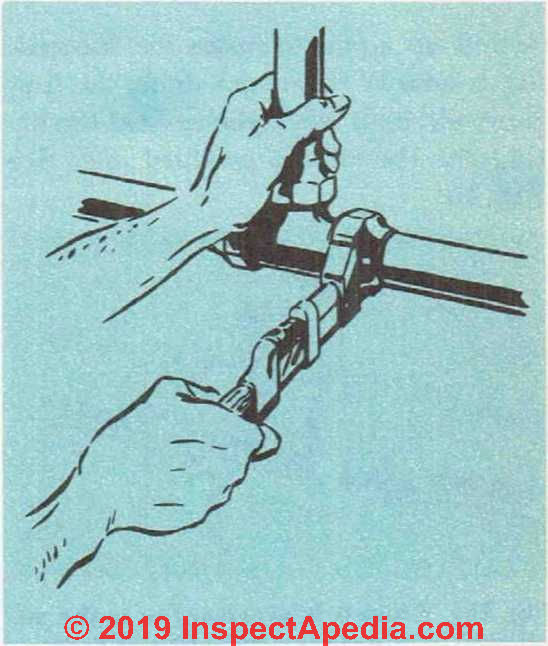
Fig. 23. Tightening up a flared joint with a monkey wrench or an adjustable wrench (such as a "crescent wrench").
Flared copper tubing and flare fittings are sometimes used on water supply but are most-widely used not on water supply systems but rather on lower-pressure piping systems for LP or natural gas piping and for heating oil piping systems.
See details about flared copper piping and flare fittings & flaring tools at FLARE FITTINGS
Flare fittings used on flexible copper piping and their leaks and defects are also discussed at GAS LEAK DETECTION, LP / NG and GAS PIPING CLEARANCES, CODES & DEFECTS.
Also see GAS PIPING, VALVES, CONTROLS - home
Avoid Galvanic Corrosion Leaks
The best practice is to use the same type of pipe throughout the fresh-water system. There is little to be gained by using half copper and brass and half galvanized steel.
In fact, connecting copper to steel will cause trouble - galvanic corrosion between dissimilar metals (copper and steel) will lead to leaks. Brass and copper, however, can be used together without harm.
See details at GALVANIC SCALE & METAL CORROSION
This entire chapter is also available as PLUMBING SYSTEM INSTALLATION [eBook], or as a PDF image at THE HOUSE PLUMBING SYSTEM [PDF] original page images.
...
Continue reading at at PIPE SIZE SELECTION - next section of this chapter, or go to book contents at BUILD YOUR DREAM HOME, or select a topic from the closely-related articles below, or see the complete ARTICLE INDEX.
Or see these sections of Chapter 13 - PLUMBING SYSTEM INSTALLATION
- PROPER PLUMBING WORK is IMPORTANT
- WATER SUPPLY SOURCES
- TYPES of PIPING MATERIALS
- COPPER PIPE INSTALLATION
- COPPER FLARE CONNECTIONS
- PIPE SIZE SELECTION
- CAST IRON PIPE INSTALLATION
- PLUMBING SYSTEM LAYOUT PLAN
- PLUMBING FIXTURE INSTALLATION BATH KITCHEN
- WATER HEATERS & TANKS
- PLUMBING SYSTEM PRESSURE TESTS
- SEPTIC TANK, DRAINFIELD INSTALLATION
- PLUMBING MATERIALS LIST for the basic house
Or see these
Recommended Articles
- BUILD YOUR DREAM HOME
- COPPER PIPING in BUILDINGS
- COPPER FLARE CONNECTIONS
- COPPER PIPE INSTALLATION
- FLARE FITTINGS
- PLUMBING SYSTEM INSPECT DIAGNOSE REPAIR - home
- WATER SUPPLY & DRAIN PIPING - home
Suggested citation for this web page
COPPER FLARE CONNECTIONS at InspectApedia.com - online encyclopedia of building & environmental inspection, testing, diagnosis, repair, & problem prevention advice.
Or see this
INDEX to RELATED ARTICLES: ARTICLE INDEX to PLUMBING SYSTEMS
Or use the SEARCH BOX found below to Ask a Question or Search InspectApedia
Ask a Question or Search InspectApedia
Share this article:Questions & answers or comments about how to identify the architectural style of buildings and building components
Try the search box just below, or if you prefer, post a question or comment in the Comments box below and we will respond promptly.
Search the InspectApedia website
Note: appearance of your Comment below may be delayed: if your comment contains an image, photograph, web link, or text that looks to the software as if it might be a web link, your posting will appear after it has been approved by a moderator. Apologies for the delay.
Only one image can be added per comment but you can post as many comments, and therefore images, as you like.
You will not receive a notification when a response to your question has been posted.
Please bookmark this page to make it easy for you to check back for our response.
IF above you see "Comment Form is loading comments..." then COMMENT BOX - countable.ca / bawkbox.com IS NOT WORKING.
In any case you are welcome to send an email directly to us at InspectApedia.com at editor@inspectApedia.com
We'll reply to you directly. Please help us help you by noting, in your email, the URL of the InspectApedia page where you wanted to comment.
Citations & References
In addition to any citations in the article above, a full list is available on request.
- In addition to citations & references found in this article, see the research citations given at the end of the related articles found at our suggested
CONTINUE READING or RECOMMENDED ARTICLES.
- Carson, Dunlop & Associates Ltd., 120 Carlton Street Suite 407, Toronto ON M5A 4K2. Tel: (416) 964-9415 1-800-268-7070 Email: info@carsondunlop.com. Alan Carson is a past president of ASHI, the American Society of Home Inspectors.
Thanks to Alan Carson and Bob Dunlop, for permission for InspectAPedia to use text excerpts from The HOME REFERENCE BOOK - the Encyclopedia of Homes and to use illustrations from The ILLUSTRATED HOME .
Carson Dunlop Associates provides extensive home inspection education and report writing material. In gratitude we provide links to tsome Carson Dunlop Associates products and services.
 |
HOME | ABOUT | ASK a QUESTION | CONTACT | CONTENT USE POLICY | DESCRIPTION | POLICIES | PRIVACY | |
| © 2026 - 1985 Publisher InspectApedia.com - Daniel Friedman | |||||||||