 How to Install Cast Iron Pipe
Chapter 13 of How to Build Your Dream Home © 2020 InspectApedia.com

- POST a QUESTION or COMMENT about how to identify the architectural style of buildings and building components
This article series provides an updated version of Hubbard Cobb's Your Dream Home, illustrated by Sigman-Ward, first published by Wm. H. Wise & Co. New York, 1950.
From site selection and obtaining financing through each step in construction of a single family home the simple procedures and drawings in this book are still useful for anyone building or repairing a home or other small structure.
InspectAPedia tolerates no conflicts of interest. We have no relationship with advertisers, products, or services discussed at this website.
- Daniel Friedman, Publisher/Editor/Author - See WHO ARE WE?
Cast Iron Drain Piping Installation
 Here we describe how to assemble & install vertical and horizontal runs of cast iron drain pipe.
This is a section of Chapter 13 of BUILD YOUR DREAM HOME at InspectApedia.com - online encyclopedia of building & environmental inspection, testing, diagnosis, repair, & problem prevention advice.
This article series provides an updated version of Hubbard Cobb's Your Dream Home, illustrated by Sigman-Ward, first published by Wm. H. Wise & Co. New York, 1950. The link above provides versions of each chapter as a web page, as an ePub, and in the original form as a PDF file.
Cast-iron bell and spigot pipe over 2" is used for the drainage inside the house and for the vent system. These pipes come in standard lengths of 5" and up to 6" in diameter. For most purposes, a 4" pipe will be sufficient except for the kitchen sink-drain, where a 2" pipe is used.
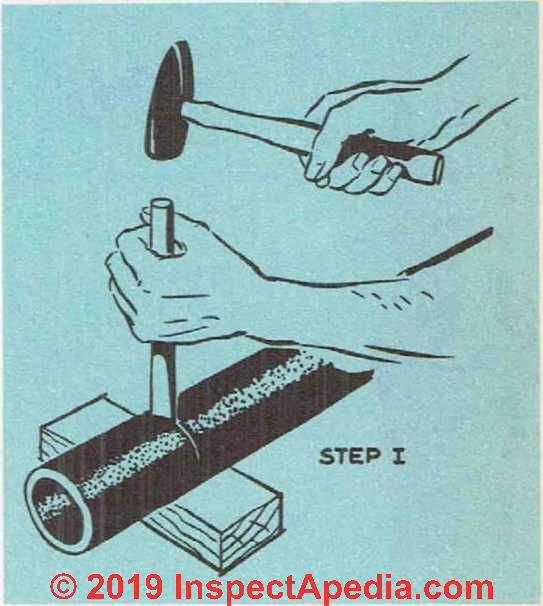
Cast-iron pipe is cut with a cold chisel. See Fig 24. First of all, the pipe should be lightly scored around the point where the cut is to be made. Make this line as square as you can. Now, with the pipe supported on some 2" x 4"’s, start making deeper cuts along the line with the cold chisel. Turn the pipe after each blow. After you have gone around several times the pipe will break clean at the cut line. Before you assemble the pipe, strike it at each end with a hammer. If you get a clear ring, the pipe is sound.
How to Make Vertical Joints in Cast Iron Soil Pipe
Making up the joint in cast-iron pipe is a complicated business, but with a little practice you should not find it too difficult.
Fig. 24. Cutting soil pipe with a cold chisel.
The ends of pipe to be joined should be clean and bone dry. When working in a vertical line, the bell end of the pipe should face up. Insert the spigot end of the next section of pipe into the bell end and then secure this length of pipe to a framework with metal strips or by some other means so that it will not fall over.
Now pack twisted oakum into the bell until it is about 1" from the top. For a 4" soil pipe, you will need about 5 feet of oakum for each joint. The oakum should be solidly packed into the bell with a tool called a yarning iron.
See Figs. 25 and 28 below. If any of the fibers of the oakum protrude, they should be burned off with a blow-torch. After the oakum is well packed into place, the joint is ready to be caulked with lead.
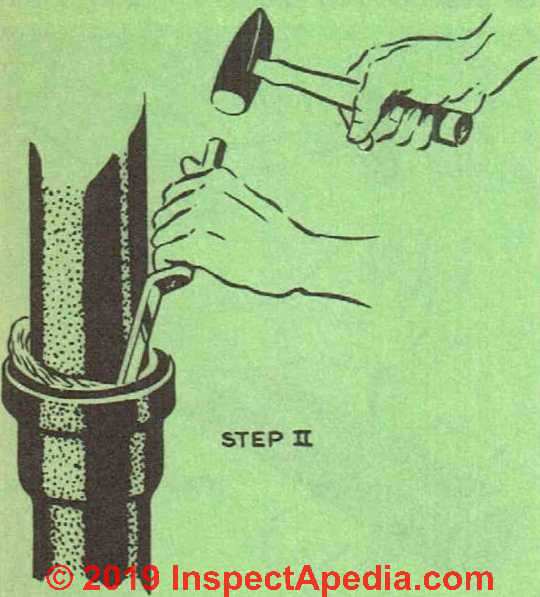
Fig. 25. Packing in the oakum with a yarning iron.
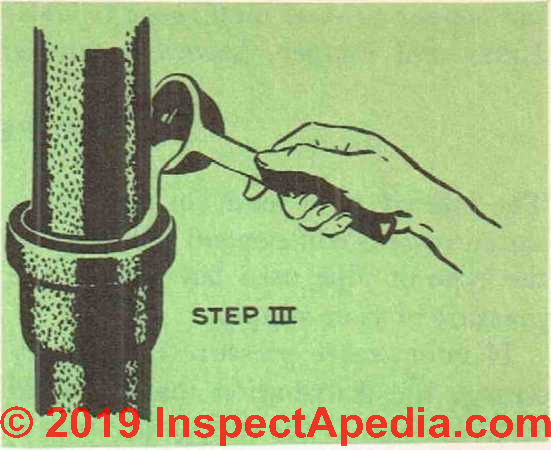
Fig. 26. Pouring in the hot lead to make a leak-proof joint in cast iron pipe.
You will need about 3 pounds for 4" pipe. Needless to say, enough lead should be melted at one time for several joints. Lead can be melted in a gasoline-fired melting pot. When the lead is molten, pre-heat the ladle that is used to carry the lead so that it will not chill the molten lead before you get it to the joint.
Take the hot ladle and push back some of the dross or slag that lies on the surface of the lead and then scoop up a ladleful of lead. Do not disturb the molten lead in the pot any more than is necessary. The lead must be poured into the joint in one operation.
Move the ladle around as you pour so that the joint is filled uniformly. See Fig. 26.
Watch out: Do not pour hot lead on a wet joint because the moisture will cause the hot lead to fly out. It is wise to keep your face away from the joint while you pour so that if any of the lead does fly out it will not hit you.
The cast iron pipe joint should be completely filled until the lead is a little above the rim of the hub—about 1/8" or so.
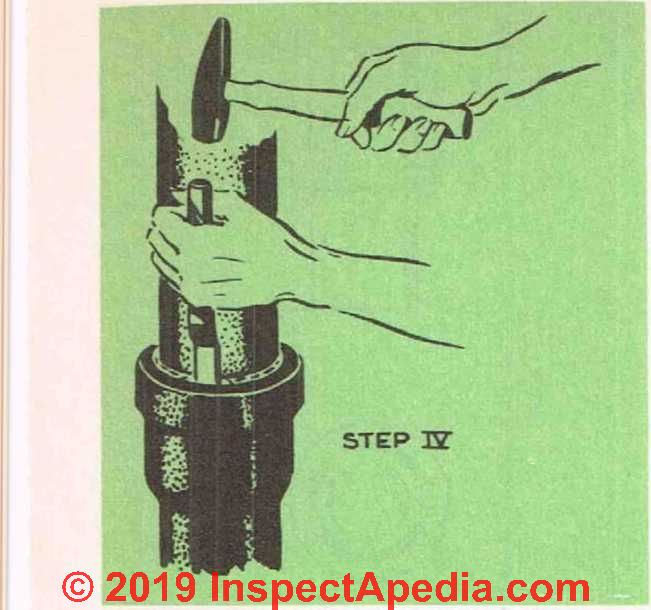
Fig. 27. Caulking a vertical joint in cast iron pipe.
The next step is the final caulking of the joint and this can be done just as soon as the lead is cool. Caulking backs the lead firmly inside the joint. See Figs. 27 and 28. It must be done because lead will shrink slightly as it cools and, therefore, unless the joint is caulked it will not be tight.
The first step in caulking is done with an out-side-caulking tool. Place the end of this tool on the lead and then strike it gently with a hammer. If you strike it too hard, you may jar the lead loose from the joint. Tap all around the leaded joint and then change to an inside-caulking tool.
Heavier blows can be struck with this. Finish off the caulking with a caulking tool that fits into the space without binding.
When working with a section of pipe that has been cut, great care must be taken to be sure that the cut end is properly centered in the bell of the section below. See Figs. 29 and 30. If the end is not properly centered, you will not get a good joint.
Some codes permit joints in cast-iron pipe to be made with a commercial jointing-compound that requires no caulking or with shredded lead, which is calked cold.
How to Make Horizontal Joints in Cast Iron Pipe
For making horizontal joints, the same general procedure is used as for the vertical joints. The joint is first packed with oakum. To introduce the lead, a contraption called a joint-runner is required. See Fig. 31.
The cast iron pipe joint runner is made of asbestos rope or a modern (non-asbestos) fireproof substitute that is wrapped around the pipe just above the hub.
Get the runner on as tightly as possible; the clip that holds the runner together should face up. This is the point at which the lead is poured in. Tap the runner after it is fastened in place and drive it against the hub so that there is no open joint here where the lead can flow out.
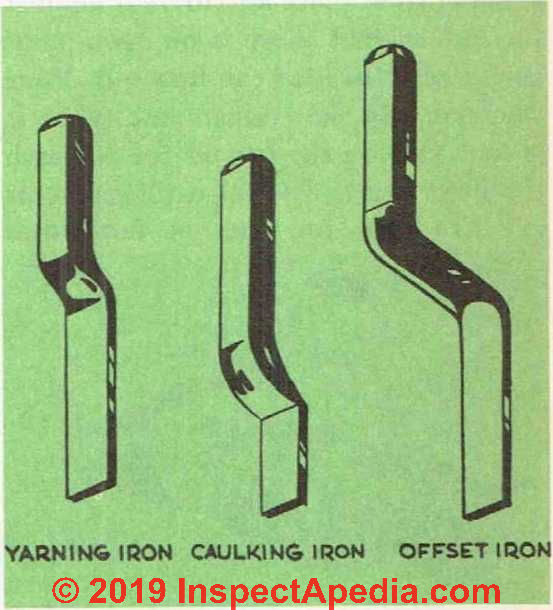
Fig. 28. Three tools you will need to make up joints in cast-iron soil pipe.

Fig. 29. Care must be taken in making up a joint with a section of pipe that has been cut, to get the end properly centered in the bell end. The joint shown above is off center and may cause trouble.
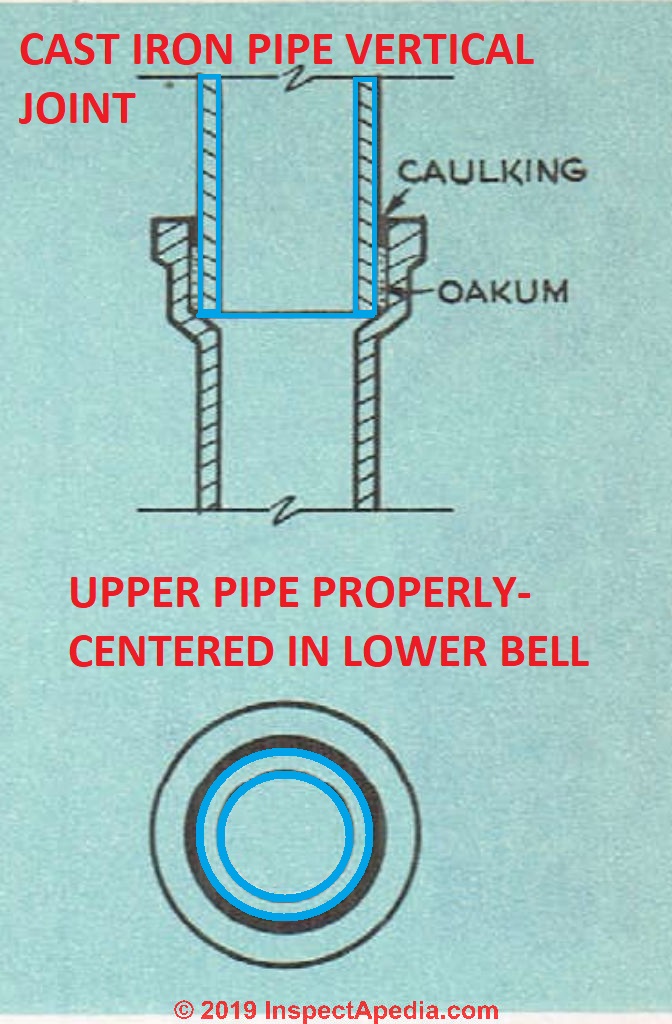
Fig. 30. Correct method of centering the end of cut pipe for making a caulked joint.
Pour the lead into the runner and, when it is cool, remove the runner for use with the next joint.
Special caulking tools are available for use on horizontal joints so that the underside of the joint can be caulked.
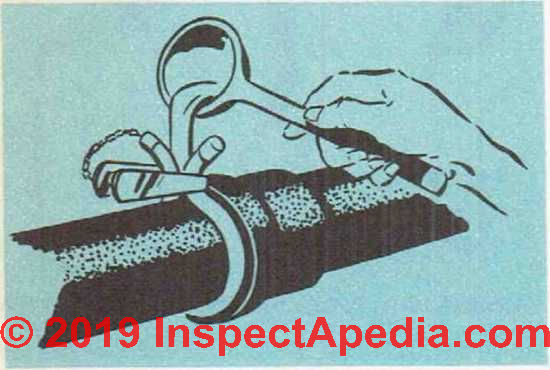
Fig. 31. Pouring lead for a horizontal caulked joint by means of a joint runner.
Threaded Joints in Drain Waste Vent Pipes
If you wish to save yourself the job of having to make up caulked joints in cast-iron pipes, you can use special pipes of this type with threaded joints.
They are especially designed for drainage work so that the interior of the pipe at the fitting or joint will be perfectly smooth and free from shoulders that might catch solid matter passing through the line.
Of course, this type of pipe is more expensive than the bell and spigot type and more care is required in cutting and fitting the sections together. On the other hand, the same degree of skill is not required in making the joints, the work goes faster and is much neater.
See details about cast iron piping piping at CAST IRON DRAIN PIPING
Also see DRAIN & SEWER PIPING - home
Details about lead pipes in buildings are at LEAD PIPES in BUILDINGS
...
Continue reading at PLUMBING SYSTEM LAYOUT PLAN - next section of this chapter, or go to book contents at BUILD YOUR DREAM HOME, or select a topic from the closely-related articles below, or see the complete ARTICLE INDEX.
This entire chapter is also available as PLUMBING SYSTEM INSTALLATION [eBook], or as a PDF image at THE HOUSE PLUMBING SYSTEM [PDF] original page images.
Or see these sections of Chapter 13 - PLUMBING SYSTEM INSTALLATION
- PROPER PLUMBING WORK is IMPORTANT
- WATER SUPPLY SOURCES
- TYPES of PIPING MATERIALS
- COPPER PIPE INSTALLATION
- COPPER FLARE CONNECTIONS
- PIPE SIZE SELECTION
- CAST IRON PIPE INSTALLATION
- PLUMBING SYSTEM LAYOUT PLAN
- PLUMBING FIXTURE INSTALLATION BATH KITCHEN
- WATER HEATERS & TANKS
- PLUMBING SYSTEM PRESSURE TESTS
- SEPTIC TANK, DRAINFIELD INSTALLATION
- PLUMBING MATERIALS LIST for the basic house
Or see these
Recommended Articles
- BUILD YOUR DREAM HOME
- CAST IRON DRAIN PIPING - home
- CAST IRON DRAIN LEAK, ODOR, REPAIR
- CAST IRON PIPE INSTALLATION
- PLUMBING VENT DISTANCES & ROUTING
- SEPTIC CLEARANCE DISTANCES
- SEPTIC TANK, DRAINFIELD INSTALLATION
- WATER SUPPLY & DRAIN PIPING - home
Suggested citation for this web page
CAST IRON PIPE INSTALLATION at InspectApedia.com - online encyclopedia of building & environmental inspection, testing, diagnosis, repair, & problem prevention advice.
Or see this
INDEX to RELATED ARTICLES: ARTICLE INDEX to PLUMBING SYSTEMS
Or use the SEARCH BOX found below to Ask a Question or Search InspectApedia
Ask a Question or Search InspectApedia
Share this article:Questions & answers or comments about how to identify the architectural style of buildings and building components
Try the search box just below, or if you prefer, post a question or comment in the Comments box below and we will respond promptly.
Search the InspectApedia website
Note: appearance of your Comment below may be delayed: if your comment contains an image, photograph, web link, or text that looks to the software as if it might be a web link, your posting will appear after it has been approved by a moderator. Apologies for the delay.
Only one image can be added per comment but you can post as many comments, and therefore images, as you like.
You will not receive a notification when a response to your question has been posted.
Please bookmark this page to make it easy for you to check back for our response.
IF above you see "Comment Form is loading comments..." then COMMENT BOX - countable.ca / bawkbox.com IS NOT WORKING.
In any case you are welcome to send an email directly to us at InspectApedia.com at editor@inspectApedia.com
We'll reply to you directly. Please help us help you by noting, in your email, the URL of the InspectApedia page where you wanted to comment.
Citations & References
In addition to any citations in the article above, a full list is available on request.
- In addition to citations & references found in this article, see the research citations given at the end of the related articles found at our suggested
CONTINUE READING or RECOMMENDED ARTICLES.
- Carson, Dunlop & Associates Ltd., 120 Carlton Street Suite 407, Toronto ON M5A 4K2. Tel: (416) 964-9415 1-800-268-7070 Email: info@carsondunlop.com. Alan Carson is a past president of ASHI, the American Society of Home Inspectors.
Thanks to Alan Carson and Bob Dunlop, for permission for InspectAPedia to use text excerpts from The HOME REFERENCE BOOK - the Encyclopedia of Homes and to use illustrations from The ILLUSTRATED HOME .
Carson Dunlop Associates provides extensive home inspection education and report writing material. In gratitude we provide links to tsome Carson Dunlop Associates products and services.
 |
HOME | ABOUT | ASK a QUESTION | CONTACT | CONTENT USE POLICY | DESCRIPTION | POLICIES | PRIVACY | |
| © 2026 - 1985 Publisher InspectApedia.com - Daniel Friedman | |||||||||