 How to Install Copper Piping
Chapter 13 of How to Build Your Dream Home © 2020 InspectApedia.com

- POST a QUESTION or COMMENT about how to identify the architectural style of buildings and building components
This article series provides an updated version of Hubbard Cobb's Your Dream Home, illustrated by Sigman-Ward, first published by Wm. H. Wise & Co. New York, 1950.
From site selection and obtaining financing through each step in construction of a single family home the simple procedures and drawings in this book are still useful for anyone building or repairing a home or other small structure.
InspectAPedia tolerates no conflicts of interest. We have no relationship with advertisers, products, or services discussed at this website.
- Daniel Friedman, Publisher/Editor/Author - See WHO ARE WE?
How to Install Copper Water Pipes
 This is a section of Chapter 13 of BUILD YOUR DREAM HOME at InspectApedia.com - online encyclopedia of building & environmental inspection, testing, diagnosis, repair, & problem prevention advice.
Copper Water Pipe Installation Details
Copper tubing has one great advantage over either brass or galvanized iron and that is the ease with which it can be installed. See Fig. 6. Tubing comes in long rolls up to 100 feet in length. See Fig. 7. The tubing is strong enough to withstand handling but it is also soft enough so that it can be bent around obstructions, saving both time and the cost of various fittings. This is
a great help for the amateur plumber because with rigid pipes it is necessary to have the exact measurements for a run of pipe between two fittings, but with copper the tube can be cut a little too long and then be bent slightly until it is just the right length.
Copper tubing, like red brass, will better withstand corrosive elements found in most water.
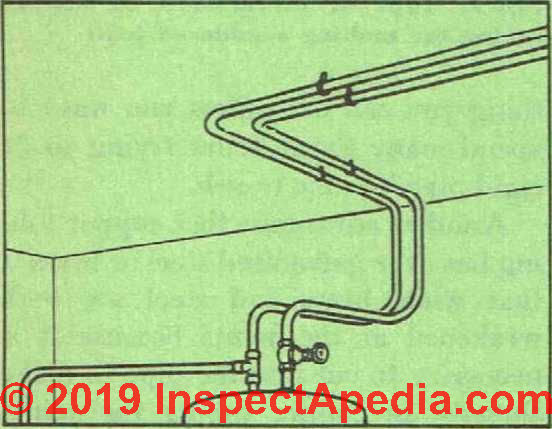
Fig. 6. Copper tubing (above) has a great advantage over rigid pipe (below) in that the copper tubing can be installed with a minimum of fittings.

Below: Coil of flexible copper tubing.
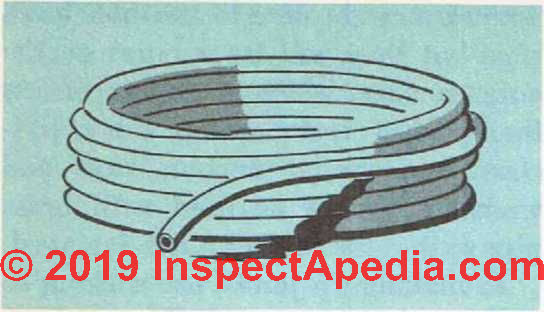
Fig. 7. Copper tubing comes in rolls up to 100 feet in length.
One common mistake made about copper tubing, however, is the belief in its ability to withstand freezing.
It is true that water inside soft-drawn copper tubing can be frozen several times before the tube itself is damaged, but repeated freezings will burst it eventually. Hard-drawn tubes will be damaged by freezing just like other types of rigid pipe.
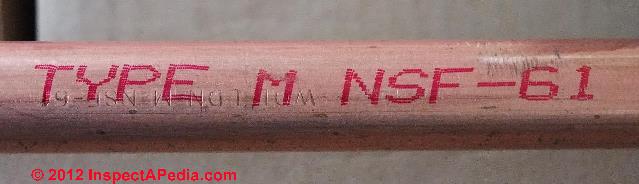
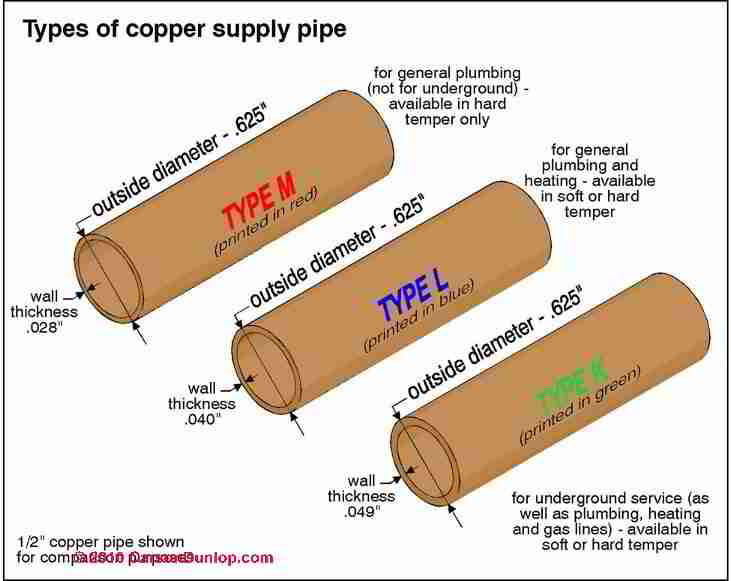
Types of Copper Pipe: Type K, Type L
Copper tubing is either hard drawn or soft drawn. There are also two wall thicknesses, type K copper pipe for the heavy and type L copper pipe for the light.
Type L can be used in most instances, unless the water happens to be extremely corrosive, in which case the heavier type K should be used. Tubing comes in sizes from 1/8" to 2".
Copper tubing can be used for the entire plumbing water supply system, including the service entrance.
In fact, if you had difficulty in digging a trench from the house to the source of water because of large rocks and it is impossible to get a straight trench, copper tubing is about the only thing you can use unless you want to spend many extra hours trying to fit rigid pipe into the trench.
Another advantage that copper tubing has over galvanized steel or brass is that while brass and steel are both weakened at the joints because it is necessary to cut into the pipe to make threads, in copper tubing the joints are stronger than any other part.
This is due to the type of fittings used with copper.
Cutting Copper Pipe or Tubing
There are two methods of making joints in copper tubing: one with a soldered type of fitting, and the other with a flanged compression type of fitting.
Copper tubing can be cut with a hacksaw.
Considering the fact that it is going to be necessary to do considerable cutting, it is well worth the effort to make a jig somewhat like a miter box so that the pipe can be cut with ease. See Fig. 8.
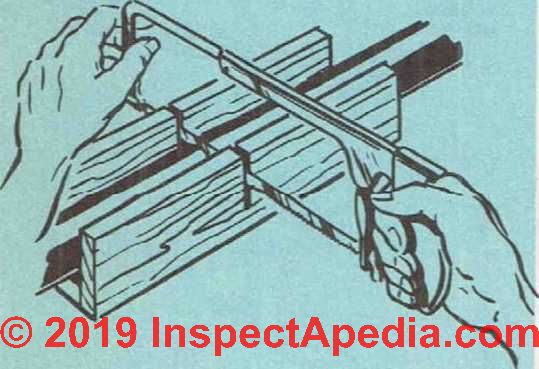
Fig. 8. Cutting copper tubing with a hacksaw and a simple wood jig. Tip: Buy a copper tubing or copper pipe cutter for faster easier cuts of copper pipe or copper tubing. A tubing cutter permits both making the cut and removing the copper burrs inside the pipe edge before soldering or "sweating" the pipe joints.
There are also special tube-cutters that can be used for this purpose. Care must be taken when working with soft copper not to squeeze it in a vice or with a wrench so that it becomes dented, because this would act as an obstruction. If the end of the tubing is damaged in handling, it can be restored to shape with a sizing tool. After the tube has been cut, ream out the burr
How to Install Soldered Copper Pipe Fittings
As shown in Fig. 9, the fittings for soldered joints are made so that the openings at each end are slipped over the copper tubing. Before this is done, the ends of the tube should be carefully cleaned with steel wool or emery cloth until the metal is shiny.
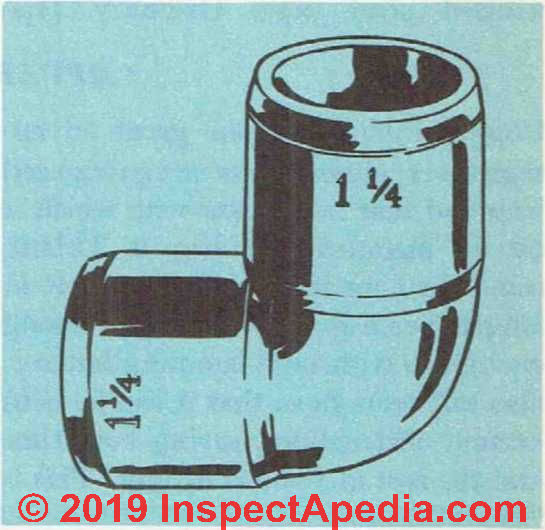
Fig. 9. Type of fitting used on copper tubing for making a soldered joint. Elbows and other fittings for joining copper pipe may be made of copper themselves, or of brass.
Newer type of copper pipe joint fittings include quick crimp type fittings such as "shark bite " connectors that dispense with soldering. A special SharkBite crimping installation tool is required. Shark Bite fittings are availble for copper and for PEX tubing. We illustrate the use of these fittings at PEX PIPING INFORMATION
The inside of the fitting should be thoroughly cleaned in the same manner. See Fig. 10.
If the surfaces of both the tube and fitting that are to be soldered are not clean you will not get a good joint.
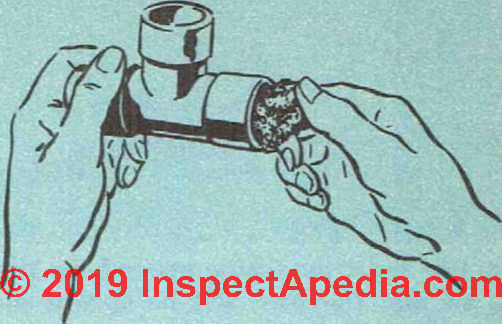
Fig. 10. Polish both fitting and end of pipe with steel wool until the metal is bright.
After the metal has been polished until it is bright, apply a non-corrosive soldering flux to the tube and the fitting where they have been cleaned. See Fig. 11.
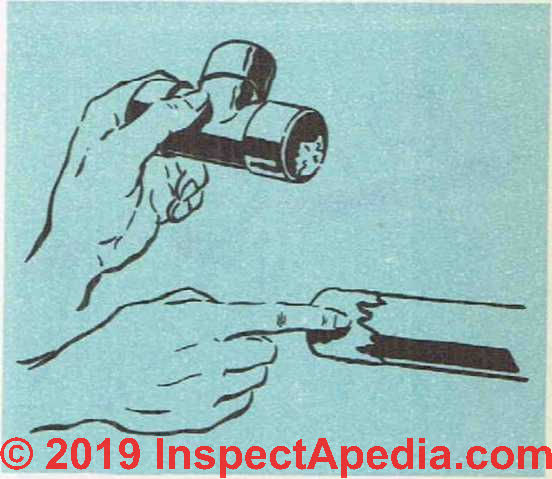
Fig. 11. Flux should be applied to the in* side of the fitting as well as to the outside of the pipe.
Slip the fitting over the end of the tube and then turn it around several times so that the flux will be spread out evenly and all portions of the metal will be covered. See Fig. 12.
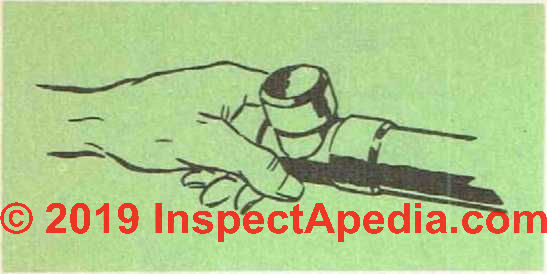
Fig. 12. Twist the fitting around the tubing so that the flux will be spread out evenly.
The next step is to solder the joint. Some fittings are provided with a little hole in the side into which the wire solder is fed. Other types have no such hole, and the solder is fed in around the edges of the fitting. See Fig. 13.
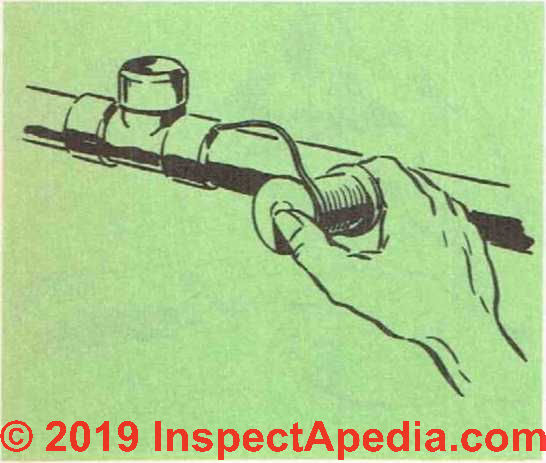
Fig. 13. If the fitting has been properly heated, the solder will be drawn into the joint until the joint is full.
In either case, the soldering procedure is about the same. The fitting must be heated and this can be done either with a gasoline blowtorch or an air-acetylene torch. See Fig. 14.
There is some advantage in using the acetylene torch because it produces a more concentrated flame and, therefore, can be used more conveniently in close quarters where there is woodwork or other inflammable material present. But whichever type of torch is used, be careful about fire.

Fig. 14. The fitting must be heated so that the solder will run into the joint.
The best plan is to put pieces of fiber cement (non-combustible) board around all near-by woodwork so that there will be less danger of setting something on fire. Hold the flame of the torch on the fitting and tube until the flux begins to boil.
After this, remove the torch and start feeding in the wire solder either through the hole in the fitting or along the edges. If the joint is not hot enough, the solder will not be drawn into it, so be sure that both fitting and tube are properly heated. On the other hand, if you get the metal too hot, you will not get a good joint.
Feed the solder into the fitting and when no more is drawn up it means that the fitting is properly soldered. A ring of solder will appear around the edge of the fitting. Wipe the excess solder off with a brush. See Fig. 15.
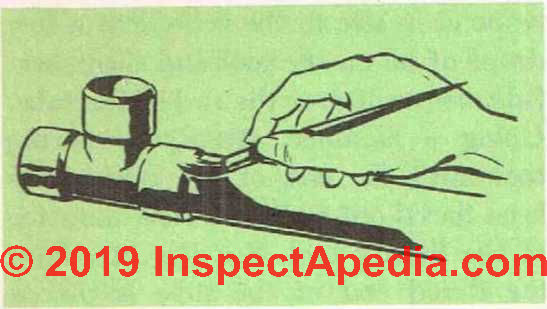
Fig. 15. A brush can be used to remove excess solder from around the edge of the fitting.
Give the joint time to cool, and then rub the ring of solder down with steel wool to make a neat job of it.
How to Make Multiple Solder Joints Close to One Another
Usually, you will have to make at least two joints at the same fitting. In such cases, it is necessary to wrap the joints that you have previously soldered with wet cloths so that the fitting can be heated up again to make the succeeding joints. If this is not done, the first joint will melt when you re-heat the fitting for the second or third one. See Fig. 16.
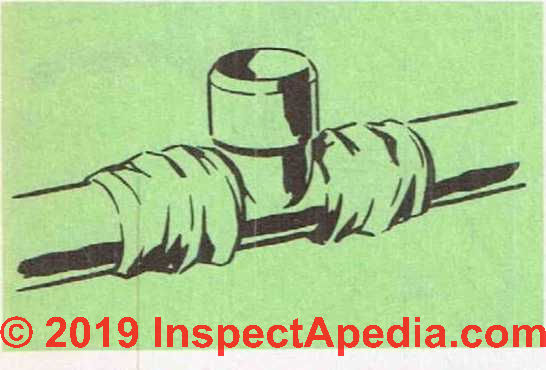
Fig. 16. When it is necessary to make additional connections with soldered fittings, cover the soldered joints with wet rags so that the joints already soldered will not melt when the fitting is heated.
See details about copper water pipe at COPPER PIPING in BUILDINGS - home
Joining Lead Pipes to Brass or Copper: Wiped Joint
Watch out: because of lead poisoning concerns, lead pipe is no longer used in most modern plumbing systems, but in the 1950s and earlier lead was often found both at service entry piping and at toilet bends and some other waste piping. Lead supply piping was also used in some homes.
This joint is used when it is necessary to join lead pipe to lead or to brass or copper. The first step is to prepare the two sections of pipe as shown in Fig. 32. This can be done with a rasp.
The ends of the pipe should then be painted with plumber’s soil for 4" or so. After the soil is dry, the pipe should be shaved about VA" back until the metal is bright.

Fig. 32. How the ends of pipes should be prepared for making a wiped joint connecting lead pipes to copper or brass. Note: Lead pipes are no longer used in modern construction.
Rub candle wax over the shaved portion to prevent it from tarnishing. Both ends of pipe should be treated in this manner.
Solder used for wiping joints should be 60 per cent lead and 40 per cent tin. The solder should not be overheated.
Note: 60/40 Lead solder is no longer used in modern plumbing, particularly on water supply piping.
Before the solder is poured, put the two sections of pipe together and support them above the floor so that there are at least 4 inches under the joint.
The cloth used to make the joint is herringbone ticking, and it should be folded until you have a pad with 16 thicknesses of ticking.
This should be warmed and then rubbed with mutton tallow without salt. The pad is held under the joint while the solder is poured slowly back and forth over the top of the joint.
The solder that runs off the sides can he caught in the cloth and patted against the underside. The pouring continues until the solder on the joint becomes plastic. When the solder over the entire joint has become plastic, the pouring ceases and the plastic is worked into a joint that has the shape of an egg.
Solder that runs off the joint and onto the floor can be reheated and used again.
...
Continue reading at COPPER FLARE CONNECTIONS - next section of this chapter, or go to book contents at BUILD YOUR DREAM HOME, or select a topic from the closely-related articles below, or see the complete ARTICLE INDEX.
This entire chapter is also available as PLUMBING SYSTEM INSTALLATION [eBook], or as a PDF image at THE HOUSE PLUMBING SYSTEM [PDF] original page images.
Or see these sections of Chapter 13 - PLUMBING SYSTEM INSTALLATION
- PROPER PLUMBING WORK is IMPORTANT
- WATER SUPPLY SOURCES
- TYPES of PIPING MATERIALS
- COPPER PIPE INSTALLATION
- COPPER FLARE CONNECTIONS
- PIPE SIZE SELECTION
- CAST IRON PIPE INSTALLATION
- PLUMBING SYSTEM LAYOUT PLAN
- PLUMBING FIXTURE INSTALLATION BATH KITCHEN
- WATER HEATERS & TANKS
- PLUMBING SYSTEM PRESSURE TESTS
- SEPTIC TANK, DRAINFIELD INSTALLATION
- PLUMBING MATERIALS LIST for the basic house
Or see these
Recommended Articles
- BUILD YOUR DREAM HOME
- COPPER FLARE CONNECTIONS
- COPPER PIPING in BUILDINGS
- COPPER PIPE INSTALLATION
- PLUMBING SYSTEM INSPECT DIAGNOSE REPAIR - home
- SUPPLY PIPING - home
- WATER SUPPLY - home
- WATER SUPPLY & DRAIN PIPING - home
Suggested citation for this web page
COPPER PIPE INSTALLATION at InspectApedia.com - online encyclopedia of building & environmental inspection, testing, diagnosis, repair, & problem prevention advice.
Or see this
INDEX to RELATED ARTICLES: ARTICLE INDEX to PLUMBING SYSTEMS
Or use the SEARCH BOX found below to Ask a Question or Search InspectApedia
Or see
INDEX to RELATED ARTICLES: ARTICLE INDEX to BUILDING ARCHITECTURE
Or use the SEARCH BOX found below to Ask a Question or Search InspectApedia
Ask a Question or Search InspectApedia
Share this article:Questions & answers or comments about how to identify the architectural style of buildings and building components
Try the search box just below, or if you prefer, post a question or comment in the Comments box below and we will respond promptly.
Search the InspectApedia website
Note: appearance of your Comment below may be delayed: if your comment contains an image, photograph, web link, or text that looks to the software as if it might be a web link, your posting will appear after it has been approved by a moderator. Apologies for the delay.
Only one image can be added per comment but you can post as many comments, and therefore images, as you like.
You will not receive a notification when a response to your question has been posted.
Please bookmark this page to make it easy for you to check back for our response.
IF above you see "Comment Form is loading comments..." then COMMENT BOX - countable.ca / bawkbox.com IS NOT WORKING.
In any case you are welcome to send an email directly to us at InspectApedia.com at editor@inspectApedia.com
We'll reply to you directly. Please help us help you by noting, in your email, the URL of the InspectApedia page where you wanted to comment.
Citations & References
In addition to any citations in the article above, a full list is available on request.
- Our recommended books about building & mechanical systems design, inspection, problem diagnosis, and repair, and about indoor environment and IAQ testing, diagnosis, and cleanup are at the InspectAPedia Bookstore. Also see our Book Reviews - InspectAPedia.
- In addition to citations & references found in this article, see the research citations given at the end of the related articles found at our suggested
CONTINUE READING or RECOMMENDED ARTICLES.
- Carson, Dunlop & Associates Ltd., 120 Carlton Street Suite 407, Toronto ON M5A 4K2. Tel: (416) 964-9415 1-800-268-7070 Email: info@carsondunlop.com. Alan Carson is a past president of ASHI, the American Society of Home Inspectors.
Thanks to Alan Carson and Bob Dunlop, for permission for InspectAPedia to use text excerpts from The HOME REFERENCE BOOK - the Encyclopedia of Homes and to use illustrations from The ILLUSTRATED HOME .
Carson Dunlop Associates provides extensive home inspection education and report writing material. In gratitude we provide links to tsome Carson Dunlop Associates products and services.
 |
HOME | ABOUT | ASK a QUESTION | CONTACT | CONTENT USE POLICY | DESCRIPTION | POLICIES | PRIVACY | |
| © 2026 - 1985 Publisher InspectApedia.com - Daniel Friedman | |||||||||