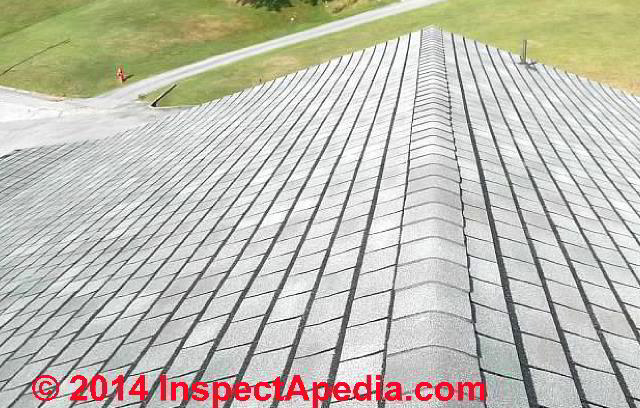
 Asphalt Shingle Roof Installation Procedures
Best Roofing Practices Guide
- POST a QUESTION or COMMENT about the best practices to follow when installing asphalt shingle roofing.
Asphalt shingle installation:
This article discusses best roofing practices for the installation of asphalt roof shingles, including:
- installation temperature
- shingle sealing methods
- starter course requirements
- shingle course offsets
- asphalt shingle nailing location and specifications
- low slope and steep slope limits for asphalt shingles
- roofing flashing and underlayment
- roof flashing at building eaves and around skylights
InspectAPedia tolerates no conflicts of interest. We have no relationship with advertisers, products, or services discussed at this website.
- Daniel Friedman, Publisher/Editor/Author - See WHO ARE WE?
...
Installation Recommendations for Asphalt Shingle Roofs
 Article Contents
- INSTALLATION TEMPERATURE REQUIREMENTS
- MANUAL SEALING REQUIREMENTS
- STARTER COURSE REQUIREMENTS
- OFFSETS REQUIREMENTS BETWEEN SHINGLE COURSES
- FASTENING (NAILING) REQUIREMENTS
- FASTENER LOCATION REQUIREMENTS - WHERE DO THE SHINGLE NAILS OR SHINGLE STAPLES GO?
- STEEP SLOPE LIMITS & SHINGLE NAILING AND HAND SEALING REQUIREMENTS
- FLASHING REQUIREMENTS
- UNDERLAYMENT REQUIREMENTS
- FLASHING RECOMMENDATIONS FOR EAVES AND SKYLIGHTS
- SHINGLE INSTRUCTIONS, ROOFING MATERIALS & EQUIPMENT SUPPLIERS
...
Installation Temperature Requirements for Asphalt Shingle Roofs
Ideally, shingles should be installed at temperatures ranging from 40°F to 85°F. Below 40°F, shingles are brittle and crack easily when hammered or bent.
Above 85°F, it is easy to tear the shingles or mar the granular coating. In hot temperatures, roofers often start very early in the morning and break at midday. In cold temperatures, it is best to store the shingles in a heated enclosure until they are installed.
Details about shingle temperatures in manufacture and on-roof are
at ASPHALT SHINGLE TEMPERATURES
[Click to enlarge any image]
Adapted/paraphrased with permission from Best Practices Guide to Residential Construction (Steve Bliss, J Wiley & Sons),
chapter on BEST ROOFING PRACTICES
...
Manual Sealing Requirements for Asphalt Shingle Roofs
Details about the sealing recommendations from asphalt shingle roofing experts are at WIND DAMAGE to ROOFS
and
at ASPHALT SHINGLE CELLOPHANE STRIP REMOVAL we include an exhaustive review of the argument around whether or not one should remove the cellophane strips from the back of asphalt roof shingles before they are installed [basically, no, provided they are secure and in place].
Here is what the GAF Materials Corporation, Grand Timberline™ Premium Architectural Shingle Application Instructions say about the glue strips and cellophane. You'll note that we are to leave the cellophane in place, but if site conditions (high wind) require immediate shingle sealing, an extra step, using additional shingle tab adhesive, is permitted.
WIND RESISTANCE/HAND SEALING: These shingles have a special thermal sealant that firmly bonds the shingles together after application when exposed to sun and warm temperatures. Shingles installed in Fall or Winter may not seal until the following Spring.
If shingles are damaged by winds before sealing or are not exposed to adequate surface temperatures, or if the self sealant gets dirty, the shingles may never seal. Failure to seal under these circumstances results from the nature of self-sealing shingles and is not a manufacturing defect.
To insure immediate sealing, apply 4 quarter-sized dabs of shingle tab adhesive on the back of the shingle 1" (25mm) and 13" (330mm) in from each side and 1" (25mm) up from bottom of the shingle. Press shingle firmly into the adhesive.
For maximum wind resistance along rakes, cement shingles to underlayment and each other in a 4" (102mm) width of asphalt plastic roof cement.
NOTE: Excess tab adhesive can cause blistering of the shingle.
[The company is referring to the use of additional roof shingle adhesive, not the factory-applied glue strip. Also
see BLISTERS on ASPHALT SHINGLES - Ed.]
The film strips on the back of each shingle are to prevent sticking together of the shingles while in the bundle and to keep dirt and debris out of the adhesive material so that after installation the adhesive will work. Their removal is NOT required during application.
In cold climates, the asphalt shingle sealant strip may not set up properly and may require manual sealing.
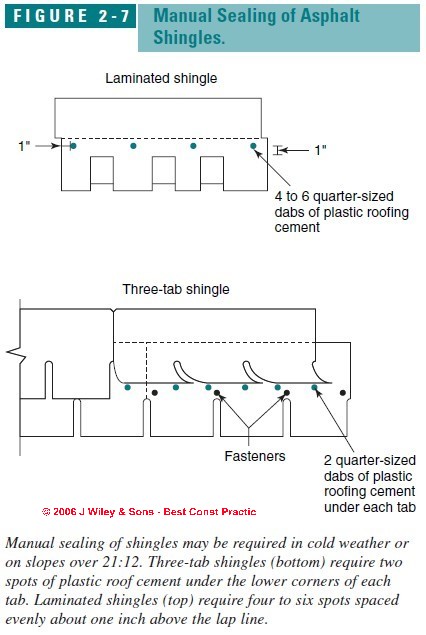
For three-tab shingles, place two quarter-size spots of plastic roof cement under the lower corners of each tab (as shown in Figure 2-7).
With laminated shingles, place four to six quarter-sized dots, spaced evenly, about one inch above the bottom of the overlapping shingle.
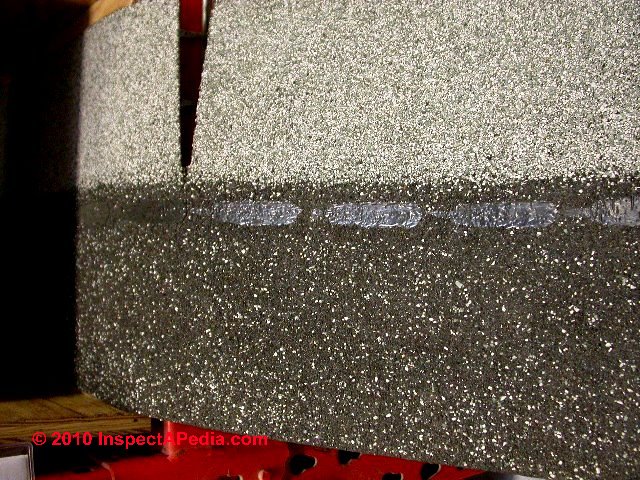
Our page top photo shows the standard sealant strips [image] found on asphalt shingles, in this case a GAF® product we photographed at a Home Depot® store.
Details about the sealing recommendations from asphalt shingle roofing experts are
...
Starter Course Requirements for Asphalt Shingle Roofs
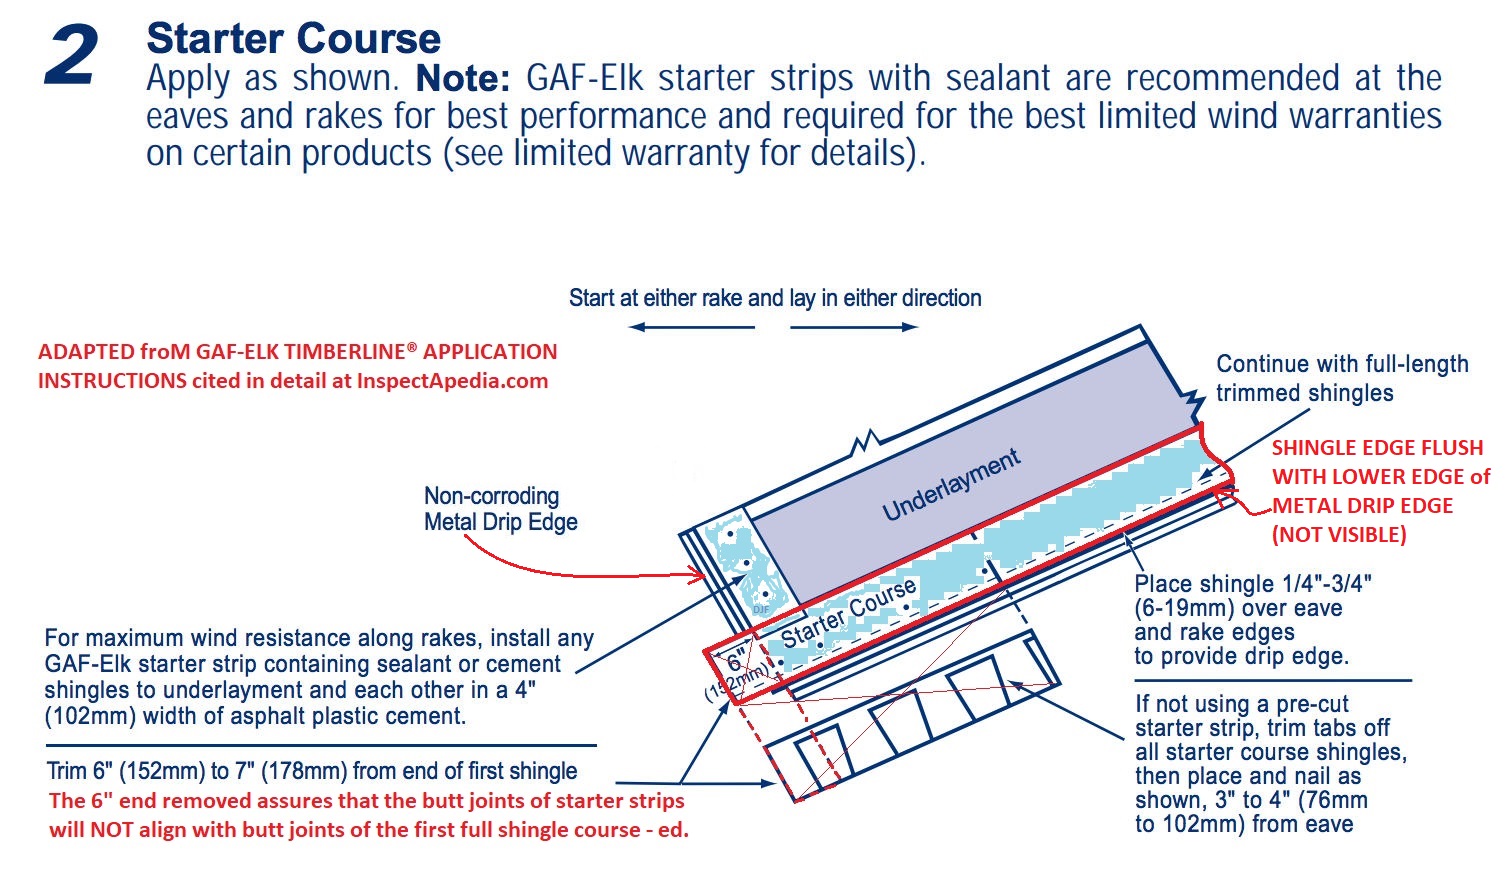 After the underlayment and drip edge
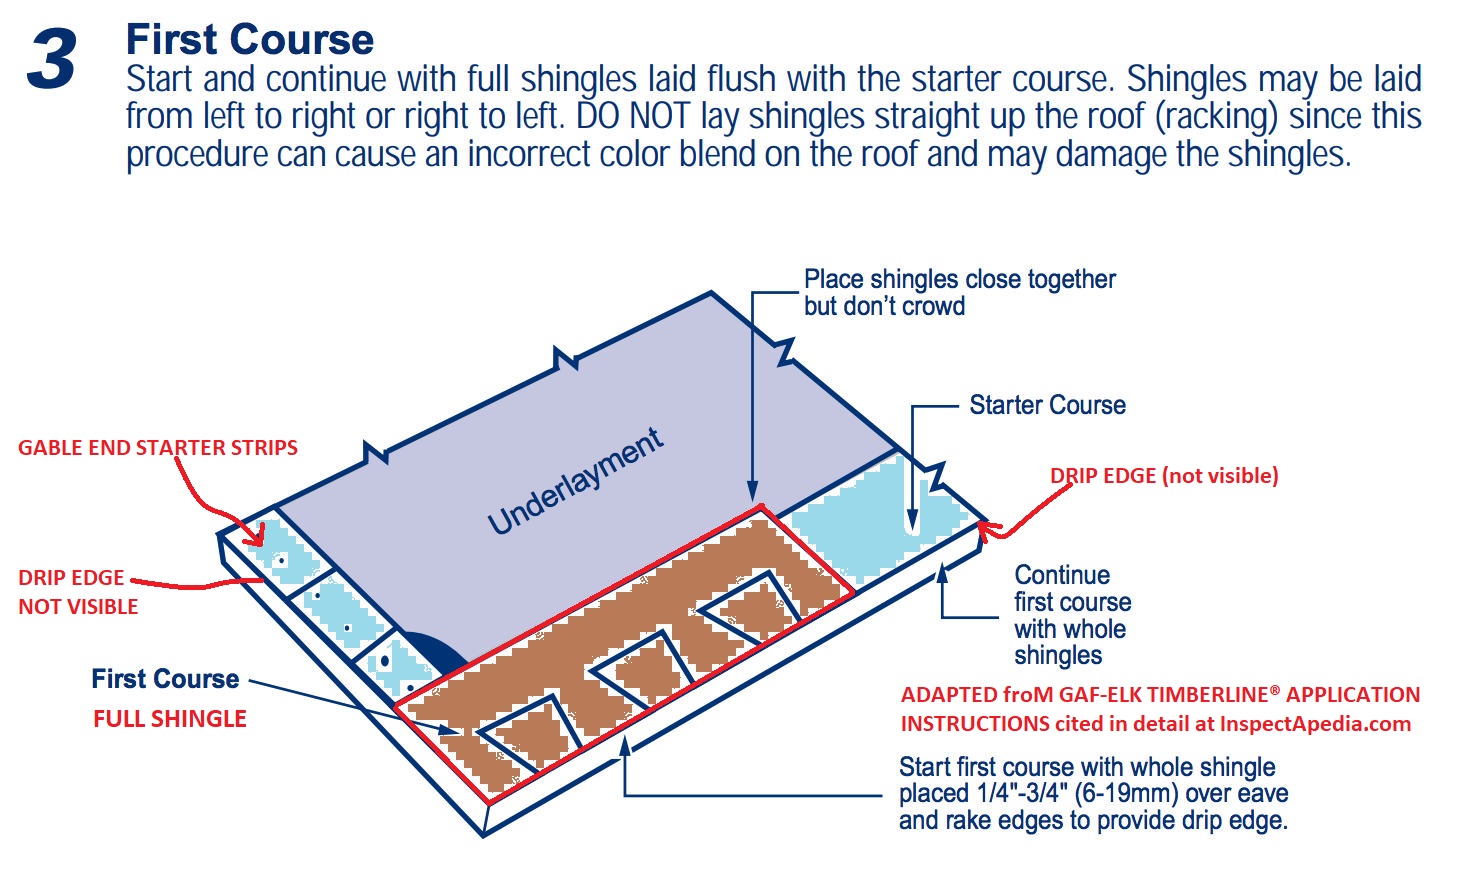
are installed, a starter course of asphalt shingles, with the
tabs removed, is nailed along the eaves so its sealant strip
seals down the first course.
Illustrations© adapted from GAF Timberline® Application instructions, cited in detail below. [Click to enlarge any image]
The recommended starter shingle course details vary among manufacturers but typically would be placed as follows:
Either use starter-strips provided by the manufacturer, OR if you are not using a precut shingle starter strip, trim 6 to 7" of the tabs or lower portion of all of your starter course shingles, then install the remaining solid asphalt strips along the eaves.
That is going to yield a starter strip that is no less than 6" in width.
Watch out: don't forget as well to trim 6" off of the end of the first starter strip - shown at the left end of the first starter strip in our image above. This will assure that the butt joints of the starter strips do not end up right under the butt joints of the first full shingle course.
The starter strip is placed to lap over the eave and rake edges (and drip edge that should have already been placed) by 1/4" to 3/4". Don't overlap more than that or the unsupported shingle edges are likely to curl and break over time.
Nail the starter strips up 3" to 4" (76mm to 102mm) from the roof edges or eaves. No less than 4 nails are used. If using three-tab open-cut asphalt shingles the nails need to be placed so that they will not be exposed by the cut-outs between shingle tabs.
The first full-shingle course is then laid over the starter course with the full shingle lower edge flush with the edge of the starter course.
Our illustration of the starter course and first course of roof shingles shown here is excerpted from
TIMBERLINE® APPLICATION INSTRUCTIONS [PDF] (2007) GAF-Elk Corporation, Technical Services: Tel: 1-800-ROOF-411 or Website: www.gaf.com retrieved 2018/08/08, original source: http://esgreenville.com/wp-content/uploads/2011/07/timberlineinstallation.pdf
Watch out: Starter shingle courses for re-roof jobs are different, typically cut 5" rather than 6" as we explain
...
Offsets Between Shingle Courses, Requirements for Asphalt Shingle Roofs
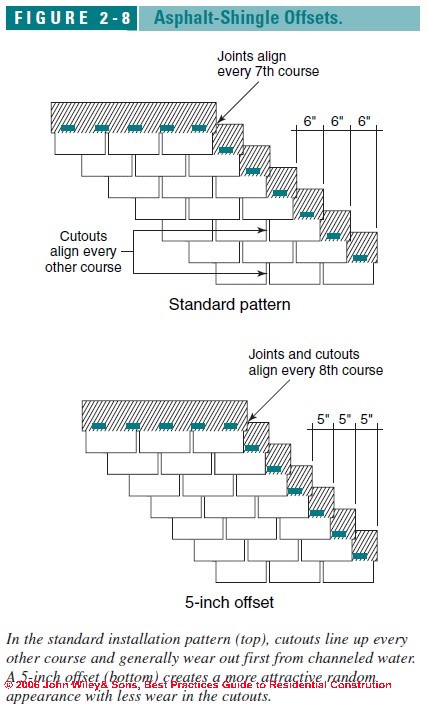
Successive courses are typically offset 6 inches (half a tab horizontally) on a 36-inch shingle in a stepped fashion, making cutouts align every other course and butt joints align every seventh course (Figure 2-8).
For a more random pattern where cutouts align only every eighth course, offset shingles only five inches.
Both of these patterns effectively resist leakage, but the 5-inch offset may provide longer wear since water will not be channeled down the cutouts thereby eroding the stone topping.
Shingle Laddering is Not Recommended
As we discuss in detail
at LADDERING vs STAIR STEPPING SHINGLES,
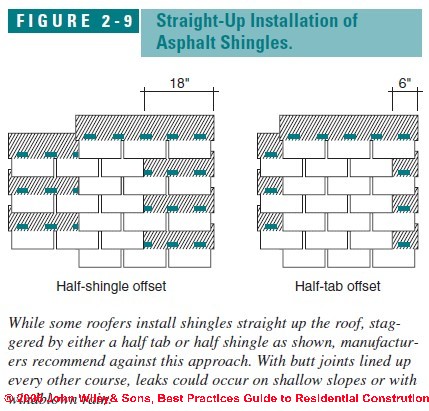
for ease of installation some roofers install shingles straight up the roof in sets of one or two shingles wide, staggering shingles 6 inches or 18 inches back and forth as shown in our photo and as illustrated in Steve Bliss's Figure 2-9 below.
Since this lines up butt joints every other course, this is considered a less watertight roof and may leak under extreme situations, such as windblown rain on a low pitch.
Ladder style application of asphalt roof shingles is not recommended by any roofing manufacturers. Manufacturers also claim that shingle color patterns may create splotches or stripes if laid this way.
Racking is another form of (or a synonym for) laddering in which shingles are laid straight up the roof in columns just one shingle wide.
DO NOT lay shingles straight up the roof (racking) since this procedure can cause an incorrect color blend on the roof and may damage the shingles - Timberline GAF instructions, Op. Cit. We add that it also increases the chances of roof leaks.
...
Fastening (Nailing) Requirements for Asphalt Shingle Roofs
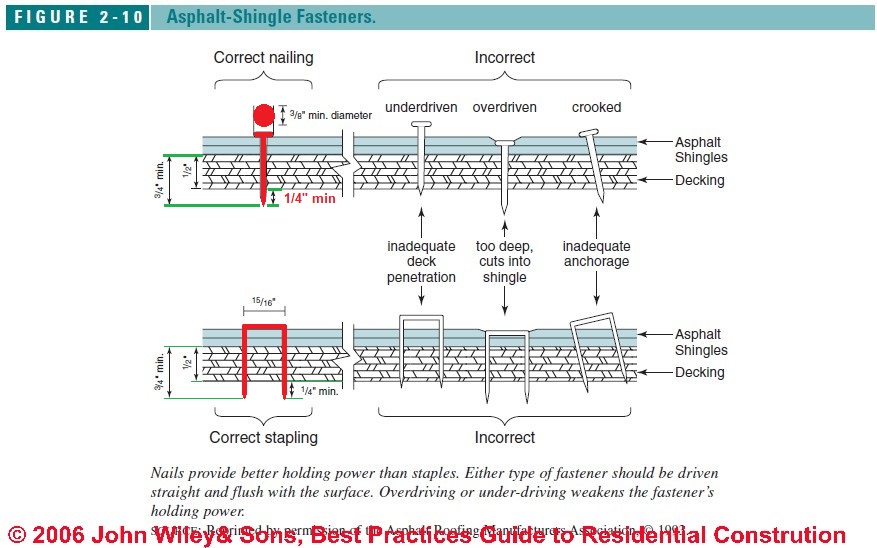
The preferred fastener is galvanized roofing nails with a minimum 12-gauge shank and head diameter of at least 3/8 inch.
Although staples are allowed in some jurisdictions, they do not provide the same holding power.
[Click to enlarge any image]
Both nails and staples should be long enough to penetrate the roof sheathing by 3/4 inch or penetrate 1/4 inch through the sheathing if it is less than 3/4 inch thick.
Fasteners should be driven straight and flush with the shingle surface (Figure 2-10 above).
Overdriven nails or staples can cut into the shingle or crack it in cold weather.
Roofing nails driven through the roof material placed on 1/2" (nominal) thick plywood roof deck must be long enough that the tip of the roofing shingle nail penetrates beyond the underside of the roof deck by at least 1/4". This assures that there will be sufficient holding power of the roof deck around the full-diameter shank of the roofing nail.
Nails can penetrate more that that required 1/4" minimum but not less, unless the roof decking is a thicker material.
When using shingle staples rather than roofing nails, the same 1/4" extension of the staple tips beyond the underside of the roof deck is also quired .
- Dixon, Craig Robert, THE WIND RESISTANCE OF ASPHALT ROOFING SHINGLES, [PDF] (2013 Dissertation thesis), University of Florida, retrieved 2017/09/27, original source http://ufdc.ufl.edu/UFE0046235/00001,
Excerpt:
Florida Building Code (2010), Building Commission 2010) requires that fasteners should consist of:
Galvanized steel, aluminum or copper roofing nails, minimum 12 gage [0.105 in (3 mm)] shank with minimum 3/8 in (10 mm) diameter head, ASTM F 1667, of a length to penetrate through the roofing materials and a minimum of ¾ in (19 mm) into the roof sheathing.
Where the roof sheathing is less than ¾ in (19 mm) thick, the fasteners shall penetrate through the sheathing.
Florida Building Code also requires a minimum of four fasteners per strip, and, where the structure is within the High-Velocity Hurricane Zone (Broward and Miami-Dade, FL counties), a minimum of six nails are required (Florida Building Commission 2010). Fasteners are either placed by hand or pneumatic air pressure guns. - See details at ASPHALT SHINGLE NAIL TYPES
Use Staples to Install Asphalt Roof Shingles?
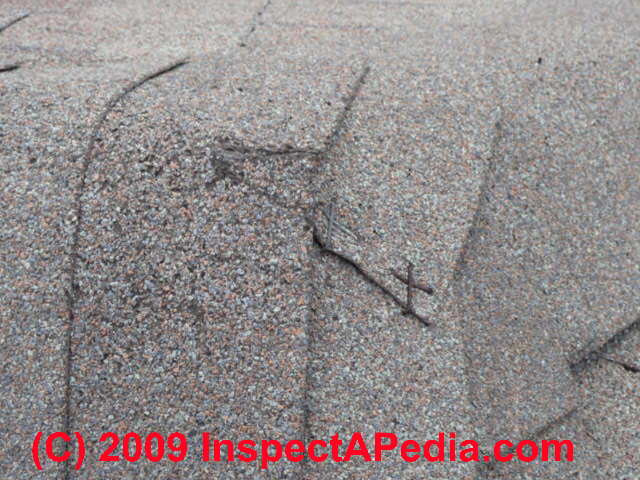 Watch out: the following is an excerpt from a GAF Technical Advisory Bulletin warning about the use of staples to secure asphalt shingles:
Staples are not recommended by GAF and most industry organizations
…Staples made of at least 16-gauge galvanized steel with a minimum crown of 15/16” (24 mm) have been and continue to be used by some applicators to install shingles.
If staples are used to install GAF shingles, our limited shingle warranty will remain in effect.
However any problems resulting from the use of staples, including wind blow-off, are not covered by the warranty.
... Most local building codes do not permit the use of staples…
Details about stapling vs. nailing asphalt shingles including our list of the many ways to make a mistake when stapling shingles are
at ASPHALT SHINGLE STAPLE vs NAIL
...
Fastener Location Requirements for Asphalt Shingle Roofs - Where Do the Shingle Nails or Shingle Staples Go?
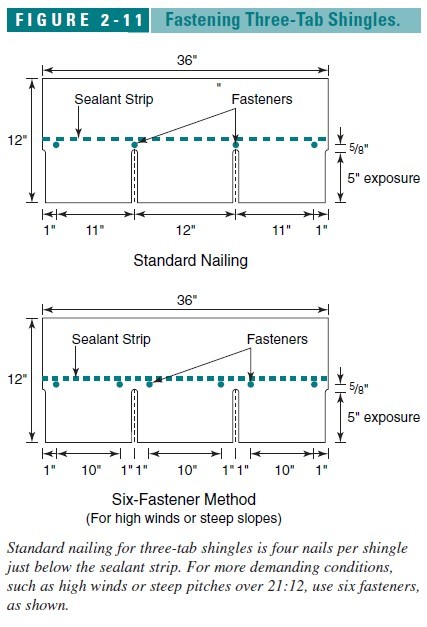
Standard shingle nailing for three-tab shingles is four nails per shingle, about 1 inch in from either end and one over each slot.
Shingle nail placement should follow manufacturers specs, which typically require nailing or stapling just below the sealant strip (Figure 2-11 at left).
Nailing the roof shingle too high: can allow wind to get under the shingles.
Nailing the roof shingle too low: will expose nails to the weather and to view from below.
Nailing the shingle through the sealant strip: can interfere with sealing.
Shingle Nailing in Areas of High winds
For areas subjected to high winds, use six nails as shown in Figure 2-11 or add two
dabs of sealant at the bottom of each tab (as discussed
at WIND DAMAGE to ROOFS and as shown in Figure 2-7).
Also special wind-rated shingles with heavier sealing strips are available by special order and may be required in some jurisdictions.
See our excerpt from the 2003 IRC R905.2.5 IRC (New Jersey Copy) included just below.
Nailing Requirements for Laminated or Architectural Asphalt Roof Shingles
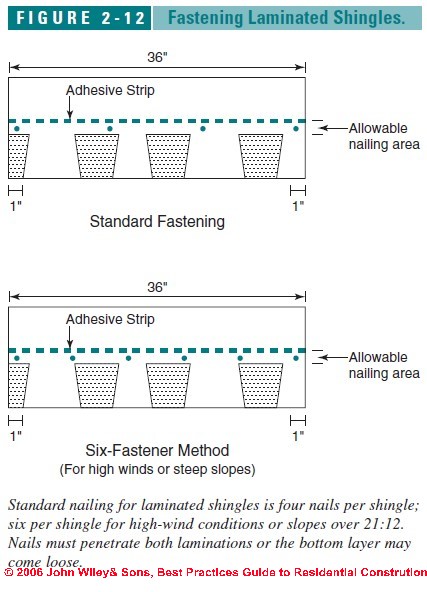 Use 4 or 6 roofing nails in architectural shingles, as shown here.
With laminated asphalt roof shingles, standard nailing is four fasteners spaced equidistant as shown in Figure 2-12, or six fasteners equidistant for heavy-duty installations.
It is important that fasteners go in the designated nail area where they will penetrate both laminations.
Nailing a laminated or architectural asphalt roof shingle too high will leave the bottom lamination loose and subject to slipping out of place.
R905.2.6 Attachment. Asphalt shingles shall have the minimum number of fasteners required by the manufacturer. For normal application, asphalt shingles shall be secured to the roof with not less than four fasteners per strip shingle or two fasteners per individual shingle.
Where the roof slope exceeds 20 units vertical in 12 units horizontal (167 percent slope), special methods of fastening are required. For roofs located where the basic wind speed per Figure R301.2(4) is 110 mph (49 m/s) or higher, special methods of fastening are required.
Special fastening methods shall be tested in accordance with ASTM D 3161, Class F. Asphalt shingle wrappers shall bear a label indicating compliance with ASTM D 3161, Class F. - IRC 2006 Section R905.2.5
in IRC CHAPTER 9 ROOF ASSEMBLIES [PDF] (2006)
Low Slope Roof Specifications for Asphalt Shingle Roofs: OK with Special Procedures
Asphalt shingles can be installed on roof slopes of 2:12 to 4:12 if special procedures are followed for underlayment.
See details at ASPHALT SHINGLES on LOW SLOPE ROOFS
...
Steep Slope Limits & Shingle Nailing and Hand Sealing Requirements for Asphalt Shingle Roofs
Asphalt shingles should not be installed on vertical walls, but they can be used on steep slopes, such as mansard-style roofs.
For slopes greater than 21:12, apply underlayment in the normal fashion.
However, shingle sealing may be a problem, particularly on shaded portions of the roof.
For best performance, use the six-fasteners-per-shingle method (Figure 2-11 above) and manually seal the shingles with plastic roofing cement (see manual sealing discussed
at “WIND DAMAGE to ROOFS” ).
Nailing & Sealing Asphalt Shingles on Near-Vertical Building Surfaces
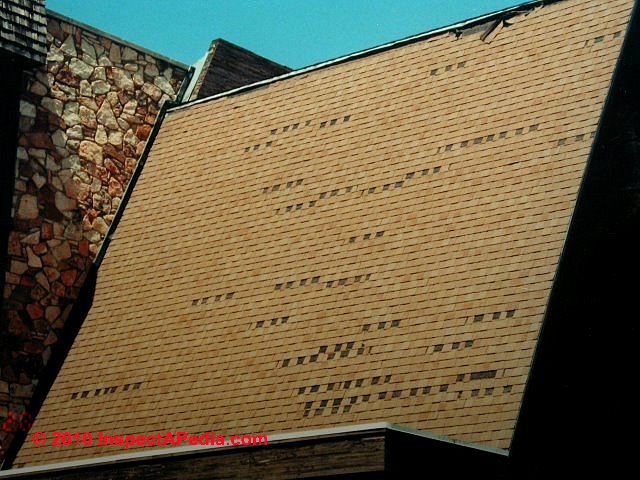
Our steep roof photo (left) shows quite a few shingles lost from this rather steep church roof slope.
Similar problems occur when asphalt shingles are nailed to the steep sides of mansard roofs unless proper nailing and sealing have been performed.
Flickinger cites the NRCA Roofing and Waterproofing Manual 4th Ed where, in referring to roof slopes of 18" rise in 12" of run (150%) or more, [note that this is more cautious than Bliss's advice above] the NRCA (Flickinger) points out that there are differing views within the roofing industry about the maximum slope on which asphalt shingles may be applied using typical methods.
We discuss the recommended installation details for installing asphalt roof shingles on very steep or near vertical roof slopes and also use of roof shingles or even roll roofing on vertical building walls separately
...
Flashing Requirements for Asphalt Shingle Roofs
Flashings for asphalt shingles should be corrosion resistant metal with a minimum thickness of 0.019 inch. A cricket or saddle should be installed on any chimney greater than 30 inches wide and can be covered with flashing or the same materials used as a roof covering.
See these roof flashing articles:
...
Underlayment Requirements for Asphalt Roof Shingles
The roof deck should be sound and level before laying the underlayment. Fifteen-pound or heavier felt underlayment is required by code in some areas. Whether or not it is required, underlayment is cheap insurance against problems. There are several good reasons to install underlayment:
- It protects the roof deck from rain before the roofing is installed.
- It provides an extra weather barrier in case of blowoffs or water penetration through the roofing or flashings.
- It protects the roofing from any resins that bleed out of the sheathing.
- It helps prevent unevenness in the roof sheathing from telegraphing through the shingles.
- It is usually required for the UL fire rating to apply (since shingles are usually tested with underlayment).
Details about the requirements and benefits of roofing underlayments are at:
Underlayment On Standard Slopes where Asphalt Roof Shingles are Installed
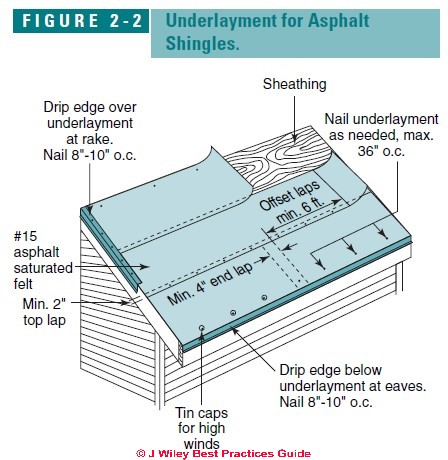
On roofs with a slope of 4:12 or greater, use a single layer of 15 lb. asphalt-saturated felt, starting at the eaves and lapping upper courses over lower by a minimum of 2 inches. Vertical joints should lap a minimum of 4 inches and be offset by at least 6 feet in successive rows (see Figure 2-2 at left).
Secure each shingle course along seams and edges with enough corrosion-resistant nails to hold it in place until the roofing is installed.
In high-wind areas, apply fasteners a maximum of 36 inches on-center along overlaps.
For best protection against leaks, run felt 6 inches over ridges and hips, from each direction, and 6 inches up any adjoining walls. Valleys should be lined with a full width of roofing felt (or bituminous membrane) pushed tight into the valley so there is no slack.
Side courses of underlayment should run over the valley lining and extend 6 inches past its edge.
See ASPHALT SHINGLE VALLEY FLASHING
Underlayment Application of Asphalt Shingles on Low Slope Roofs
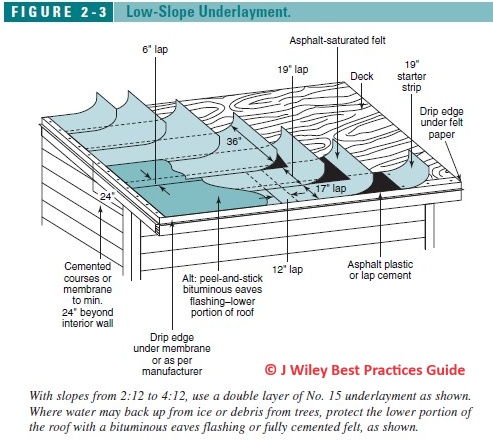
Asphalt shingles can be used on roofs with a slope of 2:12 to 4:12 if double-coverage underlayment is used.
Details of that installation are now
...
Flashing Recommendations for Eaves and Skylights
Eaves Flashing Recommendations for Asphalt Shingle Roofs
The best defense against ice dams in cold climates is a so-called “cold roof,” consisting of high levels of ceiling insulation separated from the roof surface by a free-flowing vent space
See PREVENTING ICE DAMS on ROOFS.
Where a cold roof cannot be achieved due to complex roof shapes, unvented roofs, or retrofit constraints, ice dams may form during severe winters, in some cases, causing pooled water to wet wall cavities and interior finishes.
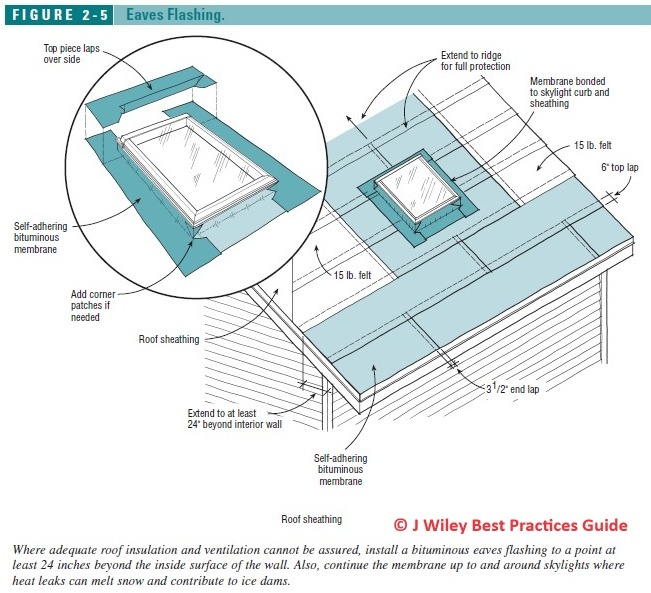
Where adequate insulation and ventilation cannot be assured, self-adhering bituminous eaves flashing should be installed. The membrane should go from the lower edge of the roof to a point at least 24 inches inside the interior wall line (Figure 2-5 at left).
See PEEL & STICK FLASHING MEMBRANES
Where two lengths of eaves flashing meet at a valley, run each across the valley, starting with the length from the roof with the lower slope or lesser height. The valley flashing should later lap over the eaves flashing.
See also DRIP EDGE FLASHING for ROOFS
Skylights and Ice Dams on Asphalt Shingle Roofs
With deep snow, melting water from above and around the skylight can lead to ice dams below.
For full protection, some contractors extend the eaves membrane up to the bottom of any skylights and continue it around the sides and top of the skylight.
By wrapping the skylight curb with membrane as well, any potential flashing leaks are also eliminated as shown in Figure 2-5 at left.
See also “Skylight Flashing,” page 127 in the printed text Steve Bliss - Best Practices Guide to Residential Construction - (J Wiley)

If it is impractical to install membrane all the way from eaves to skylight, install a 3-foot-wide band of membrane below the skylight, lapping the bottom edge of the membrane over the row of shingles where the membrane terminates.
Drip Edge. Drip edge should always be used along the eaves to kick water away from the fascia, and it is a good idea along rakes as well.
Drip edge should lap over the underlayment at the rakes and under it at the eaves (as shown in Figure 2-6 at left).
Overlap joints in the drip edge by 2 inches. Shingles can be set even the with the drip edge or overlap by up to 3/4 inch.
Some manufacturers of eaves membranes specify that the drip edge be installed on top of the membrane along the eaves, violating the principle that upper layers of flashing should overlap lower layers.
To remedy the problem, the manufacturers suggest using a second strip of membrane to seal the top of the drip edge to the eaves membrane. In practice, however, most installers place the drip edge first and lap the eaves membrane over it, consistent with good building practice.
- - Adapted with permission from Best Practices Guide to Residential Construction (Steve Bliss, J Wiley & Sons) .
...
Shingle Instructions, Roofing Materials & Equipment Suppliers
- CertainTeed SHINGLE APPLICATORS MANUAL - Landmark® Shingle Series Instructions [PDF] Certainteed Saint-Gobain Corporation, Building Professionals call: 800-233-8990 Consumers call: 800-782-8777 Website: https://www.certainteed.com/ retrieved 2019/09/11 original source: https://www.certainteed.com/resources/LandmarkInstall.pdf
- Certainteed LAMINATED SHINGLE APPLICATION INSTRUCTIONS [PDF] additional advice for English Dimension shingles: Landmark & Woodscape series asphalt shingles & Metric Dimension Shingles: Firehalt, Firehalt 2000, Estate, Architec 80, High Sierra & Landmark Series shingles.
- "GAF-Elk Timberline ® Prestique ® Grande ® 40 High Definition Roofing Shingles Product Information" (2008) GAF-Elk Corporation 5/08 13 61 Alps Road, Wayne, NJ 07470 www.gaf.com, retrieved 9/8/2014, original source: http://www.gaf.com/Other_Documents/ Legacy_Products_Discontinued/Timberline_Prestique_Grand%C3%A9 /Timberline_Prestique_Grande_40_Info_Spec_Sheet.pdf [Note that this is a discontinued product]
- GAF Materials Corporation, TIMBERLINE ROOF SHINGLE APPLICATION INSTRUCTIONS [PDF] (2012) discusses the requirements for successful asphalt shingle installation including the condition of the roof deck, the use of roofing felt underlayment, the selection of roofing nails by type and length and penetration of the roof decking, and the role of glue strips on the back side of asphalt roof shingles.
- Owens Corning, ROOFERS GUIDE to ROOF INSTALLATION [PDF] (2016) Op. Cit.
Excerpt:
2012 International Residential Code now requires drip edge at the eves and rake edge of the roof. The IRC has required drip edge since the 2009 edition.
Manufacturers
Asphalt Shingles
- Atlas Roofing Corp. www.atlasroofing.com Fiberglass and organic felt shingles
- Certainteed Roofing www.certainteed.com Fiberglass shingles
- Elk Premium Building Products www.elkcorp.com Fiberglass shingles
- GAF Materials Corp. www.gaf.com Fiberglass shingles
- Georgia-Pacific Corp. www.gp.com/build Fiberglass and organic felt shingles
- IKO www.iko.com Fiberglass and organic felt shingles
- Owens Corning www.owenscorning.com Fiberglass shingles
- Tamko Roofing Products www.tamko.com Fiberglass and organic felt shingles
Low-Slope Roofing Membranes
- Duradek www.duradek.com Vinyl roofing and walkable deck membrane
- Firestone www.firestonebpe.com RubberGard EPDM residential roofing system
- GenFlex Roofing Systems www.genflex.com Peel-and-stick TPO membrane
- Hyload, Inc. www.hyload.com Kwik-Ply self-adhering polyester and coal-tar roofing membrane
Ridge Vents
- Air Vent/A Gibraltar Company www.airvent.com A complete line of roof ventilation products, including shingle-over and exposed-ridge vents with exterior wind baffles and internal weather filters. Also soffit and drip edge vents and passive and powered attic turbine-type vents.
- Benjamin Obdyke www.benjaminobdyke.com Shingle-over ridge vents. Low-profile Roll Vent uses nylonmatrix. Extractor vent is molded polypropylene with internal and external baffles.
- Cor-A-Vent www.cor-a-vent.com Shingle-over low-profile ridge vents, including Cor-a-vent, Fold-a-vent, and X-5 ridge vent, designed for extreme weather. Corrugated core.
- GAF Materials Corp. www.gaf.com Cobra vent: roll-out shingle-over ridge vent with a polyester-matrix core 102 CHAPTER 2 | Roofing
- Mid-America Building Products www.midamericabuilding.com Ridge Master and Hip Master shingle-over molded plastic ridge vents with internal baffles and foam filter
- Owens Corning www.owenscorning.com VentSure corrugated polypropylene ridge vents; also passive roof vents and soffit vents
- Trimline Building Products www.trimline-products.com Shingle-over low-profile ridge vents, Flow-Thru battens for tile roofs
- Elk Premium Building Products www.elkcorp.com Highpoint polypropylene shingle-over ridge vents
- Tamko Roofing Products www.tamko.com Shingle-over ridge matrix–type Roll Vent and Rapid Ridge (nail gun version) and Coolridge, which is molded polypropylene with external and internal baffles
Venting Underlayments
- Benjamin Obdyke www.benjaminobdyke.com Cedar Breather, a 3/8 -in.-thick matrix-type underlayment designed to provide ventilation and drainage space under wood roofing
More Information about Roofing Materials, Methods, Standards
- Asphalt Roofing Manufacturers Association (ARMA) www.asphaltroofing.org
- Cedar Shake and Shingle Bureau www.cedarbureau.org
- Metal Roofing Alliance www.metalroofing.com
- Tile Roofing Institute www.tileroofing.org
- - Adapted with permission from Best Practices Guide to Residential Construction (Steve Bliss, J Wiley & Sons).
...
Reader Comments, Questions & Answers About The Article Above
Below you will find questions and answers previously posted on this page at its page bottom reader comment box.
Reader Q&A - also see RECOMMENDED ARTICLES & FAQs
Reader question - When were colored plastic capped roofing nails introduced?
When were colored plastic capped roofing nails introduced? 2020-11-20 by david
Moderator reply:
David
Thank you for pointing out an area where we can add some historical detail on roofing nails.
A general answer is in the U.S. we see plastic-capped roofing nails patented and so probably introduced in the mid 1990s.
Plastic-capped roofing nails are also referred to as roofing nails that incorporate a "pressure plate", generally used to hold underlayment such as felt in place on the roof deck. Pressure plates around roofing nails have been in use for nearly 100 years, though the plates were traditionally made of metal.
So we took a look at more-recent roofing nail patents where plastic pressure plates are described. Those are much more recent. The earliest relevant U.S. patent I found dates from 1978. Compare that date with early US Patents for special roofing nails designs dating from the 1930s like
Tucker, Edgar M. "Roofing nail." U.S. Patent 2,048,234, issued July 21, 1936.
Plastic roofing nail plates or roofing nails with plastic caps:
Bruins, Roger C., and Jon Tanis. "Roofing nail pressure plate." U.S. Patent 5,407,313, issued April 18, 1995.
Excerpt:
A resilient molded pressure plate formed of polypropylene or the like is provided for a roofing nail in engagement with a sheet of roofing felt to increase the retention of the felt. The underside of the plate is concave in the undeflected form, and is provided with a central boss that limits the downward diaphragm deflection as a nail is driven through a central opening.The peripheral rim of the plate is serrated with concentric ridges disposed initially at progressively increasing distances from the plane of the outer ridge, proceeding radially inward. As the plate is deflected on driving of the nail through the central opening, these ridges come into coplanar relationship, providing the maximum intensity of engagement with the sheet of felt material.
Lassiter, Robert F. "Roofing material with nail tabs." U.S. Patent Application 08/544,858, filed September 16, 1997.
Damron, Matthew S. "Multipurpose roofing and siding fastener." U.S. Patent 5,415,511, issued May 16, 1995.
Excerpt:
One other embodiment of the 'cap' nail utilizes a one inch in diameter cap, or head, made of plastic. It has an ardox-type shank extending centrally through the slightly domed cap. It is used on underlayments and wall sheathings.When installed the dome flattens, thereby putting passive pressure against the underlayment binding it to the pitched roof deck. However, this fastener is not only more expensive than the present invention, it loses most of its holding power in direct sunlight and as the temperature increases.
The thickness of the plastic head of this fastener is such that, in certain situations, they can hold up an area of the shingle preventing it from seating flatly to the roof deck.
Reader question - self healing roofing underlayment
Roofer just used wrong color shingles- not what I ordered. They will have to pull up and redo. They have told me I do not need new underlay membrane as it will self heal. I disagree. Please give me your advice. 2020-09-16 by Randall
Mod reply:
I'm doubtful about self healing roofing underlayment; even if the underlayment was ice and water shield or an equivalent it's meant to seal around nails, not nail holes where nails were removed; simple roofing felt doesn't "heal" punctures.
However, the underlayment in an asphalt shingle roof is not intended to make the roof waterproof; it's the shingles that have that job. The underlayment is a cushion.See details at FELT UNDERLAYMENT REQUIREMENTS
Reader question: not everyone with an opinion has read the manufacturer's instructions
It was recommended by a respected contractor / roofer to cover a low slope 2 1/2 pitch with ice and water membrane 1/2 - 2/3 of the roof area followed with 2 layers of felt on the peak remaining 1/2-1/3.
Since it was stated that an I&W membrane over the entire roof acts as a vapor barrier, I believe the method of application as described was recommended to allow the roof deck to 'breathe'.
Could you please comment on this method? Admittedly I am still confused about the matter of putting a 'vapor barrier' on the roof (regardless of adequate ventilation) because the roof deck cannot 'breathe' with rubber membranes, TPO, etc. So really what's the difference? 2020-06-14 by Ruth
Mod reply:
Ruth
The construction field has plenty of people who may have strong opinions but have not yet read the instructions on the box of the product or material being installed.
In my opinion what you are being told is incoherent. Why would we expect half of a roof deck to "breathe" and the other half not to breathe? Roof decks, especially on a low slope roof, expect to be covered with a waterproof membrane - thus breathing through that is going to be difficult, even if it were recommended.
Contractor opinions vary about the cost and time involved in putting an ice and water shield over the whole roof versus just over the lower roof where leak risks are greater.For the added cost versus the cost of re-roofing or worse, cost of leak damage, in my opinion, covering all of a low slope roof with ice and water shield is inexpensive additional insurance.
But it's not "required" by roofing standards - unless specified by the manufacturer of the specific roofing product being installed.
Those standards you can find in the references sections of our various roofing articles.
Why not identify the specific final roof covering product being installed. Then you (or we) can take a look at what the manufacturer recommends.
Asphalt Roof Shingle Exposure
Reader Question: is this shingle exposure correct?
8 Sept. 2014 Pam said:
Is anyone familiar with this type of roofing installation? We could be wrong, but it seems as if the rows are too far apart? We would be very grateful for any information or insights. Thanks in advance!
Reply:
Pam I took a look at your photo and will also post it here for others to comment.
It looks as if there was a deliberate effort to expose a black shadow-line between courses. I can't know if this is a shingle appearance feature or if the roofer separated the courses by more space than the usual 4-5" of asphalt shingle exposure.
Make some measurements and tell us the shingle exposure amount: that is, the distance from the lower edge of a course of shingle tabs down to the lower edge of the successive course below.
If you know the shingle brand and model number that would also be useful.
Watch out: on typical 3-tab asphalt roof shingles, using an exposure amount greater than 5 5/8" risks leaving the shingle nails exposed to the weather - asking for roof leaks.
Details are at SHINGLE EXPOSURE AMOUNT
On 2019-04-10 by Anonymous - what temperature is needed to properly install shingles correctly ?
what temperature is needed to properly install shingles correctly ?
On 2019-04-10 by (mod) - Asphalt shingle installation temperature limits
Asphalt shingle installation temperature limits:
Cold weather: at or below 40° F (4° Celsius) shingles won't seal and risk wind damage unless you add sealant manually using a special cold-weather sealant recommended by the shingle manufacturer
Hot weather: In hot weather, for easiest handling, temperatures should be below 90° F (32° C). [GAF]
Watch out: while shingles can be installed in hot weather and at high temperatures, in my experience they are very easily damaged by foot traffic. Simply standing on a shingle and rotating or twisting your foot will grind off the mineral granules from the shingle to and leave a semi-bald spot that is going to make that shingle have a shorter life than her un-abused neighbours.
So I'd take particular care to protect shingles from foot traffic damage when installing or walking on a roof in hot weather.
In hot weather you may also find that shingles tear easily or that where you left a few shingles in a portion of a bundle sitting in the hot sun the bottom shingle becomes stuck to the roof - tearing it up to move it to its installation procedure may damage the shingle and shorten its life as well as leaving sealant blotches on the finished shingle area where it lay.
Here are some typical additional Asphalt shingle installation temperature notes, using GAF Timberline Lifetime Shingle Application Instructions as an example:
Store on flat surface in a covered, ventilated area–maximum temperature 110°F (43°C). Do not store near steam pipes, radiators, etc., or in sunlight
WIND RESISTANCE/HAND SEALING:These shingles have a special thermal sealant that firmly bonds the shingles together after application when exposed to sun and warm temperatures.
Shingles installed in fall or winter may not seal until the following spring. If shingles are damaged by winds before sealing or are not exposed to adequate surface temperatures, or if the self-sealant gets dirty, the shingles may never seal.
Finally, as any roofer can tell you, working on a hot roof on a hot day (darker colors are still hotter) increases the danger of injury or of falling off the roof in a faint - if you fail to keep workers hydrated and sun-protected.
In my opinion there are different but analogous cold weather roofing hazards such as running up a frost-covered roof first thing in the morning and finding you slip and slide off into space. It's not the fall that hurts it's the sudden landing in the bushes.
...
Continue reading at ASPHALT SHINGLE UNDERLAYMENT SPECS or select a topic from the closely-related articles below, or see the complete ARTICLE INDEX.
Or see ASPHALT SHINGLE INSTALLATION FAQs - questions and answers posted originally on this page
Or see these
Recommended Articles
- ASPHALT ROOF SHINGLES - home
- ASPHALT SHINGLE INSTALLATION
- ASPHALT SHINGLE NAIL TYPES
- ASPHALT SHINGLE LIFE / WEAR FACTORS
- ASPHALT SHINGLES on LOW SLOPE ROOFS
- ASPHALT SHINGLE RE-ROOF GUIDE
- ASPHALT SHINGLE REMOVAL TOOLS
- ASPHALT SHINGLE STAPLE vs NAIL
- ASPHALT SHINGLE UNDERLAYMENT SPECS
- ATTIC MOLD ROOF TEAROFF
- ROOF LEAK DIAGNOSIS & REPAIR
- SHINGLE EXPOSURE AMOUNT
- WARRANTIES for ROOF SHINGLES
- WIND DAMAGE to ROOFS
Suggested citation for this web page
ASPHALT SHINGLE INSTALLATION at InspectApedia.com - online encyclopedia of building & environmental inspection, testing, diagnosis, repair, & problem prevention advice.
Or see this
INDEX to RELATED ARTICLES: ARTICLE INDEX to BUILDING ROOFING
Or use the SEARCH BOX found below to Ask a Question or Search InspectApedia
Ask a Question or Search InspectApedia
Questions & answers or comments about the best practices to follow when installing asphalt shingle roofing..
Try the search box just below, or if you prefer, post a question or comment in the Comments box below and we will respond promptly.
Search the InspectApedia website
Note: appearance of your Comment below may be delayed: if your comment contains an image, photograph, web link, or text that looks to the software as if it might be a web link, your posting will appear after it has been approved by a moderator. Apologies for the delay.
Only one image can be added per comment but you can post as many comments, and therefore images, as you like.
You will not receive a notification when a response to your question has been posted.
Please bookmark this page to make it easy for you to check back for our response.
Our Comment Box is provided by Countable Web Productions countable.ca
Citations & References
In addition to any citations in the article above, a full list is available on request.
- "GAF-Elk Timberline ® Prestique ® Grande ® 40 High Definition Roofing Shingles Product Information" (2008) GAF-Elk Corporation 5/08 13 61 Alps Road, Wayne, NJ 07470 www.gaf.com, retrieved 9/8/2014, original source: http://www.gaf.com/Other_Documents/ Legacy_Products_Discontinued/Timberline_Prestique_Grand%C3%A9 /Timberline_Prestique_Grande_40_Info_Spec_Sheet.pdf [Note that this is a discontinued product]
- GAF Materials Corporation, Grand Timberline Premium Architectural Shingle Application Instructions.
http://www.gaf.com/Content/Documents/20573.pdf discusses the requirements for successful asphalt shingle installation including the condition of the roof deck, the use of roofing felt underlayment, the selection of roofing nails by type and length and penetration of the roof decking, and the role of glue strips on the back side of asphalt roof shingles. - Roofing The Right Way, Steven Bolt, McGraw-Hill Professional; 3rd edition (November 1, 1996), ISBN-13: 978-0070066502, p. 350 for one of many citations on this point.
- "Hurricane Damage to Residential Structures: Risk and Mitigation", Jon K. Ayscue, The Johns Hopkins University, Baltimore, Maryland, published by the Natural Hazards Research and Applications Information Center, Institute of Behavioral Science, University of Colorado, November 1996. Abstract:
"Property damage and loss from hurricanes have increased with population growth in coastal areas, and climatic factors point to more frequent and intense hurricanes in the future. This paper describes potential hurricane hazards from wind and water. Damage to residential structures from three recent intense hurricanes - Hugo, Andrew, and Iniki - shows that wind is responsible for greater property loss than water. The current state-of-the-art building technology is sufficient to reduce damage from hurricanes when properly applied, and this paper discusses those building techniques that can mitigate hurricane damage and recommends measures for mitigating future hurricane damage to homes." - online at www.colorado.edu/hazards/publications/wp/wp94/wp94.html - "Evaluating OSB for Coastal Roofs," Paul Fisette, Coastal Contractor, Winter 2005, online at coastalcontractor.net/pdf/2005/0501/0501eval.pdf . Fisette cites: "Jose Mitrani, a civil engineer and professor at Florida. International University in Miami, was ... Florida’s official damage assessment team. ... After Hurricane Andrew, Florida code advisers ruled OSB sheathing inferior to plywood."
- ARMA - Asphalt Roofing Manufacturer's Association - Asphalt Roofing Manufacturer's Association - https://www.asphaltroofing.org/
750 National Press Building, 529 14th Street, NW, Washington, DC 20045, Tel: 202 / 207-0917 - ASTM - ASTM International, 100 Barr Harbor Drive, PO Box C700, West Conshohocken, PA, 19428-2959 USA The ASTM standards listed below can be purchased in fulltext directly from http://www.astm.org/
- NRCA - National Roofing Contractors Association - Website: www.nrca.net, 10255 W. Higgins Road, Suite 600, Rosemont, IL 60018-5607, Tel: (847) 299-9070 Fax: (847) 299-1183
- "Applying Shingles on Extreme Slopes", Dave Flickinger, RRO, Professional Roofing, July 1999. [PDF copy] - National Roofing Contractors Association - http://www.nrca.net/, 10255 W. Higgins Road, Suite 600, Rosemont, IL 60018-5607, Tel: (847) 299-9070Fax: (847) 299-1183, Office hours: 8 a.m. to 5 p.m. CST
- UL - Underwriters Laboratories - https://www.ul.com/
2600 N.W. Lake Rd.
Camas, WA 98607-8542
Tel: 1.877.854.3577 / Fax: 1.360.817.6278 E-mail: cec.us@us.ul.com - Best Practices Guide to Residential Construction, by Steven Bliss. John Wiley & Sons, 2006. ISBN-10: 0471648361, ISBN-13: 978-0471648369, Hardcover: 320 pages, available from Amazon.com and also Wiley.com. See our book review of this publication.
- Decks and Porches, the JLC Guide to, Best Practices for Outdoor Spaces, Steve Bliss (Editor), The Journal of Light Construction, Williston VT, 2010 ISBN 10: 1-928580-42-4, ISBN 13: 978-1-928580-42-3, available from Amazon.com
- Problems in Roofing Design, B. Harrison McCampbell, Butterworth Heineman, 1991 ISBN 0-7506-9162-X (available used)
- Roofing The Right Way, Steven Bolt, McGraw-Hill Professional; 3rd Ed (1996), ISBN-10: 0070066507, ISBN-13: 978-0070066502
- In addition to citations & references found in this article, see the research citations given at the end of the related articles found at our suggested
CONTINUE READING or RECOMMENDED ARTICLES.
- Carson, Dunlop & Associates Ltd., 120 Carlton Street Suite 407, Toronto ON M5A 4K2. Tel: (416) 964-9415 1-800-268-7070 Email: info@carsondunlop.com. Alan Carson is a past president of ASHI, the American Society of Home Inspectors.
Thanks to Alan Carson and Bob Dunlop, for permission for InspectAPedia to use text excerpts from The HOME REFERENCE BOOK - the Encyclopedia of Homes and to use illustrations from The ILLUSTRATED HOME .
Carson Dunlop Associates provides extensive home inspection education and report writing material. In gratitude we provide links to tsome Carson Dunlop Associates products and services.


