 Install Window & Skylight Flashing & Sealants
- POST a QUESTION or COMMENT about installing window or door flashing or sealant or caulk
Window or skylight flashing & sealant application:
Here we provide best-practice details about flashing and sealing around windows to avoid air and water leaks.
In this article series we discuss the selection and installation of windows and doors, following best construction and design practices for building lighting and ventilation, with attention to the impact on building heating and cooling costs, indoor air quality, and comfort of occupants.
We review the proper installation details for windows and doors, and we compare the durability of different window and door materials and types.
InspectAPedia tolerates no conflicts of interest. We have no relationship with advertisers, products, or services discussed at this website.
- Daniel Friedman, Publisher/Editor/Author - See WHO ARE WE?
Installation Guide to Window Flashing & Sealing
 This article includes excerpts or adaptations from Best Practices Guide to Residential Construction (Steve Bliss, J Wiley & Sons) , by Steven Bliss, courtesy of Wiley & Sons.
Adapted from Chapter 3, BEST PRACTICES GUIDE: WINDOWS & DOORS:
[Click to enlarge any image, photo, or table]
While modern flange-type window frames appear to simplify window installation, how best to integrate the nailing flanges with the sheathing wrap and siding has been a subject of debate, and recommendations vary among different window manufacturers, sheathing wrap manufacturers, and contractors.
Article Contents
The approaches shown below represent a broad consensus of leading manufacturers and experienced contractors, but other approaches that follow the same basic principles can also work. These are:
- Always lap higher flashings over lower to shed water.
- Do not rely on caulking as a waterproof barrier, as it is
likely to fail over time.
See CAULKS & SEALANTS, EXTERIOR - With heavy exposure to wind-driven rain and snow, use pan flashing to protect the sill and use flashing tape to seal the head flashing to the sheathing.
- Leave horizontal joints unsealed at the top and bottom of the window frame to allow trapped water to escape.
 Window Installation, Flange-Type
All clad and solid-vinyl windows come with an integral nailing flange or one that is friction-fit into a slot in the frame.
In addition to simplifying the nailing, the flange helps to create a weather-tight seal at the head and sides of the window.
The most critical details are the head flashing, which should seal to the sheathing to pick up any dripping water from above, and the sill or pan flashing, which should freely drain to the exterior.
The following approaches take advantage of the newer peel-and-stick flashing tapes, which have simplified the flashing of flange type windows.
Watch out: as our window photos above demonstrate, installing any window without proper flashing and sealing is likely to result in leaks into the building interior.
The owner of this new home was very unhappy that each time it rained water ran down the inside of her walls at this window.
Installing Housewrap at Window Openings Before Installing the Windows
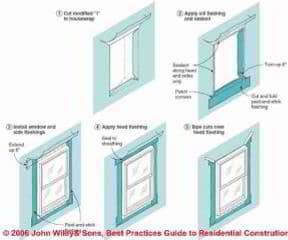
Figure 3-13 below shows how to flash a window installed after the plastic housewrap is in place. After cutting a modified “I” in the plastic housewrap, fold in the flaps, staple every 6 inches, and trim the excess.
- Pan flashing. The next step, the pan flashing, is often
omitted but is critical for leak-free performance in
harsh weather exposures. The pan flashing can either
be a custom metal pan, an adjustable plastic pan, or
one formed in place from flexible flashing tape, as
shown (Figure 3-14 below).
If using flashing tape, first add a piece of beveled wood siding to the rough sill, sloping to the exterior. Remember to increase the rough opening height by 1/2 inch. Add patches of flashing tape to bridge the gap at the cut corners.
- Install window. Next install the window, slipping the
top flange under the housewrap. Most manufacturers
recommend bedding the side and top flanges in a bead
of high-quality sealant to create a backup seal, a good
idea in harsh weather exposures.
Do not caulk the bottom flange, however, which must be left unsealed so any trapped water can freely drain. To facilitate drainage at the sill, set the window on shims. - Side and head splines. Side splines of peel-and-stick flashing tape go on next, sealing from the window flanges to the sheathing wrap, extending 6 inches above the top of the window opening and lapping over the pan flashing. Finally, the head spline is slipped under the housewrap, sealing the window’s top flange to the sheathing. Patches of tape seal the diagonal slits in the housewrap.
- Drip cap. If the window is trimmed on the exterior with wood casings, use a metal drip cap on top of the head casing and seal the drip cap to the sheathing tape with peel-and-stick flashing tape. When the siding is installed, do not caulk the horizontal joints above or below the window, which would create a water dam. Leave all horizontal joints unsealed to drain away any trapped water.
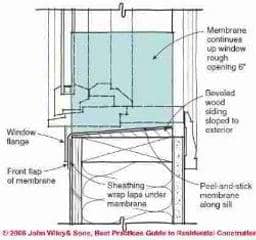
Figure 3-14: Formed-in-Place Pan Flashing for Windows or Doors.
As we note above, the pan flashing can either be a custom metal pan, an adjustable plastic pan, or one formed in place from flexible flashing tape, as shown (Figure 3-14 below).
If using flashing tape, first add a piece of beveled wood siding to the rough sill, sloping to the exterior. Remember to increase the rough opening height by 1/2 inch.
Add patches of flashing tape to bridge the gap at the cut corners.
Installing Windows Before Housewrap
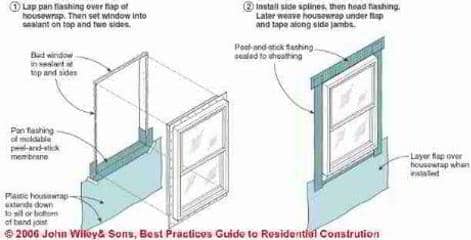
When windows are installed before the building is wrapped, the key is to detail the pan flashing so it can properly lap over the housewrap. One approach is to leave the paper facing on the outer flap of the pan flashing so it can layer over the housewrap when installed.
Another approach, shown in Figure 3-15 below, is to seal the pan flashing to a flap of sheathing wrap that will be layered over the housewrap when installed.
Figure 3-15: Installing Flange Type Windows Before the Sheathing Wrap is Applied.
Whether to seal the side window flanges directly to the sheathing or the housewrap is a matter of personal preference. Since few leaks originate at the sides of windows, either detail can work well as the flashings are detailed so each sheds water to the layer below.
Felt Paper Flashing or as Housewrap Around Windows
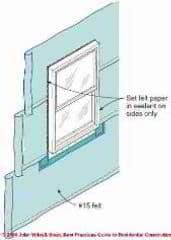
When using felt paper, paper up to the bottom of the window. Then install the pan flashing, window, and side and head flashings as shown in Figure 3-15 just above.
When installing the building paper later, layer successive courses over the side and head flanges, setting them into a bed of sealant at the sides of the window (see Figure 3-16 at left).
Leave the building paper unsealed at the head flashing, however, to allow any trapped water from above to escape.
Head Flashing Details for Round-Top Windows
To create a head flashing on round-top windows, one approach is to patch together several short pieces of flashing tape, making sure to start at the bottom and lap each upper piece over the preceding lower piece.
Another option is to use a flexible membrane such as DuPont’s Flexwrap® tape, which can be bent to conform to the curve without cutting.
Sealing Details ford Mulled Windows
Where multiple windows are mulled together in the field, treat the space between the windows like a small section of sidewall. Make sure horizontal mullions are lapped properly so the sill flashing above laps over the cap flashing below. Use peel-and-stick flashing tape on vertical mullions, overlapping the vertical tape onto any horizontal mullions that intersect.
Window Installation, w/ Integral Brickmold
As reported in Best Practices Guide to Residential Construction (Steve Bliss, J Wiley & Sons) Chapter 3, BEST PRACTICES GUIDE: WINDOWS & DOORS:
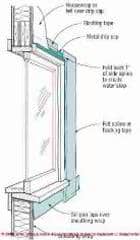
If installing windows with integral brickmold, proceed the same way as shown for flange-type windows above.
However, since there are no side flanges on the window, the brickmold goes over the side splines, which can be either felt paper or flashing tape.
Flashing tape is of less value with brickmold since the windows have no flange to seal to.
Apply a continuous bead of sealant on the backside of the brickmold before installing the window (Figure 3-17 at left)..
As an extra precaution against wind-blown rain entering behind the side casings, you can fold back the inside edge of the spline to form a one-inch hem, a detail developed by Pennsylvania contractor Carl Hagstrom.
At the head casing, a metal drip cap is required to protect the brickmold and provide a watertight seal. Slip the metal drip cap under the sheathing wrap and seal it to the sheathing with flashing tape.
-- Adapted and paraphrased, edited, and supplemented, with permission from Best Practices Guide to Residential Construction (Steve Bliss, J Wiley & Sons) .
...
Reader Comments, Questions & Answers About The Article Above
Below you will find questions and answers previously posted on this page at its page bottom reader comment box.
Reader Q&A - also see RECOMMENDED ARTICLES & FAQs
Comment:
(Apr 8, 2012) Anonymous said: excellent-clear -thorough
Question:
(Mar 8, 2013) doug norton said:
what is the appropriate range of aluminum flashing gauges for flashing around existing windows previous to re-siding a home?
Reply:
Typically aluminum flashing used on homes is 0.26". We do not recommend using the thinner 0.19 ga aluminum flashing.
...
Continue reading at FLASHING MEMBRANES PEEL & STICK or select a topic from the closely-related articles below, or see the complete ARTICLE INDEX.
Or see these
Window & Door Leak / Repair Articles
- FLASHING on BUILDINGS - home
- WINDOW FLASHING & SEALING GUIDE
- FLASHING DOORS, DETAILS
- FLASHING MEMBRANES PEEL & STICK
- FLASHING MEMBRANE FAQs
- SKYLIGHT LEAK DIAGNOSIS & REPAIR
- SKYLIGHT LEAK TROUBLESHOOTING
- SLIDING GLIDING DOOR MANUFACTURERS & REPAIR GUIDES
- SLIDING GLIDING WINDOW DEFECTS
- WINDOW & DOOR FLASHING TAPE DETAILS
- WINDOW / DOOR AIR LEAK SEALING HOW TO
- WINDOW LEAKS INTO BASEMENT
- WINDOWS & DOORS - home
Suggested citation for this web page
WINDOW FLASHING & SEALING GUIDE at InspectApedia.com - online encyclopedia of building & environmental inspection, testing, diagnosis, repair, & problem prevention advice.
Or see this
INDEX to RELATED ARTICLES: ARTICLE INDEX to DOORS & WINDOWS
Or use the SEARCH BOX found below to Ask a Question or Search InspectApedia
Ask a Question or Search InspectApedia
Try the search box just below, or if you prefer, post a question or comment in the Comments box below and we will respond promptly.
Search the InspectApedia website
Note: appearance of your Comment below may be delayed: if your comment contains an image, photograph, web link, or text that looks to the software as if it might be a web link, your posting will appear after it has been approved by a moderator. Apologies for the delay.
Only one image can be added per comment but you can post as many comments, and therefore images, as you like.
You will not receive a notification when a response to your question has been posted.
Please bookmark this page to make it easy for you to check back for our response.
IF above you see "Comment Form is loading comments..." then COMMENT BOX - countable.ca / bawkbox.com IS NOT WORKING.
In any case you are welcome to send an email directly to us at InspectApedia.com at editor@inspectApedia.com
We'll reply to you directly. Please help us help you by noting, in your email, the URL of the InspectApedia page where you wanted to comment.
Citations & References
In addition to any citations in the article above, a full list is available on request.
- Basic Housing Inspection, US DHEW, S 352.75 U48, p.144, out of print, but is available in most state libraries; New York State version, ca 1955, source of our window parts and window repair sketches.
- Best Practices Guide to Residential Construction, by Steven Bliss. John Wiley & Sons, 2006. ISBN-10: 0471648361, ISBN-13: 978-0471648369, Hardcover: 320 pages, available from Amazon.com and also Wiley.com. See our book review of this publication.
- Decks and Porches, the JLC Guide to, Best Practices for Outdoor Spaces, Steve Bliss (Editor), The Journal of Light Construction, Williston VT, 2010 ISBN 10: 1-928580-42-4, ISBN 13: 978-1-928580-42-3, available from Amazon.com
- The Journal of Light Construction has generously given reprint permission to InspectAPedia.com for adaptations, quotations, or reproductions used at this website. All rights and contents of the JLC material are ©Journal of Light Construction and may not be reproduced in any form.
- In addition to citations & references found in this article, see the research citations given at the end of the related articles found at our suggested
CONTINUE READING or RECOMMENDED ARTICLES.
- Carson, Dunlop & Associates Ltd., 120 Carlton Street Suite 407, Toronto ON M5A 4K2. Tel: (416) 964-9415 1-800-268-7070 Email: info@carsondunlop.com. Alan Carson is a past president of ASHI, the American Society of Home Inspectors.
Thanks to Alan Carson and Bob Dunlop, for permission for InspectAPedia to use text excerpts from The HOME REFERENCE BOOK - the Encyclopedia of Homes and to use illustrations from The ILLUSTRATED HOME .
Carson Dunlop Associates provides extensive home inspection education and report writing material. In gratitude we provide links to tsome Carson Dunlop Associates products and services.


