 Roof-Wall Flashing SNAFUs to Avoid
- POST a QUESTION or COMMENT about problems and leaks at roof-wall joint flashing locations
Roof-wall flashing detail specifications & SNAFUs:
This article illustrates and discusses alternate or rather goofy attempts at roof-wall intersection flashing to prevent leaks & water damage and points out where leak risks may remain.
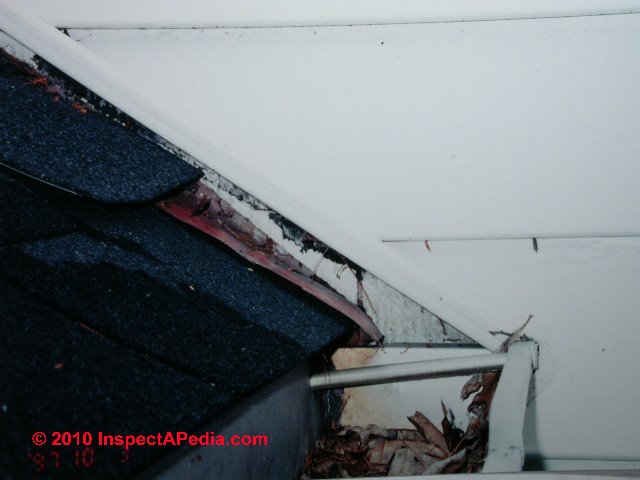
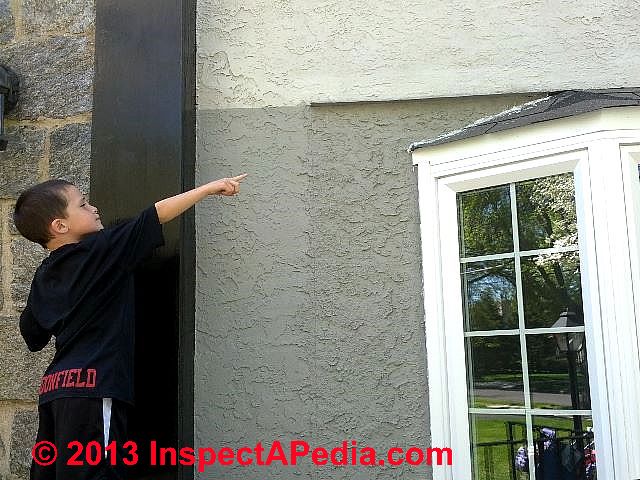
In our page top photo my grandson, Tanner Gilligan points out the white caulk that was installed as a stopgap measure where the builder has installed a bay window into a stuccoed wall without proper roof-wall flashing (red arrow).
Tanner would have also pointed out the horizontal flashing (orange arrow) had he not needed his other arm to hold on to the building.
InspectAPedia tolerates no conflicts of interest. We have no relationship with advertisers, products, or services discussed at this website.
- Daniel Friedman, Publisher/Editor/Author - See WHO ARE WE?
Wall Flashing & Step Flashing Snarl-Ups to Avoid
This article series discusses best practices construction details for building exteriors, including water and air barriers, building flashing products & installation, wood siding material choices & installation, vinyl siding, stucco exteriors, building trim, exterior caulks and sealants, exterior building adhesives, and choices and application of exterior finishes on buildings: paints, stains.
[Click to enlarge any image]
Improper Roof-Wall Flashing Example: horizontal roof abutting vertical wall
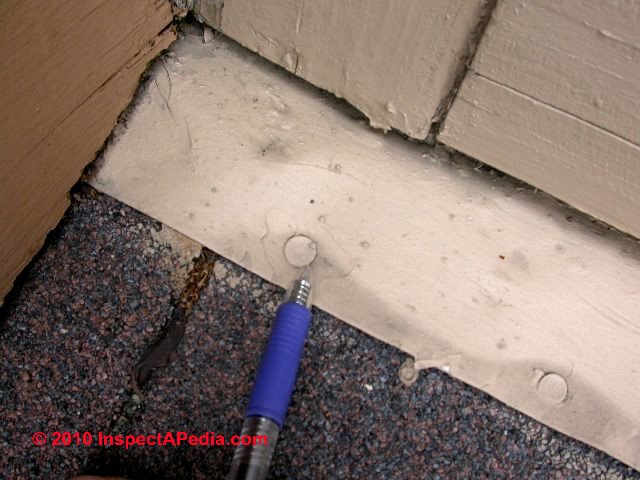
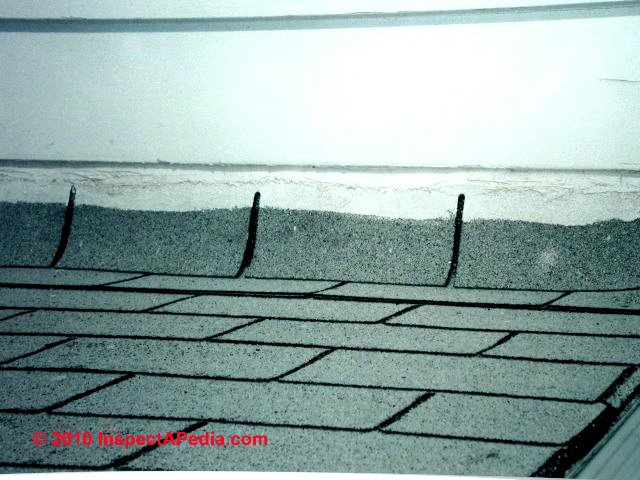
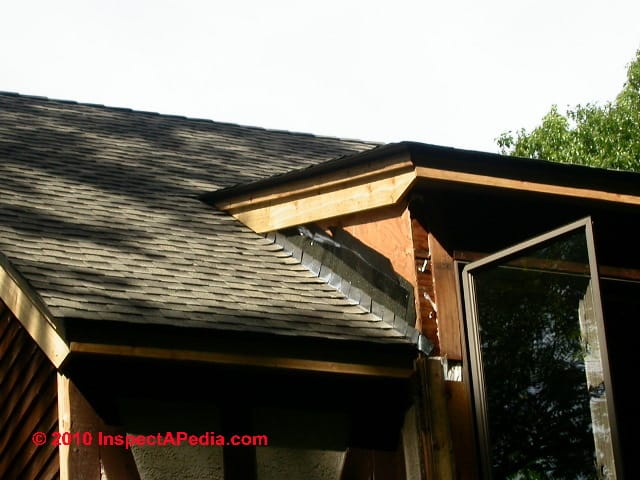
In this photo we show a feeble attempt at flashing and counter flashing at the roof-wall intersection of a low slope roof.
The installer tacked a row of asphalt shingles to the wall, caulked their top edge, and hoped for the best.
What's wrong in this photo?
- Asphalt shingles are not durable flashing material
- And every shingle cutout slot is a potential "flashing" leak point.
- Caulking the upper edge of asphalt shingles to a vertica sidewall is not a durable nor water-tight seal
Use metal step flashing and counter-flashing where a lower shigle roof abuts a side-wall.
Proper Roof-Wall Flashing Example: horizontal roof abutting vertical wall
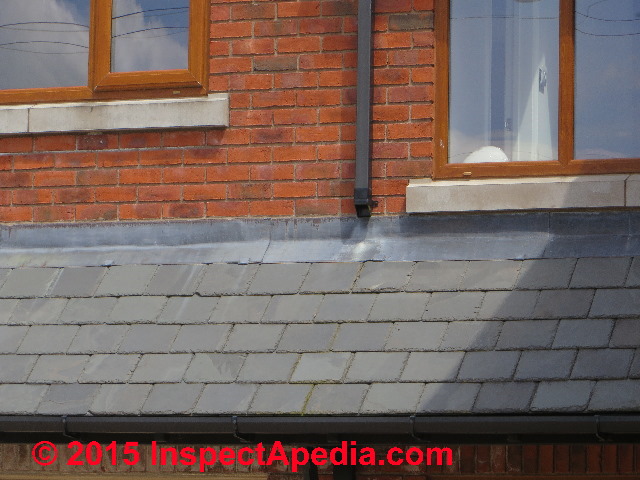
To install the roof-wall flashing above the builder bent the top edge of the flashing into a 90-degree lip about 2 cm in width.
That lip is then set into a reglet or groove, in this case cut into the mortar joint of the brick wall above.
Above the flashing lip the groove is sealed with mortar or with a sealant to prevent water from running behind the flashing and to hold it in place.
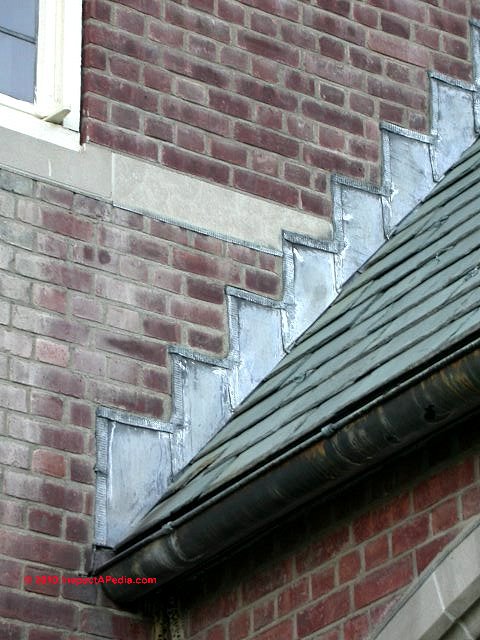
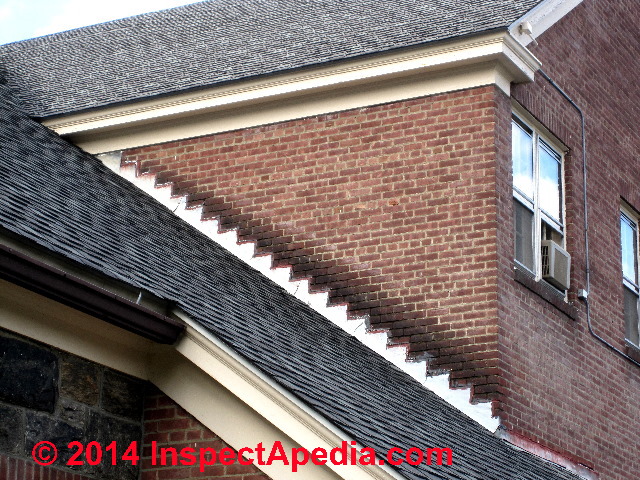
Just above, at a similar abutment of a roof to a vertical wall, we illustrate a proper installation of flashing, in this case lead, installed at the abutment of a lower roof to a masonry wall on a building near Goodrich Castle in Ross on Wye in Herefordshire in the U.K.
Also see CAULKS & SEALANTS
More Questonable or Ugly Roof-Wall Flashing Examples
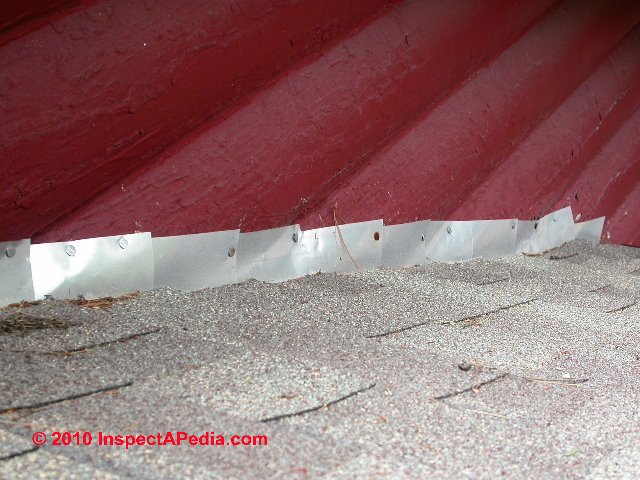
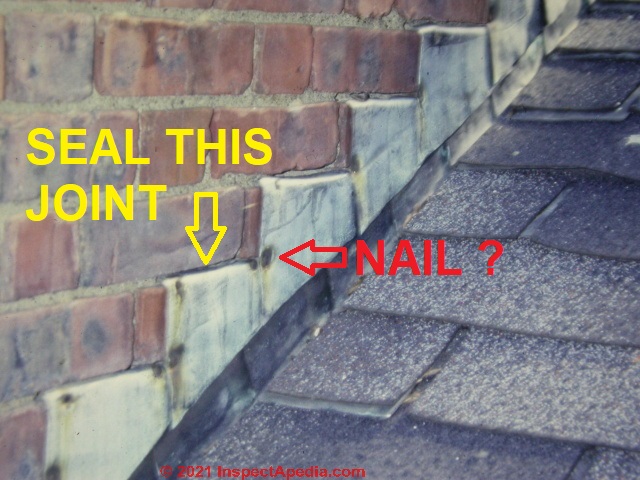
Exposed nails in flashing, not sealed
Below we illustrate that using a single piece of metal flashing where the uppermost edge of a shed-roof abuts a vertical building sidewall works fine, though the use of exposed nails (see our photo below) may form leak or wear points in the roof.
Below we discuss the very different case of the use of single-piece versus step flashing at the abutment of the side of a sloping roof to a building sidewall.
Re-Using Step Flashing When Re-Roofing?
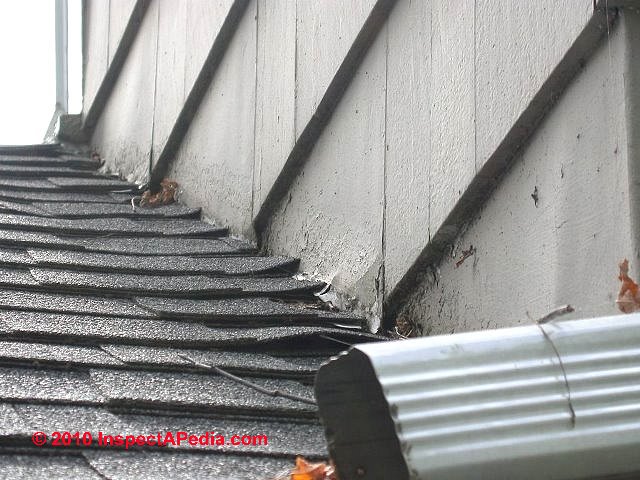
At re-roofing time, when the old shingles are to be torn off, it's not always so easy to re-use the original step flashing that extends up under the building siding.
The new shingle courses have to line up exactly with the original shingle course/step flashing placement, the old step flashing is often bent-up during old shingle removal, making it hard to get the new shingles to lay flat.
As we see in our step flashing re-use at re-roofing time photo (left) the installer cut the new shingles too long so they have two reasons to be buckled, lifted, and vulnerable to wind-blown rain leaks at this building wall.
Installing step flashing but no counterflashing at a sloped-roof to sidewall abutment
Flashing against irregular sidewalls such as this up-state New York cabin (above left) can require some thought.
Against a curved log wall where counter-flashing is needed, we'd need to use custom-formed lead counterflashing as is done on tile roofs, or cut a reglet into the wall deep enough to bend the counterflashing and hook it into the wall to keep wind-blown rain and wall run-down rain from moving behind this step flashing.
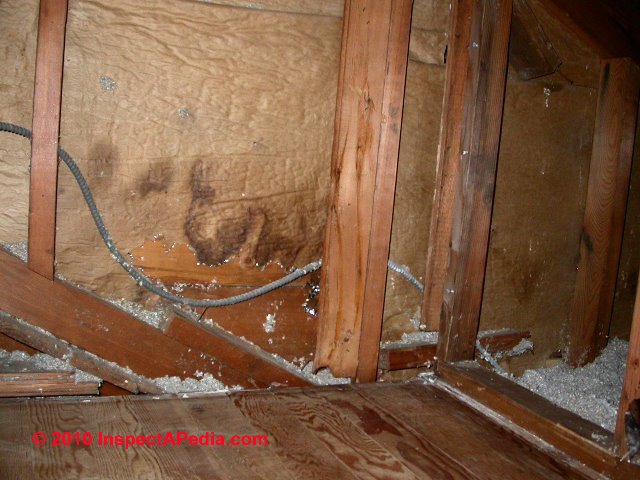
Our photo above shows leak stains on the interior of the building wall where this log wall-roof-flashing installation had no counterflashing.
Use of Continuous Single-piece Solid Metal Flashing vs. Step Flashing at Roof-Wall Abutments - Steep Slope Roofs?
Our photo shows the bottom end of a single-piece of (damaged) sloped-roof-wall flashing. In our OPINION it's not likely that this flashing installation will long resist any significant quantity of water at the lower roof edge, and both blowing wind and any backup due to gutters, ice, or snow will exacerbate the leak risk.
NRCA (Berg) points out that while continuous metal flashing is used at wall junctures in certain steep-slope roof installations, special flashing installation details are required that are different from a step-flashing sealed roof, and even when installed according to specifications, this approach can leave the roof vulnerable to leaks or moisture damage from wind-driven rain.
If single piece flashing is to be used, according to Mr. Berg, [paraphrasing]
- The flashing needs to be installed before installing the roof shingles
- The metal flashing is formed with a hook edge and cleated on 12" centers
- The flashing extends up the wall at least 4"
- The flashing extends onto the roof a minimum of 2 inches - 4 inches is preferable in more severe climate areas.
- Flashing joints are lapped 6" in the direction of water flow
- Building siding material and roofing felt on the building vertical wall may serve as counterflashing [this is true also with the step flashing method if installed at original construction]
- The shingles are sealed to the metal flashing with plastic cement to attempt to reduce wind-driven rain penetration, however as this sealing may separate from the material the single-piece flashing approach again becomes vulnerable to leakage
Berg continues that "Because the hook edge and cleats tend to raise the shingles above the flashing, the detail is somewhat vulnerable to wind-driven rain and from moisture trapped in debris that may accumulate in lower areas of the flashing".
OPINION: DF: inspecting thousands of residential properties we have encountered quite a few attempts to use a single piece of metal flashing instead of step flashing at roof-wall abutments, virtually never installed according even to the not-entirely-reliable NRCA recommendations above.
And in our experience, when a single piece of flashing extends only a few inches under the shingles, especially on a long roof slope, and worse on a roof that happens to slope slightly towards rather than away from the abutting vertical building wall, the accumulated roof drainage water near the bottom end of the roof-wall intersection will overwhelm the width of the flashing and, because it is not directed back out on top of successive shingle courses, it leaks into the building or building wall.
In sum, single piece roof-wall flashing is a bad idea in the hands of typical residential roofers and re-roofers, and this approach has been found by home inspectors to be unreliable in practice.
Proper Roof-Wall Abutment Flashing Examples
Above we see roof-wall step flashing, completed and effective of a slate roof against a brick wall.
Above: lead counter-flashing has been let into stepped reglets cut into the vertical brick wall. This is the right approach to adding counter-flashing over the step flashing between shingle courses.
Even though it's "correct", a few details could have made this a better roof-to-wall flashing job.
- It appears that this installer drove nails thorugh each bit of counter-flashing into one of the mortar joints to try to secure it in place.
Each of those nails is, of course, a penetration of the flashing and a possible leak, especially in heavy wind-blown rain or if there is snow piled up against (and later melting against) this wall. - To resist frost damage and provide a better seal the roofer could have used mortar or a sealant in those horizontal reglet cuts above the bent-over flashing after it was set into the brick wall.
Below we see, flashing in-process, with step flashing against a dormer sidewall before the dormer siding has been put in place - the dormer siding and counter-flashing over the step flashing remain to be installed..
Also see FLASHING ROOF WALL DETAILS for more details about proper exterior wall flashing specifications.
This article is an addendum to FLASHING ROOF WALL DETAILS [live link just below] adapted from BEST ROOFING PRACTICES.
...
Reader Comments, Questions & Answers About The Article Above
Below you will find questions and answers previously posted on this page at its page bottom reader comment box.
Reader Q&A - also see RECOMMENDED ARTICLES & FAQs
Why choose one type of wall flashing over another?
 Regarding the first few paragraphs and photos in the "Wall Flashing" section, I'd like to better understand the reasoning for why one type is not recommended and the other is?
I ask because we recently had the flashing above the "eyebrow" above the garage door replaced.
The top recommended roofers in our area both suggested "tuck pointing" the flashing which involved removal of mortar (front of the house is brick), bending the top edge into the space (as you noted, they bend it at a 90 degree angle) and then filling w/new mortar.
There were actually two different pieces of material used: one was installed on top of the edge of shingles and then the other was installed along the front of the brick and tucked into the space where the original mortar was removed as I described.
It looks awful, but the aesthetics are besides the point right now. I'd like to know the functional reason why you don't recommend this approach.
We thought it sounded like something that would provide a tighter seal. I have photos if that would help. - On 2021-05-24 by Sarah
Reply by (mod) - step flashing and counter-flashing let into brick wall mortar joints is good practice
@Sarah,
There's absolutely nothing wrong and absolutely everything right if the roofers installed step flashing (under shingles, against wall) and counter flashing (upper edge let into the mortar joints and then sealed).
I'm sorry if something in the article above was confusing and I will review the text against your question.
This illustration shows step flashing at the shingles and counter-flashing whose top edge is set into the mortar joints - this flashing approach would pertain at the intersection of a roof sloping along a brick wall.
The illustration also shows how rain splash-up on the lower roof stains the brick wall (actually it's probably a black algae growth
- but that problem is caused by the absence of a gutter along the upper roof eaves, and has nothing to do with the flashing ...
except that if the lower roof-to-wall flashing had not been well-sealed water from the rain splash-up might well have leaked behind the flashing and into the ceilings below that lower roof section.
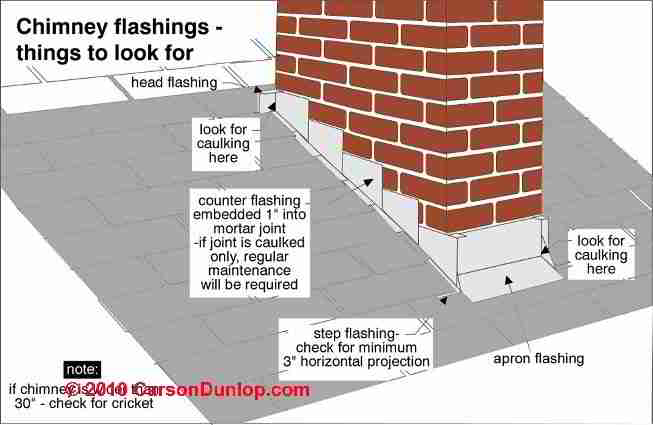
Below we illustrate a similar situation, using Steve Bliss's sketch of step flashing and counter-flashing along a brick chimney.
Details are at FLASHING, CHIMNEY MISTAKES & LEAKS
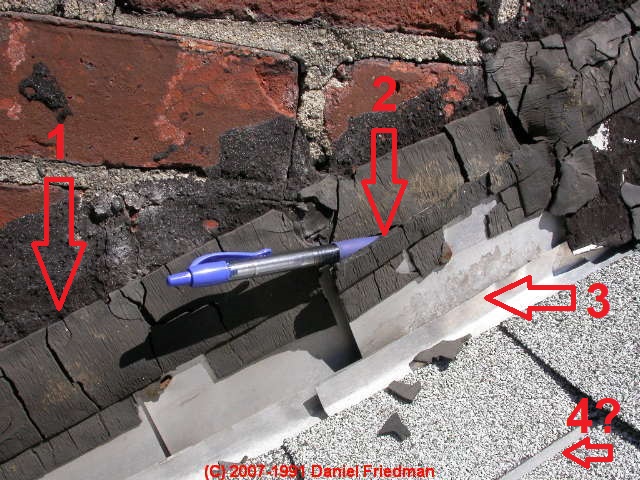
And below, from that same article, I'm pointing to what happens when counter-flashing is omitted and the installer tries to get by using blobs of roofing mastic over the tops of the step flashing: it leaks.
The roof - to - chimney side flashing shown above is a mess, but it's main crime is the omission of counter-flashing let into the brick mortar joints or adequately sealed to the vertical brick wall.
- The use of roof mastic did not provide a durable long-term seal: you can see it dries, cracks leaks behind the step flashing (my pen is showing that separation)
- There was no counter-flashing
- The step flashing against the chimney has been "supplemented" by more flashing, bent up just about 1/2" under the new roof shingles - but again, wind-blown rain and rain water running down the chimney side will simply run under that "add-on" flashing material.
- It looks as if that supplemental flashing runs under the upper shingle tab but I'm not clear what's under that? Normally we'd extend flashing under the single course below, not over-it.
...
Continue reading at FLASHING ROOF WALL DETAILS or select a topic from the closely-related articles below, or see the complete ARTICLE INDEX.
Or see these
Recommended Articles
- BRICK WALL LEAK REPAIRS
- DIVERTER KICK-OUT FLASHING
- DORMER SIDE / ROOF FLASHING
- FLASHING on BUILDINGS - home
- FLASHING ROOF-WALL SNAFU
- FLASHING WALL DETAILS - Roof-wall, roof-chimney & siding bottom
- RAIN SPLASH-UP SIDING DAMAGE - splashback or splash-up water damage to exterior walls
- ROOF SEALANTS & MASTICS
- WALL / WINDOW LEAK DIAGNOSIS
Suggested citation for this web page
FLASHING ROOF-WALL SNAFU at InspectApedia.com - online encyclopedia of building & environmental inspection, testing, diagnosis, repair, & problem prevention advice.
Or see this
INDEX to RELATED ARTICLES: ARTICLE INDEX to BUILDING FLASHING
Or use the SEARCH BOX found below to Ask a Question or Search InspectApedia
Ask a Question or Search InspectApedia
Questions & answers or comments about problems and leaks at roof-wall joint flashing locations.
Try the search box just below, or if you prefer, post a question or comment in the Comments box below and we will respond promptly.
Search the InspectApedia website
Note: appearance of your Comment below may be delayed: if your comment contains an image, photograph, web link, or text that looks to the software as if it might be a web link, your posting will appear after it has been approved by a moderator. Apologies for the delay.
Only one image can be added per comment but you can post as many comments, and therefore images, as you like.
You will not receive a notification when a response to your question has been posted.
Please bookmark this page to make it easy for you to check back for our response.
IF above you see "Comment Form is loading comments..." then COMMENT BOX - countable.ca / bawkbox.com IS NOT WORKING.
In any case you are welcome to send an email directly to us at InspectApedia.com at editor@inspectApedia.com
We'll reply to you directly. Please help us help you by noting, in your email, the URL of the InspectApedia page where you wanted to comment.
Citations & References
In addition to any citations in the article above, a full list is available on request.
- Steve Bliss's Building Advisor at buildingadvisor.com helps homeowners & contractors plan & complete successful building & remodeling projects: buying land, site work, building design, cost estimating, materials & components, & project management through complete construction. Email: info@buildingadvisor.com
Steven Bliss served as editorial director and co-publisher of The Journal of Light Construction for 16 years and previously as building technology editor for Progressive Builder and Solar Age magazines. He worked in the building trades as a carpenter and design/build contractor for more than ten years and holds a masters degree from the Harvard Graduate School of Education. Excerpts from his recent book, Best Practices Guide to Residential Construction, Wiley (November 18, 2005) ISBN-10: 0471648361, ISBN-13: 978-0471648369, appear throughout this website, with permission and courtesy of Wiley & Sons. Best Practices Guide is available from the publisher, J. Wiley & Sons, and also at Amazon.com - Critique, contributions wanted: Contact Us to suggest corrections or additions to articles at this website, and if you wish, to receive online listing and credit as a contributor. Particular thanks are due to the many experts and also consumers who read and critique technical articles at InspectAPedia.com.
- Best Practices Guide to Residential Construction, by Steven Bliss. John Wiley & Sons, 2006. ISBN-10: 0471648361, ISBN-13: 978-0471648369, Hardcover: 320 pages, available from Amazon.com and also Wiley.com. See our book review of this publication.
- Paul Galow [Website galowconsulting.com ] - technical consultant on networking, LAN design, applications support. Galow Consulting Services [Website galowconsulting.com ] , 914-204-1749, email: paulgalow@galowconsulting.com
- John Rudy, Advantage Home Inspections, Flemington N.J. 08822 home inspector, 908-806- 6364, Home, Radon & Termite Inspections, Central & Parts of North New Jersey, email: jonadvantage1@yahoo.com
- "Flashing: the plain solution to leaky walls", Thomas E. Remmele, Manager, Technical Services, Sto Corporation, Building Standards, November/December 1999 p. 21-25.
- NRCA - National Roofing Contractors Association - Website: www.nrca.net 10255 W. Higgins Road, Suite 600, Rosemont, IL 60018-5607, Tel: (847) 299-9070 Fax: (847) 299-1183
- "Continuous metal vs. step flashing in steep-slope roofing", Donald Berg, P.E., Professional Roofing (NRCA), June 1993, p. 57.
- Decks and Porches, the JLC Guide to, Best Practices for Outdoor Spaces, Steve Bliss (Editor), The Journal of Light Construction, Williston VT, 2010 ISBN 10: 1-928580-42-4, ISBN 13: 978-1-928580-42-3, available from Amazon.com
- The Journal of Light Construction has generously given reprint permission to InspectAPedia.com for this article. All rights and contents are ©Journal of Light Construction and may not be reproduced in any form.
- In addition to citations & references found in this article, see the research citations given at the end of the related articles found at our suggested
CONTINUE READING or RECOMMENDED ARTICLES.
- Carson, Dunlop & Associates Ltd., 120 Carlton Street Suite 407, Toronto ON M5A 4K2. Tel: (416) 964-9415 1-800-268-7070 Email: info@carsondunlop.com. Alan Carson is a past president of ASHI, the American Society of Home Inspectors.
Thanks to Alan Carson and Bob Dunlop, for permission for InspectAPedia to use text excerpts from The HOME REFERENCE BOOK - the Encyclopedia of Homes and to use illustrations from The ILLUSTRATED HOME .
Carson Dunlop Associates provides extensive home inspection education and report writing material. In gratitude we provide links to tsome Carson Dunlop Associates products and services.


