
InspectAPedia® FREE Encyclopedia of Building & Environmental Construction, Diagnosis, Maintenance & Repair |
Question? Just ask us! InspectAPedia
|
 Nichicha Fiber Cement Shingle or Shake Siding Board Defects
Field report of fiber cement siding product complaints in California

- POST a QUESTION or COMMENT about installing fiber cement siding troubleshooting, defect causes, remedies, warranties, warranty claims
Fiber cement shingle, shake or clapboards formed in shingle or shake relief defects, failures, problem troubleshooting: a field report of fiber cement siding complaints including installation errors and shrinkage gaps in the installed product.
This article describes the types of problems that occur in fiber cement siding shingle & shake installations in North America, including fiber cement shingle shrinkage gaps at butt joints, cracks, breaks, and loose or buckling shakes.
We describe various fiber cement siding complaints: open butt joint gaps, buckled siding, loose siding, nailing failures, moisture effects, and we include opinions, field observations, and research on the causes & effects of these conditions.
InspectAPedia tolerates no conflicts of interest. We have no relationship with advertisers, products, or services discussed at this website.
- Daniel Friedman, Publisher/Editor/Author - See WHO ARE WE?
Fiber Cement Shingle or Shake Installation SNAFUs
 FC Siding end gaps, loose siding, crooked, curved, bent siding, missing flashing, trim rot, building leaks
Nichiha Fiber Cement Boards Formed into Single or Shake Pattern, Installation & Performance Problems
This article and its accompanying photographs were provided by a reader who commented:
[Click to enlarge any image]
Your website has been a big help in getting resolution of the faulty cement fiber siding installation on my house.
You may be interested in seeing some pictures. Feel free to download and use them if you wish.
After lots of negotiation (aided by your website info) and a failed attempt at a manufacturer warranty claim [Nichiha Fiber Cement] , my general contractor has agreed to full replacement. - E.D. 12/14/2014, San Diego CA
Reply:
It is indeed a troublesome topic and in my *opinion* is but another example of production in huge volume of a building product with innate design and production and durability problems that range from cosmetic to functional. For example a gap can be more than unsightly if it also means leaks into the building.
There is a second class of product design problems, personified by a different product, EIFS: a product that does not perform well in the field or that has significant hidden costs is defended by creation of an installation specification that is so detailed and burdensome that we can be sure installers will not follow it in the field.
It's a bad design that for success depends on installers performing tasks that cannot be relied upon.
Some of this class II problem shows up in fiber cement siding products in back-flashing and caulking details. I think that nailing mistakes are less forgivable.
Finally, it is worth noting that these fiber cement siding complaints about shrinkage gaps, buckling, and installation or workmanship issues are not confined to a single manufacturer. - DF
Fiber Cement Shingle / Shake Defect Catalog - Nichiha
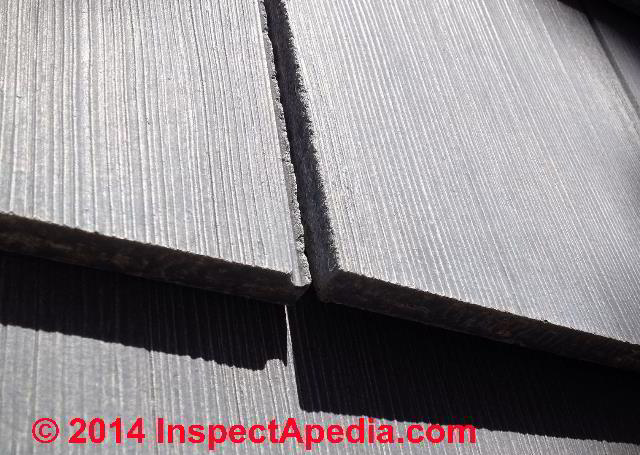
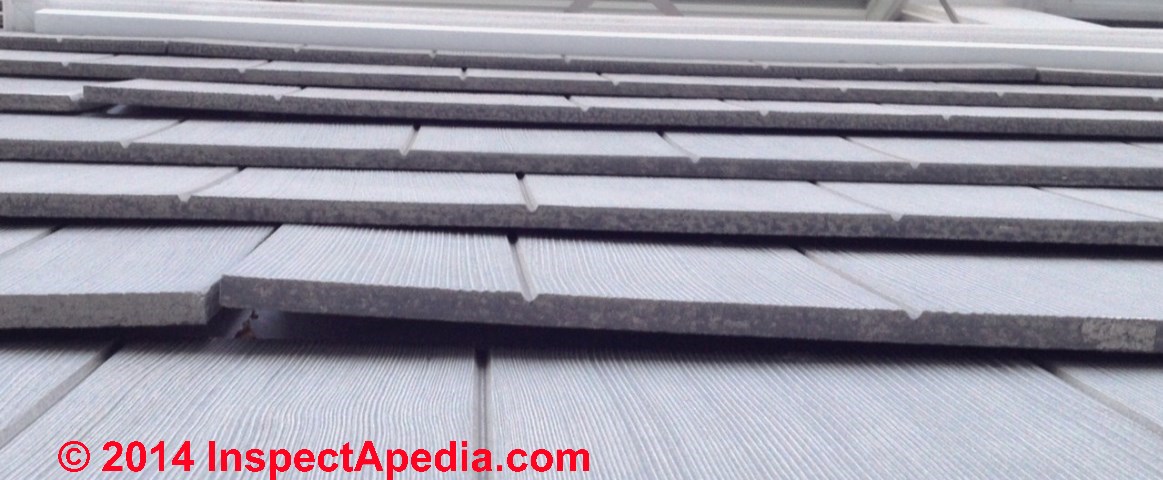
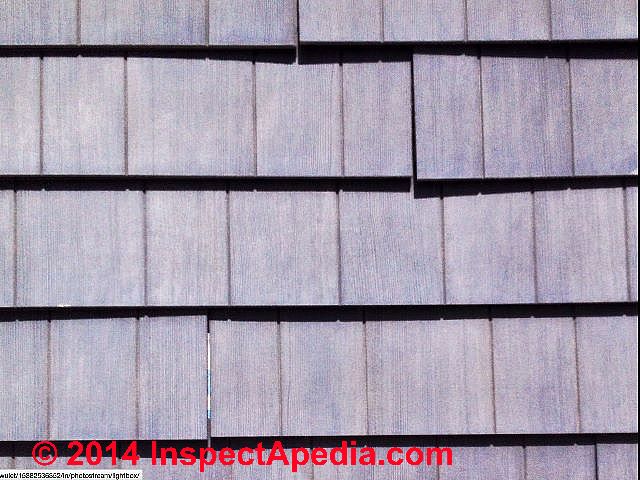
These photographs illustrate a 5-year-old Coronado Nichiha Sierra Shake Installation using 1/2" thick fiber cement siding boards moulded to include wood grain and grooves to portray shingle or shake siding.
Contact information for the siding manufacturer is at the end of this article and also atReferences or Citations .
As we indicated above, the installation or product defects illustrated here are not peculiar to any single fiber cement siding manufacturer, except
perhaps BUTT JOINT CURLING in FIBER CEMENT SIDING in which the thickness of the siding material may be a factor.
It is no surprise to find the same or quite similar product complaints across multiple buildings.
Often the same contractor or same crew repeat the same mistakes over many homes; in other cases, a significant volume of building product materials, such as fiber cement siding, may be shipped in the same condition - at high moisture level, even visibly wet, or may have been improperly stored at a major supplier's site before delivery.
Note: Black et als (2003) point out the questionable merits of making thicker fiber cement panels but did not investigate possible disadvantages such as curling due to differential drying of thicker materials when wet for any reason.
Fiber Cement Siding Complaint Diagnostic Questions
This section has moved to a separate article at SIDING, FIBER CEMENT DEFECT DIAGNOSTIC QUESTIONS
Buckling Fiber Cement Siding Complaints
Fiber cement siding products expand as an increase in temperature or moisture or both. Buckling is more likely to occur over longer boards installed tightly
Any condition that increases board moisture level after installation could cause an expansion and possibly buckling that could appear anywhere but more often appears in the center of long runs.
Also see our notes on loose fiber cement boards and fiber cement board nailing failures.
Curling at Butt Joint Gaps in Thick Fiber Cement Siding
Details of this topic are at BUTT JOINT CURLING in FIBER CEMENT SIDING.
Note: the reader-comments appearing at points in this article were provided by a reader whose siding is further illustrated and discussed
at SIDING, FIBER CEMENT SHINGLE DEFECT DIAGNOSIS - Troubleshooting gaps, breaks, peeling, bowing, loose fiber cement siding: causes, remedies. Nichiha Fiber Cement products, performance & warranty field report.
This looks a little like curling, as much as a 1/2" board could - but more definitely end effects rather than a whole board phenomena. I was only speculating -- attached are two photos [of 1/2" thick Nichiha Fiber Cement siding]that seem to lend some support the idea though.
Looking down from above at the point where the boards meet a gap will appear and get larger. Its a visual gap from above -- but its not due to any "shrinkage" of the board.
The gap resulted from the "lifting" the ends in the Z axis, not due to separation in the Y axis. Anyway -- don't know anymore what my point here really was?
Note that my installer told me everything was "tight" at installation. And I believe him because the east and north sides are still tight with no gaps at all. -
E.D. 12/15/2014
Butt Joint Gaps & Fiber Cement Siding Shrinkage

Illustrated in the photo above, where butt joint gaps appear in previously-tightly-butted joints between fiber cement siding boards we expect this cosmetic problem to be due to shrinkage of boards installed at too high a moisture content.
Open butt joints increase the risk of moisture or water penetration behind the siding and are for many homeowners also a cosmetic complaint.
Research on fiber cement shrinkage makes measurements over a considerable length of board. You simply cannot obtain a 1/8" shrinkage gap if only 6" of board end is wet.
OPINION: From some careful field observations and measurements including moisture levels and observations of where gaps or nail failures occurred, I've formed some opinions reflected in the article we're developing.
It seems rather unlikely that product buckling failures or shrinkage gap failures could reasonably be traced to failure to seal an end cut.
Further, wetting causes expansion. It's the dry-out of a length of board installed "wet" that producers shrinkage gaps.
The "all correct" siding job was not the same brand as yours. The property owner had thought they paid for HardiPlank® siding - paying a premium for what was considered a premium product.
When the product shrinkage (and other failures) upset the owner enough to decide to tear off and re-side the home we determined that the fiber cement siding was "brand X" suspected to be a Chinese product. I was able to exclude the known American brands by various identifying markings.
But the siding in no way resembled the current Nichiha product line.
To be clear, I have inspected many homes with fiber cement siding not just one, but I have studied in detail less than 10 - in particular, it's more difficult to be on-site to perform product inspections and measurements from time of delivery through and after installation.
But seeing product arrive soaking wet even in the original factory sealed plastic wrapping may be more important than has been acknowledged.
We are talking about a product that uses water in its manufacture and has been shipped wet.
Details about the causes and cures for shrinkage gaps at fiber cement siding butt joints that pertain to all brands and thicknesses of fiber cement siding are at
Butt Joint Back-Flashing Omitted
There is no flashing installed behind butt joints. - E.D.
Watch out: the absence of back flashing invites moisture penetration throughout the entire field of the fiber-cement sided wall. This omission and water entry into the wall from rain or even heavy condensation on the weather side of the wall risk a variety of both cosmetic and functional complaints about the fiber cement siding performance including board curling or lifting, buckling, and looseness.
The company's NichiBoard™ specifications include these requirements
B. Flashing: Flash all areas specified in manufacturer’s instructions. Do not use raw aluminum flashing. Flashing must be galvanized, anodized, or PVC coated.
...
4. Appropriate flashing shall be used to prevent moisture penetration around all doors, windows, wall bottoms, material joints, transitions, and penetrations. Refer to local building codes for best practices.
. - NichiBoard_3-part_Spec.docx retrieved 12/16/2014 original source http://nichiha.com/images/uploads/NichiBoard_3-part_Spec.docx
...
D. Joint Installation Using Flashing (recommended): Attach joint flashing recommended for fiber cement siding and follow manufacturer’s instructions. Joint flashing shall be at least 3” in width and long enough to extend above the board width a minimum of 1-1/2”. Then install boards over flashing with moderate contact.
E. Joint Installation Using Caulk: Leave a 1/8” gap between each board and fill with recommended sealant.
. - NichiBoard_3-part_Spec.docx retrieved 12/16/2014 original source http://nichiha.com/images/uploads/NichiBoard_3-part_Spec.docx
Caulk Omitted at Fiber Cement Siding
There appears to be no caulking at most vertical abutments. - E.D.
Manufacturers fiber cement siding installation specifications typically specify both a clearance space and the use of an approved caulk or sealant where the siding abuts vertical trim on the building.
But the manufacturers' recommend against butt joint caulking in installation specs, most likely because of cosmetic issues; some offer an unattractive "H" clip to flash butt joints - rarely used in my experience.
Watch out: the absence of sealant where required at vertical trim such as corner boards or along the sides of windows and doors invites moisture penetration into the fiber-cement sided wall.
This omission and water entry into the wall from rain or even heavy condensation on the weather side of the wall risk a variety of both cosmetic and functional complaints about the fiber cement siding performance including board curling or lifting, buckling, and looseness.
Gaps at butt joints in fiber cement siding as well as questions about where caulk should and should not be applied are discussed separately at SIDING, FIBER CEMENT GAPS.
The company's NichiBoard specifications include these requirements
C. Sealant: Sealant shall be polyurethane, or hybrid, and comply with ASTM C834 or C920.
. - NichiBoard_3-part_Spec.docx retrieved 12/16/2014 original source http://nichiha.com/images/uploads/NichiBoard_3-part_Spec.docx
D. Joint Installation Using Flashing (recommended): Attach joint flashing recommended for fiber cement siding and follow manufacturer’s instructions. Joint flashing shall be at least 3” in width and long enough to extend above the board width a minimum of 1-1/2”. Then install boards over flashing with moderate contact.
E. Joint Installation Using Caulk: Leave a 1/8” gap between each board and fill with recommended sealant.
F. Horizontal Joints: A minimum 1-1/4” overlap is required. Do not fasten closer than 1” from the top edge and no closer than 3/8” from the board ends. If face fastening is required, fasteners shall be placed at 3/8” from bottom edge. For top of windows/doors, leave ¼” gap over flashing or drip cap
G. Trim Joints: For sides, bottom, and around windows and trim, leave a 1/8” gap and fill with recommended sealant.
. - NichiBoard_3-part_Spec.docx retrieved 12/16/2014 original source http://nichiha.com/images/uploads/NichiBoard_3-part_Spec.docx
House Wrap Moisture Barrier Damage on Fiber Cement Siding Installation
House wrap has already been compromised in many places due to UV exposure through un flashed butt joints.
Research is needed on the effects of sun exposure on housewrap at open fiber cement siding butt joints. Back-flashing insertion behind the siding may be a feasible repair for this concern.
See HOUSEWRAP INSTALLATION DETAILS
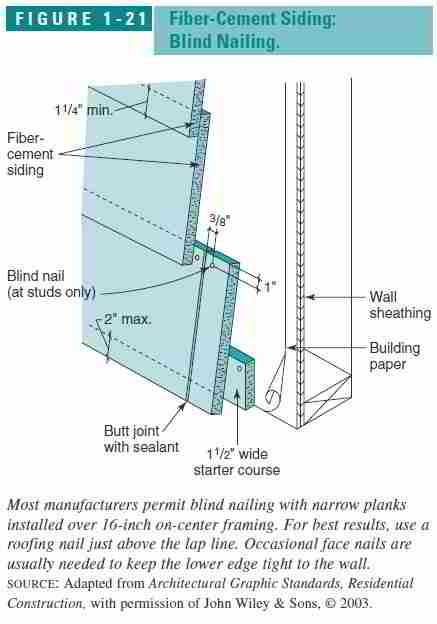
Loose FIber Cement Siding Boards, Inadequate Siding Fastening, Nailing Failures
Butt joints do not land on studs and have not been screwed down.
I can tell you that I have many loose boards on the house -- which the Nichiha rep attributed to nailing too close to the top edge of the board. (A point that goes to the scientist recommendation that it might be a good idea to go beyond the minimum overlay). - E.D.
We observed in the photo set provided by the reader examples of mismatched horizontal lines at siding butt joints. We can't tell if this was sloppy installation work (failure to align during installation) or poor faster installation allowing the siding boards to slip or fall after installation.
We discuss possible causes of fastener failure throughout these comments. Misplacement of nails (too close to board edge), if that explains loose boards, will be plainly visible when the board above a loose board is removed.
We did exactly this when stripping FC siding from a home in New York where some boards had slipped downwards and were loose. We found siding board damage - broken away - at some nails placed too close to the board top. (The factory specified exposure and overlap provided ample room for sound nailing without modifying the overlap spec).
But other loose boards, particularly where there was buckling (more often towards the center of a board) we found were traced to nails that had simply failed to resist withdrawal (or perhaps had been worked to and fro by cyclic expansion and contraction of the material?).
We could pull some boards completely off the building very easily, by hand, despite the requisite number of ring-shanked nails having been used to nail the boards in place onto 1/2" thick exterior plywood sheathing.
A visual inspection of the actual nail failures is necessary to reliably document why loose or buckled siding boards are found on a building.
On a FC sided home that we stripped (DF & EG) we found that some ring-shanked siding nails pulled straight out of the plywood sheathing; As we pulled off siding boards we found few cases of nails breaking away along the top edge of the board. But some siding boards I could pull off by hand - the nails were not performing as expected in the plywood sheathing.
There were fewer buckled boards than open butt joint gaps.
I have speculated that if boards did take up moisture and expand after installation that could explain both buckling and nail failures but that this seems less likely than mis-nailing and sloppy original work. One needs to look at the specific nail failures.
But of course one needs to look at nail placement, board breakage, with care at the house you are describing to be able to offer more confident opinion about the failure.
The company's NichiBoard specifications include these requirements
A. Fasteners: Corrosion resistant fasteners, such as hot-dipped galvanized nails and screws appropriate to local building codes and practices must be used. Use Stainless Steel fasteners in high humidity and high-moisture regions.
Board manufacturer is not liable for corrosion resistance of fasteners. Do not use aluminum fasteners, staples, clipped head nails or fasteners that are not rated or designed for intended use.
See manufacturer’s instructions for appropriate fasteners for construction method used. - NichiBoard_3-part_Spec.docx retrieved 12/16/2014 original source http://nichiha.com/images/uploads/NichiBoard_3-part_Spec.docx
C. Fastening
1. Fiber cement boards must be jointed on studs and should be staggered after installing the first course. For better appearance, 32” or more stagger is recommended.
2. Fasteners must penetrate studs at least 1” into wood studs and ½” into steel studs.
3. Fastener head must be flush to the board surface.
4. Fasteners should be placed a minimum of ¾” to 1” from the top edge and a minimum of 3/8” from board edges.
5. If face fastening, fasteners should be a minimum of 3/8” from the bottom edge. NichiBoard_3-part_Spec.docx retrieved 12/16/2014 original source http://nichiha.com/images/uploads/NichiBoard_3-part_Spec.docx
Primer Coating Missing on Cut Ends of FC Siding or Shakes as a Cause of Fibre Cement Gaps & Buckling
E.D.'s comments:
Butt joints should be factory primed ends.
The siding was installed incorrectly in late 2009. The primary cause of the degradation is the failure to paint or prime field cut board ends.
The major defects are primarily on the heavily sun exposed south and west sides.
Problems are beginning to appear on the east and north sides and in a few years they may look just as bad.
Once a board splits the ends are unsealed and allows further moisture intrusion and continued degradation.
They look very much like splits but I have no way of knowing if they are really splits or butt joints.
When i asked the installer why he didn't caulk vertical abutments he told me the GC told him not to do it because "it looks bad."
Some (but not all) of the boards that appear "split" are single runs tightly installed between two vertical abutments without caulk. Expansion with no place to go = split?
Because of this installation defect as well as others listed below, the whole siding installation must be redone.
Numerous field cuts that are unprimed have been identified.
Comments by a building scientist provided to InspectApedia by reader E.D.
Every cut end must be primed. The cupping, warping and lifting at board ends, even without discernible delamination, suggests that the unprimed cut ends may be playing a role in the overall failure.
The fiber cement industry knows very well that this is one of the material's greatest vulnerabilities.
Perhaps the manufacturer has tried to compensate for this with the 1/2" thickness, which in theory would be less susceptible to this condition. Generally fiber cement siding is 1/4", 5/16" or 7/16".
As the siding is removed, I recommend comparing the conditions expressed at uncut ends to those seen at cut ends.
Together with the other known deficiencies (fastening, gapping, flashing, etc.), you have likely found the chief mechanisms and therefore the means for correcting them in your re-installation.
I did look at those photos and the one clearly shows an unprimed field cut. I've seen thousands of these and they almost always lead to problems. - S.D., Ph.D. LEED AP, 12/2/2014
Really? OPINION: First the principal complaints we receive and have inspected in FC siding jobs are from shrinkage and open butt joints, not expansion due to moisture uptake after installation.
The amount of shrinkage measured in research studies and sufficient to explain a 1/8 or larger opening in a previously-tight butt joint requires a considerable length of (wet then dry) fiber cement board.
For this shrinkage to occur at a previously tightly-butted end joint between two boards the boards needed to have been installed wet, tightly butted, then experienced shrinkage during dry-out.
Moisture uptake and board expansion after installation could explain buckling, particularly if the butt joints and abutments to vertical trim are simultaneously observed to be tight. Where might that water come from?
Water penetration into the wall cladding at improperly flashed or sealed windows or doors is the most common source we've found in the field.
End cut priming vs. Product Moisture Explaining Fiber Cement Shrinkage Gaps & Buckling

OPINION: If failure to prime end cuts were a prime cause of buckling we should see buckling failures focused at board ends whose cuts were not primed.
Photo of a gap in another brand of fiber cement siding shown at left is discussed at SIDING, FIBER CEMENT GAPS.
In my [DF] field investigations I have seen buckling and shrinkage gaps in new and recent fiber cement siding installations that were completely independent of whether or not the end cuts were primed or factory-coated or even left bare.
At a project whose boards were studied in detail (DF- EG 2013-2014) the contractor took care to make sure that all butt joints were formed between factory-primed ends.
He accomplished this by careful planning such that all board end cuts made in the field could be primed and then placed against vertical trim where they were further protected by the sealant specified by the manufacturer for that location. [Sealant is not specified between board end butt joints].
I of course suggest that installers follow the manufacturer's installation instructions regarding end-priming of cut boards, but it appears much more likely that shrinkage gaps and buckling occur in these boards due to installation in a too-wet condition or in some installations due to improper installation that allows wind-blown rain to wet the backs of the siding boards.
A less likely secondary effect factor in fiber cement board shrinkage gaps might be the temperature at which boards are installed, but I have not found this as significant as moisture content.
The building scientist also commented
What is the product's thickness? This might be more relevant than the overlap. Thinner sheets and panels are sometimes more susceptible to the combined effects of solar/heat expansion and moisture. Minimum overlap is just that... minimum.
Additional overlap might help, especially if the other installation requirements are achieved.
In the two articles listed just below we discuss moisture level measurements and also research by others on percent shrinkage in fiber cement products.
Details are at
We were talking here about the amount of reveal or exposure. The board is 9 1/4" wide ... and in my case anyway (and in most every installation I looked at) -- the installers used a 8" reveal or a 1 1/4 overlap, the minimum per the manufacturer specs. (A greater overlap means you have to buy more material but I think it looks better).
So maybe a greater overlap (or less exposure), just say 2" (or where 7 1/4" of the shingle is exposed rather than 8"), may hold everything together more tightly? I don't know.
Or it may allow more room for error in face nailing (spec says a minimum of one inch from top of board) -- if you're doing the minimum 1 1/4" overlap there's only that 1/4" spacing in which to place the nails. Maybe if the nails are a little lower there will be less movement?
I don't know ... I was just asking ... and I'll probably go with a greater overlap next time -- if only because of aesthetic reasons. - E.D.
In none of the FC siding board failures that we inspected was the 1 1/4" head lap inadequate for proper nailing so long as nails were kept about an inch down from the board top.
Nails placed within 1/4" of the board top were more likely to fail, but even then on siding disassembly it appeared that broken board tops were due to hammer strikes not in-service failure, and that more often failures were due to poor withdrawal resistance of nails leading to buckled siding. - DF
Bottom line on Role of Missing Primer on Fiber Cement Board Curling
Because field observations report fiber cement board curling at the butt joints of intact, un-cut, full-length factory-end-primed boards as well as in shorter, cut and in some cases un-primed board ends, the absence of primer is not likely to explain fiber cement board curling.
Furthermore, it is unlikley that moisture entering a fiber cement board at an un-primed end cut would travel sufficiently far nor sufficiently rapidly into the length of the board to explain curling FC siding that extends in some cases for more than a foot of board length.
It is more likely that the curling observed in Nichiha Fiber Cement occurs because the combined effects of the following factors:
- Water or moisture entering the wall cladding system from rain, dew, or other water sources, entering at un-flashed butt joints, at faulty window or door head or side flashings and sealants, at missing vertical trim abutment sealants, or less likely, from other leaks into a building's wall cavity.
- Moisture absorption through the back or hidden side of the board whose coating might be less water-resistant than the exposed weather side of the board (reseach & confirmation needed about coatings)
- Moisture differential in the board thickness: air and sun dry the exposed board surface while moisture remains on the hidden or cavity side of the board.
We discuss curling or lifting ends of fiber cement siding boards also
at BUTT JOINT CURLING in FIBER CEMENT SIDING
and
at MOISTURE ABSORPTION into FIBER CEMENT SIDING.
The installation instructions for Nichiha Fiber Cement recommend that all board cut ends be primed. More likely this priming is intended to reduce possible weathering or softening in the board end and not to address the curling siding complaint.
Starter strip defects in Fiber Cement Siding
Starter strip is unprimed wood inviting termite infestation.
Note: in my experienced [DF] installers do not use primed nor treated wood for siding starter strips, most likely believing that the wood is not close to ground level and is protected from the weather.
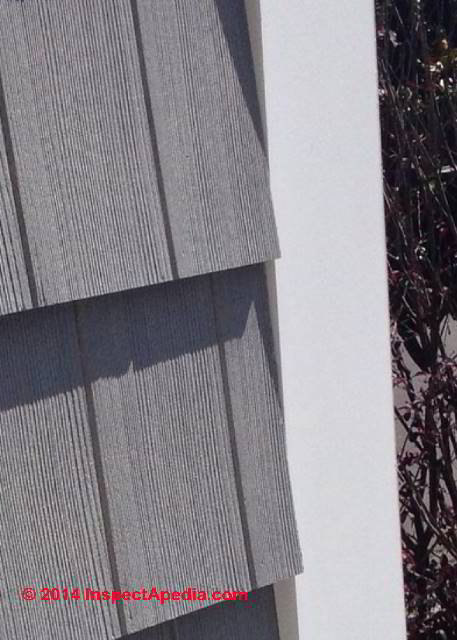
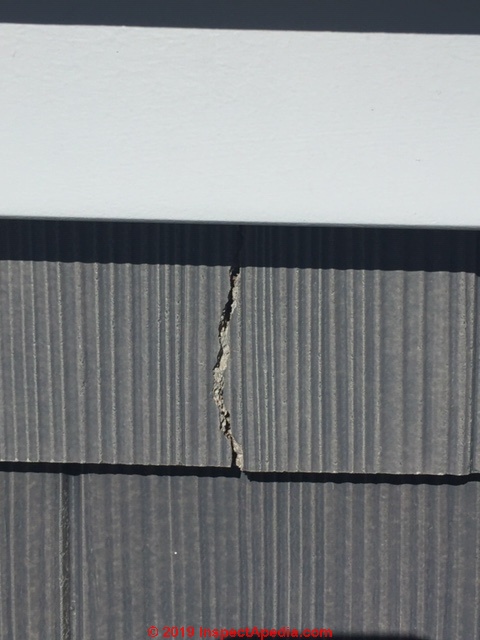
Splits in Fiber Cement Siding

The owner describes "splits" occurring in the fiber cement siding, presumably as distinct from butt joints.
This is a section on the much less sun exposed north side. Just to the right out of the photo is vertical trim.
No caulk either side. Span about 4 feet. Its seems likely that they would have used whole pieces for these runs and no (intentional) butt joints. They look like splits or cracks to me. - E.D.
Reply: End cutoffs used near vertical abutments?
You describe as well as measurements indicating where these occur in the board and on the house.
[Click to enlarge any image]
Expansion compresses a board - which would close up open butt joints or openings at vertical trim. I can speculate that cyclic expansion/contraction might stress a board causing other damage but it's not something I've seen nor found reported.
More likely your "splits" are clean cuts made by the contractor using up shorter siding leftovers when nearing the vertical abutment.
If so I suspect the installer simply was making cuts to fit short segments in near the end of runs or using up left-over short segments in a location where the installer felt they'd not be observable.
Often we can inspect installed materials for such clues that tell us the installation sequence, from which side the installer began nailing materials, even sometimes where the installer stood when swinging a hammer (by the angle of a hammer mark).
For example you may find more of these "split-cuts" near one end of the wall than at the opposite end.
If we could document that the splits appeared after original installation would we expect to find a different explanation pointing to material stresses but I suspect this is an unlikely case.
We'd also like to examine the two sides of one of these splits in our forensic lab. We can probably distinguish between cuts and breakage rather quickly and unambiguously.
Reader Follow-Up on splits in FC Siding
Looking more closely at the siding these last few days.
I agree that what I thought were "splits" was more of an optical illusion and they are most probably butt joints. - E.D. 12/17/2014
Temperature Effects on Fiber Cement Siding
Temperature: I have to say that the problems are 99% on the heavily exposed sunny west and south sides of the house. North and east sides look pretty good and I feel bad about having to tear them down.
But I paid for 30 -50 year siding and I know the same installation issues are there and it may only be a matter of time before they start appearing. - E.D.
This makes perfect sense: more sun exposure = not only more temperature variation but faster and more extensive dry-out of wet boards.
Water Penetration into Fiber Cement Siding
This topic has moved to MOISTURE ABSORPTION into FIBER CEMENT SIDING.
What Nichiha says:
Every product we make comes off the line with three protective coatings; 2 coats of primer and an anti-efflorescence coating that prevents chalky residue from appearing.
The result is a product that holds paint better and looks better longer. We’re confident enough to back that up with the strongest warranty in the business. - original source: http://www.nichiha.com/products/our-process-awp retrieved 12/16/14
Sierra Premium and NichiFrontier products MUST be kept dry, and stored in a covered area or covered with a tarp before installation. Moisture saturation before installation may result in shrinkage and board damage.
Do not install saturated boards. All pre finished products are required to be stored in a covered area.
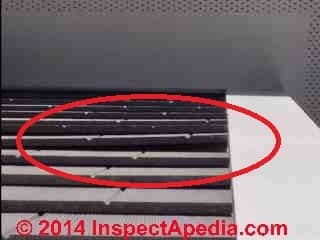
Question: what caused these cracks & gaps in our Nichiha Fiber Cement Siding?
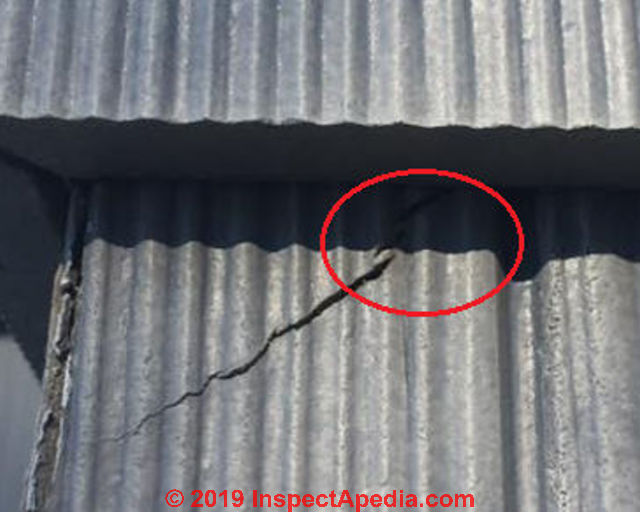 2019/03/21 Anon said:
We are having problems with Nichiha siding cracking and gaps. Any thoughts on possible causes?
This Q&A were posted originally
at SIDING, FIBER CEMENT SHINGLE DEFECT DIAGNOSIS
Reply:
Anon:
I think it's probably quite possible to determine the cause of those cracks but you may need to pull off at least one piece of siding to permit a more complete examination.
I suspect a nailing issue, perhaps combined with installation of wet Nichiha fiber cement siding, but I can't be sure without seeing more.
Are all of the breaks at the corners or ends of siding boards?
My first reaction was nailing constraints or possibly hammer damage at upper corners. Then I noticed that discontinuous crack: that would be less common in a dry material (but of course possible depending on the material's properties).
Do you have photos of the job during installation or at site before installation?
But looking at some of your follow-up photos sent by private email (see except posted below),
What do we know about the condition of the siding when it was installed and about the weather:
How was the siding delivered? Wrapped, wet, dry, exposed to weather, left exposed to weather, moisture content?
One of your photos has what could be a diagnostic clue:
Take a look at the crack in my excerpt from one of your photos (below). You'll see that it is discontinuous.
Typically I see that sort of break in material occurring when the material was installed at a high level of moisture, secured in place, then shrunk during drying to create a stress, similar to shrinkage cracks in concrete slabs.
See that description
All fiber cement siding manufacturers include a warning against installing wet or "saturated" fiber cement siding.
Unfortunately when I asked JamesHardie, another fiber cement siding manufacturer, just what actual moisture level would be considered too-wet to install, the representative had no answer. It is relatively easy to measure fiber cement siding moisture levels if the proper type of moisture meter is used, but without a standard for acceptable moisture levels in the product the installer is left with no real guidance.
We do not assert that the damage shown in these photos is definitely due to siding moisture at installation, but that's a good candidate explanation in my OPINION.
Reader follow-up:
The two additional Nichicha siding crack or break photos below are from the same building and illustrate that the damage is not occurring only at the ends or corners of the product. The reader noted:
I have Nichiha siding with cracking and gaps and wondered what the causes might be. Nichiha inspected it and said they could not determine a cause, therefore they have no liability. - Anonymouys by private email 2019/03/22

See details about the effects of installing wet fiber cement siding
at SIDING, FIBER CEMENT DEFECT DIAGNOSTIC QUESTIONS
Also see
SIDING, FIBER CEMENT MOISTURE ABSORPTION
SIDING, FIBER CEMENT MOISTURE LEVELS
Composition of fibre cement siding boards and panels - research citations
NichiBoard specifications indicate the product's composition:
Fiber cement panels are manufactured from a pressed, stamped, and autoclaved mix of Portland cement, fly ash, recycled rejects, and wood fiber bundles. - NichiBoard_3-part_Spec.docx retrieved 12/16/2014 original source http://nichiha.com/images/uploads/NichiBoard_3-part_Spec.docx
The product specification also lists first among its performance requirements the following:
A. Fiber Cement Cladding – Must comply with ASTM C-1186, Type A, Grade II requirements:
1. Linear Variation with Change in Moisture Content: 0.08% linear change.
2. Wet Flexural Strength, lower limit: 1015 psi.
3. Water Tightness: No water droplets observed on any specimen.
4. Freeze-thaw: No damage or defects observed.
5. Warm Water: No evidence of cracking, delamination, swelling, or other defects observed.
6. Heat-Rain: No crazing, cracking, or other deleterious effects, surface or joint changes observed in any specimen. - NichiBoard_3-part_Spec.docx retrieved 12/16/2014 original source http://nichiha.com/images/uploads/NichiBoard_3-part_Spec.docx
That some fiber cement siding products contain wood or cellulose fibers including materials from cotton or paper is clear from some research on the topic. Fiberglass is also used in some fibre-reinforced cement products while asbestos was previously used.
See ASBESTOS CEMENT PRODUCTS for a history of the contents & manufacture of these materials.
- Black, Andrew, James Gleeson, Donald Merkley, and Steve Terzian. "Fiber cement siding planks and methods of making and installing the same." [Patent Disclosure] US 20030056458, US Publication No. US20030056458 A1, Published Mar 27, 2003 US, Also published as CA2442840A1
Excerpt:
While panels and planks made from wood, wood composites, and fiber-reinforced cementitious materials are inherently solid and thick, further increases in thickness of the fiber cement are not practical for reasons of material cost, weight and handling characteristics of long siding planks.
Rather, an assembly that allows the use of less material while maintaining perceived thickness when installed would be beneficial. - Bomers, Joseph JP. "Laminated board." U.S. Patent 4,361,616, issued November 30, 1982.
- "Cementitious Roofing And Siding", U.S. Patent 3,841,885, issued October 15, 1974.
The process of making a nailable, lightweight, fireproof and waterproof construction slab includes: A. combining Portland cement, perlite, glass fiber, cellulose pulp, slaked lime and water to form an aqueous admixture, and B. forming and curing the slab from said admixture, said curing including subjecting the formed slab to pressurization to squeeze water therefrom. - Dargontina, Jason E., and Donald W. Boespflug. "Abrasion resistant coating for stacks of fiber cement siding." U.S. Patent 7,238,391, issued July 3, 2007.
- Dolmans, Toussaint, and Bertrand Van Acoleyen. "Cementitious building panel with cut bead." U.S. Patent 6,138,430, issued October 31, 2000.
- Gleeson, James A., Kalynne H. Paradis, Brian P. Sloane, David L. Melmeth, and Dean M. Seligman. "Fiber cement building materials with low density additives." U.S. Patent 6,572,697, issued June 3, 2003.
- Guthrie, Bernard M., and Robert B. Torley. "Composite materials made from plant fibers bonded with portland cement and method of producing same." U.S. Patent 4,406,703, issued September 27, 1983.
- Johnson, Robert M., and Elmer M. Melling. "Reinforced cement sheet product containing fibers other than asbestos, clay and thickener." U.S. Patent 4,363,666, issued December 14, 1982.
- Merkley, Donald J., and Caidian Luo. "Fiber cement composite materials using sized cellulose fibers." U.S. Patent 6,676,745, issued January 13, 2004.
- Merkley, Donald J., and Caidian Luo. "Fiber cement composite materials using cellulose fibers loaded with inorganic and/or organic substances." U.S. Patent 6,676,744, issued January 13, 2004.
- Mohr, B. J., H. Nanko, and K. E. Kurtis. "Durability of kraft pulp fiber–cement composites to wet/dry cycling." Cement and Concrete Composites 27, no. 4 (2005): 435-448.
- Murdock, John B. "Roofing or siding article." U.S. Patent 4,288,959, issued September 15, 1981.
- Shao, Yixin, Jun Qiu, and Surendra P. Shah. "Microstructure of extruded cement-bonded fiberboard." Cement and concrete research 31, no. 8 (2001): 1153-1161.
- Ziegler, B. Randall. "Cotton-cement articles." U.S. Patent 4,040,851, issued August 9, 1977.
Owner Details about Fiber Cement Siding Complaints
More of the story.
I just bought this house a few months ago. Paid a premium price -- it was built by a well-known local "premium" builder. I bought it based upon his reputation and after personally talking to him about its "maintenance free" "lifetime" cement fiber siding. Home Inspectors said nothing.
At eye level the damage and defects are not that noticeable, I'm the second owner, built less than 5 years ago -- I thought and was told I had 50 year maintenance free siding.
I'm a retired engineer -- most of my life savings in this house. I quickly began my own investigation (InspectAPedia was my first stop) and identified lots of installation issues. But the builder insisted that it would be worth filing a warranty claim -- which was denied citing the same installation issues I found. (after lots of negotiation, Nichiha, however was nice enough to offer "goodwill" replacement material for a complete do-over.)
I agree with some of what you are saying about possibly overly complex installation instructions (I don't know what EIFS is?) -- but in my opinion there is no excuse to not follow simple things like flashing butt joints or painting end cuts.
It gets even worse -- now that I'd become a siding "expert"
-- I found about 10 other houses around town with badly installed Nichiha siding. The owners all probably thinking they have 50 year siding and never bothering to look at it as closely as I have! All installed by the same siding company that did my house and is used by nearly every GC in town! (Where's the GC oversight?) These houses are from 1 1/2 to 8 years old.
Still trying (unsuccessfully as yet) to get some good answers too what may be happening here.
In a different town I found a NIchiha install that appeared to closely follow most (but not all) of the installation requirements and it is still has rather large gaps at butt joints (flashing not house wrap is visible). Photo attached. One thing they obviously didn't do was to properly stagger the joints -- and they don't appear to land on studs
-- and (I talked to the installer) and they didn't screw down the butt end corners of the boards as Nichiha requires. I suspect that wasn't done on any of the other houses either (blind nailed all the way across the board). I wonder if that would keep the separations from occurring.
I found a great new flashing product -- wondering if you've heard of it: ProLine Tamlyn -- interesting video here:
ProLine Series of Flashings by Tamlyn
Anyway ... I'm hoping you can help me get it installed right the next time.
- E.D. 12/14/2012
Reply:
These details are helpful.
I am indeed interested, having spent considerable field time and some forensic lab time investigating problems with this material, and having been disappointed in the un-helpful response from a major manufacturer's customer service department when we called to ask for details about moisture levels, shrinkage, and moisture criteria for the product.
Bottom line:
Fiber cement manufacturers advise not to install the siding if it is too moist, too wet, or in words of one, "saturated", but no one will tell us what is "too moist". Worse the customer service rep with whom I spoke told me (incorrectly) that "... it is impossible to measure the moisture level in fiber cement siding" at the same time that she told me ".
.. if the siding is too wet the contractor should refuse the shipment, send it back, or not install it". [paraphrasing]
It is true that a particular moisture meter may not use a scale that has been calibrated specifically for fiber cement products, and that a pin type moisture meter may not adequately measure moisture deeper in the material.
But the choice of instruments is broad and includes equipment perfectly capable of making comparison measurements of moisture levels in materials, permitting calibration to fiber cement that is dry, moist, or wet as needed.
See SIDING, FIBER CEMENT MOISTURE LEVELS.
and
Your installation photos show other defects besides gaps, including questionable fastening of the material, falling slipping boards, missing flashing, missing caulk.
I don't expect every home inspector to be a siding expert but even an amateur eye on the walls of the home ought to have seen something amiss - askew siding, loose open boards, risking leaks into the wall structure - if the siding boards were at the time of inspection in the same shape as in your photos. Tougher to sort out is cosmetic vs functional defects.
I would NOT rush to install new siding. On the largest such project I investigated in NY last year even the new, premium siding from a major brand arrived from the factory wet and began to show shrinkage gaps during and immediately after installation.
I'd prefer to get a grip on the moisture and shrinkage problem and its solution first. Other installation errors are easier to manage with careful supervision by someone who agrees to follow the manufacturer's specifications.
Nichiha Fiber Cement Siding Manufacturer Contact
- Nichiha Fiber Cement, 6465 E Johns Crossing, Suite 250 Johns Creek, GA 30097, USA, Tel: 1.866.424.4421
or 770-805-9466
Fax: 770-805-946 , Website: http://www.nichiha.com/ Email: info@nichiha.com
The company provides a variety of technical details about their fiber cement products, found at http://www.nichiha.com/resources/technical-documents including- General Instructions for All Nichiha Siding Products, http://nichiha.com/images/uploads/Sierra_Install_Brochure.pdf
These instructions include this advice:
Contact your local dealer or Nichiha Customer Service Representative toll-free at 1-866-424-4421 immediately, should you have any questions about Sierra Premium and NichiFrontier products
Nichiha fiber cement siding products have been earning their stripes in commercial settings for years. Fiber cement is a versatile, sustainable, high-performance product that makes as much sense for a home as it does for commercial building. You’ll be impressed with the many and varied looks of Nichiha products, but the performance will amaze you.NichiBoard delivers the look of lap and the performance of fiber cement at price that makes it an outstanding value and an easy choice. Both products will never warp, rot or fall victim to pests. Every single piece is factory primed, perfectly uniform and guaranteed to perform.
[This is described in the product literature as fiber cement lap siding boards. Nichiha has been producing fiber cement products since the 1970's and began producing residential fiber cement siding products in the 1990's. - Ed. .
- General Instructions for All Nichiha Siding Products, http://nichiha.com/images/uploads/Sierra_Install_Brochure.pdf
Nichiha fiber cement siding Customer Service & Technical Information
Our inquiry to Nichiha about the fiber cement siding performance described in the article above is printed below along with the company's response.
TECHNICAL REVIEW REQUEST from InspectApedia.com - Nichiha Fiber Cement Siding Installation, 14 December 2014
TO:
Nichiha Fiber Cement, 6465 E Johns Crossing, Suite 250 Johns Creek, GA 30097
FROM:
Daniel Friedman, Editor
InspectApedia.com
Sirs:
We are writing with these requests:
1. Could you please have a suitable technical expert take a look at our new article about fiber cement siding gaps, installation errors, customer complaints
found at SIDING, FIBER CEMENT SHINGLE DEFECT DIAGNOSIS
https://InspectAPedia.com/exterior/Fiber_Cement_Shingle_Siding_Diagnosis.php
and let me know if you have suggestions for technical accuracy or additions of content. [Of course we'd welcome comment or critique from you on any of our website content, not just this article].
IMPORTANT: two items:
- The article includes photographs and homeowner comments specifically about fiber cement siding that is reported to be your product. If the product in the photos is not yours be sure to tell us so that we can correct that details.
- The article reiterates that we have had great difficulty obtaining specific guidance from manufacturers about just how much moisture is too-much such that the FC siding product should not be installed. Your literature uses a term saturated. What's that? How can we get past subjective opinion such that we could improve the product's success in the field?
If you can give guidelines that an installer could actually measure that would be of significant help, OR if you want help devising such a guide I'd be glad to assist.
I have field experience in measuring moisture levels in many materials including fiber cement siding.
2. We have cited your organization for our readers as an information source, - if you do not want that source suggestion in the article let me know.
3. Please take a look at our citation for you as an information source for our readers, found in the article (we cite you in the article Technical Reviewers & References found at the article bottom as well as in article text)
InspectAPedia.com® is an independent publisher of building, environmental, and forensic inspection, diagnosis, and repair information for the public - we have no business nor financial connection with any manufacturer or service provider discussed at our website.
We are dedicated to making our information as accurate, complete, useful, and unbiased as possible: we very much welcome critique, questions, or content suggestions for our web articles. Contributors, even if it's just a small correction, are cited, quoted, and linked-to from the appropriate additional web pages and articles - which benefits us both. Working together and exchanging information makes us better informed than any individual can be working alone.
A brief summary about InspectAPedia.com can be read at https://InspectAPedia.com/About_Us.htm
Thank you. Respectfully,
Daniel Friedman, Editor
editor@InspectApedia.com
https://inspectapedia.com
Response from Nichiha Fiber Cement
As of 25 December 2018 & 22 March 2019: no reply
...
Continue reading at SIDING, FIBER CEMENT DEFECT DIAGNOSTIC QUESTIONS or select a topic from the closely-related articles below, or see the complete ARTICLE INDEX.
Or see these
Recommended Articles
- FIBER CEMENT SIDING DEFECTS - home
- FIBER CEMENT SHINGLE DEFECT DIAGNOSIS
- FIBER CEMENT SHINGLE CUTTING TOOLS
- FIBER CEMENT SHINGLE REPAIRS
- FIBER CEMENT SIDING BUCKLING
- FIBER CEMENT SIDING BUTT JOINT CURLING
- FIBER CEMENT SIDING BUTT JOINT GAPS & SHRINKAGE
- FIBER CEMENT SIDING BUTT JOINT BACK FLASHING OMITTED
- FIBER CEMENT SIDING CAULKING ERRORS
- FIBER CEMENT SIDING COEFFICIENTS of EXPANSION
- FIBER CEMENT SIDING CURL / LIFT DEFECTS
- FIBER CEMENT SIDING DEFECT DIAGNOSTIC QUESTIONS
- FIBER CEMENT SIDING END CUT PRIMER COAT
- FIBER CEMENT SIDING GAPS
- FIBER CEMENT SIDING GAP & CAULK SPECS
- FIBER CEMENT SIDING GAP CURE
- FIBER CEMENT SIDING NAILING DEFECTS
- FIBER CEMENT SIDING LOOSE, NAILING FAILURES
- FIBER CEMENT SIDING NAILING ERRORS
- FIBER CEMENT SIDING SPLITS
- FIBER CEMENT SIDING STARTER STRIPS
- GROUND CLEARANCE DISTANCE for SIDING
- HOUSEWRAP DAMAGE
- HOMEOWNER COMMENTS on FIBER CEMENT SIDING
- TEMPERATURE EFFECTS on FIBER CEMENT SIDING
- FIBER CEMENT SIDING IDENTIFICATION
- FIBER CEMENT SIDING MANUFACTURERS & Manuals
- FIBER CEMENT SIDING MOISTURE LEVELS
- FIBER CEMENT SIDING REPAIRS
- JAMES HARDIEPLANK® FC SIDING
- NICHIHA ™ FIBER CEMENT SIDING FIELD REPORT
- SIDING CLEARANCE TO GROUND
- SIDING HARDBOARD IDENTIFICATION & CLAIMS
Suggested citation for this web page
SIDING, FIBER CEMENT SHINGLE DEFECT DIAGNOSIS at InspectApedia.com - online encyclopedia of building & environmental inspection, testing, diagnosis, repair, & problem prevention advice.
Or see this
INDEX to RELATED ARTICLES: ARTICLE INDEX to BUILDING SIDING
Or use the SEARCH BOX found below to Ask a Question or Search InspectApedia
Ask a Question or Search InspectApedia
Try the search box just below, or if you prefer, post a question or comment in the Comments box below and we will respond promptly.
Search the InspectApedia website
Note: appearance of your Comment below may be delayed: if your comment contains an image, photograph, web link, or text that looks to the software as if it might be a web link, your posting will appear after it has been approved by a moderator. Apologies for the delay.
Only one image can be added per comment but you can post as many comments, and therefore images, as you like.
You will not receive a notification when a response to your question has been posted.
Please bookmark this page to make it easy for you to check back for our response.
IF above you see "Comment Form is loading comments..." then COMMENT BOX - countable.ca / bawkbox.com IS NOT WORKING.
In any case you are welcome to send an email directly to us at InspectApedia.com at editor@inspectApedia.com
We'll reply to you directly. Please help us help you by noting, in your email, the URL of the InspectApedia page where you wanted to comment.
Citations & References
In addition to any citations in the article above, a full list is available on request.
- Nichiha Fiber Cement, 6465 E Johns Crossing, Suite 250 Johns Creek, GA 30097, USA, Tel: 1.866.424.4421
or 770-805-9466
Fax: 770-805-946 , Website: http://www.nichiha.com/ Email: info@nichiha.com
The company provides a variety of technical details about their fiber cement products, found at http://www.nichiha.com/resources/technical-documents including- General Instructions for All Nichiha Siding Products, http://nichiha.com/images/uploads/Sierra_Install_Brochure.pdf
These instructions include this advice:
Contact your local dealer or Nichiha Customer Service Representative toll-free at 1-866-424-4421 immediately, should you have any questions about Sierra Premium and NichiFrontier products
- General Instructions for All Nichiha Siding Products, http://nichiha.com/images/uploads/Sierra_Install_Brochure.pdf
- [1] "James Hardie's Mesothelioma and Asbestos Legacy Continues, 2009", web search 03/01/2011, www.survivingmesothelioma.com
- [2] Killer Company, James Hardie Exposed, Matt Peacock, Harper Collins Australia, ISBN: 9780733325809; ISBN10: 0733325807
- [3] " Anyone else have HardiePlank siding on their house?", Early Retirement.org online blog, retrieved 1/14/2013, original source: http://www.early-retirement.org/forums/f27/anyone-else-have- HardiePlank-siding-on-their-house-19475.html
- [4] - DIY Chatroom, retrieved 1/17/2013, original source http://www.diychatroom.com/f2/ certainteed-weatherboard-vs-HardiePlank-4638/
- [5] Certainteed Weatherboard fiber cement siding and trim products - see certainteed.com/ or see certainteed.com/resources/sidingandtrimspecsheet.pdf
- [5a] "CertainTeed WeatherBoards™ Fiber Cement Siding Installation Manual", CertainTeed Corporation, 2012, CertainTeed Corporation, PO Box 880, Valley Forge PA 19482, Professional Help Line: 800-233-8990, Consumer Help Line: 800-782-8777, Website: Certainteed.com www.certainteed.com/resources/fc017.pdf retrieved 4/11/2013, [copy on file as Certainteed_Fiber_Cement_Siding_Install_fc017.pdf ]
- [5b] "Certainteed WeatherBoards™ Fiber Cement Siding Best Practices for Effective Job Site Management", CertainTeed Corporation, retrieved 4/15/13 original source: www.certainteed.com Copy on file as Certainteed_FC_Handling Brochure-Contractor_FC063.pdf
- [6] "Moisture Control in buildings: Putting Building Science in Green Building," Alex Wilson, Environmental Building News, Vol. 12. No. 5. [Good tutorial, "Moisture 101" outlining the physics of moisture movement in buildings and a good but incomplete list of general suggestions for moisture control - inadequate attention given to exterior conditions such as roof and surface drainage defects which are among the most-common sources of building moisture and water entry.--DJF]
- [7] J. Tibbets, "Green Houses", NCBI, retrieved 1/17/2013, original source: http://www.ncbi.nlm.nih.gov/pmc/articles/PMC1469482/
- [8] Gleeson et al, "Fiber Cement :Building Materials with Low Density Additives", U.S. Patent 8,182,606, B2 5/22/2012, [adding low volumes of volcanic ash & hollow ceramic microspheres to cellulose fiber-reinforced building materials.
- [9] Thanks to reader Marie Carr for James HardiePlank siding photograph and case history information. 06/01/2008
- [10] JamesHardie HardiePlank® Lap Siding information can be found at the company's web page on this material:
https://www.jameshardie.com/products_siding_hardieplankLapSiding.py - [11] "30-Year Limited Warranty
HardiePlank® HZ5® Lap Siding, HardiePanel® HZ5® Vertical Siding,
HardieShingle® HZ5® Siding, HardieSoffit® HZ5® Panels", 1-800-9-HARDIE
10901 Elm Avenue Fontana, CA 92337, retrieved 1/18/2013, original source: https://www.jameshardie.com/pdf/warranty/hz5.pdf [copy on file as Hardieplank_Warranty_hz5.pdf] - [12] James Hardie Building Products, James Hardie CustomerLink™ Service Centre, 10 Colquhoun Street, Rosehill NSW 2142, Tel: 13 1103, Outside Australia 61 2 8837 4709,
Fax: 1 800 818 819. Hardie has operations in Australia, Asia, Canada, Europe, New Zealand, United States, and the Philippines. The company is a significant producer of fiber cement siding and backerboard. Email: info@JamesHardie.com and Website https://www.jameshardie.com/
- JamesHardie Corporation, in the U.S. can be contacted at 26300 La Alameda, Suite 400,
Mission Viejo, California 92691 -
1-888 J-HARDIE
1-888 542-7343 or by email to info@JamesHardie.com - [12b] "Technical Bulletin #9, Joint Flashing at Field Butt Joints", JamesHardie, retrieved 4/15/2013, original source: www.jameshardie.com, copy on file as James_Hardie_9-joint-flashing.pdf - quoting:
This Technical Bulletin is an explanation supporting the announcement made by James Hardie on September 8th, 2008 withdrawing its recommendation on the use of caulk at field butt joints for HardiePlank® lap siding.
- JamesHardie Corporation, in the U.S. can be contacted at 26300 La Alameda, Suite 400,
Mission Viejo, California 92691 -
1-888 J-HARDIE
- [13] Instructions for application of HardiePlank lap siding can be found at https://www.jameshardie.com/products_siding_hardieplankLapSiding.py?openTab=jsnavLink4
- [14] "Homeowners Care and Maintenance Tips", 1-800-9-HARDIE
10901 Elm Avenue Fontana, CA 92337, included with product warranty information, retrieved 1/18/2013, original source: https://www.jameshardie.com/pdf/warranty/hz5.pdf [copy on file as Hardieplank_Warranty_hz5.pdf] - [15] "HardiePlank HZ5 Lap Siding Installation Requirements - Primed & Colorplus® Products",JamesHardie, November 2012, 1-800-9-HARDIE, 10901 Elm Avenue Fontana, CA 92337, retrieved 1/18/2013, original source: https://www.jameshardie.com/pdf/install/hardieplank-hz5.pdf, [copy on file as Hardieplank-hz5_Install.pdf]
- [16] Technical Bulletin #9, Joint Flashing at Field Butt Joints, James Hardie corporation, retrieved 1/19/2013, original source: https://www.jameshardie.com/pdf/technical-bulletins/9-joint-flashing.pdf
- [17] Technical Bulletin #17, Fastening Tips for HardiePlank® Lap Siding, James Hardie Corporation, retrieved 1/19/2013, original source: https://www.jameshardie.com/pdf/technical-bulletins/17 -fastening-tips-for%20-plank.pdf [copy on file]
- [18] Technical Bulletin #8, Expansion Characteristics of James Hardie® Siding Products, James Hardie Corporation, retrieved 1/19/2013, original source: https://www.jameshardie.com/pdf/technical-bulletins/8-expansion-characteristics.pdf [copy on file]
- [19] Eric Galow, Galow Homes, Lagrangeville, NY. Mr. Galow can be reached by email: ericgalow@gmail.com or by telephone: 914-474-6613. Mr. Galow specializes in residential construction including both new homes and repairs, renovations, and additions. Personal communication 3/20/2013.
- [20] MASONITE WOODRUF® ROOFING OR MASONITE OMNIWOOD® SIDING LAWSUIT SETTLEMENT NOTICE - PDF file
- [21] Eric Galow, Galow Homes, Lagrangeville, NY. Mr. Galow can be reached by email: ericgalow@gmail.com or by telephone: 914-474-6613. Mr. Galow specializes in residential construction including both new homes and repairs, renovations, and additions.
- [22] Roger Xu, 徐银杰 (my Chinese name), Ningbo Yihe Greenboard Co., Ltd., No.189, Longzhen Road, Nongkenchang, Longshan Town, Cixi, Ningbo, Zhejiang China, Tel: 0086-574-63974118/83887668 Fax:0086-574-63974129/83887670 Mobile: 0086-15924317823; E-Mail: sales6@yhboard.com; Skype: dajiezi107, www.yhboard.com/en, personal correspondence 3/21/2013
- [23] James Hardieplank, personal communication with Daniel Friedman, 6/6/2013. We called James Hardie to ask for guidance in determining just how much moisture was "too much" in Hardieplank siding, after observing that siding at a job arrived visibly wet from the factory even though still inside its original sealed plastic wrapping. We called James Hardie's technical support line where a courteous representative told us he would refer us to Hardie's expert Benjaman Batres. Our call to Mr. Batres was returned by Stephanie (declined to give last name) from James Hardie's customer warranty service department. Stephanie informed us that there are no moisture numbers, that it is not possible to measure moisture in fiber cement siding (utter nonsense!) and repeatedly advised "Just read our instructions" or "So file a claim". Don't count on much help from James Hardie's customer warranty department on siding shrinkage or butt joint gap concerns. Gaps at Hardieplank siding butt joints continue to appear in the Hardieplank installation.
- In addition to citations & references found in this article, see the research citations given at the end of the related articles found at our suggested
CONTINUE READING or RECOMMENDED ARTICLES.
- Carson, Dunlop & Associates Ltd., 120 Carlton Street Suite 407, Toronto ON M5A 4K2. Tel: (416) 964-9415 1-800-268-7070 Email: info@carsondunlop.com. Alan Carson is a past president of ASHI, the American Society of Home Inspectors.
Thanks to Alan Carson and Bob Dunlop, for permission for InspectAPedia to use text excerpts from The HOME REFERENCE BOOK - the Encyclopedia of Homes and to use illustrations from The ILLUSTRATED HOME .
Carson Dunlop Associates provides extensive home inspection education and report writing material. In gratitude we provide links to tsome Carson Dunlop Associates products and services.
 | HOME | ABOUT | ASK a QUESTION | CONTACT | CONTENT USE POLICY | DESCRIPTION | POLICIES | PRIVACY | |
| © 2024 - 1985 Publisher InspectApedia.com - Daniel Friedman | |||||||||