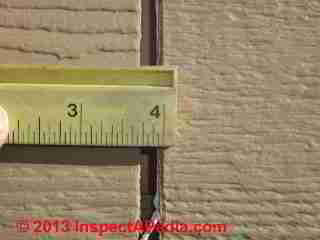
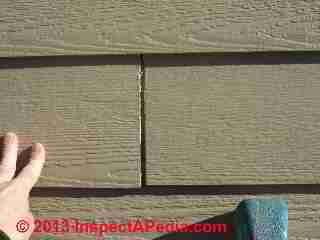
 Cures for Fiber Cement Siding Gaps
How to choose a cure for fiber cement lap siding butt joint & trim joint gaps
- POST a QUESTION or COMMENT about the cause & cure of butt joint gaps in fiber-cement siding & about fiber cement siding installation
Fiber cement lap siding installation butt joint gap remedies are described in this article.
Companion articles explain where are clearance gaps required and how big should they be; where should there be no gap (butt joints).
The article series describes a problem of gaps at siding board butt joints that has been observed at some fiber cement lap siding installations.
InspectAPedia tolerates no conflicts of interest. We have no relationship with advertisers, products, or services discussed at this website.
- Daniel Friedman, Publisher/Editor/Author - See WHO ARE WE?
Cures for Exposed Gaps in Fiber Cement Building Siding - guidelines adapted from James Hardie, CertainTeed & Others
Here we describe approaches to fixing both the cosmetic complaint "I don't like to see those gaps in the wall siding" as well as a possible leak complaint if the butt joints were not back-flashed.
Separately at SIDING, FIBER CEMENT GAPS we explain why unsightly gaps may appear at the butt joints between individual pieces of fiber cement lap siding on a building. Unless the builder erroneously and deliberately left such openings, the gaps are usually due to having installed fiber cement siding while it was at a "too high" moisture content.
First, it is important to listen to what the manufacturers of fiber cement lap siding have to say about the expansion/contraction (and buckling or gap formation) of this product:
It is normal for building products located on the exterior of a home to expand and contract with temperature changes. To ensure a successful siding installation, you must allow for this movement during installation.
While CertainTeed WeatherBoards Fiber Cement siding does not experience the same rate of expansion and contraction as many other building products (such as wood), over time you may notice movement of the siding, specifically at the butt end/joints.
This issue is mainly an aesthetic issue and should not create a condition that would cause long-term product failure. If you are dissatisfied with the appearance of the butt end/joint locations and wish to address them, CertainTeed recommends that you apply H-covers at the joint locations.[5a][5b]
- Warranty notes: Building owners should be informed that any repair that is not specifically recommended by a product manufacturer may affect the product's warranty coverage.
On the other hand, warranty coverage reports have an unfortunate history anyway, so in our OPINION, you may not be risking so much. - Cosmetic issues: Building owners should also be made aware of possible future cosmetic issues, depending on the repair method used and workmanship;
For cosmetic concerns, if building condition permits a slower approach, consider trying more than one product and method for gap sealing, examining the durability and appearance of the repair after 12 months or longer of weather exposure on the most-challenged building sides. - Butt Joint Treatments: in 2008 James Hardie withdrew its recommendation for caulking butt joints in HardiePlank lap siding. Quoting from the company's technical bulletin 9,
- Previously, there were two options for treating field butt joints for
Primed HardiePlank lap siding (i.e. the use of caulk with a gap or
the use of a joint flashing behind the joint). Effective immediately,
James Hardie does not recommend the use of caulk at field butt
joints for HardiePlank™ lap siding Primed or with ColorPlus®
technology.
The use of a joint flashing behind field butt joints is the required joint treatment method for HardiePlank lap siding with ColorPlus technology and the preferred method for primed HardiePlank lap siding. The use of caulk at field butt joints is a maintenance item for the homeowner, aesthetically compromises the finish look and is recommended against by some caulk manufacturers. All HardiePlank lap siding must be installed in accordance with our installation details as outlined in the relevant installation instructions. - HardiePlank lap siding with ColorPlus technology- Joint flashing behind field butt joints is required, the use of caulk will not be warranted.
- HardiePlank lap siding Primed – Recommend the use of joint flashing, but the use of caulk will not void the warranty.[16]
- At SIDING, FIBER CEMENT BOARD REPAIRS. and further at SIDING, FIBER CEMENT MAINTENANCE we discuss the use of back flashing and more to the point of after-installation complaints, use of sliding H-flashing at fiber cement butt joints as a siding butt-joint gap repair
- Previously, there were two options for treating field butt joints for
Primed HardiePlank lap siding (i.e. the use of caulk with a gap or
the use of a joint flashing behind the joint). Effective immediately,
James Hardie does not recommend the use of caulk at field butt
joints for HardiePlank™ lap siding Primed or with ColorPlus®
technology.
- Caulking: Repairs such as caulking or flashing-over and re-painting butt joints in siding, may protect the building from water intrusion and further deterioration but may leave cosmetic issues;
Caulk applied in siding butt joint gaps should be top quality, rated for the application and materials, applied to a clean dry joint, in weather conditions permitted by the manufacturer; the company recommends a "... high quality, paintable latex caulk ... that complies with ASTM C834, ASTM C920 or better..." [14]
We discuss the FC siding gap caulking option in detail later in this article.
- Nailing repairs for HardiePlank: in James Hardie's technical bulletin No. 17, the company provides a description of PinBack nailing for use at loose planks that were "high nailed" at original installation) or where there are problems with gaps, loose planks, or rattling noises. Excerpting:
- Pin Backs
Pinning the plank down at the bottom edge is a common practice called “pin back.” It
is used to correct “high nailing”, loose planks, gaps or rattling. Pinning of the butt joints
with is not intended to increase wind load values; and shall be installed 3/8” from end
and between 3/4” and 1” from bottom edge.
The finish nail shall be nailed flush to the surface (not countersunk), must be corrosion resistant (e.g. galvanized or stainless) and does not provide structural support. For best aesthetics nail heads should be touched up to color match. [17]
- Pin Backs
Pinning the plank down at the bottom edge is a common practice called “pin back.” It
is used to correct “high nailing”, loose planks, gaps or rattling. Pinning of the butt joints
with is not intended to increase wind load values; and shall be installed 3/8” from end
and between 3/4” and 1” from bottom edge.
- Flashing: install, by retrofit if necessary, proper flashing details behind butt joints, at the wall bottom, and at roof-wall abutment, including a kick-out flashing to prevent roof runoff from surging down building walls are important for a successful, durable HardiePlank siding installation [15]
Flashing repairs at loose fiber cement siding
Where siding is loose and where inspection shows that butt joint flashing was omitted, it may be possible to slip flat butt joint flashing product into place.
Proper flashing details behind butt joints, at the wall bottom, and at roof-wall abutment, including a kick-out flashing to prevent roof runoff from surging down building walls are important for a successful, durable HardiePlank siding installation [15]
If the installer omitted Zee flashing at the abutment of siding bottom edges to horizontal trim boards (the water table trim) or over windows and doors, retrofitting now will require sufficient loosening and possibly removal siding in those locations to slip the z-flashing in place.
At SIDING, FIBER CEMENT GAPS we give the clearance gaps required for these locations.
- Painting: Take care when re-painting, to avoid incompatible paints. The company recommends 100% acrylic paint. [14]
- James Hardie Repair References: see James Hardie Technical Bulletin 17.
Fiber Cement Siding Gap Caulking Advice for Homeowners
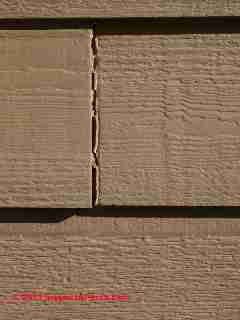 Watch out: the HZ5® HardiePlank lap siding installation instructions include important details for joint treatment, including warnings against caulking at butt joints. CertainTeed fiber cement siding installation guides contain similar admonitions:
- Joint flashing behind butt joints is required for ColorPlus and recommended for primed products
- DO NOT caulk field butt joints on ColorPlus siding (for aesthetic reasons, as caulk and ColorPlus siding will weather differently - this reason is also cited for not caulking nail heads)
- It is OK to caulk field butt joints on James Hardie primed siding products that are to be field painted. The company warns of a cosmetic issue - that there may be a surface sheen difference at the caulked butt joints compared to the painted siding surfaces.
- DO Caulk where HardiePlank® siding meets vertical trim. [15]
- DO NOT caulk the bottom horizontal (flashed) gap between siding and the foundation wall top
- See SIDING, FIBER CEMENT GAP & CAULK SPECS for new work and for fiber cement siding maintenance or repair also
see SIDING, FIBER CEMENT BOARD REPAIRS.
Watch out: the HZ5® HardiePlank lap siding installation instructions include important details for joint treatment, including warnings against caulking at butt joints. CertainTeed fiber cement siding installation guides contain similar admonitions.
Certainteed Corp. provides important advice for building owners troubled by gaps that appear in fiber cement exterior siding after the product has been installed and in service for some time.
The company points out that while these products expand and contract less in response to temperature changes than [some] other siding materials, thermal movement is normal, should have been allowed for at installation, and might produce noticeable gaps at butt joints. Numbers below refer to the page numbers in the product installation guide.[5]
This issue is mainly an aesthetic issue and should not create a condition that would cause long-term product failure.
If you are dissatisfied with the appearance of the butt end/joint locations and wish to address them, CertainTeed recommends that you apply H-covers at the joint locations.
NOTE: Refer to your sealant manufacturer’s specifications to determine if they allow the caulking of fiber cement siding butt joints/ edges, what their minimum and maximum gap requirements are, and/or how this practice may affect the warranty for the caulking. To ensure that caulks and sealants stay in place, we recommend using materials that remain flexible.
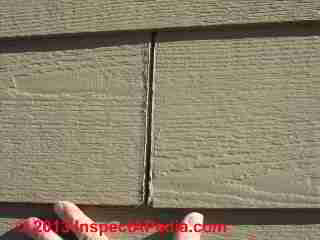
The labels of these materials will be clearly marked with a phrase similar to “permanently flexible.” For best results, use a high quality, exterior-grade caulk or sealant that meets ASTM C834 (latex caulk) or ASTM C920 (urethane caulk). The caulk or sealant should be color matched or paintable.
It should be compatible with both fiber cement siding and the materials used for the trim. Check the gloss and texture of the caulk to make sure it is compatible with the paint. - p. 55
Before you begin to caulk, remove any dust or debris. Caulk wherever siding meets the trim vertically at the corners and around windows and doors.
Do not caulk where the siding is installed into J-channel or a pocket/ accessory. Follow the caulk manufacturer’s application instructions. - p. 56
To see a table of the specified gaps for Certainteed's fiber cement building products as well as where caulk should or should not be used,
see SIDING, FIBER CEMENT GAP & CAULK SPECS
Caulk & sealant recommendations, products, descriptions are
at CAULKS & SEALANTS, EXTERIOR and
at CAULK GUN TYPES, CHOICES
OPINION: on textured siding products for which a coat of paint won't cover any caulk overspread, (or as the manufacturer may recommend), don't caulk these gaps.
You risk causing more trouble than it's worth, though I can imagine that meticulous work at each joint along with a new paint job may be cosmetically acceptable. You may also be voiding a product warranty.
Watch out: Certainteed Corp. does not recommend caulking at butt joints in lap siding and provides important advice for building owners troubled by gaps that appear in fiber cement exterior siding after the product has been installed and in service for some time.
HardiePlank Fiber Cement Siding Butt Joint Treatments: in 2008 James Hardie withdrew its recommendation for caulking butt joints in HardiePlank lap siding.The company's technical bulletin 9, added that
The use of a joint flashing behind field butt joints is the required joint treatment method for HardiePlank lap siding with ColorPlus technology and the preferred method for primed HardiePlank lap siding.
The use of caulk at field butt joints is a maintenance item for the homeowner, aesthetically compromises the finish look and is recommended against by some caulk manufacturers. All HardiePlank lap siding must be installed in accordance with our installation details as outlined in the relevant installation instructions.
- HardiePlank lap siding with ColorPlus technology- Joint flashing behind field butt joints is required, the use of caulk will not be warranted.
- HardiePlank lap siding Primed – Recommend the use of joint flashing, but the use of caulk will not void the warranty.[16]
Watch out: any repair that is not specifically recommended by a product manufacturer may affect the product's warranty coverage. On the other hand, warranty coverage reports have an unfortunate history and often a poor payout rate anyway, so in our OPINION, you may not be risking so much.
SIDING, FIBER CEMENT BOARD REPAIRS shows that ultimately the fiber cement siding manufacturer throws in the towel on the don't-caulk-the-butt-joints position for the case of people who are determined to try that approach, and offers some advice about applying caulk in these lap siding gap locations.
Caulking: Repairs such as caulking or flashing-over and re-painting butt joints in siding, may protect the building from water intrusion and further deterioration but may leave cosmetic issues; Caulk applied in siding butt joint gaps should be top quality, rated for the application and materials, applied to a clean dry joint, in weather conditions permitted by the manufacturer; the company recommends a "... high quality, paintable latex caulk ... that complies with ASTM C834, ASTM C920 or better..." [14]
Details about repair approaches to unattractive lap siding butt joint gaps are also discussed
at SIDING, FIBER CEMENT BOARD REPAIRS
Installing H-Covers to Cover Siding Butt Joint Gaps
To improve the appearance of these open gaps at butt joints in lap siding installations where their fiber cement lap siding was used, CertainTeed recommends installing H-covers at the joint locations.
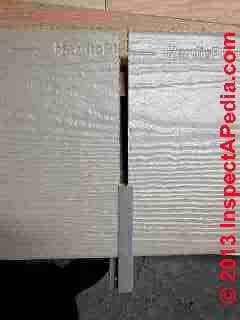
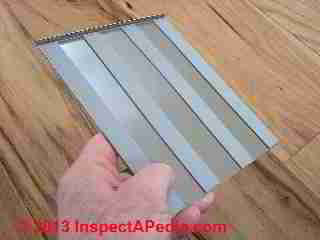
We tried a sample H-flashing product (too short for actual use) and found it was difficult to install and risked cosmetic damage to the siding. (Photo at left).
We point out that retrofitting these products, while a nice idea, may be tricky (jamming the "H" up under nailed lapped siding above) and will still be "visible", even perhaps leading to color differences as the two materials (flashing and siding) age.
OPINION: on textured siding products for which a coat of paint won't cover any caulk overspread, (or as the manufacturer may recommend), don't caulk these gaps.
You will see vertical lines where each H-cover is installed, but then in our OPINION there were vertical lines already visible at the butt joint.
And we agree with CertainTeed that this approach is likely to be more attractive than blobbing or smearing caulk into butt joint openings - a procedure that changes the texture of the siding and its coating performance or re-painting performance and appearance in a way that can be far more ugly, leaving roundish smears at every butt joint so treated.
Watch out: even the H-cover solution to siding board butt joint gaps is not without possible trouble.
What are the chances that the plastic or aluminum of the H-cover will weather and change color at the same rate and in the same hue as the paint or coating on the siding boards?
I'll bet zero. So over time these covers may become more noticeable.
Open Butt Joint Repairs in Fiber Cement Flashing: using slip-on H-flashing or slip-in Back Flashing
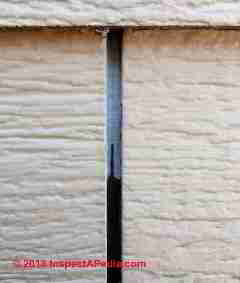
Our photo is a close-up of one of the bad fiber-cement siding installation job we describe at SIDING, FIBER CEMENT GAPS. Take a close look at our picture - that blue paper you see in the gap is housewrap.
There is no back flashing installed in this siding job, which means that blowing rain enters the wall at every butt joint gap. We are depending entirely on the housewrap to keep water (and later insects and rot) out of the building walls. Do you figure that the same fellows who installed this siding took great care to install the housewrap correctly and without leak points? Doubtful.
Several fiber cement manufacturers recommend the use of sliding H-flashing at fiber cement butt joints as a siding butt-joint gap repair. If the building siding is otherwise in good condition this option may be appealing.
Where to buy exterior siding butt joint back-flashing & H-covers for fiberboard siding products
- Appleton Back Flash, Appleton Supply Co., Inc., Tel: 800-558-3414, website: appletonsupply.com (Menards Lumber Suppliers, reesewholesale.com, and other suppliers)
- Pro Siding Accessories, Tel: (503) 253-8837, Website: http://www.prosidingaccessories.com, Email: Email: contact@prosidingaccessories.com, Product: 140-series joint covers Quoting: Joint Covers protect the butt joint where two siding planks meet and a 1/4" expansion joint helps to prevent siding buckling.
A wraparound lower lip hooks the siding and requires one nail to hold it in place. These covers are primed on the outside for easy painting and coated on the inside with a chromate backer to inhibit corrosion. - Tamlyn Building Products, Tom Tamlyn, President, 13623 Pike Rd., Stafford TX 77477, Tel: 800-334-1676. Website: http://www.tamlyn.com,
Product: H-Flashing: "XtremeTrim® Sliding H Mold, 5/16" x 8" - see http://tamlynstore.com
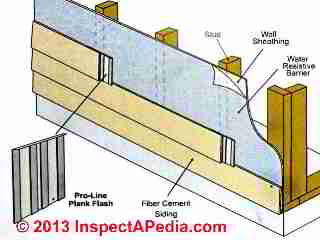
Product: Back-Flashing: Tamlyn Proline Plank Flash also see www.xtremetrim.com (illustrations shown below, sketch provided courtesy Tamlyn Building Products)
Separately in "Fiber Cement Siding Best Practices for Effective Job Site Management" [5b] the company recommends
Use high-quality, exterior grade, color matched or paintable caulk or sealant that complies with either ASTM C834 (latex) or ASTM C920 (urethane) and is compatible with both fiber cement siding and the materials used for trim. Be sure to caulk wherever the siding meets the trim, non-self-flashing penetrations, and around all windows and doors.[5a][5b]
CertainTeed's advice on caulking siding butt joints and edges continues:
NOTE: Refer to your sealant manufacturer’s specifications to determine if they allow the caulking of fiber cement siding butt joints / edges, what their minimum and maximum gap requirements are, and/or how this practice may affect the warranty for the caulking. To ensure that caulks and sealants stay in place, we recommend using materials that remain flexible.
The labels of these materials will be clearly marked with a phrase similar to “permanently flexible.” For best results, use a high quality, exterior-grade caulk or sealant that meets ASTM C834 (latex caulk) or ASTM C920 (urethane caulk). The caulk or sealant should be color matched or paintable.[5a][5b]
Separately in "Fiber Cement Siding Best Practices for Effective Job Site Management" [5b] the company recommends 100% acrylic latex primer or paint to seal cut ends of all siding boards.
Watch out: as with our warning about H-covers for butt joint gaps, a caulking or sealant product will most likely weather and change color at a different rate and to a different hue from those of the paint or coating on the siding boards. CertainTeed continues:
It [the caulk] should be compatible with both fiber cement siding and the materials used for the trim. Check the gloss and texture of the caulk to make sure it is compatible with the paint. - p. 55
Before you begin to caulk, remove any dust or debris. Caulk wherever siding meets the trim vertically at the corners and around windows and doors. Do not caulk where the siding is installed into J-channel or a pocket/ accessory. Follow the caulk manufacturer’s application instructions. - p. 56 [5a][5b]
Alternative Approach for a Bad Siding Job: Siding Removal & Replacement
Should we remove & replace the siding? installing it correctly this time.
The contractor at the job we investigated considered this approach, though there would be some lost material due to damage during removal. There the siding had so many installation errors, missing flashing, crooked, trim rot around windows and doors, building leaks, that a patch job was in our opinion and that of the owner and contractor, likely to lead to a lifetime of aggravation for the building owners.
Since the old counterfeit fiber cement siding was going to be removed anyway, the contractor chose to remove it with care, minimizing the damage, to give the owner the option of re-installing the orignal siding without gaps.
(The owner later elected to toss the old siding and purchase new Hardieplank fiber cement siding - a step that was not without its own difficulties as we explain
at SIDING, FIBER CEMENT MOISTURE LEVELS )
This is a very costly approach but makes sense in some installations such as the fiasco of a fiber-cement siding installation job shown
Details about when, why, & how to remove fiber cement siding from a building are provided
at SIDING, FIBER CEMENT REMOVAL
Maintaining & Protecting Fiber Cement Siding - How to Keep the Water Out
Manufacturers point out that keeping water out of siding and avoiding too-close exposure to ground surfaces, patios, decks (where rain splash-up adds wear) and shrubs too close to the building are all sources of moisture trouble down the road.
Details about avoiding water damage to building siding are at:
- SIDING, FIBER CEMENT MAINTENANCE
- GRADING, DRAINAGE & SITE WORK
- GUTTERS & DOWNSPOUTS
- SIDING DAMAGE by SPLASHBACK
- SIDING WOOD, FLASHING DETAILS
- WINDOW FLASHING & SEALING Guide
...
Reader Comments, Questions & Answers About The Article Above
Below you will find questions and answers previously posted on this page at its page bottom reader comment box.
Reader Q&A - also see RECOMMENDED ARTICLES & FAQs
On 2017-07-20 by (mod) -
Anon:
If you are asking about butt-joint covers to close gaps at shrunken fiber cement siding, those just slid up into place. You don't have to remove siding nor add nails.
On 2017-07-20 by Anonymous
How do you install joint covers on existing siding? The nail is supposed to go underneath the overlapping board.
On 2017-02-27 by (mod) -
Local building suppliers who sell fiber cement siding, or direct from siding manufacturers.
Home Depot Stores, Lowes Building Supply Stores
Also specific suppliers, such as Simplicty Tool (simplicitytool.com) provides a 140-series Joint Cover for hardboard and cement siding. Here's that product description:
140 Series Joint Covers are intended for use with hardboard and cement siding. The Joint Covers protect the butt joint where two siding planks meet and provide an expansion joint to help prevent siding buckling.
A wraparound lower lip hooks the siding and requires one nail to hold it in place. 0.015” aluminum covers are primed on the outside for easy painting and coated on the inside with an epoxy backer to inhibit corrosion.
They are manufactured with either a smooth or wood grained texture and are available in lengths and return
lip widths to fit all major brands of hardboard and cement fiber siding, including most profiled 12” and 16” shapes. Face width is 13/16”.
These joint covers are also available in pre-finished colors.
Available by piece or cartons of 100.
On 2017-02-27 by lonnie
Where to I find metal gap covers for butt joints on cement fiber siding?
On 2016-06-04 by (mod) -
Unfortunately I don't think there is a perfect, win-win, low-cost fix for this problem.
On 2016-06-04 by PMUSG4690
Still at a loss as to which is the "best fix". My South facing Certainteed wall shows such large gaps and warping when the sun is beating on it in the summer.
Don't even think the H gap pieces are wide enough for some, and don't address the downward migration of some of the boards creating nearly and inch difference of the bottom line.
Neighbor did the H brackets with a nail at each bottom side. Looks nice for now....guess I will try that, but his is a ranch, mine a 3 story, might look hoosier to do just the South side, but the other 2 sided areas aren't as damaged.
On 2016-03-22 by (mod) -
My system mistyped the word leak as week.
On 2016-03-22 by (mod) -
Every crack in fiber cement shingles such as you describe is likely to be a week into the interior wall. That in turn can cause mold contamination insect damage or rot. Every such crack should be repaired. A common repair is to install flashing behind the cracked single.
The problem I see is that over the entire area of the house you're likely to not see all the cracks until the leaks make themselves evident.
On 2016-03-22 by Bob Schutte
I have been quoted for a blown cellulose wall insulation upgrade to a 100 year old house clad with cement board shingles which requires the installer to use a 1 inch hole saw to access and fill the un-insulated air-gaps between the studs in them.
The installer advises that this may produce some cracks in some cement board shingles which he will not be responsible to repair. Such cracks will not likely be on the order of the "butt joint gaps" discussed above.
My house is in the Pacific Northwest and I don't have any serious gaps due to thermal conditions now. What, if anything, am I to do about such cracks however? Should I groove them with a dremel tool and apply some kind of caulking or what?
On 2015-10-16 by (mod) -
Thanks for your remarks anon;
at SIDING, FIBER CEMENT IDENTIFICATION - https://inspectapedia.com/exterior/Fiber_Cement_Siding_Identification.php
are details about distinguishing among brands of fiber cement siding.
We have studied Hardieplank extensively as well as other brands of fiber cement siding.
At SIDING, FIBER CEMENT MOISTURE LEVELS - https://inspectapedia.com/exterior/Fiber_Cement_Moisture_Levels.php you can see Hardieplank at a study jobsite including original factory wrapping.
On 2015-10-16 by Certainteed Vs Hardie
First and foremost so all of you know- the only product that is JH in these picture is the one "INSTALLING H COVERS" the rest are certainteed!
...
Continue reading at SIDING, FIBER CEMENT GAP & CAULK SPECS or select a topic from the closely-related articles below, or see the complete ARTICLE INDEX.
Or see these
Recommended Articles
- SIDING, FIBER CEMENT SHINGLE DEFECT DIAGNOSIS
- SIDING, FIBER CEMENT DEFECTS - home
- SIDING, FIBER CEMENT BOARD REPAIRS
Suggested citation for this web page
SIDING, FIBER CEMENT GAP CURES at InspectApedia.com - online encyclopedia of building & environmental inspection, testing, diagnosis, repair, & problem prevention advice.
Or see this
INDEX to RELATED ARTICLES: ARTICLE INDEX to BUILDING SIDING
Or use the SEARCH BOX found below to Ask a Question or Search InspectApedia
Ask a Question or Search InspectApedia
Try the search box just below, or if you prefer, post a question or comment in the Comments box below and we will respond promptly.
Search the InspectApedia website
Note: appearance of your Comment below may be delayed: if your comment contains an image, photograph, web link, or text that looks to the software as if it might be a web link, your posting will appear after it has been approved by a moderator. Apologies for the delay.
Only one image can be added per comment but you can post as many comments, and therefore images, as you like.
You will not receive a notification when a response to your question has been posted.
Please bookmark this page to make it easy for you to check back for our response.
IF above you see "Comment Form is loading comments..." then COMMENT BOX - countable.ca / bawkbox.com IS NOT WORKING.
In any case you are welcome to send an email directly to us at InspectApedia.com at editor@inspectApedia.com
We'll reply to you directly. Please help us help you by noting, in your email, the URL of the InspectApedia page where you wanted to comment.
Citations & References
In addition to any citations in the article above, a full list is available on request.
- James Hardie Fiber Cement Siding Best Practices, Appendix A, (2014) [PDF] available from James Hardie Corporation, 231 S. LaSalle St., Suite 2000
- [1] "James Hardie's Mesothelioma and Asbestos Legacy Continues, 2009", web search 03/01/2011, www.survivingmesothelioma.com
- [2] Killer Company, James Hardie Exposed, Matt Peacock, Harper Collins Australia, ISBN: 9780733325809; ISBN10: 0733325807
- [3] " Anyone else have HardiePlank siding on their house?", Early Retirement.org online blog, retrieved 1/14/2013, original source: http://www.early-retirement.org/forums/f27/anyone-else-have- HardiePlank-siding-on-their-house-19475.html
- [4] - DIY Chatroom, retrieved 1/17/2013, original source http://www.diychatroom.com/f2/ certainteed-weatherboard-vs-HardiePlank-4638/
- [5] Certainteed Weatherboard fiber cement siding and trim products - see certainteed.com/ or see certainteed.com/resources/sidingandtrimspecsheet.pdf
- [5a] "CertainTeed WeatherBoards™ Fiber Cement Siding Installation Manual", CertainTeed Corporation, 2012, CertainTeed Corporation, PO Box 880, Valley Forge PA 19482, Professional Help Line: 800-233-8990, Consumer Help Line: 800-782-8777, Website: Certainteed.com www.certainteed.com/resources/fc017.pdf retrieved 4/11/2013, [copy on file as Certainteed_Fiber_Cement_Siding_Install_fc017.pdf ]
- [5b] "Certainteed WeatherBoards™ Fiber Cement Siding Best Practices for Effective Job Site Management", CertainTeed Corporation, retrieved 4/15/13 original source: www.certainteed.com Copy on file as Certainteed_FC_Handling Brochure-Contractor_FC063.pdf
- [5c] Personal communication, M. Smith, CertainTeed Corp, Customer Service, to D Friedman 4/16/2013
- [5d] Consumer Services CertainTeed Corporation 803 Belden Road Jackson, MI 49203 Toll Free #: 800.999.3654 Fax #: 517.787.0023 Email: jtc.conservfc@saint-gobain.com
- [6] "Moisture Control in buildings: Putting Building Science in Green Building," Alex Wilson, Environmental Building News, Vol. 12. No. 5. [Good tutorial, "Moisture 101" outlining the physics of moisture movement in buildings and a good but incomplete list of general suggestions for moisture control - inadequate attention given to exterior conditions such as roof and surface drainage defects which are among the most-common sources of building moisture and water entry.--DJF]
- [7] J. Tibbets, "Green Houses", NCBI, retrieved 1/17/2013, original source: http://www.ncbi.nlm.nih.gov/pmc/articles/PMC1469482/
- [8] Gleeson et al, "Fiber Cement :Building Materials with Low Density Additives", U.S. Patent 8,182,606, B2 5/22/2012, [adding low volumes of volcanic ash & hollow ceramic microspheres to cellulose fiber-reinforced building materials.
- [9] Thanks to reader Marie Carr for James HardiePlank siding photograph and case history information. 06/01/2008
- [10] JamesHardie HardiePlank® Lap Siding information can be found at the company's web page on this material:
https://www.jameshardie.com/products_siding_hardieplankLapSiding.py - [11] "30-Year Limited Warranty
HardiePlank® HZ5® Lap Siding, HardiePanel® HZ5® Vertical Siding,
HardieShingle® HZ5® Siding, HardieSoffit® HZ5® Panels", 1-800-9-HARDIE
10901 Elm Avenue Fontana, CA 92337, retrieved 1/18/2013, original source: https://www.jameshardie.com/pdf/warranty/hz5.pdf [copy on file as Hardieplank_Warranty_hz5.pdf] - [12] James Hardie Building Products, James Hardie CustomerLink™ Service Centre, 10 Colquhoun Street, Rosehill NSW 2142, Tel: 13 1103, Outside Australia 61 2 8837 4709,
Fax: 1 800 818 819. Hardie has operations in Australia, Asia, Canada, Europe, New Zealand, United States, and the Philippines. The company is a significant producer of fiber cement siding and backerboard. Email: info@JamesHardie.com and Website https://www.jameshardie.com/
- JamesHardie Corporation, in the U.S. can be contacted at 26300 La Alameda, Suite 400,
Mission Viejo, California 92691 -
1-888 J-HARDIE
1-888 542-7343 or by email to info@JamesHardie.com - [12b] "Technical Bulletin #9, Joint Flashing at Field Butt Joints", JamesHardie, retrieved 4/15/2013, original source: www.jameshardie.com, copy on file as James_Hardie_9-joint-flashing.pdf - quoting:
This Technical Bulletin is an explanation supporting the announcement made by James Hardie on September 8th, 2008 withdrawing its recommendation on the use of caulk at field butt joints for HardiePlank® lap siding. - [12] Hardiplank James Hardie warranty claims information:Tel: (866) 375-8603, Email: claims.administration@jameshardie.com
- JamesHardie Corporation, in the U.S. can be contacted at 26300 La Alameda, Suite 400,
Mission Viejo, California 92691 -
1-888 J-HARDIE
- [13] Instructions for application of HardiePlank lap siding can be found at https://www.jameshardie.com/products_siding_hardieplankLapSiding.py?openTab=jsnavLink4
- [14] "Homeowners Care and Maintenance Tips", 1-800-9-HARDIE
10901 Elm Avenue Fontana, CA 92337, included with product warranty information, retrieved 1/18/2013, original source: https://www.jameshardie.com/pdf/warranty/hz5.pdf [copy on file as Hardieplank_Warranty_hz5.pdf] - [15] "HardiePlank HZ5 Lap Siding Installation Requirements - Primed & Colorplus® Products",JamesHardie, November 2012, 1-800-9-HARDIE, 10901 Elm Avenue Fontana, CA 92337, retrieved 1/18/2013, original source: https://www.jameshardie.com/pdf/install/hardieplank-hz5.pdf, [copy on file as Hardieplank-hz5_Install.pdf]
- [16] Technical Bulletin #9, Joint Flashing at Field Butt Joints, James Hardie corporation, retrieved 1/19/2013, original source: https://www.jameshardie.com/pdf/technical-bulletins/9-joint-flashing.pdf
- [17] Technical Bulletin #17, Fastening Tips for HardiePlank® Lap Siding, James Hardie Corporation, retrieved 1/19/2013, original source: https://www.jameshardie.com/pdf/technical-bulletins/17 -fastening-tips-for%20-plank.pdf [copy on file]
- [18] Technical Bulletin #8, Expansion Characteristics of James Hardie® Siding Products, James Hardie Corporation, retrieved 1/19/2013, original source: https://www.jameshardie.com/pdf/technical-bulletins/8-expansion-characteristics.pdf [copy on file]
- [19] Eric Galow, Galow Homes, Lagrangeville, NY. Mr. Galow can be reached by email: ericgalow@gmail.com or by telephone: 914-474-6613. Mr. Galow specializes in residential construction including both new homes and repairs, renovations, and additions. Personal communication 3/20/2013.
- [20] Johnston, Colin D., Fiber-reinforced cements and concretes. Vol. 3., Taylor & Francis, (CRC Press) 2000. ISBN-10: 9056996940 ISBN-13: 978-9056996949, "This book summarizes and simplifies the results of a considerable body of research and practical experience with a wide range of fiber-reinforced cementitious composites."
- [21] Hugh Cairns, Subject 2 Home Inspections, is a professional home inspector in British Columbia, Canada, with offices in Kelowna B.C. and Kamloops B.C. He contributed the American Cemwood photo used at the top and within this article. Mr. Cairns can be contacted by telephone: 250-808-5777, or by email: okanagan@subject2homeinspections.com
- [22] Roger Xu, 徐银杰 (my Chinese name), Ningbo Yihe Greenboard Co., Ltd., No.189, Longzhen Road, Nongkenchang, Longshan Town, Cixi, Ningbo, Zhejiang China, Tel: 0086-574-63974118/83887668 Fax:0086-574-63974129/83887670 Mobile: 0086-15924317823; E-Mail: sales6@yhboard.com; Skype: dajiezi107, www.yhboard.com/en, personal correspondence 3/21/2013
- [23] James Hardieplank, personal communication with Daniel Friedman, 6/6/2013. We called James Hardie to ask for guidance in determining just how much moisture was "too much" in Hardieplank siding, after observing that siding at a job arrived visibly wet from the factory even though still inside its original sealed plastic wrapping. We called James Hardie's technical support line where a courteous representative told us he would refer us to Hardie's expert Benjaman Batres. Our call to Mr. Batres was returned by Stephanie (declined to give last name) from James Hardie's customer warranty service department. Stephanie informed us that there are no moisture numbers, that it is not possible to measure moisture in fiber cement siding (utter nonsense!) and repeatedly advised "Just read our instructions" or "So file a claim". Don't count on much help from James Hardie's customer warranty department on siding shrinkage or butt joint gap concerns. Gaps at Hardieplank siding butt joints continue to appear in the Hardieplank installation.
- MASONITE WOODRUF® ROOFING OR MASONITE OMNIWOOD® SIDING LAWSUIT SETTLEMENT NOTICE - PDF file
- In addition to citations & references found in this article, see the research citations given at the end of the related articles found at our suggested
CONTINUE READING or RECOMMENDED ARTICLES.
- Carson, Dunlop & Associates Ltd., 120 Carlton Street Suite 407, Toronto ON M5A 4K2. Tel: (416) 964-9415 1-800-268-7070 Email: info@carsondunlop.com. Alan Carson is a past president of ASHI, the American Society of Home Inspectors.
Thanks to Alan Carson and Bob Dunlop, for permission for InspectAPedia to use text excerpts from The HOME REFERENCE BOOK - the Encyclopedia of Homes and to use illustrations from The ILLUSTRATED HOME .
Carson Dunlop Associates provides extensive home inspection education and report writing material. In gratitude we provide links to tsome Carson Dunlop Associates products and services.


