
InspectAPedia® FREE Encyclopedia of Building & Environmental Construction, Diagnosis, Maintenance & Repair |
Question? Just ask us! InspectAPedia
|
 Free Guide to Kitchen & Bath Design: Best Practices Home Page
- POST a QUESTION or COMMENT about about kitchen & bath design, fixtures, faucets, lighting, flooring, construction, installation, and troubleshooting.
Kitchen and bath design guide:
This article series discusses current best design practices for kitchens and bathrooms, including layout, clearances, work space, and accessible kitchen and bathroom layout, clearances, turning space, grab bars, controls, etc.
We include advice on choosing and installing kitchen countertops, cabinets, and kitchen or bathroom flooring, sinks, and other plumbing fixtures and fixture controls such as faucets.
A list of kitchen and bath product manufactures and sources is included.
InspectAPedia tolerates no conflicts of interest. We have no relationship with advertisers, products, or services discussed at this website.
Kitchen and Bath Best Design Practices
 As noted in Chapter 6 of Best Practices Guide to Residential Construction (Steve Bliss, J Wiley & Sons) :
Kitchen Design Basics
Please see KITCHEN DESIGN PRINCIPLES for the detailed, illustrated version of this section. Excerpts are below.
[Click to enlarge any image]
Whether designing a small galley kitchen or an expansive space for multiple cooks and entertaining, the same rules apply regarding clearances and relationships between key work centers so that work in the kitchen flows smoothly and efficiently.
While the traditional American kitchen developed around three main appliances—the sink, range, and refrigerator—today’s kitchen may have many more centers of activity, including the following list adapted from the National Kitchen and Bath Association (NKBA):
- Primary clean-up center: Includes the main sink, dishwasher, recycling center, and waste disposer.
- Secondary sink center: May also serve cleanup functions. Often associated with the food preparation center.
- Food preparation center: A clear space at least 16x36 inches typically located between the sink and cooktop or sink and refrigerator. A two-cook kitchen requires two such spaces.
- Cooking center: Revolves around the cooktop and may also include a separate built-in oven or microwave.
- Microwave center: Because of its frequent use, this should be near the main activity areas.
- Pantry center: Tall storage cabinets work well to store food and cooking supplies near the preparation area. Tall cabinets may also store dishes in the serving or dining area.
- Serving center: This area stores dishes and other serving items and may be in the kitchen or closer to the dining area.
- Dining center: Many kitchens include either an eating counter or a separate dining area.
- Socializing center: A casual seating area adjacent to the kitchen work space allows other family members or friends to visit and socialize with the cook.
- Home office center: A space for the telephone, mail, household records, and cookbooks is often incorporated into the kitchen. Concealing the desktop visually from the kitchen is appreciated by many clients. (List adapted with permission from John Wiley & Sons from Essential Kitchen Design Guide, © NKBA, 1996.)
Kitchen Design Guidelines
 In 1992, the National Kitchen and Bath Association
(NKBA) introduced new design guidelines based on research
conducted at the University of Minnesota. These
have been expanded and revised over time to reflect the
continuing evolution of kitchen design and usage.
In 1992, the National Kitchen and Bath Association
(NKBA) introduced new design guidelines based on research
conducted at the University of Minnesota. These
have been expanded and revised over time to reflect the
continuing evolution of kitchen design and usage.
The key kitchen design rules are shown below. Accessibility recommendations are listed separately here, but they are now incorporated into all NKBA guidelines.
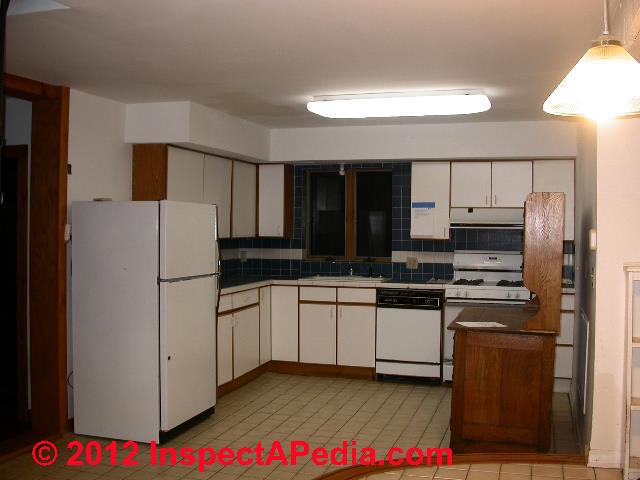
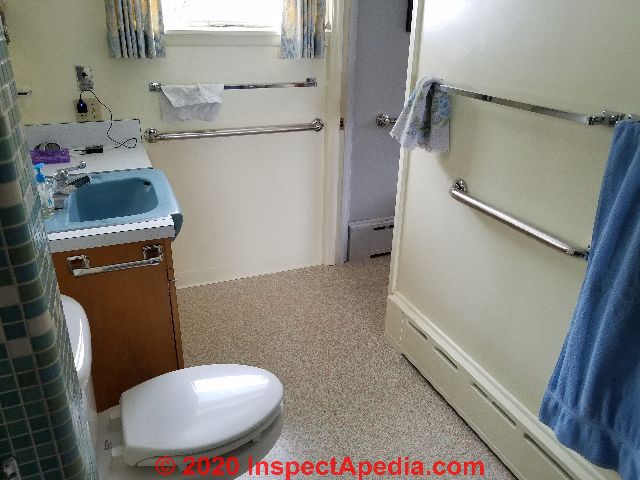
At left, a 1980's kitchen renovation in a Hudson Valley New York home.
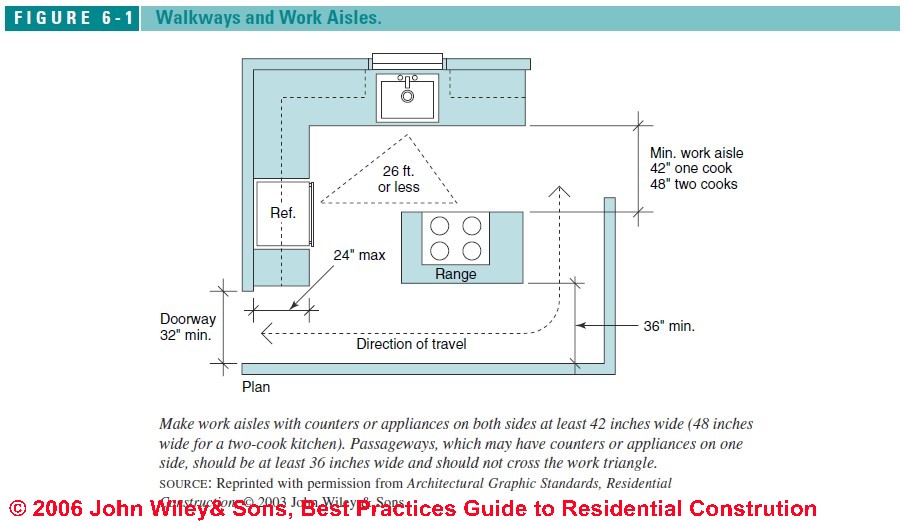
Kitchen Walkways and Kitchen Work Aisles
Work aisles with counters or appliances on both sides should be at least 42 inches wide for a one-cook kitchen and 48 inches wide for a two-cook kitchen. Walkways, which may have a work counter on one side, should be at least 36 inches wide and should not cross the work triangle (see Figure 6-1).
Kitchen Work Triangle Specifications
The shortest walking distance between the refrigerator, primary sink, and primary cooktop should be 26 feet or less, as shown in Figure 6-1 above. Each leg of the triangle should range from 4 to 9 feet long. No major walkway should pass though the triangle, and no corner of an island or peninsula should intersect the triangle by more than 12 inches.
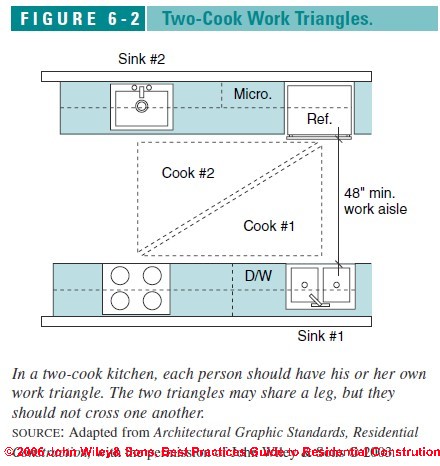
Two-Cook Kitchen Work Triangles
In a two-cook kitchen, each person should have his or her own work triangle of less than 26 feet. The two triangles may share a leg, but they should not cross one another (Figure 6-2).
Conflicting Kitchen Entry, Appliance, Cabinet Doors
All entry doors, appliance doors, and cabinet doors should swing freely without interfering with another door.
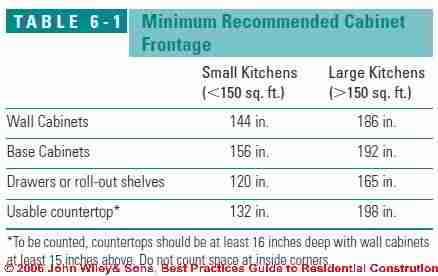
Kitchen Cabinet Frontage Recommendations
Provide the minimum cabinet frontage shown in Table 6-1 below. Do not count difficult-to-reach wall cabinets over hoods or refrigerators unless special access is provided.
A pie-cut lazy Susan base counts as 30 inches. Tall cabinets 72 inches or higher can count as either base or wall cabinets as follows: for 12-inch-deep cabinets, multiply frontage by one to count as base cabinets and by 2 to count as wall cabinets. Double these amounts for 21- to 24-inch-deep tall cabinets.
Kitchen Counter Heights and Edge Specifications
Provide at least two counter heights in the kitchen with one 28 to 36 inches high and the other 36 to 45 inches high. Varied heights create work spaces for various tasks and for cooks of different heights, including seated cooks. Also, clip or round over countertop corners and edges to eliminate sharp edges.
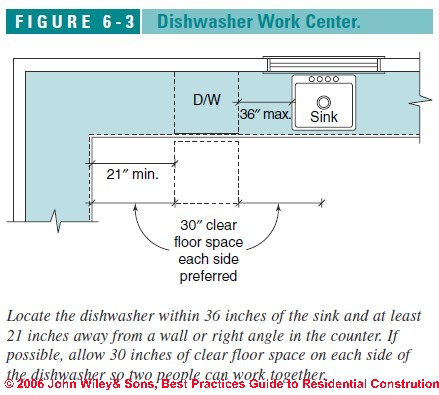
Dishwasher Work Center Location
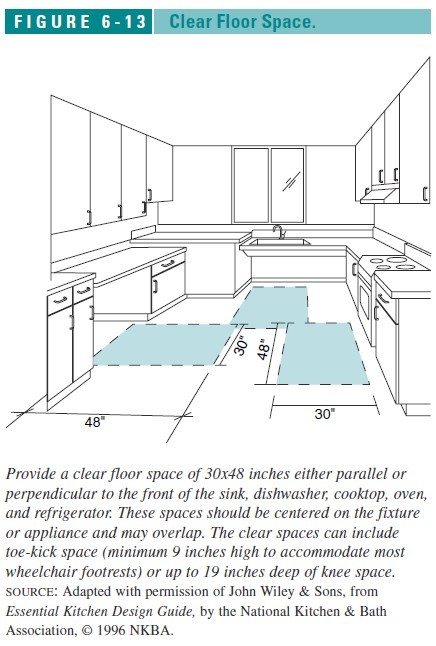
Locate the dishwasher within 36 inches of the sink and allow at least 21 inches of clearance between the dishwasher and any counters, cabinets, or appliances placed at a right angle to the dishwasher. If possible, allow 30 inches of clear floor space on each side of the dishwasher so two people can work at the same time (Figure 6-3).
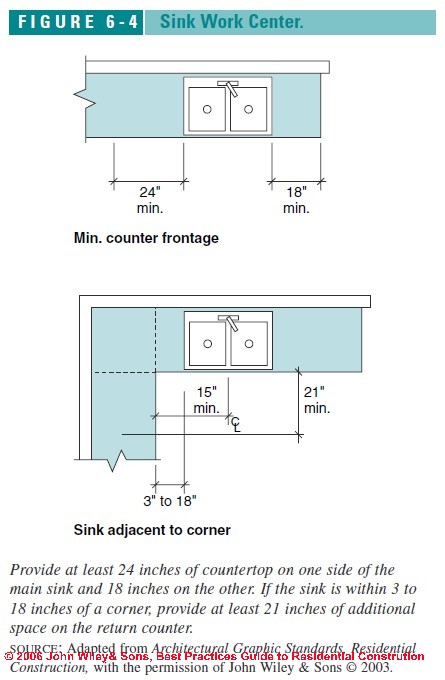
Kitchen Sink Work Center Location
Locate the primary sink between or across from the cooking surface, food preparation area, or refrigerator (Figure 6-4).
- Counter space: Allow 24 inches on one side of the sink and 18 inches on the other. If the sink is within 3 to 18 inches of a corner, provide at least 21 inches of additional space on the return counter.
- Cabinet space: Provide at least 60 inches of wall cabinet frontage within 72 inches of the primary sink centerline. Alternate: Use one tall cabinet within 72 inches of the sink.
- Floor space: A 30x48–inch floor space centered in front of the sink will make it wheelchair accessible. Secondary Sinks. Provide a minimum of 3 inches of countertop frontage on one side of a secondary sink and at least 18 inches on the other side.
Food Preparation Area Specifications
Provide 36 inches of continuous countertop, at least 16 inches deep, immediately adjacent to a sink. For a two-cook kitchen, provide either two separate 36-inch spaces or one 72-inch space adjacent to a sink (see Figure 6-5).
Recycling Center Area Specifications for Kitchens
Unless provided elsewhere in the plan, provide at least two waste receptacles in the kitchen, one for garbage and one for recyclables.
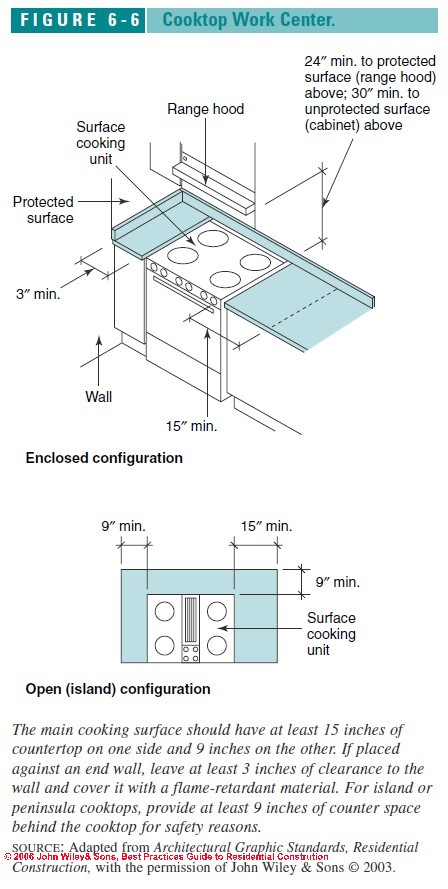
Cooktop Work Center Design Specifications
- Counter space: Provide 15 inches on one side of the cooktop and 9 inches on the other. Or if placed against an end wall, leave at least 3 inches of clearance to the wall and cover it with a flame-retardant material. Where there is no backsplash, as in an island or peninsula, provide a minimum of 9 inches behind the cooktop for safety reasons (Figure 6-6).
- Clearances: Allow at least 24 inches of clearance between a cooking surface and a protected surface above, such as a range hood, or 30 inches to an unprotected surface.
- Ventilation: Ventilate all major appliance cooking surfaces with a minimum 150 cfm exhaust fan. Gas appliances must vent to the exterior.
Oven Landing Space Needed in Kitchens
Provide at least 15 inches of landing space, a minimum of 16 inches deep, next to or above the oven. If the oven does not open into a traffic area, the landing space can be directly across from the oven by no more than 48 inches.
Microwave Work Center Measurements
Locate stand-alone microwave ovens so that the bottom of the appliance is 24 to 48 inches above the floor. Provide at least 15 inches of landing space, a minimum of 16 inches deep above, below, or to the side of the microwave oven.
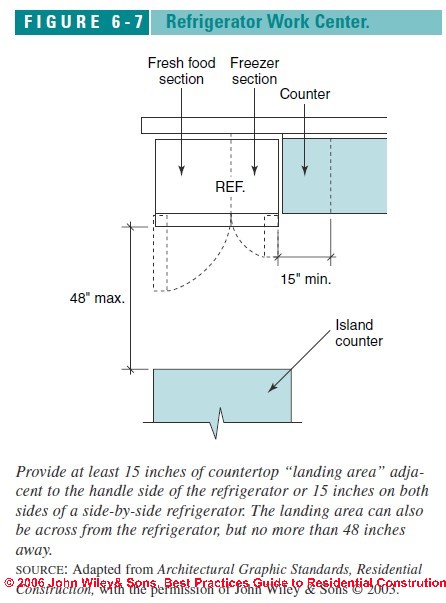
Refrigerator Work Center Specifications
Provide at least 15 inches of counter space as a “landing area” adjacent to the handle side of the refrigerator or on both sides of a side-by-side refrigerator. Alternately, provide 15 inches of countertop directly across from the refrigerator and no more than 48 inches away. With a side-by-side unit, provide easy access to a counter from the fresh food side (Figure 6-7).
Overlapping Work Centers
Where countertop areas of two work centers (e.g., sink, refrigerator, food preparation) overlap, the minimum counter frontage between the centers should equal the longest of the required two lengths plus 12 inches.
Tall Cabinets Between Work Centers
Do not separate two primary work centers (primary sink, refrigerator, preparation area, or cooking center) by a full-height, full depth tower such as an oven cabinet, pantry cabinet, or refrigerator. One exception is a corner-recessed tall tower if knee space is planned to one side.
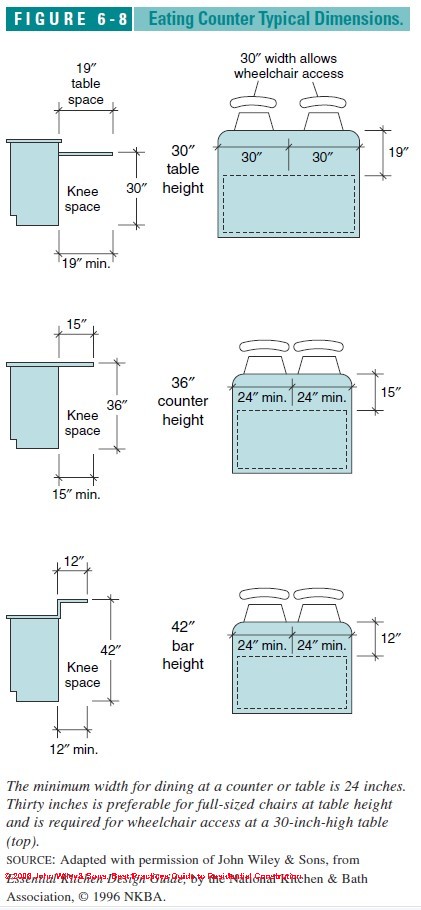
Kitchen Eating Area Design Specifications
- Eating counter heights. Heights and capacities for tables, eating counters, and bars are shown in Figure 6-8. Seating widths have been increased to 30 inches in the 30-inch-high seating area to accommodate wheelchairs.
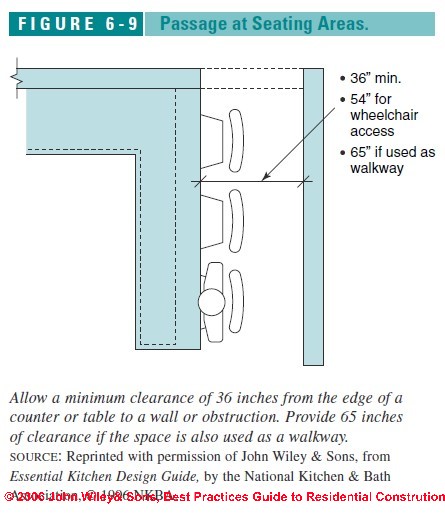
- Clearances to walls. Allow a minimum clearance of 36 inches from the edge of a counter or table to a wall or obstruction. Increase this to 65 inches if the space also serves as a walkway (Figure 6-9).
- Table sizes. Many kitchens feature small or full-size dining tables (Table 6-1). When selecting a table, pay close attention to whether leg placement will interfere with the number of chairs planned.
Kitchen Wiring for Use of Electrical Devices
Install ground-fault circuit interrupters (GFCIs) on all receptacles within the kitchen. Locate wall-mounted room controls, including electrical receptacles, switches, thermostats, telephones, and intercoms, between 15 to 48 inches above the finished floor.
Home Kitchen Fire Protection Advice
A fire extinguisher should be visibly located in the kitchen away from cooking equipment and 15 to 48 inches above the floor. Smoke alarms should be installed near the kitchen.
Natural Lighting for Kitchens
The combined area of windows and skylights should equal at least 10% of the square footage of the kitchen. Also, every work surface should be well illuminated by appropriate task or general lighting. (For details see Kitchen Lighting Requirements).
Typical Kitchen Layouts
Please see: Kitchen Layouts, Typical for the detailed, illustrated version of this section. Excerpts are below.
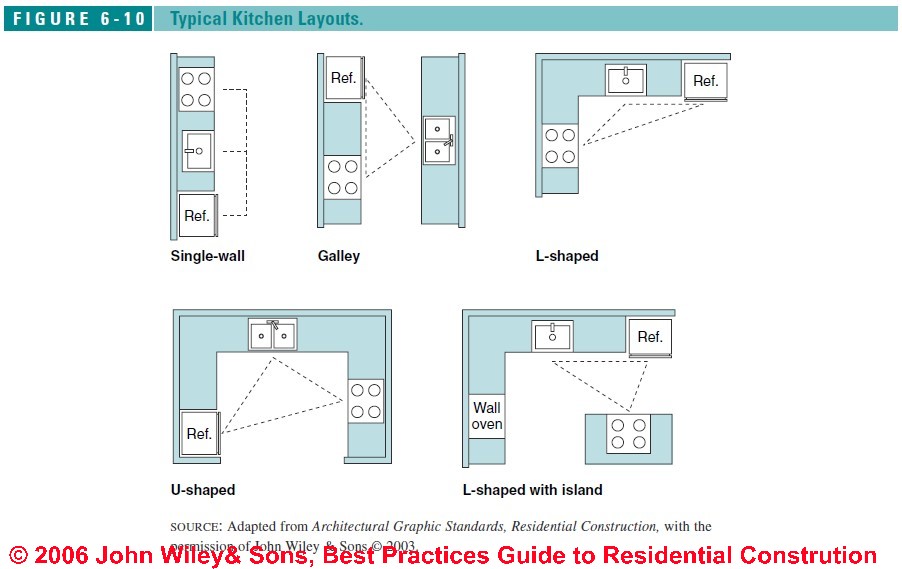
Kitchen plans should follow the work flow from the garage or side entrance where food enters the home to the storage area or refrigerator. From there, work typically flows to the sink and food prep area, then on to the cooktop or oven, and eating area.
Finally, dishes move back to the sink and dishwasher for clean up. All kitchens from the simplest to most complex should be designed to smoothly accommodate this basic workflow (see Figure 6-10).
Single-Wall Kitchen Layout
The simplest kitchen plan is designed for one cook and primarily used in small apartments. If the kitchen has a second wall, use it for storage with pegboards or shelving narrow enough to leave adequate clearance.
Galley Kitchen Layout
A corridor or galley-style kitchen can provide an efficient layout for a single cook. If household traffic must regularly pass through, provide at least 48 inches of clearance between counters.
L-Shaped Kitchen Design Layout
This layout provides adequate counter space and creates an efficient work triangle away from the household traffic flow. The large open space can often accommodate a dining area.
U-Shaped Kitchen Plan
Many designers consider this the most efficient plan, since the cook is surrounded on three sides by countertop, work centers, and storage areas. Also, household traffic is naturally directed around the work area, keeping it clear for kitchen tasks.
L-Shaped Kitchen Layout with Island
This combines the compact efficiency of a U-shaped plan with the benefits of a more open plan. The island invites interaction between the cook and visitors or helpers because more than one person can work at the open counter.
Accessible Kitchen Design Recommendations
Please see KITCHEN DESIGN, ACCESSIBLE for the detailed, illustrated version of this section. Excerpts are below.
To make a kitchen fully functional for wheelchair users and other seated occupants requires simple commonsense changes, like placing knobs within reach, as well as more significant changes, such as lowering counters and providing knee space below. The guidelines below, based on ANSI (American National Standards Institute) A117.1 standards, are a good starting point in design, but they should be tailored to the size, reach, and specific capabilities of the occupants.
Work Aisles and Passageways in Accessible Kitchen Design
Clear space at doorways and passageways must be at least 32 inches wide and no more than 24 inches long in the direction of travel. Eliminate any thresholds at doorways.
The minimum work aisle with counters or appliances on both sides should be 40 inches. Walkways with counters or appliances on only one side can be 36 inches wide, but if a walkway turns a corner, as in Figure 6-1 , one leg should be widened to 42 inches for a wheelchair to make the turn.
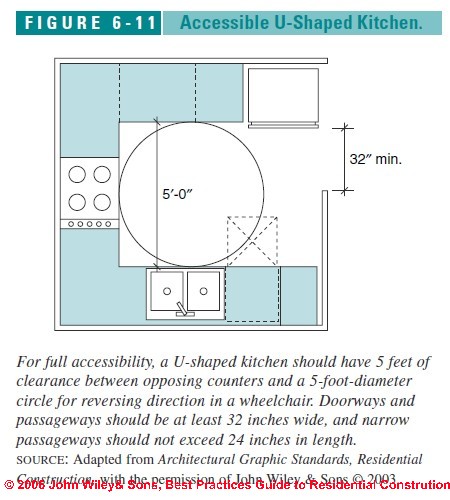
From a table or eating counter to a wall, leave 54 inches for wheelchair access. In a U-shaped kitchen the minimum clearance between counters is 60 inches (Figure 6-11).
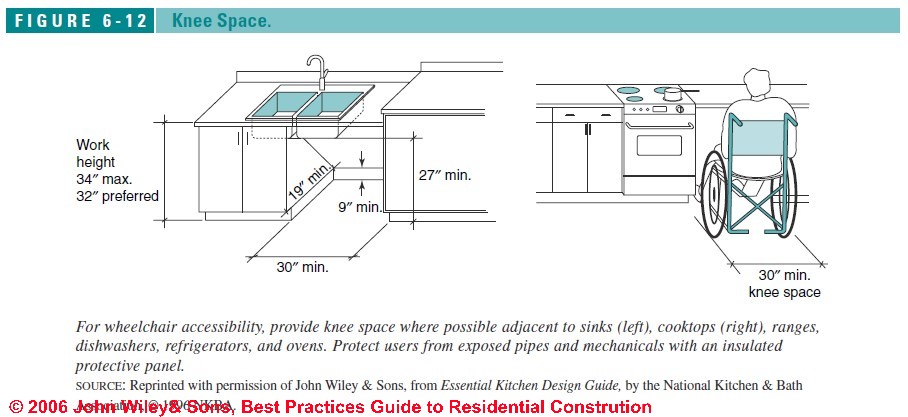
Knee Space Requirements for Accessible Kitchens
Wherever possible, provide knee space for a seated user below or adjacent to sinks, cooktops, ranges, dishwashers, refrigerators, and ovens. To accommodate a seated user, below-counter knee space should be a minimum of 30 inches wide, 27 inches high in front, and 19 inches deep, with a minimum 9-inch-high toe space, which will accommodate most wheelchair footrests. Protect users from exposed pipes and mechanicals with a protective panel and insulation (Figure 6-12).
Clear Floor Space Needs for Accessible Kitchens
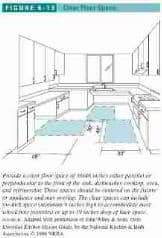
To make work centers universally accessible, provide a clear floor space of 30x48 inches or 48x30 inches, centered in front of the sink, dishwasher, cooktop, oven, and refrigerator. These floor spaces may overlap, and the long dimension can include up to 19 inches deep of knee space below counters (Figure 6-13).
Counter and Appliance Height for Accessible Kitchen Designs
he optimal height for most seated occupants at counters, sinks, and cooktops is about 32 inches and should be no higher than 34 inches.
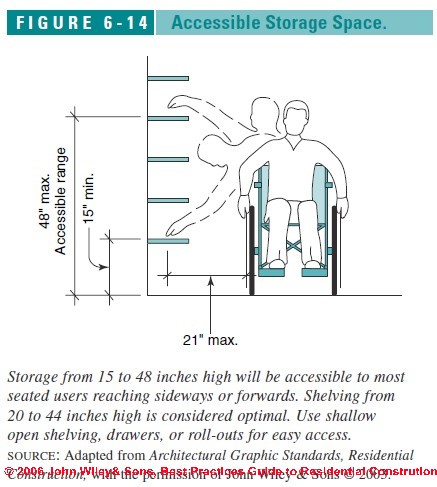
Storage Height Specifications for Accessible Kitchen Designs
Most seated users can fully reach shelving located from 15 to 48 inches high. Storage located from about 20 to 44 inches is considered optimal. Use open shelving, shelf racks on pantry doors, and drawers or roll-out shelving for easy access (Figure 6-14).
Handles and Control Recommendations for Accessible Kitchens
Controls, handles, and door and drawer pulls should be operable with one hand, require minimal strength, and not require tight grasping, pinching, or twisting of the wrists. Lever-action handles work well for doors and faucets. A simple test is to try to operate the controls with a closed fist.
Mount wall cabinet doors at the bottom of the cabinets and base cabinet pulls at the top of the cabinets.
Sink and Dishwasher Work Center for Accessible Kitchen Designs
Use a shallow sink mounted at 32 to 34 inches (32 preferred) with the drain in the rear so it does not interfere with knee space (Figure 6-15). The garbage disposal must also be offset so it does not interfere with knee space. A tall faucet and pullout spray attachment are recommended to simplify work at the sink. Locate the dishwasher adjacent to the sink or no more than 12 inches away.
Lighting Suggestions for Accessible Kitchens
Lighting levels should be up to twice normal levels. Using light-colored floors, walls, ceilings, and counters will help keep all areas well illuminated. Light colors on the insides of cabinets and drawers will help make items more visible.
Cooking Work Center Suggestions for Accessible Kitchens
If possible, place the cooktop and sink on the same wall so users do not have to carry heavy pots across the room. Electric cooktops with a smooth surface and controls on the front work best so the user does not have to reach over the top. Look for units with staggered burners for easier access to back burners.
Use a separate wall-mounted oven, not an under-counter design. An oven with a side-hinged door rather than the usual pull-down style works well.
Refrigerator Work Center Design for Accessible Kitchens
Side-by-side units with doors that swing back a full 180 degrees are preferable to up-and-down models. Provide at least 18 inches of counter space adjacent to the refrigerator.
Kitchen Lighting Specifications - References
See
- Kitchen Lighting, Ambient Specifications
- Kitchen Lighting Counters, Sinks, Cooktops
- Kitchen Lighting Requirements
Bathroom Design Basics
Please see Bathroom Design Principles for the detailed, illustrated version of this section. Excerpts are below.
A well-designed bathroom is comfortable to use, safe, durable, and easy to clean. Space planning revolves around the main fixtures and their required clearances. Proper clearances are critical to avoid problems such as banged elbows at a sink placed too close to a wall or difficult access to the tub faucet.
Bathroom safety concerns should be paramount in design decisions and material choices. For example, choose only nonskid flooring types and select tub and shower controls with foolproof antiscald protection. Avoid designs with sunken tubs or tub surrounds with steps, both of which are hazards.
Details about anti-scald protection and devices are found at MIXING / ANTI-SCALD VALVES.
Also remember that following code is not a guarantee of safety. For example, while it is legal to place bathroom lighting circuits downstream from the GFCI outlet, it is unwise since anything that trips the GFCI will also plunge the bathroom into darkness.
Bathroom Design Guidelines
The following recommendations are based on guidelines first published by the National Kitchen and Bath Association in 1992. While accessible design principles are provided separately below, NKBA now incorporates these principles into their recommendations for all projects.
Lavatories: Sink Clearances, Heights, Measurements
- Sink Clearances.
Locate each sink so its centerline is at least 15 inches from a wall and 30 inches from the centerline of a second sink. The minimum walkway shown in front of the sink may not allow full accessibility (see Figure 6-16). - Sink Height.
While the standard vanity or sink height is 30 to 32 inches, 34 inches is a better compromise between shorter and taller users. If a bath has more than one vanity, set one at 30 to 34 inches and the other at 34 to 42 inches high.
Mirror Height Specifications for Bathrooms
The bottom edge of a mirror over a vanity should be no more than 40 inches above the floor, or 48 inches if the mirror is tilted forward.
Shower Clearances & Measurements for Bathrooms
- Shower Clearances:
Allow a minimum 21-inch walkway (30 inches preferred) from the front of the shower stall to a wall or fixture. These clearances may not allow full accessibility. - Shower Size:
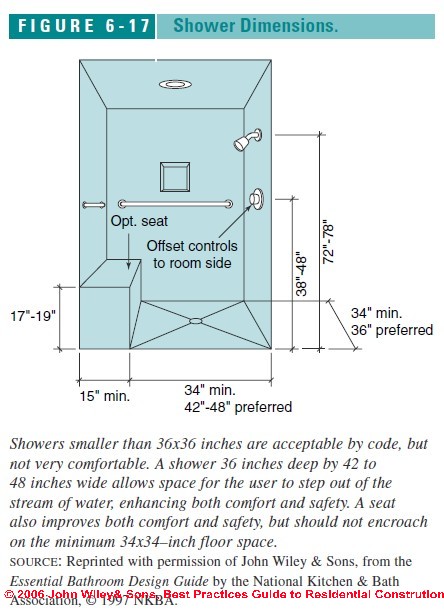
Provide a minimum clear floor space inside the shower stall of 34x34 inches, preferably 36x36 inches or larger. For optimal comfort and safety, increase the size to 36x42 inches to 48 inches, which allows space for the user to step out of the stream of water to adjust the temperature (Figure 6-17). - Neoangle Showers:
Neoangle showers are popular space savers, but the showering area is reduced in size due to the cut-off corner. The size of the corner cut varies from one model to another, with some cutting significantly into the shower space. For comfort, neoangles should be at least 42x42 inches. - Showerhead Location:
Locate the showerhead supply pipe 72 to 78 inches above the finished shower floor. The installed showerhead will be 4 to 6 inches lower. If a handheld showerhead is used, it should be no higher than 48 inches at its lowest position. - Seating in Shower Stalls:
Shower stalls should include a bench or seat that is 17 to 19 inches high and a minimum of 15 inches deep. The seat should not encroach on the minimum 34x34-inch floor space. - Doors for Showers:
Shower doors must open into the bathroom, not into the shower stall. - Controls for Showers:
Locate controls 38 to 48 inches off the floor and offset toward the room so they are accessible from both inside and outside the fixture.
Bathtub Clearances & Measurements
- Bathtub Clearances.
Allow a minimum 21-inch walkway (30 inches preferred) from the open side of the tub to a wall or fixture. These clearances may not allow full accessibility. - Steps to a tub.
Do not build steps leading to a bathtub or raised tub platform. These create a serious hazard. It is much safer for users to sit on the lip of the tub or platform and swing their legs in. Sunken tubs are also a hazard. Safety rails should be installed to help users get in and out of any tub configuration. - Bathtub Controls.
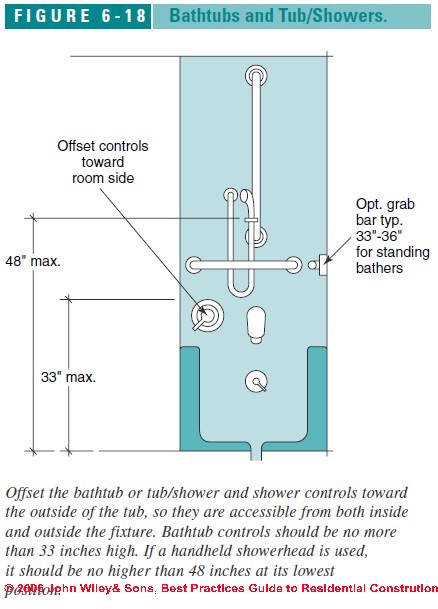
Offset controls toward the outside of the tub so they are accessible from both inside and outside the fixture. Bathtub controls should be no more than 33 inches high. If a handheld showerhead is used, it should be no higher than 48 inches at its lowest position (Figure 6-18).
Antiscald Protection Advice for Bathrooms
Protect all tubs and showers with a pressure-balancing valve or thermostatically controlled valve to limit water temperatures at a faucet or showerhead to 120°F or less. Recommend that homeowners set water heaters to no more than 120°F as an added precaution. Details about anti-scald protection and devices are found at MIXING / ANTI-SCALD VALVES .
Toilets and Bidet Layout & Clearances for Bathrooms
- Toilet Clearances.
Fifteen inches is the allowable minimum from the centerline of toilets and bidets to a fixture or wall, while 17 to 18 inches will create a more comfortable space (Figure 6-19). Sixteen inches is the minimum for full accessibility as long as there is sufficient transfer space in front or on the side (see “Accessible Bathroom Design,” below). - Separate toilet compartment.
Compartmental toilet areas should be a minimum of 36x66 inches with a swing-out or pocket door. - Toilet paper holder.
Locate with the center 26 inches above the floor, about 8 inches forward from the front of the toilet.
Flooring Choices & Suggestions for Bathrooms
Make all bathroom flooring slip-resistant. Ventilation. Provide mechanical ventilation to the exterior (see “Bathroom Ventilation,” for sizing information).
Electrical Receptacles for Bathrooms - GFCI Needed
All bathroom receptacles must be GFCI protected. All light fixtures above a tub or shower must be rated for damp locations (tub) or wet locations (shower). Switches must not be reachable from within a tub or shower. Many bathrooms are wired so that all the lights go out if a GFCI is tripped. Although this is allowed by code, it is neither safe nor convenient for the homeowners.
Lighting Suggestions for Baths
The vanity area should include both overhead and side lighting. P
lace side lighting centered at eye level (For details see Bathroom Lighting Guidelines). Where possible, provide natural lighting as well from a window or skylight area equal to at least 10% of the floor area.
Glass Safety Requirements in Bathrooms
All glass used in a tub or shower enclosure or other glass applications within 18 inches of the floor should be safety glazing, such as laminated glass, tempered glass, or an approved plastic.
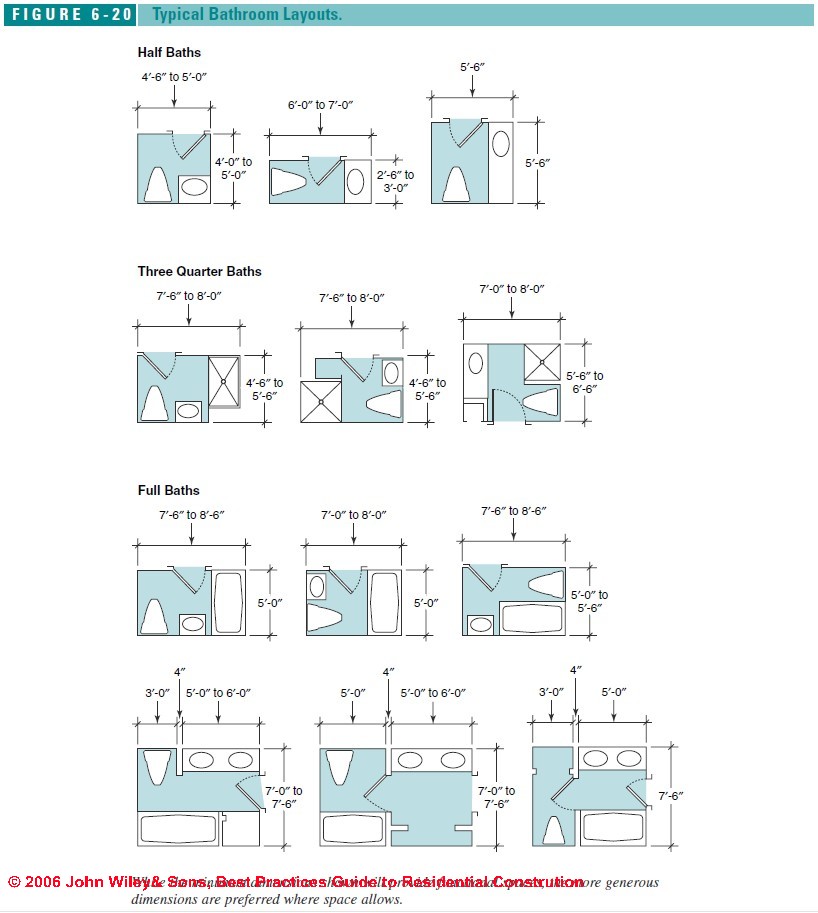
Typical Bathroom Layouts
Bathrooms are divided into three main centers of activity: lavatory/grooming, toilet/bidet, and bathing/showering. In smaller bathrooms, these all share one common space, while in more spacious rooms, the grooming area or toilet area may be separated to allow greater flexibility and privacy for multiple users.
Larger spaces also allow for greater storage, such as a linen closet, within the bathroom space. Typical bathroom layouts with minimum dimensions for comfortable use are shown in Figure 6-20.
Accessible Bathroom Design Specifications
Please see BATHROOM DESIGN, ACCESSIBLE for the detailed, illustrated version of this section. Excerpts are below.
To make a bathroom fully functional for wheelchair users and other seated occupants requires commonsense changes, such as using universal controls and placing them within reach, as well as some significant changes, such as lowering sinks and providing knee space below.
In some cases, the room will need to be enlarged to accommodate a roll-in shower or to allow room for wheelchair users to reverse direction. The minimum guidelines below, based on ANSI Standard A117.1, are a good starting point in design, but they should be tailored to the size, reach, and specific capabilities of the occupants.
Doors and Passageways for Accessible Bathrooms
Clear space at doorways and passageways should be at least 32 inches wide and no more than 24 inches long in the direction of travel. Walkways between vertical objects (walls, cabinets, fixtures) greater than 24 inches long in the direction of travel should be at least 36 inches wide.
Pocket doors or doors that swing outward are preferred, since they do not encroach on bathroom space and will not get blocked in an emergency. Eliminate any thresholds at doorways.
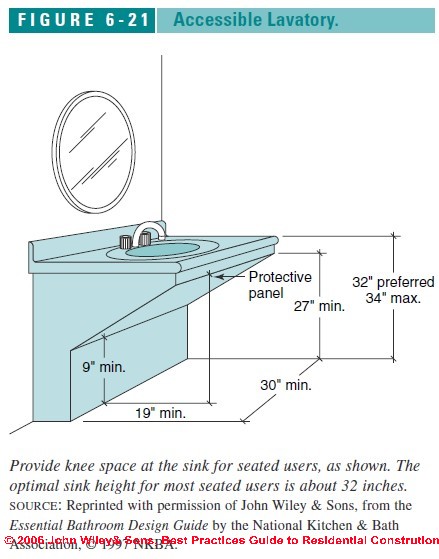
Lavatory Height and Knee Space for Accessible Bathrooms
For most seated users, the recommended sink height is 32 inches (Figure 6-21). Provide knee space at the sink at least 27 inches high at the opening and 19 inches deep, with adequate toe space. Protect users from exposed pipes and mechanicals with insulation and a protective panel.
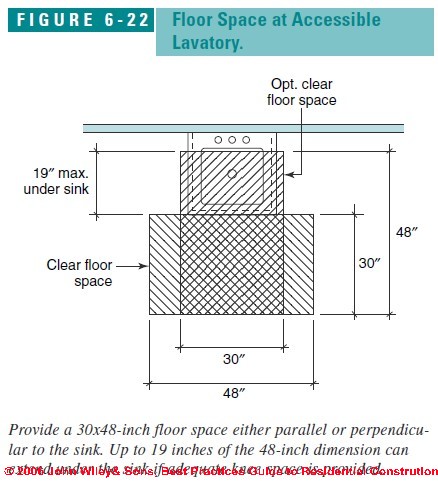
Floor Space at Lavatory in Accessible Bathrooms
Provide a minimum clear floor space of 30x48 inches centered in front of the sink either parallel or perpendicular to the sink. Up to 19 inches of the 48-inch dimension can extend under the sink if knee space is provided (Figure 6-22).
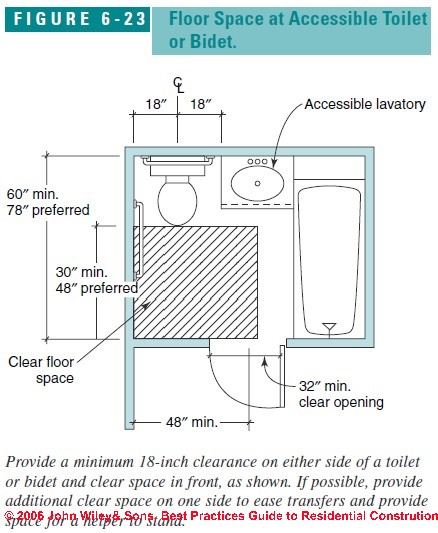
Floor Space at Toilet or Bidet in Accessible Bathrooms
Provide a minimum clearance of 18 inches on either side of the toilet or bidet centerline to a wall or fixture. Also provide a minimum 30x48-inch clear floor space (preferably 48x48 inches) in front of the toilet or bidet. If necessary, the clear floor space may include up to 12 inches of knee space under an adjacent sink. Remember that these are minimum clearances. To simplify transfers, leave as much free space on one side of the toilet as possible (Figure 6-23).
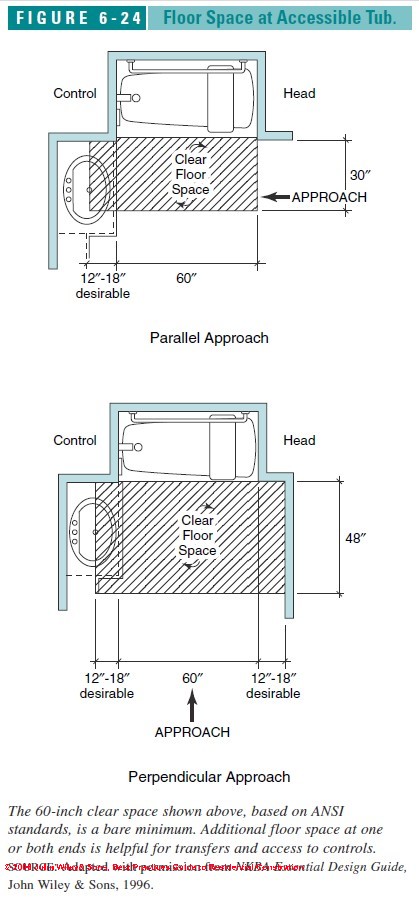
Floor Space Requirements at Bathtub in Accessible Bathrooms
Provide a minimum clear floor space of 60 inches along the length of the tub by 30 inches deep for a parallel approach or by 48 inches deep for a perpendicular approach. An additional 12 to 18 inches of clear space beyond each end of the tub is also desirable for access to controls and to ease transfers (see Figure 6-24).
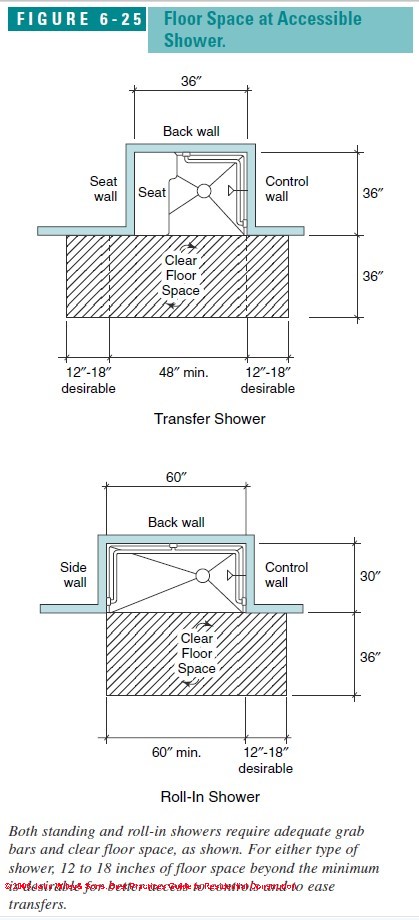
Floor Space at Shower in Accessible Baths
For people who shower standing, provide a minimum 36x36–inch shower with appropriate grab bars, and provide a minimum clear floor space in front, 36 inches deep by the width of the shower plus 12 inches. People who cannot leave their wheelchair require wider roll-in showers of at least 30x60 inches.
The minimum access space should be the full length of the shower by 36 inches. For either type of shower, an additional 12 to 18 inches beyond each end is desirable for better access to controls and to ease transfers (Figure 6-25).
Overlapping Floor Spaces in Accessible Bathrooms
Clear floor spaces in front of fixtures may overlap and may include up to 12 inches deep of knee space below the sink.
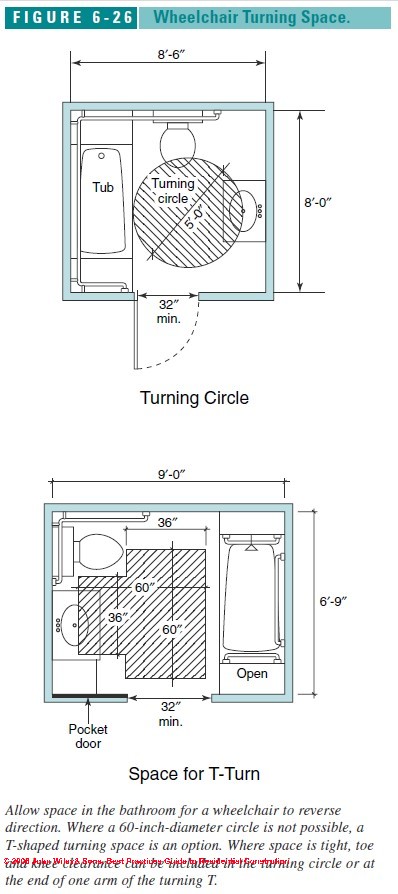
Turning Space Needed in Accessible Bathrooms
A bathroom clear space for reversing direction in a wheelchair should be either a circle, 60 inches in diameter, or a T-shaped space of 36x36x60 inches (see Figure 6-26).
Grab Bar Locations & Installation Requirements for Accessible Bathrooms
These should be installed in the bathtub or shower and toilet areas for full accessibility.
Photo: grab bars installed by the editor (DF) in a northern Minnesota home.
- Grab Bar Reinforcing.
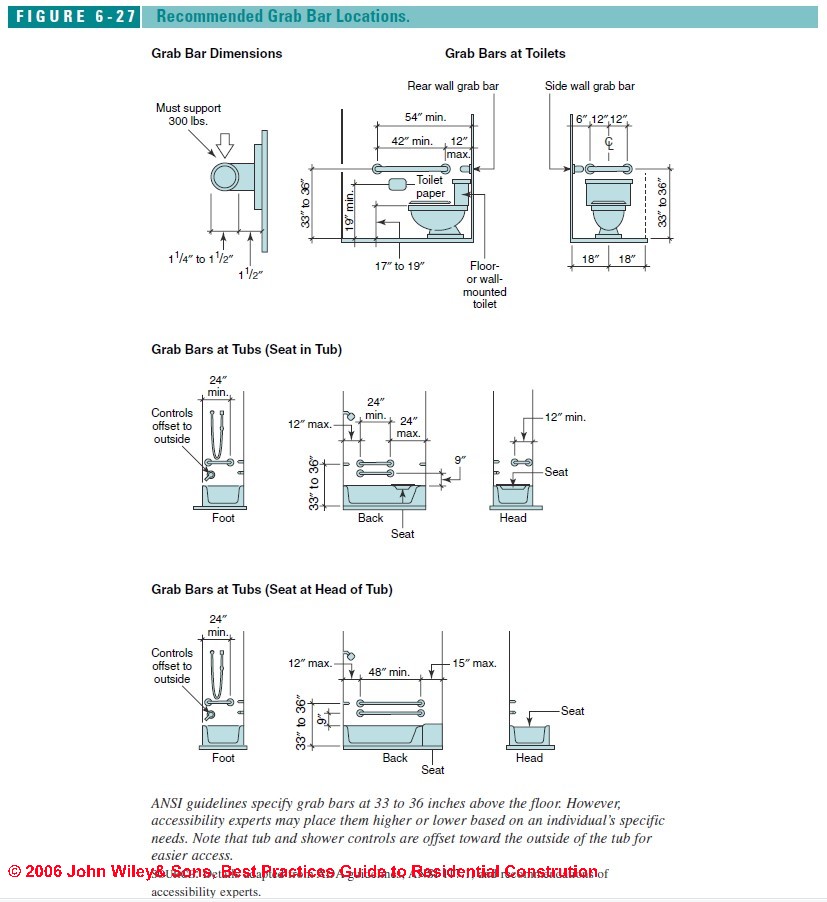
Reinforce attachment points at the time of construction with 3/4-inch plywood or solid 2x6 blocking designed to bear a static load of 300 pounds. - Grab Bar Size.
Grab bars should be from 1 1/4 to 1 1/2 inches in diameter with a slip-resistant surface and sit 1 1/2 inches away from the wall. - Grab Bar Location.
The optimal location of grab bars will depend on the users’ specific needs, such as whether they will be sitting or standing and which types of movements they can and cannot perform. One vertical bar placed at the entry point to a shower or bath enclosure is generally useful to anyone getting in or out. A horizontal bar on the control side is useful for people who stand in the shower.
ANSI guidelines for accessible bathrooms specify grab bars at 33 to 36 inches above the floor. However, accessibility experts often place them higher or lower based on an individual’s specific needs. In toilet areas, install one grab bar behind the toilet and one on the side wall closest to the toilet. Some people require grab bars on both sides. ANSI guidelines for toilet and tub areas are shown in Figure 6-27.
See details at GRABRAIL GRAB BAR SPECIFICATIONS
Storage Locations in Accessible Bathrooms
Locate storage for toiletries, linens, and bathroom supplies within 15 to 48 inches from the floor. Locate towel racks, soap dishes, and other personal hygiene items within the same height range.
Controls Specifications for Accessible Bathrooms
Controls, dispensers, and outlets should be located from 15 to 48 inches high, and all devices should be operable with a closed fist. Offset controls in showers and tubs toward the room side, as shown in Figure 6-27. This makes them easier to reach for all users.
Kitchen & Bathroom Flooring Choices & Recommendations
Please see FLOOR DESIGNS: KITCHEN & BATHfor the detailed, illustrated version of this section. Excerpts are below.
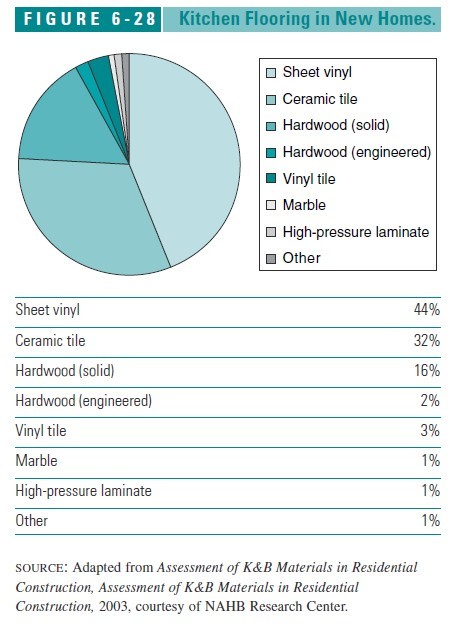
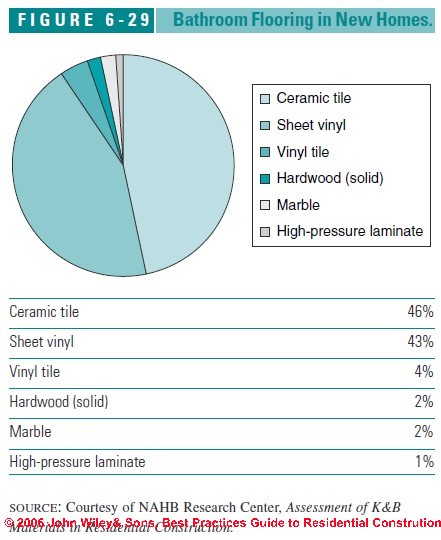
The leading choices for kitchen and bath flooring installed in new homes are sheet vinyl and ceramic tile, chosen for their durability, ease of maintenance, and tolerance of water (Figure 6-28 and Figure 6-29). Vinyl offers a resilient surface underfoot and is generally less expensive than tile, although the high-end vinyl products can cost nearly as much as lower-end tiles.
Tile is often chosen for its durability in both wet and dry environments. Although a ceramic tile installation is not completely waterproof without the addition of a waterproofing membrane, the tile itself, along with the cement backerboards and thinset mortars used in quality installations, are unaffected by water.
Hardwood, too, has become popular in kitchens as kitchens have evolved into primary centers for recreation and socializing. Although not the most practical choice for wet areas or high-traffic zones, new harder finishes make it more resistant to scratching and better able to tolerate the occasional wetting.
The toughest finishes are available only on prefinished flooring, but seams between the boards could allow water to penetrate if exposed to standing water (see FLOOR, WOOD FINISHES).
A satin finish is preferable in a high-traffic area like a kitchen, since it shows scratches less than a glossy finish. With any wood floor, the homeowners should wipe up spills quickly and use water sparingly when cleaning.
For consumers seeking a resilient walking surface but reluctant to use vinyl for environmental or health reasons, newer options include a variety of cork products, newly introduced lines of traditional linoleum, and a variety of laminated bamboo products that perform essentially the same as solid hardwood flooring. With proper installation and care, any of these materials can provide a durable, attractive floor in a kitchen.
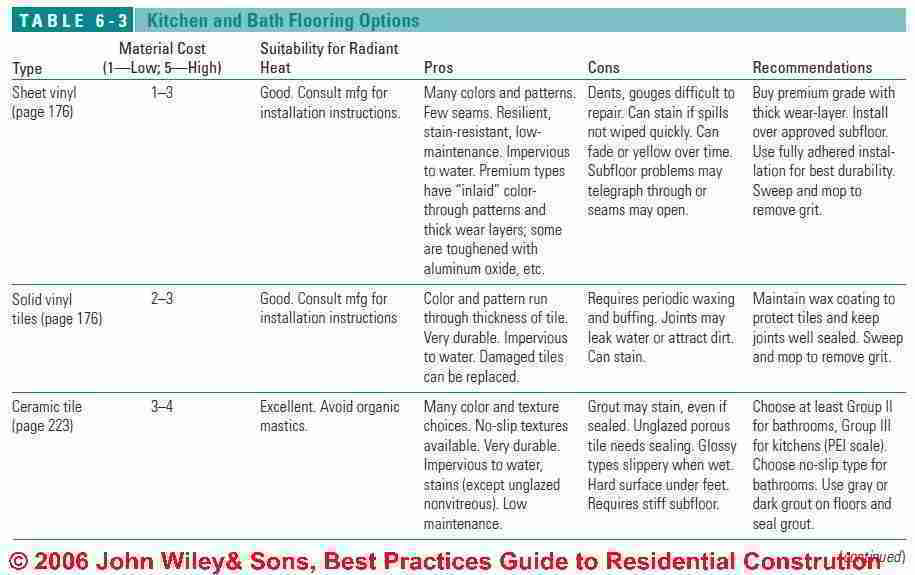
In a bath, the best option is a waterproof surface with few joints or seams to allow water penetration (Table 6-3).
Ceramic & Stone Tile Installation Advice for Bathrooms & Kitchens
Please see CERAMIC TILE FLOOR & WALL for the detailed, illustrated version of this section. Excerpts are below.
A quality ceramic tile job starts with proper framing to support the tile and the selection of tile materials that are right for the application and compatible with each other.
The substructure must be stiff enough to support the tile without excess movement or deflection, and the tile, backerboard, adhesive, grout, and any waterproofing membrane must be compatible with one another. If all these products are installed following the manufacturer’s instructions as well as the specifications of the Tile Council of America (TCA), the result should be an attractive and durable job.
Finally, it is critical that the installer leave the required expansion joints at the room perimeter, tub lips, and other places the tile is restrained—the source of many tile callbacks.
Selecting Tile for Kitchens & Baths
A wide array of tiles are readily available. In addition to aesthetic concerns, tiles vary in strength, water absorption, scratch resistance, ease of cleaning, and slip resistance.
In general, look for harder tiles for floor and counter applications, and tiles low in water absorption for wet applications. Beyond looking at the specifications, it is a good idea to test a sample of tile for scratch resistance, scuffing, and ease of cleaning, using real pots and pans, shoes, and household cleansers.
Strength and Water Absorption of Ceramic Tiles
The body of a ceramic tile, also called the bisque, is made by heating a mixture of clay and other additives in a kiln. In general, the longer the clay is fired and the higher the temperature, the denser and stronger the tile will be and the more impervious to water absorption.
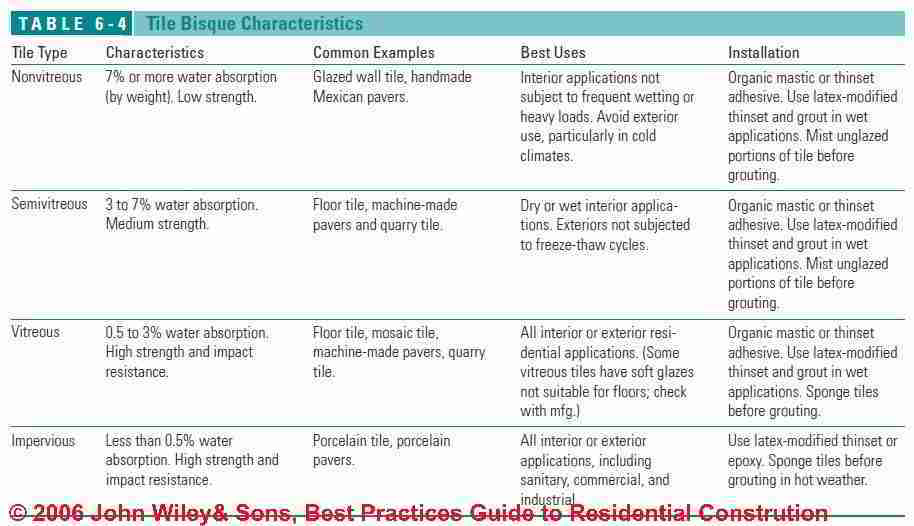
Nonporous tiles that absorb little water will perform better in wet applications than porous tiles. The tile bisques manufactured according to ANSI standards are rated from nonvitreous to impervious (see Table 6-4).
Comparison of the Properties of Glazed vs. Unglazed Ceramic Tile
With the exception of quarry tile, terra-cotta, and some porcelains and mosaics, most tiles come glazed. The glaze consists of a mix of silica and pigments that is fused to the surface of the tile at high temperatures, creating a glasslike coating.
Glazes provide decorative color and protect the surface of porous tiles from absorbing water and stains. How well a glaze resists abrasion and shows scratches depends on several factors:
- Tile Glazing Temperature:
Glazes fired hotter and longer tend to be harder and more scratch-resistant. - Tile Color:
Light-colored glazes tend to be harder than dark colors and conceal scratches better. - Tile Gloss level:
Matte-finished glazes tend to be harder than high gloss and also conceal scratches better.
Unglazed tiles show the natural color of the clay, although some unglazed mosaics have pigment added to the clay. Unglazed tiles may need to be sealed to prevent staining during grouting or in use on floors, counters, and other applications prone to staining. Sealing is generally done before grouting. If used on a counter, make sure the sealer is suitable for use around food.
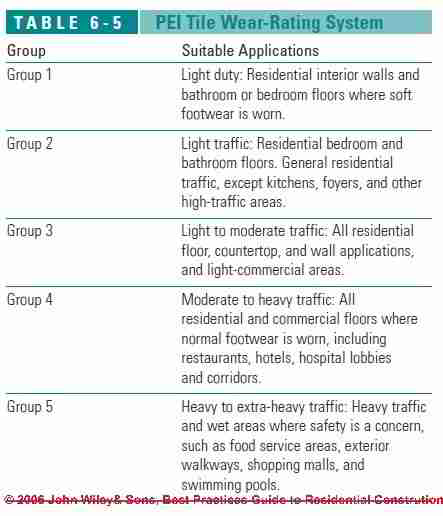
Many manufacturers now rate the abrasion resistance of their tile using the guidelines of the Porcelain Enamel Institute (PEI). The PEI system rates tiles from 1 to 5 as shown in Table 6-5. Select Grade 3 or higher where scratching of the tile surface is a concern.
Slip Protection vs. Use of Glazed Tiles in Baths or Kitchens
Many glazed floor tiles become dangerously slippery when wet. This is a concern wherever floors are subject to wetting, but particularly on shower floors and bathroom floors near tubs and showers. In general, unglazed tiles or textured patterns will be less slippery. Some tile has a special nonskid surface made by adding an abrasive grit to the tile face or glaze. The downside is that nonglossy surfaces are somewhat harder to keep clean.
Many tile manufacturers use a coefficient of friction (COF) to rate the traction a tile provides. While there are no national standards that specify a required COF, the Americans with Disabilities Act (ADA) recommends a minimum COF of .60 on accessible walking routes.
Experts also recommend a minimum COF of .60 for shower stalls, wet bathroom floors, and other wet areas.
Guide to Ceramic, Stone, & Other Tile Types
Please see FLOOR, STONE, GRANITE, MARBLE, AGGLOMERATE for the detailed, illustrated version of this section. Excerpts are below.
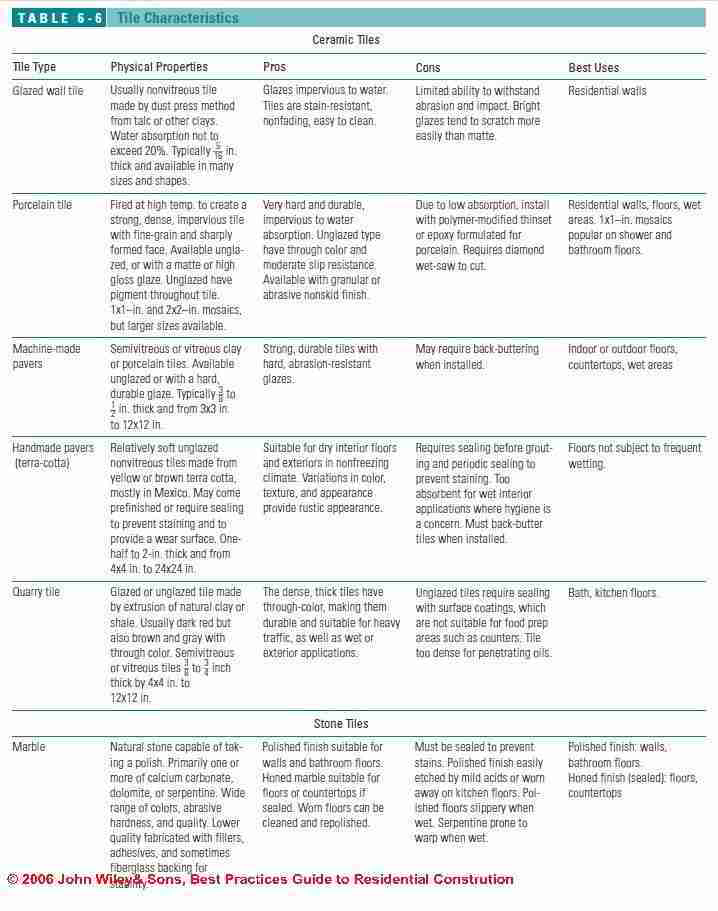
A wide variety of man-made synthetic and natural tiles are available (Table 6-6). Most fall into one of the categories described below:
Glazed Ceramic Tile Properties
The most common type of tile, glazed ceramic tile, is usually marketed as either a wall or floor tile, depending on the hardness and water-absorption of the underlying clay body of the tile or bisque. Wall tiles are typically 1/4 inch thick and range in size from 4x4 to 12x12 inches.
Floor tiles are generally thicker and are available in sizes up to 13x13 inches and larger. Some floor tiles may also have a slip-resistant surface, which is advisable in a bathroom. A tile sold for use on floors will not necessarily have a hard scratch-resistant glaze, however.
Where tile scratching is a concern, such as in kitchens and entryways, look for a PEI rating of 3 or higher, or test the scratch resistance of the tile yourself with a cooking utensil or other abrasives the tile might face in service.
Porcelain Tile Characteristics
Porcelain tile is fired at high temperatures, creating a dense and strong material that is impervious to water absorption. The tile has a smooth texture and sharply formed face. Small imperfections in size due to the high firing temperatures give it a less formal look than standard tiles.
Porcelain tile is available unglazed or glazed with a matte or high-gloss finish, and comes in a wide variety of sizes, colors, and shapes. Small 1x1–inch porcelain tiles are commonly used on shower and bathroom floors.
These are usually mounted in sheets to simplify installation. Because porcelain is impervious to water absorption and because the mounting sheet can interfere with the bond, it should be installed with a polymer-modified thinset mortar made for use with porcelain.
Mosaic Tile Properties
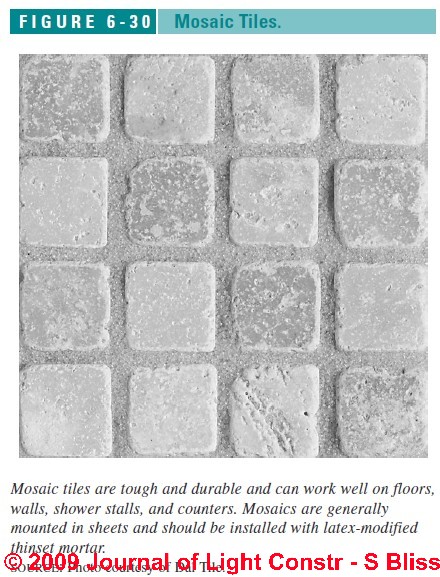
Mosaic refers to any hard, dense tile, such as porcelain, vitreous clay, or glass, that is typically one inch square. Porcelain mosaics are usually unglazed and are colored by adding pigment directly to the clay. Because it is tough and durable, mosaic tile can work well on just about any application, including floors, shower stalls, and counters. Gen
erally mosaics are mounted in sheets and should be installed with latex-modified thinset mortar (Figure 6-30).
Paver Tiles Properties
Machine-made pavers are 1/2 to 3/4 inch thick and are available glazed or unglazed. They are usually made from semivitreous or vitreous clay or impervious porcelain, making them suitable for outdoor use. The glazes used on machine-made paver tiles tend to be very hard and well suited to floors and countertops.
Handmade pavers, on the other hand, tend to be relatively soft, unglazed, nonvitreous tiles, so they are not suitable for wet interior applications or outdoors in areas subject to freeze/thaw cycles. Handmade pavers are generally made in Mexico from yellow or brown terra cotta and come in various shapes and sizes.
Because they are handmade, they have uneven faces and vary in color and texture from tile to tile, giving a floor a rustic appearance (Figure 6-31).
Handmade paver tiles may come prefinished or require sealing by the installer with either a surface coating or penetrating sealer to provide a wear surface. Penetrating sealers have the advantage of easy refinishing of worn spots, whereas surface coatings need to be stripped before being reapplied.
Apply any sealers before grouting. All pavers should be set with a thinset adhesive. Because of their irregular shapes, the individual tiles may need to be “back-buttered” to provide full support and contact with the substrate material.
Quarry Tile Characteristics
Originally made from quarried stone, quarry tiles are typically unglazed, semivitreous or vitreous tiles made from extruded slabs of clay or shale. They are 3/8 to 3/4 inch thick and come in a variety of square and rectangular shapes. They range in color from gray to browns and reds, depending on the type of clay and firing temperature.
These dense, thick tiles have through-color, making them very durable and suitable for heavy traffic as well as wet or exterior applications. The tiles will stain, however, so they should be sealed with surface sealers where that is a concern (the material is too dense for penetrating oil sealers). Since most surface sealers are not suitable for food contact, quarry tile is not a good choice for counters where staining is a concern. Installation should be with thinset adhesive.
Natural Stone Tiles Characteristics
Stone and agglomerate stone tiles are popular choices in kitchens and baths due to their durability and natural beauty. Stone tiles typically measure from 3/8 to over 1 inch thick, making some 12-inch square tiles weigh over 10 pounds. The most common stones are marble and granite, since they both can take a high polish.
Of the two, granite is much more durable and stain-resistant, and is unharmed by mild acids that will etch marble and limestone. Granite is stained by oil and grease, however. All natural stones are subject to staining if they are not sealed when installed and resealed whenever water does not bead up on the surface.
Most customers prefer a highly polished finish on natural stone in the kitchen or bath. A polished finish offers some protection against stains but can also make floors slippery and requires maintenance to preserve the sheen.
On kitchen floors, polished stone will eventually lose its sheen in high-traffic areas, unless protective coatings and sealers are applied regularly. Softer and more porous stones, such as limestone and sandstones, are prone to excess wear and staining and are rarely used in kitchens and baths.
On any stone floor, sand, dirt, and grit do the most damage due to their abrasiveness. Commonsense approaches, such as entry mats to clean shoes and frequent dusting with a dry mop, will go a long way toward preserving the stone surface.
Installation Procedures for Stone Tiles
Installation of stone tile is essentially the same as with ceramic tile except for the following:
- Deflection of substrate.
Some of the softer stones, such as marble and limestone, require a stiffer floor than the L/360 required for ceramic tile. To meet the stiffer load requirements of L/720 or L/1020, floor joists must be upsized or located closer together. A thicker or double-layer subfloor may also be required. - Compatibility with setting materials.
Porous and light-colored stone tiles may be stained or discolored by certain grouts, adhesives, or sealants. With light colored or translucent stone tiles, it is best to use a white thinset rather than the more common gray type. Also, colored grouts, plumber’s putty, and some caulks will stain lighter-colored stones and porous stones. It is best to test a sample for compatibility before installation.
Marble and Limestone Tile Use & Installation Advice for Kitchens & Baths
Both marble and limestone are carbonates, made from ancient shells, sand, and mud, although marbles have been additionally heated and squeezed until crystallized.
Marbles tend to be denser and less porous than limestones and can take a high polish, but both materials are relatively soft and will etch with mild acids (lemon juice, vinegar), making them unsuitable for kitchen counters unless a rustic appearance is acceptable. Darker stones will etch more noticeably. Limestones and softer marbles are not suitable for floors either.
Marble comes in a wide variety of colors and levels of quality, ranging from Grade A with few to no flaws or voids to Grade D, which has a large proportion of flaws, voids, veins, and lines of separation that need to be repaired with fillers and adhesives during fabrication of the tiles. A fiberglass mesh may also be laminated to the back to provide stability. Some of the most highly prized colored marbles are the least stable.
Tiles are available either polished or honed. Polished marble is suitable for walls or bathroom floors, but the polish will generally not hold up well on kitchen floors or countertops due to wear and tear and mild acid spills.
Although worn marble can be cleaned and re polished, a nonglossy honed finish is a better choice for kitchen floors and counters. The honed finish must be sealed to prevent permanent staining of the porous marble.
Dark green marble, called serpentine, is actually a much harder silicate. It will not etch but has a tendency to warp when wet, so it should not be installed in wet areas or exposed to standing water when cleaned. When installing serpentine, epoxy-based mortars and adhesives are preferable to water- or latex-based products. Pre sealers, applied before grouting, help prevent stains and simplify cleanup, particularly with non polished finishes.
Granite Tile Choices & Installation Advice for Kitchens or Baths
Granite is a hard, granular igneous rock that contains mostly quartz and feldspars and ranges in color from pink and red to light or dark gray or a mix of these. It is generally uniform in color and has high compressive strength and abrasion resistance. It has very low absorption, but some types, especially the popular swirl types (technically called gneiss), are subject to staining if not sealed. Common finishes include polished, honed, or thermal.
Polished granite tiles are suitable for kitchen and bath walls, floors, or countertops. While granite holds its polish longer than marble and is not bothered by mild acids, such as orange juice or vinegar, over time the traffic on a kitchen floor will dull the finish. Use of doormats and frequent sweeping to remove abrasives from the floor will help prolong the finish. Re polishing the granite tends to be expensive due to the hardness of the material.
Waxing and special coatings may help protect the polished finish, but frequent stripping and reapplication can, by itself, cause excessive wear.
Another option for floors are honed or thermal finished granite tiles, which are more commonly used outdoors. These are less slippery when wet than polished granite. However, a sealer is required with this type of finish to prevent staining during grouting and to protect from oil or grease stains. These finishes are easy to apply and do not need stripping for touch-up reapplication.
Agglomerate Tiles for Kitchens or Baths: Recommendations, Installation
Agglomerate tiles consist of graded chips of marble or granite mixed with a resin binder and stone dust. Typical thicknesses vary from about 1/4 inch to 7/8 inch. Agglomerates usually cost less than natural stone, but have many of the same virtues and limitations as their natural counterparts.
For example, granite agglomerates are harder than marble agglomerates, and the polish on granite can withstand greater abrasion and last longer. Also, granite agglomerates will resist mild household acids, such as citrus juice and vinegar, while these will tend to etch marble agglomerates.
Guide to Using Kitchen or Bath Tile Sealers
Please see FLOOR TILE SEALERS, CERAMIC, STONE for the detailed, illustrated version of this section. Excerpts are below.
A wide variety of proprietary sealers are available to protect natural stone against staining from grout, dirt, foods, and household products. In addition, some sealers help conceal minor scratches and increase slip resistance.
Some products require regular reapplication and may cause a surface buildup unless stripped. Penetrating oil-type sealers may change the color of some types of stone and can even trap dirt in the finish. For best results, follow recommendations of the stone supplier and use products with an established track record.
Recommended Floor Framing under Tile to Avoid Cracks
Please see Floor Framing & Subfloor for Tile for the detailed, illustrated version of this section. Excerpts are below.
Tiles, stones, and grout joints crack easily from stresses imposed by movement. For a successful installation, the structure underneath must be very stiff. On walls, 16-inch on-center framing with 2x4s or steel studs is usually adequate. Floors must be level and subject to minimal deflection under uniform or point loads.
Floor Deflection Problems in Tile Floors Lacking Stiffness
An insufficiently stiff floor will crack ceramic or stone tiles. The Tile Council of America (TCA) specifies a maximum deflection for floors of L/360 under a 300-pound concentrated load. While building codes limit deflection in living spaces to L/360 under uniform loads, code-compliant floors may still have too much flexing between joists under point loads. Many natural stone tiles require stiffer conditions, ranging from L/480 to as stiff as L/720.
Subflooring Requirements for Tile Floors
To meet TCA stiffness requirements, floor framing should be no more than 16 inches on-center with minimum 19/32 -inch plywood subflooring. Upgrading to 23/32- inch plywood will stiffen the subfloor by almost 80% and provide a more solid feeling floor. The subflooring should be level to 1/8 inch in 10 feet. (TCA specs now permit 1/4 inch in 10 feet, but this can be problematic for the large tiles popular today.)
To avoid tile cracks caused by tight-fitting plywood joints, it is best to use square-edged subflooring under tile and leave an 1/8-inch gap between sheets (unless the setting material specifications require tight joints). Lay the plywood with its long dimension across the joists and use solid blocking at all open joints.
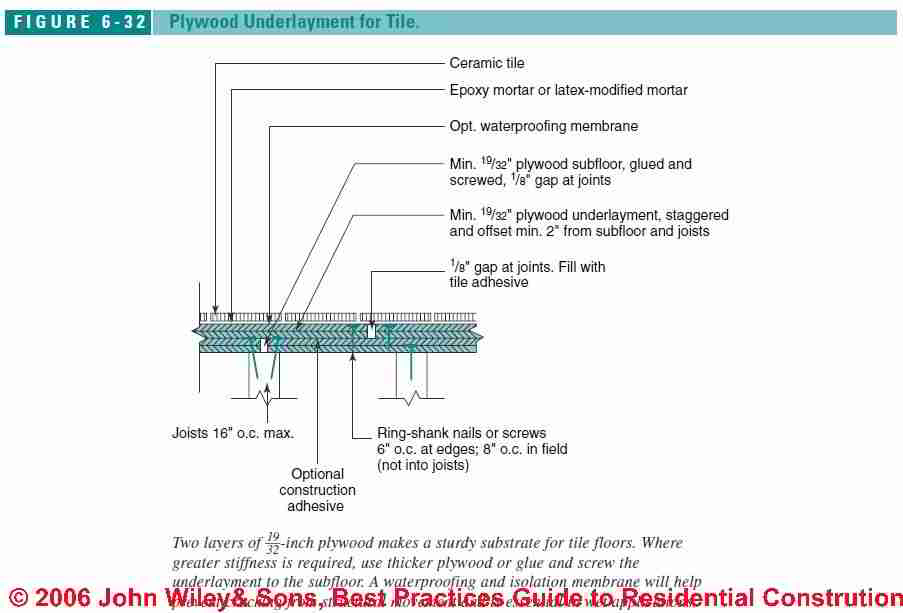
Two-Layer Subflooring System for Ceramic Tile Floors
To meet the stiffness requirements for natural stone floors may require two layers of subflooring screwed and glued together, with the upper layer serving as the underlayment.
Two layers of 19/32 inch plywood glued and screwed together on 6-inch centers is several times stiffer than a single layer (and over four times as stiff as a single layer of 23/32-inch plywood). Offset the upper layer so the joints do not line up with the joints in the lower layer or the joists.
Also, screws in the upper layer, which serves as underlayment for the tile, should penetrate the subfloor only and not the joists. Use underlayment- grade plywood or plywood rated C-C Plugged or Plugged Crossbands, with a smooth face and no voids.
Floor Substrates for Ceramic Tile: Concrete, Cement Backerboard, Plywood, Drywall, Plaster
Ceramic tile can be installed over clean and sound concrete, plywood, cement backerboard, drywall, or plaster. Most substrates can be used with either organic mastic or thinset mortar, but the installer should always check the adhesive label for compatibility with the substrate.
Plywood Underlayment Specifications for Tile for Floors or Countertops
Because of its stiffness and durability, exterior plywood makes an excellent substrate for tile in relatively dry applications.
Cement Backerboard for Use Under Ceramic Tile: Installation Specifications
Please see Cement Backerboard Installation for the detailed, illustrated version of this section. Excerpts are below.
Developed specifically for use under ceramic tile, cementitious backer units (CBUs) are made of sand and cement and are reinforced by fiberglass facings or chopped fibers within the material itself. Cement backerboard is impervious to moisture, but may let moisture pass through, so it should always be backed by a waterproof barrier, such as polyethylene sheeting or asphalt-impregnated felt.
Because the material has little inherent strength, it relies on the structure beneath for stiffness when used on floors and other applications subject to significant loads. A variation on cement backerboard, Hardibacker (James Hardie Building Products), is made of fiber-cement. Because it is only 1/4 inch thick, it is usually installed over 1/4 -inch plywood, both for stiffness and to bring it flush with the surrounding drywall.
Cement backerboard should be installed with special backerboard screws (not drywall nails) that have an anti corrosive coating and oversized heads with ridges underneath designed to self-countersink and pull tight. Roofing nails are also acceptable with most backerboards.
Closely follow manufacturers instructions, which vary a little from product to product. Typical installations include:
- Backerboard on walls:
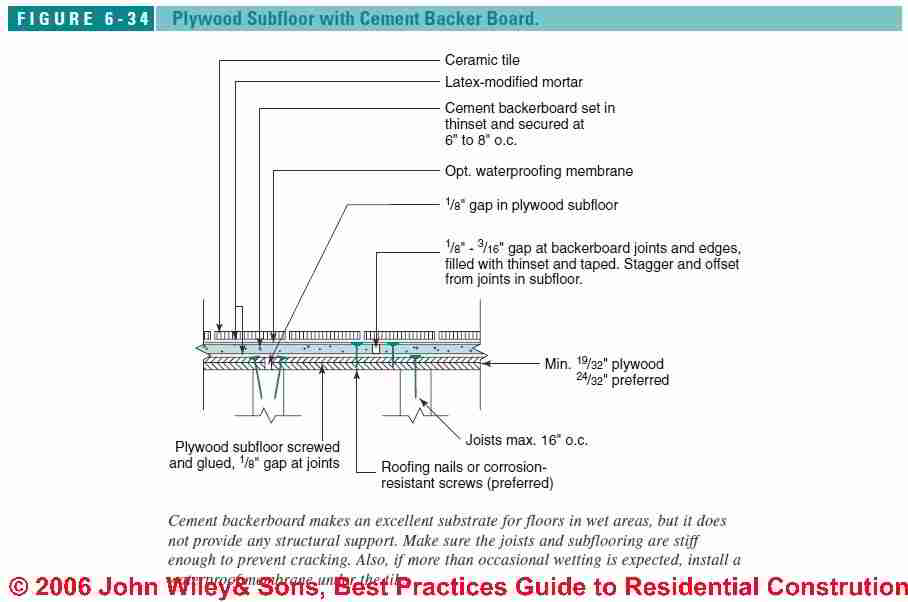
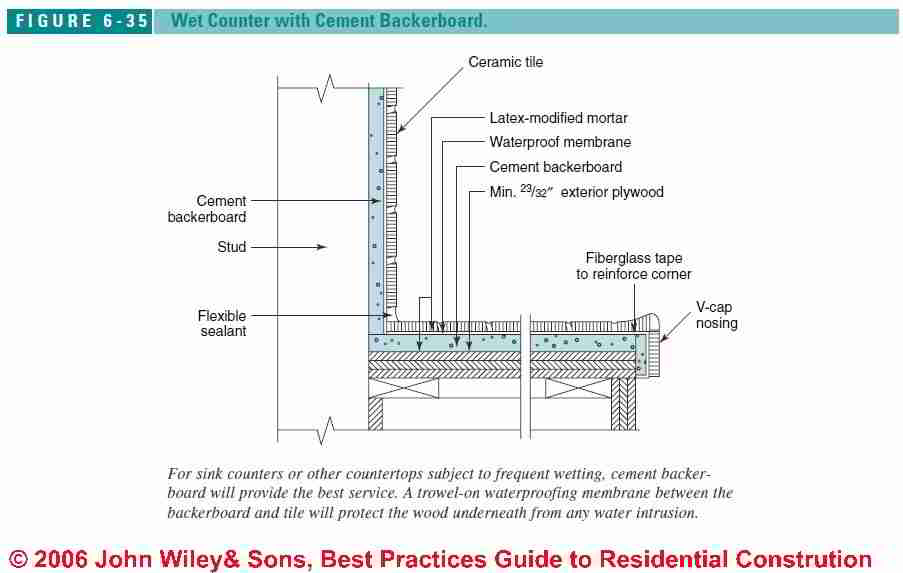
CBUs can go directly over studs at 16 inches on-center or over drywall, and it is fastened with 1 1/2 -inch galvanized roofing nails or special self-countersinking galvanized screws at 6 to 8 inches on-center. - Backerboard on floors and countertops:
CBUs are bonded to the plywood with a layer of latex- or acrylic-modified thinset (Figure 6-34 and Figure 6-35). Apply the thinset with the flat side of a 1/4 -inch notched trowel, then rake with the notched side to provide a continuous level setting bed. Seat the backerboard evenly with a beating block, then secure with roofing nails or special backerboard screws. Because CBUs provide little added stiffness, it is best to upgrade to a 23/32-inch subfloor. - Joint details for Cement Backerboard Under Tile:
Leave a 1/8 - to 3/16-inch gap between adjoining sheets of backerboard and at edges. Just before tiling, fill the joints with thinset and cover with 2-inch-wide fiber mesh tape (unless the adhesive manufacturer recommends otherwise). Then embed the tape in a thin skim coat of thinset. Reinforce inside and outside corners with three pieces of 2-inch tape or one piece of 4-inch tape. - Obstruction Clearances at Concrete Backerboards:
Leave a minimum 1/4 -inch gap where the CBU meets a tub lip, plumbing fixture, pipe, or any restraining surface and fill the joint with a flexible, waterproof sealant.
Installation Guide for Drywall Substrate Below Tile
Regular 1/2-inch drywall over 2x4 framing or steel studs 16 inches on-center is a suitable substrate for dry installations. Using 5/8-inch drywall or a second layer of 1/2-inch will provide a stiffer wall. Joints should be taped and one coat of joint compound applied to joints and nails. If tiles will be set in thinset mortar, use thinset with mesh tape at the drywall joints.
Using "Greenboard" Moisture-Resistant Drywall Under Tile
Commonly called “greenboard,” this offers moderate protection in moist conditions, but it is not recommended in wet areas, such as tub surrounds, unless protected by a waterproof membrane.
Coated Glass-Mat Gypsum Backerboard Use Under Tile
Competing with cement backerboard, gypsum products such as Georgia Pacific’s Dens-Shield® are designed as tile substrates for damp areas. The gypsum core is treated with silicone to make it water-resistant, and the fiberglass and acrylic facing acts as a surface vapor barrier.
While not as strong as cement backerboard, gypsum-based backerboard installs faster since it cuts and installs like drywall. Installation is with roofing nails or galvanized bugle-head drywall screws, which should be driven flush with the surface but should not break the waterproof skin.
Panels are butted tightly and the joints are taped and embedded with latex Portland cement mortar, also used to set the tile.
In use since 1987, Dens-Shield® is well-suited to tub surrounds and other light-duty wall applications, but it is not suitable for saunas, steam rooms, or other applications facing extreme heat and humidity. As with other tile substrates, follow manufacturer’s instructions closely regarding framing, installation, and tile application.
Guide to Installing Tile Over Concrete Slabs
Please see Tile Over Concrete Slab for the detailed, illustrated version of this section. Excerpts are below.
Tiles can be applied directly to a clean, smooth concrete slab with a latex Portland cement mortar. The concrete should be properly cured, be level to 1/4 inch in 10 feet, and have a steel trowel or fine broom finish. Curing compounds or old adhesives used for carpeting or resilient flooring will act as bond breakers, so they need to be removed before installing the tile.
Either a power-blast cleaning machine or a rotary sander with a coarse carborundum sanding sheet can be used. If the slab has cracks or control joints, a crack isolation membrane should be used (see Isolation Membranes).
Other Tile Substrates Used in Remodeling
In remodeling, tiles can be successfully installed over existing ceramic tile, plastic laminate, or resilient flooring (except the cushioned type) that is well bonded. These must be stripped of any sealers or waxes and scarified with a coarse sander before applying the new adhesive. Wood floors must first be covered with plywood or a cementitious backerboard.
Unsuitable substrates that should not be used under tile include oriented-strand board (OSB), lower grades of plywood with voids, and interior grade plywoods such as lauan.
Guide to Using Floor Leveling Compounds For Setting Tile
If a wood floor or slab needs leveling, you can use special cement leveling compounds formulated for use as a substrate for ceramic tile or stone tile. These are either site-mixed from a bag or installed by a specialty subcontractor. Some are self-leveling and others require screeding.
Gypsum-based underlayments are generally not suitable for tile. Most self-leveling compounds can be installed up to about an inch thick. For thicker applications, let the first layer dry before adding more, or fill lower areas with plywood shims before adding the compound. Use exterior-grade plywood with no voids.
Guide to Moisture and Water Barriers for Kitchen or Bath Tile
Although glazed ceramic tile is waterproof, neither the grout joints nor the cement backerboard behind the tile are water barriers. To prevent moisture from passing through the tile and substrate to the plywood or wood framing, a moisture barrier is required in areas subject to high moisture levels or occasional wetting, such as tub surrounds and kitchen counters.
In areas subject to heavy wetting, such as shower pans and some bathroom floors and counters, a sheet membrane or trowel-on membrane should be used to provide full waterproofing.
Moisture Barriers for Kitchen or Bath Tile
On tiled walls, protect the wood framing from water intrusion, using either 6-mil poly or 15-pound asphalt-impregnated felt lapped to shed water. The barrier should go between the tile substrate and the framing. On outside walls, this material can also served as the air and vapor barrier if the joints are sealed with tape or a compatible sealant.
Tile Membranes for Wet Areas, Bathrooms, Showers
Full waterproofing is required in construction that must retain water, such as shower pans and tiled tubs. It is also recommended in areas subject to frequent wetting, such as raised tub surrounds, bathroom floors, and counters with sinks. There are two types of membranes: thermoplastic sheet materials and trowel-on membranes.
Sheet membranes can be applied to most tile substrates with either thinset mortar or a proprietary adhesive, and tiles are bonded directly to the membrane. With any membrane, check the label for compatibility with the substrate and adhesives. Most waterproofing membranes also serve as isolation membranes.
- Sheet membranes:
These single-layer elastomerics, such as chlorinated polyethylene (CPE), are bonded to the substrate—typically cement backerboard, plywood, or a mortar bed—with a compatible thinset mortar or proprietary adhesive (Figure 6-36).
After the adhesive cures, tiles are set onto the membrane with a second layer of thinset. For watertight performance, joints in the membrane are caulked with a proprietary sealant or are solvent-welded. In addition to stopping water, CPE membranes act as an isolation membrane, protecting the tile and grout from movement in the substrate (see “Isolation Membranes,” p. 237).
Examples are Noble-Seal TS (Noble Company) and Dal-Seal TS (Dal-Tile Corp.), both 30-mil thick CPE. Special heavier membranes are designed for shower pans, tubs, and other details that must contain standing water. - Trowel-on membranes:
These one-part or two-part liquids are troweled or brushed on, some with a reinforcing fiberglass fabric. These are good for less critical areas that are only occasionally wetted, such as countertops, tub surrounds, and some floors.
They also provide limited protection against cracking due to movement in the substrate when used in conjunction with a reinforcing fabric. Examples of one-part membranes include Laticrete 9235 (Laticrete International, Inc.) and Mapelastic HPG (Mapei Corp.).
Expansion Joint Requirements in Tile Surfaces
Tile and grout are fairly unforgiving of movement in the substrate. To protect against cracking of the tile or grout joints, expansion joints are recommended by the Tile Council of America in the following places:
- Every 24 to 36 feet
each direction; or every 8 to 12 feet in each direction if the tiled surface is exposed to moisture or direct sunlight. - Around the perimeter
of a room or wherever tile meets a different material or abuts restraining surfaces, such as curbs, columns, or pipes. At inside corners, such as where a countertop meets the backsplash. - Wherever changes occur in the backing
material, for example, from wood to masonry. - Directly over any expansion,
control, construction, or cold joint
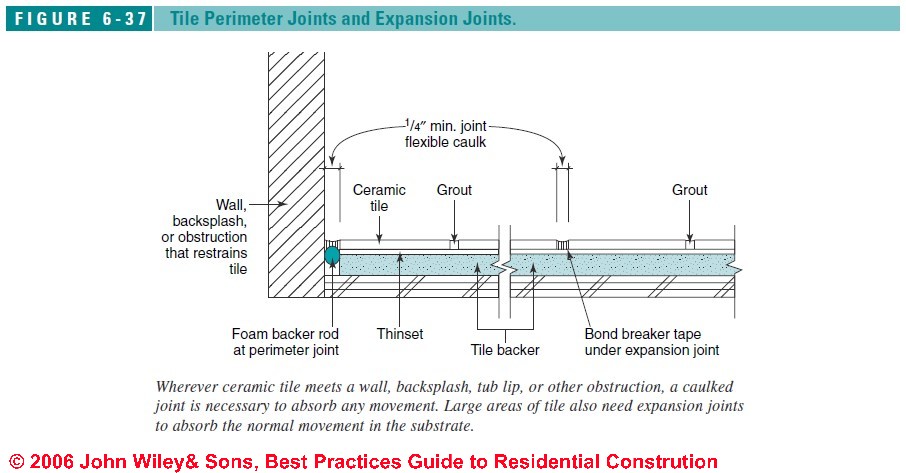
Expansion joints should be at least 1/4 inch wide and free of grout, backerboard, or tile adhesive. Use an elastomeric caulk with a backer rod or bond-breaker tape to prevent three-sided bonding of the caulk (Figure 6-37). Most tile suppliers now carry colored caulks designed to match standard grout colors, or colored caulks can be ordered from Color Caulk (see Kitchen & Bath Associations, Product Sources).
Guide to Using Isolation Membranes to Avoid Cracks in Tile Surfaces
Polymer-modified thinset can absorb small amounts of movement, but where more significant movement is expected, a crack isolation membrane is the safest approach. Examples include tiling over concrete with control joints or shrinkage cracks, over radiant slabs, or over existing tile or other problematic remodeling surfaces. Wood-framed floors with long joist spans of 16 feet or more are also good candidates for isolation membranes.
Tile contractors typically use the same type of elastomeric membrane used for waterproofing, such as Noble- Seal TS (Noble Company) or Dal-Seal TS (Dal Tile). It is applied as described above under “Membranes” (previous page), although joints between sheets do not need to be solvent welded unless waterproofing is also required.
Crack Isolation for Tile Surfaces
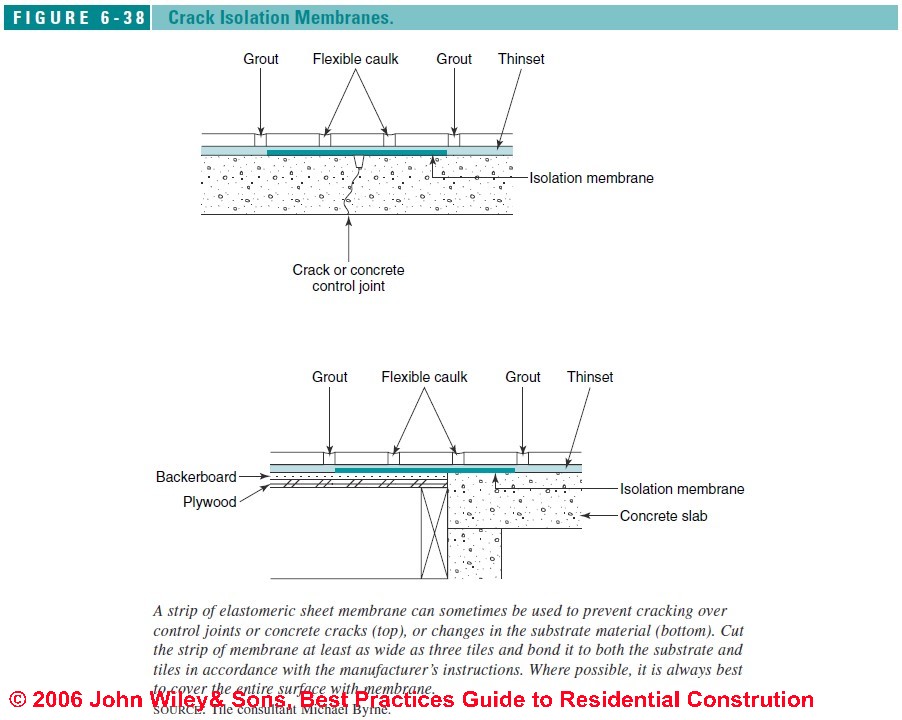
In repair work or other jobs where covering an entire floor with isolation membrane is not feasible, a strip of membrane can be installed over just a crack, change of materials, or control joint where minor movement is expected. In general, this will work where cracks are less than 1/8 inch wide, and there is no vertical movement.
Also, with some types of membrane, the contractor can offset the sealant-filled “soft joints” in the tile, so they do not have to fall directly over the crack or control joint in a concrete slab. In this case, create soft joints on both sides of the crack or joint (Figure 6-38), using a flexible sealant instead of grout. If a crack in the concrete substrate runs diagonal to the grout joints, the soft joint must run in a zigzag pattern on each side of the crack.
According to tile expert Michael Byrne, crack-isolation membranes used this way should be three times the width of the tile, but he cautions that the preferred approach is to cover the entire floor with membrane. This provides better protection against cracking and eliminates the soft joints and the slight bump in the tile surface, which may be unacceptable visually.
Floor Tile Setting Compounds Guide
Please see Tile Over Concrete Slab for the detailed, illustrated version of this section. Excerpts are below.
Manufacturers offer a wide range of setting compounds formulated for different setting beds and conditions. Choosing the wrong one can result in a failed tile job. For example, applications subject to moisture, temperature extremes, and heavy loading will need a higher quality setting compound than a kitchen backsplash, where organic mastic may serve perfectly well.
If applying mortar to a thickness of over 1/4 inch to even out low spots in the floor or irregularities in the tile, use a medium-set mortar or multipurpose thinset suited to the task. With any product, it is important to follow the manufacturer’s instructions regarding application and compatibility with the particular substrate (see Table 6-7).
Organic Mastics Used for Floor Tiles
These are ready-to-use adhesives primarily used with drywall and plywood substrates, although some are also approved for concrete and cement backerboards. Most now use a water-soluble formula, although some still use petroleum-based solvents.
In general, mastics are the least expensive setting material and provide the least strength and flexibility. The substrate must be very flat, since mastic is troweled on thin and cannot bridge low spots or uneven joints. Mastic should be avoided in applications subject to high temperatures.
Type II mastic is rated for use on walls not subject to wetting. Type I is approved for use on floors and wet areas. However, thinset mortars are better suited for floors and wet applications, for a modest increase in cost.
Dry-Set Mortar Use for Floor Tiles
Dry set mortar for floor tile installation is a factory blend of sand, cement, retarders, and other additives that is mixed with water on the job site. It provides a strong bond and high compressive strength, making it more suitable on floors than organic mastic. It is commonly used over concrete slabs, mortar beds, or cement backerboards. It cleans easily with water; but once dried, it is unaffected by water.
Polymer-Modified Mortar Uses for Floor Tile Installation
Polymer modified mortar for floor tiles is essentially dry-set mortar with latex or acrylic polymers added to increase the bond strength, compressive strength, and flexibility of the compound. One formulation uses a latex or acrylic liquid added to the dry mix at the job site.
The other has dry polymers blended into the dry mix at the factory so only water is added on site. Polymer-modified mortar bonds well to most substrates, including waterproofing membranes, to provide a premium waterproof system. Some kinds are not recommended for use with plywood, however (always check the label for compatibility with a substrate).
Cleanup should be done quickly with a damp sponge while the material is wet, or it is difficult to remove from skin and materials.
Modified-Epoxy Mortar and Grout System for Floor Tile Installation
Epoxy mortar for flooring is generally used for floors and countertops that require moderate chemical resistance, or where higher bond strength is needed to withstand greater loading, impacts, and flexing. It is also useful with questionable substrates such as existing tile, sheet vinyl, or plastic laminate, all of which are suitable for epoxy as long as they are sound and the surfaces are roughed up.
In addition to their higher cost, these products have precise mixing requirements, a short pot life, and more difficult cleanup than standard thinsets. High-chemical-resistance formulations are also available. Cleanup of dried material requires special solvents, and the silica sand presents a respiratory hazard. Because of the mixing requirements and faster setup, skilled applicators are required.
Epoxy Adhesive & Grout Floor Tile Details
Epoxy adhesive is often used to install green (serpentine), white, and other moisture sensitive marbles and marble agglomerates that may stain or warp with water-based products. It provides high-bond strength and impact-resistance over most sound substrates, including plywood.
It also provides water-resistance and moderate chemical-resistance. It requires precise mixing and skilled application, and special solvents are required to remove any material that dries on the surface of the tile (or the installer’s hands). Also, the silica sand presents a respiratory hazard.
Guide to Tile Installation with Thinset Mortars
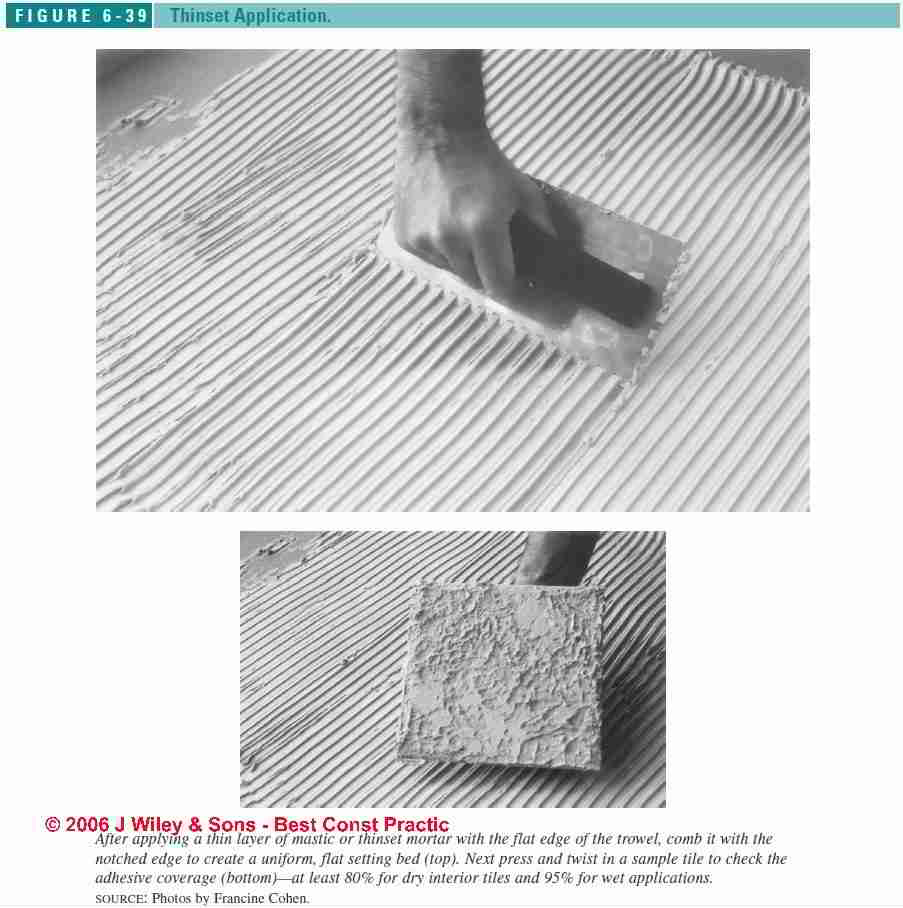
Thinset Application. All mastics and thinset mortars are applied in the same way. First apply a thin layer of the adhesive using the flat edge of the trowel for continuous coverage, then comb with the notched edge of the trowel to create a uniform, flat setting bed. Hold the trowel at about 30 degrees from the surface for the continuous layer and at about 45 degrees when combing with the notched edge (Figure 6-36).
Notches range from about 3/16 inch for thin tile to 3/8 inch for tiles 12x12 inches and larger or irregular tiles such as handmade pavers.
A 1/4 -inch notch works for most other tiles. Always follow the directions on the can. Coverage varies depending on the type of substrate and tile, as well as the heat and humidity in the environment. this is particularly important with tile 12x12 inches or larger.
Also apply thinset mortar to only one small section at a time—no larger than the area that can be tiled before the thinset skins over. Any thinset that skins over will have to be discarded.
Medium-Set Application for Tiles
Where irregularities in the substrate or tile shape, such as handmade pavers, require a setting bead thicker than 1/4 inch, choose a medium-set mortar or an all-purpose thinset approved for medium-set usage. Other thinset mortars are not strong enough when built up to that depth. Irregular-shaped tiles will need some adhesive “back buttered” directly to the tile to obtain proper coverage.
Tile Installation Using Thinset and Medium Set Mortars
Next press and twist in a sample tile to check the adhesive coverage. ANSI standards require that dry interior tiles be evenly covered over at least 80% of their surface area (Figure 6-39).
Wet or exterior applications require 95% coverage. When set back in place and beat in with a rubber mallet (larger tiles) or beating block (smaller tiles such as mosaics), the setting bed should be about 3/32 inch but not larger than 1/4 inch, unless medium-set mortar is used. Irregular-shaped handmade tiles need some adhesive “back buttered” directly to the tile to obtain proper coverage.
Grout Installation Guide for Tile Jobs
Please see GROUT INSTALLATION, TILE for the detailed, illustrated version of this section. Excerpts are below.
A high-quality grout job makes a tile installation stronger, more attractive, and easier to clean. Properly formed joints are generally flat for square-edge tiles and slightly concave for rounded-edge tiles.
Standard grout is a mixture of Portland cement and additives to control its texture and cure time, along with pigments if the grout is colored. In general, floors do best with a basic gray or other dark grout. White and light colors show stains the most. Most grouts also contain latex or acrylic additives to improve their performance.
Properties of Sanded vs. Un sanded Tile Grout
Sand is added to grout to strengthen the grout where joints are wider than 1/8 inch. For joints wider than 1/2 inch, special grout with coarser sand is recommended.
Polymer Additives for Tile Grout
Most grouts now have latex or acrylic compounds added either to the dry mix at the factory or as liquid on the job site. These polymer additives make the grout more water-resistant, flexible, and stain resistant, and, with colored grouts, better able to maintain a consistent color. Although cured grout, like other masonry products, is unaffected by water, it cannot be relied on as a waterproof material.
Epoxy Tile Grouts Resist Stains
For a higher degree of stain-resistance as well as moderate resistance to some chemicals, epoxy grout is a good option for applications such as showers, bathroom floors, or heavily used kitchen counters. One type, called epoxy-emulsion grout, mixes a two-part epoxy with Portland cement and sand.
Another, called 100%- solids epoxy, mixes two-part epoxy with silica sand filler. Both types require precise mixing and installation. If joint cleaning is rushed, the grout pulls out and smears the tile; too much delay causes it to harden before you can shape the joints. If installed correctly, however, epoxy grout offers excellent protection against staining and does not require sealing. Epoxy grout will yellow slightly over time, however, particularly if exposed to direct sunlight.
Instructions for Tile Preparation & Tile Grouting
Allow the adhesive to dry at least overnight, or longer if recommended by the manufacturer, before grouting. Clean any adhesive or foreign matter from the grout joints. If the tiles are nonvitreous and unglazed, as with handmade pavers, they may need to be sealed prior to grouting to prevent staining. Also, light-colored glazed tiles may need to be sealed to prevent stains from dark colored grouts.
With nonvitreous tiles, which soak up moisture, it is best to mist or sponge the tiles just before grouting so the grout will cure properly. For best results, maintain the room temperature between 50°F and 80°F during grouting and curing.
Grout Installation Details: Mixing & Application
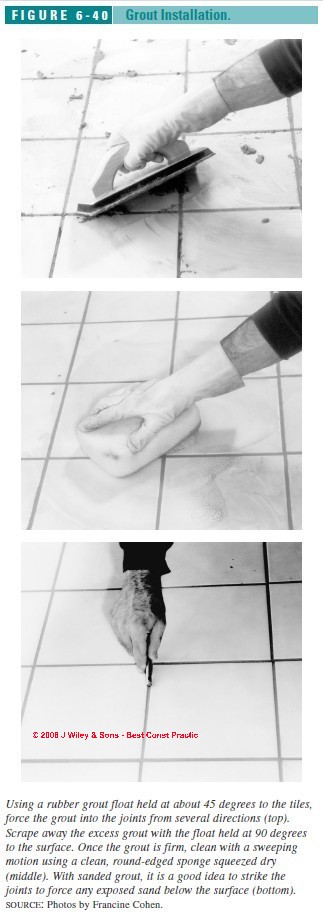
Mix the tile grout by hand or with a paddle bit run at slow speed (air bubbles from fast mixing will weaker the mix). After letting the grout “slake” for 10 minutes, which allows the ingredients to fully react, the material is remixed and ready to apply as follows, working one small area of several square feet at time (see Figure 6-40):
1. Using a rubber grout float held at about 45 degrees to the tiles, force the grout into the joints from several directions.
2. Scrape away the excess grout with the float held at about 90 degrees to the surface.
3. Once the grout is firm, typically in 15 to 30 minutes, clean the surface of the tiles with a sweeping motion, using a large clean round-edged sponge squeezed as dry as possible (water splashed on the joint lines can weaken the grout or cause splotchy coloring).
4. First remove the excess grout from the face of the tiles, then concentrate on shaping the grout joints. Rinse the sponge frequently, always keeping it as dry as possible.
5. Clean until just a light haze remains, which can be wiped off with a damp rag when the grout is dry.
Now is also the time to pack fresh grout into any voids you discover and clean the grout out of any “soft joints” that are to be filled with sealant. Use the tip of a margin trowel to clean up any corners or problem joints. With sanded grout, it is also a good idea to strike the joints with a curved metal implement, such as the back of a spoon, a steel chisel handle, or the side of a nail set to help force any exposed sand below the surface. This make the joint smoother and easier to clean.
Damp Curing Recommended for Portland cement grout
Traditional Portland cement grout requires several days of damp curing to reach its full strength. This was typically done by covering the freshly grouted tile with Kraft paper and periodically misting or sponging the tile. Most modern grouts with latex or acrylic additives, however, do not require wet curing except in very hot, dry weather. As with all tile products, check the label for instructions.
Guide to Using Tile Grout Sealers
While latex or acrylic additives help protect the grout from staining, sealing the grout after it cures provides the best protection. There are a wide variety of products on the market. Consult the directions regarding when and how often to apply. Many require reapplication annually or more often, depending on the specific use. Regardless, to keep grout from darkening and staining, it will need regular cleaning with a grout cleaner or mild detergent. Avoid oil-based soaps as they tend to darken grout.
Recommendations for Constructing or Installing Bath Shower Pans
Please see Bathroom Shower Pans, Build, Installthe detailed, illustrated version of this section. Excerpts are below.
A shower pan must be completely watertight and able to hold pooled water should the drain get clogged. Most are built in place over a mortar bed with a waterproof membrane liner. However prefabricated setting beds have also become available recently.
Using Prefab Cement Shower Pans
For standard shapes and sizes, one option is to install a prefabricated pan made from 40-lb polystyrene foam coated with a reinforced cementitious coating that is ready to receive tile. These range in size from 36x36 inches to 36x60 inches and come pre sloped with a built-in drain.
One unit, called Pro-Form (Bonsal American) is bonded to the subfloor with latex modified thinset, coated with a liquid waterproofing membrane, and is then ready to tile. As long as the subfloor is sufficiently stiff to prevent flexing, these units should perform well with 4x4–inch tiles. Smaller tiles may exert too much of a point load for the underlying foam, while larger tiles can cause problems with the slope angle.
How to Install Prefab Plastic Shower Pans
A less expensive option is to combine tiled walls with a one-piece fiberglass or acrylic shower pan (not to be tiled). These are the same materials used in one-piece shower or shower-tub units. A few companies also sell stand-alone solid-surface shower pans.
Like other plastic units, these must be properly supported underneath to prevent flexing and cracking. Some require setting in sand, wet mortar, or plaster. In general, acrylic units cost more than fiberglass but are stronger and less prone to flexing and cracking.
How to Build Mortar-Bed Shower Pans
Built-in-place shower floors using a mortar bed and modern waterproofing membranes can provide many years of trouble-free service. For best performance use a heavy-duty sheet membrane, such as 40-mil Chloraloy (Noble Company), which is designed for use in shower pans and similar applications.
To guarantee that any trapped water will drain properly, the membrane is placed on a layer of latex-modified mortar sloped 1/4 inch per foot toward the drain. Two-piece clamping-type drains are designed to seal to the membrane by compression between the upper and lower flanges (see Figure 6-41).
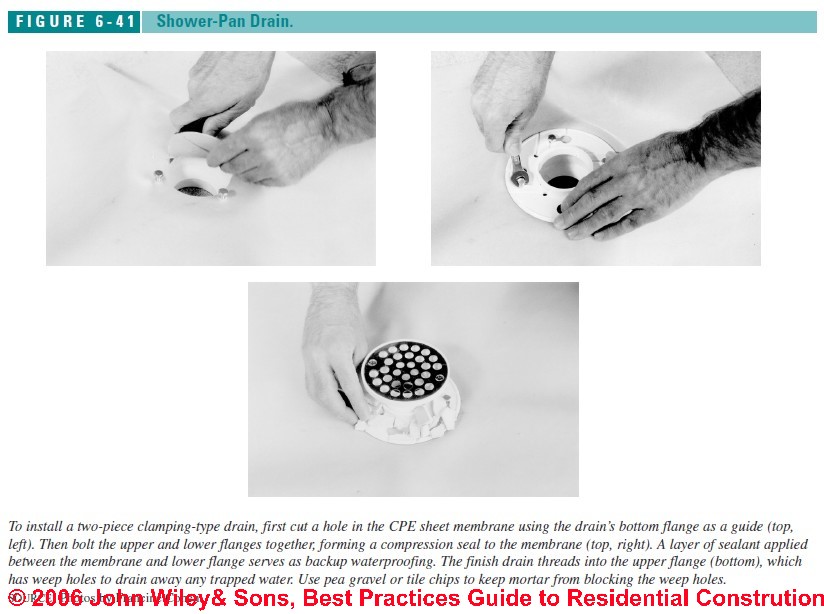
A layer of sealant applied between the membrane and lower flange serves as backup waterproofing. Weep holes around the bottom of the drain, surrounded by pea gravel or pieces of broken tile, allow any water that accumulates to drain away (see Figure 6-42).
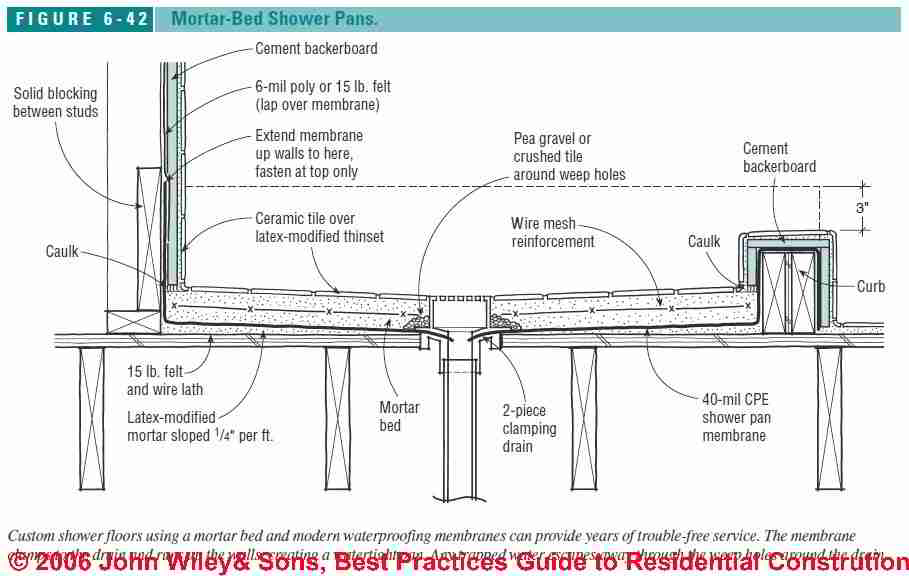
The membrane should run up all sides of the shower, at least 3 inches above the height of the finished curb. Secure the membrane to the framing with galvanized staples or roofing nails along the top edge, being careful to make no holes in the membrane any lower than 2 inches above the finished curb.
At the inside wall corners, the extra membrane material is not cut, but pleated and folded over to lay flat against the framing. Avoid making wrinkles here or along the bottom of the pan. At the curb, the membrane must be cut so it can fold over the top of the curb. Seal these corner cuts with either prefabricated “dam corners” or patches of membrane caulked in place with Nobleseal 150, a high-performance Kraton-based sealant.
Kitchen Cabinet Choices & Design Guide
Kitchen cabinets range widely in styles, materials, and levels of quality. Well-made cabinets feature sturdy cabinet boxes and drawers, stiff shelves that resist sagging, and solid hardware that operates smoothly. Higher-end cabinets make greater use of veneer-core plywood rather than medium-density fiberboard (MDF), particleboard, or other composites.
Doors, drawer fronts, and visible end panels in premium cabinets make use of solid wood, real wood veneer, or high-pressure plastic laminate. At a glance, it is not always easy to discern quality levels since the best wood-grain vinyl facings do a surprisingly good imitation of real wood, at least until someone dents or scratches a corner.
With so many variables, it is not surprising to find that a set of cabinets for a midsize kitchen could range in price from as little as $3,000 for builder-grade cabinets picked up at a home center to as much as $20,000 for a custom high-end job.
Guide to Wall Cabinet Grades
The cabinet industry generally divides cabinets into three main grades: stock, semicustom, and custom.
- Stock cabinets are mass-produced in factories in standard sizes, typically in increments of 3 inches, although all sizes may not be available for certain items. Each line comes in a limited number of materials, styles, and options. These are the least expensive option with the quickest delivery time, but usually not the best quality. Fillers are used to fit the cabinets into place.
- Semicustom cabinets may be similar to stock cabinets in quality level or may be significantly better. Since these are made to order, however, the buyer has many more choices for wood species and finishes, laminates, door styles, and storage options and accessories. More sizes, including special heights and depths, are often available. Like stock cabinets, these are built in 3-inch increments, requiring filler strips for installation.
- Custom cabinets are made to order by smaller shops for an individual job. Each shop has its own preferred materials, styles, options, and details; but for enough money, most shops will create whatever is requested. With a custom fit, filler blocks are not needed.
Cabinet Materials
Cabinet Panel Products
Cabinets use a wide variety of substrate materials for panels. The main panel products, typically covered with a wood, melamine, or vinyl veneer, are listed below:
- Hardboard, sometimes referred to by the brand Masonite®, is made from compressed wood fibers and lignin or phenolic resin. It swells and degrades when wet and is used for drawer bottoms, backs, and bottoms of lower-end cabinets.
- Particleboard is made from small wood particles that are resin-bonded under pressure and heat. Type I uses urea-formaldehyde resin and Type II uses water resistant phenol-formaldehyde resin. Density classes are L (low), M (medium), and H (high). Better cabinets use medium-density stock (40 to 50 pounds/cu ft). Some also use Type II, which is water-resistant and has little off-gassing of formaldehyde. Particleboard tends to swell when wet, and it is used widely for cabinet panels, shelves, and doors. Formaldehyde off-gassing may be a concern.
- Medium-density fiberboard, or MDF, is a high-quality
substrate made from fine fibers and urea-formaldehyde
resin. It is more stable than plywood, stiffer than
particleboard, and less affected by water. Its surface
is smoother than particleboard and can be routed,
shaped, and painted.
MDF is widely used for all cabinet panels and shelves. A 36- to 38-lb/cu ft density is adequate for most applications, although some use 42- to 48-pound material. The high formaldehyde content is a concern to individuals concerned about off-gassing. - Plywood is made from thin wood sheets laminated to each other with the grain running at right angles in alternate plies for strength. Interior grades, typically used in cabinets, use urea-formaldehyde resin. Better quality cabinets use plywood for cabinet panels, shelves, and drawer bottoms. Plywood resists water damage.
Guide to Cabinet Finishes
These are the most common finish materials used for cabinet sides, interiors, and door and drawer fronts.
- Wood veneer cabinets. Wood veneer is a thin layer of wood bonded to particleboard, MDF, or plywood to give the appearance of solid wood. Used in both flat and raised panels, veneer provides good grain matching. Veneered panels rarely have problems, although scratches or dents are easier to repair on solid wood. Very high heat or humidity can cause cracking or delamination. The finish may be a simple solvent-based varnish or a more advanced and expensive multi coat system.
- High-pressure laminate cabinets. Often called “plastic laminate,”
high-pressure laminate is composed of layers of
resin-saturated kraft paper with a clear melamine finish.
High-pressure laminate is widely used on countertops
because it is inexpensive, durable, and easy to
clean.
Scratches and damage are difficult to repair, however. It is used on door and drawer fronts and occasionally on side panels. Color-through laminates are also available at a higher cost. These hide chips and scratches better and do not leave a telltale dark edge at corner seams. - Melamine cabinets. Also known as low-pressure laminate, melamine is thinner and less durable than high-pressure laminate. It comes applied to particleboard or MDF with a paper layer under the melamine that provides the color or wood grain. Low-pressure laminate can chip or crack and may discolor over time. It is used widely on cabinet boxes and door backs, and on door and drawer fronts on low-end cabinets.
- Vinyl cabinets. Vinyl is a plastic sheet material that comes applied to a particleboard or MDF substrate, and is printed with a wood-grain or other pattern. It is typically 2 to 4 mils thick and is not as durable as melamine, although the heavier 4-mil material resists scratches fairly well. Exposed, unfinished edges are prone to damage, and scratches or dents are difficult to repair.
- Rigid thermofoil (RTF) cabinets. RTF is a rigid PVC sheet
that is heated, vacuum-formed, and glued onto MDF
doors and moldings, creating a seamless face. Most
RTF doors are shaped to simulate a raised panel door.
Thermofoil is available in many colors and woodgrain
patterns, although white is the most common.
High-quality RTF is durable, scratch-resistant, and resists yellowing—a problem with some of the early formulations. Better products carry warranties of five or more years. When using wood-grain thermofoil, it is best to use full-overlay doors and matching thermofoil moldings, since real wood finishes will age differently than the thermofoil. Many thermofoil doors have matching melamine backs. - Painted cabinets. There are a number of high-quality painted
finishes that are durable, lustrous, and resistant to
crazing, chipping, or yellowing. Polyester paint, also
used on cars and appliances, is a very expensive
option that requires many coats that are oven-cured
and wet-sanded by hand. The finish can be gloss or
matte and fills the pores of the wood, giving it a solid
appearance.
Catalyzed enamel paint is a less expensive option that uses a two-part formula to achieve a similar lacquer like finish. Although these paints resist chipping, nicks are difficult to touch up and blend in. Also hairline cracks will typically appear at the joints in solid wood doors due to expansion and contraction—not a problem with a dimensionally stable substrate such as MDF.
Guide to Assessing the Quality of Kitchen or Bathroom Cabinets
Assessing a cabinet’s quality is not always easy due to the large number of components involved and the fact that much of the material and joinery is concealed. One good indication of overall durability is certification by the Kitchen Cabinet Manufacturers Association, which has a rigorous testing and certification program that measures such things as structural integrity, shelf strength, hardware durability, and quality of finishes.
Also, many manufacturers offer two or three grades of quality. Comparing the specifications of each line can provide a good idea of what the upgrades are and whether the added expense is worthwhile. The main components to evaluate are covered below.
Types of Kitchen or Bathroom Cabinet Boxes
The cabinet box, or carcase, makes up the body of the cabinet and gives it structural integrity. Typically, the only visible parts are end panels, portions of the interior, and the front edges in frameless cabinets or faceframes in framed cabinets (Figure 6-43).
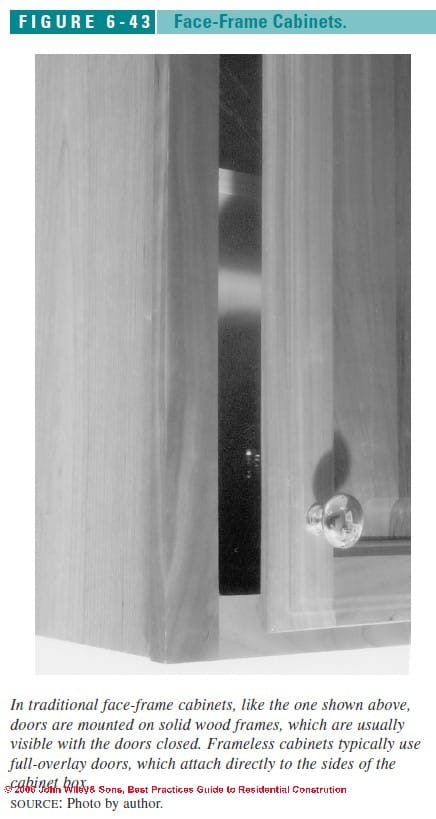
- Framed cabinets. These are the traditional style of construction with a frame of 3/4-inch-thick solid wood rails and stiles fastened to the front of the box. Hinges attach to these face-frames, which are usually partly or fully visible with the doors closed.
- Frameless cabinets. Also called 32-mm cabinets or
Euro cabinets, these have no face-frames in front. The
doors attach directly to the inside face of the cabinet
sides with cup hinges. Doors and drawers are usually
full overlay, concealing the front edges of the boxes.
However, some frameless cabinets now offer more traditional wooden doors that leave a narrow band of the cabinet fronts exposed. The front edge is typically finished in vinyl, melamine, or wood veneer. High-end cabinets may have solid wood banding.
With either type of cabinet, the price is driven by the materials, hardware, and assembly techniques. The cheapest cabinets typically use 1/2 - to 5/8-inch particleboard with a vinyl or melamine face. Better quality cabinets use medium-density fiberboard (MDF), and the best generally use 1/2- to 5/8-inch plywood. The facings on better cabinets are usually high-pressure laminate or real wood veneer.
With some cabinet lines, it is possible to order plywood sides only where needed, for example, on the sink base and wherever there is an exposed end panel, which might be subject to wetting or the occasional dent or nick.
Backs and floors if cabinets range from flimsy 1/8- or 1/4 -inch hardboard to thicker particleboard, MDF, or plywood (in order of stiffness). The finish inside the cabinet is typically vinyl or melamine. Cabinet bottoms should be rigid enough not to flex under the weight of pots and pans.
Finally, look for securely installed corner blocks or stretchers across the top of the cabinet to hold it square during shipping and installation Some high-end cabinets have a full-size top panel to reinforce the top of the box.
Guide to Types of Kitchen or Bathroom Cabinet Shelves
Shelves in cabinets range from 1/2 -inch particleboard, which will bow under the weight of dishes, to 3/4 -inch plywood. Plywood is the strongest shelving material, followed by MDF, then particleboard.
In base cabinets, look for full depth shelves or roll-out shelving. Wall cabinet shelves should be adjustable and have solid clips, preferably metal. In general, shelves are designed to support a uniform load of 15 pounds per square foot (psf) for kitchens, 25 psf for closets, and 40 psf for bookshelves. If loads are likely to exceed these, upgrade to a stronger shelf (see Table 5-11, page 186).
Types of Kitchen or Bathroom Cabinet or Counter Drawers
It is important to have solidly built drawers, since they get a lot of use and abuse. High-quality drawers typically have solid hardwood or poplar sides and backs, with minimum 1/4 -inch plywood bottoms glued into dados. In the best cabinets, drawer sides are dovetailed or dowelled to the front and back and the drawer front is a separate piece screwed to the box.
Respectable drawers are also built with sides of 1/2 -inch or thicker plywood or melamine stock dowelled together. In lower-end cabinets, drawer sides are often particleboard or MDF wrapped in vinyl and nailed or stapled and glued together, with a particleboard or hardboard bottom. Also many lower-quality cabinets use the drawer front as the front of the drawer box, a weaker detail.
Types & Choices of Drawer Slides
All drawer slides, even with the same rating, are not alike. Look for heavy-duty epoxy-coated components with ball-bearing rollers that operate smoothly and quietly. At a minimum, use three-quarter extension drawer slides rated to carry 75 pounds.
Consider upgrading to full-extension slides rated for 100 pounds, particularly for any large, deep drawers. Under mount slides have the advantage of helping to support the drawer while remaining out of sight. Side-mounted slides that wrap around the drawer bottom also provide good support.
Guide to Types of Cabinet Doors and Drawer Fronts
Doors and drawer fronts are the most visible part of a kitchen and take a lot of abuse. Many cabinet manufacturers buy doors and drawer fronts from large specialty door manufacturers, so they may not reflect the overall quality of the cabinets. When selecting a material and finish, consider durability and ease-of-cleaning as well as appearance. Frame-and-panel wood doors are typically more expensive than laminate or thermofoil doors.
- Frame and panel cabinet doors or drawers have either a raised or flat panel of solid wood or veneer. Veneered panels are more stable but more difficult to repair if nicked or scratched. Avoid frames with mitered corners, as they may open with seasonal changes in humidity.
- High-pressure plastic laminate cabinet doors and drawer fronts are more durable than melamine (low-pressure laminate). Melamine is fine, however, for the backs of doors.
- Painted wood cabinet doors or drawer fronts may show small gaps (over time) at joints due to seasonal movement of the wood. Also the center panel in a frame-and-panel door may show a paint line if the panel shrinks during the heating season.
- Thermofoil (RTF) doors can provide a frame-and panel look with the convenience of a durable PVC plastic facing. It is best to use matching RTF moldings as well, since colors may change over time.
Frameless cabinets typically have full overlay doors, while framed cabinets may have doors that are inset, rabbeted, or overlaid partially or fully (Figure 6-44). Rabbeted or partial-overlay doors are the easiest to fit and adjust since they have considerable play.
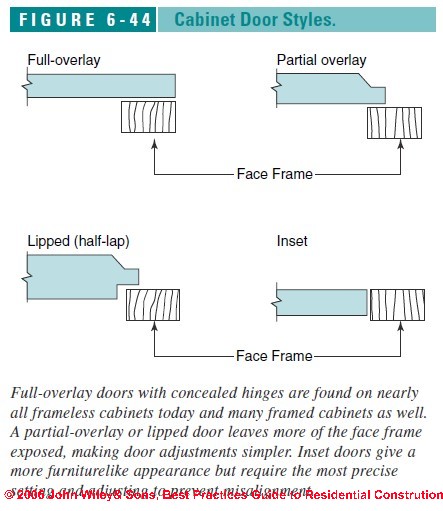
Inset doors provide an attractive furniture like appearance, but they are also a common cause of callbacks, since the slightest movement in cabinets or hinges can cause the doors or drawers to rub. Full-overlay doors also need careful adjustment, since they have only about an 1/8-inch gap to the next door. Fortunately, most are hung with easy-to-adjust cup hinges.
Guide to Types of Cabinet Hinges
Good quality hinges are sturdy, smooth to operate, and easy to adjust. Undersized or poor quality hinges, on the other hand, can lead to sagging or rubbing doors and are a common problem with low-end cabinets.
- Cup hinges. Originally designed for full-overlay
doors on frameless cabinets, concealed cup hinges
are now available for most types of doors and
cabinets (Figure 6-45). Most can be adjusted in
three directions, which makes it easy to align the
doors and compensate for minor irregularities in
the cabinets.
Plus, many cup hinges have a convenient “snap-on” feature that allows removal of the door without tools. Swing angles range from 95 to 175 degrees, with typical doors opening from 105 to 110 degrees. Special hinges are available for nearly every door configuration and self-closing types eliminate the need for magnetic or mechanical catches. - Barrel and knife hinges. These are partially concealed when closed and are usually adjustable in two directions by loosening the hinge-mounting screws. They are common on lower-end cabinets.
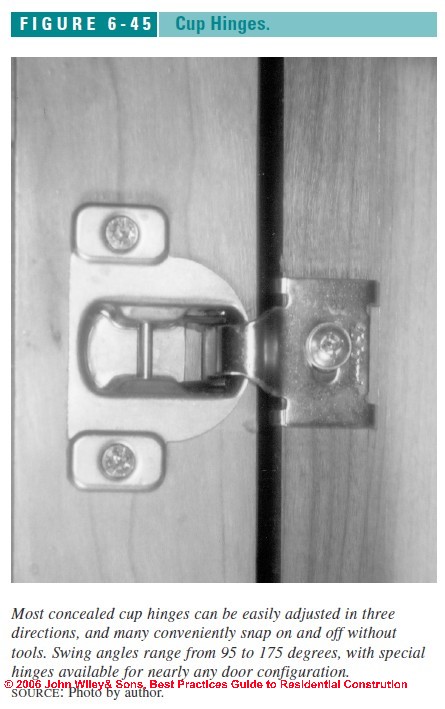
Design Guide & Choices for Countertops for Kitchens and Baths
After the cabinets, the countertop is the most visible element in most kitchen and bath designs. In addition to providing a visual focal point, durable and easy-to-clean counters are critical for both hygiene and efficiency.
These workhorse surfaces should resist scratching, knife cuts, and burns, be impervious to water and stains, and wipe clean with a sweep of the sponge.
Nonporous surfaces like plastic laminate, solid surface, and engineered stone fit the bill well. While plastic laminate still dominates the market based on its combination of good performance and low cost, both natural and manmade stone products now account for a substantial and growing share of the market (Figure 6-46 and Figure 6-47).
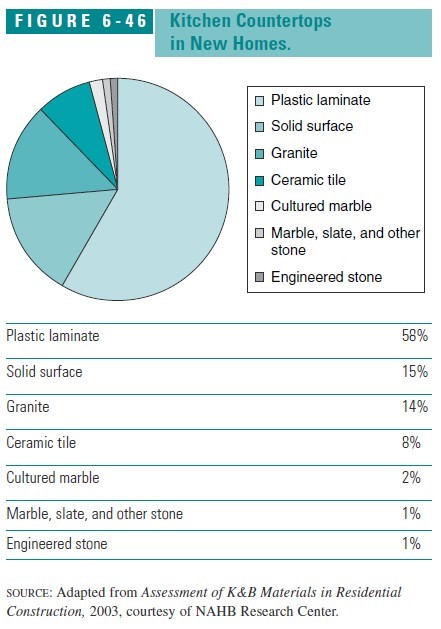
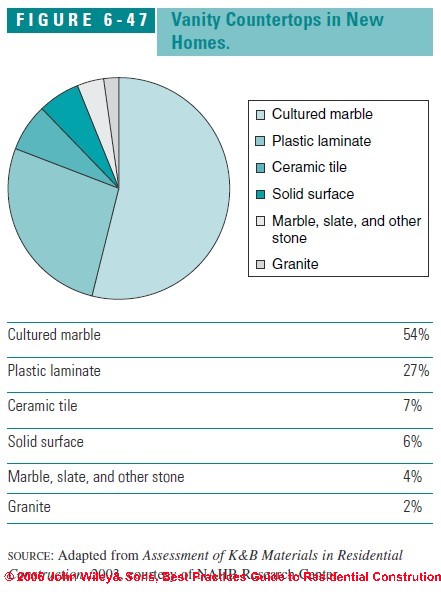
Since no one product can meet every need in a home, it often makes sense to mix and match materials, particularly in the kitchen. The main counter areas might be plastic laminate or solid surfacing with special sections using, for example, stone for baking, wood for a cutting board, and tile for a place to set hot pots. The most common countertop materials and their characteristics are shown in Table 6-8.
Countertop Design Issues
For ease of use and maintenance, a countertop will function best if it has the following characteristics:
- A smooth surface that is nonporous, stain-resistant, and has minimal joints and seams.
- A flush or under mount sink that lets the homeowner easily sweep water and dirt into the sink.
- A waterproof joint where the counter meets the backsplash and side splashes. Side splashes. should go wherever a counter end meets a wall or tall cabinet.
- A coved corner at the backsplash makes this joint easier to keep clean.
- In the kitchen: a no-burn area to set down hot pots.
- In the bathroom: a raised dripless counter edge helps keep water contained near the sink.
Cleanup Advice for Countertops
For most customers, easy cleanup of countertops is a top priority. While most of the materials discussed below are at least moderately stain-resistant, the actual performance will vary, depending on the specific color, pattern, finish texture (gloss vs. matte), and porosity of the material. If possible, obtain samples of the materials being considered, with sealers applied if planned.
Mark each sample with a few stubborn stains: indelible marker, grape juice, salad oil. Let them dry for an hour and then see how easily they clean up with normal household cleansers and nonabrasive cleaning pads.
Advice About High-Pressure (Plastic) Laminate Countertops
Plastic laminate still dominates the market for kitchen counters, because it provides an attractive, durable surface at a cost of $5 to $10 per square foot versus $50 to $100 per square foot for solid surfacing or stone. The range of colors and textures continues to expand with new printing technologies that have produced realistic looking wood and stone surfaces.
Made from a sandwich of resin-impregnated kraft paper, a decorative paper layer, and a top layer of clear melamine fused under heat and pressure, plastic laminate is impervious to moisture and resists scratches, dents, and chips. It can be scratched with a knife, however, or scorched with a hot pot. Small chips can be repaired with special sealers, but scratches and burns are permanent.
Before selecting a countertop color, it is a good idea to test a few sample squares with an indelible marker to see how easily the marks clean off. Matte finishes stain much more readily than gloss, and there may be considerable variation from one pattern and finish to another. More expensive color through plastic laminates show wear less than the standard type, and they eliminate the dark band at exposed edges.
If using a postformed counter with a miter joint, it is essential to mechanically draw the joint tight and to seal that joint to prevent water intrusion, which will degrade the particleboard and open the joint. Silicone or special laminate seam sealer can be used.
Edge Treatment Choices for Countertops
There are now many alternatives to the traditional square edge that exposes the dark edge of the horizontal sheet of laminate. The least expensive is a postformed counter with either a seamless square edge or raised dripless edge. A wide variety of upgrades are available to dress up the counter. Beveled laminate, solid surfacing, and hardwood edging are common details. Site applied wood edging, however, can lead to problems over time if the joint is not watertight.
Cast Polymer (Cultured Marble, Engineered Stone) Countertop Guide
Cultured marble, solid surfacing, engineered stone, and most other composites used in kitchen and bath counters, sinks, and wall panels are different types of cast polymer. Cast polymer products consist of a plastic resin, either acrylic or polyester, and a mineral filler.
The type and amount of filler largely determines the hardness, stain resistance, and overall durability of the product. Cultured marble, for example, which uses crushed limestone as a filler, is relatively soft and porous and needs to be protected by a gel coat.
The new granite and quartz “engineered stone” composites, on the other hand, are nearly indestructible. These materials are described in greater detail below.
Guide to Cultured Marble Countertop Properties & Quality
Cultured marble has been produced since the 1960s. It combines ground-up marble dust with polyester resins and pigments to make a sheet material for use in kitchens and bathrooms, as well as fireplace surrounds and other ornamental applications.
Nearly all cultured marble products are finished with a thin clear or colored gel coat, which provides the color and pattern and creates a relatively hard and stain-resistant skin.
Quality varies widely, as there are hundreds of small-volume manufacturers around the country producing the material. Some of the lower-quality products have had problems with crazing (small cracks) in the gel coat around drains and other areas subjected to thermal shocks. High-quality products should carry a label certifying compliance with ANSI standard Z-124.
While cultured marble is stronger and less brittle than natural marble, it is less impact-resistant and scratch resistant than other cast polymers such as solid surfacing. The nonporous surface resists mildew and most stains and is easily cleaned with nonabrasive cleaning agents.
Cultured marble is commonly used for vanity tops with integral sinks, as well as shower and tub enclosures, but it is rarely used for kitchen counters. Scratches and small chips can be repaired using a special gel-coat compound available from the supplier, but cracks or breaks cannot be repaired. Since the gel coat provides the color and pattern, significant damage to the gel-coat cannot be repaired.
The sheen, however, can be restored with a thin coat of auto wax or Gel Gloss (TR Industries).
Because many of the light-colored products are translucent, they should always be installed on a light-colored background material with clear silicone adhesive.
Solid Surfacing Corian-type Countertop Guide
Initially introduced as Corrigan® by Dupont almost 40 years ago, solid surfacing products consist of mineral fillers, usually alumina trihydrate (a product of bauxite), and acrylic or polyester resins. Solid surfacing is a hard and durable homogenous material with color throughout and is easily machinable with woodworking tools.
It can be seamlessly welded to itself at joints and to under mount sinks made of the same material. This creates an attractive, continuous work surface that is easy to wipe clean. An economical veneer version, laminated over a particleboard substrate, is available from some manufacturers.
Because solid surfacing is nonporous, stains do not penetrate and it will not support mold or bacterial growth. Most stains can be wiped away with a nonabrasive pad and mild cleanser, although bleach is OK if needed. It also resists mild chemicals, but it should not be exposed for long to harsh chemicals, such as acetone or paint thinner. The alumina trihydrate filler also makes solid surfacing fire resistant, although it is possible to scorch the surface.
While relatively easy to scratch or stain, solid surfacing is easily repaired. Tough stains as well as minor scratches or burns can be buffed out of a matte finish with an abrasive cleanser and Scotch-Brite pad, or wet sanded with very fine sandpaper (start with 1000-grit and use coarser grits as needed). Most solid surfacing used on countertops has a matte-satin finish, which is the easiest to maintain. For a gloss finish, follow the recommendations of the manufacturer.
Recommendations for Using Engineered Stone Countertops
The newest class of cast polymer, sometimes called composite or engineered stone, uses a high percentage of quartz, quartz silica, and granite to produce a material with the hardness of natural stone and the easy maintenance of solid surfacing. Engineered stone typically has over 90% stone aggregate with just enough acrylic resin and binders to hold it together. Combined under heat and pressure, the resulting material is uniform throughout and has greater flexural strength than stone.
The nonporous surface is virtually stain-proof and very scratch-resistant, although it should not be used as a cutting board. Unlike natural stone, it does not require any sealing or waxing. Although it will not burn or scorch, placing hot pots directly on the surface can cause surface damage from the thermal shock.
Some manufacturers are able to add a seamless under mount solid-surface sink to the engineered stone slab, adding to the appeal of the material. Products include Silestone® (Cosentino USA), Zodiaq®, (Dupont), Cambria®, (Cambria), Technistone® (Technistone USA), Ceasarstone® (U.S. Quartz Products), and Granyte® (Halstead International).
Guide to Choosing Ceramic Tile Countertops
Ceramic tile is a popular countertop material in the West and Southwest. Its main advantages are high durability and imperviousness to heat and water. Glazed tiles will not stain, and tiles rated for use on floors and counters are very scratch resistant. Softer tiles are prone to chipping, but damaged tiles can be removed and replaced if necessary. Installing ceramic tile on one section of counter near the range can provide a handy place to set down hot pots and pans.
The main problem with tile counters are the grout joints, which tend to discolor over time. Using a latex modified grout and sealing the grout will help but will not prevent stains altogether. The best solution is to use an epoxy grout and to choose a dark or neutral grout color such as gray. Lighter colors are generally OK on backsplashes and walls. Tile is also very hard and prone to breaking fragile glasses or dishes that strike it.
Two details that will enhance a tile counter are a V-cap nosing tile, which will create a clean-looking dripless edge, and a coved corner at the backsplash, which will make it easier to keep the corner clean. Tile counter details are shown in Figure 6-33 and Figure 6-35.
Guide to Choosing Natural Stone Countertops
Natural stone has become as popular as solid surfacing in the past few years as stone prices have dropped and finished stone slabs have become more widely available.
In general, natural stone is hard, heavy, and cold, and is unaffected by heat and water. Bakers like the cool, smooth surface for handling dough. Stain and scratch resistance varies with stone type, but all stones need some type of sealer to prevent staining. The most common choices are discussed below:
- Granite countertop properties: Very hard and resistant to scratching or chipping. Takes high polish. Oil and grease may stain granite if not sealed.
- Marble countertop properties: Acidic foods etch or dull surface. Porous surface absorbs oils, stains, and some odors if not sealed. Avoid abrasive pads or cleansers.
- Soapstone countertop properties: Very dense and stain-resistant but relatively soft. Usually treated with mineral oil. Scratches can be sanded out.
- Slate countertop properties: Very stain-resistant. May need sealers depending on quality of stone. Minor scratches can be buffed out with steel wool.
Design Guide to Plumbing Fixtures for Kitchens & Bathrooms
Plumbing Fixture Recommendations for Sinks
Because of its durability and economy, stainless steel accounts for over 60% of kitchen sinks in both new homes and remodels. In new construction bathrooms, cultured marble is the leading material for lavatory sinks, while the more expensive vitreous china leads in remodels.
Both stainless steel and vitreous china are extremely durable, easy to clean, and impervious to rust, stains, and heat. Cultured marble quality varies, based largely on the thickness and quality of the thin gel coat that provides the color and wear surface.Well-made cultured marble, however, treated with reasonable care, can provide years of satisfactory service.
With any sink, choose a bowl that is large enough for the intended use. A kitchen sink should be deep enough to handle large pots and have vertical sides and tight-radius corners to increase the usable space.
A relatively flat bottom allows dishes to sit without sliding toward the drain, and an offset drain also increases the usable space. Models with multiple bowls and built-in cutting boards, draining racks, and other accessories can simplify both food prep at the sink and cleanup. A raised or gooseneck-type faucet allows large pots to be easily rinsed or filled (Figure 6-48).
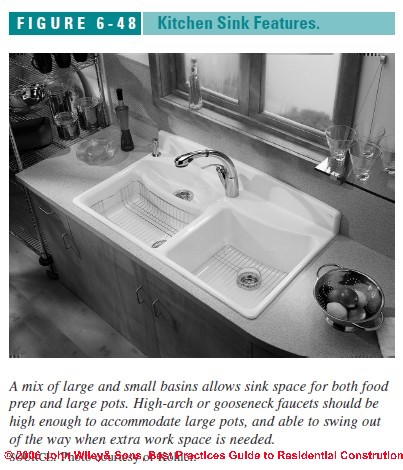
Many “builders’ grade” lavatory sinks are undersized for basic grooming tasks, such as tooth brushing and face washing without splashing water across the vanity top.
If the client plans to wash hair, water plants, or perform other household chores at the lavatory, an oversized bowl is recommended. A sink with the faucet offset to one side, with a pivoting spout, provides still more usable space.
Mounting Procedures for Sink Fixtures (Faucets)
Most kitchen and bath sinks are self-rimming and sit on top of the counter surface. However, demand has been growing for flush-set and under mount sinks, which cost more to buy and install, but have the benefits of a more streamlined appearance and easy cleaning (Figure 6-49).
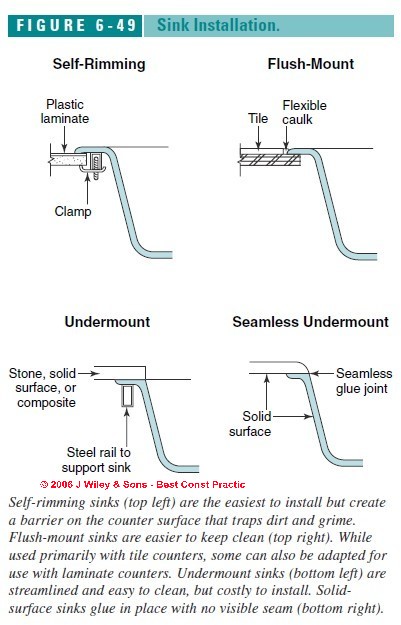
With the sink set level with or beneath the counter, food debris can be easily swept into the sink and grime does not collect at the joint of the sink rim and counter.
- Self-rimming Sinks. Standard cast-iron and stainless-steel sinks have a metal flange that hides any rough cuts in the countertop but tends to collect grime where it joins the counter. The rim should be sealed to the counter with silicone sealant.
- Flush-set Sinks. This type of sink, sometimes called a “tile edge” sink, is designed to sit level with the countertop and is often used with tile counters.With tile counters, a flexible sealant such as Color Caulk (Color Caulk, Colton, CA) should be used to seal between the sink and tile. Flush-set stainless-steel or cast-iron sinks can also be set into laminate counters by carefully routing a hole for the sink and using special trim that is virtually flush with the counter. European-based sink manufacturer Karran USA makes a reinforced solid surface sink specially designed to flush set in laminate tops.
- Under mount Sinks and Basins. This type of sink provides the most streamlined appearance and easiest cleanup, but it is also the most costly to buy and install. Used with solid surfacing, stone, or composite tops, the cutout must be perfect, and most sinks must be independently supported from underneath the counter. Solid-surfacing sinks are typically glued to the countertop from underneath, creating a seamless transition.
The main material choices for kitchen and bathroom sinks are outlined below (Table 6-9).
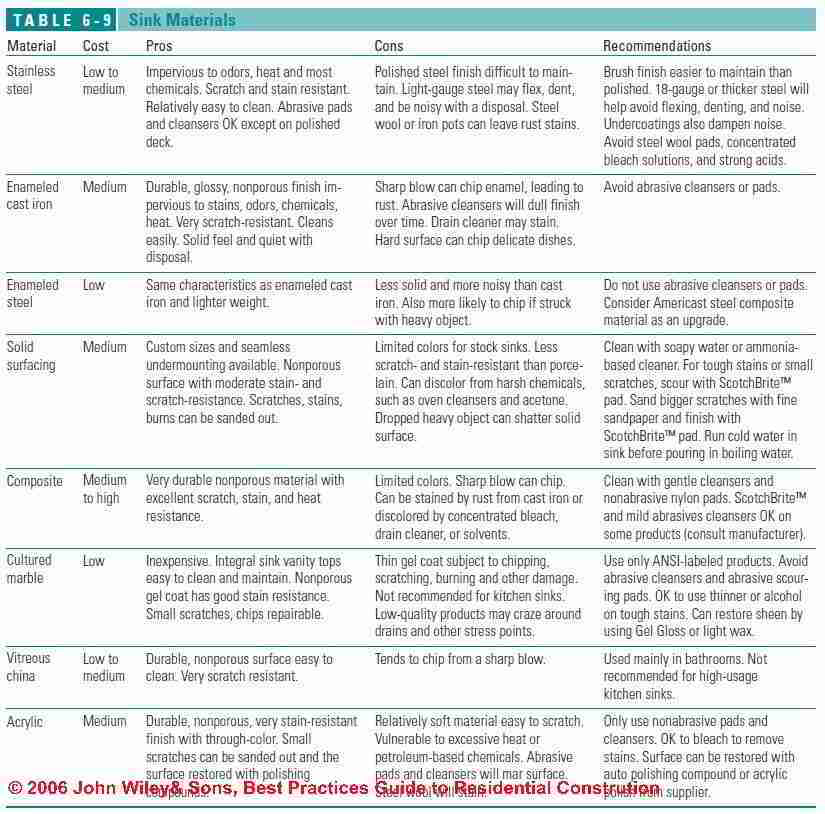
Enameled Steel Sink Choices
This uses the same process as enameled cast iron, but with a substrate of stamped 14-gauge steel. These sinks weigh half or less than a comparable cast-iron model, making them easier on the installer.
But the lighter, less rigid substrate does not dampen noise as well and is more likely to chip if a heavy object is dropped. One alternative is a hybrid from American Standard called Americast, introduced in the late 1980s, which uses enameled steel on the inside and a cast-polymer composite on the outside to create a sturdy tub with half the weight of cast iron.
Solid Surfacing Sink Choices
The main advantage of solid-surface sinks is that they can be installed seamlessly to the underside of a solid-surface counters. This provides a very streamlined appearance, easy cleanup, and no joints to collect dirt.
Solid surfacing also offers great design flexibility, as most fabricators can build nearly any configuration desired. Most solid surface sinks have a matte finish, which is easier to maintain than a semi gloss or high-gloss. While relatively easy to scratch or scorch, this type of damage is superficial and is easy to sand away with fine sandpaper or a ScotchBrite™ pad.
Composite Sink Guide
Similar to solid surfacing, composite sinks are a cast polymer using crushed quartz or granite as the filler. High-quality composites have similar characteristics to engineered stone counters, and in some cases are seamlessly cast from the same material (Figure 6-50).
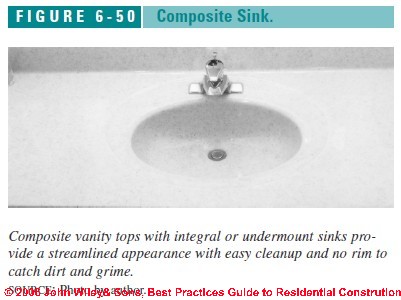
In general, they provide excellent resistance against stains, scratches, chips, and fading. They also tolerate heat well. For example, the sinks made from Moenstone (Moen) and Kindred Granite (FHP Kindred) can tolerate temperatures up to 530°F for short periods.
Finishes range from matte to a satin semigloss. Cleaning instructions vary from manufacturer to manufacturer, but most recommend mild nonabrasive cleansers and nylon scrub pads for everyday cleaning and ScotchBrite™ pads and abrasive cleansers as needed. Scratches or stubborn stains can be sanded out as with solid surfacing, although matching a glossy finish may be difficult (one solution is to sand the whole sink).
Metal scouring pads or cast-iron cookware can leave rust stains on composite sinks. Concentrated bleaches, paint strippers, or products containing formic acid (drain cleaner) can discolor the surface. An application of Gel-Glos™ (T.R. Industries) or Invisible Shield® (Unelko Corp.) is recommended by some manufacturers to maintain the sheen and ease of cleaning.
Cultured Marble Sink Properties
See Table 6-9 for a discussion of the performance and care of cultured marble.
Vitreous China Sink Choices - Porcelain Sinks
Also called porcelain, vitreous china is a heavy ceramic product also used to make toilets. It is highly scratch-resistant and less affected by abrasive cleansers than enameled cast iron or cast-polymer materials (solid surfacing, stone composites). It is widely used in vanity sinks, but because the china substrate will chip more easily than other materials, it is not commonly used in kitchens. Some high end ornamental china sinks are available for kitchens, but may be too fragile for a kitchen work center.
Properties of Acrylic Sinks
A relative newcomer, acrylic sinks are made of the same materials as acrylic tubs or showers. Made from heat-molded 1/8 -inch thick acrylic plastic sheets, the fixtures are molded into a wide variety of shapes, then reinforced on the back side with fiberglass and resin. The surface is nonporous and very stain-resistant, but it is relatively soft and easy to scratch. It is also vulnerable to petroleum based chemicals and heat, for example from a hot skillet. Burns are not repairable.
On the plus side, acrylic has good noise dampening characteristics and can tolerate bleach when needed for a difficult stain. The color goes all the way through the material, so it is possible to sand or buff out small scratches with auto polishing compound or special acrylic polish. For larger scratches, use 400- to 600-grit sandpaper and buff with baking soda.
Stainless Steel Sink Characteristics & Recommendations
A basic stainless-steel sink is one of least expensive options, and one of the most durable. It is unaffected by heat and most chemicals and the surface will not absorb stains, odors, or oils. It is relatively easy to clean and can be scrubbed with abrasive cleansers and pads when needed.
Avoid the cheapest sinks, which use lightweight steel (20 to 23 gauge), as they can flex or dent; also avoid low-nickel alloys, such as 18-8, which can tarnish. Lightweight steel sinks also tend to be noisy with a waste disposer. Good quality sinks are typically 18-gauge or thicker and use high-quality alloys, such as 18-10.
Also avoid steel sinks with a polished finish, which is difficult to maintain. A brushed (matte) finish hides scratches from normal use and cleaning. And although good quality stainless is tough to damage, it is not indestructible. It can develop rust stains from steel wool residue or prolonged contact with cast iron cookware. Also, prolonged contact with concentrated bleach solutions, strong acids, or salty materials can cause pitting. Still, for function and economy, steel is hard to beat.
Enameled Cast Iron Sink Properties
The hard, glossy finish on a cast iron sink is made by fusing a porcelain enamel glaze to a heavy cast-iron substrate under high heat. This creates a solid fixture with a tough, lustrous finish that is impervious to stains, chemicals, odors, and heat, and cleans easily with a sponge.
The heavy mass of the cast-iron base dampens any disposal sounds, but the same rigid mass will readily crack a dropped dish. The porcelain finish is durable but not indestructible. Harsh, abrasive cleansers and abrasive pads will dull the surface and a hard enough blow with a sharp object can chip the coating exposing the iron beneath to rust.
Guide to Choices of Tubs and Tub/Shower Units
The classic tub for many homeowners is still the rock solid, cast-iron model with a porcelain enamel finish. Driven by cost savings on both materials and installation, manufactures have introduced lighter-weight alternatives using molded plastics (Table 6-10).
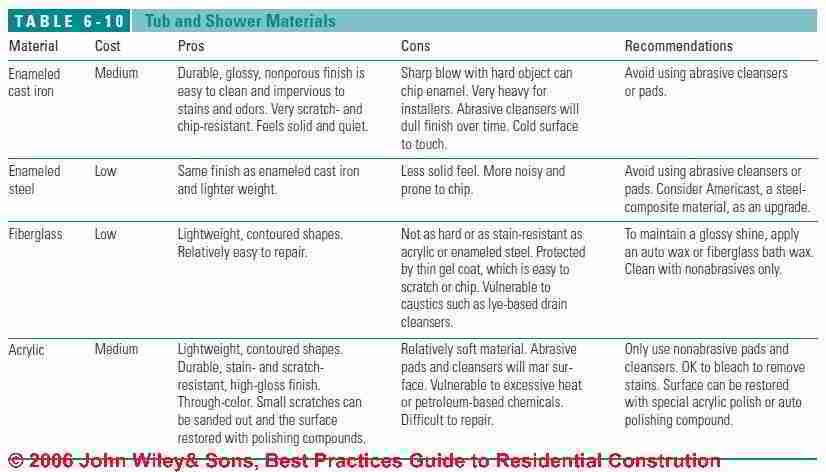
While not as hard as the original iron tubs, the plastic alternatives have improved over the years and provide great flexibility for designers.
Most units include integral soap dishes, ledges, grab bars, and other molded features that help bathers and also provide rigidity to the unit. For new construction, most units are one-piece, creating a seamless, leak-free bathing enclosure (see Figure 6-51).
Retrofit tub/shower units typically have four or five pieces that fit together with sealant. The fewer pieces, the better.
Porcelain-Enameled Cast Iron Tub Properties
The classic tub material is very solid, very quiet, and resists scratches, chips, and stains. On the other hand it is very heavy, cold to the touch, and available only in pretty basic shapes. It does not easily mold into the body-hugging contours found on many of the plastic units.
Although the surface is the most durable for molded tubs, it is not indestructible. If homeowners use abrasive cleansers and pads, over time the finish will dull.
Porcelain-Enameled Steel Bathtub Properties
This weighs less than cast-iron and feels less substantial, as the material has some give under the weight of water and bathers. It is also more prone to chip than cast iron.
A hybrid alternative is American Standard’s Americast, which is a porcelain enameled steel reinforced on the back with a cast polymer.
The material is stiffer and quieter than regular enameled steel, but it is half the weight of cast iron. The company literature claims that the surface is more durable and slip resistant than standard porcelain enamel and that the composite layer helps retain heat.
Fiberglass Bath & Shower Enclosure Properties & Recommendations
Also called FRP (fiberglass-reinforced plastic), or gel coat, this material is manufactured by spraying a thin coat of gel coat into a mold followed by several layers of polyester resin mixed with chopped fiberglass. Between coats, fabricators typically reinforce tub and shower walls and floors with blocks of wood or corrugated cardboard.
One of the premium manufacturers of fiberglass tubs, Aqua Glass, uses a layer of rigid polyurethane foam between fiberglass coats, creating a stiffer assembly that helps the tub retain heat and deadens sound. The company also adds an antimicrobial compound to the gel coat to inhibit the growth of bacteria and mold. With any FRP tub, the thickness of the gel coat and thickness of the overall lay-up affect its strength and durability.
One way to assess quality is to look for tubs that conform to the voluntary standard ANSI Z-124, which requires that a random sampling of acrylic and gel-coat tubs undergo a variety of durability tests.
The thin gel coat can be damaged, but it is relatively easy to repair with gel-coat repair kits sold in marine and automotive stores. Color matching, however, can be difficult. Also if a chip is not repaired quickly, water can penetrate to the backing and cause the damage to spread.
Overall, a gel-coat surface is less scratch- and stain-resistant than acrylic. Abrasive cleansers must not be used. Many manufacturers recommend an auto wax or special fiberglass bath wax available from tub suppliers.
A proprietary FRP composite called Vikrell™ (Sterling/ Kohler), makes tubs from a mix of resin, color, and chopped fiberglass molded under compression.
The material has no gel coat or layers to chip or crack and has color all the way through. The manufacturer claims that the high gloss finish has the durability of acrylic and the ease of repair of fiberglass at roughly 40% less than the cost of acrylic.
Acrylic Bathtub & Shower Properties
See description (above), under sink materials. One interesting high-end product called Armacryl (Kallista/Kohler) uses a thick clear layer of acrylic over a second color layer. Like other acrylic fixtures, it is reinforced with a fiberglass backing. The result is a lustrous and thick acrylic finish with excellent durability.
Guide to Choosing Soaking Tubs and Jetted Tubs
Material choices for jetted tubs and other oversized “soaking” tubs are the same as described above. However, with the added stress of higher water levels, multiple bathers, and the vibration of jets, the choice of material is more critical.
The most durable type of tub, enameled cast iron, has limited offerings and are very heavy so they are not often used. Acrylic is an excellent choice, as are some of the proprietary materials, such as Americast (American Standard), Vikrell (Sterling/Kohler), and Armacryl (Kallista/ Kohler). A tub with a nonslip surface is recommended for safety.
Soaking or Jetted Tub Designs & Shapes
Jetted tubs come in a wide range of shapes, sizes, and depths and are designed for either a drop-in or niche installation with a tile flange. Typical rectangular or oval units range from 5 to 6 feet long, 32 to 45 inches wide, and 18 to 24 inches high, and many offer an optional skirt to finish the front and conceal the motor and plumbing. A drop-in requires a custom-built surround and requires more floor space (see Figure 6-52).
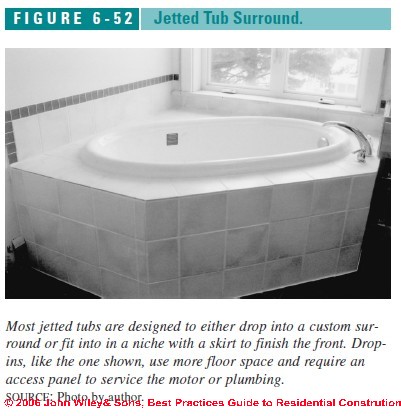
- Tub-showers. Some models are available as tub shower combos and others can be adapted for use as a tub/shower. However, most designs do not lend themselves to showering due to placement of controls, impractical shapes for doors or curtains, high walls, and rounded interiors. A hand-held shower is always an option.
- Primary bath. If this is the home’s only tub, be aware that deep tubs with a wide top edge or tile ledge can be awkward for bathing small children. Also pay attention to the number of gallons required to take a bath, often double the volume of a standard tub.
- Two-person. For two people, look for a tub with a center drain, or a triangular corner model. Taller people will generally need larger tubs to stretch out.
- Tight spaces or retrofits. Many manufacturers make a tapered model designed to replace a standard 30x60–inch tub. Corner models can also save space in a tight layout.
Noise Issues with Jetted Tubs & Spas
Jetted tubs can be rather noisy. If this is a concern, look for a unit with flexible hoses connected to the pump, which helps reduce the vibration and noise transmitted to the tub. Some manufacturers also offer quieter jet mechanisms as an upgrade.
Types of Jets Used in Whirlpools & Spas or Tubs
Some manufacturers offer different types of jets with different flow characteristics. Some circulate air, some water, and some both, producing the most vigorous massage.
It is best to try out a system at a showroom if possible. Also pay attention to jet locations. Jets high and on the sides will provide swirling water, while jets placed where bathers will sit and directed toward the back and other stress points will provide a more effective massage. Some manufacturers will customize jet locations. Other options to consider are:
- Recessed jets that do not protrude
- Individually adjustable jets, including on-off controls
- An in-line heater if long soaks are desired
- A built-in cleaning system to keep the internal plumbing free from mold and other residues.
Mechanicals: Pumps & Heaters for Whirlpools, Jetted Tubs, Spas
Pumps are usually located at the opposite end from the drain and fill area. Some manufacturers allow the buyer to specify the pump location for better access. Look for a pump with automatic protection against burn-out if accidentally run dry. Pumps range from 1/2 to 3 horsepower, and many manufacturers offer a horsepower upgrade for a modest price increase, often a worthwhile expense.
The pump comes with a cord and plug that requires a GFCI-protected receptacle. Since the receptacle is inaccessible, it should be either downstream of an accessible GFCI-receptacle or on a circuit with a GFCI breaker. Locate the receptacle where it does not block access to the pump. To ensure safety, make sure that the unit purchased is UL-listed for the entire system, not just the individual components.
Heaters for Whirlpools & Spas or Tubs
If the occupants expect to take long soaks in the tub, an accessory heater is advisable. Energy-efficient models capture waste heat from the motor and pump to provide a modest degree of supplemental heat, while others use a conventional electrical heating element that can maintain the water temperature indefinitely. For installations where the volume of the tub exceeds the capacity of the home’s water heater, some manufacturers offer an instantaneous water heater that will heat the water as it enters the tub.
Installation Recommendations for Whirlpools & Spas or Tubs
The simplest and least expensive installation is into a two-wall or three-wall cove with factory-supplied skirts to conceal the mechanicals. However, many customers prefer the look of a drop-in model with a custom tile surround (see Figure 6-53).
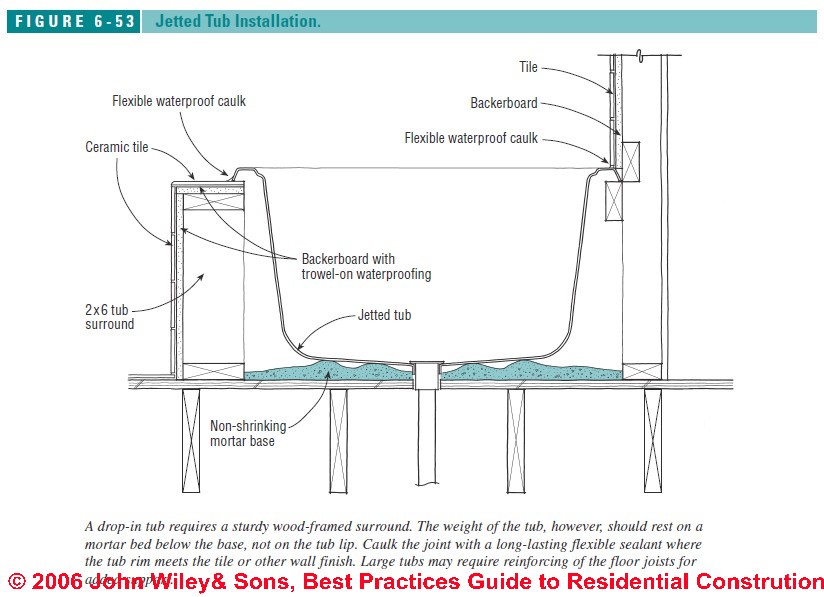
With either type of installation, it is critical that the weight of the tub be supported by the base, not the lip.With larger tubs, often holding 50 to 80 gallons of water (at 8 pounds per gallon), the framing and subfloor may need to be reinforced to support the total weight of the tub, water, and bathers. A larger water heater may also be needed.
The most common method to support the tub bottom and dampen vibration is to set the tub onto several small mounds of wet plaster or mortar mix that compress and conform to the shape of the tub bottom as it is installed. A non shrinking grout such as Sonogrout 10K (Sonneborn) is best since it will not leave gaps as it dries.
Partially filling the tub with water until the mortar sets will ensure a good fit. Many contractors recommend using mortar even with units including “self-leveling” bases, which are designed to sit on a level subfloor with no additional support.
A few tubs are designed with individual bearing points molded into the bottom of the tub. With this type, it is important to make sure that the bearing points fall on joists or solid blocking. Solid bridging should also be added to help distribute the load to the surrounding joists.
Access Panel Designs for Whirlpool Baths, Jetted Tubs, Spas
With a custom-built surround, it is necessary to leave an access panel. Although access to the mechanicals is rarely needed, it should not require tearing apart the tile surround.
A simple approach is to tile the access panel, hang it with magnets, and caulk the joint between the access panel and surrounding tiles. If access is necessary, the caulk can be slit with a knife and the panel removed. Where the tub rim meets tile at a wall or the top of the surround, use a flexible caulk rather than grout, which will crack as the tub flexes, and expands and contracts with temperature changes.
Design Guide to Choosing Kitchen & Bathroom Faucets
Manufacturers offer a vast array of faucet styles and finishes. Most homeowners choose single-level models for the convenience of one-handed control, and chrome remains the most popular finish because of its durability and easy cleaning. New finishing technologies permit nearly any color or metallic finish with similar durability. Most faucets also have improved valve systems that make leaky faucets a thing of the past.
Finish Choices for Faucets
Most faucet finishes are guaranteed for life. Chrome, the most popular choice, is easy to clean and very resistant to scratching. For a colored finish, the best choice is an epoxy coating. These come in a wide range of colors and are also very durable and easy to maintain, but they can be scratched with an abrasive scouring pad. Also solvents, such as nail polish remover (acetone), can soften the epoxy coating.
Many higher-end faucets now use a new high-tech plating technology called physical-vapor deposition or PVD, which can imitate almost any metallic finish from brass to pewter to gold. PVD finishes are as hard as chrome and easy to maintain, although they can be stained by drain cleansers containing lye. Also, abrasive pads, such as steel wool or ScotchBrite®, can scratch these or any finish with enough effort. Where scratching is a concern, a brushed or satin finish is preferable, since it will help conceal scratches.
Solid brass faucets usually come with a lacquer or similar coating to protect against tarnishing. The metal will tarnish, however, when the coating eventually wears off or where it gets scratched. As an alternative, many manufacturers now offer “tarnish-free brass” finishes using PVD technology. Marketed under a variety of names, these finishes are actually applied over a chrome-plated faucet and have the durability of chrome.
A Guide to Kitchen & Bath Faucet Styles
Most homeowners find single-handle faucets more convenient, and experts consider them safer for kids than separate hot and cold levers, which are more likely to cause a scalding injury. Whatever style is chosen, levers are easier to manipulate than knobs, particularly for anyone with restricted mobility. Lavatory faucets should be low enough that they do not hit people in the head if they lean down to wash their face. An offset faucet or one that swings out of the way can provide greater useful space.
The faucet spout in a kitchen should be high enough to accommodate large pots and long enough to reach all the basins in a multi basin model. One that swings out of the way can increase the useful space. High-arch or gooseneck designs are often a good solution (see Figure 6-48).
Pullout spray spouts are also very convenient, but avoid those with flimsy plastic hoses. Look for a durable double interlock hose that will not kink.
Details about anti-scald protection and devices are found at MIXING / ANTI-SCALD VALVES.
Guide to Bathroom or Kitchen Faucet Materials
Underneath the finish, the base material for most faucet bodies is brass, zinc, steel, or cheap alloys called “pot metal.” Some economy models use plastic.
The highest-quality faucets use solid forged or machined brass, which will last the longest and require the least care, particularly in areas with hard water. Cast brass is also used, but it is not quite as durable. Midrange faucets use brass or chrome plating on zinc alloys, which provides good durability, but must be replaced when the plating wears through. Plastic, steel, and pot-metal bodies are usually the least durable.
Valve Types Used in Bathroom or Kitchen Faucets
The faucet valve is the mechanism that regulates the flow of water when you turn the lever or knob. There are four basic types, each with pros and cons.
- Compression valves
are the old standby used in traditional two-handle faucets. These have a rubber washer on the bottom of a threaded stem, which opens and closes as the knob is twisted. The washers wear out over time, more quickly with hard water or over tightening. New washers cost less than a dollar and are generally easy to replace. The metal valve seats also get worn over time and need to be ground with fine sandpaper to prevent leaks. - Sleeve-cartridges
have a hollow stem that rotates inside a metal or plastic sleeve to control the water flow in both one- and two-handle faucets. Usually the whole cartridge is replaced when it leaks, although replacing the O-ring at the top or bottom of the cartridge may work. Most cartridges are easy to replace, but some faucets require a special tool to pry out the cartridge. Choose brass cartridges, rather than plastic, if available. Replacements cost $15 to $20. - Ball valves.
Developed originally by Delta, these are still widely used in single-lever faucets. They use a hollow brass or plastic ball with spring-loaded seals to control water flow. Ball valves last a long time, and replacement parts are inexpensive (under $10), but the small parts can be tricky to assemble. Brass replacement parts will outlast plastic. - Ceramic-disk cartridges.
Considered the most reliable approach, this new type of valve uses hard ceramic disks that rotate in a cartridge until the holes line up to release water. The polished disks are nearly indestructible, but eventually the grease between the disks washes out or the washers or O-rings wear out. Typically, the whole cartridge is replaced. This is a simple operation, which costs about $10 to $20 for parts.
Watch out: while most faucet manufacturers do a great job of stocking replacement and repair parts for faucets, once the faucet is installed, the cost of repair parts may approach the cost of installing an entirely new faucet assembly. We found that some brands (including Kohler™) can list stunning prices for small replacement parts for faucets, cartridges, and handles - DF.
Guide to Scald Protection for Bathrooms, Tubs, Showers
Details about anti-scald protection and devices are found at MIXING / ANTI-SCALD VALVES. Excerpts are below.
There are many styles of mixer valves in tubs and showers, but all should have some sort of protection against scalding. The young and elderly are at greatest risk due to thinner skin and slower reaction times. More than 35,000 children, most under age six, are treated each year in emergency rooms for tap-water scald burns, according to the National Safe Kids Campaign.
A child exposed to 140°F water for as little as three seconds can sustain a third-degree burn requiring hospitalization and skin grafts. Although most scald burns occur in the kitchen, according to the Consumer Product Safety Commission, the most severe scald burns are caused by water flowing into the tub or shower. In response, many state and local codes now require antiscald protection in residential tubs and showers.
Many organizations advocate setting water heaters to no more than 120°F, which gives bathers significantly more time to move away or adjust the temperature before a burn occurs. While this strategy is helpful, it is not always reliable and can cause other problems:
- Noncompliance: many homeowners turn the thermostats up to increase supply.
- Water heater thermostats are often inaccurate. The ANSI standard for gas water heaters allows the temperature to vary by plus-or-minus 10°F.
- Stacking effect: water at the top of a gas water heater can exceed the set point by as much as 30°F.
Use of Water Pressure-Balancing Valves to Control Temperature & Avoid Scalding
This is the most commonly used point-of-supply approach. These automatically adjust the water pressure to maintain the mix of hot and cold water to within 2°F to 3°F of where the user set the shower control. If cold water is diverted to a flushing toilet or other appliance and the pressure drops, the valve automatically reduces the hot water flow proportionately to maintain the temperature.
If the cold water pressure plummets or stops altogether, the flow is reduced to a trickle. To guard against someone accidentally turning the shower valve to scalding temperatures, these valves typically use a temperature limit stop that prevents the user from turning the shower control past a set point—typically set at or below 120°F.
Use of Thermostatic Mixing Valves to Avoid Scalding Burns
These are more expensive than pressure-balancing valves and not widely used in the United States.
They can be installed either inline near the water heater or as part of the shower control. The inline type of valve, also called a tempering valve, adds cold water to the hot water as it leaves the water heater to maintain a constant temperature, set by the installer. These are commonly used with solar water heaters but can also be tied to a conventional water heater.
A check valve is required on the cold water side to prevent backflow, and a hot-water expansion tank is recommended to prevent excessive pressure on the hot water side.
The other type of thermostatic valve is built into some high-end showers (Figure 6-54). These allow the user to set the temperature on a dial when showering. The unit will compensate for changes in either pressure or temperature to maintain a constant delivery temperature and flow rate. If the cold water fails or the tempered water is still too hot for any reason, the unit will shut off the flow.
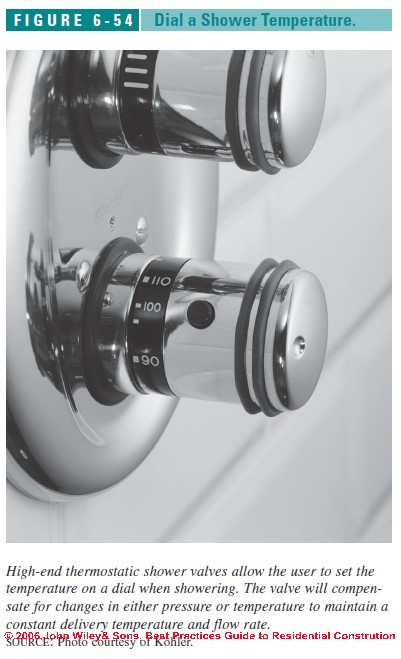
As with the pressure-balancing valve, the installer sets a temperature limit stop to prevent the user from turning the shower control to scalding temperatures.
Retrofits to Avoid Scalding Burns at Plumbing Fixtures
In retrofits, point-of-use devices can be installed by a plumber or homeowner to limit water temperatures to 120°F. These include antiscald showerheads, as well as point-of-use devices that fit into individual plumbing fixtures, such as showerheads and bath and sink faucets.
For example, MemrySafe and ScaldShield (Antiscald Inc.) are inexpensive retrofit devices that reduce the water flow to less than 1/4 gallon per minute when the water temperature at the faucet or showerhead exceeds 120°F. These devices do not regulate temperature or pressure, but do offer protection against serious burns.
Design Choices & Alternatives for Toilets
When water-saving toilets were first introduced in the 1980s, they reduced water usage from 5 to 6 gallons per flush (gpf) to 3.5 with little effect on performance.
However, when Congress mandated in 1992 that manufacturers had two years to reduce water usage to 1.6 gpf, the engineering challenges were much greater. Most early models were essentially 3.5 gallon designs hastily modified with smaller tanks and narrower trapways intended to increase the flow rate. Most did not work well and required two and sometimes three flushes, negating much of the benefit to water conservation.
Better design and new technologies have led to greatly improved performance in some models. In addition to traditional gravity designs, two types of pressurized designs have been introduced: pressure-assisted and vacuum-assisted. Both types benefit from the additional flushing power. However, with the pressure-assisted, the increased flush comes with increased noise and complexity (Table 6-11).
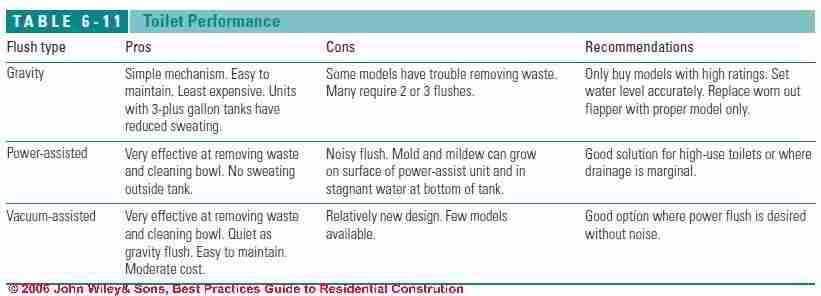
Because there is no standardized testing, figuring out which models perform well is difficult. Test results on individual models performed by the National Association of Home Builders, Consumer Reports, and other groups are a useful guide, but results are not consistent due to differing test methods. While all toilets sold in the United States must meet the American Society of Mechanical Engineers (ASME) performance standard A112.119.2M, this only guarantees basic functionality.
Operating Properties Gravity-Flush Toilets
This is the traditional method, which relies on water dropping from the tank to cleanse the bowl and start a siphon action in the trapway. Although the first low-flow gravity toilets had trouble, many of the newer models have been re engineered with higher tanks and larger trapways to improve the flush.
Some store three or more gallons in the tank to create greater pressure, but only let 1.6 gallons drain in each flush. One side benefit to this approach is less sweating in hot weather, since only a portion of the water in the tank is replaced with new cold water.
Gravity-flush models are generally easy to maintain, although they are a little more finicky than older 3.5 gallon models. For example, the water level must be accurately set for them to work as designed and worn out flapper valves must be replaced with the proper model rather than a generic one.
Among the gravity flush models that consistently rated well in independent tests are any of the Toto models that use its G-Max flushing system and the Kohler Wellworth and Santa Rosa.
Operating Characteristics of Power-Assisted Toilets
Widely used in commercial settings, these toilets have a sealed chamber in the tank that fills after each flush, using the home’s water pressure to compress the air trapped inside.With each flush, the compressed air forces the water down into the bowl with a loud whoosh, which is the primary complaint about these models. As long as household water pressure is at least 25 psi, these are very effective at clearing the bowl.
Because of the tank within a tank, there is no sweating on the outside of the porcelain, but condensation and mildew can form on the surface of the power-assist unit. While these toilets are not for everyone, they are particularly useful in retrofits where drainage is a problem, for example, where venting is inadequate or where the toilet sits at the end of a long drainage run with no fixtures upstream to wash the line.
When these toilets malfunction, the complete pressure-assisted unit is replaced. Power-assisted toilets cost about $100 to $150 more than comparable gravity models.
Examples of top-rate power-assisted toilet models include the Crane Economiser, American Standard Cadet PA, and Gerber Ultra Flush.
Operating Characteristics of Vacuum-Assisted Toilets
A relatively new design, these also have a sealed chamber. With each flush, a partial vacuum is created in the chamber, which connects to the trapway with tubing. The vacuum boosts the suction during the next flush, achieving a powerful flush but without the noise of a power-assisted unit.
Vacuum-assisted toilets use the same flush and fill valves as gravity flush toilets, making them easy to maintain. Only a few models are currently on the market, but they have performed very well in tests and are moderately priced at $50 to $100 more than comparable gravity models.
Among the top-rated models are the Briggs Vacuity 4200 and the Crane VIP Flush 3999.
One-Piece vs. Two-Piece Toilets
One-piece units tend to have low sleek lines and cost substantially more than standard two-piece models where the tank is bolted to the bowl during installation (Figure 6-55).
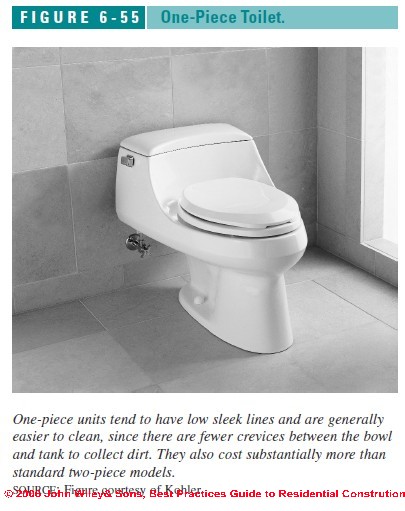
One-piece models are generally easier to clean, since there are fewer crevices between the bowl and tank to collect dirt. With gravity flush toilets, it is harder for designers to achieve a sufficient head of water without the height of a standard tank, although redesigning other components has overcome this in at least some models.
Sweating (Condensation) Problems on Toilets
In humid areas with cold incoming water, sweating on the outside of the porcelain tank can be a significant problem, in some cases rotting the flooring around the toilets. Some of the new flushing strategies alleviate the problem somewhat:
- In gravity toilets that store 3 or more gallons of water in the tank, the incoming 1.6 gallons of cold water is tempered by the retained water in the tank.
- In pressure-assisted toilets, the incoming water resides in a small tank within the larger porcelain tank, so the porcelain tank is not chilled. However, condensation can form around the inner tank, leading to mold growth.
One approach to avoiding "sweating" or condensation problems with older toilets is to add special foam insulation inserts inside the tank. These may not work with low-flow designs, however. Also this does not prevent dripping from the bowl or water supply line. Where the problem persists, consider added an anti sweat valve (Beacon Valves) that tempers the incoming cold water with a little bit of hot water to bring it up to room temperature.
Installation Procedures & Details for Toilets
Before installing a toilet, examine it for manufacturing defects that can cause leaks or prevent it from sealing fully to the closet flange. Occasionally the inlet where the tank connects to the bowl, or the outlet (horn) at the bottom of the bowl that seals to the closet flange, is deformed enough to cause problems.
Also make sure the base (foot) of the toilet is flat or it will have a tendency to rock and break the seal, leading to odors and leakage.
Next, make sure the framing is adequate. Ideally the toilet should sit between two joists set no more than 12 inches on-center, with blocking nailed on either side of the drain to reinforce the area around the closet flange (Figure 6-56). This will limit any movement in the fixture that could break the seal at the wax ring.
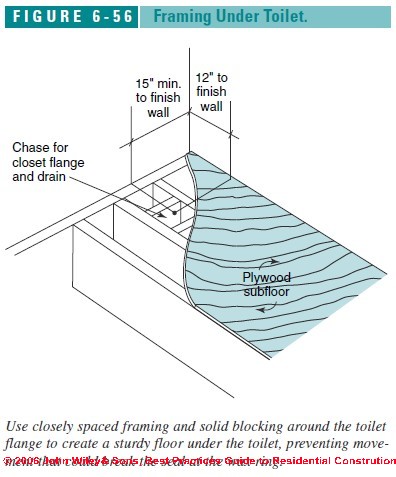
The hole in the subfloor should be just a bit larger than the drain. Also, it is best if the toilet sits on top of the finished flooring rather than having a dirt-trapping joint where the finished floor abuts the fixture.
Next, install the closet flange and secure it to the subfloor with brass or stainless-steel screws. With vinyl flooring, the flange can sit directly on the subfloor. With tile, use a plywood spacer to raise the flange to the height of the tile. To insure longevity, use brass closet bolts, nuts, and washers rather than the plated steel that is often packaged with the toilet. Then place the wax ring in the closet flange and set the bowl in place.
Gradually tighten the nuts on the closet bolts, alternating from one side to the other until it is snug without over tightening. Finally, apply a bead of silicone caulk around the sides and front of the toilet foot, leaving the back unsealed. This will allow leaks to be spotted before serious damage develops.
Design Recommendations for Kitchen & Bathroom Ventilation
Kitchens and bathrooms are key sources of indoor moisture and other pollutants. Kitchens produce particulates and atomized grease from cooking, and with a gas range, they also produce combustion by-products including nitrogen dioxide and carbon monoxide.
Bathrooms produce moisture, odors, and VOCs from aerosols and various personal hygiene products. Effective spot ventilation in these areas is critical for maintaining healthy levels of indoor humidity levels and an overall healthy indoor environment (see INDOOR AIR QUALITY IMPROVEMENT GUIDE.
Bathroom Ventilation Design Recommendations
Bathroom ventilation should be powerful enough to remove excess moisture before it has time to condense on cold walls and windows, potentially damaging finishes, or escape into wall or ceiling cavities, where it may lead to decay or peeling paint.
Ventilation Rate Required for Bathrooms
The minimum ventilation rate for bathrooms required by the 2003 International Residential Code (IRC) is 50 cfm intermittent or 20 cfm continuous (if part of a whole-house ventilation system). While this may be adequate for a small bath, the guidelines of the Home Ventilating Institute (HVI) are more suitable for larger rooms:
- Small baths: For bathrooms up to 100 sq ft, HVI recommends using an exhaust fan that provides 1 cfm per square foot of floor space. This will provide approximately 8 air changes per hour. So, for example, an 8x10-foot bathroom would require 80 cfm of ventilation.
- Large baths: For bathrooms over 100 sq ft, the HVI recommends a ventilation rate based on the number and type of fixtures as shown in Table 6-12. For example, a bathroom with a toilet, shower, and jetted tub would require 200 cfm (50 + 50 + 100) of ventilation either in a single fan or multiple fans placed over the fixtures being vented.
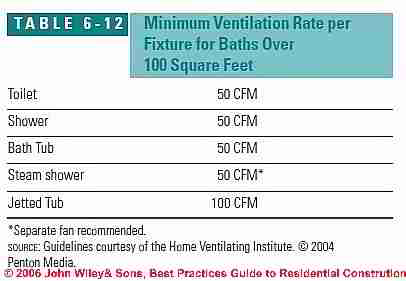
Bath Fan Noise Issues
The biggest homeowner objection to bath fans, their noise, has been addressed with the introduction of whisper-quiet bath fans from a number of manufacturers. Choose the quietest fan for the job, preferably one rated 1.5 sones or less (one sone roughly equals the sound of a quiet refrigerator motor).
Recommendations for Bathroom Fan Location
For optimal ventilation, locate the exhaust grilles near the source to be ventilated, typically over the tub or shower. In smaller baths, a single, central exhaust point is usually adequate, while in larger baths, multiple smaller fans (or a remote fan with separate pickups) will be more effective.
Bathrooms with enclosed toilet areas or steam showers should have separate exhaust grilles in those areas. Since all exhaust fans require makeup air, the bathroom door needs to be undercut to provide makeup air when bathroom windows are closed.
Advice for Bath Fan Controls
The Home Ventilating Institute (HVI) recommends that a fan be left on for 20 minutes after use of a bath or shower to remove all excess moisture from the room and ductwork. A timer switch is the simplest way to accomplish this. Another option is a de humidistat switch, which will automatically operate the fan whenever the humidity level rises above a preset level. A manual override allows normal operation of the fan for other bathroom uses.
Bath Fan Ductwork Specifications
A ventilating fan must overcome the resistance, called “static pressure,” created by the ductwork, including transitions, elbows, and the wall or roof cap. The advertised airflow of bath fans is typically based on a static pressure of 0.1 (inches of water gauge) although some also publish the airflow rating at 0.25 inches, which gives a better estimate of actual airflow in most installations.
A static pressure of 0.1 is roughly equivalent to 15 feet of straight, smooth 4-inch duct with a 100 cfm fan. A typical installation with about 20 feet of duct, two elbows, and a wall cap has an equivalent duct length closer to 80 feet (see Table 6-13).
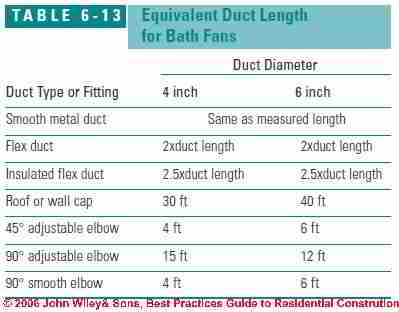
How well a particular fan can overcome the ductwork’s resistance to airflow is highly variable and is indicated by its fan curve, available from the manufacturer. Inline fans mounted remotely and exterior fans are generally the most powerful.
A typical installation with two elbows and 20 to 30 feet of duct reduces the rated airflow of a standard fan by anywhere from 10 to 30%. With long runs, multiple elbows, or corrugated flex duct, airflow may be reduced by 50% or more. To ensure good airflow, follow these guidelines:
- Use smooth ductwork of the same size or slightly larger than the fan outlet. Thin-walled PVC pipe works well and is easy to seal.
- Keep duct runs as short and straight as possible.
- Where possible, use broad sweeps rather than 90-degree angles to change direction.
- Seal all joints in metal duct with foil-backed tape or duct mastic, not cloth duct tape.
- For a standard installation, choose a slightly larger fan size than required. Where duct runs exceed about 25 feet plus two elbows, choose a larger fan size and check the fan curve to determine actual airflow.
Condensation in ductwork is also a concern in cold climates. To avoid problems, insulate the ductwork to at least R-5 or run it below the ceiling insulation. Also keep any metal duct seams facing upward and slope the duct slightly toward the exterior outlet so that any condensation drains to the outside. Avoid any sags in the ductwork, which are potential pooling areas for condensation.
Kitchen Ventilation Design Guide
Kitchen cooktops produce large amounts of water vapor, atomized grease, particulates, and cooking odors. In addition, gas cooktops produce combustion by-products, including carbon dioxide, nitrogen dioxide, nitrous oxide, and carbon monoxide (see “Combustion Appliances,” ). The most effective way to remove the moisture and contaminants from a cooktop is with an overhead range hood vented to the outdoors. Unvented range hoods offer no protection against moisture and combustion gases and provide only minimal protection against grease, smoke, and odors trapped by the filter.
Kitchen Range Hood Location Advice
Research at the University of Minnesota has shown that many range hoods are too small, too high, or not oriented properly to do their job well. According to the study, the most effective range hoods are at least as wide as the cooktop and rectangular rather than angled in front.
For best performance, standard hoods should be mounted no more than 24 inches above the cooking surface and project out at least 20 inches from the wall (see Figure 6-57).
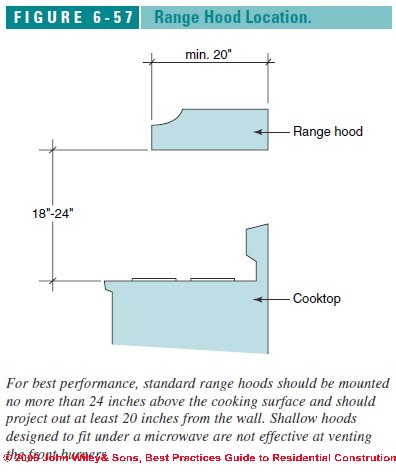
Some high-capacity ventilators are designed to work from 24 to 30 inches above the cooking surface, but the stronger fans increase the risk of backdrafting other combustion appliances. Hoods integrated with microwaves typically project out only 13 to 15 inches and miss most of the contaminants generated by the front burners.
Required Kitchen Fan Ventilation Rate
The minimum ventilation rate for kitchens required by the 2003 International Residential Code is 100 cfm intermittent or 25 cfm continuous (if part of a whole-house ventilation system).
Most industry experts recommend that overhead range hoods have a minimum capacity of 150 cfm and recommend higher capacity fans for open grilling, high-BTU commercial-style ranges, and other cooking styles that generate greater than average steam or smoke (see Table 6-14).
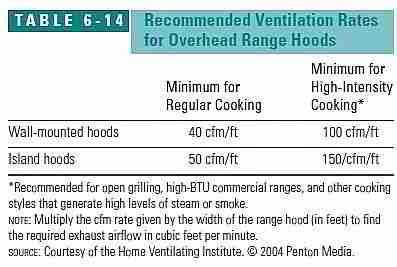
A rule of thumb for high-output ranges is 1 cfm of ventilation per 100 BTU’s of output. With high-powered fans, multi speed controls are best so the fan speed (and noise) can be lowered when full power is not required.
Installation Specifications for Kitchen Island Hoods
Island hoods are typically installed at least 27 inches above the cook surface so they do not interfere with sight lines. Because they are farther from the cooktop and subject to passing air currents, they require more powerful fans than standard wall-mounted hoods. HVI recommendations for wall-mounted and island hoods are shown in Table 6-14.
Downdraft Fans for Kitchens
Because they lack a canopy to catch contaminants and must overcome natural convection, downdraft fans are less effective than overhead range hoods. Typically sized at 400 to 600 cfm or more, they do a reasonable job of venting barbecues and grills, but are less effective with pots and pans taller than about 3 inches. Downdraft fans are either flush-mounted at counter level or pop up about 8 inches at the back of the range.
- Flush-mounted fans are typically located in the center of the cooktop or to one side. They generally do an adequate job of capturing combustion gases, as well as water vapor and cooking odors from pans 3 inches or shorter. Vapors from taller pots tend to escape.
- Pop-up fans in the rear do an adequate job of capturing combustion gases and moisture, except for tall pots on the front burners.
Kitchen Vent Fan Noise Ratings & Advice
Look for the unit with the lowest noise rating that meets the ventilation requirements. Some hoods are rated as low as 2.5 sones, although most range from 4 to 7 sones at full power (one sone roughly equals the sound of one quiet refrigerator).
Ductwork Suggestions for Kitchen Fans
Like bathroom fans, the airflow from kitchen exhaust fans is generally rated at a static pressure of 0.1 in. (see “Ductwork,” page 262). This is roughly equivalent to 30 feet of smooth 7-inch round or 3 1/4x10 in. metal duct venting a 200 cfm fan. For good performance, the total equivalent duct length, not counting the wall or roof cap, should not exceed about 30 feet. Equivalent duct lengths for common fittings are shown in Table 6-15.
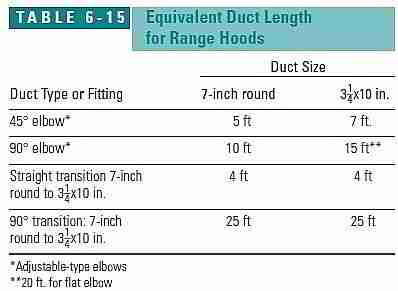
Backdrafting & Safety Issues with Exhaust Fans
With large-capacity exhaust fans of 200 cfm or greater, there is a risk of causing backdrafting of a fireplace or atmospherically vented boiler, furnace, or water heater. The potential for backdrafting can be tested by a heating system technician and should be conducted with all household exhaust fans running to simulate the worst-case scenario. A simple preliminary test can be done by holding a stick of incense next to the draft diverter or dilution port of each combustion appliance with the furnace fan on and off.
If the smoke spills into the room for more than 30 seconds, then dedicated makeup air is most likely required. Modest amounts of makeup air can be delivered through a passive duct with an automatic damper, but significant depressurization may require an active supply fan. The makeup air supply should be delivered into the kitchen or a nearby room not blocked by a door. (For more information, see “Backdrafting,” page 295).
Kitchen and Bath Product Manufacturers, Sources, Associations
Ceramic Tile-Setting Material Manufacturer List
- Bonsal American www.bonsal.com Setting compounds, grouts, preformed shower pans, curbs, and niches. Also, distributor of backerboards, isolation membranes, and other tile-setting products
- Color Caulk, div. of Roanoke Companies Group www.colorcaulk.com Color-matched caulking
- Custom Building Products www.custombuildingproducts.com Elastomeric and liquid-applied membranes, self-leveling underlayments, setting compounds, and grouts
- Laticrete International www.laticrete.com Trowel-on membranes, self-leveling underlayments, setting compounds, grouts, and sealants
- Noble Company www.noblecompany.com CPE sheet membranes, trowel-on membranes, clamping ring drains, and preformed slopes, niches, and curbs
- Mapei www.mapei.com Trowel-on and sheet membranes, self-leveling underlayments, setting compounds, grouts, and color-matched sanded caulks
Ceramic Tile Backerboard Producers
- Custom Building Products www.custombuildingproducts.com Wonderboard cement backerboard, Easyboard cement and polystyrene lightweight backerboard, and Rhinoboard fiber-cement backerboard
- Georgia-Pacific Gypsum www.gp.com/build Denshield gypboard backer with glass-matt facing
- James Hardie Building Products www.jameshardie.com Fiber-cement backerboard
- National Gypsum www.nationalgypsum.com Permabase lightweight cement and polystyrene backerboard
- Schluter Systems www.schluter.com Kerdi tile membrane goes directly over drywall or other substrates
- T. Clear Corp./Fin Pan Inc. www.finpan.com Util-A-Crete lightweight concrete backerboard
- U.S. Gypsum www.usg.com Durock cement backerboard
- W. R. Bonsal www.bonsal.com Extruded polystyrene backerboard with fiberglassreinforced cement facing
Cabinet Hardware Manufacturers List
- Accuride International www.accuride.com Ball-bearing drawer slides
- Amerock Corp. www.amerock.com Comprehensive catalog of cabinet hinges, pulls, slides, and accessories
- Grass America www.grassusa.com Cup hinges, slides, shelf supports, and storage accessories
- Hafele America www.hafeleamericas.com Cup hinges, ball-bearing slides, pulls, and KD connectors
- Mepla Inc. www.mepla-alfit.com Cup hinges, ball-bearing slides, drawer systems, shelf supports, and KD connectors
- Hettich America www.hettichamerica.com Cup hinges, ball-bearing drawer slides, shelf supports, and KD connectors
Plastic Laminate Countertop Manufacturers List
- Abet Inc. www.abetlaminati.com
- Arborite www.arborite.com
- Formica Corp. www.formica.com
- Nevamar Decorative Surfaces www.nevamar.com
- Pionite Decorative Surfaces www.pionite.com
- Wilsonart International www.wilsonart.com
Solid Surface Countertop Manufacturers
- Avonite Surfaces www.avonite.com
- Centura Solid Surfacing www.centurasolidsurface.com
- Dupont www.corian.com
- Formica Corp. www.formica.com Formica solid surfacing, formerly Surell and Fountainhead
- Halstead International www.e-topstone.com Topstone solid surface distributor
- Lippert Corp. www.lippertcorp.com
- Sansung Staron www.getstaron.com Swanstone www.theswancorp.com
- TFI www.tficorp.com
- Transolid Inc. www.transolid.com
- Wilsonart International www.wilsonart.com
Engineered Stone Countertop Manufacturers
- Cambria www.cambriausa.com Cosantino USA www.silestoneusa.com
- Dupont www.zodiaq.com
- Halstead International www.halsteadintl.com Granyte distributor
- Technistone USA www.technistoneusa.com
- U.S. Quartz Products www.caesarstoneus.com
Jetted and Soaking Tubs Manufacturers
- American Standard www.americanstandard-us.com
- Aqua Glass Corp. www.aquaglass.com
- Aquatic Industries www.aquaticwhirlpools.com
- Bains Oceana Baths www.bainsoceaniabaths.com
- Eljer Plumbingware www.eljer.com
- Hydro Systems www.hydrosystem.com
- Jacuzzi Whirlpool Baths www.jacuzzi.com
- Kohler Co. www.kohler.com
- Lasco Bathware www.lascobathware.com
- Maax www.maax.com
- MTI Whirlpools www.mtiwhirlpools.com
Bath Fan Manufacturers
- American Aldes www.americanaldes.com Remote location single- and multi-port exhaust ventilators
- Broan-Nutone LLC www.broan.com Low-sone Broan bath fans, also single- and multiport remote location exhaust ventilators; Nutone ceiling-mount bath fans
- Fan Tech www.fantech.com Remote location inline-duct fans
- Kanalflakt www.kanalflakt.com Remote location inline-duct fans
- Marley Engineered Products www.marleymeh.com Ceiling-mount bath fans and general kitchen and room exhaust fans
- Panasonic www.panasonic.ca/English/ventilationfans Low-sone, Energy-Star-compliant ceiling-mount, inline, and wall bath fans
Kitchen Exhaust Fan Companies
- Amana www.amana.com Pop-up and traditional range hoods
- Bosch www.boschappliances.com Chimney style, downdraft, and traditional range hoods, stainless steel and colors
- Kitchenaid www.kitchenaid.com Retractable downdraft, slide out, island, and traditional range hoods
- Broan-Nutone LLC www.nutone.com Nutone downdraft, island, and traditional range hoods
- Dacor www.dacorappl.com Commercial-style, stainless-steel pop-up and overhead range hoods; hood liners for custom canopies
- Gaggenau www.gaggenau.com/us Chimney-style, pop-up, slide-out, and island range hoods in stainless-steel, aluminum, and glass
- Jenn Aire/Maytag Corp www.jennaire.com Pop-up, under-cabinet, wall, soffit, island, and fans and hood liners for custom canopies
- Thermador www.thermador.com Updraft, downdraft, and island-range hoods
- Wolf Appliance Co. www.wolfappliance.com Pop-up, chimney-style, wall, and island-range hoods in stainless steel
Kitchen & Bath Industry Associations
- Association of Home Appliance Manufacturers(AHAM) www.aham.org
- National Kitchen and Bath Association (NKBA) www.nkba.org
- Ceramic Tile Institute of America www.ctioa.org
- Home Ventilation Institute (HVI) www.hvi.org
- Marble Institute of America www.marble-institute.com Porcelain Enamel Institute (PEI) www.porcelainenamel.com
- Tile Council of America (TCA) www.tileusa.com
-- Adapted with permission from Best Practices Guide to Residential Construction (Steve Bliss, J Wiley & Sons) .
Reader Question: I need advice on what I can do to fix up the kitchen in a home I'm buying for $20,500.
 I need some advice on what I can do for my kitchen here. I am on Social Security income and could never afford to do what I see in magazines and online.
Everything they show is way to expensive for me. I will have to buy things at second hand shops, thrift stores, or yard sales. But no one shows poor people what they should do.
I'm not any good at remodeling so I could really use some advice if you've got any.
I was just hoping I could do a little at a time, but what can I do?
I don't even know where to start. I'm buying this house for $20,500 and I haven't had noway to fix it up. J.R. & C.R., Bridgeport AL, 3/7/2013
Reply: set priorities of repair to first address "the 3-D's of Fixing-Up a Home"
Before spending anything on a kitchen remodel let's check a few critical questions about setting the priority of home fix-up or remodeling projects.
Watch out: You are buying a home at such a very low price that I would be worried about what expensive repairs are needed to make the home safe and habitable. It is possible, indeed likely, that a kitchen remodel is not the highest priority repair your home needs. In order of priority one needs to address
1. Dangerous conditions: unsafe electrical wiring, chimneys, heating appliances, stairs and railings, some infestations or contaminations (e.g. a sewer backup).
Examples of possible hazards in your new home: iIn your photos (which were a bit too blurry for me to see much) I see what looks like loose kitchen floor tiles: these may be a trip and fall hazard, and depending on their age they may also contain asbestos - not something to panic about but you wouldn't want to launch into a demolition and remodeling project that makes a bunch of hazarous asbesos-dust.
at ASBESTOS FLOORING IDENTIFICATION we explain how to recognize or assume that flooring contains asbestos.
at ASBESTOS FLOORING HAZARD REDUCTION we describe how to minimize that hazard. I also see what might be a gas stove. You'll want to assure that its piping, shutoff valves, etc. are properly installed and not leaking. And depending on the age of the home you might be looking for lead plumbing and lead paint hazards.
2. Don't work: things that you need to live in a home that are not working or that do not work reliably enough, such as heating, cooling, plumbing supply, drains, fixtures, lights, some outlets. "Reliably enough" means that you can go out of the house for a few days without having to worry that it will freeze up, melt down, or blow up, and that basic amenities, water, toilets, heat, are working in at least enough of the house that it can be inhabited.
3. Damage: things that are causing rapid costly damage. Examples are a collapsing foundation, active and significant roof leaks, extensive termite or carpenter ant infestations, significant plumbing leaks
I have inspected thousands of homes for buyers and owners. Some of them that looked like the "least expensive" were in truth the "most expensive" once the "3-D's of Fixing a Home" listed above were considered. Even if someone gave you the home for free, you still must have enough money to address these categories of repairs. Otherwise you are risking losing everything: money, safety, or worse.
If you have not already done so, I recommend hiring an expert home inspector - one with no conflicts of interest, that is an inspector who works for you, not for the seller or real estate agent. Ask that person to help you list the top priority repairs for the home. You might find a good home inspector by asking your acquaintances about their experiences in buying a home, or you can check inspectors listed at EXPERTS DIRECTORY or in your own state's professional directories.
When you know the high priority repairs, then you can make a game plan for what projects to address, in what order in the home. At that point I'd agree that sometimes we can do some remodeling or improvement as part of another high priority repair project. For example if we have to tear out a sink to get at and fix leaks, we might decide to replace it with a better unit.
Reader Comments, Questions & Answers About The Article Above
Below you will find questions and answers previously posted on this page at its page bottom reader comment box.
Reader Q&A - also see RECOMMENDED ARTICLES & FAQs
Question:
(Mar 31, 2015) Candothebest said:
I have a small 7.75 X 11.4 kitchen. I want to place a dishwasher right next to the range. This would allow another 18 inch cabinet between the range and the wall instead of breaking up the 18 inches into two nine-inch cabinet and inserting the range in-between, which I don't like.
Is there any reason against putting a dishwasher next to a range or any other configuration that wouldn't split the 18-inch cabinet I want into small ones? If this is a problem would it make sense to insert a spacer of a couple of inches before he range then a 15 inch cabinet? Your help would be deeply appreciated.
Reply:
Can-do
OPINION: In terms of hook-up or durability, you will be OK as long as you find room for wiring and plumbing connections.
I would look out for practical issues such as access space when range and dishwasher are opened, avoiding reaching across a range with dishes headed for the dishwasher, etc.
...
Continue reading at KITCHEN DESIGN PRINCIPLES or select a topic from the closely-related articles below, or see the complete ARTICLE INDEX.
Or see these
Kitchen & Bath Design Guide Articles
- BATH & KITCHEN DESIGN GUIDE - home - you are on this page
- BATH & KITCHEN ASSOCIATIONS, PRODUCT SOURCES
- BATHROOM DESIGN
- BATHROOM DESIGN, ACCESSIBLE
- BATHROOM LIGHTING GUIDELINES
- BATHROOM VENTILATION CODES SPECS
- BATHROOM VENTILATION DESIGN
- CABINET CHOICES, Bath / Kitchen
- CABINETS & COUNTERTOP DEFECTS
- CASEWORK, CABINETS, SHELVING INSTALLATION
- CERAMIC TILE FLOOR, WALL
- COUNTERTOPS, KITCHEN & BATH
- FAUCETS, Kitchen & Bathroom
- FLOOR DESIGN, Kitchen & Bathroom
- FLOOR, STONE, GRANITE, MARBLE, AGGLOMERATE
- GROUT INSTALLATION, TILE
- KITCHEN CABINET DESIGN Guide
- KITCHEN DESIGN PRINCIPLES
- KITCHEN DESIGN, ACCESSIBLE
- KITCHEN LAYOUTS, Typical
- KITCHEN LIGHTING REQUIREMENTS
- KITCHEN VENTILATION DESIGN
- LIGHTING, INTERIOR GUIDE
- MARBLE CLEANING METHODS
- PLUMBING FIXTURES, KITCHEN, BATH - home
- PLUMBING NOISE CHECKLIST
- SHOWER PAN INSTALLATION & LINERS
- SINK TYPES & MATERIALS
- SPAS WHIRLPOOLS SOAKING & JETTED TUBS
- TILE INSTALLATION DETAILS
- TOILET DESIGNS, CHOICES
- TOILET INSTALLATION PROCEDURES
- TUBS & TUB REPLACEMENTS or RELINERS
Suggested citation for this web page
BATH & KITCHEN DESIGN GUIDE at InspectApedia.com - online encyclopedia of building & environmental inspection, testing, diagnosis, repair, & problem prevention advice.
Or see this
INDEX to RELATED ARTICLES: ARTICLE INDEX to BATH & KITCHEN
Or use the SEARCH BOX found below to Ask a Question or Search InspectApedia
Ask a Question or Search InspectApedia
Try the search box just below, or if you prefer, post a question or comment in the Comments box below and we will respond promptly.
Search the InspectApedia website
Note: appearance of your Comment below may be delayed: if your comment contains an image, photograph, web link, or text that looks to the software as if it might be a web link, your posting will appear after it has been approved by a moderator. Apologies for the delay.
Only one image can be added per comment but you can post as many comments, and therefore images, as you like.
You will not receive a notification when a response to your question has been posted.
Please bookmark this page to make it easy for you to check back for our response.
Our Comment Box is provided by Countable Web Productions countable.ca
Citations & References
In addition to any citations in the article above, a full list is available on request.
- Best Practices Guide to Residential Construction, by Steven Bliss. John Wiley & Sons, 2006. ISBN-10: 0471648361, ISBN-13: 978-0471648369, Hardcover: 320 pages, available from Amazon.com and also Wiley.com. See our book review of this publication.
- Our recommended books about building & mechanical systems design, inspection, problem diagnosis, and repair, and about indoor environment and IAQ testing, diagnosis, and cleanup are at the InspectAPedia Bookstore. Also see our Book Reviews - InspectAPedia.
- Best Practices Guide to Residential Construction, by Steven Bliss. John Wiley & Sons, 2006. ISBN-10: 0471648361, ISBN-13: 978-0471648369, Hardcover: 320 pages, available from Amazon.com and also Wiley.com. See our book review of this publication.
- Stephenson, Elliott O., THE ELIMINATION OF UNSAFE GUARDRAILS, A PROGRESS REPORT [PDF] Building Standards, March-April 1993
- "Are Functional Handrails Within Our Grasp" Jake Pauls, Building Standards, January-February 1991
- Access Ramp building codes:
- UBC 1003.3.4.3
- BOCA 1016.3
- ADA 4.8.2
- IBC 1010.2
- Access Ramp Standards:
- ADA (Americans with Disabilities Act), Public Law 101-336. 7/26/90 is very often cited by other sources for good design of stairs and ramps etc. even where disabled individuals are not the design target.
- ANSI A117.4 Accessible and Usable buildings and Facilities (earlier version was incorporated into the ADA)
- ASTM F 1637, Standard Practice for Safe Walking Surfaces, (Similar to the above standards)
- America's Favorite Homes, mail-order catalogues as a guide to popular early 20th-century houses, Robert Schweitzer, Michael W.R. Davis, 1990, Wayne State University Press ISBN 0814320066 (may be available from Wayne State University Press)
- Best Practices Guide to Residential Construction, by Steven Bliss. John Wiley & Sons, 2006. ISBN-10: 0471648361, ISBN-13: 978-0471648369, Hardcover: 320 pages, available from Amazon.com and also Wiley.com. See our book review of this publication.
- In addition to citations & references found in this article, see the research citations given at the end of the related articles found at our suggested
CONTINUE READING or RECOMMENDED ARTICLES.
- Carson, Dunlop & Associates Ltd., 120 Carlton Street Suite 407, Toronto ON M5A 4K2. Tel: (416) 964-9415 1-800-268-7070 Email: info@carsondunlop.com. Alan Carson is a past president of ASHI, the American Society of Home Inspectors.
Thanks to Alan Carson and Bob Dunlop, for permission for InspectAPedia to use text excerpts from The HOME REFERENCE BOOK - the Encyclopedia of Homes and to use illustrations from The ILLUSTRATED HOME .
Carson Dunlop Associates provides extensive home inspection education and report writing material. In gratitude we provide links to tsome Carson Dunlop Associates products and services.
 | HOME | ABOUT | ASK a QUESTION | CONTACT | CONTENT USE POLICY | DESCRIPTION | POLICIES | PRIVACY | |
| © 2024 - 1985 Publisher InspectApedia.com - Daniel Friedman | |||||||||