
InspectAPedia® FREE Encyclopedia of Building & Environmental Construction, Diagnosis, Maintenance & Repair |
Question? Just ask us! InspectAPedia
|
 Wood Framing Toe-Nailing Connections
Slant-driven nails for wood framed joists, studs, sill plates, top plates, & beams
Effect of using too many or too few nails
Recommended nailing for various wood framing joints

- POST a QUESTION or COMMENT about toe nailing in wood frame construction
Wood frame toe nailing: how to toe-nail joists, studs, & beams in wood framed structures.
This article describes the proper method for strong "double-shear" angled or toe nailing of joists or studs that butt into beams or top or shoe plates in wood framed buildings.
Properly done, toe-nailing makes very strong wood framing connections. But mistakes like choosing the wrong nail size, wrong nail placement, or wrong number of nails can mean weak joints and a weak structure.
Wood framing connections & connectors: this article series explains the proper selection and installation of structural connectors, brackets & tie plates used to connect deck or porch framing and support members.
InspectAPedia tolerates no conflicts of interest. We have no relationship with advertisers, products, or services discussed at this website.
- Daniel Friedman, Publisher/Editor/Author - See WHO ARE WE?
Guide for Toe Nailing Wood Framing Connections

Definition of toe-nailing
Toe-Nailing in carpentry refers to framing nails driven on an angle from opposing sides and through the nailed-through wood framing member into the nailed-to framing member so that the "crossed" opposed toe-nails form both a shear-resistant and a withdrawal-resistant connection between the framing members.
Article Contents
- TOE NAILING BASICS - when to use, strength, position
- NUMBER OF NAILS to USE WHEN TOE-NAILING - wood framing connections
- HOLD FRAMING in POSITION WHEN TOE-NAILING - how-to
- NAIL PLACEMENT & SPACING when TOE-NAILING
- NAIL SIZE to USE when TOE-NAILING - wood framing
- TOE-NAILING MISTAKES - avoid these errors that mean a weak or failed wood structure: too many, too few, wrong-placed nails, splitting or damaging lumber
- TOE-NAILING FRAMING RESEARCH & REFERENCES
...
Basics of Toe-Nailed Framing Connections
 When do we Use Toe-Nailing?
Toe-nailing or slant-driven nails are commonly used wheit is not possible to drive straight through the abutting framing member, and has been historically widely used for connecting studs to the top or bottom plate, beam to plate, and rafter to plate, girder, at rafter to ridge board connections.
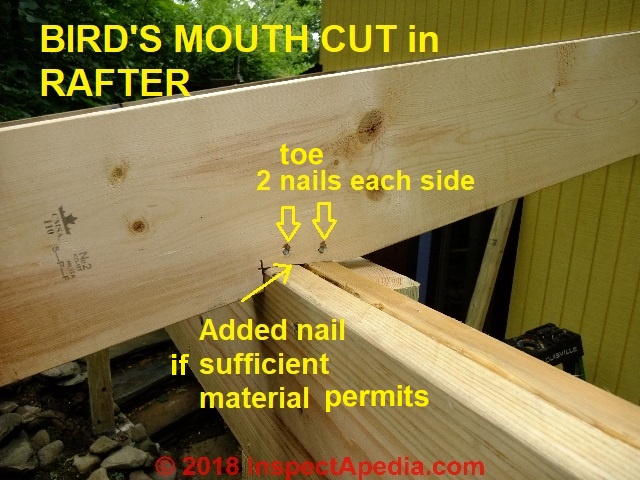
Our photo just above shows toe-nailing on either side of the birds mouth cut in a low slope building rafter in order to secure the rafter bottom to the upper surface of the girder on which it rests.
We'll illustrate other toenail framing examples in this article.
Toe-nailing is used both stand-alone, without steel framing connectors and also toe-nailing is specified for the installation of some (not all) framing connectors.
Note: while we're describing toe-nailing using framing nails on this page, it's perfectly correct to also use construction screws of proper size in any of the examples on this page.
Is Toe-Nailing Strong Enough?
In carpentry school we were taught that provided you use the correct type and size fastener (common nails, construction screws) and the correct number of them (on this page we include to nailing tables and standards) toe-nailed from both sides of the abutment of a stringer face to the floor joist (or rafter to ridge and rafter to top plate, or stud to top and bottom plate) the connection is completely adequate, and is as strong as that made using proper joist hanger nails and joist hangers.
In fact, crossed nails between framing members, properly placed, provide tremendous resistance against separation of the toenailed members because the nails are resisting shear force loading.
It is not necessary to use steel joist hangers if the joist is properly toe-nailed from either side into the ledger board, provided that the proper size and number of nails are used.
See FRAMING CONNECTORS & JOIST HANGERS for details about those connectors
Definition of shear loading & lateral loading of wood framing connections:
Shear loads or lateral load are across the framing nails while withdrawal loads are those that tend to pull the framing nails out of the nailed-to member.
Position of Toe-Nailed Fasteners Within Wood Framing Members
Our illustration (above, adapted from a Double-Shear stamping on a steel joist hanger) explains why toe-nailed lumber connections can be very strong.
We drew in spray-brown color, a representation of the position of wood framing members (behind or within the steel framing connector) showing the abutting of 2x lumber (vertical in the illustration) with a header or beam (horizontal in the illustration).
The crossed nails, when applied close together (as guided by the framing connector or by the hand of a competent framing carpenter), form a very strong wood-to-wood connection.
Use of toe-nailing, or angled opposed framing nails (Double-Shear in Simpson Strong-Tie's patented[10] joist hanger such as the item adapted above), can permit the use of fewer total nails in a wood frame construction.
You will see that there are many opportunities to make a bad connection using either approach, in particular, using improperly-sized, placed, or number of fasteners.
There is no evidence in my experience that people make fewer mistakes using a joist hanger than using direct nailing. They just make different mistakes.
What Affects the Strength of a Toe-Nailed Wood Framing Connection?
The strength of a toe-nailed wood framing connection will be affected by:
- How close to opposite one another the two nails are placed
- Using nails of sufficient length to adequately penetrate both wood members
- Nailing the toe-nails at the proper angle (45 degrees).
- Placing nails high enough from the edges of the abutting member (vertical in our sketch) as to have adequate purchase and to avoid simply splitting out a little chip of the edge of the 2x.
- Placing nails low enough in that same member to be sure that the length of the nail penetrates both the abutting member and the nailed-to facing member.
- Using the correct number of nails specified for the lumber sizes involved.
- The species and grade of the lumber being used and of course the condition of the lumber
- The type of loading: shear loading or lateral loading versus withdrawal loading that will be applied to the connection
...
Proper Number of Nails for Toe-Nailed Framing Connections
Nailing Schedule for Toe-Nailed or Slant-Nailed Wood Framing Connections |
|
| Wood Frame Connection Type | Number of Nails Required |
| Blocking or Bridging, between joists / rafters | 3-8d into top plate 2-8d into joists at each end of the block or bridging |
| Ceiling joist to top plate of wall | 3-8d toenails - 12d |
| Cross bridging between joists | 2-8d nails |
| Header to studs | 4-8d - 12d toenails two on opposing sides |
| Rafter to surface of top plate | 3-8d - 10d - 12d toe-nails (see notes in text above), also 10d box nails may be used in some jurisdictions. |
| Floor joists or ceiling joist to top surface of sill plate or girder top | 3-8d common toenails, or 10d, or 12d |
| Floor joists or deck joists to ledger board face | 4-6 8d or 10d toenails per side, 2x6 joist; number per side increases for deeper joists; |
| Joist & rafter blocking | 3-8d, face nail from 2 nails from one side |
| Rim joist to surface of top plate or sill plate | 8d, 6" o.c. |
| Wall stud (2x4) to top plate | 2 - 16d end-nails (through the plate from below, into the stud end) |
| Wall stud (2x4) to sole plate or "shoe" | 4 - 8-d toe-nails or 2 - 16d end-nails (through the plate from below, into the stud end) |
Notes to & Complete Nailing Schedule Sources for table above
- NAIL FASTENING SCHEDULE - 2016 CALIFORNIA BUILDING CODE Table 2304.10.1 [PDF] Building & Safety Division, Plans & Permits Div., City of Fremont California, 39550 Liberty St., Fremont CA 94538, Website: www.fremont.gov, original source: https://www.fremont.gov/DocumentCenter/View/7140/FASTENING-SCHEDULE?bidId=
- NAILING SCHEDULE - 1994 Uniform Building Code Table 23-I-Q [PDF] - this PDF provides the entire wood framing nailing table that serves as a general guideline on number of toe-nails used and nail size used for various residential wood framing connections.
- RESIDENTIAL NAILING SCHEDULE TABLE R602.3(1) FASTENER SCHEDULE for STRUCTURAL MEMBERS [PDF] Dublin CA Building & Safety Division, 100 CIvic center Plaza, DublinCA 95468 USA, Tel: 925-833-6620 website: dublin.ca.gov
- IRC Code: IRC–12/13 Table R602.3(1) Fastening Schedule for Structural Members
Other code & data source citations for nailing schedules are given below
Watch out: It is essential that nails be driven from both sides of the member for a proper toe-nailed connection.
Toe Nailing Connection Nail Number & Position Details
- Rafter toenail connections:
At the birds' mouth cut of a rafter connecting to the top plate we use three nails per side, two down through the top of the birds' mouth into the top plate and one (on either side) of the rafter's vertical portion of the bird's mouth cut into the face of the top plate.
Really? Well yeah, in traditional wood framing we toe-nail the rafter to the top plate at the birds mouth cutout. However depending on the location of the structure and framing practices, the builder may use a framing anchor specifically designed for joining a rafter to the top plate of the wall.
Our photo above shows a bird's mouth notch in a porch rafter sitting atop the outer girder - equivalent in location and rafter measurements to setting a rafter atop the wall top plate of a building wall.
In a properly-cut bird's mouth, the length of the horizontal or level line (below my two red arrows in the photo above) should be about equal in length to the width of the top plate.
The actual design of the bird's mouth cut will vary in both length and depth according to the width of the top plate, the angle of the roof, the design of the roof overhang and also the use of framing connectors.
Some framing anchors eliminate the birds mouth notch; a framing anchor provides a steel nailing plate connector that provides a stronger connection with better hurricane or storm wind resistance. Similar special connectors are provided for connection of the rafter to the ridge. - Framing Connectors Indicate Numer of Nails Required - for that connection
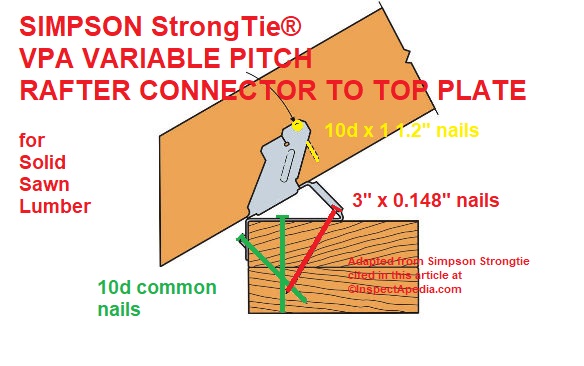
Above: a Simpson Strongtie® VPA variable pitch rafter-to-wall connector designed for solid sawn lumber. Notice that using the VPA rafter connector the bird's mouth cut or notch is eliminated. [Click to enlarge any image]
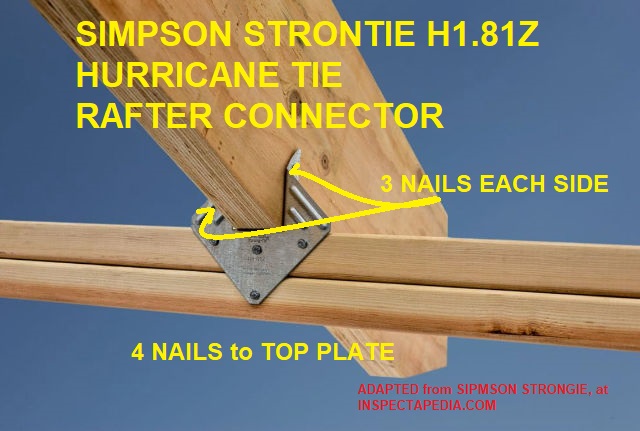
Below: a Simpson Strongtie® H1.81Z Hurricane Tie designed for LVL roof rafters to give a stronger connection to the top plate
At the ridge the rafter is toe-nailed to the ridge board OR a steel framing connector can be used.
- Girder or beam to post, plate or other connections: must be specified by the design
...
How to Keep the Framing Member in Position When Toe-nailing
Framing tip: if you've marked the stud, rafter, or joist location on the nailed-to plate or ridge board you may find that as you toe-nail the first nail into the side the nailed-through member begins to slide past the placement line.
If the movement of the nailed-through member off of the layout line is 1/8" or less, go ahead and finish the first nail, but then start the second nail on the opposite side of the nailed-through member. As you finish that nail you will drive the nailed-through member back to its exact position on the layout line.
If the movement off of the layout line is more than 1/8", stop nailing the first toe-nail and start the second opposite-side toenail to move the member back into position.
Rather than tippy-tap back and forth on the two sides, you should be able to fully drive the second nail even if it moves the member back over the layout line up to 1/8" in the opposite direction. When you finish nailing the first toenail you'll drive the member back into perfect position.
Then finish the remaining toenails, taking turns to nail from opposing sides.
Holding Framing Member in Position when Toe-Nailing with a Power Nailer
Really? Well not necessarily. If you're using a power nailer, holding the framing member in position while nailing is much easier as the power nailer shoots the nail so quickly and with so much force into the wood that it tends to move the framing member itself very little.
...
Where to Place & How to Space Nails When Toe-Nailing
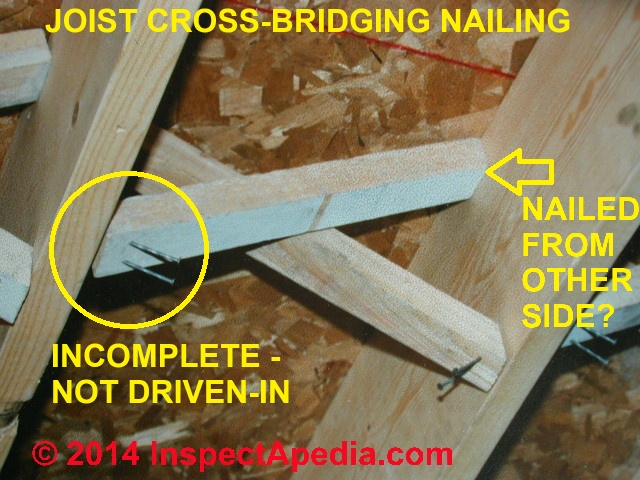
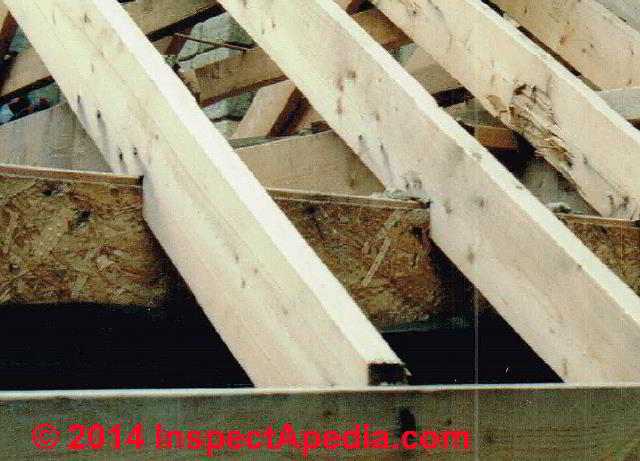
Above is an example of angle or slant nailing that is not "toe nailing" because the nails for each connection are being driven into only one side of the mated wood members. That's ok for this application.
Incidentally, you may notice that the joist bridging was (or might have been) nailed at its upper end before the subfloor was set in place.
Watch out: But no one remembered to finish the job. The nails in the bridging ends show proper placement and angle for nailing into the joist bottom edges.
Details about using cross-bracing between wood framing like these floor joists is found
First let's understand the objective: we want the toe-nailed nails to accomplish the following:
- Avoid splitting the nailed-through member:
this means don't start the toenail to close to the very end of the nailed-through member. Usually 3/4" to 1 1/4" before the end of the nailed through member will work. - Obtain sufficient depth or bite into the nailed-to framing member.
This means we want 3/4" or more of nail fully into the body of the nailed-to member. Choose a nail of the right size (see below) and right location to achieve this.
If you're not sure about the angle (about 50° to 60° up from horizontal) or starting location of your nail from the end of the member, hold your toenail across an example of the to-be-connected lumber where the end of the nailed-to member is visible. You'll be able to see the depth to which it's going to penetrate.
Toenail or Slant-nailing Spacing Specifications |
|
| Location | Minimum Clearance Distance |
| Minimum end-distance to start the toenail: | 7/8" |
| Minimum edge distance to start the toenail | 7/8" |
| Minimum center-to-center distance for spacing toenails | 1 3/4" |
Notes to the table above
Some model building codes such as the UBC specify the spacing for slant nailed or toenailed connections, with differing requirements depending on whether the objective is to reduce shear loading or lateral loading versus withdrawal loading.
Building code specifications for nailing schedules also include assumptions about the wood species and grade, typically Douglas-fir/larch or Southern Pine lumber.
...
What Size Nails should be Used for Toe-Nailing
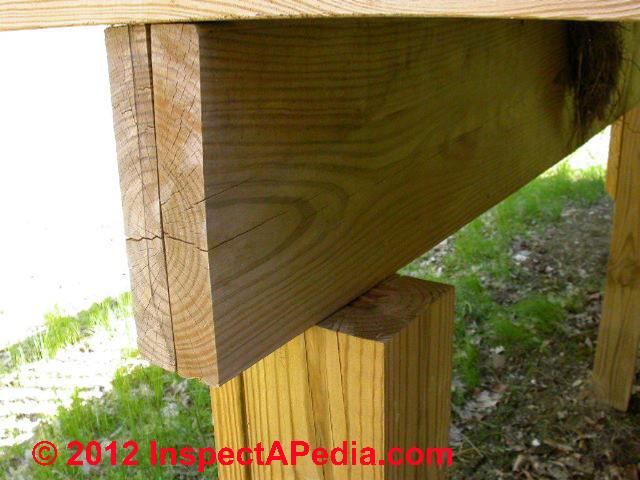 Our photo (left) shows a built-up girder sitting atop a wood post with no visible connection.
But in my OPINION the typical "toenailing" of this girder to the post top that some builders may use would still be an inadequate connection.
This connection, discussed in detail at FRAMING CONNECTORS & JOIST HANGERS, is an unsafe structure that risks collapse.
Reader question: (July 22, 2012) Ron said: 3" or 3 1/4" for toe nailing 2x lumber?
Reply: Ron,
In the article above you can see an illustration of toe-nailing showing nails crossing into the nailed-to member for strength.
- The required nail size for toenailing
or slant-nailing depends on the application, location, type of connection, and size of lumber involved. - The nail size also affects the number
of nails required. - For example in connecting a wall stud to the sole plate we use 2 end-driven 16d nails OR 4 8d toenails.
- As another example, where making structural connections of larger lumber sizes using 16d (3 1/2") common nails, the Uniform Building Code (UBC) requires 1 3/4" of penetration into the nailed-to member.
- For nailing typical 2x studs to a bottom plate or top plate the UBC requires 4 8d common nails, two per side of the stud.
- A 3-inch nail or 10d nail would be big enough for most common framing situations. In fact some framing texts (Wagner, Willis H, "Modern Carpentry" (1976)) describe using four 8d toenails, most likely again out of a concern to avoid splitting problems.
Driven a properly-sized nail on a proper angle through the 1 1/2" of thickness of 2x lumber you've got 1- 3/4" bite into the lumber below;
Toe nailing can be quite strong if properly installed - with nails in pairs set on opposing sides and at opposing angles so that they "cross" inside the nailed-to wood. But if "toe nailing" is done only from one side the framing connection is not strong and in my opinion not proper.
It's also important to locate the toenail correctly - if it's too close to the bottom of the vertical stud or end of the horizontal framing joist it will split the wood and won't have enough bite in the nailed-through member.
If on the other hand the toenail is too high in the nailed-through member it won't have enough bite in the nailed-to member.
I toenail about an inch from the end of the nailed-through member and on an angle that I can visualize as sending a good portion of the nail into the body of the nailed-into member.
...
Avoid these Serious Toe-Nailing Mistakes
Because the "toe-nails" cross one another in the header or ledger board when used to secure a deck joist, this connection can actually be stronger than straight-in or end-nailing the deck joists from the other side of the ledger or girder.But using too many nails (below left) or too few nails (below right) is a mistake that results in a weak connection and potentially an unsafe structure.
Using Too Many Nails when Nailing Wood Framing
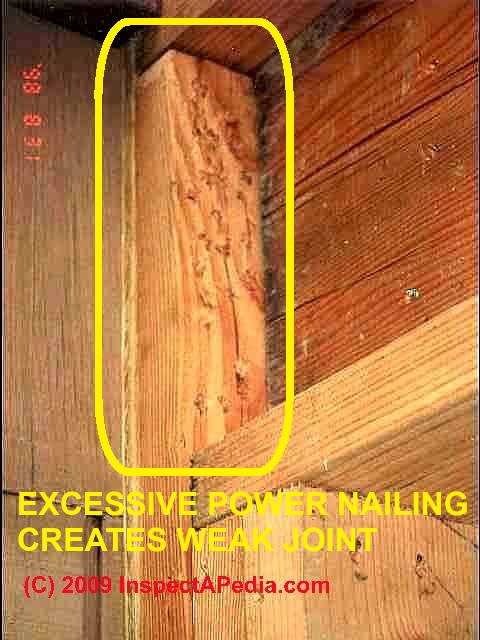
Using too many nails in a framing lumber connection when toe-nailing or in any position for that matter will also cause a weak framing connection that can lead to structural collapse.
That's because an excessive number of nails actually fractures the lumber. If you click-on and enlarge our photo at above left you'll see that the contractor fractured the vertical stud near its top. Our photo (left) shows about 30 nails shot by the builder during framing of this home.
The framer was trying to drive a recalcitrant stud into position. Clamps might have worked better.
This stud was so split as to lose its structural integrity, and replacement of this wall stud was needed.
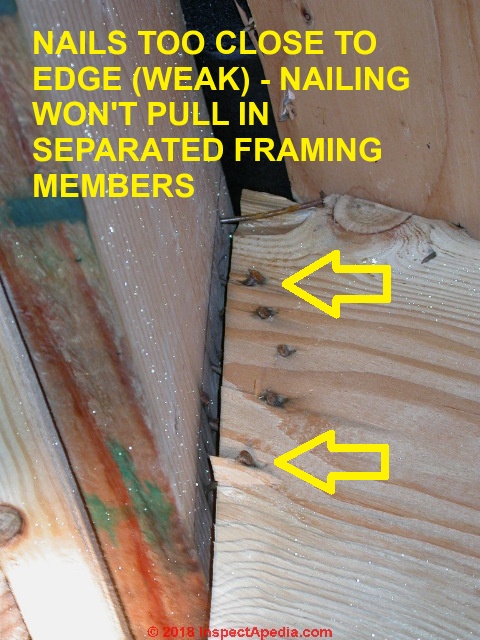
As we show below, adding more nails, even with a pneumatic nail gun, does not do a great job of pulling together framing members that are separated.
Too few nails when toenailing framing
Using too few toe-nails in a framing lumber connection is going to make a weak structure that could collapse.
For code compliant nailing see the nail schedules in the applicable building code for your area.
For example see the UBC Table 25-Q Nailing Schedule as well as the table we give at
NUMBER OF NAILS to USE WHEN TOE-NAILING - wood framing connections
A few examples are cited below.
- Studs: 2x4: 4 nails - In the bottom of a 2x4 stud we use two nails per side, opposite one another, crossing in the nailed-to member.
- Studs, 2x6: 6 nails - In the bottom of a 2x6 stud we'd use 3 (and in some cases 4) nails per side.
- Joist to ledger board: varies by joist depth.
In a 2x6 joist I'd use 8 nails, 4 per side.
Avoid splitting when toenailing or slant-nailing wood framing
Start by keeping the toenails a sufficient distance from the end of the nailed-through member but not so high that you won't have adequate penetration into the nailed-to member.
In our photo at left I point out the location of two of the four required toenails for nailing the rafter to the top plate at the birds' mouth cut.
I don't see any splitting but I'm worried that the nails may be a bit high. Depending on the size of nail used there may not be adequate penetration into the top plate.
Photo courtesy of Carson Dunlop Associates, a Toronto engineering & home inspection firm and home inspection education company.
Framing tip: experienced carpenters learn to place the long axis of the diamond-shaped cut tip of a common framing nail across the wood grain of the nailed-into member.
This position minimizes splitting. As you take the nail out of your nail apron with your left hand, just place the tip of your third finger on the nail tip and use your thumb and forefinger to roll the nail so that you feel its long axis against the flat of your third finger. With the nail in that position, as you start the fastener, place the long axis of the nail point across the wood grain.
A 3 1/2 inch common nail or 16d might be over-sized for toe-nailing and is likely to split the 2x, especially if nailed near the edges of the lumber.
You originally asked this question in an article on framing connectors. Framing connectors, an alternative to toenailing, are nailed straight into the respective framing members using common, galvanized but short framing connector nails, not full length common nails.
Separately, in our article on framing square use,
at FRAMING SQUARE for BIRDS MOUTH CUT
we explain how the bird's mouth cut is located in a rafter by following the rafter's line length from ridge to outer face of wall top plate.
Below my photo shows separation between the rafter face and the ridge board.

Below: questionable rafter-to-wall connections
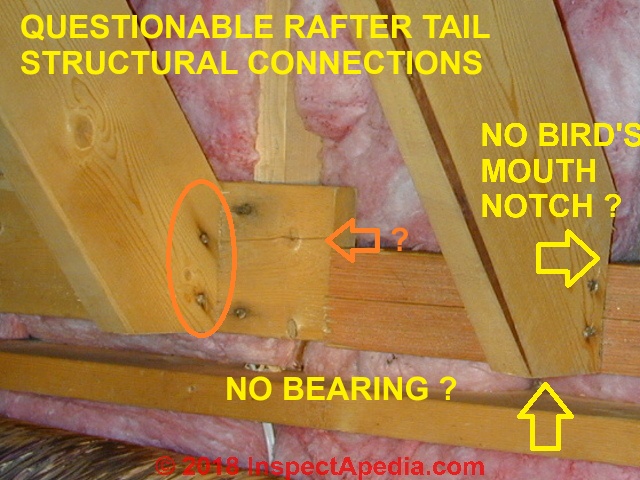
Above: two visible, possibly four maximum, toe-nails through rafter ends along with some other rather odd wood framing in a U.S. home inspected by the author.
In my OPINION (not an engineering opinion) and from what we can see, these rafters are not adequately connected to the rest of the structure.
Toe-Nails Instead of Joist Hangers are OK for Framing Lumber & Engineered-Wood Butt-Joint Connections, but Don't Over-Nail and Don't Under-Nail
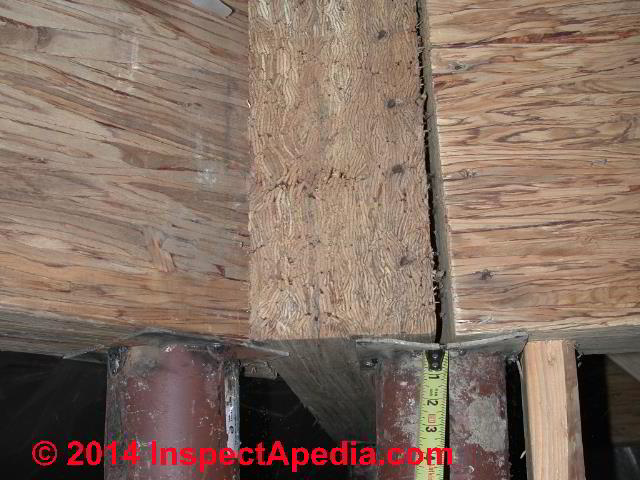
Our photo at left shows an unsuccessful use of toenailing in a failed attempt to connect intersecting glulam beams. The nails (those brown spots) pulled, broke, bent, and allowed the connection to fail.
The steel Lally columns are also not properly located an installed.
These beams are not properly connected and their structure is in danger of collapse. That some movement has already occurred is evident in the gap above my tape measure.
...
Toe-nailing & Slant-Nailing References
- Breyer,Donald E., Kenneth Fridley, Kelly Cobeen, David Pollock, Design of Wood Structures - ASD, McGraw Hill, 2003, ISBN-10: 0071379320, ISBN-13: 978-0071379328
- [3] Cleveland Steel Structural Fasteners, 26001 Richmond Rd., Bedford Heights, OH 44146,| Phone: 216.464.9400, Fax: 216.464.9404, E-mail: info@clevelandsteel.com, Website: http://clevelandsteel.thomasnet.com/category/construction-hardware-division?
- [4] Daytona Bolt & Nut, 815 N. Beach Street, P.O. Box 1391, Daytona, FL 32114, P: 386-255-0248, F: 386-257-5985, E-mail:Daytona@DaytonaBolt.com
- Harris, Samuel Y. P.E., AIA, Esq., Building Pathology, Deterioration, Diagnostics, and Intervention, ISBN 0-471-33172-4, John Wiley & Sons, 2001 [General building science-DF] ISBN-10: 0471331724 ISBN-13: 978-0471331728
- [8] Incom Distributor Supply, PO Box 868, Fort Wayne IN 46801, Tel: 260-748, 5469, Website: http://shop.incomsupply.com/shop/, "... a growing nationwide network of over 500 Commercial Industrial Distributors" Incom Inc, 73-5600 Kauhola St Ste C, Kailua Kona, HI 96740, Tel: (808) 329-1311
- [5] Schuler Mfg. & Equip. Co. Inc., 63724 Richland Road, Griswold, Iowa 51535, Tel: (712) 774-2228 Website: http://www.schulermfg.net/
- [10] Silva, Double Shear Joist hangers include a cut-out/stamping that provides distributed, and properly-angled 45-degree nailing positions (load points) in the joist hanger. The angles assure proper toe-nailing of the hanger nails. Double shear nailing hangers are a patented [since 1984] feature of Simpson Strong-Tie ZMAX galvanized joist hangers. Other companies such as Silva Timber Products (in the U.K.) produce similar double-shear joist and truss hanger products.
- [11] Silva Timber Products, Unit 4, Albright Road Widnes, Cheshire, WA8 8FY, Tel: 0151 495 3111, Fax: 0151 495 2255, Website: http://www.silvatimber.co.uk/, Email: enquiries@silvatimber.co.uk
- [6] Simpson Strong Tie®, Tel:1-800-999-5099, Website: http://www.strongtie.com/
- [7] "Tamlyn Structural Lumber Connectors, Masonry / Concrete Products, Pest Control, [catalog & reference guide]", Tamlyn, 13623 Pike Road, Stafford, TX 77477, USA Toll Free 800-334-1676, Phone: 281-499-9604, Fax: 281-499-8948, (photo, above left), Website: http://tamlyn.com/ [copy on file as /structure/Framing/Connectors Framing/Tamlyn_Structural_Connector_Cat.pdf]
- UBC: 1994 Uniform Building Code Table 23-I-Q, Table 23-II-8-1, Table 25Q
- UBC Nailing Schedule: "Residential Addition Submittal Checklist", City of Ripon, Public Works Department, excerpts from model building codes including the UBC nailing schedule, retrieved 5/20.14, original source http://www.cityofripon.org/Building/PDF/09-Residental-Addition.pdf
- [9] USP Structural Connectors®, Tel: 1-800-328-5934, Email: uspcustomerservice@mii.com, Website: http://www.uspconnectors.com/
- Wagner, Willis H, Modern Carpentry, Building Construction Details in easy-to-understand form, [at Amazon] The Goodheart-Wilcox Co., Inc., 1976, ISBN 0-87006-208-5
- Watt, David , Building Pathology: Principles and Practice, Wiley-Blackwell, 2d edition (March 7, 2008) ISBN-10: 1405161035 ISBN-13: 978-1405161039
- Wisconsin Administrative Code, Chapter SPS 321, Construction Standards, retrieved 5/20/14, original source: http://docs.legis.wisconsin.gov/code/admin_code/sps/safety _and_buildings_and_environment/320_325/321.pdf
...
Reader Comments, Questions & Answers About The Article Above
Below you will find questions and answers previously posted on this page at its page bottom reader comment box.
Reader Q&A - also see RECOMMENDED ARTICLES & FAQs
On 2022-10-25 by nick How to Replace Incompletely-Nailed or Bad Joist Hangers using Simpson LUS28Z
 Question
20 year old deck. I am replacing the deck hangers one by one, as the nails are rusting. using simpson LUS28Z, with their specified screws.
BUT, see this corner. not any way to get that joist hanger off.
And when they built it, they wrapped the RIGHT side of the joist hanger around the ledger board, and nailed it in the end of the ledger board,
and then covered it with the upper deck post.
Is there any suggestion for how to redo that corner (remove left sided screws,
cut joist hanger off, add an inner bracket, etc, or something), it also has the reinforcing board (blue arrow),
I could move that toward the front of deck; deck only holds 3 or 4 people max,
it is only about 10 feet wide, just an outside sun porch deck. thanks
[Click to enlarge any image]
On 2022-10-25 by InspectApedia (Editor) - replacing questionable deck hangers
@nick,
I'm glad that you're replacing questionable fasteners in those joist hangers - making the structure safer.
I'd be interested in seeing a sharp photo of the nails that you've removed so that we can get a closer-view of
1. the condition of the nails : were they badly corroded, surface rusted, other?
2. the type of nails used: were they joist hanger nails (if so they ought to have been galvanized and rust-resistant) or were they the wrong type of nail entirely (roofing nails?)
For that corner joist hanger there are a couple of options:
a. remove just the nails themselves, where accessible, then installing structural screws designed for use with the joist hanger - leave the inaccessible nails alone;
b. add structural fasteners through the joist to the ledger board starting beyond the steel of the joist hanger, using structural screws of sufficient length, from both sides of the rim joist.On 2022-10-26 by nick
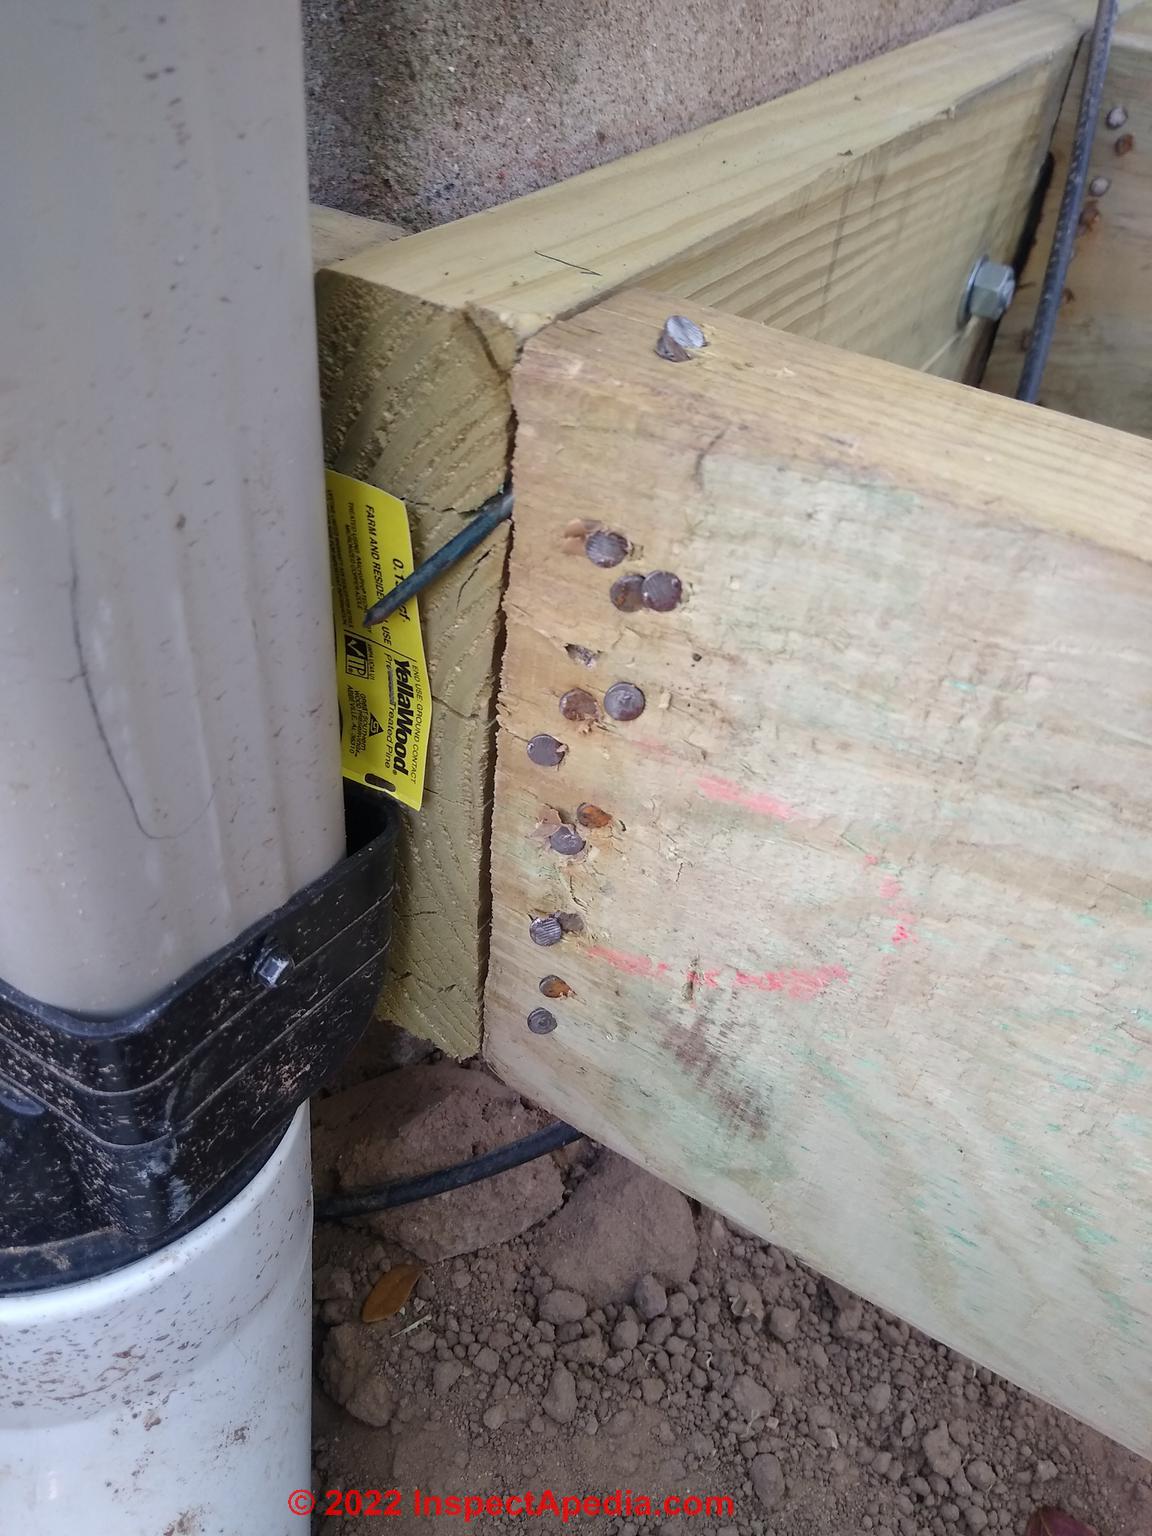
@InspectApedia (Editor), ok, followup. see attached. this was the WORST joist hanger. the rest were not as bad. Galvanized nails were used, and most were not as deteriorated as some of the ones in this picture. the two new ones were what the contractor recommended.
BUT, there was no mention of the 2 1/2 inch one for the hanger-to-ledger, I did some research on the simpson site, to get the correct screws. I used #10 x 1 1/2 for the 6 face screws because if I hit the prior holes I had more holding power, and then used #9 x 2 1/2 for the toenails, and the impact gun told me I got a good hold on things (they were NOT easy to drive in).
OK, QUESTION, for being able to access the corner joist hanger, and the one to its left. can I remove that crosspiece of lumber (the blue arrow), so I can get to the screws on those joist hangers,then replace the left hanger, and screws on the inner corner of the right hanger, then add a NEW REPLACEMENT piece of lumber, back further from the wall so I'm not at the same nail structure, etc,
and use #9/#10 x 3" structural screws to fasten that, so those last two joists are fastened together?
and, question #2 - since the nails on the RIGHT side of that hanger are not accessible, I could do as you say, run a couple diagonal screws from outer face of joist, a little more distal to the wall (longer screws). how far back would you go?
any other suggestions appreciated, thanks.On 2022-10-26 by InspectApedia (Editor) - rusty joist hanger and joist hanger screws
@nick,
Thank you for the added detail photo of the rusty joist hanger and joist hanger screws. Unfortunately the quality control across manufacturers varies so even buying galvanized components doesn't assure us that there won't be serious rust from time to time.
Yes you can remove that blocking between the two deck joists. It's not exactly structural it's there instead to prevent the joists from twisting. So if you remove it and reinstall it slightly farther away to give yourself working room that's perfectly fine.
About your second question about screwing structural screws on an angle you move far enough back from the end of the joist that there's no danger of it splitting and you use a screw long enough that it will make it through the thickness of all of the wood through which it has to pass including well into the ledger board.On 2022-10-26 by nick
@InspectApedia (Editor), Thank you VERY MUCH ! you've been a big help ! I got the 12 easy joist hangers done, new hangers and fasteners. now I will tackle the corner ones.
the rest of the deck wood is actually very good condition, and I did all the SURFACE FASTENERS last year, about 300 of them !! (remove old rusted square-head screws, put in in new screws that were 1/2 inch longer, repositioned ones that were not removable, etc.
now nothing sticks up, nothing to cut my feet, etc. this is just a nice deck to sit out back and enjoy the trees,, but well worth renewing it. thanks again
On 2022-10-26 by InspectApedia (Editor) - be sure joist hangers are in good condition and that all of the fasteners required have been installed
@nick,
Glad to assist, working together helps us both.
I welcome seeing any photos of your project and expect that both the discussion and the photos will help some other readers as well.
It's a bit unusual to see joist hangers and nails rusted badly enough that we want to replace them but it's very important to make sure that they are in good condition and that all of the fasteners required have been installed.
Basically if there's a hole in the joist hanger it needs to have a nail or a screw in it.
As you appear to understand better than some a deck that falls away from a building can seriously injure or even kill someone.
Years ago one of my inspection clients was warned to stay off of an unsafe deck but instead had a party on the deck.
The deck collapsed. sending several people to the hospital.
Children have been playing under the deck, and if they hadn't run out they might have been killed.
Since then I realized how extremely serious these hazards can be.
That deck collapsed is documented at this website in an article under the title
deck collapse hazardOn 2022-11-01 by nick
@InspectApedia (Editor), here is finished project, to hopefully help others.
left joist, RIGHT SIDE screws replaced,
joist was ok and could not move the other board anyway to do full replacement.
next two pictures, joists replaced, zoom in to see screws, etc.
fourth picture,
LEFT side of deck, see a prior photo, board blocked these last two joists.
i removed the board and inserted NEW board slightly further back,
and added FOUR corner brackets (two visible, two on other side at top of board), with structural screws.
then was able to replace the screws in right joist,
LEFT SIDED screws. done, should last past when I move to happy acres !
On 2021-02-17 by Paul
IRC 2018 R602.7.1 specifies the ability to run window single-member headers directly against the top plate.
I plan to use this framing approach when I add a new 54" wide window in my bathroom, as close to the ceiling as I can get it.
However, this section of the IRC is a bit complicated when we're talking remodeling, because I don't have the best access to drive nails from on top of the top plate, down through the top plate into my single-member 2x6 header.
Any suggestions on how I might secure the header on the topside? Toe Nailing? Or with screws?
On 2021-02-18 by danjoefriedman (mod)
I would use structural screws to angle-connect the header to both the top plate and to the side studs. The length depends on the thicknesses of the top plate and single vs doubled headers, but you probably need 3 1/2" to 4" or longer construction screws.
An engineer might specify the number or spacing; without an engineer I'd probably use 8" O.C. and a double header considering that it's a 54" width.
On 2021-02-25 by Myke S.
RE: 2020-10-13 Chuck
Reading the question this person asked, and looking at his photos, especially the second (bottom) one, I had two thoughts.
The first is that this support system is pretty common here in Philadelphia - you see it all the time in older basements, and I have some of it in my own house.
Lateral movement in the joist ends is prevented by horizontal blocking.
The other thing is that while it would be possible to drive a lag screw through the short end of the beam upwards - it would actually be a bad idea.
When evaluating the strength of connections between members using dowel-like fasteners (nails, screws), the width of the fastener has an adverse impact on the finished joint: wider-diameter fasteners yield weaker joints.
At first sight, this seems unreasonable - given a wider diameter fastener and a thinner diameter fastener made of the same steel alloy, the wider one will have higher tensile strength.
However, the wider fastener also removes more material from the beam, cutting through more of the fibers that give a wood beam its strength.
This is why, for example, the Code bans the use of bore holes and notches in the middle section of a load-bearing member.
A small change in fastener diameter can have a significant impact on the overall connection strength: NDS, 2018, Table 12.3.3 for example shows a 30% reduction in dowel bearing strength between any 1/4" dowel and any 1/2" dowel at the same wood density.
Boring through a wooden beam across its grain in the vertical axis would cause a significant reduction in its ability to withstand loading. A 1/2" lag screw driven upwards through the bottom of a 2x would cut through roughly 25% of the fibers on that side of the joist, and 50% of the fibers comprising the middle of the section - and in a wood beam, the upper (compressive) and lower (tensile) surfaces are where the 'work' takes place..
I see a lot of this on jobsites, and it strikes me that this happens because folks tend to think of wood beams as 'building' materials having uniform composition, like steel, and not as something derived from a living object (a tree).
Wood is an amazing thing, but it really helps to understand its properties if you want to get the most out of it - and avoid doing things that are stupid or even dangerous.
On 2021-02-26 by danjoefriedman (mod) - so many nails are driven that the wood has been destroyed
@Myke S.,
We are in agreement; over-sized or improperly-located bolts or lag-screws are simply another example of the problem illustrated in that earlier photo where so many nails were driven that the wood is split and the joint thereby weakened.
I also appreciate your second comment about wood being a natural material with its own personality varying from individual piece to piece.
My carpentry teacher, Berne Campabalik, often remarked that the carpenter has to actually pay attention to the wood and the presence of knots as well as the pattern of wood grain we're deciding exactly where to drive a nail.
We were taught, in addition to using the proper size and number of fasteners, when nailing to feel the end of the nail and to correctly orient the diamond shaped point of the nail to cut across rather than in between the grain, thus reducing splitting.
But in the case of the photo below so many nails are driven that the wood has been destroyed.On occasion I see this particularly where a power nailer is in use and the "carpenter" is trying to drive an out-of-position member back to where he wants it - a bad approach that never works.
That's what the builder did in the photo that I show here.
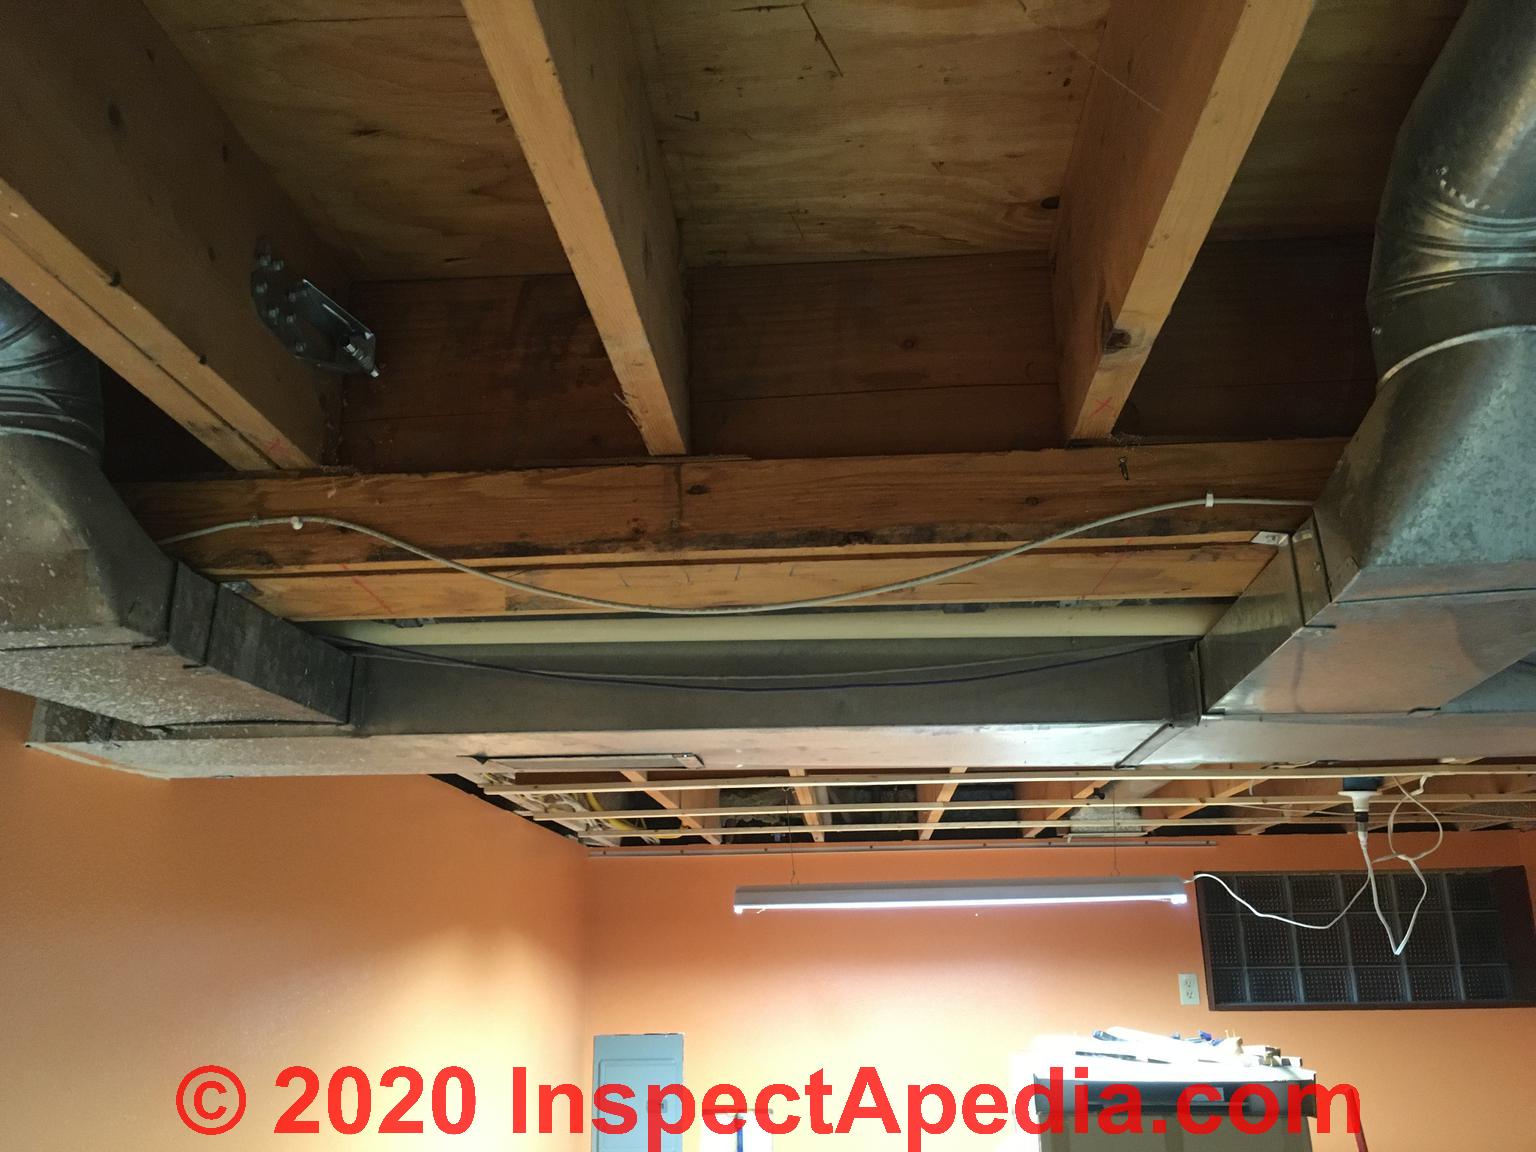
On 2020-10-14 by Matt
I've had a contractor building a deck. They put the initial joist(2x8 treated) too far apart and ended up using a reciprocating saw to cut the nails where they went to the ledger.
When they nailed them back in, it appears they did not use galvanized fasteners. The contractor fired the crew, and the new crew is now using joist hangers with the same joist to attach it to the ledger.
I'm worried that the joists are nailed out now and new joists should be installed, but the contractor is avoiding it due to the large cost.
On 2020-10-14 - by (mod) - improper toe-nailing: too many nails, split lumber
Matt: those joist connections don't look too nice to me either.
1. The nails are rather close to the joist end. At some of those locations the joist end is splitting, giving a weak and potentially unsafe structural connection.
2. The nails are mis-driven in at least one case (from the joist top) - missing the ledger.
3. The ledger is split at the end from having driven what looks like 14 nails on that side of the outermost joist - and that's before even looking at the other side of the same joist where more nails may be present.
In a 2x6 joist I'd use a total of 8 8d or 10d nails, 4 per side, typically 8d in size or in some cases 10d - these are the most-commonly-used nail sizes when toe-nailing 2x framing lumber as unless you're using box nails, larger nails tend to split the lumber, especially when, as in your photo, they're nailed too close to the end of the joist.
4. The next ledger (near the photo's upper right corner) in is roughly cut, not flush with the ledger board, nailed too close to the joist end and perhaps too sports too many nails. Too many nails actually weaken the connection by splitting the wood especially at the joist end.
5. In the ledger board connection to the structure, there is an exposed nut and washer that look loose but I can't see enough to be sure how this framing member is secured to the building;you sure want that ledger board to be properly and securely connected to the building (at what looks like a concrete block or parged foundation wall)
6. I see no flashing between ledger and building
Watch out: inadequately or poorly fastened framing risks structural collapse and injury
Luckily all is not lost. The careful addition of properly-sized steel joist hangers MIGHT be able to salvage this situation; the down-side is having to drive again more nails into the joist but the hangers can be nailed to the ledger board and those fasteners will be further away from the point at which the joist butts into the ledger board.
When I've run into this situation and the lumber was badly split the contractor agreed to replace it and re-frame the area.
When I've had to use steel joist hangers or mending plates in these situations I take great care to use the proper fastener; joist hanger nails or screws are manufactured in the proper size, both diameter and length, for use with these structural fasteners.
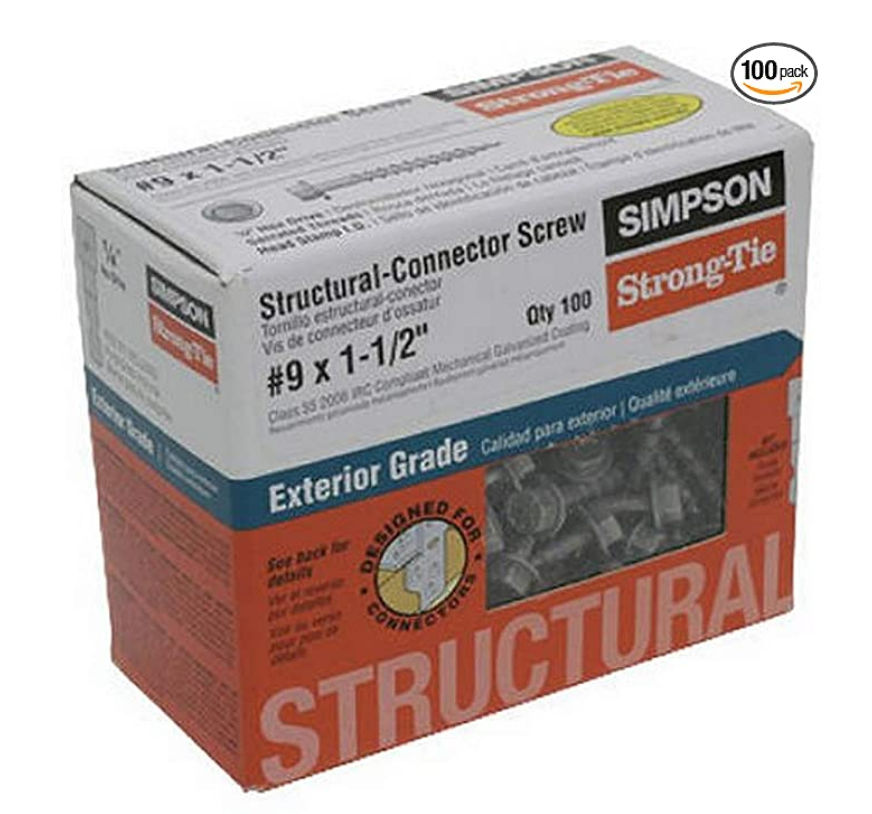
Watch out: In my OPINION, I prefer using joist hanger screws for their ease of installation in spots where sometimes hammering space is limited, and because the screws have not just acceptable shear resistance but improved withdrawal resistance over nails.
An example of that product is shown above, Simpson Strong-Tie Structural Screws SD9112R100 No.9 by 1-1/2-Inch Structural-Connector Screw - specifically designed for this application.
The company says: Simpson Strong Tie SD Structural-Connector Screws are designed to be used with Simpson Connectors for both interior and exterior applications.
Frankly I can't see much from one photo but I agree that some additional measures are appropriate.
On 2020-10-13 by Chuck - Repairs for split ledger or rim joist?
I have a daylight rambler with post & beam down the length of the house in the basement.
For most of the length, joists sit on top of the beam, but for about 11 feet at one end the joists are toenailed into the beam and sit on a 2x4 sill nailed along the bottom of the beam, which provides better headroom for that area.
I decided to tie every other opposing joist together through the beam in order to better resist them coming apart in an earthquake.
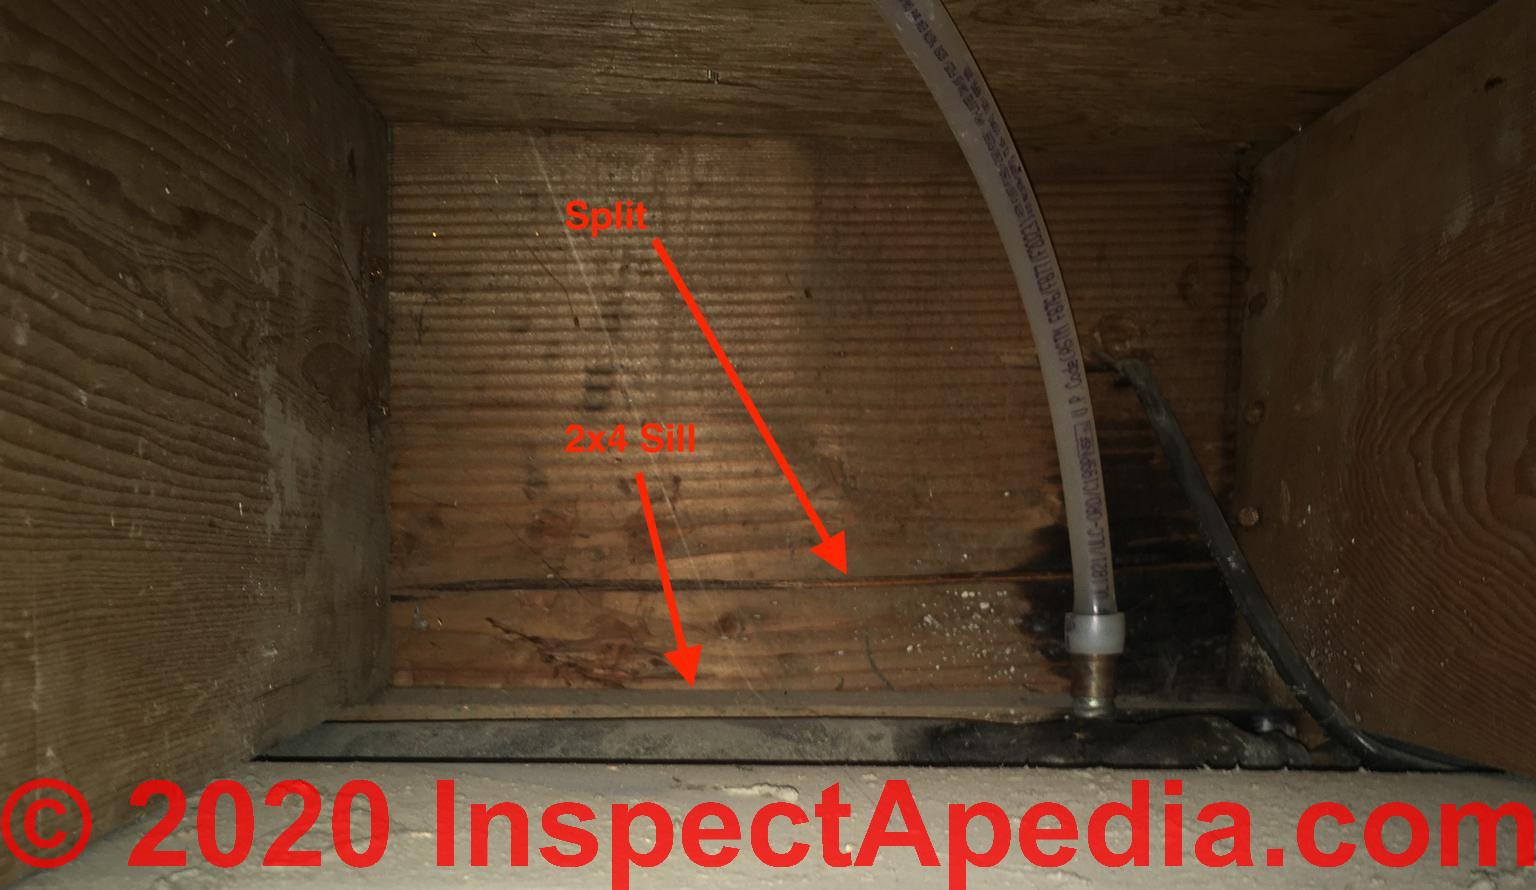
However, when I started looking at the "hidden" (by pipes & ductwork) side of the beam, I found a split running for around 8 feet about 3-4" above the sill.
I'm wondering if that's a problem and, if so, whether running lag bolts up through the beam to reinforce it would help. First photo shows the construction. Second photo shows the crack on the opposite side of the beam.
This is the second photo.
On 2020-10-13 by (mod) - add steel mending plates to reinforce the area of the split
Chuck:
If the split your photos show is in a rim joist that sits atop a foundation wall or sill then it's not likely to presage a sag or collapse;and I'm unclear how you could run lag bolts up through the bottom of the joist as it's bottom is atop a foundation or sill.
You could, however, add steel mending plates to reinforce the area of the split.
Shown here is a Simpson TP37 flat metal mending plate from Simpson Strong Tie
On 2020-06-12 by Jan
Building a floating deck. Contractor wants to use toe nailing instead of joist hangers. What are your thought
On 2020-06-14 by (mod) - Building a floating deck
Jan
As long as the nails are the right size for the framing members and the right number are used, toe-nailing is perfectly acceptable.It does require a bit more expert workmanship to get the connections neat, proper, and strong, but, then, a careless worker can foul up joist hangers just as easily.
On 2018-11-29 by John Sumnicht
How much of a gap can there be between toe-nailed members before the toe-nails start losing effectiveness??
On 2018-11-30 by (mod) - recommended number of toe-nails per side for various dimensions of 2x lumber
John
In the article above we give the recommended number of toe-nails per side for various dimensions of 2x lumber. That's what I recommend as your guide.
There is no single exactly right answer to your question because wood is a natural material from a living plant that is not absolutely consistent and identical by species nor even from one board or 2x to the next of the same species, even the same tree.
In a given 2x for example, moisture content, wood species, the presence of a knot, the proximity to heartwood, the presence of existing damage or splits, variations in grain density and direction, as well as the nail diameter and even nail cross section shape and the angle to which the nail is driven and the closeness of the nail entry point to the end of the member ALL affect the probability that the member will split around the nail, weakening or ruining the connection.
Thanks for asking a great question. We will keep this with the article and add other factors in the probability that a piece of wood is going to split or otherwise have a poor nailed connection.
On 2014-12-19 by JoAnn
What I have read here sounds to cover my concern somewhat on toe nailing beam to joist. I will ask though, for my personal use: This involves constructing a patio cover.
In connecting a double 2x6 beam to a 2x6 joist, and if toe nailing, what recommendation in order to pass city code, can be given me on proper nailing to use, nail size, how many and how placed. The rafters/joist will be over the double 2x6. Thank you.
On 2014-12-19 by (mod)
JoAnn the nailing schedule, size, number are given for toe nailing in the article above.
Your local building department and your codes could require other connectors, depending on where you live, such as for seismic or high wind conditions.
...
Continue reading at FRAMING FASTENERS, NAILS, SCREWS or select a topic from the closely-related articles below, or see the complete ARTICLE INDEX.
Or see these
Recommended Articles
- CONNECTORS, FASTENERS, TIES
- FRAMING CONNECTORS & JOIST HANGERS
- FRAMING SQUARE for BIRDS MOUTH CUT
- HURRICANE TIE DOWN CONNECTORS & FASTENERS
- STAIR STRINGER to FRAMING CONNECTORS
Suggested citation for this web page
TOE NAILED FRAMING CONNECTIONS at InspectApedia.com - online encyclopedia of building & environmental inspection, testing, diagnosis, repair, & problem prevention advice.
Or see this
INDEX to RELATED ARTICLES: ARTICLE INDEX to BUILDING DECKS & PORCHES
Or use the SEARCH BOX found below to Ask a Question or Search InspectApedia
Or see
INDEX to RELATED ARTICLES: ARTICLE INDEX to BUILDING STRUCTURES
Or use the SEARCH BOX found below to Ask a Question or Search InspectApedia
Ask a Question or Search InspectApedia
Try the search box just below, or if you prefer, post a question or comment in the Comments box below and we will respond promptly.
Search the InspectApedia website
Note: appearance of your Comment below may be delayed: if your comment contains an image, photograph, web link, or text that looks to the software as if it might be a web link, your posting will appear after it has been approved by a moderator. Apologies for the delay.
Only one image can be added per comment but you can post as many comments, and therefore images, as you like.
You will not receive a notification when a response to your question has been posted.
Please bookmark this page to make it easy for you to check back for our response.
IF above you see "Comment Form is loading comments..." then COMMENT BOX - countable.ca / bawkbox.com IS NOT WORKING.
In any case you are welcome to send an email directly to us at InspectApedia.com at editor@inspectApedia.com
We'll reply to you directly. Please help us help you by noting, in your email, the URL of the InspectApedia page where you wanted to comment.
Citations & References
In addition to any citations in the article above, a full list is available on request.
- Steve Bliss's Building Advisor at buildingadvisor.com helps homeowners & contractors plan & complete successful building & remodeling projects: buying land, site work, building design, cost estimating, materials & components, & project management through complete construction. Email: info@buildingadvisor.com
Steven Bliss served as editorial director and co-publisher of The Journal of Light Construction for 16 years and previously as building technology editor for Progressive Builder and Solar Age magazines. He worked in the building trades as a carpenter and design/build contractor for more than ten years and holds a masters degree from the Harvard Graduate School of Education. Excerpts from his recent book, Best Practices Guide to Residential Construction, Wiley (November 18, 2005) ISBN-10: 0471648361, ISBN-13: 978-0471648369, appear throughout this website, with permission and courtesy of Wiley & Sons. Best Practices Guide is available from the publisher, J. Wiley & Sons, and also at Amazon.com - Best Practices Guide to Residential Construction, by Steven Bliss. John Wiley & Sons, 2006. ISBN-10: 0471648361, ISBN-13: 978-0471648369, Hardcover: 320 pages, available from Amazon.com and also Wiley.com. See our book review of this publication.
- Building Pathology, Deterioration, Diagnostics, and Intervention, Samuel Y. Harris, P.E., AIA, Esq., ISBN 0-471-33172-4, John Wiley & Sons, 2001 [General building science-DF] ISBN-10: 0471331724 ISBN-13: 978-0471331728
- Building Pathology: Principles and Practice, David Watt, Wiley-Blackwell; 2 edition (March 7, 2008) ISBN-10: 1405161035 ISBN-13: 978-1405161039
- Decks and Porches, the JLC Guide to, Best Practices for Outdoor Spaces, Steve Bliss (Editor), The Journal of Light Construction, Williston VT, 2010 ISBN 10: 1-928580-42-4, ISBN 13: 978-1-928580-42-3, available from Amazon.com
- Design of Wood Structures - ASD, Donald E. Breyer, Kenneth Fridley, Kelly Cobeen, David Pollock, McGraw Hill, 2003, ISBN-10: 0071379320, ISBN-13: 978-0071379328
This book is an update of a long-established text dating from at least 1988 (DJF); Quoting:
- Wagner, Willis H, Modern Carpentry, Building Construction Details in easy-to-understand form, [at Amazon] The Goodheart-Wilcox Co., Inc., 1976, ISBN 0-87006-208-5
- [1] Eric Galow, Galow Homes, Lagrangeville, NY. Mr. Galow can be reached by email: ericgalow@gmail.com or by telephone: 914-474-6613. Mr. Galow specializes in residential construction including both new homes and repairs, renovations, and additions.
- In addition to citations & references found in this article, see the research citations given at the end of the related articles found at our suggested
CONTINUE READING or RECOMMENDED ARTICLES.
- Carson, Dunlop & Associates Ltd., 120 Carlton Street Suite 407, Toronto ON M5A 4K2. Tel: (416) 964-9415 1-800-268-7070 Email: info@carsondunlop.com. Alan Carson is a past president of ASHI, the American Society of Home Inspectors.
Thanks to Alan Carson and Bob Dunlop, for permission for InspectAPedia to use text excerpts from The HOME REFERENCE BOOK - the Encyclopedia of Homes and to use illustrations from The ILLUSTRATED HOME .
Carson Dunlop Associates provides extensive home inspection education and report writing material. In gratitude we provide links to tsome Carson Dunlop Associates products and services.
 | HOME | ABOUT | ASK a QUESTION | CONTACT | CONTENT USE POLICY | DESCRIPTION | POLICIES | PRIVACY | |
| © 2025 - 1985 Publisher InspectApedia.com - Daniel Friedman | |||||||||