 Best Practices Guide to Wall Siding, Trim, & Finishes on Building Exteriors
- POST a QUESTION or COMMENT about the best methods for selecting, installing,& maintaining building exterior siding, trim, and finishes.
Guide to building exterior siding, coatings, & finishes:
This article series discusses best practices construction details for building exteriors, including water and air barriers, building flashing products & installation, wood siding material choices & installation, vinyl siding, stucco exteriors, building trim, exterior caulks and sealants, exterior building adhesives, and choices and application of exterior finishes on buildings: paints, stains.
We also discuss Trim on buildings: wood, composite, finger-jointed, hardboard, LVL, fiber cement, polymer moldings, cellular PVC moldings, trim installation details. Caulks & sealants on buildings: joint design, silicones, polyurethane caulk, butyl caulk, acrylic latex caulk.
Exterior building adhesives: Type II yellow glue, polyurethane, Epoxy. Exterior Finishes on Wood: moisture, surface prep, paint choices, solid color stains, paint & stain application details, discoloration, semitransparent penetrating stains, clear & light-tint finishes, bleaching oils, unfinished siding & trim
InspectAPedia tolerates no conflicts of interest. We have no relationship with advertisers, products, or services discussed at this website.
- Daniel Friedman, Publisher/Editor/Author - See WHO ARE WE?
Best Practices Guide to Residential Construction of Building Exteriors, Trim, and Finishes
[Click to enlarge any image]
Article Contents
- EXTERIOR WALL SIDING TRIM & FINISHES - home
- WATER RESISTIVE BARRIERS on EXTERIOR WALLS
- RAIN SCREEN PRINCIPLES
- HOUSE WRAP, GUIDE TO
- PEEL & STICK FLASHING MEMBRANES
- WALL FLASHING
- SIDEWALL FLASHING
- WOOD SIDING PRODUCTS
- FIBER CEMENT SIDING
- VINYL SIDING
- STUCCO EXTERIORS
- TRIM, EXTERIOR
- GLUES & SEALANTS, EXTERIOR
- PAINTS & STAINS, EXTERIOR
- BUYERS GUIDE, EXTERIOR PRODUCTS
Water Resistive Barriers on Building Exterior Walls
As noted in Best Practices Guide to Residential Construction (Steve Bliss, J Wiley & Sons) :
Water leakage through building exteriors has been the source of numerous callbacks and lawsuits across the United States. In nearly every case, the problems have been traced back to missing or poorly designed flashings or to weather barriers that inadvertently directed large amounts of water into building cavities or interiors.
[Click to enlarge any image]
Most of these leaks occur at window and door openings or at intersections between building components. In some cases, caulks and sealants forestalled leakage at these poorly designed joints for the first few years. But eventually most caulk joints fail, allowing water to enter.
All residential cladding systems are more or less porous to water, particularly during wind-driven rain when high air pressures on the windward side of a building force water to flow toward lower-pressure areas behind the siding.
Under pressure, the water exploits butt joints, lap joints, nail holes, and other openings to flow inside (Figure 1-1 at left ). Even without wind, some water will migrate through tiny gaps to the back of siding through capillary action, the way water is siphoned up a stalk of celery. This is true of brick, wood, and stucco, as well as the newest composite materials.
This backup layer, called a water-resistive barrier by the International Residential Code (IRC), typically consists of properly lapped building paper or plastic housewrap integrated with all flashings to safely drain water away. It is also called the drainage layer or drainage plane. In this approach, the outer cladding functions as a decorative “rain screen,” slowing down wind and water, but it is not expected to be 100% waterproof.
Details about water resistive barriers on building exteriors can be found
at WATER BARRIERS, EXTERIOR. Excerpts are below.
Adapted/paraphrased with permission from Best Practices Guide to Residential Construction (Steve Bliss, J Wiley & Sons) . Steven Bliss.
Rain-Screen Principles Keep Water Out of buildings
As detailed in Best Practices Guide to Residential Construction (Steve Bliss, J Wiley & Sons) :
he optimal way to protect the structure, siding, and exterior finishes from moisture damage is to design the outer layer of the house as a decorative “rain screen” that is solid enough to shed rain, block wind, and protect the sheathing wrap, but porous enough to dry to the exterior when wet.
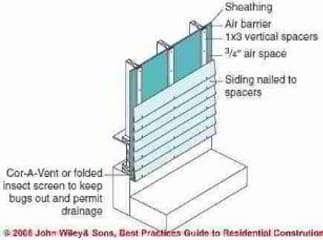
This is accomplished by separating the outer cladding from the building’s water-resistive barrier by using an air space. This system takes advantage of the fact that no siding system is entirely waterproof and relies, instead, on the drainage layer for waterproofing (see Figure 1-2 at left).
The rain-screen system has four components: an exterior cladding, an air space, a drainage plane, and weep holes.
Also see PAINT FALURE, DIAGNOSIS, CURE, PREVENTION
For details about wood siding failures when installed over foam board insulation,
see SIDING WOOD, FAILURES OVER FOAM BOARD
Details about water resistive barriers on buildings can be found
at WATER BARRIERS, EXTERIOR.
Building Sheathing Wrap - House Wrap Installation, Purposes, Guide
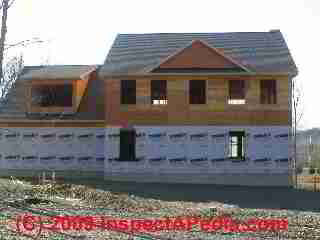
Details about the installation of building water barrier wrap installation are
at HOUSEWRAP INSTALLATION DETAILS. Excerpts are below.
The primary goal of a sheathing wrap is to protect a building’s structural components from water. At the same time, the sheathing wrap must be permeable enough to allow drying to the building’s exterior if the framing or sheathing should get wet.
While the permeance and water resistance ratings of sheathing wraps vary significantly, how they are installed is far more important than the specific product used. The key is to always lap the sheathing wrap to shed water and to properly integrate the wrap with flashings so water is directed on top of the layer below.
All sheathing wraps fall into three basic types: asphalt felt, Grade D building paper, and synthetic housewrap.
Grade D building paper is used primarily under stucco in the western United States and is essentially a lighter weight version of asphalt felt. Comparing one material to another is difficult since there is no single standard for all products, and even where manufacturers follow the same test standard, test conditions may vary dramatically from one company to the next.
Also see HOUSEWRAP AIR & VAPOR BARRIERS
and VAPOR CONDENSATION & BUILDING SHEATHING for more details.
Building Sheathing Wrap Materials & Choices
Details of this topic are at
HOUSEWRAP PRODUCT CHOICES. Excerpts are below.
Also see VAPOR BARRIERS & HOUSEWRAP for a detailed table of housewrap products & their properties, perm ratings, water resistance, etc.
Installed carefully, any of the sheathing wraps can perform well and keep water out of walls. The three main choices are traditional asphalt felt, Grade D building paper, and the newer plastic housewraps. The optimal product will depend upon the siding choice, building details, and climate. With any sheathing wrap material, however, the key to good performance is to carefully lap the material to shed water.
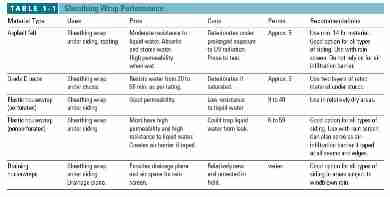
This job has been made easier by the introduction of a number of peel-and-stick membranes for use around windows, doors, and other trouble spots. General performance characteristics of sheathing wraps are summarized in Table 1-1 below.
[Click to enlarge any image]
More details about housewrap products, inspection, failures, and diagnosis of problems can be found
at HOUSEWRAP AIR & VAPOR BARRIERS
and VAPOR CONDENSATION & BUILDING SHEATHING.
Using Building Flashing Membranes - Peel & Stick Flashing Tape
Details about peel and stick flashing tape are
at FLASHING MEMBRANES PEEL & STICK. Excerpts are below.
Peel-and-stick eaves membranes have been used for nearly 20 years to prevent roof leaks from ice dams and other roofing trouble spots. These are typically available in 36-inch widths and are used to protect eaves, shallow-pitch roofs, and other problem roof areas. Over the past few years, a new family of related products has been introduced to help seal walls against water intrusion.
Peel-and-Stick Flashing Tapes, Types, Uses, Applications
Typically ranging in width from 4 to 12 inches, these peel and- stick membranes greatly simplify the task of creating a continuous barrier to water entry around doors, windows, decks, and other problem areas. Flashing tapes are faced with reinforced polyethylene or foil on the outer surface and a peel-away paper on the adhesive surface.
The foil faced products may be left exposed to the weather permanently, whereas the plastic-faced tapes should not be exposed to sunlight and weather for more than 30 days (longer for some brands) since UV radiation will degrade the facing.
Comparing Modified Bitumen vs Butyl Peel and Stick Flashing Tapes
Most flashing membranes are made from modified bitumen, the same rubberized asphalt used in eaves flashing. Some use a more expensive butyl rubber core, which stays more flexible in cold weather and is more stable at high temperatures. Butyl products also bond better to difficult substrates than modified bitumen and can be peeled off and adjusted during installation.
Guide to Wall Flashing Details on buildings
Details about selecting and installing flashing at building walls, wall-deck intersections, and roof-wall intersections as well as building corners and other locations are provided at
FLASHING WALL DETAILS. Excerpts are just below.
Wall flashings are required at openings, corners, intersections, and wherever a roof terminates into a wall. While peel-and-stick tapes have replaced these flashings at many details, metal flashings are still preferred for many standard details and applications where the flashing is visible or needs to hold a shape or serve as a drip edge.
Wall Flashing Material Choices
Choose metal flashings that are compatible with the adjoining building materials and are at least as durable as the siding and roofing materials where they are to be placed. (See “Galvanic Corrosion” for information on metal compatibility.)
Aluminum Flashing
Most residential wall flashing today is made from light-gauge aluminum coil stock. Aluminum is inexpensive, easy to bend, and holds paint well. However, it tends to oxidize and pit in salty or polluted air and, if unpainted, will corrode from contact with masonry due to the lime and acids. Aluminum cannot be soldered. If using aluminum, use at least .029-inch coil stock, preferably anodized or pre finished, which is much more resistant to corrosion.
Copper Flashing on buildings
When the budget allows, copper is a good choice. Copper flashings come in two types: soft and harder cold-rolled. Soft copper is very malleable and useful for molding into irregular shapes. The harder cold rolled material is a better choice for most applications, because it is stronger and more durable.
Copper flashings solder easily and offer good corrosion resistance, even in polluted air and in contact with masonry. Over time, all unpainted copper will oxidize and develop a green patina that protects the underlying copper. While most people find the patina attractive, the runoff of the green oxidation can stain siding or trim.
Lead-Coated Copper Use on buildings
This is a sheet of copper with a lead coating on each side. Where staining of building components from runoff is a potential problem, lead-coated copper may be used, which has a less noticeable gray runoff. Also, without the lead coating, copper flashing will react with galvanized steel.
Lead Flashing Uses on buildings
For special flashing applications where a high degree of malleability is required, lead is an option. In addition to being easily bent and molded, lead is very resistant to corrosion. Lead is relatively soft, however; so it should not be used where it will be bumped or walked on. Also, it is best if left unattached on one side; if rigidly fastened on all sides, it can tear from fatigue due to thermal movement.
Building Sidewall Flashing Details Avoid Leaks, Rot, Insect Damage
Using Termite Shields on Building Foundation Tops
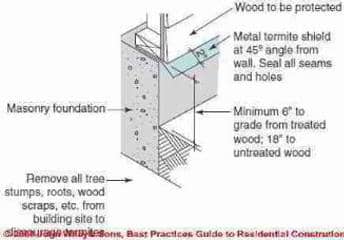
Metal termite shields are widely used atop foundations in the southern United States and in tropical climates as a physical barrier to termites. They sit directly on top of foundation walls, piers, and other supports before the first piece of wood is installed (see Figure 1-3 at left).
At one time termite shields were thought to block the entry of subterranean termites, the most widespread and destructive wood-boring insect in the United States.
However, subterranean termites, which nest in the soil, will exploit the tiniest gaps in termite shields or other barriers to reach the wooden portions of a house and will build tunnels along exposed foundation walls and around termite shields if necessary.
Although the shields do not stop termites, they slow down their progress and force them to build their tunnels in the open where they can be easily seen during inspections.
See ROT, FUNGUS, TERMITES for termite and other wood destroying insect information in depth, including termite inspection case reports, field photos and advice. More installation details for termite shields and other building flashing can be found
at FLASHING WALL DETAILS. Readers concerned about termite damage associated with foam, fiberglass, or other building insulation materials should also
see Insects & Foam Insulation. Also
see TERMITE SHIELDS vs TERMITICIDE for a discussion of termite shields and insect attack on buildings using foam board foundation insulation.
Guide to Wood Siding Products on buildings: Choices, Installation, Maintenance
Details about wood siding types, products, choices, and grades are
at WOOD SIDING PRODUCT CHOICES. Excerpts are below.
Solid wood siding materials (clapboards, drop-leaf or novelty siding, wood shingles, vertical wood siding, board and batten, etc.) s have been used for hundreds of years and remain popular in many sections of the United States and other countries despite their need for regular refinishing.
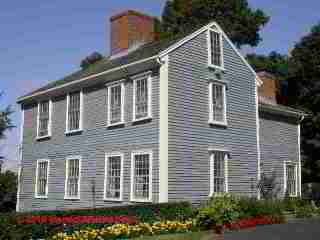
Our photo of a wood clapboard-sided home (left) shows the Daniel Vose house, referred to historically as the Suffolk Resolves historic home (1774) relocated to Milton MA.
See ARCHITECTURE & BUILDING COMPONENT ID
In the Northeastern U.S., the most popular wood siding profile remains a simple bevel siding, or “clapboard.”
In the western states, heavier profiles such as channel rustic are more common.
Plywood building siding products such as "T-111" grooved siding products installed in 4' x 8' sheets has been widely used throughout the U.S. since the 1970's.
Species of Wood Choices for Wood Siding
Red cedar remains the wood siding material of choice due to the natural decay resistance of the heartwood and its attractive appearance when stained or finished clear. Ot
her decay-resistant woods are popular in the regions where they are produced: for example, redwood on the West Coast and cypress in the Southeast and Gulf Coast.
On projects where premium wood species are not affordable, builders also use a wide variety of softwoods, including pine and spruce, which are not naturally resistant to decay. While most suppliers of wood siding now recommend back-priming and priming of cut ends, these details are even more critical with the less decay-resistant species.
Grading Methods for Wood Siding Products
Since wood siding is a nonstructural application, grading is generally for appearance only and is not governed by building codes.
Most western species used for siding are graded according to one of the established grading agencies such as the Western Wood Products Association (WWPA). Still, manufacturers are free to name the grades as they choose for marketing purposes. So one company’s “Select” grade may be quite different from another’s. For this reason, it is best to examine the material before specifying or purchasing.
Wood Siding Profiles
Because horizontal profiles naturally shed water, they resist water leakage better than vertical profiles. Also vertical wood siding is prone to wick up moisture from the bottoms of the boards, particularly where there is snow buildup or splashback. D
iagonal siding is the most prone to leakage since water is conducted down the joints to window headers and other possible entry points. The most common profiles with typical installation details are shown in Figure 1-7 above.
Installation Details - Guide for Wood Siding
Details of best construction practices when installing wood siding products are found
at WOOD SIDING INSTALLATION. Excerpts are below.
While the premium grades of siding are more forgiving of installation and finishing problems than budget materials, all wood siding requires attention to detail to provide a durable and attractive exterior. Critical details are backpriming, air space, nailing, and finishing.
Drainage Details for Wood Building Siding
An air space behind the siding, in addition to protecting the building shell (see “Rain-Screen Principle,” page 2), also improves the performance of wood sidings. The siding material is less prone to moisture movement and paint is less likely to fail, even if the space is only 1/4 inch wide.
While the vast majority of wood siding is installed directly on the sheathing wrap, builders who have had problems with paint and siding have found that adding an air space is worth the additional cost. New products— such as wrinkled and corrugated sheathing wraps with an integral air space, and behind-the-wall drainage mats such as Benjamin Obdyke’s Home Slicker®—are simplifying this step.
Back-Priming Suggestions for Wood Siding
The major trade associations representing siding manufacturers all recommend back-priming and priming of cut ends. W
ith cedar and redwood, backpriming will minimize the bleeding of extractives from the back of the siding, which can drip onto the face of the siding and stain the finish, and can also degrade sheathing wraps. With all sidings, back-priming will reduce the movement of moisture into and out of the siding, minimizing problems with cupping, warping, and checking.
Advice for Installing Wood Siding Over Foam
The need for back-priming and a ventilation air space is even greater when installing over foam sheathing. With no air space and no wood sheathing to temporarily store the moisture, any water that leaks through the siding or is driven in by the sun will tend to wet the back of the siding. Th
e result, documented in a joint study conducted by wood siding and foam manufacturers, is increased cupping, cracking, and paint problems.
- Details about installing wood siding are at WOOD SIDING INSTALLATION. Excerpts are below.
Wood Siding Flashing Details at Joints & Corners
Details about installing proper flashing for wood building siding products are
at WOOD SIDING FLASHING DETAILS. Excerpts are below.
Proper detailing at joints, corners, and openings makes for an attractive and durable job. Key details follow: Lap Joints. The IRC requires that horizontal lap sidings have a minimum one-inch lap joint, or 1/2 inch if the siding is rabbeted.
Weather-proofing Butt Joints in Building Siding
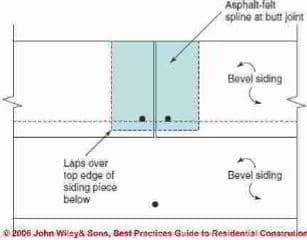
In most climates, it is a good idea to slip a
small spline of asphalt-felt paper behind each butt joint in
horizontal sidings.
Layer the spline so it overlaps the piece of siding below, directing any water out onto the siding (see Figure 1-12 at left).
All end grain in the siding should be sealed after cutting with a water-repellent preservative (WRP) or primer.
Building Siding Flashing & Finish Details for Building Corners
Use overlapping 1x4s or 1x6s at outside corners
or use 5/4 stock for a heavier look. Use a felt paper
spline, wrapped around the corner and extending 6 inches
beyond the corner board, to protect the joints where the
siding meets the corner boards (see Figure 1-5 at left).
Use a square length of 5/4 stock at inside corners with a spline underneath. All end grain in the siding should be sealed after cutting with a water-repellent preservative (WRP) or primer.
With the spline, there is no need to caulk the joint. With no caulk, the joint is free to dry out when wet.
Wood Shingles and Shakes: Grades, Installation Details
Details about wood shingle siding choices, installation, nailing, patterns, flashing and sealing are
at WOOD SHINGLE INSTALLATION. Excerpts are below.
Cedar shingles and shakes are a popular choice for sidewall applications in coastal regions.
Eastern white cedar shingles are often left unpainted in New England coastal areas.
Red cedar shakes are often left unpainted on the West Coast.
Red cedar shingles are sometimes left natural, but more often are painted or stained. Our wood shingled home photographs here demonstrate red cedar shingles exposed in two different exposure lengths, an aesthetic choice made by our associate Paul Galow.
Sidewall installation is similar for shakes and shingles with some variation in exposure (see Table 1-5).
Grades of Wood Shingles Used on Building Walls
Red cedar shingles come in four grades, but most sidewalls use grades No. 1 or No. 2. No. 1 is all heartwood and all edge-grain wood.
Red cedar shingles are available rebutted and rejointed (R&R) where a uniform appearance is desired and machine grooved for a textured surface. Red cedar shakes come either taper-split or untapered and are usually installed in Premium or No. 1 grade (see Table 1-6).
Eastern white cedar shingles are available in four grades. Most sidewall work on building exteriors uses Grade A (Extra), which is all clear heartwood, or Grade B (Clear), which has no knots on the exposed face (see Table 1-7).
Installation Details for Wood Shingles on Walls
The simplest and most common pattern for sidewall shingles and shakes is single coursing. For wider exposures and deeper shadow lines, shingles and shakes can also be installed in double courses. A rustic staggered pattern is also possible.
The Cedar Shake and Shingle Bureau recommends installation over Type 30 asphalt felt underlayment for red cedar shingles and shakes. Install the felt paper with minimum 6-inch overlaps on vertical joints, 2 inches on horizontal laps, and 4 inches wrapped each way at inside and outside corners. Creasing the felt at corners will help achieve a tight fitting corner.
For optimal performance, manufacturers of Eastern white cedar shingles now recommend installation over horizontal furring spaced equal to the shingle exposure or over a ventilating layer such as Benjamin Obdyke’s Home Slicker®.
They acknowledge that most sidewall installations still go directly over the wall sheathing covered with felt paper or plastic housewrap. Field experience suggests that an air space or drainage/ventilation layer is critical for longevity on roofs, but on sidewalls, good quality white cedar shingles perform adequately without these extra steps.
White cedar shingles are nailed 1-1/2 inch above the butt line and 3/4 inch in from each end. Manufacturers recommend a 1-1/4 inch (3d) box or shingle nail for new construction and a 1-3/4 inch (5d) nail when going over another siding material. Drive nails flush with the surface. Do not overdrive and set the nails or leave them projecting from the surface.
Keep all shingle bottoms a minimum of 1/2 inch above the lower leg of any flashings to minimize the wicking of water, which can lead to staining and possible decay.
Wood Wall Shingle Installation Details for Building Corners
See WOOD SIDING INSTALLATION. Excerpts are below.
Another more labor-intensive approach is to “weave” inside and outside corners by alternating two shingles on one side with two on the other (photo, above right). On an outside corner shingled this way, the exposed edge alternates every course. To keep outside corners tight, nail through the butts with a small hot-dipped galvanized finish nail. On woven inside corners, alternating courses keep the joints tight.
Panelized Wood Wall Shingle Installation
To simplify and speed up installation, several manufacturers offer sidewall shingles attached to panels with either staples or adhesive (see Figure 1-18).
The wood shingle panels range from one-course panels 32 inches wide to three-, four-, and five-course panels 2 feet wide by 8 feet long, including panels with decorative patterns.
Some wood siding shingle manufacturers also offer prefabricated inside and outside corners, radiused panels for curved walls, column wraps, and other types of labor-intensive details.
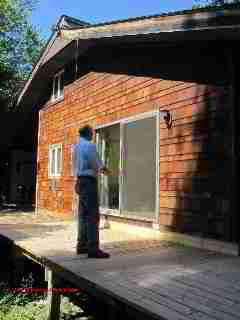
If left unfinished, red cedar shingles will tend to weather to a dark reddish-brown color. (See our photo above right, Two Harbors MN) To guarantee uniformity of color, red cedar shingles should be finished with an oil-based clear finish, oil-based stain, or bleaching oil.
If a painted finish is desired, use an oil-based primer with a 100% acrylic top coat for best results. Factory finished shingles and shakes are available pre primed or pre stained, ready for a top coat after installation. See more under “Exterior Wood Finishes” (page 42 in Best Practices Guide).
Roof Spillage & Rain Splash-Up Damage to Exterior Wall Siding
Details about water damage to building siding caused by splash-up or splashback from rain or from roof spillage are provided
at RAIN SPLASH-UP SIDING DAMAGE. Excerpts are below.
Splashback or splash-up water damage refers to the effects of water on building surfaces when rainwater strikes the ground close to the building. Splashback is most severe in areas where water falling off of a building roof strikes the ground because of the concentration of spillage in such areas. These same conditions are a prime source of building or crawl space water entry troubles.
(Also see WATER ENTRY in BUILDINGS.)
All building siding products, but especially wood-based products, are vulnerable to discoloration, wear, and deterioration or even wood destroying insect invasion when they are installed close to ground level.
Splashback damage is increased when:
- There are no roof gutters installed to intercept and redirect roof runoff
- The roof overhang amount is small - that is the roof edge does not extend far past building walls
- Wood wall siding is installed close to or even in contact with the ground
- Ground slopes towards rather than away from the building
- Paving of drives or patios is brought in contact with wood siding
- No preservative or protective coating is maintained on the wood surfaces
- The building siding is in a shaded or damp area
Photographs below illustrate some of these conditions as well as steps to protect building siding from water damage by roof spillage or splash up.
Fiber Cement Siding: Product Choices, Installation Details
Details about modern fiber cement siding product choices, installation methods, nailing, flashing, and painting, are
at SIDING, FIBER CEMENT. Excerpts are below.
Details about asbestos cement wall shingles and modern fiber cement wall shingles are discussed separately
at SIDING, ASBESTOS CEMENT.
Also ASBESTOS & FIBER CEMENT ROOFING
and also CORRUGATED ROOFING.
 Many synthetic alternatives to wood siding have fallen
short either on aesthetics or durability.
Fiber cement building cladding has been around for more than 60 years, if we include its early form, cement-asbestos shingles such as those on the home shown at left (Dover Plains, NY). Following the development of concern for asbestos safety, fiber cement shingles continue in production, but using reinforcing and filler materials other than asbestos.
Fiber-cement [in plank form], unlike it's shingle ancestors, is one of the newest entries into the siding field and holds promise in that the material can be fashioned to resemble almost any exterior cladding, holds paint well, and is essentially impervious to decay, insects, UV radiation, and fire.
Modern fiber cement siding products are also very dimensionally stable and resist shrinking and swelling, cupping, warping, and splitting. Warranties run from 30 to 50 years depending on the manufacturer and specific configuration. Fi
ber cement siding is cost-competitive with vinyl and hardboard siding and significantly less expensive than premium wood sidings.
Older fiber cement and asbestos-cement wall siding (photo at left) is vulnerable to impact damage. Repairs must be done with care to avoid breaking additional siding shingles when removing and replacing the bad ones.
Modern fiber-cement is made up primarily of Portland cement, sand, and wood fibers. It is chemically similar to older asbestos sidings but contains no asbestos, glass fibers, or formaldehyde.
Fiber-cement is available in a wide array of styles and finishes modeled after other materials ranging from horizontal wood siding to vertical sidings, wood shakes, bricks, and stones. The wood patterns are generally available either smooth or wood-grained and most are available factory-primed or finished as well as unfinished.
Our photo (left) is interesting because it shows two nearly-identical fiber cement wall shingles. The shingle on the right is a new replacement product that does not contain asbestos, while the shingle on the left is an older cousin that contains asbestos.
A clue to the presence of new fiber cement shingles on this home might be the observation that the shingle on the right is coated only with the factory primer while that on the left has been painted a few times.
See ASBESTOS CEMENT SIDING for details.
Fiber-cement horizontal siding planks are typically 5-1/4 to 12-1/4 inches wide by 12 feet long and are designed for a 1-1/2 inch overlap. Vertical siding panels measure 4x8, 4x9, or 4x10 feet, and shake and shingle panels are typically 16x48 inches. The thickness of most siding materials is 1-5/inch. Smooth and textured soffit and trim boards are also available.
Vinyl Siding: Product Choices, Installation Details
Details about the selection and installation of vinyl siding on buildings and trim on vinyl-sided buildings are
at SIDING VINYL - home
and
at VINYL SIDING INSTALLATION. Excerpts are just below.
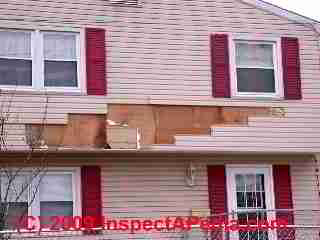
Vinyl siding is the leading choice for residential siding in the United States, accounting for an estimated 36% of the siding market. It owes its popularity to its low cost and low maintenance needs.
When first introduced in the late 1950s, vinyl was criticized for fading rapidly, turning brittle in cold weather, and buckling (or “oil-canning”) in hot weather.
Vinyl siding, if not properly installed, is also vulnerable to siding or trim blow-offs in high winds [especially on the gable-ends of houses-DF] as our photo (left) demonstrates.
Through the use of additives to the resin and better installation techniques, however, manufacturers have addressed these concerns, and vinyl is finding its way onto more higher-end projects.
Today’s premium products typically carry a 50-year, or “lifetime,” prorated warranty.
Vinyl Siding Materials
Vinyl siding is composed of the plastic polyvinyl chloride (PVC) blended with a number of additives for specific properties: plasticizers for flexibility; stabilizers to prevent oxidation; UV radiation absorbers, such as titanium dioxide, to prevent fading and degradation; and pigments to add color.
Fillers are added to hold down costs, and the resin is extruded into a wide variety of the shapes that mimic natural siding materials. PVC is inherently fire resistant and carries a Class 1(A) fire-rating.
Our photo (left) shows a 1920's home that was re-sided with vinyl. Poughkeepsie, NY.
Composition of Vinyl Siding Materials Formulas, Oxidation
While enhanced formulas have improved vinyl’s performance over the years, it is not impervious to the elements. Oxidation still occurs and, over time, may cause a white dusting on the surface, particularly in wet, cloudy climates such as the Northeast or Northwest. In freezing weather, a stray baseball can still shatter a panel.
Also sunlight tends to fade dark colors, and excessive heat will soften and potentially distort the vinyl. To minimize the effects of heat and sunlight, most vinyl colors are muted, although some darker colors are available with special additives to stabilize the vinyl.
Aluminum Siding for Building Exteriors: Product Choices, Installation Details
Details about aluminum siding on buildings are found
at SIDING, ALUMINUM.
The siding profiles, nailing, corner and trim procedures for aluminum siding installation are very close to those described
at Vinyl Siding: Product Choices, Installation Details
Inspection for aluminum siding defects also involves procedures and issues similar to those described at Inspecting
Vinyl Siding for Damage: Examples of Leaks & Damage to Vinyl Siding.
Other aluminum siding defects, principally cosmetic, that are not found with vinyl siding include
- Dent damage
- Loss of paint coating (principally on some older aluminum siding products
Stucco Building Exteriors: Product Choices, Installation Details
Details about stucco building exterior walls are provided in our stucco article series found
at STUCCO WALL METHODS & INSTALLATION. Excerpts are below.
Stucco on building exteriors, in its traditional form is a cementious coating, installed over wood lath or more recently over expanded metal wire lath. Stucco systems have been used for hundreds, and in some forms (mud over wood lath), for thousands of years.
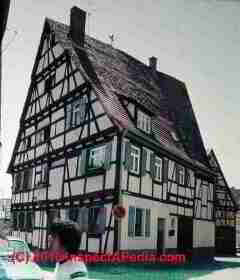
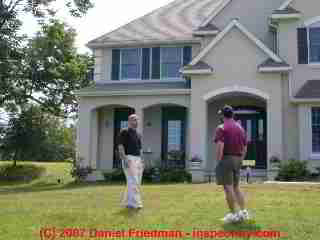
Our photograph (above-left, Daniel Friedman) shows an antique stucco-walled building in Germany.
No stucco system is impervious to water penetration, whether traditional three-coat stucco, modern one-coat systems, or exterior insulation and finish systems (EIFS). Since water may enter through cracks, penetrations, or through the stucco finish itself, all stucco exteriors rely on a backup waterproof drainage plane to protect the structure.
The drainage plane under stucco is essentially the same as under other exterior claddings, with building paper layered to shed water and carefully integrated with all flashings at doors, windows, and other penetrations.
In addition, stucco systems need a weep screed or similar
perforated flashing at the bottom of the wall to safely
drain away any trapped water at the foundation. Without a
continuous drainage plane, stucco systems are subject to
serious water problems.
See STUCCO WALL WEEP SCREED DRAINAGE
While older, traditional stucco walls were designed to get wet and readily dry out, the newer synthetic systems are less permeable to moisture. If trapped water cannot readily drain away or dry to the exterior, the underlying structure is more vulnerable to moisture damage.
Stucco Building Wall Drainage Plane
Traditionally, stucco contractors have used Grade D building paper rather than asphalt felt when applying stucco to wood-frame walls. Grade D building paper is an asphalt-impregnated kraft-type paper, similar to the backing on fiberglass insulation.
Unlike asphalt felt, it is made from new wood pulp, rather than recycled material. It has water-resistance ratings ranging from 20 to 60 minutes, depending on the thickness.
Although the IRC does not specify a required rating for stucco underlayment, the trend in the industry is to use two layers of 15- or 30-minute Grade D paper, isolating one layer from direct contact with the stucco and creating a secondary drainage space in the gaps between the two layers.
Two layers are necessary, since the stucco tends to bond to the outer layer of building paper or plastic housewrap, compromising its water repellency. The wetter the climate, the heavier the paper should be. In coastal areas, some contractors use as much as two layers of 60-minute paper.
The heavier papers provide better protection, but they are less flexible and more difficult to install.
Some contractors are starting to use plastic housewrap under stucco. How well it holds up in direct contact with stucco is in question. One option is to use plastic housewrap as the first layer and cover it with Grade D building paper, which has a longer track record in direct contact with stucco.
Other than the building paper, flashings are essentially the same as with any other cladding system. Metal or membrane pans are recommended at the bottoms of windows and doors. As with other cladding systems, it is critical that the building papers layer over window head flashings and that window pan flashings drain on top of the building paper. Do not caulk the horizontal joints at window head and pan flashings; this way, any trapped water can drain out.
To complete the system, the drainage plane behind stucco must have a perforated flashing called a “weep screed” at the foundation line. According to the IRC, this must be at least 4 inches above grade and must allow trapped water to drain to the outside of the building. Without a weep screed, the stucco tends to bond to the top of the foundation, creating a moisture dam.
Reader comments on Second Layer of D-Paper Requirements
(Apr 19, 2014) Gary Paoli said:
My question was: "why is a second layer of "D" paper required when plaster is applied over a wood based substrate". Your answer was that plaster tended to bond to the paper so you need 2 layers. This is incorrect.
Plaster will not bond to "D" paper. That should be obvious when you realize that plaster over open framing only requires one layer of paper. The actual answer is to keep the under-layer of paper reasonably dry when the scratch coat is being applied so the under-lying wood (ie: OSB) will not get wet and swell, thereby cracking the fresh plaster. My search is for a monograph explaining that, once the plaster is cured, the second layer of paper (the "sacrificial layer") is now no longer needed.
Gary Paoli gpandgp@aol.com
Reply:
Thanks Gary, we'll be sure to keep this note for other readers. - Ed.
Three-Coat Stucco Building Walls
Three-coat stucco using Portland-cement plaster has been used successfully in the United States for nearly 200 years.
It is applied about 7/8-inch thick over metal lath, which creates a drainage space between the building paper and the stucco, allowing water to drain out through the weep screed at the foundation (see Figure 1-29).
Stucco relies on this drainage plane for waterproofing, since the stucco material itself is relatively porous. It tends to soak up water when it rains, but it dries out quickly since it is highly permeable to water vapor.
Reader Question:
(Apr 23, 2014) Ed said:
If a wood framed house has a three coat stucco application with no weep screed but with the house wrap extending two inches below the top of foundation
and the stucco being taken to grade which is 8 inches below the top of foundation, will we have a problem?
Reply:
Ed I don't think I get the entire design detail in your querstion, so this is an arm-waving reply:
If you install any stucco system using details that vary from what the manufacturer specifies you can expect trouble in two forms: leaks or damage, and no warranty. I say this with the side note that sometimes the specifications seem so demanding one wonders what their real purpose was.
Second, I don't like extending a wall covering component below soil in a way that may give a protected path for carpenter ants or more likely insects to find their way into the structure. I think it increases the risk of insect damage.
Third, I don't have a clear idea of your design but I'm a little worried that if there is moisture trying to exit the wall and I dump it into the soil behind house wrap I'm making that termite invitation still more inviting.
If you want to use our CONTACT link to send me photos or a sketch I'll pass it on to Steve Bliss, the orignal author of this segment, for comment.
Stucco-Wall Structure Requirements & Stucco Cracking
Portland-cement stucco shrinks as it dries, which normally creates small hairline cracks in the finished surface. Larger cracks may form, however, if there is significant movement in the structure, since stucco is nonstructural and relatively rigid.
A well-designed foundation and good-quality, dry framing lumber with adequate bracing will minimize this type of movement. On stucco jobs with no structural sheathing, still common in some western states, adequate bracing for racking strength and rigidity is particularly critical.
Cracking can also result from thin sections in the stucco finish. To avoid these problems, fur out or straighten any bowed or irregular walls before applying stucco.
Workmanship & EIFS Exterior Stucco Wall Success
The backup drainage layer, however, should not provide an excuse for sloppy workmanship on the exterior skin. The new kinds of EIFS should still be made as waterproof as possible, since any water that leaks past the skin may be slow to dry out. EIFS consultant Russell Kenney, who has worked with these systems for nearly 20 years, recommends exceeding the minimum specs required by EIFS manufacturers.
On the other hand, 0ur EIFS damage photograph (left) shows how water or moisture traps can form in an EIFS wall even in a building interior, leading to substantial damage. (Photograph courtesy of home inspector John Rudy).
Kenney recommends a higher-density EPS foam with only 2% water absorption by volume instead of the 4% allowed by ASTM C584. In addition, Kenney recommends a heavier 6-ounce reinforcing mesh versus the typical 3-ounce cloth, as well as special high-impact mesh in high-traffic areas.
He also recommends a 3/32-inch base coat applied in two layers, with the first layer used to partially embed the fiberglass reinforcing and the second layer to fully cover and protect it.
These steps will significantly improve the impact resistance of EIFS, but it is still less durable than traditional stucco or thin-coat stucco.
Apply Sealant to EIFS Base Coat
As with the original barrier EIFS, all penetrations require a high-quality elastomeric sealant. The sealant needs to be applied to the base coat since the finish coat tends to soften when wet, providing a poor substrate for sealant. For the caulk joints to last, they must be wide enough to tolerate the anticipated movement, typically 3/8 to 1/2-inch, and backed up by backer rod (see “Joint Design,” page 37 in Best Practices Guide to Residential Construction (Steve Bliss, J Wiley & Sons) ).
While control joints are generally not needed along the length of the wall—unless it exceeds 75 feet and is in direct sun—they are required between floors on multistory buildings. Silicone sealant is recommended at all joints for its longevity and flexibility in cold temperatures.
In theory at least, drainage EIFS should function the same as any other exterior cladding systems. Any water that manages to penetrate the outer skin should be stopped by the drainage layer and safely drained away. However, given the low permeability of polymer-based coatings and the tendency of EPS foam to soak up and hold water, EIFS are best avoided in residential projects unless high-quality workmanship and regular maintenance of sealants can be assured.
Details about stucco building exterior walls are provided in our stucco article series found
at STUCCO WALL METHODS & INSTALLATION
Building Exterior Trim: Product Choices, Installation Details
Details about the selection and installation of types of exterior trim materials and exterior trim installation and maintenance, including wood, composite, finger-jointed, hardboard, LVL, fiber cement, polymer moldings, cellular PVC moldings, trim installation details, are found
at TRIM, EXTERIOR CHOICES, INSTALLATION. Excerpts are below.
Wood and Composite Exterior Trim
As costs rise and quality levels fall for solid wood board stock, builders have become more receptive to a wide range of alternative products introduced over the past 10 to 15 years.
Some of the products are variations on the material used in hardboard siding, a product that has been largely discontinued due to widespread problems with moisture absorption and buckling.
Others are fiber cement- based and offer the same durability and longevity as the siding.
Still others make use of PVC, urethane, or other types of plastics, which promise longevity and low maintenance but may cost significantly more than the solid wood they replace (see Table 1-10 below).
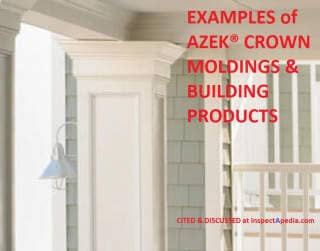
Our photograph (above) is of the Justin Morrill Smith Homestead, VT, 1840 - more examples of architectural styles including building trim styles can be found at Building Age & Architectural Style.
[Click to enlarge any image]
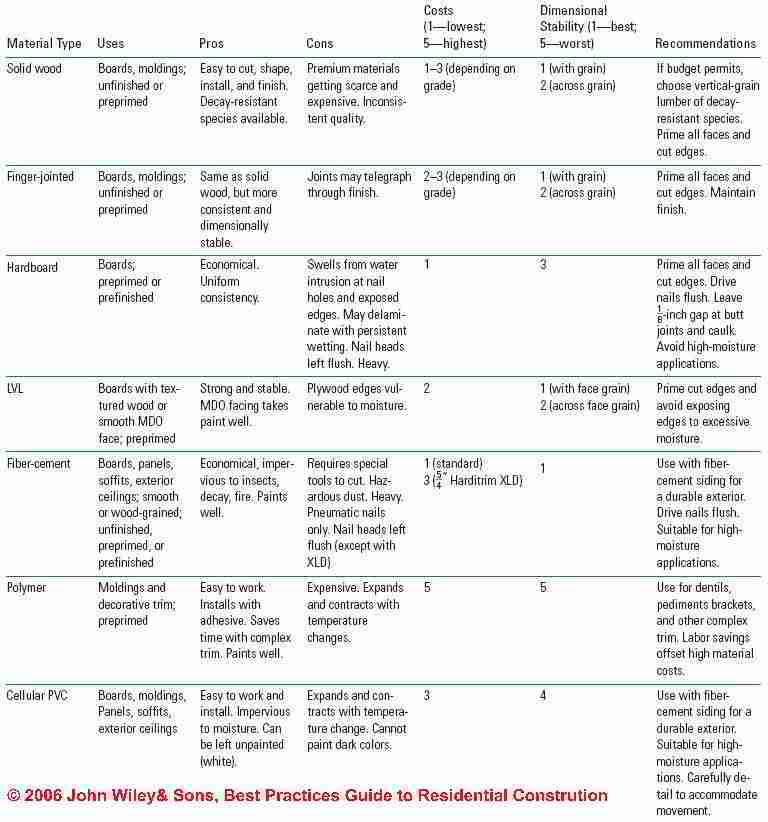
Guide to Solid Wood Trim on buildings
Solid wood is still the first choice of many builders for highly visible trim such as porch columns that require tight miters and smooth edges and need to tolerate a certain amount of wear and tear. Softwoods have served well in this capacity for many years, since they were traditionally inexpensive, dimensionally stable, and held paint well. Decay Resistance of Modern Wood Trim
As smaller, faster-growing trees replace older virgin timber stands, high-quality wood has become more expensive and harder to find. Even when using decay-resistant species, the smaller trees harvested today have less heartwood, which is where the extractives are found in sufficient quantities to be effective against decay (Table 1-11). With any wood species, the sapwood is more prone to decay.
Paintability of Wood Trim
Solid wood has virtually no shrinkage along the grain and, if finished on all sides, limited seasonal movement across the grain. In general, the denser a wood species is, the more it shrinks and swells with changes in moisture and the worse it is as a substrate for paint on a building’s exterior (Table 1-12).
Vertical-grain, or “edge-grain,” softwoods, such as vertical-grain cedar or redwood, are the most stable and hold paint the best. The flat-grained woods more commonly used as trim are more prone to cupping and other moisture movement and do not hold paint as well.
Finger-Jointed Wood Used as Exterior Building Trim
Many manufacturers now offer solid wood trim made up of short lengths of high-quality lumber that is finger jointed and, in some cases, edge-glued to make boards as long as 24 feet. As with solid lumber, finger-jointed lumber is available in a number of grades and species.
Telegraphing at Finger-Jointed Wood Trim Joints
In general, finger-jointed stock is durable and dimensionally stable since short pieces of wood are less likely to warp and twist. The main concern is whether the glue joints will telegraph through the paint as the material swells and shrinks in response to changes in relative humidity.
Because no two pieces of wood swell and shrink at exactly the same rate, the joints often do show through. The best protection is to keep excess moisture out of the wood by starting with quality pre primed stock or using a high-quality water-resistant prime coat and two top coats of paint.
When purchasing finger-jointed trim, look for long term warranties against any delamination or glue lines telegraphing through the paint. As with any wood-based product, minimizing exposure to water and maintaining the finish are important for long-term performance.
Exterior Building Trim Installation Details
The best exterior trim details are designed to keep water out but to provide easy drainage for any water that penetrates the exterior. This is particularly important when using trim materials that are vulnerable to decay or moisture damage, such as non decay-resistant softwoods or hardboard. Caulking trim joints with sealants is a double edged sword, since all caulk joints will eventually fail, and when they do, the remaining sealant will tend to keep the joint from drying.
Trim that is subject to frequent wettings from the weather, such as corner boards, water tables, or wrapped porch posts or balusters, is a good candidate for rain-screen installation, where a ventilation and drainage space is left behind the trim (Figure 1-36).
Make sure to leave 1/8 to 1/4-inch free at the bottom edge of the trim to drain to daylight. To create the drainage space, either use shims (do not block the drainage path) or synthetic drainage materials, such as Benjamin Obdyke’s Home Slicker®. Foundation drainage materials can also work. If shims are used, add metal screening or drainage matting at top and bottom to block insect entry.
Regardless of the specific detail, the following principles will help create long-lasting exterior trim:
Wide roof overhangs, 8 inches minimum, at rake and eaves keeps water away from the side of the house, preserving siding and trim.
Avoid wide horizontal wood surfaces exposed to water. Slope for drainage or cap with metal flashing. Cut drip groove under edge to shed water.
Slope top edges of exterior railings and horizontal trim boards, such as water tables, to shed water.
Avoid exposed end-grain facing upward in vertical trim boards. Heavily prime all end grain and exposed edges.
Avoid exterior miter joints, which tend to open and absorb water.
Use Z- or drip-cap flashing at horizontal joints, such as above windows or where corner boards meet the water table. Leave 1/8-inch clear above the flashing, and do not caulk the horizontal joint. • Avoid caulk joints. Instead, flash well behind joints and leave a gap of 1/8 inch for ventilation. Where caulking must be used, apply a properly shaped caulk bead (see “Joint Design,” below).
Details about the selection and installation of types of exterior trim materials and exterior trim installation and maintenance, including wood, composite, finger-jointed, hardboard, LVL, fiber cement, polymer moldings, cellular PVC moldings, trim installation details, are found
at TRIM, EXTERIOR CHOICES, INSTALLATION.
Best Practices Guide to Caulks & Sealants for Building Exterior Use
Details about selecting types of exterior caulks and sealants, and how caulks and sealants should be applied are found
at CAULKS & SEALANTS, EXTERIOR. Excerpts are below.
While no residential exteriors should rely solely on caulks and sealants to keep water out, many details require caulk either to mask an expansion joint between materials or as the first line of defense against leakage. When choosing a caulk or sealant (another name for a high-performance caulk), look for a product that will bond well to the substrate materials and be sufficiently flexible to tolerate the anticipated movement (Table 1-13).
Just as important is how the caulk bead is applied. The best quality caulk will fail if applied 1 inch thick and bonded on three sides of the joint.
Caulk Joint Design
The ideal caulk joint where movement is anticipated is an hourglass shape about twice as wide as it is deep (see Figure 1-37).
This shape allows a caulk bead to stretch without either failing in “adhesion” to the substrate materials or failing in “cohesion” by tearing itself. A good rule-of-thumb is that a caulk joint should be four times the width of the anticipated movement, limiting the sealant’s stretching to 25%. For most residential building details, this requires at least a 1/4-inch-wide joint.
In general, the sealant should be no more than 1/2-inch deep. For deep joints, it is best to pack the joint with a backer rod, a flexible foam material that controls the depth of sealant and shapes it into the hourglass profile. Backer rod is made of either open-cell or closed-cell foam and comes in diameters from 1/4-inch to as much as 2 inches. In wet locations, such as concrete control joints, use closed-cell foam, since it will not absorb water. Use a backer rod a little bigger than the joint being sealed.
Bond Breakers - Use of Backer Rods in Wide Caulk Joints
In addition to controlling the depth and shape of a caulk bead, the backer rod acts as a “bond breaker,” preventing the caulk from sticking to the back side of the joint. A three-sided caulk joint tends to tear when the materials move. Corner joints subject to movement are also prone to fail.
For corner joints, use a small diameter backer rod or any other material that will not bond to the sealant. Plastic and foam tapes sold for weather stripping can work in corners (see Figure 1-38).
Cleaning and Priming Requirements for Successful Caulk & Sealant Use
Since dirt, debris, and loose paint act as bond breakers, sealing to a dirty or flaking joint will fail when the joint moves. Also, the joint should be dry unless using a sealant approved for damp surfaces, such as some polyurethanes and some of the newer synthetic-rubber “Kraton” type sealants.
Watch out: Do not use compressed air to clean the joints unless a line filter is also used, since the oil from the compressor may coat the joint, interfering with the bond. Although priming is not required for most sealants used in residential construction, some metals may need priming with acid-cure silicones. Consult the sealant manufacturer’s specifications.
For critical joints where movement is anticipated, choose a caulk that complies with ASTM C920 and is rated for <= 25% movement
ASTM C920 indicates that the sealant is highly weather-resistant, durable, and shrinks no more than 10%. For stationary joints, + /- 12.5% rating for joint movement is acceptable.
Silicones bond well to nonporous surfaces, such as glass, tile, and metals, and they are the most flexible sealants made. A good silicone will stretch as much as 50% of its original width before tearing. Silicones are good in cold temperature work and can be applied from well below 0°F to over 100°F.
Once cured, they can also tolerate temperatures from well below 0°F to about 400°F, or higher for special high-temperature formulations. Unlike most sealants, silicone stays flexible when cold. Silicones are also very resistant to UV radiation and water, making them a good choice for exteriors as well as kitchens and baths.
The main disadvantages of silicone are that it is messy to work with, difficult to tool, and does not hold paint well. Cleanup when wet requires acetone or special-order silicone solvent, and the residue is hard to remove when it is time to reapply. Because of the residue, once you’ve sealed a joint with silicone, it is best to reseal with silicone as well. Silicone does not bond well to unpainted wood and can stain or degrade porous stone and masonry materials.
Silicones come in two types: acid-cure (acetoxy) and neutral-cure (sometimes called “noncorrosive” silicone).
The acid-cure type has a distinctive vinegar like odor. Both types will stick well to glass, ceramics, and other nonporous surfaces. Acid-cure silicone, however, requires primer with most metals to bond well and to avoid corrosion. Neutral-cure silicones are compatible with most metals and metal finishes and bond somewhat better to wood.
Guide to Using Polyurethane Caulks & Sealants Details about selecting types of exterior caulks and sealants, and how caulks and sealants should be applied are found
at CAULKS & SEALANTS, EXTERIOR.
Exterior Building Adhesives & Glues: Product Choices, Installation Details
Details about the selection and proper use of exterior adhesives and glues can be found
at ADHESIVES, EXTERIOR CONSTRUCTION. Excerpts are below.
No exterior millwork should rely entirely on adhesives, since no glue is 100% waterproof, and any adhesive can fail with enough moisture cycling and movement in the wood. It is always wise to back up an exterior glue joint with mechanical fasteners, design the woodwork to shed water, and protect it with a good paint job. Still, there are several good options for gluing exterior work that should last indefinitely if well maintained (see Table 1-14).There are several factors to consider in selecting a glue. For exterior woodwork, the biggest concerns are typically water resistance, strength, and cleanup. Working temperatures, clamping time, and gap filling abilities may also be important, depending on the specific job and conditions.
A glue’s water resistance is classified as Type I or Type II. A Type I designation indicates that the glue bond can survive repeated submerging in boiling water. Type 1 glues are used for laminating structural timbers such as glulams. The most common Type 1 glue, resorcinol, has strict temperature and clamping requirements and is rarely used on residential job sites. Type II glues must maintain their bond after being soaked for four hours and then dried three successive times. These are suitable for all but the most punishing residential applications.
Details about the selection and proper use of exterior adhesives and glues can be found
at ADHESIVES, EXTERIOR CONSTRUCTION
Finishes for Building Wood Exteriors: Product Choices, Installation Details
Details about wood surface preparation, selection of an exterior paint or stain product and type, and proper paint or stain application for a successful job are found
at PAINT / STAIN SELECTION & PROCEDURES. Excerpts are below.
The USDA Forest Service Forest Products Laboratory (FPL) has done extensive research on how to keep paints and stains on wood sidings and trim. In general, they recommend paint for the longest lasting finish and best protection of the underlying wood, followed by solid or semi-transparent stains.
Clear finishes need the most frequent recoating and offer the least protection from water damage and UV radiation (see Table 1-15).
How long a finish will last depends on many variables, including the quality of the finish, type and texture of wood, application conditions, and exposure. South- and west-facing walls get the most sun and are, therefore, often the first to need recoating. Whether painting, staining, or finishing in any manner, the FPL makes the following recommendations:
Moisture Content
Never paint wood with a moisture content over 20%. Ideally, the wood should be painted at its average moisture content for that climate—about 12% for most of the United States, 9% for dry southwestern states (see Table 1-2).
Wood Surface
A rough-sawn wood surface will hold paint and stain much longer than a smooth, planed surface, which is why many contractors prefer to install siding rough side out. Also most lumber and siding today is flat-grained, which holds paint less well than vertical (or edge) grained. The combination of flat grain and planing can create a burnished surface called “mill glaze,” which can cause problems with paint adhesion. To avoid problems, it is best to lightly sand with 50 to 80 grit sandpaper before painting smooth siding. The optimal approach is to first wet the lumber to raise its grain and then let it dry for two days before sanding.
Weathering Before Finishing
Some painters recommend letting smooth siding weather for a few weeks to open up the grain. However, research at FPL has shown that after two weeks of exposure, the wood surface begins to degrade and to loosen the wood fibers on the surface, which weakens the paint adhesion. The FPL therefore strongly recommends painting within two weeks of installation, whether the rough or smooth side is facing out. If you need to paint wood that is badly weathered, the wood should be sanded, power rinsed, and allowed to dry before priming. Once the primer is dry, the top coat should be applied as soon as possible.
Species and Grain
In general, less dense woods hold paint better than more dense woods (see Table 1.12, page 32). Also, within a single species, vertical-grain (also called edge-grain) wood holds paint much better than the more common flat-sawn lumber, primarily because flat sawn wood shrinks and swells more from changes in relative humidity.
Also vertical-grain wood has narrower bands of latewood, the denser and harder portion of each annual ring in a tree. When paint, particularly oil-based, becomes brittle with age, it tends to peel from the latewood.
Dense woods with wide, flat grain will present the greatest problems in holding paint. This is true for most hardwoods as well as dense softwoods with wide, flat grain, such as southern yellow pine and Douglas fir, especially if planed smooth.
Guide to Paints for Building Exteriors: Selection, Preparation, Application
Paints offer wood the greatest protection from the elements and can last from 7 to 10 years if properly applied with one prime coat and two top coats of quality paint. The longevity of a particular job will depend on a number of variables, including paint quality, surface preparation, climate and exposure, and the type of wood.
Latex vs. Oil-Based Exterior Paints
In addition to its easy cleanup, latex paint has always held certain advantages over oil. Perhaps most important, latex paints stay flexible over time while oil-based paints get brittle as they age. This is particularly true of 100% acrylics, which makes them less likely to crack due to seasonal movement of the substrate. Also, while oil is more resistant to liquid water, latex is more permeable to water vapor, making it less likely to blister in situations where moisture must pass through. Latex also fades less over time, is not prone to chalking, and is less likely to support mildew growth than oil-based paint. The best quality latex paints use 100% acrylic binders, offering increased flexibility and durability over latex-vinyl blends.
Oil-based paints, however, are still favored by many professional painters for their better appearance and better adhesion due to the oil penetrating the surface of the wood. Oil paint’s flow characteristics help hide brush strokes and provide better coverage, particularly in high-gloss paints. Also, window sash and doors painted with oil paint dry to a harder finish that is less likely to stick to other painted surfaces.
In the past two decades [to 2010-ed.], however, manufacturers have greatly improved the quality of latex paint, overcoming many of the problems associated with it in the past, while oil-based paints have suffered somewhat as manufacturers have had to adjust their formulas to comply with air-quality regulations that restrict the use of VOCs (volatile organic compounds) found in paint solvents. Since latex now dominates the market in residential paint sales, most development efforts now and in the future will focus on improving latex rather than oil-based paints.
Oil-Based Primers
Many painters still prefer oil as a primer for woods with water-soluble extractives, such as redwood and red cedar, although specially formulated stain-blocking latex primers can also work for this application. Many painters also favor oil primer when repainting over chalky or degraded surfaces because of its penetrating oils and strong adhesion. Painting over high gloss surfaces also may be easier with oil-based paints.
Finally, oils offer greater temperature flexibility in both hot and cold weather. In hot weather, latex may dry too fast; while below about 50°F, latex should not be used without special additives. Oil-based paints can be safely used to about 40°F. Newer formulations of latex paints, however, promise to extend their temperature range.
Solid-Color Stains
Solid-color, or “opaque,” stains are not true penetrating stains, since they form a film on the surface of the wood as paint does. In fact, they are formulated the same as paints, only with fewer solids, leaving a thinner, less protective film. They may also contain water-repellents and preservatives. Like paints, they help protect wood from UV degradation; but also like paints, they can peel and blister if applied incorrectly. Most require a primer for best results.
The thinner coating of these products tends to hide the wood grain but allows the wood texture to show through, particularly on rough-sawn siding (see Figure 1-39).
Most solid-color stains sold today are latex-based, which makes them fast-drying and likely to show lap marks if not applied carefully. The most durable latex solid-color stains are 100% acrylic. Oil-based solid stains are sometimes used on redwood and cedar.
Two coats of top-quality latex solid stain over a primer on a solid-wood siding should provide 3 to 7 years of service versus as many as 10 years for an acrylic latex paint of equal quality.
Application of Paints and Solid Stains
The best paint in the world can fail within the first year if applied over a wet, dirty, or degraded substrate. So the first priority is to make sure that the material being painted is sufficiently dry and clean.
Sealers
For the best protection of the underlying wood and the longest lasting finishes, bare wood should be sealed with a water-repellent preservative (WRP) before priming and painting or staining. WRPs contain a small amount of wax or other water repellent and a mildewcide, fungicide, or both, usually in a solvent base. The preservatives help prevent mildew and decay in above-ground applications but are not meant for ground contact. Some WRPs contain UV blockers as well, which slow down the degradation of the outer wood fibers.
While sometimes formulated as a finish treatment for siding, some WRPs can be used as a pretreatment for painting and are recommended for that use by the USDA Forest Products Laboratory (FPL) and Western Wood Products Association (WWPA). Research shows that WRPs resist water entry better than acrylic primers. On bevel siding, they also reduce warping, splitting, and mildew growth. They can also improve paint performance on hard-to-paint woods, such as southern yellow pine and Douglas fir.
In new construction, the FPL recommends that siding and trim be coated on all sides with a paintable WRP such as DAPWoodlife® or Cuprinol’s Clear Wood Preservative, preferably by dipping or with a brush, roller, or pad. If the siding or trim is already installed, they suggest treating all places vulnerable to water entry, including door bottoms, window sills, lap and butt joints, edges and ends of trim, and any end grain on panel products such as plywood sidings.
If used as a pretreatment for paint, apply to bare, dry wood when it is above 50°F, and use only a single coat or excess wax buildup on the surface could affect the paint adhesion. Allow two days of warm weather to dry, or up to a week if the material was dipped. If painted before the solvent has evaporated and the wax absorbed, the paint can be discolored and not bond well.
Priming
All paints and most solid stains require priming on new wood. Primers are formulated with a higher ratio of binder to pigment than paints. This forms a durable film that bonds well to the surface and blocks water. However, without much pigment, it offers limited UV protection.
For woods with water-soluble extractives, such as cedar and redwood, use an oil-based primer or a stain blocking acrylic primer formulated to seal in the extractives. Also use a stain-blocking primer on any knots. Otherwise the extractives can bleed through the finish and stain the siding. For wood species relatively free of extractives, use a 100% acrylic latex primer. If sprayed or rolled on, back brushing is recommended for a good bond.
Many manufacturers now sell siding and trim preprimed. In addition to the convenience for the contractor, the factory-applied coating is applied uniformly without the risk of bad weather or other job-site variables. The only concern is the thickness of the primer. While most major manufacturers of preprimed siding do a good job, some third-party pre finishers may ship material with too thin a coating. In general, the primer should be 1.5 to 2 mils thick—thick enough that it hides the wood grain.
Back Priming
Most paint failures are related to moisture moving through the wood either from wind-driven rain that reaches the back of the siding or moisture escaping from the house. In some cases exposed end grain picks up moisture and causes localized peeling. Use of a water repellent preservative or primer on the back of the siding and on all edges and cut ends, in addition to the visible face, will minimize these problems. Sealing the wood properly also helps prevent moisture from being driven through the siding by solar radiation.
Top Coats
For paints and solid stains, apply the top coat as soon as the primer is dry but not more than two weeks later. For best performance, apply two top coats. Latex paints can typically be recoated within a few hours. Oil must cure for one or two days between coats. Apply paint at the coverage recommended on the can. Too thin a coat will wear quickly and too thick a coat may crack.
While brushing provides the best adhesion, a properly done spray job can yield good results. When spraying or rolling, the best results are achieved by back-brushing the paint to help work it evenly into the wood, particularly on rough-sawn surfaces.
Temperature and Time of Day Impact on Paint Job Success
Oil-based paints should be applied when it is over 40°F; for latex coatings the temperature should be at least 50°F during application and for 24 hours after. Also it is best not to apply paint too early or too late in the day. If the dew has not evaporated in the morning, both oil and latex may have adhesion problems. If applied within two hours of sunset and a heavy dew forms before the paint dries, latex paints may streak and oil-based paints may not cure properly.
Tips for Finishing Pressure-Treated Wood
Wood that is pressure-treated with waterborne preservatives, such as chromated copper arsenate (CCA), ammoniacal copper zinc arsenate (AZCA), and ammoniacal copper quaternary (ACQ), present special problems for painted finishes. First, pressure-treated lumber is often shipped to lumberyards with very high moisture contents. If painted while wet, the moisture may get trapped by the paint film and cause peeling. Also the species most commonly pressure treated— flat-sawn southern yellow pine in the eastern United States and Douglas fir and Ponderosa pine in the West—do not hold paint well to begin with.
Whether or not you intend to paint the wood, pressure treated exterior trim should be sealed with a water repellent preservative as soon as the surface is sufficiently dry. This will protect cut ends and help keep the wood from checking, cupping, and warping as the wood dries out. If this is the only treatment, it will need recoating every one to two years. Factory-sealed treated lumber is now available that only requires treatment of cut ends when installed.
The most common treatment for pressure-treated wood is an oil-based, semitransparent stain. Since this type of finish is relatively permeable to moisture, for best results apply it over a sealer or over factory-sealed lumber. While the sealer can be applied to wood that is still wet inside, it is best to air dry the wood before staining.
This will take from a few days to a few weeks, depending on conditions, with two weeks on average. Two coats of an oil based, semitransparent stain over a sealer should last several years. The second coat should be applied before the first coat dries completely, or the second coat cannot penetrate the wood.
If a painted finish is desired, you will need to seal the wood first and allow it to dry for two to three weeks before applying a compatible primer and two coats of 100% acrylic top coat. The longer the wood dries, however, the greater the risk that UV radiation will damage the wood surface, interfering with the paint’s adhesion.
To avoid these problems and the long delays, consider using kiln dried treated lumber that can be finished immediately.
Semitransparent Penetrating Stains
Most semitransparent stains are oil-based, and they penetrate the surface of the wood. They have a moderate level of pigment that offers some UV protection and provides some color without hiding the wood grain. Because these stains do not form a film on the surface, they are not subject to blistering and peeling like paints and solid-based stains.
Penetrating stains last longer on rough than on smooth siding materials. One coat of oil-based penetrating stain on rough-sawn siding or plywood will last two to five years, depending on exposure and other variables; two coats may last as long as seven or eight years. In general, subsequent coats last longer than the first coat because the weathered wood will accept more stain. For decks, steps, or other wood subject to foot traffic, use a special deck stain formulated with better abrasion resistance (see “Finishes for Decking,” page 154).
Like paints, penetrating stains can be applied by brush, spray, or roller. If sprayed or rolled on, back-brushing will improve the penetration and performance. Also spraying without back-brushing can cause a splotchy appearance. If two coats are desired, apply the second coat before the first has fully dried or the second coat will not be able to penetrate the surface.
Because oil-based stains are thin and dry quickly, lap marks may form if the applicator is not careful to maintain a wet edge. It is best to work on a small area at a time and, if possible, to work in the shade to extend the drying time.
Clear and Lightly Tinted Finishes
Some customers want to retain the look of “natural” wood siding, particularly with the warm-toned hues of premium red cedar or redwood. Unfortunately, there is no finish that will magically preserve the look of new wood.
Wood turns gray as UV radiation degrades the outer surface and as mildew spores develop. Clear water-repellent preservatives (described under “Sealers,” previous page) with UV blockers can slow down this natural aging process, but will need to be reapplied every year or two to keep the wood from turning a weathered gray.
To retain the tone of new wood, the best approach is to use a WRP or penetrating oil with UV blockers and a tint added to match the redwood or cedar. Amteco’s TotalWood Protectant (TWP®), Flood’s Clear Wood Finish (CWF®), and Penofin® (Performance Coatings Inc.) are proprietary formulations designed to maintain a natural wood appearance. A similar product called Sikkens Translucent Cetol® (Akzo Coatings) darkens the wood somewhat and creates a thin film, but it does not peel like paint or varnish. Apply one to three coats, according to the manufacturer’s recommendations. Even with “one-coat” finishes, a second coat may be worthwhile on south or southwest sides of the building due to increased UV exposure.
If applied correctly, a high-quality tinted finish can keep redwood or cedar siding looking close to new for three to five years. Before recoating, you may need to clean the siding with a bleach solution to remove any mildew and dirt that has started to discolor the siding. After cleaning, another coat of the original finish should restore the new wood look for another three to five years.
Bleaching Oils
In some regions, homeowners like the silver-gray, weathered look of unfinished cedar shingles, but they do not want the splotchy, uneven coloring that sometimes results from uneven wetting and sun exposure. Bleaching oils solve this problem by combining a lightly pigmented semitransparent stain with a bleaching agent. Initially, the pigment colors the wood a silver-gray color, and over time, the bleach lightens the underlying wood to a uniform color.
The uniform weathered look can last for a number of years, but the oil and pigments in the original finish protect the wood for only two or three years. Beyond that, a clear water-repellent preservative can be used periodically to protect the wood from UV degradation and decay. If, after several years, the siding begins to darken or lose its uniform appearance, another coat of bleaching oil should restore the original look.
Unfinished Siding and Trim
Due to their high level of extractives, the heartwood of some species is naturally resistant to decay and insects and can be used on the exterior unfinished. The woods most commonly used this way are western red cedar, northern white cedar, redwood, and bald cypress (see Table 1-16).
In salty coastal air with good exposure to sunshine, untreated wood tends to weather to an attractive silver gray. In other regions, uneven staining from mildew is likely. Even in coastal regions, areas of the house that get frequent wetting from splashback, snow, or other types of weather exposure may become darkened from mildew (see Figure 1-19, page 19).
Also, the wood extractives do nothing to prevent cupping, warping, or cracking from uneven absorption of moisture. For a uniform appearance without leaving the results to chance, it is best treat the wood with a WRP or bleaching agent.
Resources for Building Exterior Products & Finishes
Prefabricated Cedar Shingle Panels
- Cedar Valley www.cedar-valley.com Maibec Industries www.maibec.com
- Shakertown www.shakertown.com
Fiber-Cement Siding and Trim Suppliers
- Cemplank www.cemplank.com Cemplank fiber-cement siding and trim
- James Hardie www.jameshardie.com HardiePlank, Hardipanel, fiber-cement shingles
- Nichiha Wall Systems www.n-usa.com Fiber-cement lap siding and simulated shakes, brick, and stone
- Certainteed www.certainteed.com Fiber-cement lap, vertical, and shingle sidings, and soffits and trim
- GAF www.gaf.com Weatherside fiber-cement siding
Exterior Insulation and Finish Systems (EIFS)
- Dryvit Systems www.dryvit.com
- Parex www.parex.com
- Senergy www.senergyeifs.com
- Sto Corp. www.stocorp.com
Hardboard Trim
- ABTco www.abtco.com
- The Collins Companies www.collinswood.com
- Georgia-Pacific www.gp.com
- Masonite Corp. www.masonite.co
- Temple-Inland Forest Products www.templeinland.com
Polyurethane Trim
- AZEK Building Products, 1330 W Fulton Street Suite #350,Chicago, IL 60607 USA, including AZEK composite building products such as Timbertch decking and railing, pavers, and trim and moulding AZEK Trimboards Websites: www.azek.com Tel: 877 275 2935
- AZEK, AZEK TRIM & MOULDING INSTALL GUIDE [PDF] AZEK®Building Products, 1330 W Fulton Street Suite #350,Chicago, IL 60607 USA, including AZEK composite building products such as Timbertch decking and railing, pavers, and trim and moulding AZEK Trimboards Websites: www.azek.com Tel: 877 275 2935 Retrieved 2019/11/04, original source: https://azekexteriors.com/docs/installation/azek_trimmoulding_install_guide.pdf?sfvrsn=4b586f58_28
- CELLULAR PVC TRIM MOLDINGS
- Custom Decorative Mouldings (CDM) www.custom-moulding.com
- Edge Building Products www.permatrimboard.com
- Focal Point Architectural Products www.focalpointap.com
- Flex Trim www.flextrim.com Flexible polymer composite moldings 48 CHAPTER 1 | Exterior Finish c01.qxd 10/10/05 14:49 Page 48
- Fypon www.fypon.com
- Gossen Corp. www.gossencorp.com
- Marley Moldings www.marleymoldings.com
- Mid-America Building Products www.midamericabuilding.com
- Nu-Wood Decorative Millwork www.nu-wood.com
- Outwater Plastics Industries, Inc. www.outwater.com
- POLYMER MOLDING TRIM & building DETAILS
- Ras Industries www.rasindustries.com
- Resin Art www.resinart.com Duraflex flexible moldings
Water-Repellent Preservatives (WRPs)
- Cuprinol www.cuprinol.com Cuprinol Clear Wood Preservative
- Dap www.dap.com DAP Woodlife
- Wolman www.wolman.com Premium Water-Repellent Sealer
ClearWood Finishes
- Amteco www.amteco.com Total Wood Protectant (TWP)
- The Flood Company www.floodco.com Clear Wood Finish (CWF)
- Performance Coatings Inc. www.penofin.com Penofin wood finishes
- Sikkens/Akzo Nobel www.nam.sikkens.com Sikkens Cetol finishes
For More Information on Building Practices for Exterior Wall Products
- California Redwood Association www.calredwood.org
- Cedar Shake and Shingle Bureau www.cedarbureau.org
- USDA Forest Products Laboratory (FPL) www.fpl.fs.fed.us
- Vinyl Siding Institute www.vinylsiding.org
- Western Wood Products Association (WWPA) www.wwpa.org
-- Adapted with permission from Best Practices Guide to Residential Construction (Steve Bliss, J Wiley & Sons) .
...
Reader Comments, Questions & Answers About The Article Above
Below you will find questions and answers previously posted on this page at its page bottom reader comment box.
Reader Q&A - also see RECOMMENDED ARTICLES & FAQs
Question: 12/4/2014 Judy said:
The previous owner of my flat built a lean to on to it and one of the walls was left as cheap bare,unprotected wood on the outside and although the internal wall is plasterboard and plaster and hasnt shown any signs of water getting in im worried that the outside wall is soaking up the rain and causing damp to penetrate through
.I cant afford to knock down and replace the wall so if i paint it with waterproof paint and then attach some waterproof plastic sheeting and add wooden clapboards to finish it off,would that protect my internal wall from damp or would it cause problems?
i could only do it to the top of my wall as theres a stone wall practically joining onto my property leaving just a small gap between that wall and my wooden wall so i cant access the bottom.The previous owner obviously did a botch job when he built it and it wasnt picked up on my survey and i didnt realise for ages because i cant see that wall from my property!
Reply:
Judy your solution sounds like trouble to me for several reasons:
1. leaving part of an exterior wall open to the weather invites future insect, rot, mold damage
2. laminating any waterproof material over existing wall materials that are still wet traps moisture and invites mold.
You may need to do some demolition and renovation on the wall you describe even if working just from the interior.
I appreciate the "can't afford ..." argument but by doing an improper repair you may be headed for still greater costs before long
Question: finishes for concrete floors
(Dec 12, 2014) Anonymous said:
Ways to finish concrete walkout flooring
Reply:
Anon please see CONCRETE STAINS: ID & REMOVAL
and then see CONCRETE COLORING & POLISHING that can work on both indoor and outdoor concrete surfaces
Question: bulging walls of a double-wide home
(Mar 10, 2015) Nancy said:
I live in a 1995 double wide. The exterior walls are bulging and separating from the frame, and the roof is wavey. Can this be fixed?
Reply:
Nancy
With apologies that my answer sounds a bit smarty-pants,
anything can be "fixed" - the bigger questions are these
1. is your home unsafe to occupy? If there is risk of collapse, for example, it's unsafe.
2. what will the repair cost?
3. Is the repair cost too big a percentage of the home's total value? And if so, what are your alternatives?
I'd ask a couple of contractors to inspect the building right away, to find out what's going on and to determine if the home is safe.
Search InspectApedia.com for MOBILE HOME INSPECTIONS to see more inspection points and recommendations.
(Mar 11, 2015) Nancy said:
Yes, it's been inspected by an engineer and it is safe, so far, and not shifting underneath. Someone suggested that they would support/brace the exterior walls from the outside then run lags into the interior wall to pull the outside walls back into the structure. Really? I can't see that the interior walls would be supportive enough to do that, they are like cardboard.
I will get the report next week, but I am personally wishing that they total the house and give me a new one.
Could it be that the manufacturing year of this unit is a bad one? It's a 1005 Horton. Just wondering what to possibly expect, that's all.
Question: coatings for wood siding on a cabin
(Sept 22, 2015) Phil said:
Whats the best material to put on wood siding on a cabin
Reply:
If the cabin has not been coated with anything I would first be sure the logs are cured and dry, then I'd check with the recommendations of the manufacturer. Usually we use an opaque preservative stain rather than a paint.
See SEALANTS CAULKS COATINGS for LOG HOMES for details
...
Continue reading at PAINT & STAIN SELECTION & PROCEDURES or select a topic from the closely-related articles below, or see the complete ARTICLE INDEX.
Or see these
Recommended Articles
- EXTERIOR WALL SIDING TRIM & FINISHES
- PAINT & STAIN GUIDE, EXTERIOR
- PAINT & STAIN SELECTION & PROCEDURES
- STUCCO WALL METHODS & INSTALLATION
Suggested citation for this web page
EXTERIOR WALL SIDING TRIM & FINISHES at InspectApedia.com - online encyclopedia of building & environmental inspection, testing, diagnosis, repair, & problem prevention advice.
Or see this
INDEX to RELATED ARTICLES: ARTICLE INDEX to EXTERIORS of BUILDINGS
Or use the SEARCH BOX found below to Ask a Question or Search InspectApedia
Or see
INDEX to RELATED ARTICLES: ARTICLE INDEX to PAINTS & STAINS & FAILURES
Or use the SEARCH BOX found below to Ask a Question or Search InspectApedia
Ask a Question or Search InspectApedia
Try the search box just below, or if you prefer, post a question or comment in the Comments box below and we will respond promptly.
Search the InspectApedia website
Note: appearance of your Comment below may be delayed: if your comment contains an image, photograph, web link, or text that looks to the software as if it might be a web link, your posting will appear after it has been approved by a moderator. Apologies for the delay.
Only one image can be added per comment but you can post as many comments, and therefore images, as you like.
You will not receive a notification when a response to your question has been posted.
Please bookmark this page to make it easy for you to check back for our response.
IF above you see "Comment Form is loading comments..." then COMMENT BOX - countable.ca / bawkbox.com IS NOT WORKING.
In any case you are welcome to send an email directly to us at InspectApedia.com at editor@inspectApedia.com
We'll reply to you directly. Please help us help you by noting, in your email, the URL of the InspectApedia page where you wanted to comment.
Citations & References
In addition to any citations in the article above, a full list is available on request.
- In addition to citations & references found in this article, see the research citations given at the end of the related articles found at our suggested
CONTINUE READING or RECOMMENDED ARTICLES.
- Carson, Dunlop & Associates Ltd., 120 Carlton Street Suite 407, Toronto ON M5A 4K2. Tel: (416) 964-9415 1-800-268-7070 Email: info@carsondunlop.com. Alan Carson is a past president of ASHI, the American Society of Home Inspectors.
Thanks to Alan Carson and Bob Dunlop, for permission for InspectAPedia to use text excerpts from The HOME REFERENCE BOOK - the Encyclopedia of Homes and to use illustrations from The ILLUSTRATED HOME .
Carson Dunlop Associates provides extensive home inspection education and report writing material. In gratitude we provide links to tsome Carson Dunlop Associates products and services.


