 Types of Wood Lath Used for Plaster or Stucco
Photos & description of hand spit & sawn wooden lath strips
- POST a QUESTION or COMMENT about ages & types of wall & ceiling materials, installations & practices
Types of wooden lath used to support plaster or stucco:
This article describes and illustrates hand split wooden lath, straight-sawn or Kit-sawn wood lath, and more modern circular-sawn wood lath that have been used in the construction of plaster or stucco-covered walls, ceilings, and some building exterior surfaces for hundreds of years. Recognizing the type of lath used to support plaster or stucco can help determine the age of a building.
This article series discusses the identification and history of older interior building surface materials such plaster and lath, Beaverboard, and Drywall - materials that were used to form the (usually) non-structural surface of building interior ceilings and walls.
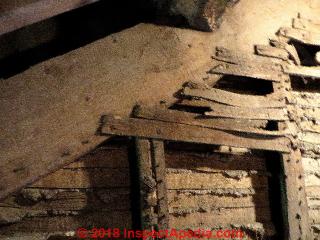
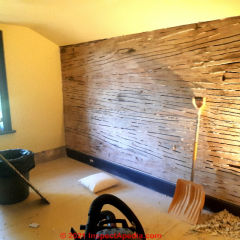
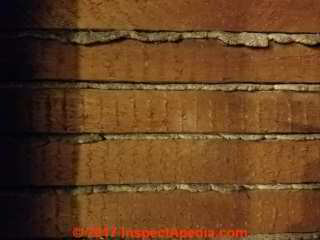
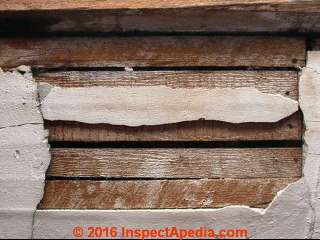
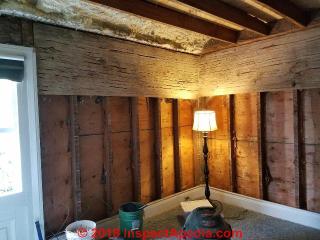
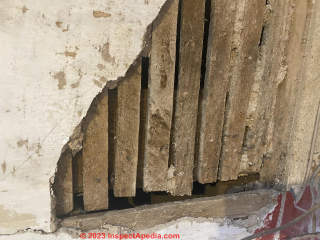
Our page top photo shows hand-split wooden lath backing for a plaster interior wall. At page top we show a photograph of hand-split wood lath and plaster wall, from the wall-cavity side. Ca 1800. There are several generations of plaster and lath, plaster board, and drywall which have been used in buildings.
InspectAPedia tolerates no conflicts of interest. We have no relationship with advertisers, products, or services discussed at this website.
- Daniel Friedman, Publisher/Editor/Author - See WHO ARE WE?
Wood Lath Systems Supporting Plaster or Stucco in Older Homes: Hand split vs. Accordion vs Sawn Wood Lath
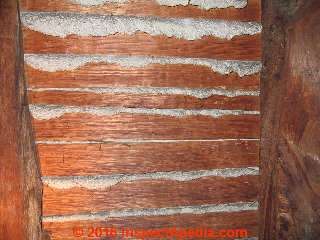 Here and at the top of this article we include a photograph of hand-split wood lath and plaster wall, from the wall-cavity side of a U.S. home built around 1800.
[Click to enlarge any image]
There are several generations of plaster and lath, plaster board, and drywall which have been used in buildings.
The irregular width and rough surface of the hand-split wood lath tells us that this building used wooden lath strips to support plaster (or sometimes stucco) on a building where hand-sawn lath was not yet available.
Below in our first photo we see regular width sawn lath from Brinstone Farm, St. Weonards, in Herefordshire in the U.K. Buildings in this area date from the 1600's.
Just when sawn lath replaced split lath in building construction depended on when sawmills were available in the area - a date that varies by more than 200 years depending on the country and province.
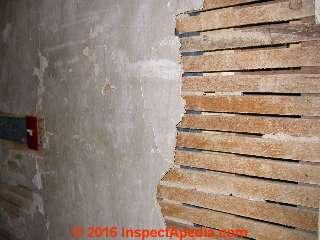
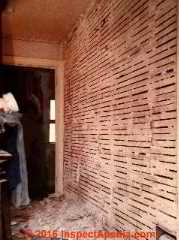
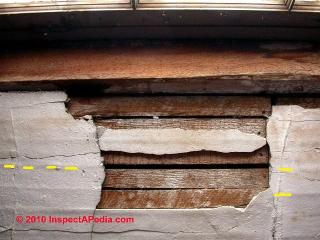
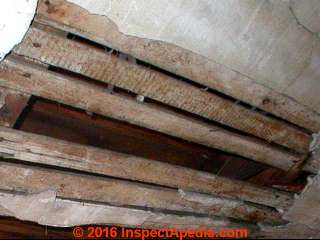
Below in our second photo showing both plaster and wooden lath, we see regular-width sawn lath strips supporting (now loose) plaster in a home constructed in the mid 1800's in New York.
Watch out: loose plaster can be dangerous. See PLASTER, LOOSE FALL HAZARDS
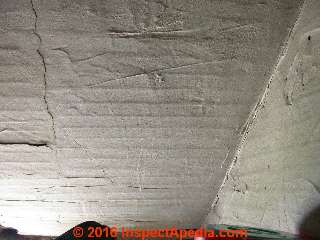
You can detect the presence of wood lath behind some plastered surfaces even when the lath is not directly visible.
Below: the regular, parallel, uniformly-spaced lines in this thin-coated plaster attic ceiling of a pre-1900 New York home (shown above) indicate the presence of sawn lath supporting this ceiling and wall plaster.
After illustrating three generations of types of wood lath support for plaster on interior walls or as stucco on exterior walls we will discuss each of these types in more detail.
Riven or Hand Split Wood Lath Based Plaster Ceilings & Walls
Photograph of hand-split wood lath and plaster wall, from the wall-cavity side. Ca 1800. Hand split wood lath will vary in width as you see in our photo.
Hand split wood lath was prepared using an adze, or less often an axe, to split lath strips out of sawn or hewn logs.
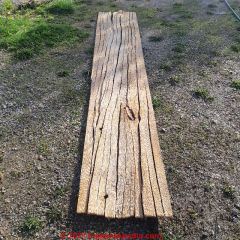
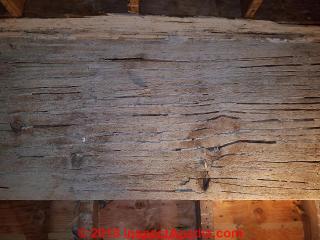
Below: click to enlarge each of these wood lath photographs and you can see split marks (and raccoon claw scratches) on hand split wood lath.
Hand-split lath will vary in width both between lath strips and often along the length of an individual wood lath strip such as you see in our photo above.
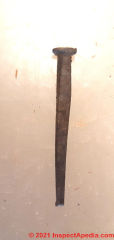
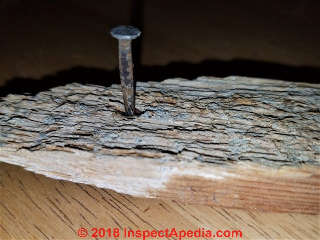
In another nice example, courtesy of a Paris, Ontario reader, we see hand-split lath from an 1840s Canadian home along with one of the original lath nails from the same structure.
Sawn-Wood Lath Based Plaster Ceilings & Walls
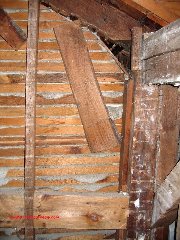 Our photographs show traditional sawn wood lath used as the supporting base for a typical three-coat plaster ceiling or wall system.
In North America after about 1830, sawn lath was made on pit sawn (angled saw kerfs), reciprocating sawn (straight saw kerfs), and circular sawn (curved saw kerfs) equipment, but sawn lath was far more widely-used where circular saws made possible the production of large quantities of machine-sawn lath boards.
Sawn wood lath will usually be regular in width (1 to 1 1/2") often of regular lengths that span several wall studs (48"). Some early forms of wood lath may be sawn on just the flat sides and edges may vary when wide boards were split.
As with the older split wood lath, plaster of paris was applied in at least two layers, usually three layers: a rough brown or scratch coat and a smooth white plaster top coat over sawn wood lath.
In our photo of split wood lath in an older New York home, you can see the "ears" or "plaster ears" formed by the plaster base coat, or brown coat (the first plaster layer) applied onto the wood lath of this antique New York home.
You'll also notice that especially in older structures whose interior partition walls often used minimal and irregularly-spaced framing for interior walls and ceilings, the plasterer sometimes tacked up an extra wood scrap (the diagonal log in our photo at left) to improve support for plaster lath, or to provide a nailing surface to secure the ends of wood lath that otherwise did not reach a vertical wall stud.
Watch out: often the framing supporting plaster ceilings in homes built before 1900 was sized to be just strong enough to support the weight of the plaster itself. Such ceiling structures were not intended to support the weight of a curious home owner or home inspector.
Below (left) is a photo of an 1870's home in "the Bleachery" in Wappingers Falls, NY, restored by the author (DF).
Most of the plaster ears had broken away and plaster was falling from the walls and ceilings in this home. Using a flat-bladed shovel we elected to remove all of the loose plaster.
Our second wood lath plaster photo (below right) is particularly interesting because at least one of the wood lath sections shows the vertical, but regularly-spaced saw kerf marks of a machine operated pits saw, a means of cutting wood used before circular saws were available and helping to date this building as pre 1840 in New York.
Below: vertical parallel saw kerf marks on wood lath of a plaster wall found in a home built in 1913 in Poughkeepsie, New York.
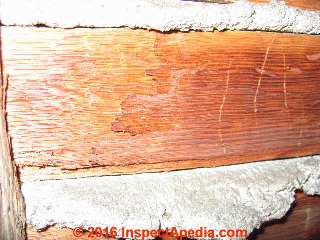
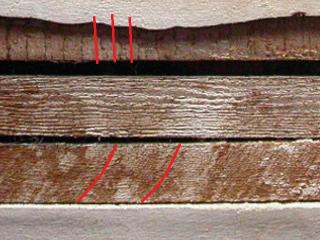
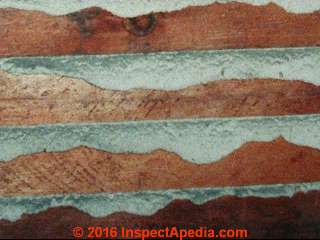
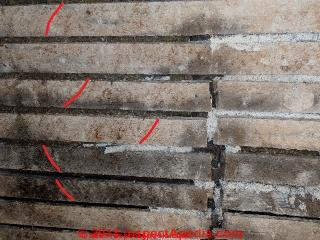
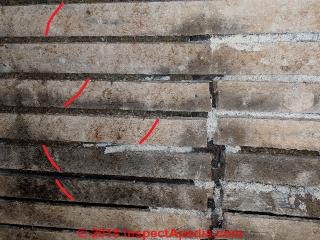
Below: unlike the almost dead-straight saw kerf marks in the machine-driven or mechanical pit saw cut lat above, our next photo illustrates wood lath cut on a circular saw.
The saw kerf marks are slightly curved, indicated by our red lines. This photo was contributed by an anonymous reader concerned about possible mold growth on the lath. [Click to enlarge any image]
More about using saw kerf marks and other tool marks on wood to determine the age of a building can be read
at SAW & AXE CUTS, TOOL MARKS, AGE.
Below: our first photo shows how a thin coat of plaster telegraphs the locations of openings between individual wood lath strips.
In a thin plaster coat over wood lath, the plaster that is forced between the lath gaps to form plaster ears may leave the horizontal lines at the lath gaps, as indicated by our yellow dashes.
Above, our second photo shows that the plaster lath on this wall was cut by two different saws, a vertical reciprocating or mechanically-operated saw (upper photo) and a curved kerf marks showing that some of the lath was cut on a circular saw.
I'd expect to see mixed saw-cut lath in a building that was constructed at a time and in an area of saw mill transition where both types of saw cut lath were available, or (less likely) in a building that was repaired or that used salvaged (older) lath on some of its wall areas.
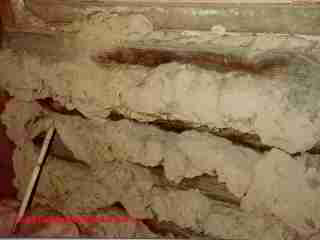
Below we illustrate the plaster ears of mud-plaster used on wood lath strips, seen from the wall cavity side.
The mud plaster in this example was simply a mud-straw mix of "plaster" base coat used in a late 18th century New York home, ca 1785.
Machine-Sawn Straight-Cut Wood Lath
In our wood lath photos below on at least some of the lathing strips you can see parallel saw kerf marks telling us that this wood lath was cut by a machine-operated vertically-reciprocating pit saw.
Earlier wood lath that was hand sawn using a hand-saw or a hand-operated pit saw will have roughly parallel marks but cut at varying angles across the wood.
Machine Cut Circular Sawn Wood Lath
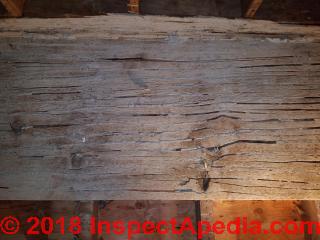
In the next close-up photo of wooden lath given just below you 'll notice the rounded kerf ridges left by a circular saw on this sawn wood lath.
Also see SAW & AXE CUTS, TOOL MARKS, AGE.
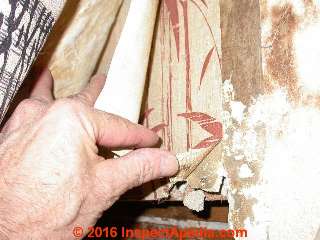
Below all of the wood lath on this wall has been exposed by the author [DF] during renovations of 28 West Street in Wappingers Falls, NY.
This home, located in "the bleachery" district of the village, was constructed in about 1880 or earlier.
Inspecting old interior walls with care can yield interesting and perhaps useful historical information about the structure. Below I'm demonstrating that this plaster-lath wall also sported four layers of wallpaper atop the originally-plastered wall surface.
Accordion Lath Plaster Base
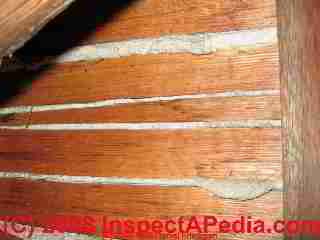
Accordion lath, used as a plaster base on homes in the northeastern U.S. was made from thin, wide sawn or possibly adze-split boards 1/4" thick or less.
Wide boards were more-often available earlier in U.S. construction as old-growth trees in New England were often quite large in diameter.
The thin-split or thin-sawn accordion lath boards were nailed in space and then split along their length using an axe or hatchet to create openings through which plaster could be pushed to form plaster ears securing the plaster to the walls.
The plasterer preparing the lath may have nailed the top of the lath to the wall studs or to a post and beam structure sporting additional vertical lath nailers. With the top of the lath in place it was split and then pulled down and further nailed to keep the splits open.
We estimate, pending further research, that accordion lath was faster to install but unless it was split to provide 3/16" to 1/4" gaps, the plaster had to press rather hard on the base coat to force plaster through small splits to get a good bond with the wall.
In the accordion lath photos shown here the splits are rather small, making this a difficult plaster job.
The plasterer would have had to either use a too-liquid plaster scratch coat mix or would have had to press quite hard on the plaster to force it through these small split lath cracks to get a good mechanical bond between the plaster and the accordion lath.
Because the lath nails used in this accordion lath installation were observed to be machine-made, yet the lath appears to have been sawn from wide trees, we guess the age of this lath as between 1820 and 1850.
Some sources give the beginning of use of sawn lath - replacing accordion lath - in the U.S. as early as 1830 but we add that the form of building materials used and its "earliest-use dates" are very location-dependent. For example, water-powered sawmills using circular saw blades were active on the east coast of the U.S. decades before they appeared further west in that country.
More about the nails used in this building is
These photographs and description of accordion lath were provided by an InspectApedia.com reader June 2018. This accordion lath was found in a rural U.S. post-and-beam home in Wyoming County, New York.
Preservation & Repair of Historic or Antique Plaster & Lath
- Flaharty, David, PRESERVING HISTORIC ORNAMENTAL PLASTER (Updated) [PDF] (1990) [Updated, color version]
- Flaharty, David, PRESERVING HISTORIC ORNAMENTAL PLASTER [PDF] (1990) [Original version]
- Grimmer, Anne E., The PRESERVATION & REPAIR of HISTORIC STUCCO [PDF], National Park Service Preservation Brief No. 22., retrieved 2018/06/18, original source: https://www.nps.gov/tps/how-to-preserve/briefs/22-stucco.htm
- Jandl, H. Ward, REHABILITATING INTERIORS IN HISTORIC BUILDINGS: IDENTIFYING AND PRESERVING CHARACTER-DEFINING ELEMENTS [PDF] (1988)
- MacDonald, Mary Lee, REPAIRING HISTORIC FLAT PLASTER WALLS & CEILINGS [PDF] Preservation Brief No. 21, U.S. National Park Service, Technical Preservation Services, retrieved 2018/06/17, original source: https://www.nps.gov/tps/how-to-preserve/briefs/21-flat-plaster.htm
Excerpts:
Plaster in a historic building is like a family album.
The handwriting of the artisans, the taste of the original occupants, and the evolving styles of decoration are embodied in the fabric of the building. From modest farmhouses to great buildings, regardless of the ethnic origins of the occupants, plaster has traditionally been used to finish interior walls.
A versatile material, plaster could be applied over brick, stone, half-timber, or frame construction. It provided a durable surface that was easy to clean and that could be applied to flat or curved walls and ceilings.
Plaster could be treated in any number of ways: it could receive stenciling, decorative painting, wallpaper, or whitewash. This variety and the adaptability of the material to nearly any building size, shape, or configuration meant that plaster was the wall surface chosen for nearly all buildings until the 1930s or 40s.
Historic plaster may first appear so fraught with problems that its total removal seems the only alternative. But there are practical and historical reasons for saving it. - The preservation of historic architecture : the U.S. government's official guidelines for preserving historic homes
- MacDonald, Marylee. Preservation Briefs 21: Repairing Historic Flat Plaster-Walls and Ceilings. Washington, D.C.: National Park Service, U.S. Department of the Interior, 1989.
- McIlwraith, Thomas F. Looking for old Ontario: Two centuries of landscape change. University of Toronto Press, 1997.
- PLASTER REPAIR METHODS
...
Reader Comments, Questions & Answers About The Article Above
Below you will find questions and answers previously posted on this page at its page bottom reader comment box.
Reader Q&A - also see RECOMMENDED ARTICLES & FAQs
On 2023-09-09 by InspectApedia Publisher - definitions of 'draw knife' and 'riven lath'
@PETE,
Continuing:
(I'm making this definition up so it's merely my opinion)
Definition of Draw Knife, or Froe:
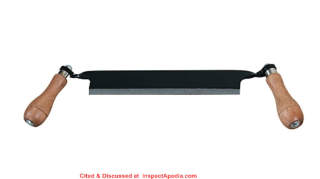
A "draw knife" in some hands is synonymous with a froe, a two handled cutting tool used by pulling it along the surface of wood (to shave off bark or to shape the wood), or through wood to split off or rive the wood to produce lath.
Definition of Riven as in Riven Lath:
"Riven" lath simply means hand-split, quite possibly using a draw knife pulled through the source boards or small but straight lengths of branches that had been first skinned of bark. (I've never seen any bark on wood lath but I suppose that version might have been used as well).
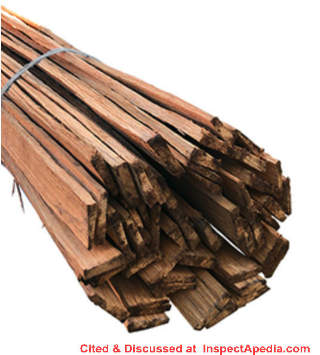
The photo below of hand riven (split, or pulled) lath illustrates that some companies still produce this form of wood lath today, probably principally used in historic restoration of older buildings. This hand riven chestnut lath is sold by Conserv, a UK producer of lime plaster and similar supplies: Web: lime-mortars.co.uk
Hand riven lath (hand split lath or pulled lath) is illustrated in a sketch in
MacDonald, Mary Lee, REPAIRING HISTORIC FLAT PLASTER WALLS & CEILINGS [PDF] (1989) [Print Version - we recommend this copy] U.S. National Park Service, Preservation Briefs, No. 21, Flat Plaster
Some of the NPS Preservation Briefs, including Preservation Brief No 21 (cited just below) can be found also at our page
PLASTER REPAIR METHODS
On 2023-09-09 by InspectApedia Publisher - what is the history of 'pulling lath'?
@PETE,
Thank you so much for an interesting lath history question about "pulling lath".
I think that the term "pulling lath" refers to using a two-handled draw knife to split off thin strips of wood from a sawn board or similar wood lengths.
Draw knives were used to shave bark off of timbers and as a handy tool for someone making lath, it might work in the hands of a 13 year-old.
The board might be clamped or simply set/propped on edge on a work surface with the board end towards the lath puller up tight against a stop - a raised block on the work surface.
Then the lath puller might reach out over the board to its far end, set the edge of the draw knife just one wood-lath thickness (less than 1/4") and draw the knife towards his or her chest, pulling it along the grain through the board to split off a strip of lath.
It would make sense that a youngster might have been given this job in a sawmill. The saw mill would cut logs into rough boards perhaps 3/4 " to 1 1/2" wide and maybe 3/16 to 1/4" thick.
Lengths of hand-riven or split, pulled or even sawn lath didn't have to be very long - the shortest could be about 15" if the strips were to be used in a building whose studs or ceiling joists were being framed 16" on center. But usually lath was sold in bundles of 4-foot lengths. Lath cut before or shortly after the chestnut blight killed off most of those trees would have been cut from chestnut, or possibly oak.
Pulling or splitting the lath strips leaves both surfaces rather rough - which gave a better, more-adhesive surface for the plaster first coat (brown coat) than would have been smooth-sawn lath.
So pulling lath out of short boards that were left from what might otherwise have been hard-to-use remnants of logs or of lumber cut to length made plenty of sense.
In the U.S., the National Park Service's Preservation Briefs (found also throughout InspectApedia in some article citations) have some discussions of repairing old plaster in which the writer refers to types of lath, of which the oldest is hand riven - often wavy as it was split from rough-cut lengths of small-diameter wood (both edges of the lath may be wavy).
Below is a 5-inch draw knife sold by online vendors and at some hardware stores, often in sales literature today referred to, naming the brand in this case, as a Timber Tuff 5-inch draw knife.
Now there may be other descriptions of "pulling lath" for plaster walls and ceilings, so I'm looking a bit beyond our own experience and opinion and will post what else I can find here.
On 2023-09-08 by PETE
Good morning. I wonder if you could help me with some information. I am doing research on one of the early citizens in our community here in Northeastern Wisconsin.
According to an early biography it says that when he was 13 years old he worked in a sawmill "pulling lath". It added that he was "so small that he had to stand on a block to reach".
This was in 1857 and I'm pretty sure it was a water powered sawmill. Is there any way you might be able to tell me a little bit more about this process of "pulling lath"? Thanks.
I just want to add that I do understand the process by which accordion lath is created by "pulling". However,I have the feeling that the process referred to here was another type of process that created a more standard type of lath. But perhaps not.
On 2023-02-20 by InspectApedia Editor - sawn lath in old farm house in northern Baltimore County, Maryland
@Rebecca,
The size and kerf marks on the lath in your photo indicate the presence of sawn lath which we discuss above in this article, specifically in the section titled
Sawn-Wood Lath Based Plaster Ceilings & Walls
Where you'll see photos of lath very similar to you and where the dates seem to fit with your building's age.
Rather than trying to recreate that discussion again here, please take a look and let us know if you have additional questions.
On 2023-02-20 by Rebecca
Hi! We are working on renovating an old farm house in northern Baltimore County, Maryland. The property straddles the Mason-Dixon Line. There have been many additions added onto the home over the years.
We were told the original part of the home dates back to 1790. I believe it was a one room house at that time, and then maybe added onto in the early/mid-1800s. The lath was exposed in this room. Can you help us to date this lath?
On 2022-10-27 by InspectApedia (Editor)
@Anonymous,
As
Scapesinspoke dot com
says
Junipers
Autumn Blaze Maple
Crepe Myrtle
Bald Cypress
Lacebark Elm
Chinese Pistache
Shumard Oak
Blue Ice Cypress
On 2022-10-26 by Anonymous
What kind of wood was lath made of in 1900s oklahoma
On 2022-05-04 by Inspectapedia Com Moderator - history of mud and lime plaster
@Dennis,
Thanks so much for the very nice comment and the interesting details about mud plaster.
Your notes about the how mud plaster was used and its binding with a bit of lime plaster are important.
At least some of the references I have read describe using lime plaster atop the mud/horsehair or mud/straw base.
Indeed I never did any lab analysis of the original mud-straw plaster in the homes where I encountered it. But I did see that it was quite fragile.
Mary Lee Mac Donald, Anne Grimmer and some of the other preservationists have written a lot on this topic.
Below I include some research results on the use of mud plaster by those authors and printed in preservation briefs by the U.S. National Park service.
MacDonald, Mary Lee, Repairing Historic Flat Plaster Walls and Ceilings [PDF] National Park Service, retrieved 2022/05/04 original source: https://www.nps.gov/tps/how-to-preserve/briefs/21-flat-plaster.htm
also available at
REPAIRING HISTORIC FLAT PLASTER WALLS AND CEILINGS [PDF]
Photo caption for a photo in this article states
The builders of this mid-18th century house installed the baseboard molding first, then applied a mud and horse hair plaster. Lime was used for the finish plaster. Photo: NPS files
Grimmer, Anne E., The Preservation and Repair of Historic Stucco [PDF] US NPS, https://www.nps.gov/tps/how-to-preserve/briefs/22-stucco.htm
also at PRESERVATION AND REPAIR OF HISTORIC STUCCO [PDF]
Excerpt:
"Stucco often contained substantial amounts of mud or clay, marble or brick dust, or even sawdust, and an array of additives ranging from animal blood or urine, to eggs, keratin or gluesize (animal hooves and horns), varnish, wheat paste, sugar, salt, sodium silicate, alum, tallow, linseed oil, beeswax, and wine, beer, or rye whiskey. Waxes, fats and oils were included to introduce water-repellent properties, sugary materials reduced the amount of water needed and slowed down the setting time, and alcohol acted as an air entrainer. All of these additives contributed to the strength and durability of the stucco."
If you're inclined to share any photos of the mud-lime-plaster that you discuss that'd be wonderful - one photo per comment, as many comments as you like.
On 2022-05-04 by Dennis
Excellent information on historic lath, and plaster. I find most information to be accurate. I wanted however to add my experiences with mud plaster from an 1824 house.
Your reference above to: "The mud plaster in this example was simply a mud-straw mix of "plaster" base coat used in a late 18th century New York home, ca 1785", was probably not just mud and straw. It most likely contained a smaller portion of lime plaster also.
I find that in areas where lime was harder to obtain or further from the job, clay was used as the key proponent of the base/scratch coats with lime added and then a finish coat of lime only. Taking a bit of old clay plaster dropping it into vinegar and it should show a bubbling reaction.
A small lime manufacturer from the New Mexico area told me that he believes the clay actually binds with the lime as in old Roman cement. The issue in houses of this era and old is also how plastering was done in relation to door, window and baseboard trim.
Folks who strip off old plaster keeping the old trim find a measly 1/2 drywall board not filling the gap to where the original carpenters intended leaving trim to stick way out from the walls. The old folks didn't care as much about getting it all just right.
After the framer, the trim man laid up the doorways, windows and baseboard first, and then the plasterer came along and built out the walls with those multiple coats until they were just right.
Sometimes you'll see where the trim came up short and the plasterer carved out the plaster back to a compromise point so the trim still showed, but was almost buried. After either ignoring this, or attempting to fur out drywall, I decided to do things right by building out plaster.
I've even experimented where Ive crushed the old clay plaster and added hydrated lime forming a new lime/clay plaster compound reapplying it to extant split lathing. The clay and lime forms a very dense and sound resistant base very desirable for interior walls.
I even retained the old straw in doing this. Ironically, you may find you will get a strong urine smell because the old folks didn't waste anything, so added "used" straw for the binder.
The acidic urine can counter act the alkaline lime, but the lime tends to win the day. In two experimental walls, there are no cracks after 3 years, where the plaster board continues to disappoint.
On 2020-04-09 by danjoefriedman (mod) - Riven or Hand Split Wood Lath Based Plaster Ceilings & Walls
Thanks for the comment, Terry.
Indeed well before plaster lath was sawn it was made by hand-splitting wood into appropriate strips.
We call that lath "split lath" and you'll see some examples of it in this article series including above on this page in the article section titled
Riven or Hand Split Wood Lath Based Plaster Ceilings & Walls
On 2020-04-09 by Terry heineken
I live in north east Kansas we have several old houses here the lath seams to be not sawn but sheared with a machine the lath is approximately 1.5 wide and 48” long it’s hardwood probably cottonwood .
On 2020-01-23 by danjoefriedman (mod) - 1920s house had moldy lath
Lauren, that black stuff we see on the exposed wood lath in your photo might be mold, indeed.
While plaster isn't as mold friendly as drywall, I do find several genera/species of mold on wood-lath that has been wet and sometimes in plaster as well as in paint layers on plaster walls and ceilings.
1. investigate the leak history of the wall. If there has been water in the wall cavity there may be more cleaning needed as well as outside repairs to stop leaking; On some older homes the exterior wall was simply clapboards nailed to studs with no sheathing and no housewrap or even felt behind them; those walls leak in blowing rain - pretty much unavoidably.
But if someone later blew insulation into those walls we might have a wet sponge now in the wall.
Pull off a couple of lath strips and look into the wall - post a photo (one per comment) of what you find there.
2. Depending on the wall cavity condition we will decide if we're going to just clean and seal the lath or do more.
Let's resolve this before restoring the wall so that we don't have to do the job twice.
(Are you thinking of re-plastering or are you going to put up drywall? )
On 2020-01-23 by Lauren
I am fixing up a house that was built in the 1920’s. Some of the lath on the walls are black. Should I be concerned about mold? It looks very similar to the photo another person wanted to know about.
Question: how old is this wood lath and how was it made?
Any informartion on the attached photo showing lath board, which appears to be a single piece but split/ expanded for applying plaster?
How was this made and around what time frame was this method used? Thank you - Dean P.
This Q&A were posted originally
at PLASTER TYPES & METHODS in BUILDINGS
Reply: see the discussion of accordion lath in the article above
Initial response: Dean:
Here is what I can see and questions I ask about the old wood lath in your photo:
From what I can see so far, and pending your answers to questions I pose below, my preliminary guess is that the wood lath in your photo, IF it is in a building in North America, was probably installed no earlier than 1840 if your building is near or on the East Coast of the U.S. or Canada, and probably closer to 1900.
- It does not appear that the splits in the lath you show were made deliberately as we see in more-traditional "accordion lath" but yours could be a version of that plaster base method. I do not see any regularity in the split widths nor locations nor do I see any tool marks that would probably appear if the plasterer had used a chisel, adze, or other tool to deliberately split the individual piece of lath.
- At the top center of the photo I think I see the remains of one small-headed lath nail. If you can pull the nail and take some sharp photos of it that would be informative since we ought to be able to determine if the nail was hand-wrought (unlikely from the nail size) or machine-made.
A machine-made nail would argue for later, rather than earlier plaster installation. - The edges of the lath in your photo appear to be dead straight, arguing that this was machine-sawn wood lath, making it a later material than the hand-split wood lath used earlier.
- The small splits in the lath appear to have occurred due to drying and natural splits in the wood before it was nailed to the surface to serve as a plaster base. We can determine that by noting that plaster penetrated the splits in the wood.
Beginning at WOOD LATH for PLASTER or STUCCO you will see examples of hand split and machine-sawn wood lath used in wall plastering systems.
- It will be helpful if you would tell us the country state or Province and city where this building is located and anything you know about the age of the building as well as the type that is residential or Farm building for example.
The building age will set a limit on the possible age of the wood lath used for this plaster installation.
The building location helps translate building age into hardware and lath manufacture and use methods. If your building is in North America then we can refine that data as the methods of manufacture and use of machine-made nails spread generally from east coast through the continent to the west.
So machine made nails appeared earlier in the east than in the western ends of the U.S. and Canada.
See NAILS, AGE & HISTORY
...
Continue reading at DRYWALL, FIBERBOARD, PLASTER INTERIORS - topic home, or select a topic from the closely-related articles below, or see the complete ARTICLE INDEX.
Or see these
Recommended Articles
- AGE of a BUILDING, HOW to DETERMINE - home
- PLASTER TYPES & METHODS in BUILDINGS
- PLASTER ASBESTOS CONTENT
- PLASTER BULGES & PILLOWS
- PLASTER DUST EXPOSURE HEALTH HAZARDS
- PLASTER INGREDIENTS, MIX, PROPERTIES
- PLASTER LATH, METAL
- PLASTER, LOOSE FALL HAZARDS
- PLASTER REPAIR METHODS
- PLASTER TYPE IDENTIFICATION
- PLASTER VENEER Best Practices
- PLASTERBOARD / DRYWALL EXPANSION COEFFICIENTS
- WALL FINISHES INTERIOR
Suggested citation for this web page
WOOD LATH for PLASTER or STUCCO at InspectApedia.com - online encyclopedia of building & environmental inspection, testing, diagnosis, repair, & problem prevention advice.
Or see this
INDEX to RELATED ARTICLES: ARTICLE INDEX to BUILDING INTERIORS
Or use the SEARCH BOX found below to Ask a Question or Search InspectApedia
Ask a Question or Search InspectApedia
Questions & answers or comments about ages & types of wall & ceiling materials, installations & practices.
Try the search box just below, or if you prefer, post a question or comment in the Comments box below and we will respond promptly.
Search the InspectApedia website
Note: appearance of your Comment below may be delayed: if your comment contains an image, photograph, web link, or text that looks to the software as if it might be a web link, your posting will appear after it has been approved by a moderator. Apologies for the delay.
Only one image can be added per comment but you can post as many comments, and therefore images, as you like.
You will not receive a notification when a response to your question has been posted.
Please bookmark this page to make it easy for you to check back for our response.
IF above you see "Comment Form is loading comments..." then COMMENT BOX - countable.ca / bawkbox.com IS NOT WORKING.
In any case you are welcome to send an email directly to us at InspectApedia.com at editor@inspectApedia.com
We'll reply to you directly. Please help us help you by noting, in your email, the URL of the InspectApedia page where you wanted to comment.
Citations & References
In addition to any citations in the article above, a full list is available on request.
- Carson Dunlop, Associates, Toronto, have provided us with (and we recommend) Carson Dunlop Weldon & Associates'Technical Reference Guide to manufacturer's model and serial number information for heating and cooling equipment ($69.00 U.S.). Technical Reference Guide, Carson Dunlop Weldon & Associates, Ltd., 120 Carlton St. Suite 407, Toronto, Ontario, M5A 4K2 Canada, ISBN 1-895585-90-2 165pp.
- America's Favorite Homes, mail-order catalogues as a guide to popular early 20th-century houses, Robert Schweitzer, Michael W.R. Davis, 1990, Wayne State University Press ISBN 0814320066 (may be available from Wayne State University Press)
- American Plywood Association, APA, "Portland Manufacturing Company, No. 1, a series of monographs on the history of plywood manufacturing",Plywood Pioneers Association, 31 March, 1967, www.apawood.org
- Asbestos products and their history and use in various building materials such as asphalt and vinyl flooring includes discussion which draws on ASBESTOS, ITS INDUSTRIAL APPLICATIONS, ROSATO 1959, D.V. Rosato, engineering consultant, Newton, MA, Reinhold Publishing, 1959 Library of Congress Catalog Card No.: 59-12535 (out of print).
- Building Research Council, BRC, nee Small Homes Council, SHC, School of Architecture, University of Illinois at Urbana-Champaign, brc.arch.uiuc.edu. "The Small Homes Council (our original name) was organized in 1944 during the war at the request of the President of the University of Illinois to consider the role of the university in meeting the demand for housing in the United States. Soldiers would be coming home after the war and would be needing good low-cost housing. ... In 1993, the Council became part of the School of Architecture, and since then has been known as the School of Architecture-Building Research Council. ... The Council's researchers answered many critical questions that would affect the quality of the nation's housing stock.
- How could homes be designed and built more efficiently?
- What kinds of construction and production techniques worked well and which did not?
- How did people use different kinds of spaces in their homes?
- What roles did community planning, zoning, and interior design play in how neighborhoods worked?
- Isham: "An Example of Colonial Paneling", Norman Morrison Isham, The Metropolitan Museum of Art Bulletin, Vol. 6, No. 5 (May, 1911), pp. 112-116, available by JSTOR.
- Manufactured & Modular Homes: Modular Building Systems Association, MBSA, modularhousing.com, is a trade association promoting and providing links to contact modular builders in North America. Also see the Manufactured Home Owners Association, MHOAA, at www.mhoaa.us. The Manufactured Home Owners Association of America is a National Organization dedicated to the protection of the rights of all people living in Manufactured Housing in the United States.
- Pergo AB, division of Perstorp AB, is a Swedish manufacturer or modern laminate flooring products. Information about the U.S. company can be found at http://www.pergo.com where we obtained historical data used in our discussion of the age of flooring materials in buildings.
- Plank House Construction: webslog from plankhouse.wordpress.com/2009/01/25/plank-house-construction/ and where plank houses were built by native Americans, see
Large 1:6 Scale Plank House Construction / P8094228, Photographer: Mike Meuser
06/12/2007 documented at yurokplankhouse.com where scale model Museum quality Yurok Plank Houses are being sold to raise money for the Blue Creek -Ah Pah Traditional Yurok Village project - bluecreekahpah.org - Scott C. LeMarr has provided his file of keys to decode Furnace and Water Heater Age from the data provided on the manufacturer's equipment labels. Mr. LeMarr is a professional home inspector, Certified Professional Inspector/President, MASTER Indoor Environmental Specialist (MIES). Vice President of Wisconsin NACHI. He and his company, Honest Home Inspections [ Website: www.HonestHomeInspections.com ], LLC. can be reached at 262-424-5587 or by email to scott@honesthomeinspections.com
- Our recommended books about building & mechanical systems design, inspection, problem diagnosis, and repair, and about indoor environment and IAQ testing, diagnosis, and cleanup are at the InspectAPedia Bookstore. Also see our Book Reviews - InspectAPedia.
- America's Favorite Homes, mail-order catalogues as a guide to popular early 20th-century houses, Robert Schweitzer, Michael W.R. Davis, 1990, Wayne State University Press ISBN 0814320066 (may be available from Wayne State University Press)
- American Plywood Association, APA, "Portland Manufacturing Company, No. 1, a series of monographs on the history of plywood manufacturing",Plywood Pioneers Association, 31 March, 1967, www.apawood.org
- Asbestos: How to find and recognize asbestos in buildings - visual inspection methods, list of common asbestos-containing materials
- Asbestos HVAC Ducts and Flues field identification photos and guide
- Asbestos Identification and Testing References
- Asbestos Identification, Walter C.McCrone, McCrone Research Institute, Chicago, IL.1987 ISBN 0-904962-11-3. Dr. McCrone literally "wrote the book" on asbestos identification procedures which formed the basis for current work by asbestos identification laboratories.
- Stanton, .F., et al., National Bureau of Standards Special Publication 506: 143-151
- Pott, F., Staub-Reinhalf Luft 38, 486-490 (1978) cited by McCrone
- What Style Is It?: A Guide to American Architecture, Rev., John C. Poppeliers, S. Allen Chambers, Wiley; Rev Sub edition (October 6, 2003), ISBN-10: 0471250368, ISBN-13: 978-0471250364
- In addition to citations & references found in this article, see the research citations given at the end of the related articles found at our suggested
CONTINUE READING or RECOMMENDED ARTICLES.
- Carson, Dunlop & Associates Ltd., 120 Carlton Street Suite 407, Toronto ON M5A 4K2. Tel: (416) 964-9415 1-800-268-7070 Email: info@carsondunlop.com. Alan Carson is a past president of ASHI, the American Society of Home Inspectors.
Thanks to Alan Carson and Bob Dunlop, for permission for InspectAPedia to use text excerpts from The HOME REFERENCE BOOK - the Encyclopedia of Homes and to use illustrations from The ILLUSTRATED HOME .
Carson Dunlop Associates provides extensive home inspection education and report writing material. In gratitude we provide links to tsome Carson Dunlop Associates products and services.


