
InspectAPedia®FREE Encyclopedia of Building & Environmental Construction, Diagnosis, Maintenance & Repair |
Question? Just ask us! InspectAPedia
|
 Small Drywall / Plaster Surface
Dust Control & Repair Methods for
Asbestos-Suspect Surfaces
Small Drywall / Plaster Damage Repair Options
Nail-hole or Drywall Seal-Up
- POST a QUESTION or COMMENT about methods of dust control for working with asbestos drywall
What's the best way to minimize dust when working with drywall or "sheetrock" containing or suspected of containing asbestos?
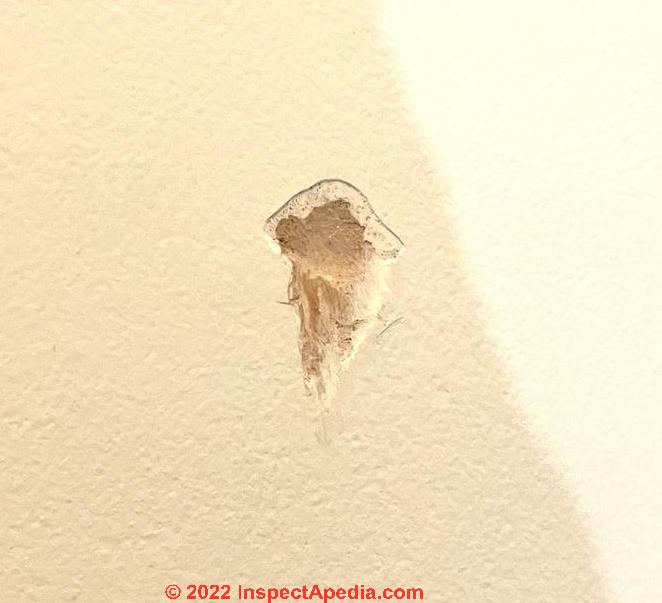
Page top photo: heroic asbestos-suspect drywall dust measures are not needed to drive a simple picture nail, but if nevertheless you're concerned we describe how to keep the dust release close to zero using painter's tape.
InspectAPedia tolerates no conflicts of interest. We have no relationship with advertisers, products, or services discussed at this website.
- Daniel Friedman, Publisher/Editor/Author - See WHO ARE WE?
Tips for Dust Control when working with Asbestos Drywall
 Modern drywall and taping compound do not contain asbestos.
Drywall systems that may contain asbestos - at least in finishes, taping joint compounds, skim coats, or in systems that applied plaster over gypsum board date from about 1910 through the early 1980's in North America (1982 in Canada).
That means that for small damage, holes, cracks or small cuts or repairs, some simple dust control measures should be sufficient.
Here we describe dust control steps you need, ranging from "do nothing" to minor containment and cleanup efforts.
Watch out: for extensive demolition of drywall (gypsum board) or plaster in buildings where those materials may contain asbestos, professional dust containment and clean-up are usually needed.
Photo just above: minor damage to plaster or drywall such as this little hole (dinged when moving a refrigerator) can be covered with painter's masking tape until you're ready to patch it using an appropriate joint compound or wall patch material.
Article Contents
- DOES ASBESTOS-SUSPECT DRYWALL NEED TO BE TESTED? - not always
- DUST CONTROL for SMALL HOLES, CRACKS or CUTOUTS in DRYWALL
- SAFE NAIL / SCREW HOLES, SMALL HOLES, SMALL DRYWALL CUT-OUTS
- HOW TO REPAIR SMALL DAMAGE in ASBESTOS-SUSPECT DRYWALL or PLASTER
Do You Need to Test Asbestos-Suspect Drywall?
- No Asbestos Test Needed:
If building materials in your home aren’t damaged and won’t be disturbed, you do not need to have your home tested for asbestos. - EPA - Asbestos Test Recommended:
IF in an older building (built before 1980 in North America) you are not sure if drywall or gypsum board or drywall joint compound used in your building contains asbestos
AND if the drywall must be disturbed so as to create a dust hazard, such as demolition or power-sawing,
THEN you should have a certified asbestos test lab examine representative samples of both the drywall (usually does not contain asbestos) and samples of the joint compound (found in greatest quantity at drywall sheet joints and often containing asbestos).
Watch out: Keep in mind that even if it contains no asbestos, drywall and joint compound dust creates ultra-fine particles that can be a serious respiratory hazard.
Don't Attempt an Amateur Drywall Removal If it Contains Asbestos
Read more about removal or encapsulation of drywall
at ASBESTOS-DRYWALL REMEDIATION / REMOVAL
A small drywall task such as nailing a picture hanging nail or small screw into a wall does not merit asbestos tests nor other heroic dust containment measures.
...
Dust Control When Cutting or Removing a Small Area of Drywall
The safest way to cut into existing old drywall that *might* along with its joint compound, contain some asbestos, is to use the following steps:
1. Control dust and confine it to the work area:
1.a. Put down a drop cloth
or better, thin disposable plastic drop cloth that you can simply fold in on itself and toss in the trash after all cutting is complete.
1.b. Work area dust containment:
If you have to do more extensive drywall demolition, consider creating negative air in the work room (a fan blowing out of a window is the amateur but successful way to do this for small jobs like installing a bath cabinet.)
1.c. Work area isolation:
A further step if we are actually making more than trivial levels of dust is to contain dust in the work space - eg plastic hung over the entry door and minimize entering and leaving the space until the cutting and dust creation are complete and cleaned-up.Our OPINION is that the simple cutting through drywall for a medicine cabinet opening is such a small job that 1.b and 1.c should not be needed.
2. Minimize dust creation in the first place by how we work
Use a rock knife (synonyms: utility knife, box cutter, drywall knife) and straight edge to make cuts, not a drywall saw.
You could get a even a little more dust reduction by putting wide painter's tape over the outline, mark the cuts and cut through the tape. (Don't wet the drywall or you may damage it).
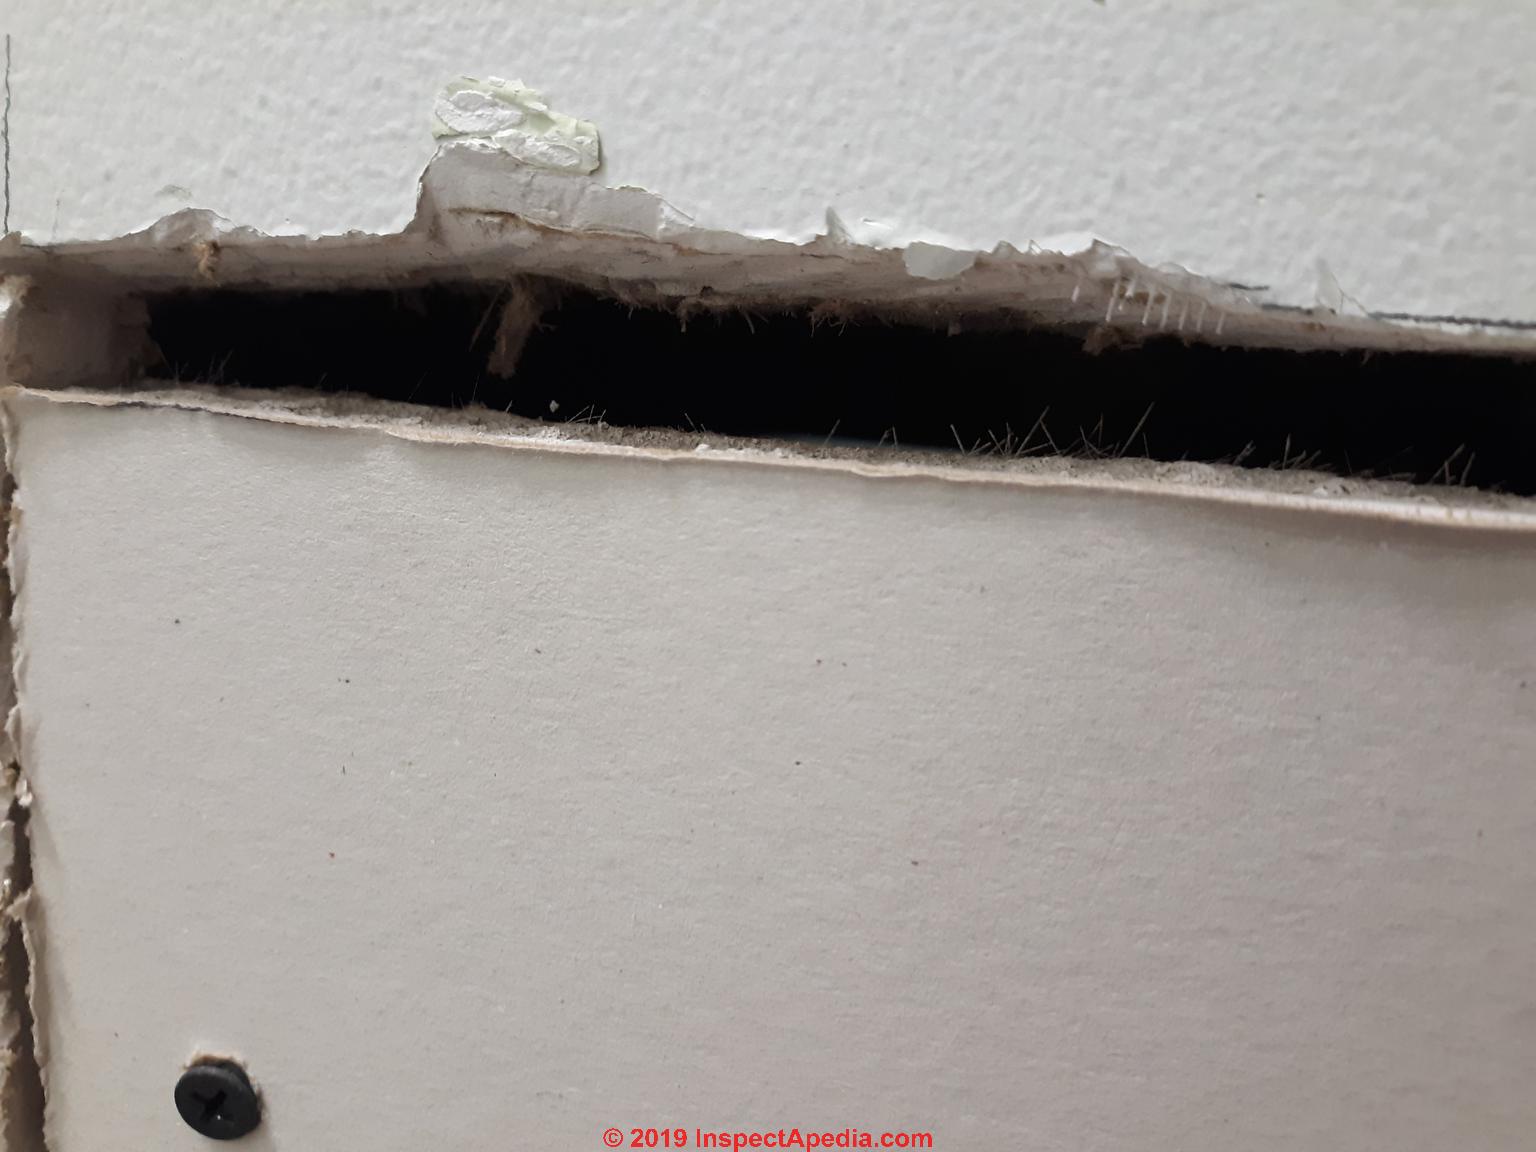
Watch out: using a coarse-toothed drywall hand-saw, or much worse, a power saw or hole cutter to cut drywall makes plenty of drywall dust, as we illustrate below
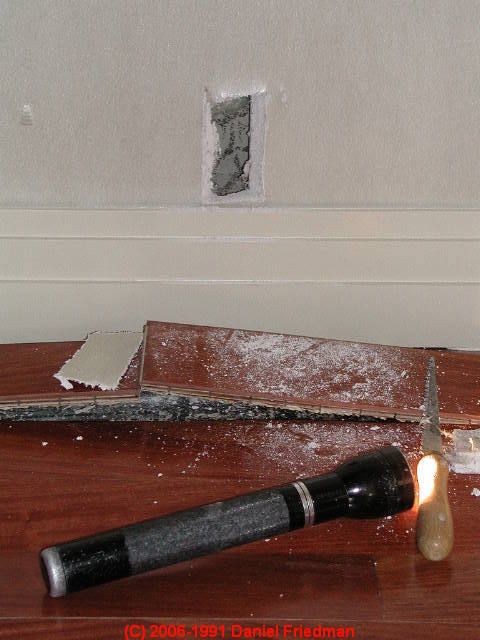
Above: We know how this messy drywall hole was cut: my flashlight is shining on the drywall handsaw used to cut the hole int the wall in the photo above.
That drywall cut was made in searching for hidden mold in the wall cavity in a building undergoing renovations: it was not occupied. This wall cut is discussed
at HIDDEN MOLD in CEILING / WALL CAVITY
3. Clean up dust after work and before the next job steps:
Use damp wiping and HEPA vacuuming of any dust on surfaces in the work room after you've carried out debris and carried out the folded-up dropcloth.
(I bring a contractor's trash bag into the work area, avoid getting it dusty itself, then when the work is finished I unfold the trash bag and put my drywall cutout debris and dropcloth into it for disposal as construction debris.)
...
Minimize the Asbestos Hazard at Small Drywall Holes or Cut-outs
Nailing Into Drywall to Hang a Picture

Simply driving a picture-hanging nail into drywall to hang a picture hook or picture on the wall should not release a meaningful amount of drywall dust.
We do not recommend asbestos testing before simply hanging a picture.
It's our opinion that collecting and sending a drywall sample for asbestos testing will cause more damage and release more suspect-dust than simply driving a small picture-hanging nail or screw as shown under the head of my Japanese Carpenter's hammer just above. - DF
To reduce even that extremely-small concern, nail through a bit of painter's tape.
Details are at PICTURE HANGING NAILS
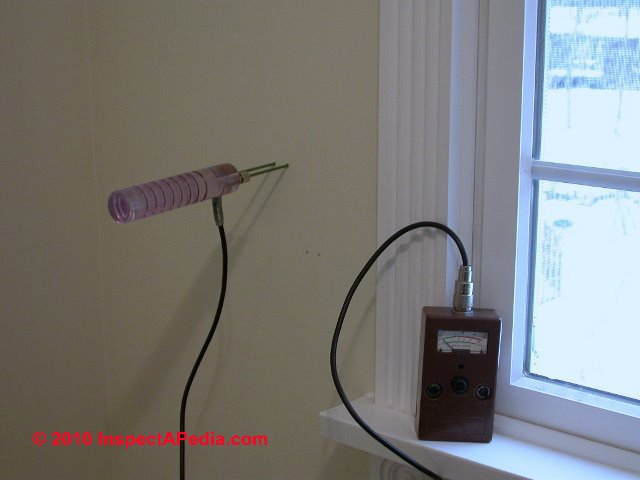
Above: another example of penetrating drywall that creates no hazardous level of dust or debris is using a pin type moisture meter inserted into the wall cavity to check for moisture on the inner surface of the exterior wall sheathing. We describe using this moisture meter
Expedient or Temporary Seal for Small Areas of Drywall Damage: Cracks or Holes
Readers often ask us how to be absolutely safe from asbestos-suspect plaster or drywall dust when a wall or ceiling has a small area of damage such as a two-inch hole or a crack in otherwise undamaged and secure material.
Above, and "repaired" below, thanks to reader Katherine, is an example of a small hole or area of damaged gypsum board or drywall.
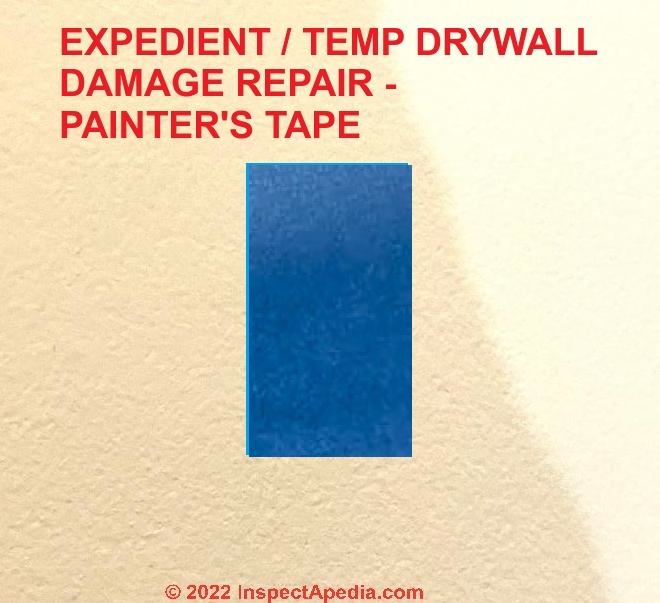
We use blue painter's tape in a suitable width to cover the wall for a safe repair that can remain in place until the hole is ready to be patched with a suitable hole filler or drywall patch compound.
Below, courtesy of reader mahmood is an example of incomplete drywall work leaving raw and slightly-damaged exposed gypsum board edges, in this case in a storage room.
Painter's masking tape in a wide range of widths between 3/4" and 6" is available at hardware stores, building suppliers, and online vendors such as Uline.com.
While the manufacturer says "holds up to 14 days with clean removal" that does not mean that the tape won't continue to adhere in place where you put it as long as the wall surface was reasonably dry and clean.
For the wall gap and exposed drywall above a quick and very inexpensive "repair" is to simply tape over that gap with 3" or 6" painter's masking tape like that shown below.

Nailing Paneling Over Drywall
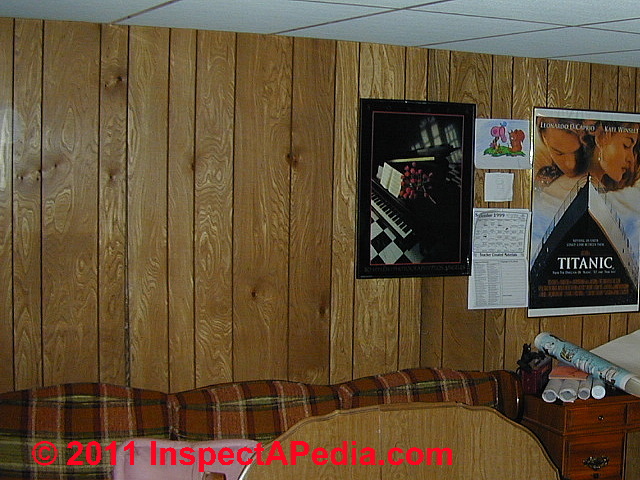
Our OPINION and experience are that the volume of dust created and released into building air by nailing through paneling into drywall that is not already damaged would be below the limits of detection, so it's perfectly "OK" to hold paneling in place against the wall and nail through it into the wall studs.
Just be sure you've used a stud finder to locate the studs. Nailing just to drywall won't hold paneling in place very well.
When I install paneling over drywall I first locate each stud top and bottom and make a pencil dot on the ceiling and floor - just far enough out from the wall that I can see the dots when I'm holding the paneling up in place against the wall.
That way I see exactly where to nail the paneling to the wall. If your nails tend to stray off the imaginary line between the ceiling and floor dots, you can have an assistant hold up a straight edge. (I don't want to make marks on the paneling itself.)
Also see PANELING, WOOD & WAINSCOTING
...
Repair Minor Damage to an Asbestos-Suspect Wall or Ceiling of Plaster or Drywall
Does this look like plaster that would contain Asbestos?
Our InspectApedia reader asked:
I have an old house that was my grandparents. It was originally build in 1900, but they added a lot to it and had the whole house plastered in either the late 1950s or early 1960s from what I gather. After looking around this site, it looks like a 2 layer system on metal lath.
Last year a section of the bathroom ceiling came crashing down. It looks like it was where an old leak caused the top layer, assuming skim coat, and several layers of paint to hang free from the rest of the plaster. Then, with the help of water from steamy showers, a three foot or so section came crashing down.
Now, the thicker bottom layer of plaster looks like it is drying out. I’m not sure if it’s because it’s getting wet or drying or the cycle, but it’s dropping little white looking crumbs on the floor below throughout the day every day.
To me this bottom layer looks more white and less chunky than a lot of the brown layers I see on here. There aren’t black specks or anything that I usually see here either.
My concern is with asbestos. I plan to get it tested, but I’m not sure if there are recommended testing companies or the best way to do this. Does this look like a general type of plaster that would have asbestos?
The house doesn’t have central air, so fans are always going all over the house. If it helps, the house is in southern Indiana, near Louisville, Kentucky. - Kyle Wilkins, 2025/06/11 - posted originally at ASBESTOS in PLASTER FAQs
Our Answer: Treat that ceiling/wall as "PACM" - Here's How to Proceed
The photo isn't quite sharp so I'm not sure about the composition of your ceiling and wall, but that looks like plaster ceiling, perhaps, based on what looks like brown paper in the center of the image, applied to a gypsum board or "rock lath" base. "Rock lath" is gypsum board between layers of paper, or in its first incarnation (Sackett board), multiple layers of gypsum and paper.
If that guess is correct, you'll want to see our description of rock lath at
at GYPSUM BOARD ROCK LATH SYSTEMS
and also see the description and photos of multi-layered gypsum/paper board that may be what you have, detailed at
Sackett Board at SACKETT BOARD
Sackett Board - if that's what your plaster is upon, was described in its patent and product documents as layers of gypsum (not asbestos) and paper (not asbestos), though you'll read at our Sackett Board article that there were some special Sakett board versions that were rated as fire resistant that may have contained asbestos to improve that property.
The edges of paper tape in your photo look like drywall tape - as if a wall-ceiling or corner joint has been repaired more than once.
So is there a chance that your dust contains asbestos? Yes; over the life of a building now 125 years old, there is a high probability that someone repaired or modified the ceilings or walls involved using joint compound that contained asbestos.
It's common for water-damaged plaster or gypsum board to become soft and to shed a powder consisting of gypsum or plaster, joint compound, and it's possible for those materials to contain abestos.
Basics of How to Repair a Small Area of Damage to an Asbestos-Suspect Wall or Ceiling of Plaster or Drywall
DO NOT
- Panic about this: doing so is itself bad for your health, invites some people to gouge you unnecessarily for inspections, tests, repairs, and for a small area of damage such as in your photo, inappropriate.
- Do any demolition or even cleanup that increases the dust level or makes matters worse before continuing with the advice given below
DO
- Use proper cleanup methods such as damp wiping and HEPA vaccuming (don't use a conventional home or shop vac that can increase the level of airborne dust).
- Make sure that your leak is not ongoing
- Reman alert for mold contamination that may require more demo and cleaning
- Repair the area of damage by cutting out the damaged (soft, shedding) plaster and probably Sackett board or rock lath and the repairing and refinishing the surface, treating the material as PACM - Presumed Asbestos Containing Material.
That means using dust control to avoid cross contaminating other areas of the building
(see DUST CONTROL METHODS WHEN CUTTING ASBESTOS CONTAINING DRYWALL OR PLASTER ) and by wearing appropriate protective gear, and using proper cleanup methods.
Be sure to READ the ETAILS of how to proceed or how your contractor would be expected to proceed at
ASBESTOS-DRYWALL REMEDIATION / REMOVAL
and also see
ASBESTOS-DRYWALL DUST CONTROL - where in a new section
titled HOW TO REPAIR SMALL DAMAGE in ASBESTOS-SUSPECT DRYWALL or PLASTER
we repeat this discussion in order to assist other readers and to invite further comment.
My OPINION is that for such a small repair - this looks like less than one square foot of damage, it would not be appropriate to hire an asbestos inspector, perform costly tests, hire an asbestos abatement contractor, etc. provided you can do the repair or have the repair done using the proper dust control measures.
Reader Followup: don't confuse insulation scraps with Sackett Board
@InspectApedia Publisher, here is a closer look.

I think the paper you see here is from the fiberglass looking pink insulation on top of the metal lath.
The metal is rusted here, but in other parts of the house you can see the metal behind the plaster where I replaced windows.
Some places in other rooms look to be an obvious taped seam, so some type of sheet/board makes sense.
All the walls have a sight texture that looks brushed on, but it’s very slight.
Moderator reply: Plaster on expanded metal lath: avoid demolition, clean, patch and paint and fix the leak
Here's what we see in your second photo:
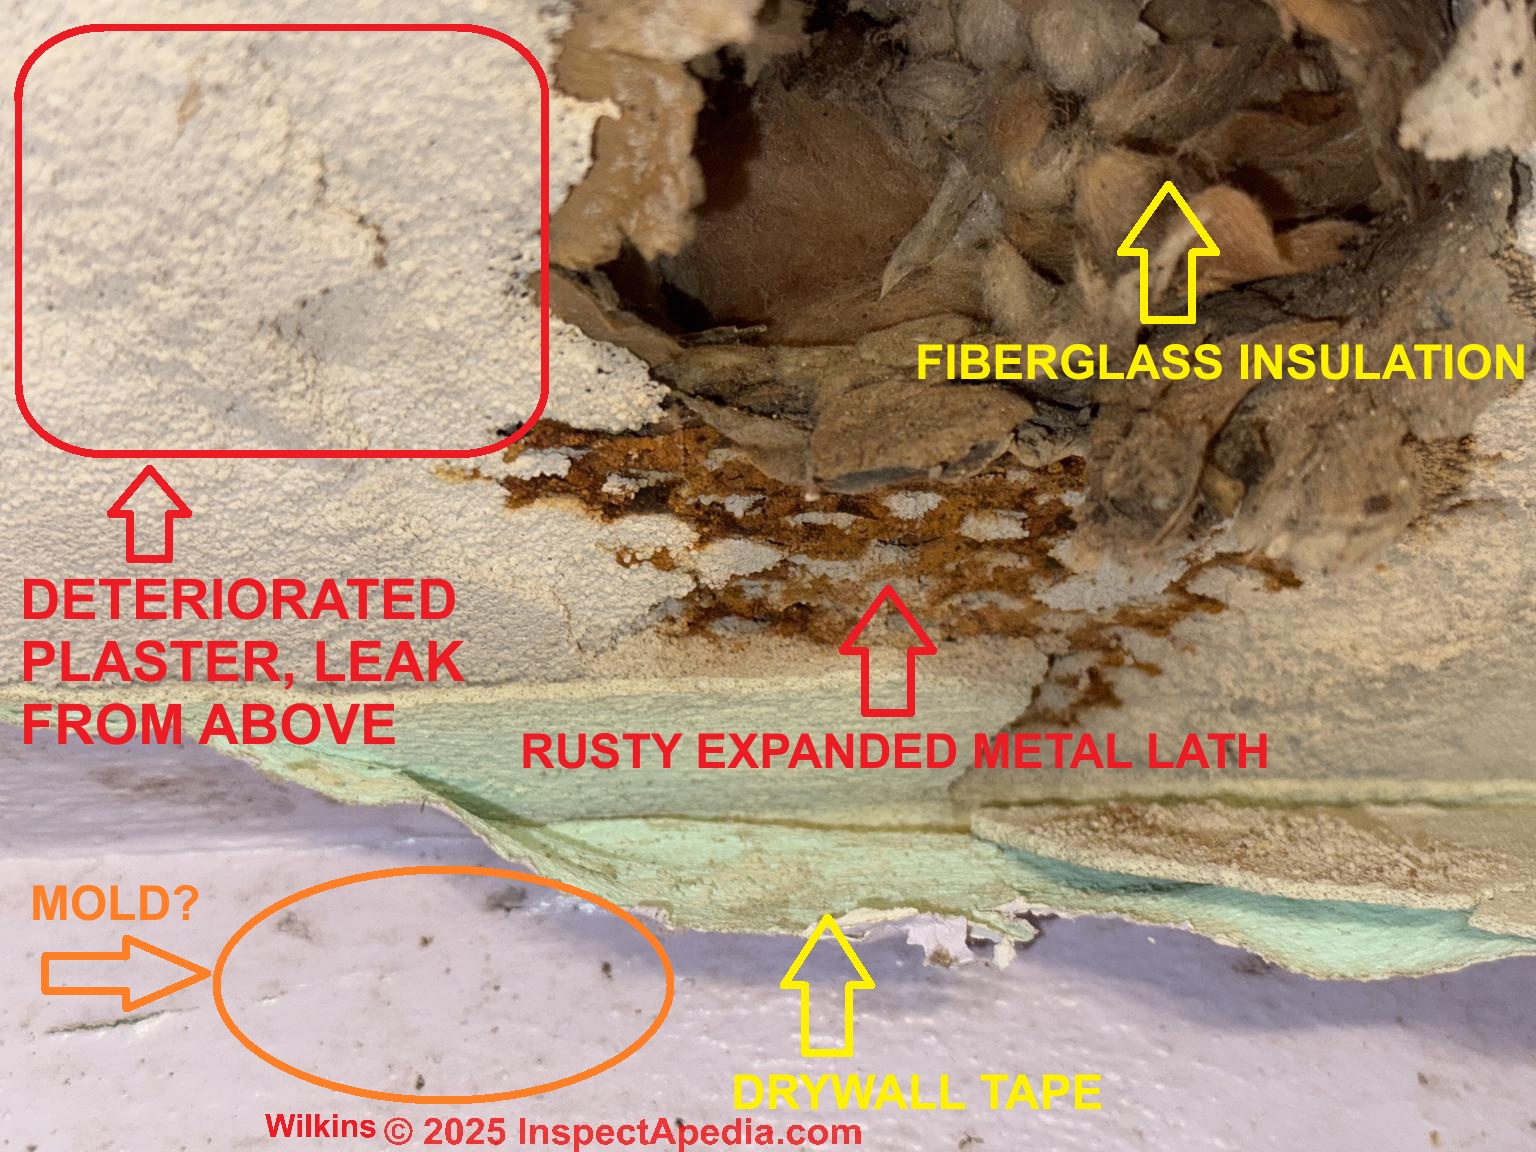
Ick, you're quite right. That is not sackett board nor rock lath, it's expanded metal lath.
Unfortunatley, and speaking from first-hand experience, removing expanded metal lath plaster is a horrible job, messy, and if you're not careful, a good way to slice up your hands on rusty metal mesh.
For those jobs I'd always prefer, if possible, to secure the lath, remove the soft plaster but leave the metal lath in place, then patch the hole with plaster, and re paint the ceiling and wall as needed.
As there's attic above, I'm hoping you'll inspect from above to be sure the leak has been diagnosed and repaired.
The good news is that this becomes a less messy and smaller job.
DF
...
...
Continue reading at ASBESTOS in DRYWALL - topic home, or select a topic from the closely-related articles below, or see the complete ARTICLE INDEX.
Or see these
Recommended Articles
- AIR HANDLER DUST CONTAMINATION - drywall dust in HVAC equipment
- ASBESTOS IDENTIFICATION IN BUILDINGS
- ASBESTOS in PLASTER - what about the use of asbestos in plaster walls & ceilings?
- DRYWALL, FIBERBOARD, PLASTER INTERIORS - home
- ASBESTOS CEMENT CEILING & WALL PANELS
- ASBESTOS in DRYWALL
- ASBESTOS in DRYWALL MUD - TEST LOCATIONS
- ASBESTOS in DRYWALL TAPE?
- ASBESTOS-DRYWALL REMEDIATION / REMOVAL
- ASBESTOS-SUSPECT DRYWALL ENCAPSULATE in PLACE
- ASBESTOS-DRYWALL DUST CONTROL
- BESTWALL DRYWALL ASBESTOS
- CELOTEX DRYWALL ASBESTOS
- CHINESE DRYWALL HAZARDS
- DOMTAR GYPROC ASBESTOS?
- DRYWALL & GYPSUM BOARD COMPOSITION & HISTORY
- DRYWALL TYPE IDENTIFICATION STAMPS
- DRYWALL INSTALLATION Best Practices
- DRYWALL INSTALLATION HORIZONTAL vs VERTICAL
- GYPSUM BOARD GYP ROCK SHEATHING
- GYPSUM BOARD PLASTER LATH SYSTEMS
- IGNIFUGE GYPSUM BOARD ASBESTOS?
- NATIONAL GYPSUM DRYWALL ASBESTOS?
- PLASTER TYPES & METHODS in BUILDINGS
- PLASTER INGREDIENTS, MIX, PROPERTIES
- SHEATHING, GYPSUM BOARD
- WOOD LATH for PLASTER or STUCCO
Suggested citation for this web page
ASBESTOS-DRYWALL DUST CONTROL at InspectApedia.com - online encyclopedia of building & environmental inspection, testing, diagnosis, repair, & problem prevention advice.
Or see this
INDEX to RELATED ARTICLES: ARTICLE INDEX to ASBESTOS HAZARDS
Or use the SEARCH BOX found below to Ask a Question or Search InspectApedia
Ask a Question or Search InspectApedia
Try the search box just below, or if you prefer, post a question or comment in the Comments box below and we will respond promptly.
Search the InspectApedia website
Note: appearance of your Comment below may be delayed: if your comment contains an image, photograph, web link, or text that looks to the software as if it might be a web link, your posting will appear after it has been approved by a moderator. Apologies for the delay.
Only one image can be added per comment but you can post as many comments, and therefore images, as you like.
You will not receive a notification when a response to your question has been posted.
Please bookmark this page to make it easy for you to check back for our response.
IF above you see "Comment Form is loading comments..." then COMMENT BOX - countable.ca / bawkbox.com IS NOT WORKING.
In any case you are welcome to send an email directly to us at InspectApedia.com at editor@inspectApedia.com
We'll reply to you directly. Please help us help you by noting, in your email, the URL of the InspectApedia page where you wanted to comment.
Citations & References
In addition to any citations in the article above, a full list is available on request.
- In addition to citations & references found in this article, see the research citations given at the end of the related articles found at our suggested
CONTINUE READING or RECOMMENDED ARTICLES.
- Carson, Dunlop & Associates Ltd., 120 Carlton Street Suite 407, Toronto ON M5A 4K2. Tel: (416) 964-9415 1-800-268-7070 Email: info@carsondunlop.com. Alan Carson is a past president of ASHI, the American Society of Home Inspectors.
Thanks to Alan Carson and Bob Dunlop, for permission for InspectAPedia to use text excerpts from The HOME REFERENCE BOOK - the Encyclopedia of Homes and to use illustrations from The ILLUSTRATED HOME .
Carson Dunlop Associates provides extensive home inspection education and report writing material. In gratitude we provide links to tsome Carson Dunlop Associates products and services.
 |
HOME | ABOUT | ASK a QUESTION | CONTACT | CONTENT USE POLICY | DESCRIPTION | POLICIES | PRIVACY | |
| © 2026 - 1985 Publisher InspectApedia.com - Daniel Friedman | |||||||||