 Hidden Mold Contamination
Wall / Ceiling Test Cuts
- POST a QUESTION or COMMENT about simple procedures that show how to find and test for hidden mold in buildings
How to detect hidden mold in walls, ceilings, floors - making test cuts:
This article discusses how, why, when, and where to make wall test cuts to find and test for hidden mold contamination or growth in buildings.
The fact that mold is "hidden" in buildings does not mean one cannot find it. Here we describe use of a borescope to find hidden mold in building wall or ceiling cavities; Growth pattern of some toxic molds in wall cavities maps insulation installation patterns; Strategies for choosing where to make test cuts to check walls or ceilings for hidden mold contamination.
We look by context: where do we see leak stains, or where do we see building practices most likely to have produced a hidden leak or moisture problem? Ice dam leaks in walls, hidden plumbing leaks, roof spillage by the foundation, are all common clues that often track to a wet building wall or ceiling cavity and from there to a hidden mold problem which may need to be addressed.
InspectAPedia tolerates no conflicts of interest. We have no relationship with advertisers, products, or services discussed at this website.
- Daniel Friedman, Publisher/Editor/Author - See WHO ARE WE?
Making wall test cut openings to spot hidden mold
 This article on mold inspection and testing discusses the use of test cuts in building surfaces to explore building cavities for hidden mold.
Since even small cosmetic damage to buildings is something to avoid when possible, we also discuss how to decide when a test cut is justified, and now to explore building cavities with the minimum damage.
This document is part of a longer article which describes how to find mold and test for mold in buildings, including how and where to collect mold samples using adhesive tape - an easy, inexpensive, low-tech but very effective mold testing method.
See TEST KIT for DUST, MOLD, PARTICLES: INSTRUCTIONS for details.
This procedure helps identify the presence of or locate the probable sources of mold reservoirs in buildings, and helps decide which of these need more invasive, exhaustive inspection and testing.
Unless a building area is already visibly damaged or moldy, we proceed with as little damage or "invasiveness" as possible.
Often no invasive cuts are needed to see into a building cavity.
Text and photo illustrations in this section are roughly in order of degree of invasiveness.
Often an experienced inspector who knows where to look, can reach very reliable conclusions about hidden mold with no damage to a property at all. Or we can perform non-damaging invasive inspection such as the careful removal of trim for further inspection.
Use of a bore scope to inspect building cavities
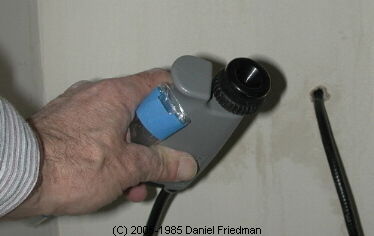
Where a 2" diameter hole is not permitted, we may explore using this small borescope which requires a hole about the diameter of a pencil.
Often this probe can be inserted behind loose trim or in existing building openings to permit a limited-access view of building cavities without any destructive cuts at all.
Photos demonstrating use of a hole cutter and drill to explore buildings for hidden mold

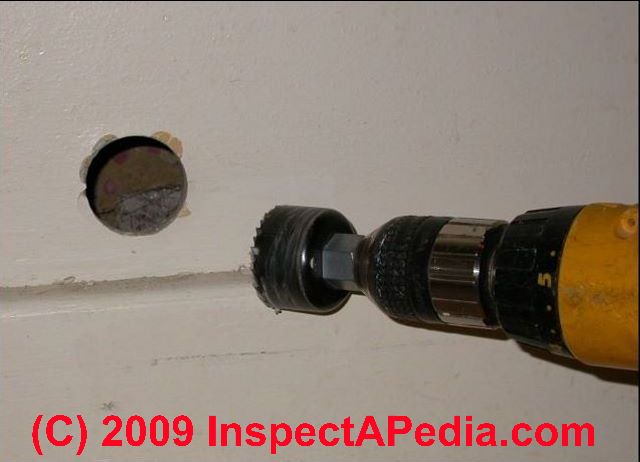
We use several sizes of hole cutter bits to explore areas where building history or visual clues suggest a high probability of hidden mold growth between plies of building material.
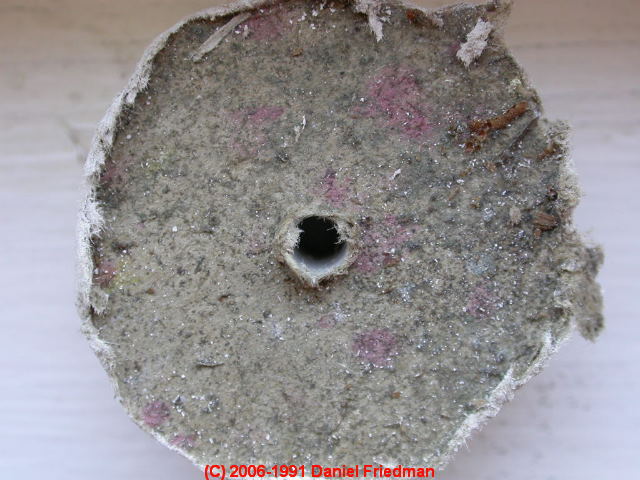
Examples include buildings which have been "renovated" by the installation of additional layers of drywall.The second photo (above right) shows that pink and other colored mold was found growing on the hidden or cavity side of the drywall where we made this cut. The building had been exposed to prior leaks into wall cavities from the floor above.
A "water extraction" company had cut holes along the bottom of the wall in each stud bay to, as they claimed, extract the water. I have never once found this approach successful.
There was no air circulation throughout the wall during the drying procedure, and worse, the process was begun too late after the leak event, and worst still, no one inspected to evaluate the effectiveness of the procedure.After the water extractors left a renovation contractor was engaged to wash and paint all of the interior wall and ceiling surfaces.
Most of them were badly mold-contaminated on their hidden side and had to be removed for proper mold remediation and cleanup.
The photo at above right shows us cutting a round hole in a wall to expose the wall cavity.
We cut high enough above the floor to avoid the sill plate and to give access to the wall cavity itself. We cut close to but not on top of a wall stud, so that when examining the wall cavity we can examine:
- The cavity side of drywall plug which was removed, checking it for visible mold
- The condition of insulation in the wall cavity - if any. It may be necessary to vacuum-test wall insulation to test for mold since fiberglass insulation can be moldy but look quite clean.
See FIBERGLASS INSULATION MOLD for details of the occurrence of mold contamination in building insulation,
and
see VACUUMING BUILDING CAVITIES as a screen for building mold
as well
as VACUUM TEST INSULATION CONTAMINANTS for finding mold-contaminated fiberglass. - The condition of nearby upper surface of horizontal sill plates to check for mold growth or evidence of leaks
- The condition of nearby vertical surface of a wall stud to check for visual evidence of mold growth or leaks
- The condition of the wall cavity-side of the opposing drywall or exterior wall sheathing.
Do not fail to check all of these surfaces. It is common to find more severe mold growth on the drywall of one side of a wall cavity than on the other. This happens when water has run down one surface but not on another.
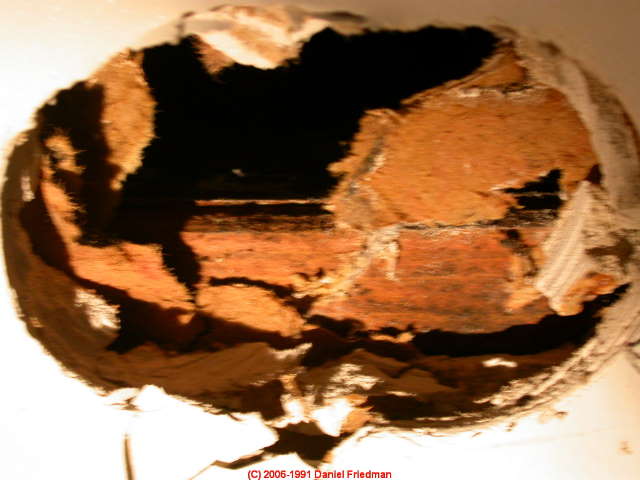
How to Find or Test for Inter-ply mold, between layers of building materials
In Poughkeepsie NY we visited our friend's son who had been hired by a real estate property "flipper" to "deal with mold" by laminating another layer of drywall over all of the very moldy walls and ceilings in the home.
It is likely that future occupants will eventually discover and be a bit upset by this shortcut. Careful cutting through layers of material can expose mold on inter-ply layers such as shown in this ceiling cut.
Larger Drywall test cuts to check for hidden mold contamination
Where we have justification to proceed we may cut a 2" x 3" hole in drywall to peer into a wall cavity.
This opening, like the plug cut openings discussed above, is trivial to patch in drywall or plaster, but permits a more reliable inspection of the building cavity interior than a borescope.
Where damage is already extensive, there is nothing lost, no material to preserve, and a still larger opening may be cut, or multiple openings, in order to confirm the extent of contamination and thus the extent of demolition and mold cleanup needed.
Memnoniella echinata - a toxic black mold in a wall cavity: During an investigation of a high-rise apartment in a large U.S. city, I was asked to evaluate black mold visible on basement floor joists in a kitchen.
Our mold inspection procedure includes a screen of the entire living unit which in this case was a large multi-room apartment.
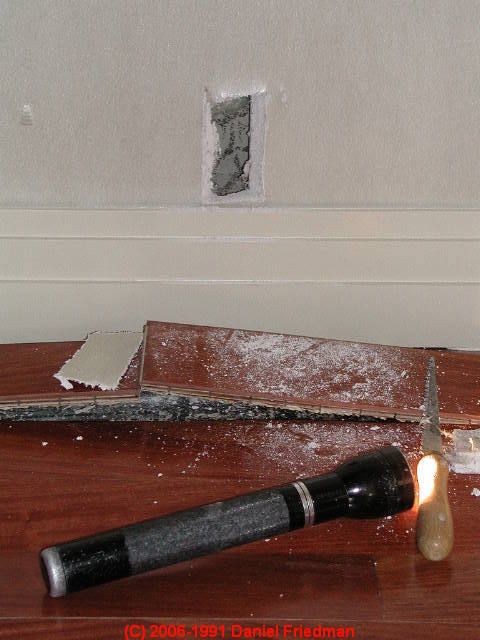
At the far end of the apartment, remote from the kitchen and its leaks and mold, I found evidence of other leaks into and below an expensive cherry-wood floor.
We traced leaks to an air conditioning wall unit whose condensate was draining into the floor rather than into its drain.
The photo above shows our initial test cut into the wall cavity.
The next photo below shows a closeup of the cavity interior.
We chose an area to make a "test cut" into the wall cavity where we thought there had been the most water exposure.
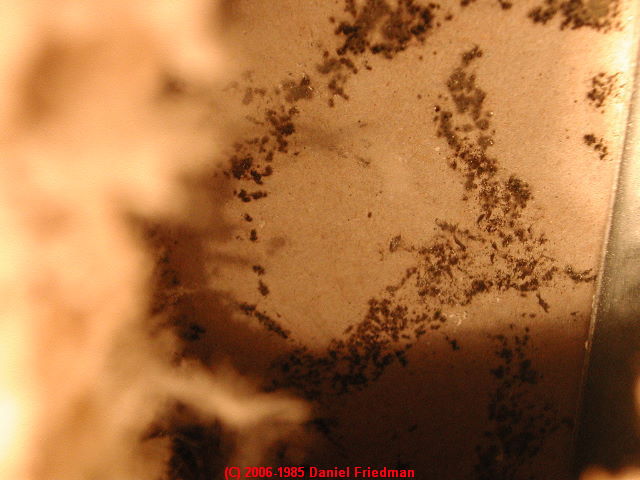 The result is in the photo you see above - there was black mold in the wall cavity on the hidden surface of
the drywall.
A simple laboratory test confirmed what our nose and throat were suggesting at the inspection - this was a particularly irritating mold, which we identified in our lab as Memnoniella echinata.
My work plan for this New York City apartment included an expansion of the original scope to cut open the lower drywall around the room where our test cut identified this problematic mold.
I asked the remediator to continue removing drywall until there was at least a 24" clear margin of no visible mold.
The result was dramatic - water had run in the steel channel formed by the metal sill plate, and had followed the wall around the apartment, producing a significant reservoir of Memnoniella echinata or "black mold" which needed to be removed.
(In case you missed it, it is complete nonsense to assume that "black molds" are always a problem and even more erroneous to include light colored and hard to see molds which often are a more significant hazard in buildings.)
Another "toxic black mold", Memnoniella echinata is particularly toxic and irritating.
It's a member of the Stachybotrys family but unlike Stachybotrys chartarum, a sticky spore that tends to stay in its place, M. echinata is more easily airborne and I often find it in the air when it's growing in the building. It's more of a problem than its famous brother.
These mold photographs provide a second warning: a small amount of mold on the visible side of a wall [Memnoniella wall] may be a clue that there is a much bigger problem inside the wall cavity.
In the first photo you are looking into a small 3" x 3" opening I made to see conditions in the wall cavity.
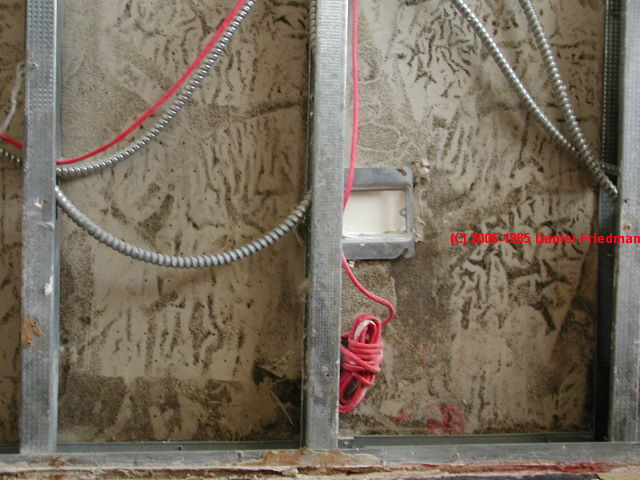
Don't do this if at risk people are around as you may be spreading spores in the air. This photo shows the growth pattern on the cavity face of drywall on the opposite side of the drywall from where we cut and removed a larger section of drywall during remediation.
You can see that the Memnoniella echinata exhibits an odd growth pattern on the wall which maps the areas of contact or non-contact of wall insulation with the paper drywall surface in this cavity.
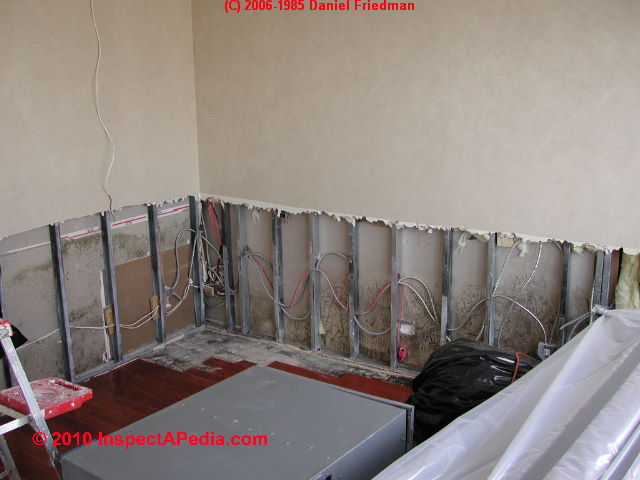
This photo (above) shows the extent of mold growth which had been hidden in the wall cavity after the remediation contractor cut away one side of the drywall as I had asked.
You'll see that a large area of moldy drywall was involved, and that the remediation project needs to expand to include removing the opposing wall drywall and thus other rooms in the apartment.
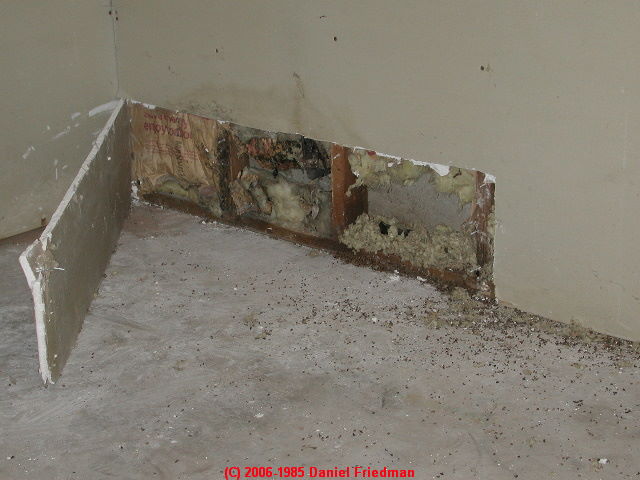
This drywall test cut to look for hidden mold was made in a basement where we observed water stains on the drywall.
We discovered a plumbing drain, unknown to the building owner, and a history of leaks leading to moldy insulation and drywall in this basement corner.
Also see MOLD RELATED ILLNESS SYMPTOMS.For an atlas of building molds and for more microphotographs of building mold samples observed in our laboratory,
see MOLD ATLAS & PARTICLES INDEX.
MOLD by MICROSCOPE shows what mold looks like under the microscope.
See MOLD RESISTANT DRYWALL for a discussion of that product type as well as a list of drywall or gypsum board industry standards and drywall product MSDS sheets.
Hidden Mold Contamination Behind Wallpaper & Below Windows
Question: What are the necessary conditions for mold growth on building drywall and in the wall cavity?
I had energy efficient windows installed in my townhouse over a year ago.
This past spring one of the master bedroom windows leaked after a rain storm because the caulking failed. The company immediately came out and recaulked the window and it hasn't leaked since.
Mold growth in wall cavity below a leaky window
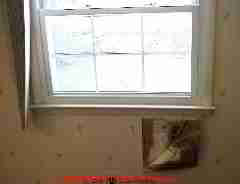
[Photo at left provided by InspectAPedia, taken from a New Jersey home and not the building discussed by this reader, shows mold growth on drywall and on wallpaper beneath a leaky window.
A single rainstorm combined with the window having been left partly opened caused this mold growth.
After checking the basement ceiling cavity below this window as well as in the wall cavity itself, our investigation found that the total moldy area was less than 30 sq.ft. and the mold cleanup could be handled as a normal renovation job.
More examples of mold growth on and in wall cavities and hidden by wallpaper are shown
at MOLD GROWTH on SURFACES, PHOTOS - Ed.] My concern is that I now have a water stain under the window on the drywall, and since I have a mold allergy, I'm wondering if there might be mold on the inside of the drywall.
I read your article on testing the dry wall but as mentioned in the article would rather not cut into it unless it's necessary. I looked at other articles but didn't see one with a picture resembling the water stain I'm concerned about. What would you recommend? By the way, this is a very helpful website.
I was considering using ozone for any possible mold in my place but see from your article that's not a good idea.
Continued: I emailed you recently about the possibility of mold forming on the inside of drywall under a window that leaked last spring when it rained.I contacted a bonded company about replacing the drywall.
The gentleman I spoke on the phone with told me that he's attended mold seminars and that mold requires an ongoing source of water or moisture over an extended period of time to grow. In his opinion, since my leak occurred only once during a rain storm that lasted an hour or so, there's little or no chance mold could grow on the inside of the drywall under the window.
He also said that since the water stain is barely visible, this is more reason to conclude there's no mold on the inside of the dry wall. I thought it would be a good idea to check this on your website, but didn't find any topic that seemed related to the conditions for mold formation, so I thought I should email you.
Is what he says about mold formation accurate? And if so, is it reasonable to conclude that there's probably no mold on the inside of the dry wall under the window that leaked? I'm hoping he's right, because I won't have to replace the drywall. I'll replace it if necessary, though. Thanks again for your help. G.N.
Reply: Even a single event water leak is likely to lead to mold growth in building ceiling or wall cavities - it depends on ...
A competent onsite inspection by an expert usually finds additional clues that help accurately diagnose a problem with mold, hidden mold, and with tracking down just how much water leaked into the building and where it went.First, how disappointing that your new windows leaked - certainly a wet wall below a leaky window is not particularly energy efficient, and indeed it could become a mold reservoir.
The risk of a mold problem that you can't see but that is significant enough to merit removal is not something I nor anyone should guess at by email nor by telephone (that is, with no building inspection) with so little information.
MOLD / ENVIRONMENTAL EXPERT, HIRE ? provides advice on deciding (or not) to hire someone to inspect and test for mold contamination.
Watch out: mold testing alone, without a building inspection, case history, and occupant interview, is not reliable.I would not rely on "mold tests" - a test, especially an air test for airborne mold, performed without an expert diagnostic inspection of the building is just not reliable in cases where the result is "negative".
Continued reply: G., your bonded company expert is mistaken, as you can see in our example photo above showing mold growth in the wall cavity and behind wallpaper below a window following a single event leak.
A single water entry event can cause mold growth in a building cavity, on the wall cavity side of drywall, in the wall insulation, on the kraft paper insulation facing, on the building structural wall wood studs or cavity side of the exterior wall sheathing.
Your expert would, however, be correct, if s/he asserted that the extent or size or severity of mold growth from a single event leak depends on the size of the leak, the amount of water entering the cavity, where it went, what materials got wet, and the moisture exit rate from the building cavity.
Unlike your expert, beyond that advice I'm reluctant to promise what is or is not in a building cavity on a building I've not studied.
Often an expert on site finds evidence of chronic leaks that a normal building owner may never have noticed. Very often very small leaks or wet spots do not produce a significant problem mold reservoir.
Why even a single building leak can cause significant mold growth in 24-48 hours
But because building wall or ceiling cavities dry out very slowly, leaks into a wall or ceiling, even from a single event, can initiate problem mold growth in those areas. In general, if a building interior or building cavity interior contains mold friendly organic materials such as wood, paper, drywall, fabrics, drywall, mold growth can be expected to occur if the area remains wet for 24-48 hours.
Low temperatures can sometimes slow down mold growth so a building that was wet during freezing weather may have a bit more time.
What happens to mold in a building wall or ceiling cavity once the area has dried out?
When the building cavity finally has dried, several conditions are likely to occur:
- Mold release surges:
Depending on the mold genera species, there may be a very large spore release as the fungus dries or in response to relative humidity changes in general. Air movement, mechanical disturbance and other forces may also come into play.
For example I've seen an enormous release of Aspergillus sp. spores during building dryout procedures preliminary to a large scale mold remediation project.
And depending on the amount of air communication between the building cavity and the occupied space, this mold reservoir and spore release can be a problem for some occupants. - Dormant mold reservoirs:
Once the building cavity is sufficiently dry ("sufficiently" depends on the mold genera species and the material on which its colony has formed) the mold colony or reservoir may become dormant - that is, it may stop further expanding growth and it may stop releasing spores to the environment. - Future changes in the building condition,
ranging from increases in indoor relative humidity to new leaks into or near the same moldy drywall or moldy building cavity can cause a renewal of mold growth and spore release activity at a more rapid rate and on a larger scale than would have otherwise occurred if the pre-existing mold reservoir had not been present or if it had been previously removed and the building cavity properly cleaned (and of course had the cause of building leakage been repaired).
How do we decide if destructive or invasive inspection of building cavities is justified
In general, if there has been anything but the most absolutely trivial leakage into a building wall or ceiling cavity, and if thus we decide to investigate, I recommend choosing the one or two most suspect leak areas, where there is the most evidence or suspicion of the area that received the most water or was the most wet.
In those areas I'll make a small test cut, perhaps 2" x 4" into the ceiling or wall, through the drywall.
There we perform a visual inspection for visible mold on all surfaces and materials; if there is insulation present we also collect a vacuum sample of that material, and we collect tape samples of any visible mold on any of the newly exposed surfaces.
If that most-suspect area is "clean" of any strong suggestion of mold contamination, we don't cut or dig further without some other compelling reason to do so.
What is appropriate when there has been building leakage and where there is a concern for possibly significant hidden mold contamination is to make a decision about whether hiring an expert is justified in a particular case.
See MOLD / ENVIRONMENTAL EXPERT, HIRE ? for advice on making that decision.
More photographs and examples of mold growth on drywall are found
at MOLD on DRYWALL or Sheetrock®.
...
Continue reading at HIDDEN MOLD in FLOOR / SUB-FLOORING or select a topic from the closely-related articles below, or see the complete ARTICLE INDEX.
Or see HIDDEN MOLD in CEILING / WALL CAVITY FAQs - questions and answers posted originally on this page.
Or see these
Recommended Articles
- HIDDEN MOLD, HOW TO FIND
- CABINET MOLD & WATER DAMAGE
- CARPET MOLD / ODOR TESTS
- COSMETIC MOLD, RECOGNIZE
- FIBERGLASS INSULATION MOLD
- FIND MOLD, ESSENTIAL STEPS
- HARD TO SEE MOLD, SPOTTING
- HIDDEN MOLD in CEILING / WALL CAVITY
- HIDDEN MOLD in FLOOR / SUB-FLOORING
- HIDDEN MOLD in FRAMING / SHEATHING
- HIDDEN MOLD in OTHER PLACES
- HIDDEN MOLD in PANELING
- LIGHT AIM FINDS MOLD & OTHER PARTICLES
- LIGHT COLORED MOLD
- LIGHT, FLASHLIGHT for MOLD
- MOISTURE GRADIENTS & MOLD
- TEST CUTS for MOLD in BUILDING CAVITIES
- UV LIGHT BLACK LIGHT USES
- MOLD APPEARANCE - WHAT MOLD LOOKS LIKE
- THERMAL IMAGING MOLD SCANS
Suggested citation for this web page
HIDDEN MOLD in CEILING / WALL CAVITY at InspectApedia.com - online encyclopedia of building & environmental inspection, testing, diagnosis, repair, & problem prevention advice.
Or see this
INDEX to RELATED ARTICLES: ARTICLE INDEX to MOLD CONTAMINATION & REMEDIATION
Or use the SEARCH BOX found below to Ask a Question or Search InspectApedia
Ask a Question or Search InspectApedia
Try the search box just below, or if you prefer, post a question or comment in the Comments box below and we will respond promptly.
Search the InspectApedia website
Note: appearance of your Comment below may be delayed: if your comment contains an image, photograph, web link, or text that looks to the software as if it might be a web link, your posting will appear after it has been approved by a moderator. Apologies for the delay.
Only one image can be added per comment but you can post as many comments, and therefore images, as you like.
You will not receive a notification when a response to your question has been posted.
Please bookmark this page to make it easy for you to check back for our response.
IF above you see "Comment Form is loading comments..." then COMMENT BOX - countable.ca / bawkbox.com IS NOT WORKING.
In any case you are welcome to send an email directly to us at InspectApedia.com at editor@inspectApedia.com
We'll reply to you directly. Please help us help you by noting, in your email, the URL of the InspectApedia page where you wanted to comment.
Citations & References
In addition to any citations in the article above, a full list is available on request.
- In addition to citations & references found in this article, see the research citations given at the end of the related articles found at our suggested
CONTINUE READING or RECOMMENDED ARTICLES.
- Carson, Dunlop & Associates Ltd., 120 Carlton Street Suite 407, Toronto ON M5A 4K2. Tel: (416) 964-9415 1-800-268-7070 Email: info@carsondunlop.com. Alan Carson is a past president of ASHI, the American Society of Home Inspectors.
Thanks to Alan Carson and Bob Dunlop, for permission for InspectAPedia to use text excerpts from The HOME REFERENCE BOOK - the Encyclopedia of Homes and to use illustrations from The ILLUSTRATED HOME .
Carson Dunlop Associates provides extensive home inspection education and report writing material. In gratitude we provide links to tsome Carson Dunlop Associates products and services.


