
InspectAPedia®FREE Encyclopedia of Building & Environmental Construction, Diagnosis, Maintenance & Repair |
Question? Just ask us! InspectAPedia
|
 Common Building Painting Mistakes to Avoid
26 ways to get a bad paint-job on a building
- POST a QUESTION or COMMENT about building exterior or interior paint job mistakes and paint failiures - how to avoid paint problems on buildings
Paint job mistakes that result in early paint failure:
This article desribes and illustrates common building exterior & interior painting mistakes, describes how to diagnose paint failures on buildings, and outlines a procedure for diagnostic field inspection & lab testing of failed painted surfaces.
We include photographs of paint failures on buildings and more photos of forensic paint laboratory examination of samples of failed paint useful to assist in diagnosing the probable cause of each type of paint failure.
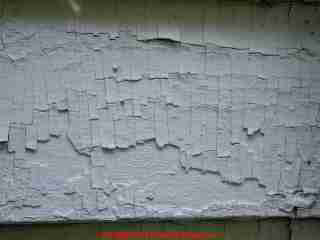
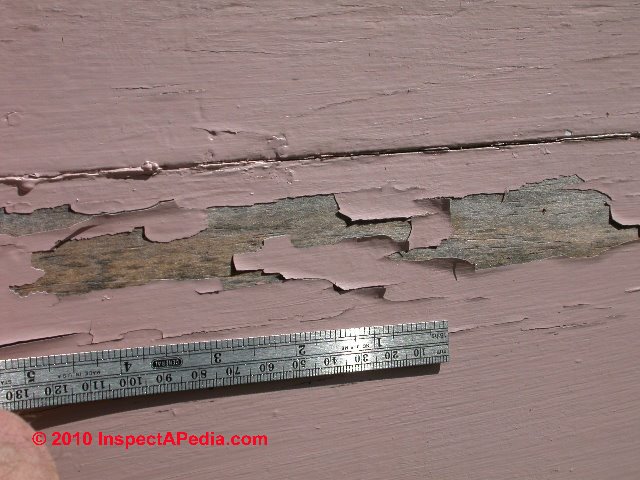
Our page top photo shows a horrible paint job on a building exterior: the painter simply painted over loose, alligatored paint.
InspectAPedia tolerates no conflicts of interest. We have no relationship with advertisers, products, or services discussed at this website.
- Daniel Friedman, Publisher/Editor/Author - See WHO ARE WE?
Common Building Painting Mistakes to Avoid
 Experts representing paint manufacturers see many
field failures of painted surfaces, often arising from a common cause.
Experts representing paint manufacturers see many
field failures of painted surfaces, often arising from a common cause.
[Click to enlarge any image]
But getting a clear answer from these professionals can be tricky: the painting contractor is their customer, not the building owner.
Therefore, while most paint failures are due to poor surface preparation or painting in improper conditions of temperature or moisture, the "expert" may be reluctant to say so.
Importantly, other paint failures are due to construction errors, building ventilation or vapor barrier errors, building leaks, or improper maintenance. It is important to understand why a paint failure occurred before re-painting a building.
Otherwise the expense of a new paint job may be wasted.
"Improper or inadequate surface preparation is by far the most common cause of house paint failures such as blistering, peeling and staining. If the new paint is separating from the old coat of paint, it is most likely due to chalking or some contaminant on the old paint that prevents the new paint from penetrating and binding to the old painted surface.
If the peeling failure is down to the bare wood, it is most likely that the problem is a result of too much moisture within the wall, forcing itself out, taking the entire paint film with it."
"Over 65% of all paint failures can be attributed to poor or improper surface preparation. Two of the major causes of paint failure on exterior wood surfaces are either moisture passing through the substrate from the interior, or exterior sources of moisture getting behind the paint film.
Temperature and humidity have major effects upon drying and ultimately upon the characteristics of the paint film. These effects will always determine the actual appearance and performance of the paint itself.
 Paint should be applied at temperatures of 70o F, (21o C), ideally, plus or minus 20o F (12o C) -
unless product specifications state otherwise. A surface should not be painted if its temperature is within 5o F of
the dew point or the relative humidity is above 85%." -- PPG Exterior Failures.
Paint should be applied at temperatures of 70o F, (21o C), ideally, plus or minus 20o F (12o C) -
unless product specifications state otherwise. A surface should not be painted if its temperature is within 5o F of
the dew point or the relative humidity is above 85%." -- PPG Exterior Failures.
The follow sections of this document form a checklist of building and site conditions leading to paint failures (such as peeling paint, blistering paint, chalking paint, cracking or alligatoring paint, or bleeding and stains through paint--terms defined below).
The focus is
on failures of painted wood surfaces on building exteriors but the paint failure diagnostic procedure can be
generalized to other surfaces inside and out.
The three key steps to successful painting are
1. Prepare the surface,
2. Prepare the surface,
3. Prepare the surface.
- DF (moderator) and a panel of experienced house painters at ASHI ca1988 Paint Failures Seminar.
Also see PAINT SURFACE PREPARATION.
But other than inadequate surface preparation, here are some other very common house painting mistakes:
26 Painting Mistakes That Mean a Bad Paint Job with a Short Life - causes of early paint job failure
- Removing only the obviously-loose paint,
leaving poorly-secured paint, leaving thick edges of old paint where blisters or old peeled paint were inadequately removed. - Using paint to try to fill gaps
where caulk should have been applied. - Using a spackling compound o
r filler intended for holes or cracks to "smooth" large building surface areas (skim coating) such as skim coating in order to apply paint over alligatored or poorly-adhered old paint. More thickness of fillers, paints, primers,or magic gluey coatings on the surface of un-sound paint are unlikely to work.
A case study of this foul-up is
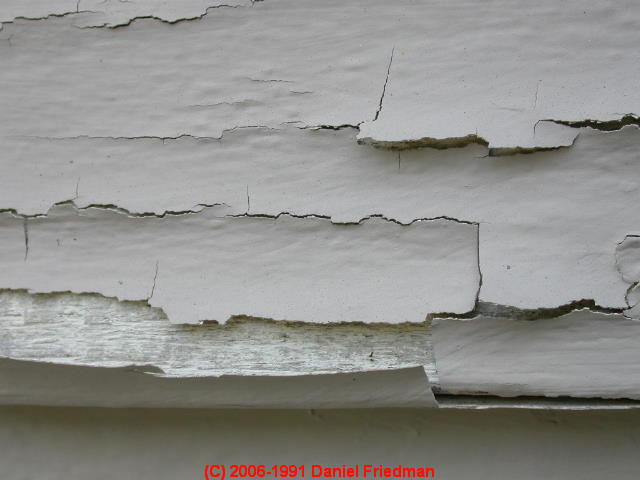
at PAINT FAILURE CASE PHOTOS, SITE. - Painting over thinly-cracked, or peeling painted surfaces
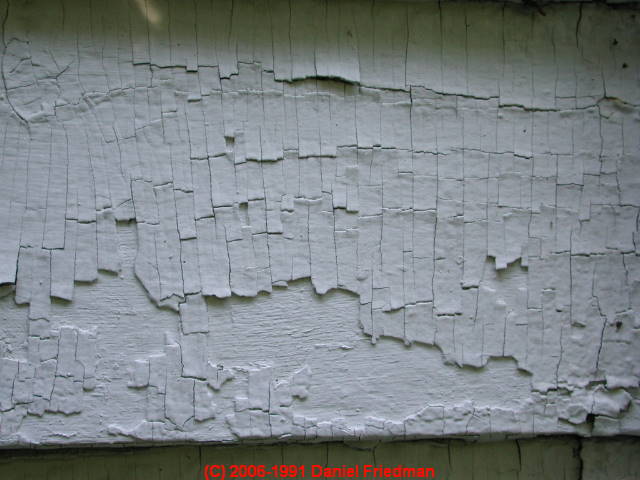
- Painting over old, existing thick, alligatored paint
- Painting over dusty or dirty surfaces.
See PAINT SURFACE PREPARATION
and for mold (or "mildew") or algae or other dark stained surfaces
see SIDING, WOOD CLEANERS, STAINS, PAINTS - Painting over mold (which many sources incorrectly call "mildew").
Painting over moldy surfaces without adequate cleaning and surface preparation such as power washing, disinfection, and light sanding, likely to lead to rapid mold re-growth in the paint and possibly to a paint adhesion failure, even if a paint "mildewcide" or fungicidal additive was used.
Even if you clean the surface, if you paint without correcting the cause of the stain (shade, trees, moisture) means those stains will recur, growing right through the new coating.
See SIDING, WOOD CLEANERS, STAINS, PAINTS for cleaning advice and for advice about choosing the right type of stain or paint.
Also see MILDEW ON BUILDING EXTERIORS?.
PARMETOL, [PDF] a wood preservativerecommended by the manufacturer was used as a fungicidal additive to paint on the Blue Poplar wood sculpture in Amsterdam, by sculptor artist Mari Shields [Website marishields.com ] whose huge wood tree sculptures and stunning works can be found at a number of locations listed at her website: http://www.marishields.com/[ - art conservation consult DF-artist MS 2010] - Painting over oily or other-contaminated surfaces
- Painting over high pH surfaces on stucco,
such as new stucco that has not adequately cured or stucco that needed additional wash and surface neutralization can cause white blooms of efflorescence and early paint failures;
See PAINT on STUCCO, FAILURES for details. - Painting over glossy hard paint
surfaces without adequate preparation such as light sanding or use of a chemical de-glosser, likely to lead to an adhesion failure. - Painting over mill-glazed surfaces such as trim or cedar or pine clapboards.
See PAINT SURFACE PREPARATION
Also see UN-FINISHED SIDING & TRIM - Painting over new masonry or new stucco that has not adequately cured.
- Painting over old oxidized chalky paint or stain
- Painting over rot or insect-damaged wood
- Painting over silicone caulk
(which in many cases is not paintable) - Painting in hot sun or dry wind:
painting in sun or wind can be a particular problem when painting new stucco surfaces.
See PAINTING in SUN or WIND
and
see PAINT on STUCCO, FAILURES for details of the problems this causes on stucco. - Painting the second coat before
the first paint coating has adequately dried - Painting without reading
the manufacturer's instructions for mixing, thinning, surface prep, temperature conditions, etc. - Soaking building cavities:
surface preparation for painting by improper use of a power washer: spraying "up" on a clapboard building forcing water into the building wall cavities, (risking hidden mold contamination or a moisture problem leading to paint failure), or spraying too-close to the building surface, causing gouging and undesirable loss of surface material - Surface washing using chemicals
or bleach without adequate wash-off of the chemical or cleaner itself - Painting on wet surfaces - failure to measure moisture levels or measuring only the "dry" areas but painting over other wet areas of a building. Also
See MOISTURE IMPACT ON PAINT - Painting over incompatible old paint - leading to poor adhesion, wrinkling, cracking, paint fall-off.
See INCOMPATIBLE PAINTS. - Painting with the wrong type of paint for the surface or environment, such as using an interior paint outside.
See INCOMPATIBLE PAINTS.
As we discuss
at PAINT FALURE, DIAGNOSIS, CURE, PREVENTION, our photo (left) shows a new paint job that failed before the job was even finished, on a historic property: the Justin Smith Morrill Homestead in Vermont.
While most of the paint failures on this building were due to use of improper paint or defective product, here we saw peeling and loss of adhesion over moldy wood.
A combination of failure to properly clean the wood surface before painting, painting under too hot or too wet conditions, and failure to use an effective primer and properly formulated top coat can conspire together to give a messy paint job failure on some projects.
As we discuss
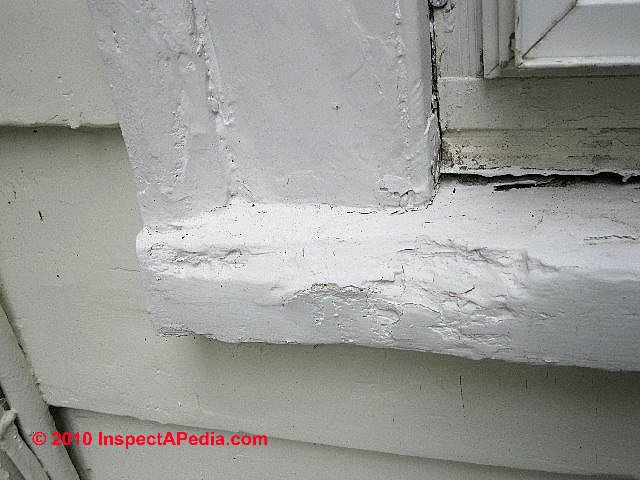
at PAINT FALURE, DIAGNOSIS, CURE, PREVENTION, our photo (left) shows a new paint job over old rot.
It looks as if the painter used a rather soft wood filler to try to repair the rotted window sill, and if you look closely (click the image to enlarge it) you'll see that the paint is already coming off - months after this costly renovation.
Where sill rot is limited, rather than replacing the entire sill or frame, we find it easier to cut out and replace a rotted window sill by piecing in a custom-cut repair segment, perhaps using treated wood (let it dry before painting) glued in place.
We have also made occasional use of wood restoration epoxy products such as those made by Abatron, Inc. to restore and save valuable trim that would be costly to replace. But slopping on some putty and paint, as was done here is not a durable job.

- Sanding with a grinder carelessly,
leaving sanding marks and gouges that ruin the surface and telegraph through the new paint job - may not reduce paint adhesion but may result in a cosmetic issue with the work.
As we discuss
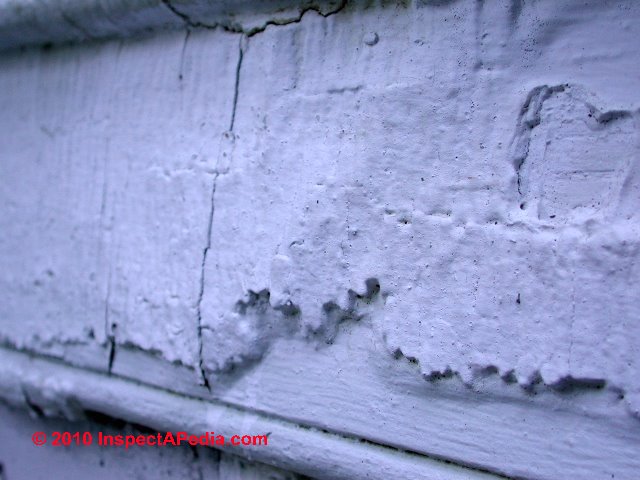
at PAINT FALURE, DIAGNOSIS, CURE, PREVENTION, our photo (left) shows the condition of a nearly brand-new paint job on an older home in Poughkeepsie, NY.
We noticed that old paint was left on the surface with no feathering of the edges of the few spots where paint had been removed or had fallen off before the paint job.
We noticed also that the painter tried to "seal" the loose paint by globbing on plenty of new paint - see that drip running down the trim board?
Finally, we noticed that this new paint job was already failing - the split in the paint visible in the lower portion of the photograph.
This paint job will have a shorter life than if the surface had been stripped, but then the painter (and owner who was selling his home) avoided a much
higher cost of stripping lead-containing paint from an older building.
- Painting too thick:
slopping on paint that runs down walls (see above and below) - Painting too thin:
over-thinning paint to extend its coverage dilutes the binders so that even if the new paint job looks great it may wear or fail prematurely
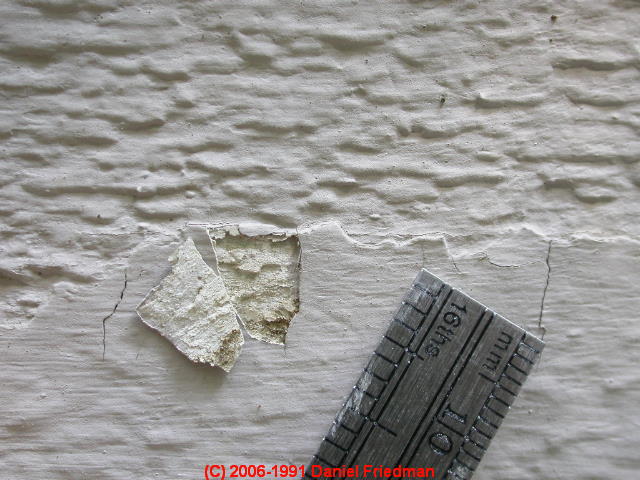
As we discuss at PAINT FALURE, DIAGNOSIS, CURE, PREVENTION, our photo (left) shows the result of many coats of paint on a home built in Dutchess County NY in the 1700's. This was some of the thickest paint we have found on a building exterior.
No tests for the presence of lead paint are necessary in a case like this - you know that lead paint is present. Y
ou also can see that this paint job is cracking and that paint has been falling off of the building between paint jobs that involved little or no surface preparation.
Painting Procedures & Paint Job Mistakes Research
- Ashurst, Nicola. Cleaning Historic Buildings. Vol. I: Substrates, Soiling and Investigations; Vol. II: Cleaning Materials and Processes . London: Donhead Publishing Ltd., 1994.
- Chase, Sara B., PAINTING HISTORIC INTERIORS [PDF] Preservation Brief No. 28, US NPS
Excerpts:
Researching the interior paint history is the key to a successful preservation or restoration project. The decorative detailing can be appreciated in this Puerto Rico Theater primarily because of appropriate paint color and paint placement.
This Brief is about historic interior paints and choosing new paints for historic interiors if repainting is necessary or desirable. It addresses a variety of materials and features: plaster walls and ceilings; wooden doors, molding, and trim; and metal items such as radiators and railings.
It provides background information about some of the types of paint which were used in the past, discusses the more common causes and effects of interior paint failure, and explains the principal factors guiding decisions about repainting, including what level of paint investigation may be appropriate.
Careful thought should be given to each interior paint project, depending on the history of the building and its painted surfaces.
Treatments may range from protecting extant decorative surfaces, to ordering custom made paint that replicates the original paint color, to using today's paint straight off the shelf and out of the can.
Finally, stripping old paints or applying new oil/alkyd paints poses serious health and safety concerns; the State Historic Preservation Officer should be contacted for current legal and technical information on removal, disposal, and health and safety precautions. - "Chemistry Leaves Its Mark on Graffiti." Chemical Marketing Reporter. November 14, 1993.
- Ehrenkrantz and Eckstut Architects, P.C. Technical Tips: Removing Graffiti . New York: New York Landmarks Conservancy, n.d. (1994).
- Graffiti Removal Manual. Providence, RI: Keep Providence Beautiful, September 1986.
- Grimmer, Anne E. DANGERS OF ABRASIVE CLEANING TO HISTORIC BUILDINGS [PDF] (1979) [Department of the Interior], Heritage Conservation and Recreation Service [Office of Archeology and Historic Preservation], Technical Preservation Services Division, 1979.
- Grimmer, Anne E. KEEPING IT CLEAN: REMOVING EXTERIOR DIRT, PAINT, STAINS AND GRAFFITI FROM HISTORIC MASONRY BUILDINGS [PDF] Washington, D.C.: Preservation Assistance Division, National Park Service, U.S. Department of the Interior, 1988. - retrieved 2022/10/08, original source: https://www.nps.gov/tps/how-to-preserve/preservedocs/Keeping-It-Clean.pdf
- O'Bright, Alan, PAINT REMOVAL from WOOD SIDING [PDF] (1986) Preservation Tech Notes, Exterior Woodwork No. 2., U.S. National Park Service, Department of Interior, Washington, D.C., - retrieved 2022/10/07, original source: https://www.nps.gov/tps/how-to-preserve/tech-notes/Tech-Notes-Exterior02.pdf
Painting the Harry S. Truman home in Independence Missouri.
Excerpt:
Examination of the exterior paint finishes in areas directly exposed to the elements revealed severe paint film failure, including cross-grain cracking, alligatoring, and peeling ....
Even in places shielded by porches and cornices, moderate paint film failure had occurred.
A number of exposed areas, including soffits, fasciae, and siding, experienced near total paint failure due to recurrent moisture penetration from deteriorated roofs and built-in gutters. - Park, Sharon C., AIA, PROPER PAINTING & SURFACE PREPARATION [PDF] (1986) Preservation Tech Notes, Exterior Woodwork No. 1., U.S. National Park Service, Department of Interior, Washington, D.C., - retrieved 2022/10/07, original source: https://www.nps.gov/tps/how-to-preserve/tech-notes/Tech-Notes-Exterior01.pdf
Excerpt from an investigation of the paint condition on an historic 1881 building at Galludet College:
Paint peeling off the wooden surface indicated that the prime coat had not adequately bonded to the wood (see figure 2).
A close inspection using a "cherry picker" revealed three areas of serious deterioration.
First it was apparent that moisture was getting behind the "half-timbering" where it covered the tongue and groove siding, and was rotting the wood.
Secondly, the joint where the recessed tongue and groove siding abutted the heavy timber posts and lintels was equally difficult to keep sealed once the paint had failed.
And finally, extensive dry rot had occurred at the intersection of the structural column and sill plate (see figure 3).
The extensive paint failure, together with the deteriorated wood, indicated a serious moisture problem. - Sheetz, Ron & Charles Fisher, REDUCING VISIBLE and ULTRAVIOLET LIGHT DAMAGE to INTERIOR WOOD FINISHES [PDF] (1990) Preservation Tech Notes, U.S. NPS, Museum Collections No. 2, retrieved 2022/10/11, original source: https://www.nps.gov/tps/how-to-preserve/tech-notes/Tech-Notes-Museum02.pdf
- Weaver, Martin E., REMOVING GRAFFITI from HISTORIC MASONRY [PDF] (1995) Preservation Brief No. 38, U.S. National Park Service, Technical Preservation Services, retrieved 2022/10/08 original source: https://www.nps.gov/tps/how-to-preserve/briefs/38-remove-graffiti.htm
- Weeks, Kay D., & David W. Look, AIA, EXTERIOR PAINT PROBLEMS on HISTORIC WOODWORK [PDF] Preservation Brief No. 10, U.S. National Park Service, Technical Preservation Services, retrieved 2022/10/02 original source: https://www.nps.gov/tps/how-to-preserve/briefs/10-paint-problems.htm
Excerpts:
A cautionary approach to paint removal is included in the guidelines to the Secretary of the Interior Standards for Rehabilitation. Removing paints down to bare wood surfaces using harsh methods can permanently damage those surfaces; therefore such methods are not recommended.
Also, total removal obliterates evidence of the historical paints and their sequence and architectural context. T
his Brief expands on that advice for the architect, building manager, contractor, or homeowner by identifying and describing common types of paint surface conditions and failures, then recommending appropriate treatments for preparing exterior wood surfaces for repainting to assure the best adhesion and greatest durability of the new paint.
Although the Brief focuses on responsible methods of "paint removal," several paint surface conditions will be described which do not require any paint removal, and still others which can be successfully handled by limited paint removal. In all cases, the information is intended to address the concerns related to exterior wood.
It will also be generally assumed that, because houses built before 1950 involve one or more layers of lead-based paint, the majority of conditions warranting paint removal will mean dealing with this toxic substance along with the dangers of the paint removal tools and chemical strippers themselves.
...
Reader Comments, Questions & Answers About The Article Above
Below you will find questions and answers previously posted on this page at its page bottom reader comment box.
Reader Q&A - also see RECOMMENDED ARTICLES & FAQs
On 2016-08-08 by (mod) - paint surface is actually oxidized
If the paint surface is actually oxidized (you can rub your finger along it and come away with pigment) then that oxide needs to be removed to get good adhesion of subsequent coats.
Same for dust, dirt, etc.
On 2016-08-08 by heidi
My painter has left the exterior of our house unprimed (a few spots primed) for over 3-4 weeks in high heat and humidity. He says all he needs to do is do a "gentle wash" before starting back up.
Shouldn't he be doing a light sand too? Also he has left the paints which were opened outside in this same heat. Are they still usable?
On 2015-08-03 by Candace
Is there a difference in cedar clapboard gouge patching when you are using exterior latex stain versus paint?
On 2015-08-03 by Anonymous
Thank you Dan. One more question. I have a can of Dap Vinyl Spackling but I'm not sure if it's the best thing to use since it dissolves in water which to me doesn't seem very weatherproof. What weatherproof filler would you use?
On 2015-08-03 by (mod) -
An exterrior-use weatherproof filler can work on surfaces that are to be painted, provided that the surface to which it is applied is sound. Fill, sand, prime, and paint a test area to see how you like it.
On 2015-08-03 by Jarie
Hi I have an old house with wood clapboard and I'm in the process of scraping. There are many layers of paint and the chips are large, deep and down to bare wood. I'd like to know whether I should just scrape, sand, prime and paint or should I use a spackling compound to even out the surface at least in areas of high visibility?
On 2015-07-29 by Candace
Thank you, Daniel.
If many clapboards were damaged, replacing them will be quite expensive! We have bidders who will attest there was no clapboard damage when they bid the job.
My question is, should we ask that in order to make it right the contractor have the west side thoroughly sanded (to remove "cosmetic" putty and to detect damaged clapboards? And then, request damaged clapboards be replaced by the company who damaged them (they bear the cost) and repaint where clapboards were sanded and replaced?
On 2015-07-29 by (mod) - blistering siding
Candace,
This sounds like a cosmetic snafu and one can but respect the company that agrees to "make it right".
Typically puttying up gouges looks like, well, puttied up gouges. The putty area will not age and weather as will the surrounding wood so color differences and texture differences may be quite noticeable unless the siding is painted or covered with a very opaque dense stain.
You may end up having to replace badly damaged siding.
I suggest allowing the company to try whatever cosmetic repairs they want, with the understanding that
1. if the repair is ugly it's not acceptable
2. you get a year warranty to address differences in weathering
On 2015-07-28 by Candace Fitzpatrick
Painter used power washer improperly and gouged some clapboards. In addition, inadequate prep and/or gouging was done on west side of house where most of the peeling was evident.
The siding stain was applied. After we complained (about the areas we could see from the ground) the company sent someone who puttied the majority of the west of the house over the already sprayed siding stain. He then hand brushed that side of the house.
After the job was "completed" we could see blistering @ the gouged/puttied boards we can see at ground level on the south side of the house. The painter has agreed to replace those few clapboards
. We have no way to assess the west side of the house above ground level and are concerned. The company agreed to "make it right." Any suggestions about what we should ask them to do? This has been a miserable experience.
On 2015-07-03 by (mod) -
Sounds like a rush paint job by someone who doesn't know about fast-setting hole filling compounds - or who didn't have any on the truck.
Depending on what was used to fill holes and its compatability with the paint the filled spots may not look so hot when the paint had dried - slower drying, these areas may form depressions if they srhink, or crack - depending on the filler used.
And if the filler was water based over which an alkyd paint was applied there's a risk of moisture blisters in those areas. If you painted-over with latex or acrylic that may not be a problem.
In terms of an indoor mold hazard what you describe is not significant.
Use the CONTACT link if you like to send us photos of the areas and details about what was used to fill the depressions and what kind of paint was applied and we can comment further.
Thanks for the query.
On 2015-07-03 by anonymous
Painter filled quarter and dime sized holes/dents in interior walls with wood filler and painted over. Some of the areas are still tacky, others are dry to touch but squishy. Can this mold over time? What should be done? Thanks!
Question: how to remove mold from a wood tree sculpture & prevent mold re-growth?
This may be unusual, but I'm a sculptor. Part of my output is expressed using lime wood branches, clippings. I've noticed that mold has appreared from the cut ends of these branches and cuttings. Can I retard this or reradicate it using a spray/chemical? I'd appreciate any advice or someone to whom reference can be made. Yours sincerely, I.C. 6/8/2013
Reply:
Thank you for the interesting question about mold growth on wood branches used in a sculpture - it helps us realize where we need to work on making our text more clear or more complete.
A competent onsite inspection by an expert usually finds additional clues that help accurately diagnose a problem with mold growth on art and artifacts as well as diagnosing the probable cause of that mold;
but I can say that the species of wood, in this case limewood or perhaps wood from the Linden tree. Indeed limewood has a long history of use in artworks, having been used for the carving of painted icons, apparently because of its resistance to cracking and the ease of sanding it smooth.[15]
I don't have a full picture of just what you're making or what mold you're dealing with nor its extent; so my advice is a bit general.
In most simple terms the proper course of action is to
1. remove the problem mold
- clean the surface; depending on the sensitivity of your wood and sculpture, simple household cleaner would perhaps suffice; for cosmetic reasons you may need to use a more aggressive or oxidizing cleaner, even bleach - but obviously you won't do that if your work would itself be damaged;
If your work is sensitive or fragile you'll want to chat with an art conservator for some specific recommendations; often we can find success using gentle means to clean and remove stains from wood. (I am an aerobiologist interested in mold in artwork but not an expert conservator, as you'll read at some of the references in links I include below);
2. protect the wood against new mold growth
- if your project permits, when the wood is thoroughly dry, if you seal it to resist moisture uptake it will be more mold resistant.
PARMETOL [PDF] a wood preservativerecommended by the manufacturer was used as a fungicidal additive to paint on the Blue Poplar wood sculpture in Amsterdam, by artist Mari Shields [Website marishields.com ] [per our discussion in 2010] I'm not sure it was entirely successful. [6]
Watch out; if you don't clean adequately, or if you seal damp wood, or if your sealant is exposed to weather, there is a risk of new mold growth beneath the sealant - a condition that then could be harder to clean; I discuss this problem
at PAINTING MISTAKES - you are on this page.
3. identify & fix the cause of the mold growth - such as wood sculpture in a damp or wet area or if outdoors, in a shaded wet area. Those conditions need to be addresses too if you expect to avoid a recurrent mold problem on your work.
You may be surprised as well but this is not the first such request I've received from a sculptor on exactly this topic; wood is a natural meal for many species of mold. If the wood is wet and thus absorbs water the risk of mold growth is significant.
Mari Shields a sculptor in Amsterdam was faced with similar problems of mold growth on a large wooden tree sculpture that was exhibited outdoors; some of her work can be see at http://www.marishields.com/ - and she may have other suggestions for you.
These articles may also be of interest to you
- ARTWORK MOLD CONTAMINATION
- ART CONSERVATION - Cultural Heritage and Aerobiology - a useful text on the topic
- Blue Poplar wood sculpture in Amsterdam - this link leaves the InspectgApedia website
- BOOK / DOCUMENT MOLD & WATER DAMAGE RESTORATION - includes gentle methods that might be helpful in your case
- Parmetol [PDF ]
Please keep me posted on how things progress, and send along photos if you can. Such added details can help us understand what's happening and often permit some useful further comment. What we both learn may help me help someone else./P>
Question: paint job preparation choices: power washing or not?
(Mar 12, 2015) Rita said:
My 100 yr old house has been painted three times in the last 25 years. It needs another painting due to peeling, dirt and mold. The two companies who bid have different approaches. One will scrape then power wash and my concern is lead contamination. T
he other will scrape then paint over the mold and dirt. Both say the other's approach is wrong. What do I do?
Reply: taking care not to spread lead dust about is important.
Rita I agree that taking care not to spread lead dust about is important.
I'm unclear why either approach is innately "wrong" - both are removing material.
Perhaps the concern and question to ask is if power washing, how will the removed material be contained? Power washing, because it's wet, makes lots of overspray that must be contained but yet produces far less airborne dust.
Generally the more throrough the surface preparation the better will be the paint job. Power washing removes additinal materials and dust that may be left behind by just scraping the surface.
On the other hand, improperly done, power washing can blow water into building wall cavities creating a mold problem or damaging interior surfaces or even electrical wiring.
And if the painters don't wait for the washed surfaces to be fully dry before painting the new paint job will fail promptly. That might be why one of your contractors doesn't power wash. Or it may simply be that they don't own a power washer.
I'd like to power wash but with the proper precautions and checks for surface dryness before re-painting.
...
Continue reading at BAD SURFACE PREP or select a topic from the closely-related articles below, or see the complete ARTICLE INDEX.
Or see these
Recommended Articles
- GRAFFITI REMOVAL FROM BRICK CONCRETE STONE SURFACES
- ODOR DIAGNOSIS CHECKLIST, PROCEDURE - Odors from paints and low-VOC or zero-VOC paints
- PAINT & STAIN GUIDE, EXTERIOR for a guide to the selection and proper application of paints and stains on exterior wood surfaces.
- PAINT FAILURE CASE PHOTOS, SITE
- PAINT FAILURE CASE PHOTOS, LAB
- PAINT FAILURE, DIAGNOSIS, CURE, PREVENTION - home
- PAINT FAILURE DICTIONARY - illustrated list of all types of paint failures
- PAINT SURFACE PREPARATION - description of proper painting procedure
- PAINTING MISTAKES
- SIDING, WOOD CLEANERS, STAINS, PAINTS how to remove stains on siding & how to choose the proper paint or stain coating
- VOCs VOLATILE ORGANIC COMPOUNDS
Suggested citation for this web page
PAINTING MISTAKES at InspectApedia.com - online encyclopedia of building & environmental inspection, testing, diagnosis, repair, & problem prevention advice.
Or see this
INDEX to RELATED ARTICLES: ARTICLE INDEX to PAINTS & STAINS & FAILURES
Or use the SEARCH BOX found below to Ask a Question or Search InspectApedia
Ask a Question or Search InspectApedia
Try the search box just below, or if you prefer, post a question or comment in the Comments box below and we will respond promptly.
Search the InspectApedia website
Note: appearance of your Comment below may be delayed: if your comment contains an image, photograph, web link, or text that looks to the software as if it might be a web link, your posting will appear after it has been approved by a moderator. Apologies for the delay.
Only one image can be added per comment but you can post as many comments, and therefore images, as you like.
You will not receive a notification when a response to your question has been posted.
Please bookmark this page to make it easy for you to check back for our response.
IF above you see "Comment Form is loading comments..." then COMMENT BOX - countable.ca / bawkbox.com IS NOT WORKING.
In any case you are welcome to send an email directly to us at InspectApedia.com at editor@inspectApedia.com
We'll reply to you directly. Please help us help you by noting, in your email, the URL of the InspectApedia page where you wanted to comment.
Citations & References
In addition to any citations in the article above, a full list is available on request.
- [1] Abatron EpoxyWood Repair/Restoration 5501 - 95th Avenue, Kenosha, WI 53144 USA Tel: (262) 653-2000 Fax: (262) 653-2019, For orders: (800) 445-1754 Abatron provides a wide range of wood & building restoration epoxy products including a low-viscosity system that penetrates and solidifies rotted wood and a thicker wood repair putty type epoxy.
- [2] Paint and Surface Coatings, Theory and Practice, R. Lambourne & T.A. Strivens, Ed., Woodhead Publishing Ltd., William Andrew Publishing, 1999 ISBN 1-85573-348 X & 1-884207-73-1 [This is perhaps the leading reference on modern paints and coatings, but is a difficult text to obtain, and is a bit short on field investigation methods - DF]
- [3] Dampness in buildings, Diagnosis, Treatment, Instruments, T.A. Oxley & E.G. Gobert, ISBN 0-408-01463-6, Butterworths, 1983-1987 [General building science-DF]
- [4] "Moisture Control in buildings: Putting Building Science in Green Building," Alex Wilson, Environmental Building News, Vol. 12. No. 5. [Good tutorial, "Moisture 101" outlining the physics of moisture movement in buildings and a good but incomplete list of general suggestions for moisture control - inadequate attention given to exterior conditions such as roof and surface drainage defects which are among the most-common sources of building moisture and water entry.--DJF]
- [5] PAINT FAILURE PROBLEMS AND THEIR CURE [PDF] Daniel L. Cassens and William C. Feist, National Forest Products Laboratory
- [6] Parmetol, a wood preservativerecommended by the manufacturer was used as a fungicidal additive to paint on the Blue Poplar wood sculpture in Amsterdam, by artist Mari Shields [Website marishields.com ] [ - art conservation consult DJF-artist MS 2010]
- [7] WHY HOUSE PAINT FAILS, [PDF] Mark Knaebe, US FPL, web search August 2010, original source: http://www.fpl.fs.fed.us/documnts/finlines/knaeb95a.pdf
- [8] WHY PAINT JOBS FAIL [on file as /exterior/Why_Paint_Fails_Bennett.pdf ] - , web search, August 2010, original source: http://www.bennette.com/pdf/whyfail.pdf, four pages describing alligatoring, bleeding, blistering, etc. Bennette Corporation, P.O. Box 9088, Hampton, VA 23670, Phone: 757-838-7777, Toll Free: 800-869-2929
Fax: 757-827-0529, Email: info@bennette.com, Website: www.bennette.com [Dead link 2019/12/13] quoting:
Bennette Paint Manufacturing Company, Inc. is a Virginia corporation which was founded in Newport News, Virginia in 1966 by James P. Bennette, Sr. In 1984, Mr Bennette sold the company to his employees through an Employee Stock Ownership Plan (ESOP). Today the company has a modern manufacturing plant, research laboratory, central warehouse and general offices located at 401 Industry Drive, Hampton, Virginia. From these facilities the company is able to supply quality paints and coatings through its company owned distribution and service centers and authorized dealers located in Virginia, North Carolina and South Carolina. Bennette Paint Manufacturing Company, Inc. also owns and operates Bennette Equipment Company which specializes in the sale, service, and rental of paint spraying and pressure cleaning equipment. - [9] Supplemental Guidelines for Removing Paint From Interior and Exterior Wood Surfaces [on file as "/exterior/Paint_Removal_USGSA.pdf ] - , US General Services Administration, Historical Preservation Technical Procedures, 06400-02, web search August 2010, original source: //w3.gsa.gov/web/p/Hptp.nsf/0/40aff5a115b6a9e5852565c50054b4f4?OpenDocument
- [10] "Common Paint Problems," parkerpaint.com/Common%20Paint%20Problems.htmlparkerpaint.com/Common%20Paint%20Problems.html illustrates common paint failures - though their images and text appear to have been stolen from PPG -whose own original page www.ppg.com/getpaint/etraining/solver/exterior.html was DOA as of 2019/12/13 which catalogs paint failures and causes
- [11] "Paint problem solver" from Lowes unfortunately abandoned and removed from their site as of 2019/12/13
- [12] MILL GLAZE, MYTH or REALITY [PDF], R. Sam Williams, Mark Knaebe, US FPL, retrieved 2019/12/13 original source: fpl.fs.fed.us/documnts/finlines/willi01a.pdf
- [13] paintlab.com is a lab offering paint chip failure analysis
- [14] PPG Exterior Failures http://www.ppg.com/getpaint/etraining/solver/exterior.html
- [15] Wikipedia Web: https://www.wikipedia.org/ provided background information about some topics discussed at this website provided this citation is also found in the same article along with a " retrieved on" date. NOTE: because Wikipedia entries are fluid and can be amended in real time, we cite the retrieval date of Wikipedia citations and we do not assert that the information found there is necessarily authoritative. "Tilia" [Linden or limewood or lime wood] usage and history] Wikipedia retrieved 6/8/2013 original source http://en.wikipedia.org/wiki/Tilia
- Analysis of Modern Paints, Thomas J.S. Learner, Research in Conservation, 2004 ISBN 0-89236-779-2 [Chemistry of modern paints, overview of analytical methods, pyrolysis-gas chromatography signatures of basic modern paints and their constituents, Fourier transform infrared spectroscopy for paint analysis, direct temperature-resolved mass spectrometry, and analysis in practice - technical reference useful for forensic paint science, focused on art works -DF]
- Art, Biology, and Conservation: Biodeterioration in Works of Art, Robert J. Koestler et als. Eds., Metropolitan Museum of Art, 2003, ISBN 1-58839-107-8
- Building Pathology, Deterioration, Diagnostics, and Intervention, Samuel Y. Harris, P.E., AIA, Esq., ISBN 0-471-33172-4, John Wiley & Sons, 2001 [General building science-DF - ** Particularly useful text **
- Dampness in buildings, Diagnosis, Treatment, Instruments, T.A. Oxley & E.G. Gobert, ISBN 0-408-01463-6, Butterworths, 1983-1987 [General building science-DF]
- Paint and Surface Coatings, Theory and Practice, R. Lambourne & T.A. Strivens, Ed., Woodhead Publishing Ltd., William Andrew Publishing, 1999 ISBN 1-85573-348 X & 1-884207-73-1 [This is perhaps the leading reference on modern paints and coatings, but is a difficult text to obtain, and is a bit short on field investigation methods - DF]
- Paint Handbook: testing, selection, application, troubleshooting, surface preparation, etc., Guy E. Weismantel, Ed., McGraw Hill Book Company, 1981, ISBN-10: 0070690618, ISBN-13: 978-0070690615, [Excellent but a bit obsolete paint theory and practice, also a bit light on field investigation methods, out of print, available used-DF]
How to select and apply the right paint or coating for any surface. The first major reference to help you choose the correct paint or other finish to do the job best on a particular surface exposed to a particular environment. Experts in the field give full advice on testing surface preparation, application, corrosion prevention, and troubleshooting. The handbook covers wood, metal, composites, and masonry, as well as marine applications and roof coatings. A ``must'' working tool for contractors, architects, engineers, specification writers, and paint dealers. - Paint and Surface Coatings, Theory and Practice, R. Lambourne & T.A. Strivens, Ed., Woodhead Publishing Ltd., William Andrew Publishing, 1999 ISBN 1-85573-348 X & 1-884207-73-1 [This is perhaps the leading reference on modern paints and coatings, but is a difficult text to obtain, and is a bit short on field investigation methods - DF]
Provides a comprehensive reference source for all those in the paint industry, paint manufacturers and raw materials suppliers, undergraduate and postgraduate students, and industrial paint users. R. Lambourne was in the Research Department at ICI Paints Division and the Industrial Colloid Advisory Group, Birstol University, UK. - Seeing Through Paintings, Physical Examination in Art Historical Studies, Andrea Kirsh, Rustin S. Levenson, Materials in Fine Arts, 2000 ISBN 99-051835 [ forensic science, technical reference, focused on art works - DF]
- Sealants, Durability of Building Sealants (RILEM Proceedings), J.C. Beech, A.T. Wolf, Spon Press; illustrated edition (1995), ISBN-10: 0419210709, ISBN-13: 978-0419210702
This book presents the papers given at the RILEM Seminar held at the Building Research Establishment, Garston, UK in October 1994. The book provides an opportunity for researchers to review up-to-date progress towards the achievement of the objectives of the standardisation of laboratory techniques of sealants in the variety of service conditions to which they are exposed. - Soiling and Cleaning of Building Facades (RILEM Report), L.G.W. Verhoef (Editor), Routledge; 1 edition (November 3, 1988), ISBN-10: 0412306700, USBN-13: 978-0412306709
The report of a comprehensive investigation by RILEM which examines all aspects of the cleaning of facades, subject to soiling by both biological and non-biological agencies. The contributors are international authorities working in this field giving essential advice to all those who need to know how to approach the problems connected with the soiling and cleaning of building facades. - Staining, Prevention of Premature Staining in New buildings, Phil Parnham, Taylor & Francis; 1996, ISBN-10: 0419171304, ISBN-13: 978-0419171300
The appearance of ugly staining early in a buildings life, ruins an otherwise pleasing appearance, tarnishes the image of the owners and gives rise to costly refurbishment works. In this book Phil Parnham raises a number of questions that should be considered whenever a new building is being designed or built. These are: * why has staining become so prominent; * what causes premature staining; which parts of new buildings are likely to be affected; * how can it be avoided? By using a number of highly illustrated case studies, the author answers these questions and ends by suggesting measures that should be taken by all design and construction professionals to prevent premature staining. - "Moisture Control in buildings: Putting Building Science in Green Building," Alex Wilson, Environmental Building News, Vol. 12. No. 5. [Good tutorial, "Moisture 101" outlining the physics of moisture movement in buildings and a good but incomplete list of general suggestions for moisture control - inadequate attention given to exterior conditions such as roof and surface drainage defects which are among the most-common sources of building moisture and water entry.--DJF]
- In addition to citations & references found in this article, see the research citations given at the end of the related articles found at our suggested
CONTINUE READING or RECOMMENDED ARTICLES.
Paint & Fiber Forensic Analysis, Diagnosis, Conservation
- Analysis of Modern Paints, Thomas J.S. Learner, Research in Conservation, 2004 ISBN 0-89236-779-2
[Chemistry of modern paints, overview of analytical methods, pyrolysis-gas chromatography signatures of basic modern paints and their constituents, Fourier transform infrared spectroscopy for paint analysis, direct temperature-resolved mass spectrometry, and analysis in practice - technical reference useful for forensic paint science, focused on art works. One of our most useful texts in forensic investigation of paint failures and paint problem diagnosis - for building investigators as well as art conservators. -DF]
Although oil remains an important binding medium in artists' paints, today's synthetic resins are being used with increasing frequency. This was true during much of the twentieth century, when artists such as David Alfaro Siqueiros, Jackson Pollock, and Pablo Picasso used commercial or industrial paints based on synthetic resins. The growing popularity of synthetic resin materials carries important implications for the conservation, preservation, and treatment of modern art.
This volume outlines the techniques that are currently employed to analyze the synthetic resins used in modern painting materials, such as pyrolysis-gas chromatography-mass spectrometry, Fourier Transform infrared spectroscopy, and direct temperature-resolved mass spectrometry. For each technique, results are given for standard samples of the principal classes of synthetic binding media, various pigments and extenders, tube paint formulations, and microscopic paint fragments taken from actual works of art.
Primarily intended for conservation scientists, conservators, researchers, and students of conservation, this book will also be of interest to other museum professionals. - Art, Biology, and Conservation: Biodeterioration in Works of Art, Robert J. Koestler et als. Eds., Metropolitan Museum of Art, 2003, ISBN 1-58839-107-8
Series of excellent research and advice articles on art work conservation of special use to conservators and also to building, artifact, and art forensic investigators. MOMA. - DF
Despite the perception that artworks are timeless and unchanging, they are actually subject to biological attack from a variety of sources—from bacteria to fungi to insects. This groundbreaking volume, which publishes the proceedings of a conference held at The Metropolitan Museum of Art in 2002, explores how the development of these organisms can be arrested while preserving both the work of art and the health of the conservator.
The richly illustrated text, containing the writings of over 40 scientists and conservators, is divided into sections on stone and mural paintings, paper, textiles, wood and archaeological materials, treatment and prevention, and special topics. The artworks and cultural properties discussed include, among many others, Paleolithic cave paintings, Tiffany drawings, huts built by early Antarctic explorers, and a collection of toothbrushes taken from Auschwitz victims. -- Robert J. Koestler is a research scientist at The Metropolitan Museum of Art; Victoria H. Koestler is a freelance writer and editor; A. Elena Charola is a freelance conservation scientist; and Fernando E. Nieto-Fernandez is a biologist at Old Westbury College, New York. - Cultural Heritage and Aerobiology, Methods and Measurement Techniques for Biodeterioration Monitoring, Paolo Mandrioli, Guilia Caneva, and Cristina Sabbioni, Eds., Kluwer Academic Publishers, 2003 ISBN 1-4020-1622-0
This is a translated and revised edition of the original Italian version. This book is the first to give a general overview of the application of aerobiology (the science that studies the biological components of the atmosphere) to the conservation of our cultural heritage. Aerobiological monitoring makes it possible to estimate the risks of degradation of artefacts of historical or artistic importance by airborne microorganisms (airborne spores and vegetative structures) according to the types of materials forming the artefacts, to the conditions of the microclimate and to the type of environmental pollution, thus enabling the planning of preventive or reparative intervention. Among the book's main features are: + Aspects of the biodeterioration of different materials (paper, wood, fabrics, parchment, leather, stone, glass, metals, plastic, etc.). + Methods for measuring environmental parameters, both physical (microclimatic) and chemical (pollutants). + Methods and techniques of aerobiological monitoring. + Specific problems concerning the different types of environments. Audience: The subject is thoroughly explored, thus supplying a useful tool to those who are in charge of the conservation of our cultural heritage (libraries, archives, museums, churches, hypogea, monuments, archaeological sites, etc.).
See our book review of this reference. - Exterior Paint Problems on Historic Woodwork [Copy on file as /exterior/Preservation_Brief_10_ Exterior_Paint_Problems_on_Historic_Woodwork.pdf ] - , Kay D. Weeks and David W. Look, AIA, U.S. Department of the Interior, National Parks Service Preservation Brief No. 10. Web search 02/01/2011, original source: http://www.nps.gov/hps/tps/briefs/brief10.htm
- Microscopy of Textile Fibres (Microscopy Handbooks, 32), P H Greaves, Garland Science; 1 edition (January 1, 1995), ISBN-10: 1872748244, ISBN-13: 978-1872748245
[We ordered our copy from the British publisher - now it's on Amazon.
These 3 fiber books have been essential forensic lab references supplementing our McCrone Research courses on forensic microscopy; also of use to textile conservators. - DF
An up-to-date practical guide to the properties and characteristics of textile fibres, with clear advice on sampling, specimen preparation and examination procedures. - Microscopy of Animal Textile Fibres, Alex Blakey Wildm, 1954
Hard to obtain, useful for forensic microscopy - DF - Modern Paints Uncovered (Getty Conservation Institute Symposium Proceedings), Thomas Learner, Getty Publications (March 1, 2008),ISBN-10: 089236906X, ISBN-13: 978-0892369065
Over the past seventy years, a staggering array of new pigments and binders has been developed and used in the production of paint, and twentieth-century artists readily applied these materials to their canvases. Paints intended for houses, boats, cars, and other industrial applications frequently turn up in modern art collections, posing new challenges for paintings conservators.
This volume presents the papers and posters from "Modern Paints Uncovered," a symposium organized by the Getty Conservation Institute, Tate, and the National Gallery of Art and held at Tate Modern, London, in May 2006. Professionals from around the world shared the results of research on paints that have been available to artists since 1930--the date that synthetic materials began to significantly impact the paint industry.
Modern Paints Uncovered showcases the varied strands of cutting-edge research into the conservation of contemporary painted surfaces. These include paint properties and surface characteristics, analysis and identification - Paint Handbook: testing, selection, application, troubleshooting, surface preparation, etc., Guy E. Weismantel, Ed., McGraw Hill Book Company, 1981
[Excellent but a bit obsolete paint theory and practice, also a bit light on field investigation methods, out of print, available used. Very useful reference for paint testing, selection, and paint failure diagnosis - focus on non-artistic use of paints such as on buildings, roofs, marine coatings. -DF]
How to select and apply the right paint or coating for any surface. The first major reference to help you choose the correct paint or other finish to do the job best on a particular surface exposed to a particular environment. Experts in the field give full advice on testing surface preparation, application, corrosion prevention, and troubleshooting. The handbook covers wood, metal, composites, and masonry, as well as marine applications and roof coatings. A ``must'' working tool for contractors, architects, engineers, specification writers, and paint dealers - Paint Magic, Jocasta Innes, Frances Lincoln; 4th edition (August 17, 2006), ISBN-10: 071122272X, ISBN-13: 978-0711222724 - Paint advice for home decoration, including painting techniques such as antiquing, bambooing, bleaching, color washing, combing, decorative painting, dragging, dyeing, gliding, graining, japanning, lacquering, lining, marbling, porphyry, rag-rolling, sponging, staining, stencilling, stippling, tortoiseshelling, trompe l'oeil, and vinegar painting - DF
- Paint and Surface Coatings, Theory and Practice, R. Lambourne & T.A. Strivens, Ed., Woodhead Publishing Ltd., William Andrew Publishing, 1999 ISBN 1-85573-348 X & 1-884207-73-1
[ This is perhaps the leading reference on modern paints and coatings, but is a difficult text to obtain, and is a bit short on field investigation methods. Encyclopedic reference on the composition, production, properties, use, and testing of paints and coatings - DF]
Provides a comprehensive reference source for all those in the paint industry, paint manufacturers and raw materials suppliers, undergraduate and postgraduate students, and industrial paint users. - Plant Biology for Cultural Heritage: Biodeterioration and Conservation, Giulia Caneva, Maria Pia Nugari, Ornella Salvadori, Getty Publications (January 15, 2009), ISBN-10: 0892369396, ISBN-13: 978-0892369393
- Quality Assessment of Textile, Karl Marshall, Kindle Edition, Springer; 2nd edition (October 31, 1993, ASIN: B00193F3BI
The damage which can occur in certain fibrous raw materials or during the production and storage of textiles is expertly described in this book by Karl Mahall. He particularly shows how to find concealed textile defects by using microscopic analysis. The examples represent typical cases that the author encountered during forty years of experience in the industry. Well-illustrated with impressive photographs, they invite you to follow each step and learn to apply the same methodology in practice. This book is especially useful as a manual for both chemical and textile engineers and quality engineers. It is also a useful reference for others in the textile industry in general. - Seeing Through Paintings, Physical Examination in Art Historical Studies, Andrea Kirsh, Rustin S. Levenson, Materials in Fine Arts, 2000 ISBN 99-051835 [ forensic science, technical reference, focused on art works - DF]
One of the best texts available for forensic investigation of the history, authenticity, and condition of paintings - DF - Building Pathology, Deterioration, Diagnostics, and Intervention, Samuel Y. Harris, P.E., AIA, Esq., ISBN 0-471-33172-4, John Wiley & Sons, 2001 [General building science-DF - ** Particularly useful text **
- Dampness in buildings, Diagnosis, Treatment, Instruments, T.A. Oxley & E.G. Gobert, ISBN 0-408-01463-6, Butterworths, 1983-1987 [General building science-DF]
- "Moisture Control in buildings: Putting Building Science in Green Building," Alex Wilson, Environmental Building News, Vol. 12. No. 5. [Good tutorial, "Moisture 101" outlining the physics of moisture movement in buildings and a good but incomplete list of general suggestions for moisture control - inadequate attention given to exterior conditions such as roof and surface drainage defects which are among the most-common sources of building moisture and water entry.--DJF]
- In addition to citations & references found in this article, see the research citations given at the end of the related articles found at our suggested
CONTINUE READING or RECOMMENDED ARTICLES.
- Carson, Dunlop & Associates Ltd., 120 Carlton Street Suite 407, Toronto ON M5A 4K2. Tel: (416) 964-9415 1-800-268-7070 Email: info@carsondunlop.com. Alan Carson is a past president of ASHI, the American Society of Home Inspectors.
Thanks to Alan Carson and Bob Dunlop, for permission for InspectAPedia to use text excerpts from The HOME REFERENCE BOOK - the Encyclopedia of Homes and to use illustrations from The ILLUSTRATED HOME .
Carson Dunlop Associates provides extensive home inspection education and report writing material. In gratitude we provide links to tsome Carson Dunlop Associates products and services.
 |
HOME | ABOUT | ASK a QUESTION | CONTACT | CONTENT USE POLICY | DESCRIPTION | POLICIES | PRIVACY | |
| © 2026 - 1985 Publisher InspectApedia.com - Daniel Friedman | |||||||||