 Rooftop Plumbing Vent Installation
Best-practices details avoid plumbing vent leaks, frost, condensation
- POST a QUESTION or COMMENT about this article topic.
This article describes proper installation details for rooftop plumbing vent flashing or boot flashings.
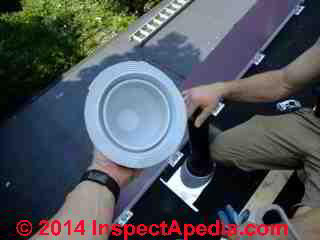
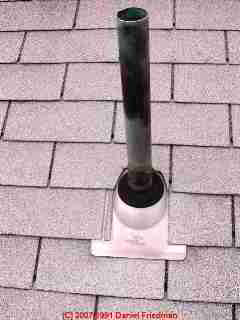
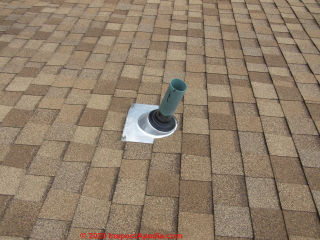
Page top photo: an aluminum and rubber plumbing vent flashing boot installed on an asphalt shingle rooftop.
This installation looks pretty good, thought that very narrow remnant of a shingle tab to the left of the vent is a bit fragile and may break off.
You can see that in a proper vent flashing installation the top and sides of the flashing are underneath the shingles and the bottom end of the pumbing vent flashing boot is brought out to the top of the shingle course below so that water will drain out on top of the lower roof surface.
InspectAPedia tolerates no conflicts of interest. We have no relationship with advertisers, products, or services discussed at this website.
- Daniel Friedman, Publisher/Editor/Author - See WHO ARE WE?
Rooftop Plumbing Vent Installation
 Here we provide procedures for proper plumbing vent flashing installation and we describe common mistakes that can cause roof leaks, condensation in the attic, heat loss, mold, sewer gas odors, even mold contamination.
Installation of plumbing vent stack flashing on a metal roof
Below are details from the original plumbing vent installation of a 3-inch ABS plumbing vent through a standing seam metal roof.
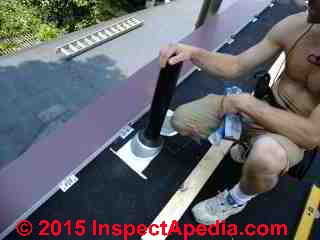
We had installed a conventional plumbing vent stack and boot (below left) along with a roof membrane, while waiting for the metal roof to arrive at the jobsite.
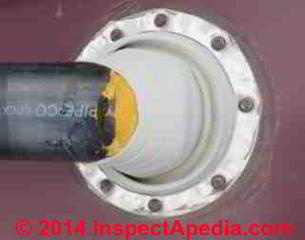
To properly seal the plumbing vent to the metal roof we replaced the shingle-roof type vent flashing with the white rubber flashing shown at below right.
That flashing is sealed to the metal roof surface by both adhesive sealant and a ring of metal screws.
Below I'm showing the original installation of the plumbing vent boot on this standing seam metal roof as it was being installed by Eric Galow.
Below you'll see that even with the plumbing vent stack broken and bent over nearly touching the roof surface, the rubber boot installed in the photos above managed to avoid a flood of melting snow into the roof cavity.
This broken plumbing vent was caused by the property-owner's reluctance to finish the job of installing snow guards on the roof.
Details about the snow guard system and its proper installation (done after this damage occurred) are
at SNOW GUARDS on METAL ROOFS
and step by step details of how we repaired this snapped-off plumbing vent without having to cut open the roof from above nor the cathedral ceiling from below are
at PLUMBING VENT REPAIR
Rooftop Plumbing Vent Installation Details vs: leaks, condensation, frost
Question: cause & effects of condensation or frost on plumbing vent in attic
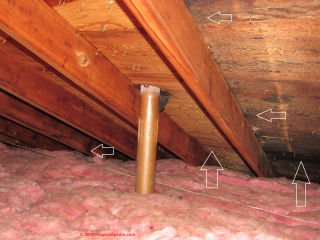
I noted frost on a plumbing vent pipe. The roof flashing appeared fine. [Photo below]
[Click to enlarge any image]
Was wondering is just from condensation freezing over or is there a larger issue. - Dov Ber Kahn, by private email, 2020/12/16
Moderator reply: details of plumbing vent boot flashing installation vs leaks, condensate, frost in the attic
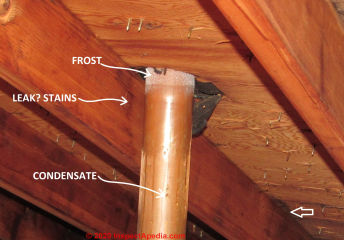
It's no surprise to see some frost on the outside of the upper portion of a plumbing vent in an attic in cold weather.
Consider that the copper pipe sticking out that point is put at a temperature below freezing. Moisture in the attic air will then condense on the pipe.
I have a couple of other observations from your photos.
The attic has certainly had a moisture problem although I can't say what the source of moisture is.
Look in the rafter bay to the right of the plumbing vent and you'll my white arrow annotations pointing to lots of dark moisture stained roof decking. [First photo above]
There's also a little bit of moisture staining on the rafter right next to the plumbing vent that says there could have been leaks at that plumbing vent in the past although they don't look like major ones. I might have pull up the insulation to look at the attic side of the ceiling drywall to be sure it wasn't moldy.
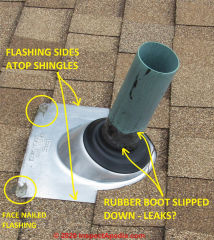 It may not be significant but a closer look at the plumbing vent boot flashing (above) shows that the rubber seal has slipped down from its original position, possibly due to snow loading or due to simple aging of the rubber.
Sometimes when there is wet snow on the roof, if the rubber seal has aged, dried, hardened, we may see a bit of leakage around the vent pipe in this location.
That would be in addition to the condensation and frost we've already noted, but it could also be related: if the plumbing vent does not seal around the vent pipe then air leaks at that location increase the movement of moist warm attic air up and out around the vent flashing, increasing the rate of condensation and frost formation on the vent pipe.
Do not face-nail plumbing vent flashing
Also notice in my enlargement of your photo those two nails at the bottom of the vent boot flashing are not a recommended practice as they puncture the metal flashing to form possible leak points.
In your photo we see two face nails, sealed atop the flashing. We can't see if sealant was used below the flashing at those nail punctures but in the attic we don't notice leak stains at that corresponding location. That's probably not a leak point.
Typical plumbing vent flashing installation guides specifically warn:
Do not face nail the plumbing vent flashing.
That sort of leak can happen in particular in a climate such as yours (North New Jersey) where there may be wet snow or even ice dams on roofs in winter.
It's not a major crime and I wouldn't be tearing up the roof to fix it, especially this time of year. But if we see recurrent or worse leaks at the plumbing vent flashing we might decide to seal that flashing more-carefully against side leakage.
Take a look again at the roof deck inside, along the opening cut into the roof to see if the stains suggest that there has been water entering along the vent boot flashing sides.
Shingle tabs should extend below the plumbing vent cut-out
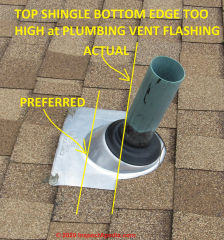
On your photo of the roof exterior I have indicated in yellow [photo above] that the actual plumbing vent boot flashing is a bit more-exposed along the sides than is preferred to avoid leaks. The top shingle's bottom edge is too high at this plumbing boot installation.
Best practice would be for the vent flashing sides to be below shingles to a point below the lower edge of the vent pipe itself - the "Preferred" line in my photo annotations. .
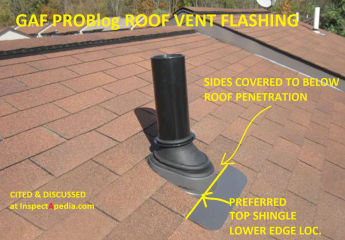
Below is in my OPINION a better plumbing vent boot flashing installation example, adapted from GAF's PROBlog plumbing vent installation advice.
Quoting GAF:
The top shingle’s bottom edge should extend, at the least, to the bottom of the hole cut in the roof deck. Any less may lead to leaking. (Barth 2016)
Notice as well that there are no exposed nails on this plumbing vent boot flashing.
Rooftop Plumbing Vent Flashing Guides & Codes
- Barth, Liza, HOW TO FLASH A PIPE ON A STEEP-SLOPE ROOF [PDF] (2016) GAF, Website: https://www.gaf.com Tel: (877-423-7663) Technical Assistance Select Option 4, Email: Commercial Customer Care: customercarecommercial@gaf.com Residential Customer Care: customercareresidential@gaf.com -
retrieved 2020/12/21 original source: https://blog.gaf.com/how-to-flash-a-pipe-on-a-steep-slope-roof/ - BASE FLASHING INSTALLATION on METAL ROOFS [PDF] Round base and square base flashing new and retrofit installation procedures for a ribbed metal roof, Pipeboot express, Protech Products, 511 Central Park Drive, Sanford, Florida 32771 USA, Tel: 800.334.9815 - retrieved 2020/12/21 original source: https://pipebootexpress.com/installation-instructions
- OATEY PLUMBING VENT ROOF FLASHING INSTALLATION INSTRUCIONS [PDF] Oatey, Tel: 800-321-9532 Website: https://www.oatey.com - retrieved 2020/12/21 original source: https://www.oatey.com/faqs-blog-videos-case-studies/blog/how-properly-install-roof-flashings
- PLUMBING VENT DEFECTS & NOISES - home
Photos courtesy of
- Dov Ber Kahn, a home inspector in Rockland County, NY has contributed photographs of various building features. Mr. Kahn is a licensed home inspector in New York and New Jersey, and can be reached at Website: Kahnbhomeinspectors, Tel: 845-445-8234, Email: kdovber@googlemail.com
We discuss how to diagnose and cure drain sounds (gurgling, bubbling, smells, poor drainage)
at PLUMBING DRAIN NOISE DIAGNOSIS (gurgling drains means bad vent piping or clogged drains)
and at CLOGGED DRAIN DIAGNOSIS & REPAIR.
We discuss drainage for plumbing fixtures, such as loose toilets, as sources of sewer gas odors separately
Also see FLASHING on BUILDINGS
...
Continue reading at FLASHING on BUILDINGS, or select a topic from the closely-related articles below, or see the complete ARTICLE INDEX.
Or see these
Recommended Articles
- CONDENSATION or SWEATING PIPES, TANKS
- FLASHING on BUILDINGS - home
- PLUMBING VENT CODES
- PLUMBING VENT DEFECTS & NOISES
- PLUMBING VENT DISTANCES & ROUTING
- PLUMBING VENT FLASHING INSTALLATION
- ROOF FLASHING DEFECTS LIST
Suggested citation for this web page
PLUMBING VENT FLASHING INSTALLATION at InspectApedia.com - online encyclopedia of building & environmental inspection, testing, diagnosis, repair, & problem prevention advice.
Or see this
INDEX to RELATED ARTICLES: ARTICLE INDEX to BUILDING FLASHING
Or use the SEARCH BOX found below to Ask a Question or Search InspectApedia
Ask a Question or Search InspectApedia
Try the search box just below, or if you prefer, post a question or comment in the Comments box below and we will respond promptly.
Search the InspectApedia website
Note: appearance of your Comment below may be delayed: if your comment contains an image, photograph, web link, or text that looks to the software as if it might be a web link, your posting will appear after it has been approved by a moderator. Apologies for the delay.
Only one image can be added per comment but you can post as many comments, and therefore images, as you like.
You will not receive a notification when a response to your question has been posted.
Please bookmark this page to make it easy for you to check back for our response.
IF above you see "Comment Form is loading comments..." then COMMENT BOX - countable.ca / bawkbox.com IS NOT WORKING.
In any case you are welcome to send an email directly to us at InspectApedia.com at editor@inspectApedia.com
We'll reply to you directly. Please help us help you by noting, in your email, the URL of the InspectApedia page where you wanted to comment.
Citations & References
In addition to any citations in the article above, a full list is available on request.
- In addition to citations & references found in this article, see the research citations given at the end of the related articles found at our suggested
CONTINUE READING or RECOMMENDED ARTICLES.
- Carson, Dunlop & Associates Ltd., 120 Carlton Street Suite 407, Toronto ON M5A 4K2. Tel: (416) 964-9415 1-800-268-7070 Email: info@carsondunlop.com. Alan Carson is a past president of ASHI, the American Society of Home Inspectors.
Thanks to Alan Carson and Bob Dunlop, for permission for InspectAPedia to use text excerpts from The HOME REFERENCE BOOK - the Encyclopedia of Homes and to use illustrations from The ILLUSTRATED HOME .
Carson Dunlop Associates provides extensive home inspection education and report writing material. In gratitude we provide links to tsome Carson Dunlop Associates products and services.


