
InspectAPedia® FREE Encyclopedia of Building & Environmental Construction, Diagnosis, Maintenance & Repair |
Question? Just ask us! InspectAPedia
|
 Chimney Re-Lining Repairs
Chimney Liners for Old or Damaged Chimney Flues
- POST a QUESTION or COMMENT about chimney flue repair
This article describes options for repairing or re-lining metal or masonry chimney flues in order to provide safe venting of combustion gases from various types of oil or gas-fueled heating equipment, wood-burning fireplaces, pellet stoves,woodstoves, etc.
InspectAPedia tolerates no conflicts of interest. We have no relationship with advertisers, products, or services discussed at this website.
- Daniel Friedman, Publisher/Editor/Author - See WHO ARE WE?
Chimney Flue Re-Lining Repair Methods
 This article along with reader Q&A lists when and why chimney flues are re-lined and lists chimney repair or relining alternatives.
Selection of the chimney liner system depends on the configuration of the flue. Straight flues are not difficult whereas offset flues will require a flexible liner system or the removing of brick work at the offsets so that angle fittings can be installed.
Illustration: adapted from DuraVent's DuraLiner® chimney relining instructions cited below on this page.
[Click to enlarge any image]
Both flexible and single wall rigid metal liners can be insulated to further avoid condensation. This is very important in cold climates and for high chimneys.
When a masonry or metal chimney flue is unsafe, perhaps because of cracks or other damage, and on occasion when changing the type of fuel whose combustion products will be vented in the chimney, four chimney repair options include the approaches listed below.
- CHIMNEY REPAIR: STAINLESS LINER INSERTION
- CHIMNEY REPAIR: CEMENT PermaFlu / SupaFlu
- CHIMNEY REPAIR: REPLACE CLAY FLUE TILES
Other chimney repair methods are discussed at
CHIMNEY REPAIR METHODS and include, for more drastic conditions, the following:
Re-Lining a Chimney with Flexible Stainless Steel + Insulating Cement
 Metal chimney liner: a solid or more often a flexible stainless steel metal liner is inserted into the flue space and
secured with various design techniques ranging from a cap plate at the top to
pressure grouting between the masonry surround and the new liner.
Metal chimney liner: a solid or more often a flexible stainless steel metal liner is inserted into the flue space and
secured with various design techniques ranging from a cap plate at the top to
pressure grouting between the masonry surround and the new liner.
Good practice includes pouring an insulating material around the metal liner, between the liner and the interior of the chimney wall, and also a good chimney rain cap and top crown seal.
Above: inserting a metal liner into the flue of a northern Minnesota home. Photos courtesy of InspectApedia.com editor A. Church.
For a square (in cross-section) chimney flue such as the one in our photo - venting a gas fueled heating boiler, the flue liner may be inserted without having to remove the original clay flue tiles, as there is very little measurable loss in draft capacity in this case.
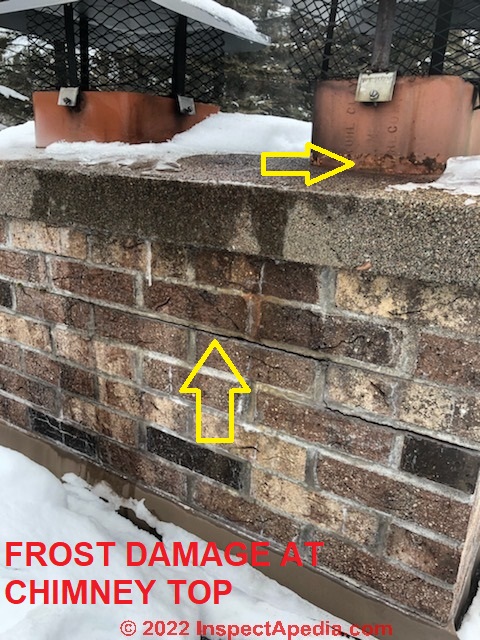
Watch out: The cost of these repairs is significant, so the repair decision as well as choices of repair method for a chimney should be based on a reliable and thorough inspection of the chimney, including the chimney top crown, caps, chimney above the roof line, and other accessible areas of the chimney interior, combined with a complete inspection of the chimney interior flue such as that demonstrated
at CHIMNEY FLUE INSPECTION CAMERA.
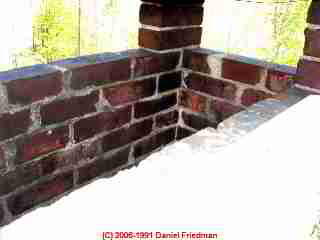
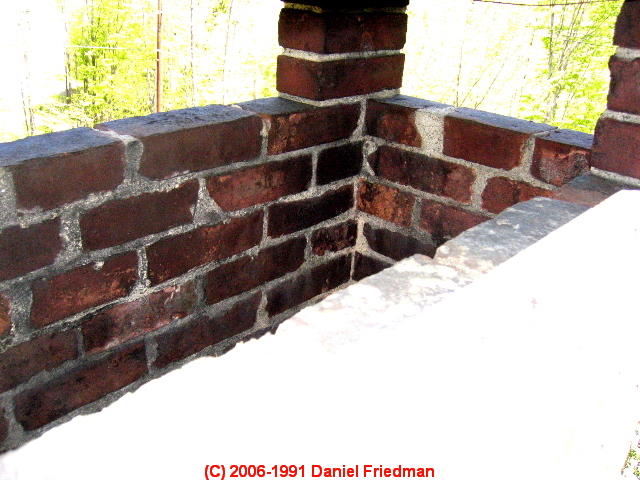
Above: frost cracking of the brick veneer and spalling of the clay chimney flue tile can be seen from a rooftop inspection but otherwise might miss detection.
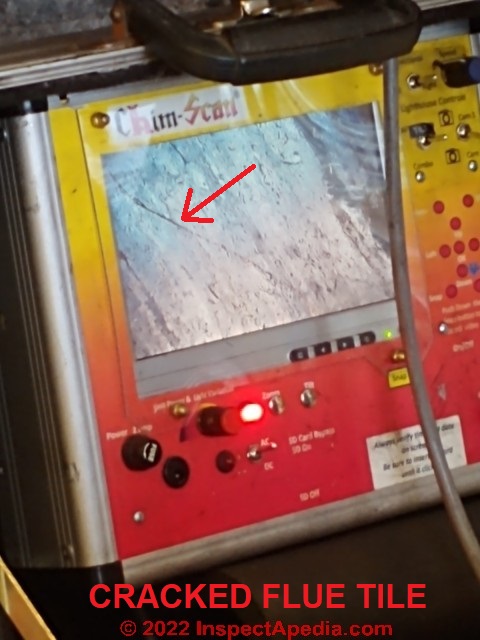
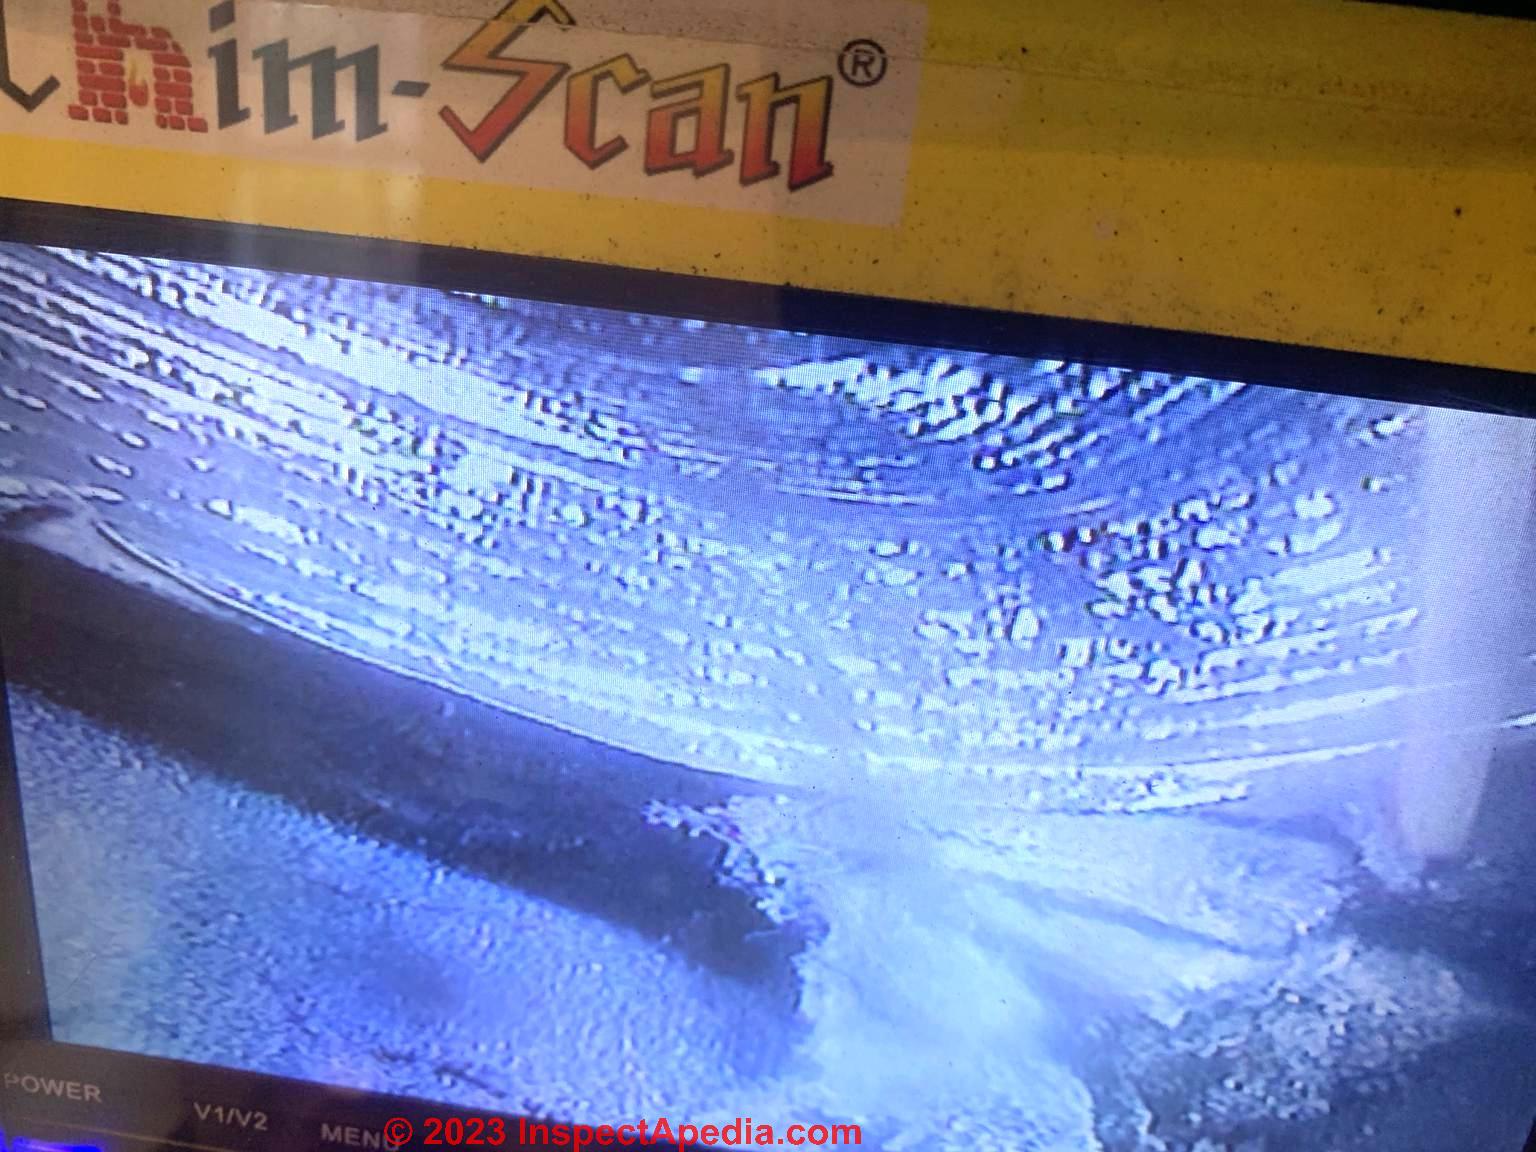
Below: in evaluating the condition of flues in the masonry chimney of a 1960s Minnesota home, the chimney inspection company used a chimney inspection camera to inspect the entire flue.
While an inspection at the chimney base and from outdoors and at the rooftop are also important, usually only a chimney inspection camera can access the entire flue interior in order to look for potentially serious fire hazards as well as risks of leakage of fatal flue gases into the building interior.
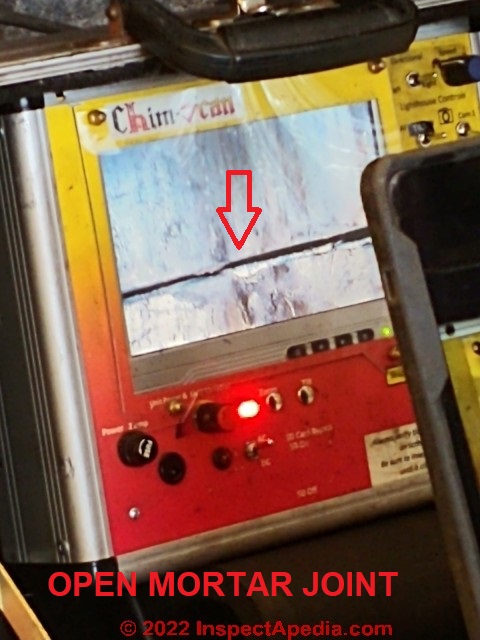
Our Chim-Scan photos below illustrate two examples: cracked chimney flue tiles and gaps between flue tiles where mortar was either lost or was insufficient during original construction. Photos courtesy of InspectApedia.com editor A. Church.
 ...
... 
When relining a larger non-square rectangular chimney flue such as a typical fireplace flue, the installers of a flexible stainless steel liner may need to first use a tool to break out and remove the original clay chimney flue tiles.
 ...
...  ...
...
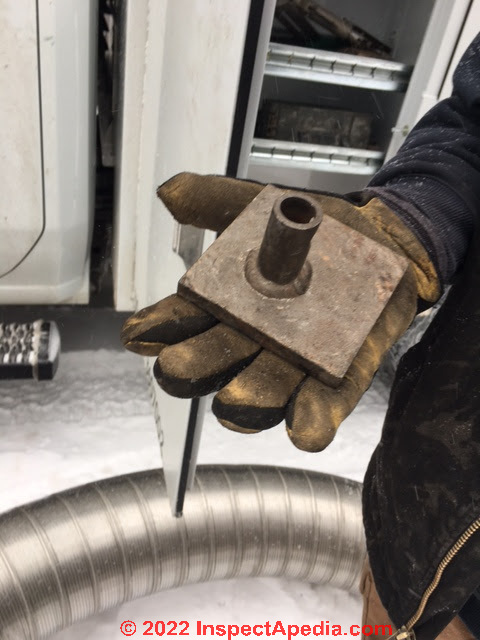
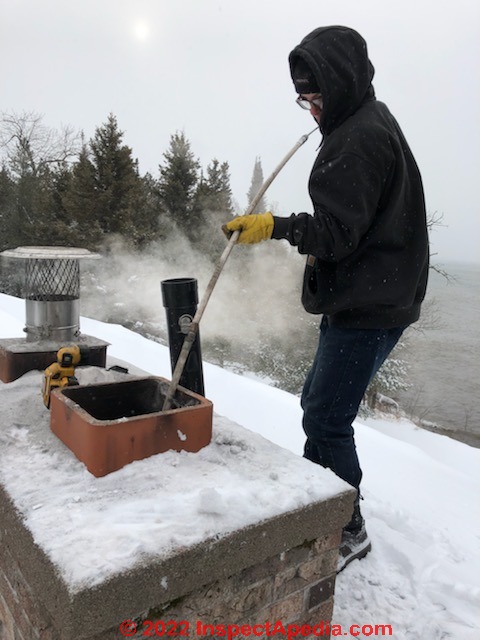
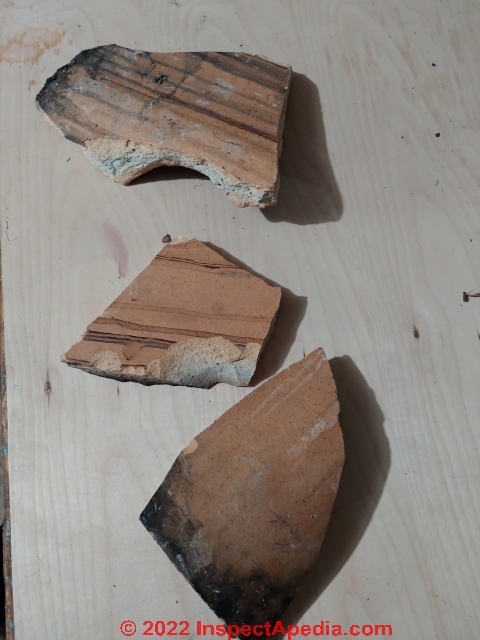
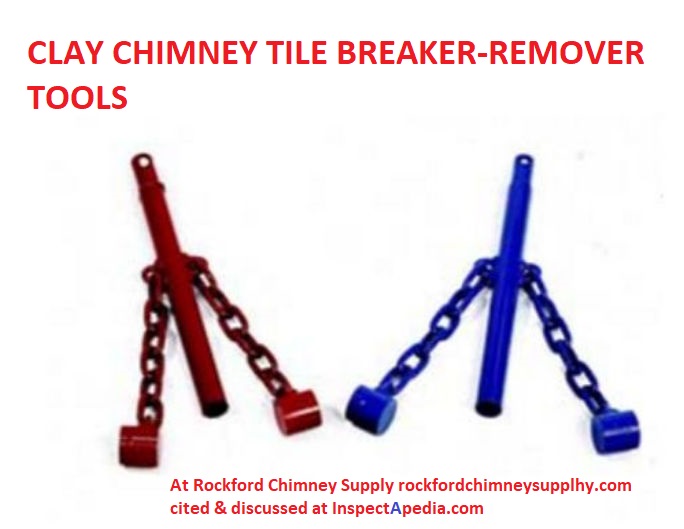
Above: A chimney tile breaking device. Clay flue liner was removed by heavy iron square plates on “num-chucks” on end of pole, inserted from the top of the chimney and spun around with power drill; breakup started at bottom, moving up the chimney slowly, tile by tile; broken pieces fell into buckets in fireplace and were taken away.
Below, working from the chimney top, the equipment is operated to break out the clay flue tiles of the original chimney, leaving the concrete block chimney construction and cavity into which the new liner will be inserted.
 ...
... 
Below: clay flue liner fragments produced by its use during a chimney relining job in Two Harbors MN in 2021.
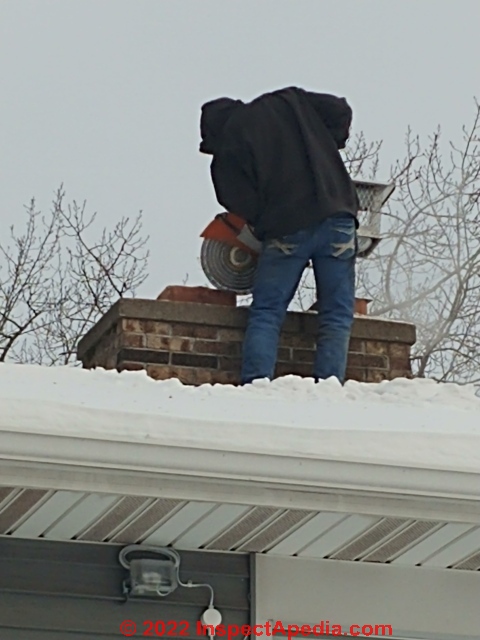
Below: In addition to removing the old clay flue tiles, the chimney repair crew use a circular carbide blade saw to cut out and remove the damper assembly.
This step, along with using refractory cement to line and shape the smoke chamber, are necessary to bring the new flue down to the proper location over the firebox.
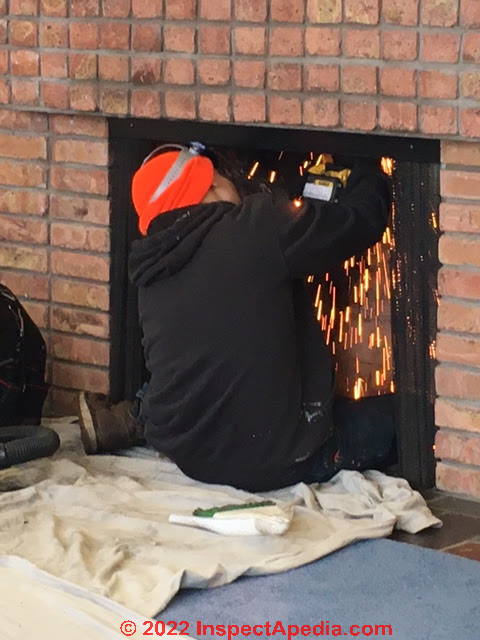
To obtain a functional damper, a chimney top damper will be installed and can be operated by pulling cables that dangle from the chimney-top damper down into the firebox.
 ...
... 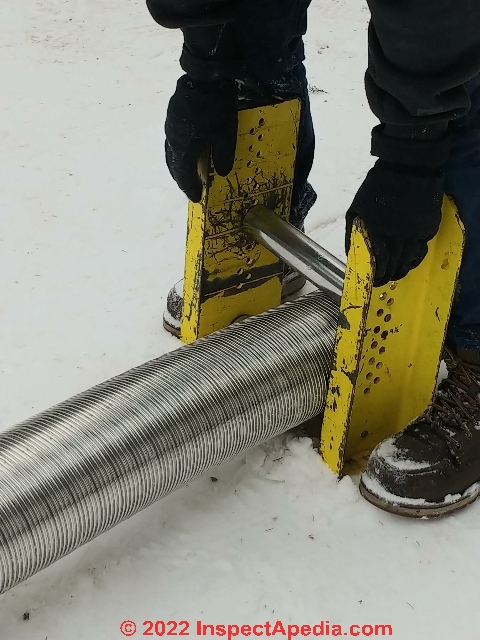
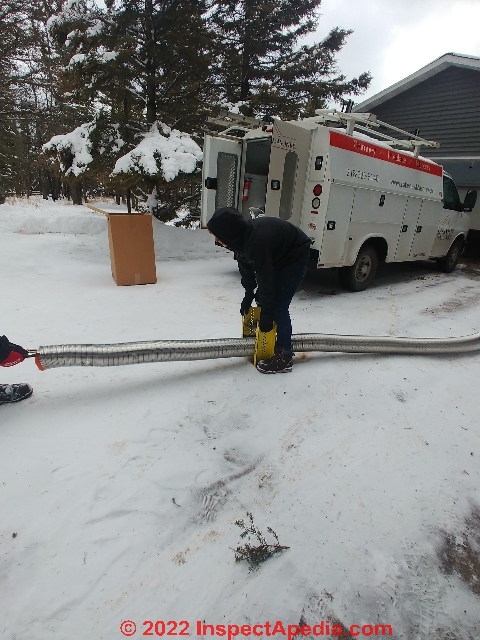
Above: before the round stainless steel chimney liner can be brought to the rooftop for insertion into the chimney, it needed to be slightly flattened to fit the rectangular flue. This round flexible chimney liner shaping tool can be adjusted to provide the needed amount of adjustment to slip the once-round, now flattened on two sides, metal flue into the rectangular flue opening.
One worker stood on the tool to hold it in place while his co-worker pulled the liner through the opening, at times getting a ride as he and the tool slid over the slippery snow.
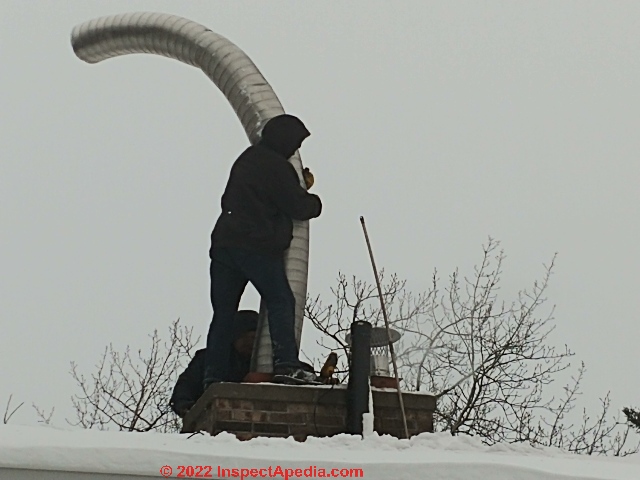
Below, the prepared chimney liner is brought to the rooftop.
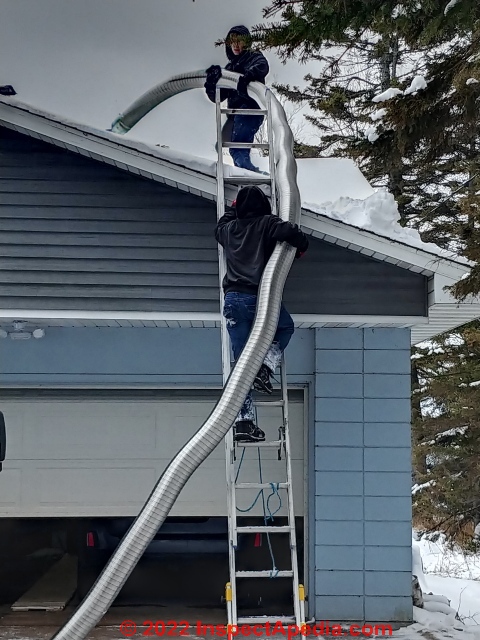
At this home, two chimneys were re-lined: a fireplace flue and the flue venting a gas-fueled heating boiler.
Below: undaunted by January sub-zero temperatures in northern Minnesota (2021), the installer is inserting the new stainless steel liner down the prepared chimney where it will form the new flue.
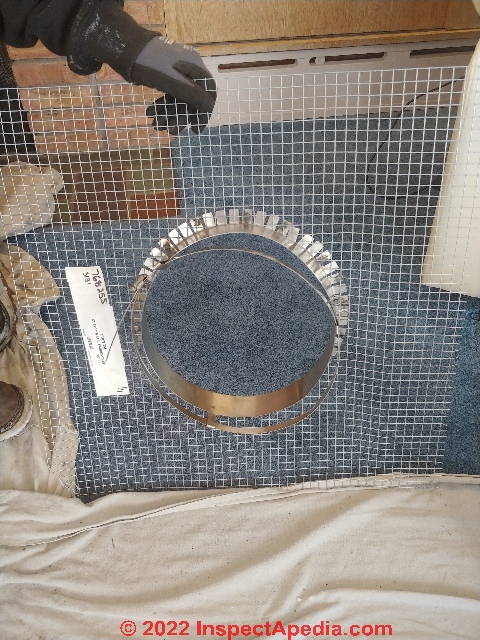
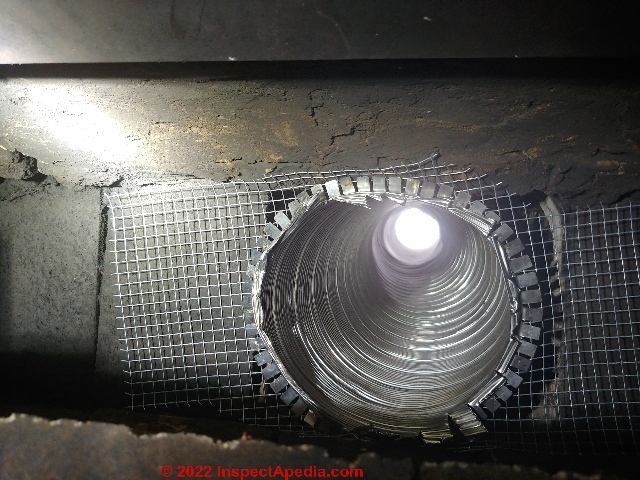
Below: back inside the home at the fireplace, with the old damper cut away and the smoke chamber prepared, a mesh insert is cut to size and inserted into the smoke chamber; the stainless steel liner will connect to this mesh that will then be cemented in place.
 ...
... 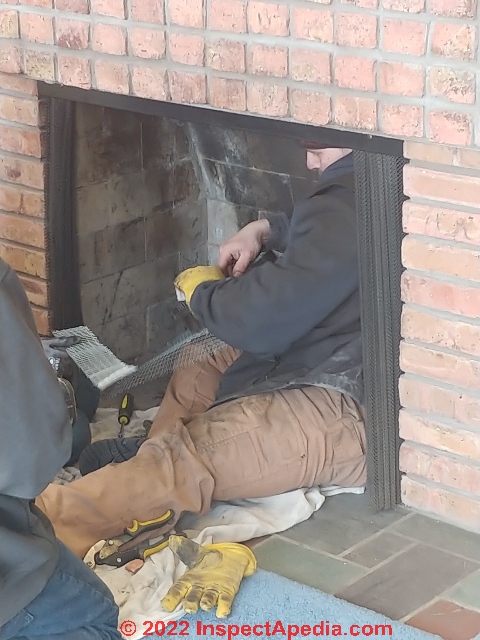
And below we see the chimney flue liner connected at the chimney base, and then the wire mesh support is sealed. This seal will then permit pouring of insulation into the chimney around the exterior of the flue liner.
 ...
... 
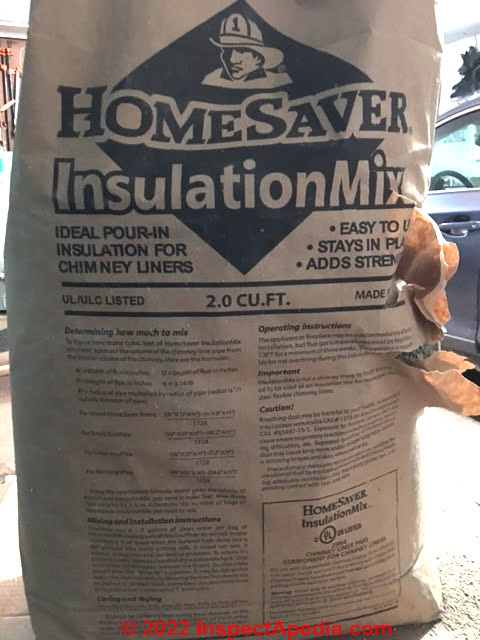
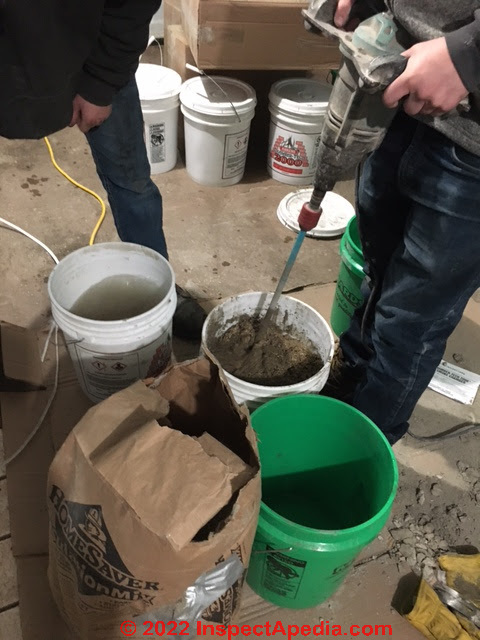
Below: HomeSaver insulation mix, to be mixed with water, will then be poured into the chimney around the now-inserted stainless steel flue.
 ...
... 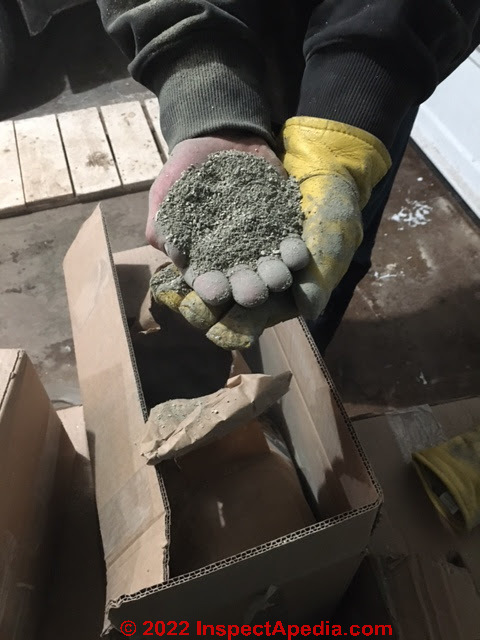
Below: the chimney insulation mix is prepared and then is hand-carried to the rooftop where it's poured around the flue liner.
(Compare this with the more costly and in our opinion possibly longer-lived Cementious SupaFlu or PermaFlue chimney re-lining found
at CHIMNEY RE-LINING by CEMENT Supa/Perma-Flu.)
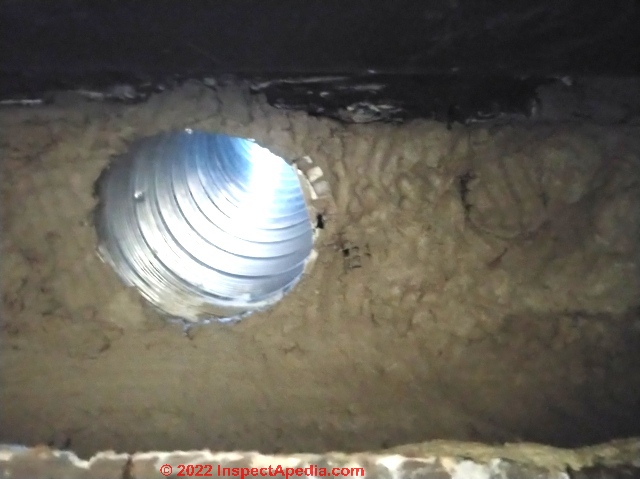
Below you can see an example of this chimney liner insulation mix poured around the stainless steel insert into the square flue used by this home's heating boiler. Most of the other photos in this series show the re-lining of the larger fireplace flue.
 ...
... 
This chimney top will get a bit of final trimming and clean-up before the chimney cap is installed.
HomeSaver Insulation Mix is a UL Listed 1777 Zero Clearance insulation for all HomeSaver Relining Pipe. Also use for ULC S635-00 standard. For details see this
- HOMESAVER INSULATION MIX INSTRUCTIONS [PDF] Homesaver Pro., Inc., that includes this warning:
Breathing dust may be harmful to your health. Nuisance dust may contain vermiculite CAS #1318-00-9 and Portland cement CAS #65997-15-1.

Above: during installation of the chimney flue "zero clearance" insulation, some of the material falls through the flue into the fire-box - and must be cleaned-up.
With the firebox prepared and the stainless liner installed and then the insulation poured around the liner and given time to set, the final steps in this fireplace chimney repair include preparing the chimney top, (below)
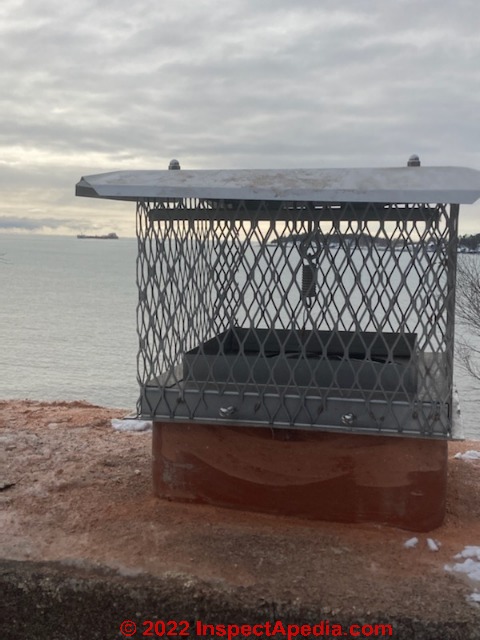
and installing a chimney top damper and chimney cap - shown below along with the damper controls that are mounted to the right side of the fireplace fire-box.
 ...
... 
A cable connects the spring-loaded chimney top damper at chimney top to the control lever found indoors.
Metal Chimney Flue Liners & Replacement Instructions
Watch out: You will see in the list of chimney re-lining products below that it is essential to choose the right product that matches your application: type of fuel being vented, and other considerations. For this reason we include excerpts from the manufacturer describing the intended application of each of these chimney liner products.
But to be sure you and your installer are using the right product, check with the chimney product manufacturer.
Note: the example chimney liner installation instructions are not an exhaustive list of chimney re-lining options and products; check with the manufacturer.
Watch out: required in in most jurisdictions and for safety at all installations, chimney liners must be installed
by an experienced professional, familiar
with the operation and maintenance of
heating appliances and chimneys.
Metal Chimney Liner Products
- Dura-Vent Chimney Installation Instructions for the company's various models can be found at https://duravent.com/installation-instructions/ (2021/05/19), including the company's products listed below. Note that a number of these (like the DuraVent DirectVentPro are NOT intended for wood burning or other heating appliances that require use of a multi-walled insulated metal chimney.
CVS® DirectVent® Pro, DuraBlack®, DuraChimney® II, DuraFlex® Aluminum, DuraFlex® Stainless Steel, DuraLiner®, DuraPlus®, DuraSeal®, DuraStack®, DuraStack® Pro, DuraTech® 5"-8", DuraTech® 10"-24", DuraTech® Canada, DuraTech® Premium, DVL®, FasNSeal®, FasNSeal® 80/90, FasNSeal® Flex, FasNSeal® W2, PelletVent® for Multi-Fuel, PelletVent Pro®, PolyPro®, PolyPro® Flex, Type B Gas Vent, Ventinox® - DuraVent, DuraFlex® AL INSTALLATION INSTRUCTIONS [PDF] (2017) [Aluminum chimney liner] M&G Duravent, Inc., Tel: 800-835-4429, Website: www.duravent.com,
Excerpts: The DuraFlex AL Chimney Relining System is UL listed for relining masonry chimneys that are intended to be used for venting gas appliances and decorative gas fireplaces.
...
The DuraFlex AL Chimney Relining System is UL listed for relining masonry chimneys that are intended to be used for venting gas appliances and decorative gas fireplaces. - DuraVent DuraFlex® STAINLESS STEEL INSTALLATION INSTRUCTIONS [PDF] includes Ventinox®
DuraFlex® Pro
DuraFlex® SW
DuraFlex® 316
DuraFlex® 304
TherMix®
ProFoil®
Excerpt: DuraVent Flexible Chimney Liners are intended to service residential heating appliances burning wood, wood pellets, oil fuel, natural gas or propane gas (Category I or draft-hood equipped appliances), or other appliances listed for use with Type B gas vents.
DuraVent Liners should not be used to vent unlisted gas or oil appliances, unlisted wood or coal burning appliances, Category II, III and IV Gas appliances (unless specifically listed to UL 1738 or ULC-S636 in Canada) or gas appliances listed for use only with Type BW vent.
DuraVent Liners must be installed by an experienced professional, familiar with the operation and maintenance of heating appliances and chimneys.
- DuraVent DURALINER® INSTALLATION INSTRUCTIONS [PDF] (2018) Op. Cit. - see Illustration above.
Excerpt: DuraLiner is a double-wall, insulated all fuel reliner for masonry chimneys, used for natural draft venting of gas, liquid and solid fuel appliances.
DuraLiner is listed to UL 1777 and ULC S635 under listing file number MH14420, where maximum continuous flue gas outlet temperatures do not exceed 1000°F/538°C (UL 1777) or 1200°F/650°C (ULC S635).
DuraLiner is approved for installation with zero clearance between the liner and masonry, plus zero clearance between the masonry and combustibles.
When the Transition Anchor Plate is used, Round DuraLiner pipe can be coupled to a Duravent factory built 103HT chimney system at the end of a masonry enclosure. - DuraVent DuraPlus® ALL FUEL CHIMNEY SYSTEM [PDF] (2017)
Excerpt: Use DuraPlus with wood stoves, fireplaces, furnaces, boilers, water heaters, stoves, ranges, or other residential-type appliances fueled by oil, gas, coal, or wood. Do not use with forced draft positive-pressure appliances. DuraPlus systems are designed to extend vertically with a maximum of (2) offsets of 30° (offset and return). - DuraVent FLEXIBLE CHIMNEY LINERS Ventinox®
DuraFlex® Pro
DuraFlex® SW
DuraFlex® 316
DuraFlex® 304
TherMix®
ProFoil® INSTRUCTIONS [PDF] (2018) retrieved 2021/05/19 original source: https://duravent.com/wp-content/uploads/2019/10/L253_820003160_Install-Instructions_DuraFlex-SS-1.pdf
Excerpt: DuraVent Flexible Chimney Liners are intended to service residential heating appliances burning wood, wood pellets, oil fuel, natural gas or propane gas (Category I or draft-hood equipped appliances), or other appliances listed for use with Type B gas vents.
DuraVent Liners should not be used to vent unlisted gas or oil appliances, unlisted wood or coal burning appliances, Category II, III and IV Gas appliances (unless specifically listed to UL 1738 or ULC-S636 in Canada) or gas appliances listed for use only with Type BW vent.
DuraVent Liners must be installed by an experienced professional, familiar with the operation and maintenance of heating appliances and chimneys. - DuraVent, DURAVENT 1777 LINERS for FACTORY BUILT CHINEY RELINING for SOLID FUEL [PDF], DuraVent Op. Cit. for Ventinox® VFT
DuraFlex® Pro
DuraFlex® SW
DuraFlex® 316
DuraFlex® 304
DuraLiner®
Excerpt: This instruction covers the installation of listed Duravent UL1777 liner products into a preexisting factory-built chimney system.
DuraVent Liners must be installed by an experienced professional, familiar with the operation and maintenance of heating appliances and chimneys. - HOMESAVER INSULATION MIX INSTRUCTIONS [PDF] Homesaver Pro., Inc.,
Cementious SupaFlu or PermaFlue Cement Chimney Re-Lining Alternative
 Poured cement chimney flue liner: or a two step cement fill and ceramic glaze can be used. Processes such as SupaFlu™ or PermaFlu™ use a refractory cement that is poured into the chimney around an inflated central core.
While these cements may be lightweight, nevertheless the chimney must be basically structurally sound for these processes to succeed.
Watch out: Expert chimney - pouring a chimney liner in stages to avoid a collapse: installers can sometimes salvage an old unlined or damaged chimney by making the chimney liner pour in stages to reduce the chances of a chimney collapse.
Chimney Re-Lining: Possible Concerns
Unlined chimneys often have been converted from one fuel use to another, are difficult to clean, and they are a fire hazard both because of possible creosote or other deposits and because of possible insufficient thickness of or openings in masonry joints which could admit spark or heat into combustible parts of the building.
Unlined (or other damaged) chimneys can also leak dangerous flue gases into the living area.
Chimney Inspection Services
Expert inspection is usually available, including TV camera scanning if needed, by consulting a certified member of the National Chimney Sweeps Guild.
The chimney may need to be relined for safe operation. There are several chimney lining alternatives depending on the particular situation and needs.
See also
CHIMNEY FLUE INSPECTION CAMERA
Concrete / Cement Chimney Liner Replacement Products & Manuals
 Watch out: You will see in the list of chimney re-lining products below that it is essential to choose the right product that matches your application: type of fuel being vented, and other considerations. For this reason we include excerpts from the manufacturer describing the intended application of each of these chimney liner products.
But to be sure you and your installer are using the right product, check with the chimney product manufacturer.
Note: the example chimney liner installation instructions are not an exhaustive list of chimney re-lining options and products; check with the manufacturer.
Watch out: required in in most jurisdictions and for safety at all installations, chimney liners must be installed
by an experienced professional, familiar
with the operation and maintenance of
heating appliances and chimneys.
Concrete PermaFlu or SupaFlu Chimney Re-Lining Products, Sources
Supaflu Masonry Chimney Lining and the PermaFlu Chimney Liner processes are a patented chimney relining system that pumps a cement mixture around a round inflated tube that is inserted into an existing chimney. Provided that the original chimney structure is sufficiently sound, the concrete can be poured, often in stages.
After the concrete liner has hardened the inflated tube is deflated and removed to leave a continuous, solid concrete chimney flue. A number of companies including the examples below offer the SupaFlu or PermaFlu chimney restoration procedure.
Watch out: No chimney relining method, traditional as may be suggested by a mason, nor re-lining methods such as the Permaflue pumped grout method which is (in our opinion) superior, can be used if the brick work is not structurally sound. Those repairs will be needed first.
- Ahrens Chimney Technique, Inc., 2000 Industrial Ave., Sioux Falls, SD 57104 800/843-4417 (UL Listed).
- Chimney Works, Breck Holladay, The Chimney Works, Inc. 2448 Bristol Rd New Harbor, ME 04554 Breck Holladay — owner EMAIL BRECK CELL: 207-557-3500 BUSINESS: 207-677-2291 Website: https://mainechimneylining.com/supaflu-lining/14-supaflu-chimney-lining
- National Supaflu Systems, Wasyl Bozydaj, Clintondale, NY 12515 914-883-6821. Observed by DJF - InspectApedia Editor at Lelyveld inspection 05/03/1991
- Solid/Flu American Chimney, 9797 Clyde Park SW, Byron Center, MI 49315 616/878-3577
- Supaflu Chimney Restorations, Howes Chimney Services Of Maine, 57 Oak Ridge Road, Kennebunkport, Maine 04046 USA Tel: 207-967-9100 Email: supaflu@gmail.com Website: https://supafluchimneys.com/
- Ventinox Chimney System, PROTECH, Inc., PO Box 1743, Albany, NY 12201 518/463-7284.
Research on Chimney Relining Methods
- Bock, Gordon, "Inspecting Chimneys",
Old House Journal , Vol. XVII No. 2, March/April 1989. Inspecting old chimneys, inspecting working chimneys, repointing tips, list of suppliers of chimney liners, masonry cements and sealers, flue brushes. - BS 6461:Part 1:1984, British Standard, lnstallations of Chimneys and Flues for Domestic Appliances Burning Solid Fuel (including wood and peat), Part 1 Code of Practice for Masonry Chimneys and Flue Pipes, p3, para 4.5.
- Colonial Chimney Sweeps, Frank Pusatere, PO Box 133, Croton on Hudson, NY 10520 914/271-6078 Cleaning, repairs, Chim Scan video inspection (See NY Metro ASHI News, Vol 3 No 9, 10 Sept 88 p.4. )
- Field Controls Company, 2308 Airport Road, Kingston, NC 28501 919-522-3031 (Draft controls, power venters and draft inducers.)
- Fidler, John. "Flue cure." Traditional Homes 5, no. 10: 115-117.
"Part 2 of a previously published article, examines methods for the repair of old chimneys, particularly flue relining. " - Kidd, Stewart. RISK IMPROVEMENT IN HISTORIC AND HERITAGE BUILDINGS [PDF] In The Colvin Trust-Uppark Seminar. 2003.
Discusses the role of unsafe fireplaces and chimneys in building fires. - Lingel, M. "The survey and repair of flues and chimneys." Structural Survey (1993).
- Masons who are experienced with chimney construction and repair can be very helpful in both evaluating chimney condition and in planning repairs.
- McCloskey, Frank G., and Northern Ireland Housing Executive. FAILURES IN TRADITIONALLY CONSTRUCTED DOMESTIC CHIMNEYS [PDF] In Proceedings of the 8 th International Brick/Block Masonry Conference Dublin, Ireland, 19-21 September 1988,, pp. 1732-1738. 1988.
Abstract: The following paper sets out the conclusions reached by the Northern Ireland Housing Executive for the large scale failure of traditionally constructed domestic chimneys in their housing stock, with an account of the unsuccessful and successful remedial action which has been taken. It a lso details the type of chimneys now used in new build in an attempt to overcome the problems of the past. - Scripture, Peter IS THIS CHIMNEY SAFE? Match the liner to the fuel type before hooking up a new furnace to an old chimney [PDF] Journal of Light Construction, June 1993, reprinted with permission.
- Silcock, G. W. H., and T. J. Shields. "An experimental thermal analysis of domestic flues serving closed solid fuel appliances." International Journal on Architectural Science 2, no. 3 (2001): 83-92.
- The Old House Journal, Sept. 1979, p. 97 "Making a Flue Liner" - a DIY article; and OHJ Dec. 1979 p. 134 (better solution).
- Tjernlund Products, Inc. 1601 Ninth Street, White Bear Lake, MN 55110-6794 800-255-4208 612-426-2993 612-426-9547 FAX. Direct-venting and sidewall venting chimney alternatives, draft inducers, duct boosters.
- West, Harry R., and Keith D. Bryant SAFE VENTING AND THE HOUSE AS A SYSTEM [PDF] In Proceedings of the 1989 Oil Heat Technology Conference & Workshop, at Brookhaven National Laboratory, Upton NY, March 27-28 1989, Sponsored by Office of Building and Community Systems, US Department of Energy, cooperation with Petroleum Marketers Association of America et als.
See Paper No. 89-11 Safe Venting and The House as a System Harry R. West and Keith D. Bryant, Target Communications, pp.. 143
Chimney Repair by Replacing Clay Flue Tiles
It's possible to replace damaged clay flue tiles in a masonry chimney by breaking out and removing the bad clay tiles from the lowest occurrence of damage up to the chimney top.
This repair is most practical when the damage does not extend far down the chimney flue.
See examples of chimney flue tile damage
at FLUE TILE DAMAGE in CHIMNEY
 \
\
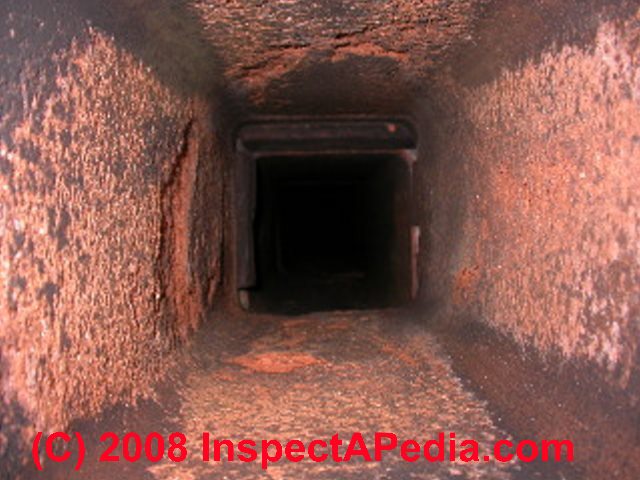
Damage to clay chimney flue tile liners can appear as spalling shown in our photo (above left) or as breaks, cracks, gaps, or even lost material, shown in the sketch provided by Carson Dunlop Associates - below.
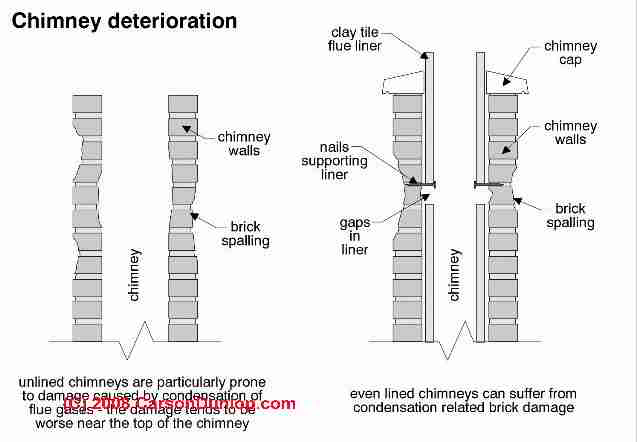
Notice that the chimney wall is getting thin at the left side of the flue. It is time to have this chimney lined for safety.

Many water damaged chimney flues could have been prevented by installation of a good chimney rain cap and crown or top seal at the time of construction.
The sketch at left shows the effects of gaps in a chimney liner.
While the drawing depicts a regular gap as if magically the upper clay flue tile was suspended during chimney construction, this is not as impossible as it may seem.
Details in the drawing show the upper liner was suspended by nails, leaving a mortar gap between the clay flue tiles.
This flue tile liner gap can also occur if sections of the flue tiles are broken and lost after chimney construction, later in its life.
These flue liner gaps may explain why white efflorescence appears mysteriously somewhere below the top of the exterior of a masonry chimney.
Gaps in the chimney liner can be found by a camera inspection of the flue interior; they might be suspected based on damage or stains on the chimney exterior.
On 2020-07-29 by (mod) - How to Remove & Replace a Bad Clay Tile & Lower new tiles without disassembling the chimney
Marquez
Indeed most masons will require that a badly damaged masonry chimney and clay flue tile liners be taken down and rebuilt so as to have confidence in the repair.
First the damaged clay tile must be removed by breaking it up as well as breaking out the tiles above it to the chimney top so that there is space to lower new tiles down into the flue.
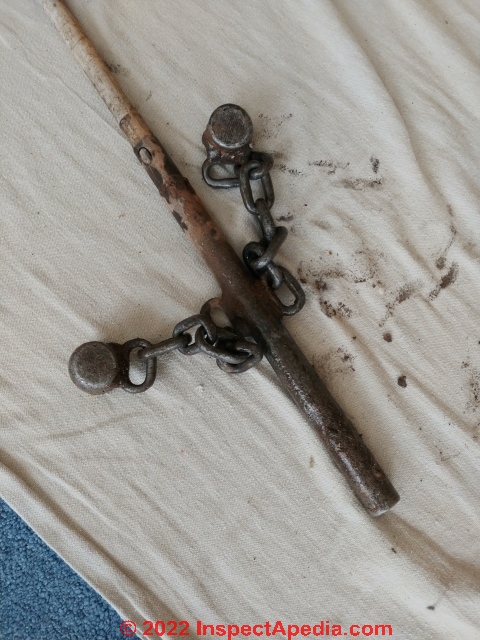
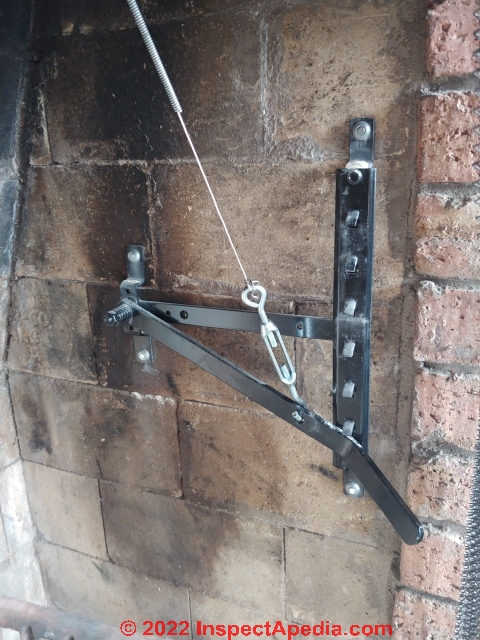
Several companies make a rotary flue tile breaker for removing old clay chimney tiles from a chimney interior, such as the ProKleen breaking tools shown above and northlineexpress.com and other vendors such as Amazon and the chain and weight type chimney clay tile breaker from Rockford Chimney Supply shown below.
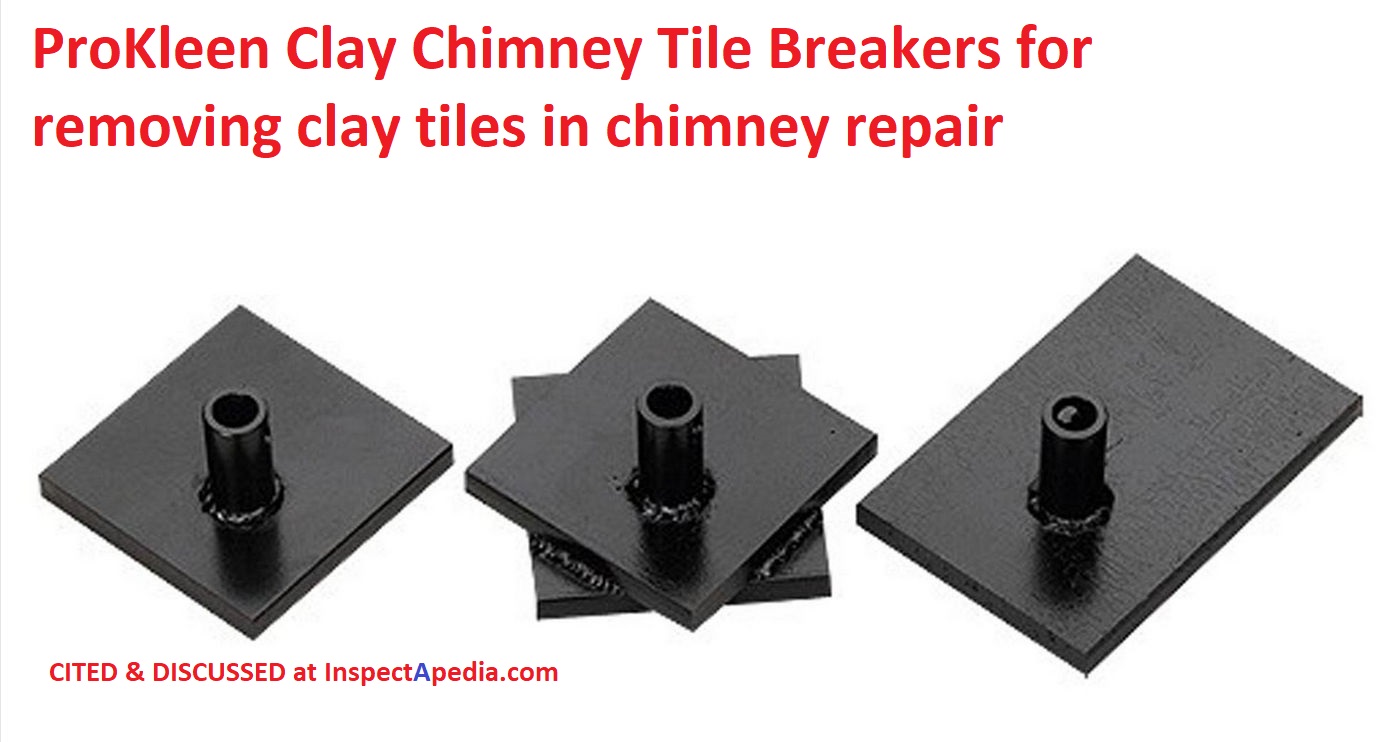
In my OPINION this sort of repair is only reasonable if all of the chimney damage is near the top but some masons may have a different view. Here we first show two common tools used to break out damaged clay chimney tiles.
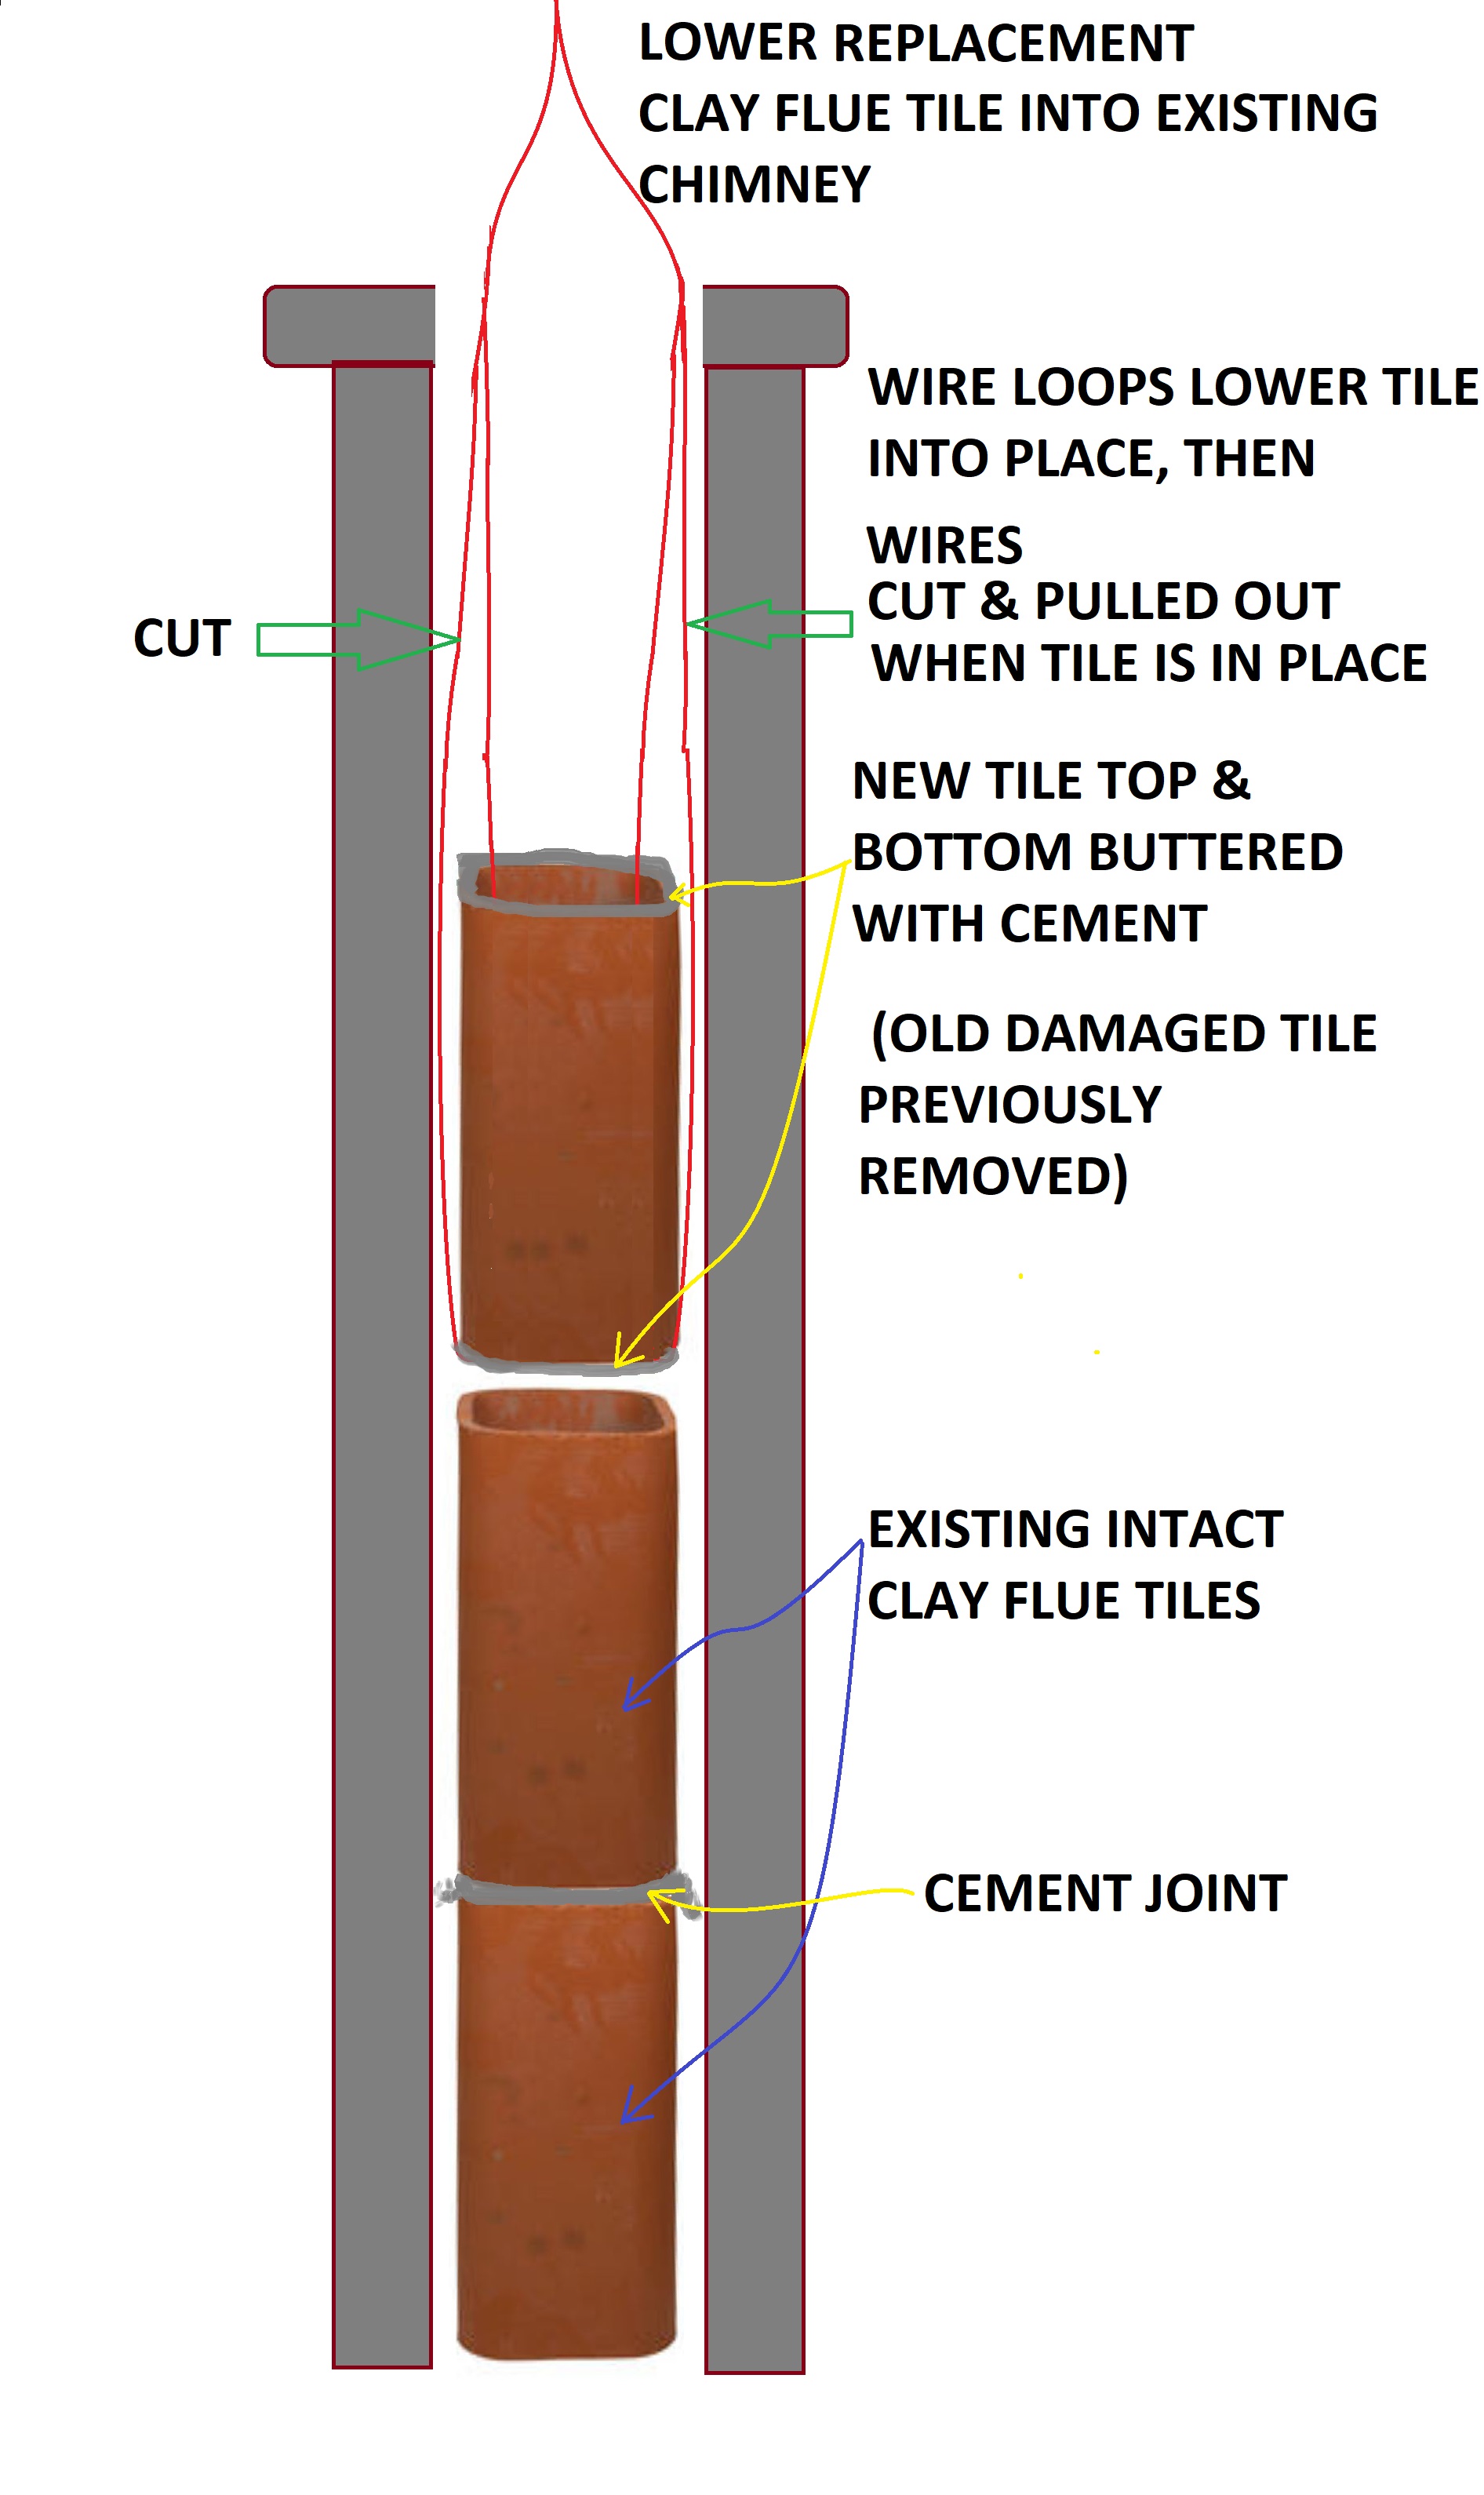
To lower the new clay tiles in place, one by one working from the lowest tile up, some masons simply use wire tied around the cement-buttered clay flue tile to lower it into place; the wire is looped with a loop big enough that once the tile is in place the loop can be cut and the wire pulled out.
[Click to enlarge any image]
That sort of repair - lowering down a replacement clay flue tile, can only be done if the original tiles have been broken away and removed from the chimney interior, and this repair is probably reasonable in cases where there are just one or two damaged clay flue tiles and they are close to the chimney top.
To complete filling in mortar between the clay flue tiles or where mortar has been lost and must be replaced, masons may use a filled, bottom-weighted burlap bag hung from a rope; the bag, sized and stuffed to press sufficiently against all sides of the clay flue tiles, is dropped down the flue and then pulled up to smooth off and remove excess mortar from the joints between clay flue tiles.
Watch out: If this step of removing excessive mortar inside of and between clay chimney tiles [photo below] is omitted and ears of cement are left oozed into the flue passage - a terrible practice - the chimney will later be impossible to clean of creosote, and as some of those ears later break off, the flue may also develop leaks into the building structure or into the building itself, risking fire or fatal CO poisoning.
Really? If a chimney is structurally sound, a more common repair is to reline the existing flue using concrete or metal.
See those details starting
at CHIMNEY RE-LINING CHOICES - choices among chimney lining alternatives when a flue liner is missing or damaged
Also see CHIMNEY REPAIRS, TOP & CLAY FLUE TILE
On 2020-07-29 by MarquezErnest@yahoo.com - How do i lower a clay 2' section down 4' to the secure tile with out dropping it?
How do i lower a clay 2' section down 4' to the secure tile with out dropping in is there a tool that expands or something.
...
Reader Comments, Questions & Answers About The Article Above
Below you will find questions and answers previously posted on this page at its page bottom reader comment box.
Reader Q&A - also see RECOMMENDED ARTICLES & FAQs
On 2023-11-20 by InspectApedia Publisher - chimney sweep invoice is not a chimney inspection report
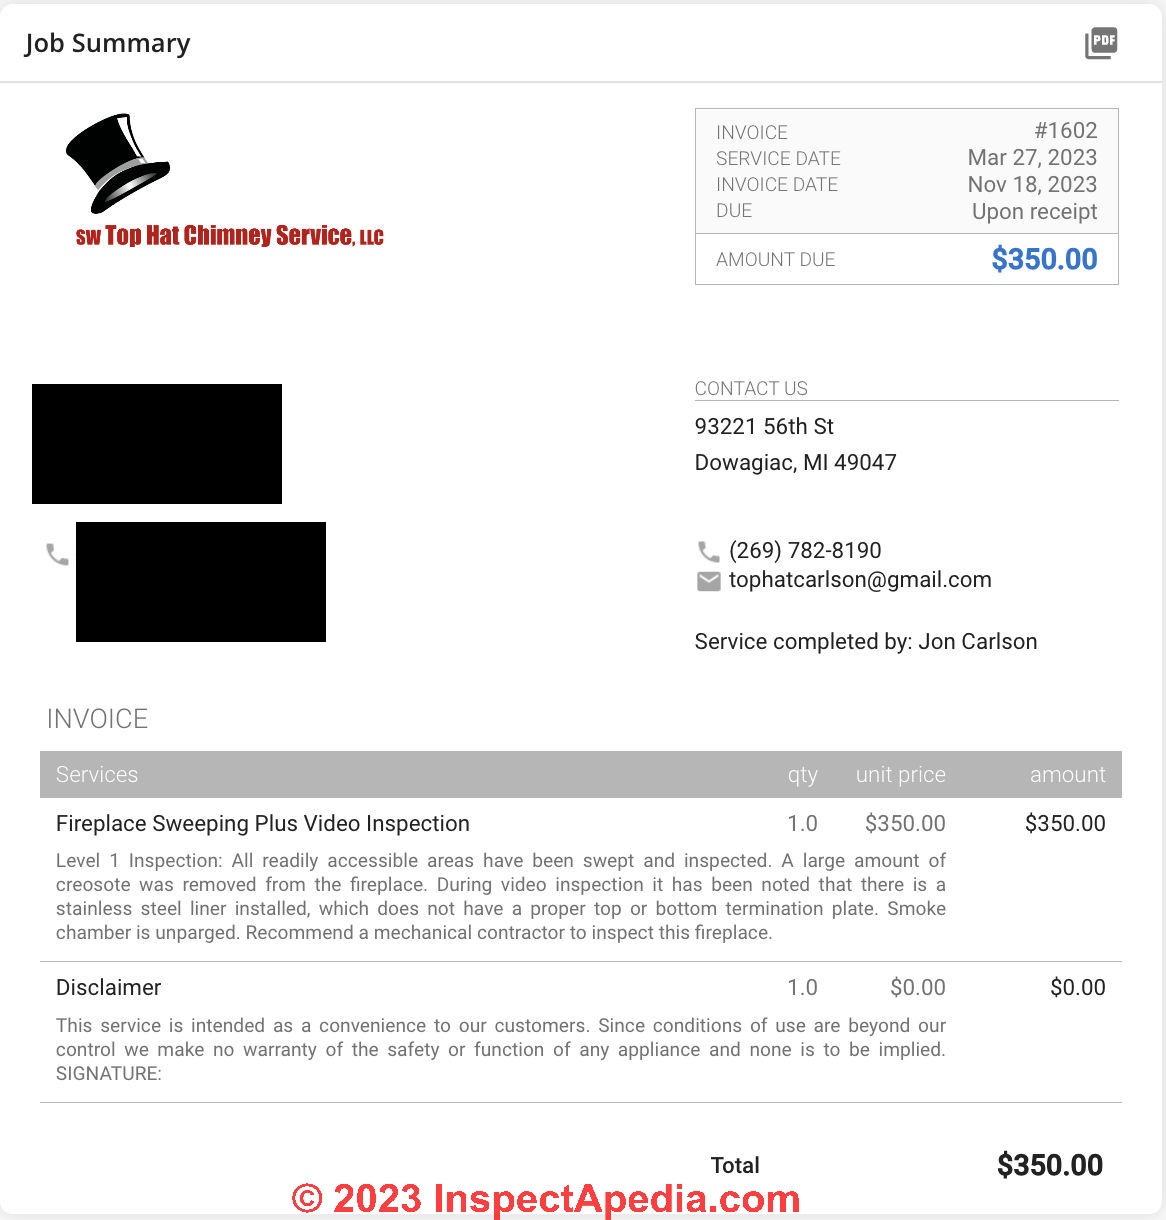
@InspectApedia DF, re-posted image of chimney service invoice for the chimney and fireplace discussed here.
Notice that this is NOT a chimney inspection report and does not contain much detail, but it does make clear that the fireplace sweep + video inspection found a fire safety concern with this chimney liner. The worker and invoice note:
"Level 1 inspection: All readily accessible areas have been swept and inspected. A large amount of creosote was removed from the fireplace. During video inspection it has been noted that there is a stainless steel liner installed, which does not have a proper top or bottom termination plate. Smoke chamber is unparged. Recommend a mechanical contractor to inspect the fireplace.
Disclaimer
This service is intended as a convenience to our customers. Since conditions of use are beyond our control we make no warranty of the safety or function of any appliance and none is to be implied. SIGNATURE:
(Not signed - Ed.)
OPINION: thoughtful and helpful but in our OPINION the worker might have made more clear whether or not they considered the fireplace and chimney unsafe.
On 2023-11-19 by InspectApedia DF (mod)
@Jay Shefsky,
You're welcome to use the page top or bottom CONTACT link to send me a copy of your chimney inspection report. That may let us comment further.
On 2023-11-19 by Jay Shefsky
@InspectApedia DF, Thanks!
On 2023-11-19 by InspectApedia DF (mod) - options for a wood-burning insert
@Anonymous,
Take a look at
FIREPLACE INSERTS INSTALL, INSPECT, REPAIR
On 2023-11-19 by Jay Shefsky
@InspectApedia Publisher, Thanks for your help with this. I've decided to stop using the fireplace till I get this solved. And since I'd be likely to spend thousands on a new liner, I've decided to investigate a wood-burning insert that could actually provide more heat for the house so I can rely less on electric baseboard heaters when I am hear in the colder months.
For our size firebox, one company quoted me 10k for a Regency insert and another 6k for Vermont Castings. If you have knowledge in this area i welcome your thoughts. Otherwise, thanks so much for your guidance. - Jay
On 2023-11-18 by InspectApedia Publisher - do NOT assume that no combustion products get drawn into the space between liner and original chimney flue
@Jay Shefsky,
I have to repeat the caveat that ALL of this is theoretical and speculative as I can't see your chimney from here in Poughkeepsie, but NO it's not correct to assume that no combustion products get drawn into the space between liner and original chimney flue.
There's a space there that can be vented from any chimney crack or opening including the omission of the top seal or plate;
There's also risk of water entering the space between liner and flue at the chimney top due to that improper installation, thus corroding the chimney liner or inviting frost damage.
Sounds as if it was not a proper original installation. If you don't have to use the flue then safest is to not use it. If you have to use it, I'd want a more thorough inspection and either a repair or re-lining. At the time of relining when you have the old liner removed and the flue inspected (chimscan camera - show me the photos) and cleaned (if needed) and relined, you'll know just how bad it was - or was not.
Search InspectApedia using our on page search box for OTHER PEOPLE'S MONEY to read a caveat about all of this.
On 2023-11-18 by Jay Shefsky
@InspectApedia Publisher, UPDATE: I just asked the inspector/cleaner for a copy of their report, which I had misplaced. Two important facts: they say the liner "does not have a proper bottom OR TOP termination plate."
And they removed a "large amount of creosote"; from the chimney. (It must have been my fireplace in Chicago that was very clean.). Ugh. So I suppose if there is also a gap at the top of the liner, smoke might be drawn into the gap at the bottom, right? Dang.
On 2023-11-18 by Jay Shefsky
@InspectApedia Publisher, Hi again - I just had a thought about this. Am I right that virtually all (if not ALL) of the smoke will be drawn into liner because of the chimney draft? So even if there is a gap at the bottom of the liner, it seems there is very little "motivation" for any smoke to go that way.
Further, I just remembered that the chimney cleaner/inspector commented on how clean the liner itself was after many years of not being cleaned. I assume that is because we use it so rarely and only use kiln-dried firewood (bundles at the grocery store).
So I am inclined to not worry about creosote outside of the liner. Would you agree? (I won't hold you responsible if our place burns down but does my thinking hold up in your opinion?) I will still look into getting that gap repaired.
While the liner may be approaching 20 years, the guy did examine the whole thing with a camera and had no comment about deterioration or aging of the liner, just that problem at the bottom. Thanks for your help with this..
On 2023-11-15 by InspectApedia Publisher - how do we assess the condition and safety of a 20-year-old metal line to chimney flue
@Jay Shefsky,
I would at least investigate that option. Unfortunately since I have essentially no actual facts about the condition of your building and the original chimney and the chimney liner everything that I have been able to say is theory
Do keep me posted on what you do and what you find as it may be very helpful to others facing these same questions.
Basically how do we assess the condition and safety of a 20-year-old metal line to chimney flue.
How much can a chimney scan camera tell us?
And beware of the
other people's money problem
that we describe it this website.
You can use our on page search box for that phrase to read about it.
When you ask people for advice about something that's dangerous they may give you advice that's safe for them and expensive for you.
On 2023-11-15 by Jay Shefsky
@InspectApedia Publisher, Thanks. Sounds like I should look into getting it relined. (ugh). But I am using the place more in colder months, I do love a fireplace fire, and it would be horrible to burn the place down. Luckily it is only one story. Thanks for your help.
On 2023-11-13 by InspectApedia Publisher
@Jay Shefsky,
Continuing: most of the research on failures or wear in stainless steel chimney liners is for industrial use. Some of that includes stainless steel chimney liner wear considerations that we might not have imagined, such as high temperature exposure and more subtle, wind-induced vibration.
Cheng, Yusong, Kaoshan Dai, Yangzhao Liu, Han Yang, Mengran Sun, Zhenhua Huang, Alfredo Camara, and Yexian Yin. "A method for along-wind vibration control of chimneys by tuning liners." Engineering Structures 252 (2022): 113561.
Gwoździk, M. "Corrosion of a chimney liner operated for 130,000 hours." Journal of Mining and Metallurgy, Section B: Metallurgy 00 (2023): 23-23.
Hansen, F. H., T. Hjelmeland, H. Landrø, and A. Østnor. "final report: cracking in flue liner of multi-wall chimney—investigation conserning future fire risk and function." (1997): 45.
T. Inha, P. Leppänen, M. Peltomäki, M. Pentti, Fire Safety of Light-weight Metal Chimneys, Tampere University of Technology, Department of Civil Engineering, Tampere (2011)
Leppänen, Perttu, and Mikko Malaska. "Fire safety of metal chimneys in real use in households." In International Fire Safety Symposium. 2017.
Leppänen, Perttu, Mikko Malaska, Timo Inha, and Matti Pentti. "Experimental study on fire safety of chimneys in real use and actual site conditions." Journal of Building Engineering 14 (2017): 41-54.
Abstract:
In recent years, numerous building fires have occurred in Finland where the fire has started due to the ignition of flammable materials in the vicinity of metal chimney penetrations through floors, roofs and walls. Based on onsite observations and experimental studies, one possible reason for the ignition is that the actual flue gas temperatures in real use in buildings are higher than those assumed for chimney design. An experimental study has been conducted in the TUT Fire Laboratory at Tampere University of Technology to determine the actual site conditions, identify the difference between the actual site conditions and the EN standard test conditions and assess whether the differences affect the fire safety of chimney penetrations. This paper describes the results of five site tests conducted in four different residential buildings and a sauna. The results revealed that the actual use of fireplaces and site conditions may differ significantly from the test conditions of EN standards. The site tests demonstrated higher flue gas temperatures and stronger draughts than what specified for the EN standard tests. The flue gas temperatures measured onsite were 134° to 278 °C higher than the mean temperature indicated in the CE marking of the tested fireplaces. The results indicate that the flue gas temperatures given in the CE markings of fireplaces may be too low for the designing of chimneys. This may cause a fire hazard at chimney penetrations.
Leppänen, Perttu. "Fire Safety of Metal Chimneys in Residential Homes in Finland." (2019).
Maj, Marek, Andrzej Ubysz, Hala Hammadeh, and Farzat Askifi. "Non-destructive testing of technical conditions of RC industrial tall chimneys subjected to high temperature." Materials 12, no. 12 (2019): 2027.
Zar, Max, Shih-Lung Chu, and James M. Doyle. "Design of Steel Chimney Liners." Journal of the Power Division 98, no. 2 (1972): 323-331.
On 2023-11-13 by InspectApedia Publisher - safety concerns for a gap between chimney flue liner and original flue
@Jay Shefsky,
How nice to connect through more than one twist of the double-helix of life. The wedding was a wonderful event. We met Allie before and then again after their first camping trip together and opined that as she survived and came home smiling things boded well.
Notes on Safety Concerns for a Gap Between Chimney Flue Liner and Original Flue, & on Chimney Liner Life
About your chimney gap, the amount of creosote deposit is one of the key elements in its risk, but the amount of creosote that actually GETS deposited depends on other variables such as the level of sap (how green was firewood) and the operating temperatures in the chimney.
There are many other factors for which we have no data. If for example there was very little air path up between the liner and the original chimney flue then one would not expect as much creosote to have been deposited in that gap.
Further, the case you describe is an unusual one: creosote in a gap between chimmney liner and original flue.
But doubtless you've read in this article series that if an accumulation of creosote is ignited the result is a very hot chimney fire that sounds like a roaring freight train and burns so hot that it can actually melt or damage chimney components, resulting in a serious house fire.
That's why people are so cautious.
In general, a stainless steel chimney liner of good quality is expected to have a life expectancy of 20-25 years, so yours may be nearing end of safe life independent of the creosote question.
OK so after all that, what's to be done?
OPINION:
1. I would not spend significant money on trying to seal the gap you describe when you're quite possibly faced with the cost of replacing the whole liner soon anyway.
2. As this is a fireplace you have the option of simply not using it. That's safest.
3. When the chimney liner is replaced - as may be due - have the old one removed and the new one properly installed, including sealing at its bottom end.
4. If you have documentation about the original chimney liner installation, dig that out and review it. Some stainless steel chimney liner manufacturers include a lifetime warranty. Look closely at that warranty. What does it cover? Then contact the liner manufacturer to ask their very specific advice on how you should evaluate the safety and condition of your specific chimney liner.
Fireplace use isn't the only factor in chimney liner condition and life. Also moisture, climate, chimney top cap and crown seal condition, history of leaks, maintenance, mechanical damage, etc. are other factors.
On 2023-11-13 by Jay Shefsky
@InspectApedia Publisher, Thanks. I will keep an eye on this space. (btw: we were both at Aaron's wedding. I am an old friend of Mike and Holly's. Sorry I never said hello!)
On 2023-11-12 by InspectApedia Publisher - bottom of the chimney liner is not properly attached to the firebox
@Jay Shefsky,
We need to give this some thought because I certainly don't want to bet your fire safety or your building on a single photo and a little bit of information.
I'm going to do a little more research. We need to know exactly how the bottom of that metal flue liner was supposed to be sealed in the first place and why it couldn't be sealed now simply by reaching up into the space with the proper material.
That is to say I don't see why demolition should be needed.
On 2023-11-12 by Jay Shefsky
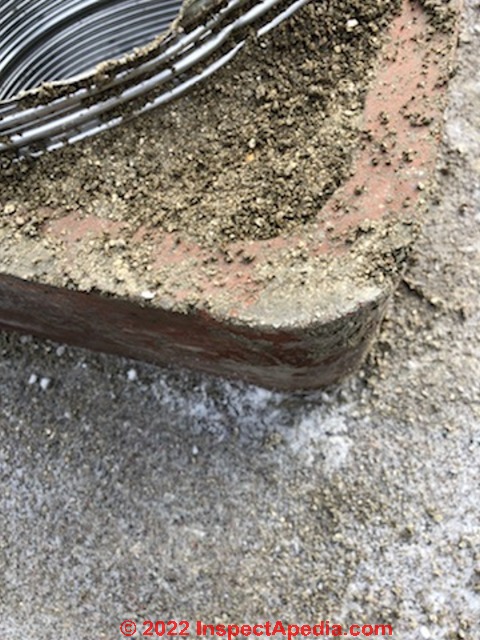
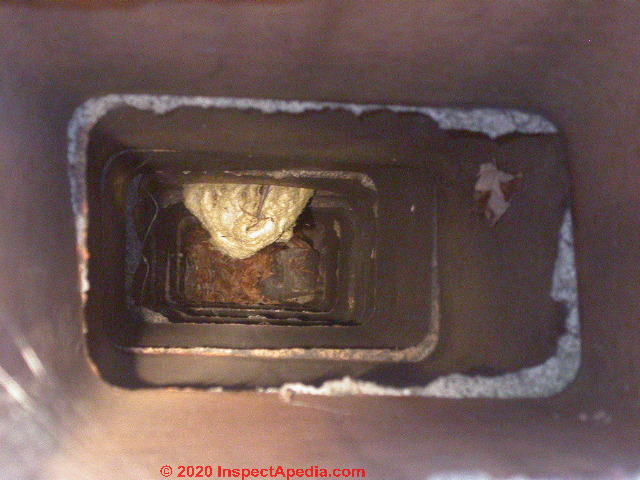
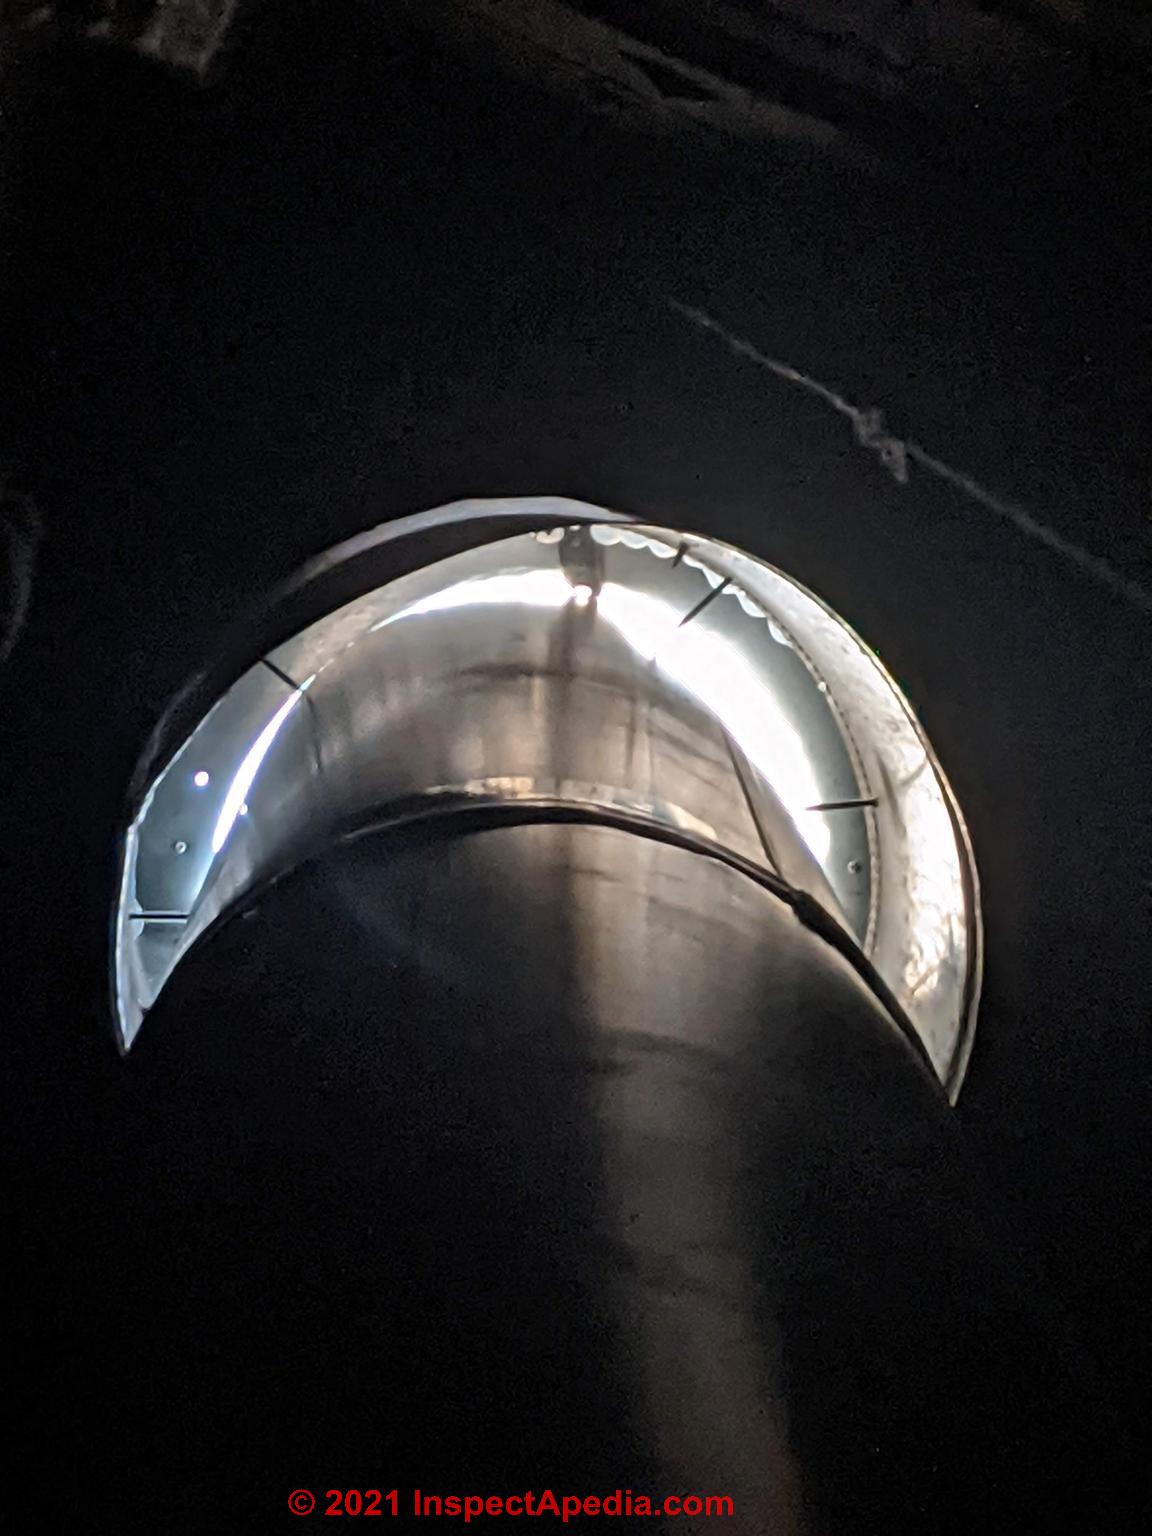
At our old family cottage in SW Michigan, the chimney has been lined for about 20 years. I recently had a cleaning and inspection and the guy noticed that the liner was not installed properly - the bottom of it is not properly attached to the firebox, so smoke can get between the liner and the clay tile around it.
He said there would be a way to repair it to block that space. (he can't do the work - Michigan wisely, imho, does not allow the cleaner/inspectors to do chimney lining or other repairs).
But my question is this: after 20 year of pretty minimal use - maybe a dozen max fires per year - how worried should I be about any creosote that has accumulated in that space between the liner and the tile? Is it a fire risk even if I get that gap sealed up?
I sure don’t want to have to replace that liner now if the less expensive repair would solve it. And do you agree that sealing that gap is essential?
Attached is a photo he took of the bottom of the liner.
Thanks,
Jay Shefsky
On 2023-04-18 by InspectApedia Editor - Does a brick chimney with clay liner and SS liner need combustible clearance in attic for an oil boiler?
@Cristina,
Thanks, that's a challenge question that makes me nervous.
If there is a brick chimney with a clay chimney tile liner AND a stainless steel chimney re-lining kit has been installed too - as in your question, that suggests that a chimney professional may have found that the chimney wasn't safe as-is.
In that case, I think that your local code official may want combustible clearance from the chimney that matches that specified by the chimney reliner manufacturer.
But what's your actual situation. In general we don't expect to see wood framing right up against the masonry chimney except in much-older homes.
On 2023-04-18 by Cristina
Does a brick chimney with clay liner and SS liner need combustible clearance in attic for an oil boiler?
On 2023-02-01 by InspectApedia Publisher - where should the screws be in the chimney installation
@Gary
It would be helpful if you could post a photo or at least tell us the brand and any other product identification information you have on that chimney. Then we could see what the manufacturer says.
Probably, the use of screws did not follow the manufacturers' instructions if it's a multi wall metalbestos type insulated chimney.
Just how serious a problem it is probably depends on where the screws are exactly.
On 2023-02-01 by Gary H
I just had the chimney for my pre-fab fireplace cleaned. The technician showed me pictures that the sections of the class A pipe had screws installed at the joints. The fireplace is 20 years old and has not been a problem
He was not sure if this was a significant risk factor or not, but said he had not seen it done
What is your advice?
On 2022-10-24 by InspectApedia (Editor) - Who fixes separated chimney flues
@Toddhubbartt,
Masonry contractors, and some certified chimney sweeps also provide Masonry repairs. I would start with a thorough diagnostic inspection of the chimney and flue so that you have an idea whether or not a repair is safe and feasible.
On 2022-10-24 by Toddhubbartt@gmail.com
Who in Wisconsin fixes separated chimney flues
On 2021-05-19 by Tatyana - making an old chimney work with new fireplace insert or wood-stove
 I've been trying to "navigate" this problem for almost two months now, but your response just put it all in perspective I was lacking before!
Thank you so much for sharing your knowledge and expertise: now I've gained much better understanding of the available options.
Fireplaces/chimney installation is such as niche industry. I really can't thank you enough for your help.
On 2021-05-18 by (mod) - Heatilator & other manufacturers see the installer as their customer
@Tatyana,
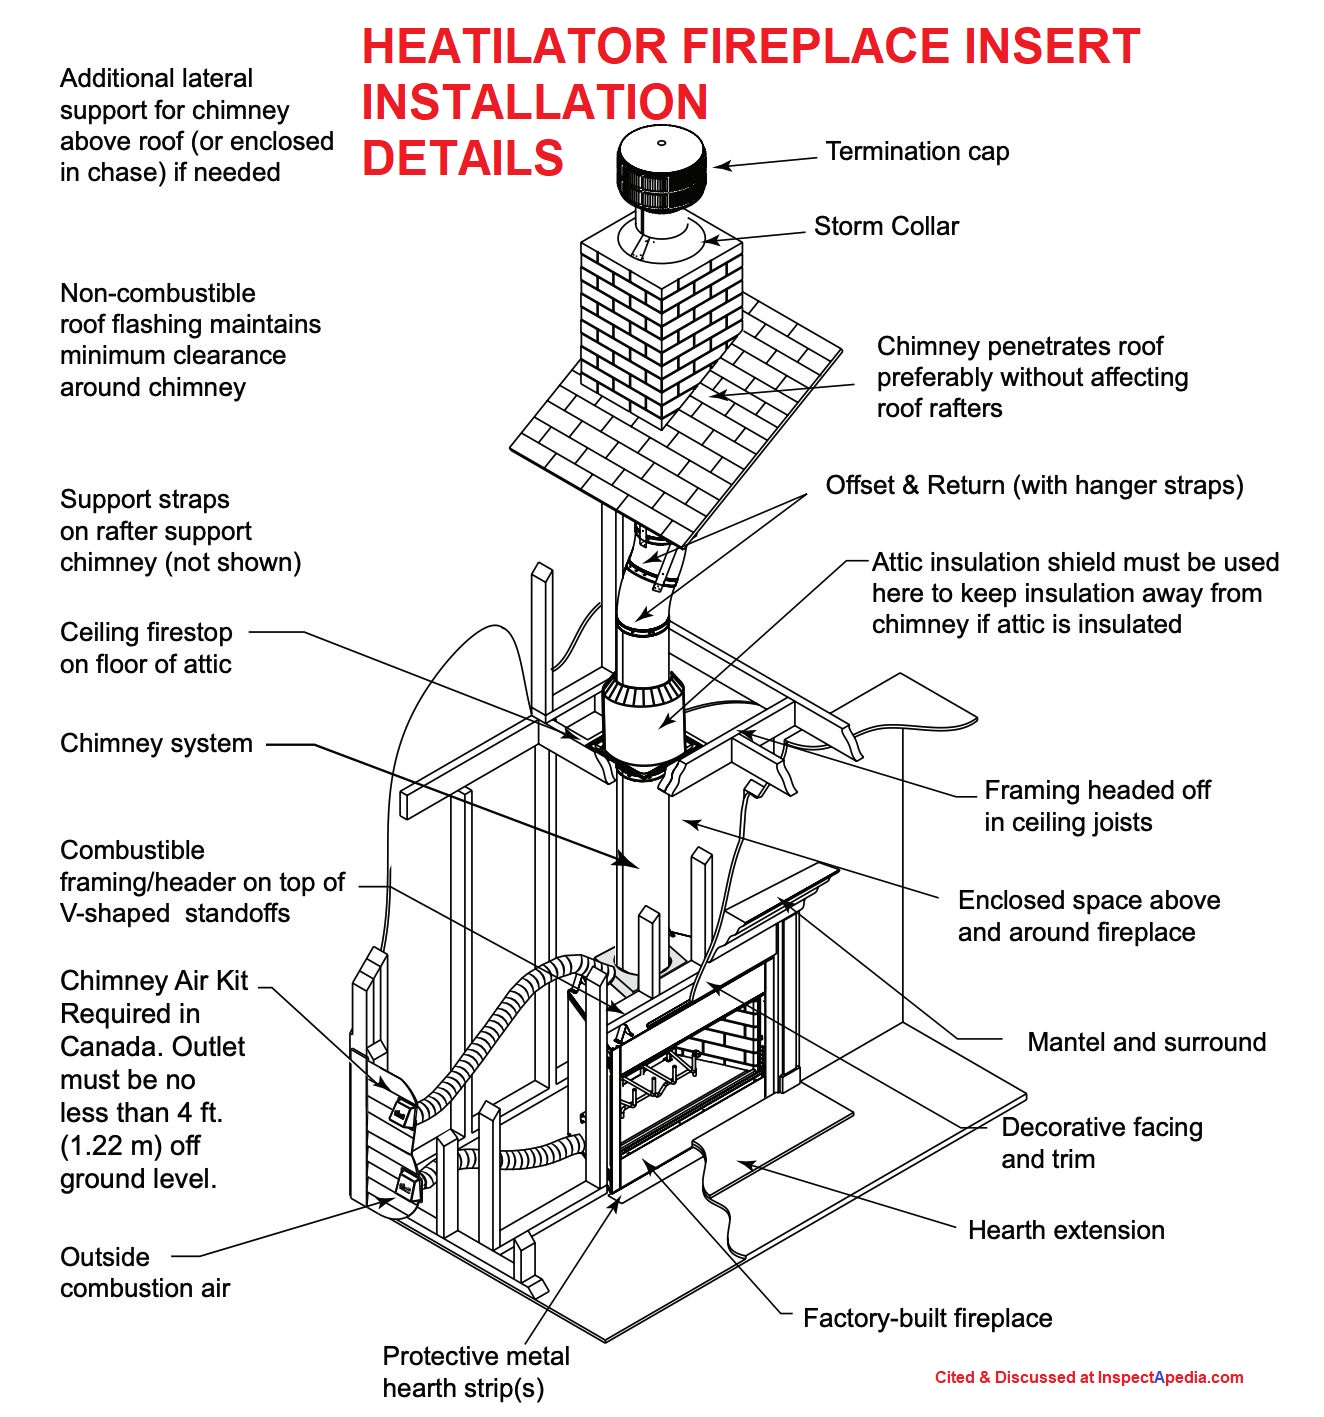
It is indeed disappointing, to put it politely, to see that the manufacturer of your Heatilator EL42 Wood Burning Fireplace appears to be entirely focused on protecting their dealer rather than the ultimate consumer of their products.
This is not a new situation. It's very often the case that a manufacturer realizes that its true "customers" are the contractors who buy and install their product, rather than the ultimate consumer.
In my OPINION this is understandable as contractor loyalty is important - money-in-the-bank - for the manufacturer, but it's also sort-sighted: the ultimate consumer is the person paying everybody.
As my mother used to remind vendors "I'm the one with the money" - in an effort to demand basic courtesy.
Similarly other dealers in your area don't want to step on one-another's toes.
What's left ?
By reading specifications and talking with your installer you either make yourself confident and comfortable with the deal and finish the job
or
perhaps you can get help from your local fire or building code compliance officer: usually that person is very interested in fire-safety.
or
Perhaps you can get help from the manufacturer of the chimney system you are using - that's an independent product from the Heatilator fireplace.
Keep us posted and hope that a bit of sunlight of public exposure might help matters run they way they ought - to the profit and protection of everybody concerned.
Also see FIRE CLEARANCES, METAL CHIMNEYS
On 2021-05-18 by Tatyana - how do if find out what chimney liner I can use for a Heatilator product?
I really do appreciate the information and realize you're going above and beyond to help. I appreciate that. I'm just a homeowner who knows nothing about chimney systems, and unfortunately this has been an impossible situation since this install failed this late March.
Manufacturer (Heatilator/Hearth&Home) refuses to talk to me stating that all technical questions must be resolved through the dealer. Every other authorized dealer in their network within 100 mile radius refused the job stating that they either don't service my area or will not take on the repairs due to the liability of a bad original install.
I even attempted to source the Level 2 inspection, but no CSIA or NFI certified tech will take on the job ( few had expressed verbally that they wouldn't feel right charging me since they can see from the photos that this is a bad installation).
I did reach out to my town's fire inspector after all the repairs, he came on site for the second time (despite permit being closed), said that clearances look okay, but wasn't able to comment on the installation since he doesn't go up on the roof.
The original installer offered to replace all the venting, but in exactly same way. Given numerous failed repair attempts by them prior, original bad install and just overall how they're handling the situation I don't have much confidence in their ability to perform a safe/proper installation.
Thank you again. Give the nature of this situation and safety risk, it seems like complete installation of a new fireplace is needed with a different product/installer.
On 2021-05-18 - by (mod) - fire clearance required around insulated chimneys
@Tatyana,
Modern insulated metal chimneys such as the SuperVent and SuperPro by Selkirk frequently require a 2" fire clearance around most penetrations through building walls, floors, ceilings, roofs, unless the wall or floor is made of noncombustible material (like concrete).
If you don't already have it, the Installation Manual for your Heatilator 36 or 42 fireplace can be downloaded at
HEATILATOR EL32-EL46 FIREPLACE INSTALLATION MANUAL [PDF] Heatilator EL36/EL42 4044-188 Installation Manual Rev Q 10/20, retrieved 2021/05/18 original source https://downloads.hearthnhome.com/installManuals/4044_188.pdf
Read with care ALL of the installation and safety warnings in that manual.
The sketch below shows the parts of a Heatilator fireplace installation.
From the instructions
Watch out: WARNING! Risk of Fire! You must maintain a minimum 2 in. (51 mm) air space clearance to insulation and other materials surrounding the chimney system.
• Insulation and other materials must be firmly secured to prevent accidental contact with chimney system.
• The chase must be properly blocked to prevent blown insulation or other combustibles from entering and making contact with fireplace or chimney.
• Failure to prevent contact between insulation or other materials and chimney system may cause overheating and fire.
The chase is constructed using framing materials much the same as the walls in your home. A variety of siding materials may be used including brick, stone, veneer brick, or standard siding materials.
• In constructing the chase, several factors must be considered:
- Maintain a 2 in. (51 mm) air space around the chimney.
- The chase top must be constructed of noncombustible material.
- In cold climates, a firestop spacer and attic insulation shield should be installed in an insulated false ceiling at the 8 ft. (2438 mm) level above the fireplace
assembly. This reduces heat loss through the chase.
- In cold climates, the walls of the chase should be insulated to the level of the false ceiling as shown in Figure 3.3. This will help reduce heat loss from the
home around the fireplace.
----
I think your chimney chase is more-complex than the usual case as it's a chimney within an existing flue; The manufacturer MIGHT tell you that that's fine. From what I can see in your description (which is VERY incomplete), I don't see a 2-inch air space around the new chimney; I don't know what that means for heat transfer, nor for the resulting temperatures inside the flue, the chimney life, and its safety.
About routing the new smaller chimney through the existing one, the appeal of that approach is obvious and on the face of it isn't a crazy idea.
But unfortunately ANY time we vary in installing a chimney system, because there are fire and gas leak hazards, nobody, not the manufacturers involved nor the installing company are likely to promise you, in writing, that the installation is safe, OR, in my experience and OPINION, if someone does-so, it's an installer who a. doesn't know better and b. is someone who hasn't the resources to cover the potential loss that could ensue if the are later called-on to deliver their on their promise.
For example, puncturing the skin of an insulated metal chimney system with screws to support it en-route might, in the opinion of its manufacturer, be a bad idea. Class A insulated metal chimneys use at least two layers of metal, an inner liner, an outer liner, and an insulating filler.
Usually such chimneys are supported by an external clamp not by puncturing the chimney with screws. The manufacturer might be concerned about the possibility of leaks into and damage to the chimney where it is punctured by screws, making it unsafe.
So before accepting this installation, and even presuming that questions of water leaks and combustible clearance can be answered satisfactorily, I would suggest that you call the manufacturer of your chimney system to talk with their engineers or technical support to be sure they are happy with your installation.
Details about safety inspections of pre-fab or fireplace inserts like yours are
at FIREPLACE INSPECTION PRE-FAB
and about your type of fireplace, see
FIREPLACE INSERTS INSTALL, INSPECT, REPAIR where we include installation manuals and specifications for fireplace inserts like your Heatilator unit.
On 2021-05-18 by Tatyana - 16" metal chimney converted to Class A SL300 Chimney Vent
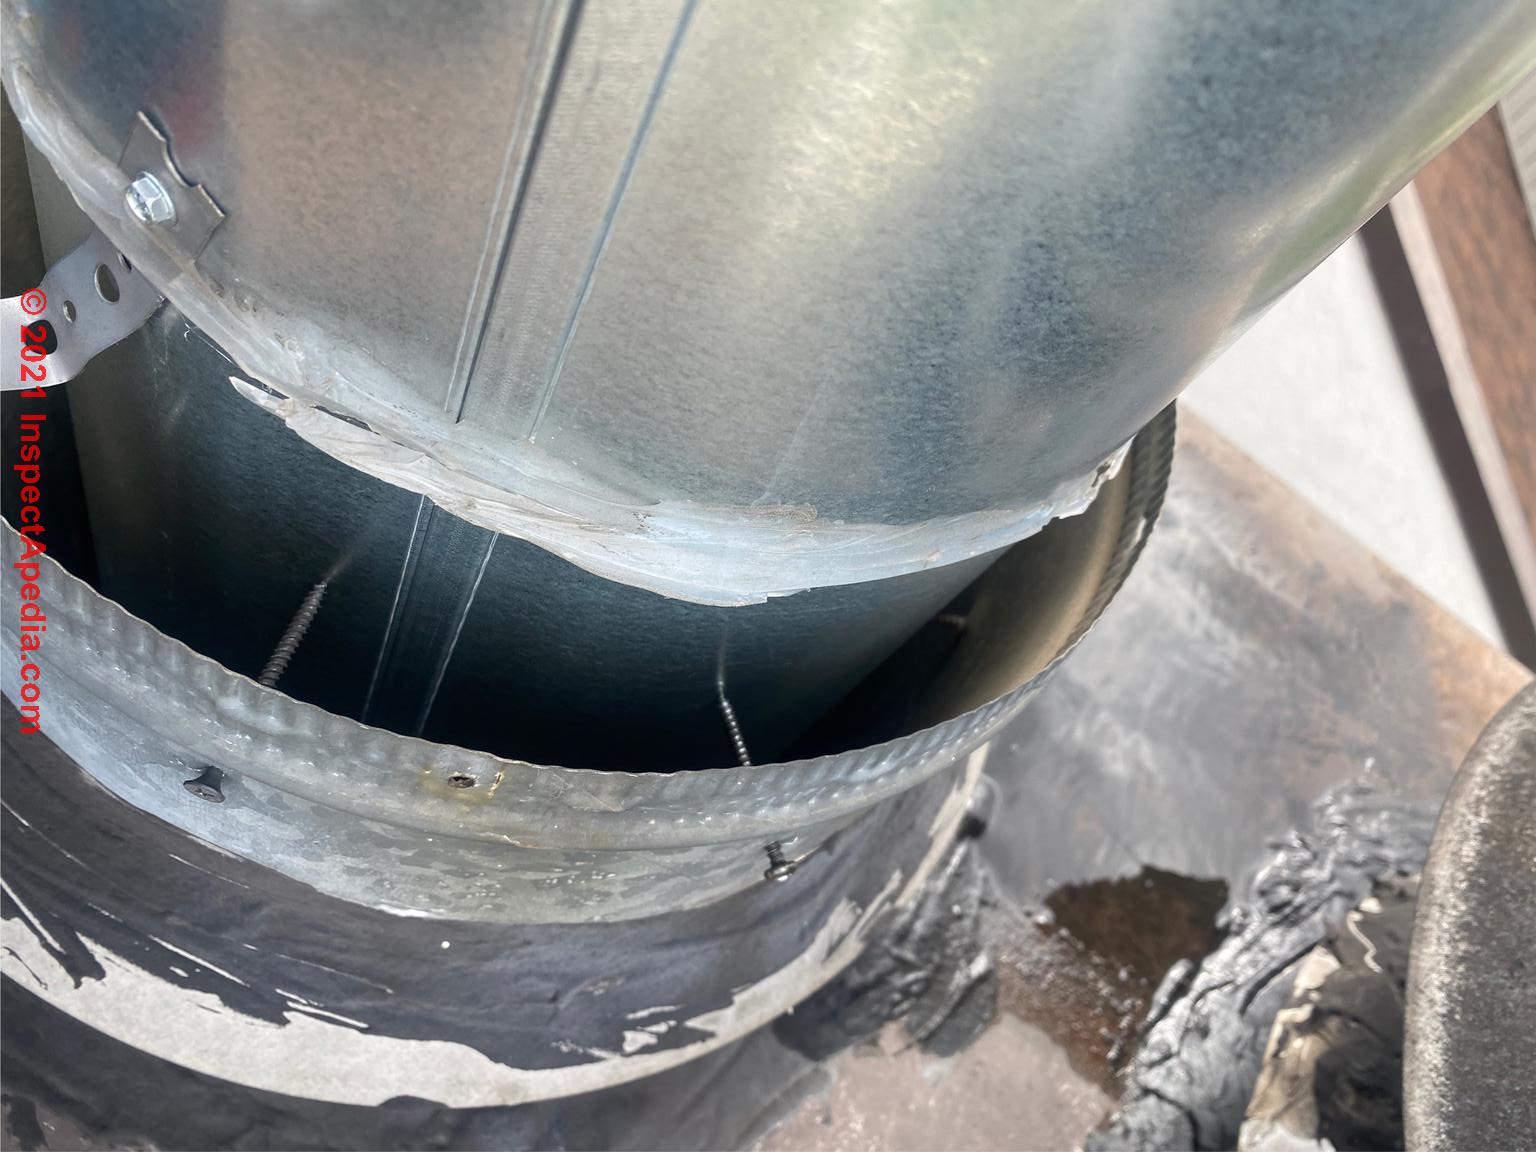
This vent was for an original build TEMCO zero clearance fireplace with 16" outer diameter triple wall pipe. It was replaced by a Heatilator zero clearance EL42 fireplace with 10" diameter class A SL300 pipe.
The installer left the top section of the outer old pipe in the roof entry/chase top. The new SL300 pipe is passing through it pinned by screws at the very top and 3" gap all around is covered by storm collar weatherproofed with silicone.
Is pinning smaller diameter pipe with screws something that's common in retrofitting new chimney though original vent that's much larger? In the winds I'm hearing noise coming from that area and very concerned that when new vent system is installed in the same way, it too will fail. Thank you in advance!
On 2021-05-18 - by (mod) -
@Tatyana,
I don't have a clear picture of the fire rating and therefore fire safety of this modified installation.
Beyond that, it also seems to me that you are reducing the internal diameter of the vent, which in turn could mean that your stove is not going to fit properly.
On 2021-05-17 by Tatyana - Heatilator EL42 Wood Burning Fireplace chimney installation
 Thank you, Dan. It's Heatilator EL42 Wood Burning Fireplace.
The manufacturer only accounts for flashing and chase top installation - the decision to put the new pipe through the old one and secure it by pinning screws was made by the installer.
The photo was taken during one of the repair attempts - the installer claimed that it was the cap that was making the noise. Replacing it did not help. Attaching an image of what roof entry looks like from inside the chase.
I'm just looking for information is this is a proper installation - I'm unable to find any other references or instances of anyone else using the same method. Thank you!!
On 2021-05-17 - by (mod) -
@Tatyana,
I take it you removed the storm collar to take that photo? My goodness, if not then we're inviting leaks into the building and risking dangerous damage to the heating equipment.
Let's start by identifying the manufacturer and brand to get the exactly-correct installation instructions for your chimney - then we can compare that with your installation details.
On 2021-05-17 by Tatyana - SL300 Chimney noise may hint at unsafe conditions & fire hazards
 Hello:
8 months after the new install, my SL300 chimney started to make terrible sounds in the winds.
The installer admitted their mistake in not using the screws to secure offset/return as per manufacturer's specifications (elbow was separating), and after subsequent 3 unsuccessful repairs they are offering installation of a new SL300 venting claiming manufacturer defect.
They will be securing the replacement chimney in the very same way as original install (plus the mandated screws).
I'm concerned about the method they used, as I suspect this contributed to the failure.
The new pipe was anchored to the remains of the old one in the roof entry by pinning it with the screws (like a Christmas tree stand). Storm collar was used to cover up the gap between old and new pipes.
Total pipe length is 14.5 feet and the only support is straps for the elbow.
The chimney currently making rattling and squeaking noise in the winds gusts, and there's a lot of light coming in from the roof entry. Is this a proper installation method as contractor claims?
Thank you in advance!
Contributor
- LAKEVIEW MASONRY, 4413 Venture Avenue, Duluth, MN 55811, Tel: 1-218-525-5146, info@lakeviewduluth.com. Offers a variety of services including chimney inspections and sweeps, chimney installation and repair, masonry work, fireplace, wood, and gas stove installation, and dryer vent cleaning. Chimney Sweep Institute of America (CSIA) certification.
Lakeview Masonry completed the chimney re-lining project described in this article.
InspectAPedia.com provides building and environmental diagnostic and repair information to the public, without cost or fee. In order to absolutely assure our readers that we write and report without bias we do not sell any products nor services, nor do we have any business or financial relationships that could create such conflicts of interest.
...
Continue reading at CHIMNEY REPAIR FRAUD WARNING, or select a topic from the closely-related articles below, or see the complete ARTICLE INDEX.
Or see these
Recommended Articles
- CHIMNEY COLLAPSE RISKS, REPAIRS
- CHIMNEY FLUE INSPECTION CAMERA - detailed inspection for hard-to-spot damage or hazards
- CHIMNEY HEIGHT EXTENSIONS - extend the height of a chimney to improve draft and fire safety
- CHIMNEY INSPECTION DIAGNOSIS REPAIR - home
- CHIMNEY LEANING, REPAIR OPTIONS - how to evaluate and then stabilize or repair a leaning chimney
- CHIMNEY REPAIR FRAUD WARNING - consumer warnings
- CHIMNEY RE-LINING CHOICES - chimney lining alternatives when a flue liner is missing or damaged
- CHIMNEY REPAIR METHODS
- CLASS A CHIMNEYS, MetalBestos™
- DAMAGED CHIMNEY FLUES: CRACKS, HOLES, SPALLING - evaluate and repair cracks and holes in masonry chimneys and flues
- FIREPLACE INSERTS INSTALL, INSPECT, REPAIR
- FUEL CHANGES for HEATING APPLIANCES - may require chimney cleaning, inspection, and re-lining
- MASONRY CHIMNEY GUIDE - home
- METAL CHIMNEYS & FLUES - home
- METAL CHIMNEY CONNECTIONS - how should flue vent connectors and metal chimney sections be connected
- REPLACEMENT PARTS for METAL CHIMNEYS - repair and replace metal chimneys and flues
- TYPE B-VENT CHIMNEYS
- UNLINED FLUE INSPECTIONS - inspect un-lined masonry flues for damage & safety; installing a chimney liner may be needed
Suggested citation for this web page
CHIMNEY RE-LINING CHOICES at InspectApedia.com - online encyclopedia of building & environmental inspection, testing, diagnosis, repair, & problem prevention advice.
Or see this
INDEX to RELATED ARTICLES: ARTICLE INDEX to CHIMNEYS & FLUES
Or use the SEARCH BOX found below to Ask a Question or Search InspectApedia
Ask a Question or Search InspectApedia
Try the search box just below, or if you prefer, post a question or comment in the Comments box below and we will respond promptly.
Search the InspectApedia website
Note: appearance of your Comment below may be delayed: if your comment contains an image, photograph, web link, or text that looks to the software as if it might be a web link, your posting will appear after it has been approved by a moderator. Apologies for the delay.
Only one image can be added per comment but you can post as many comments, and therefore images, as you like.
You will not receive a notification when a response to your question has been posted.
Please bookmark this page to make it easy for you to check back for our response.
IF above you see "Comment Form is loading comments..." then COMMENT BOX - countable.ca / bawkbox.com IS NOT WORKING.
In any case you are welcome to send an email directly to us at InspectApedia.com at editor@inspectApedia.com
We'll reply to you directly. Please help us help you by noting, in your email, the URL of the InspectApedia page where you wanted to comment.
Citations & References
In addition to any citations in the article above, a full list is available on request.
- In addition to citations & references found in this article, see the research citations given at the end of the related articles found at our suggested
CONTINUE READING or RECOMMENDED ARTICLES.
- Carson, Dunlop & Associates Ltd., 120 Carlton Street Suite 407, Toronto ON M5A 4K2. Tel: (416) 964-9415 1-800-268-7070 Email: info@carsondunlop.com. Alan Carson is a past president of ASHI, the American Society of Home Inspectors.
Thanks to Alan Carson and Bob Dunlop, for permission for InspectAPedia to use text excerpts from The HOME REFERENCE BOOK - the Encyclopedia of Homes and to use illustrations from The ILLUSTRATED HOME .
Carson Dunlop Associates provides extensive home inspection education and report writing material. In gratitude we provide links to tsome Carson Dunlop Associates products and services.
 | HOME | ABOUT | ASK a QUESTION | CONTACT | CONTENT USE POLICY | DESCRIPTION | POLICIES | PRIVACY | |
| © 2025 - 1985 Publisher InspectApedia.com - Daniel Friedman | |||||||||