
 Interior Walls, Ceilings, Built-in Furniture
Chapter 16 of How to Build Your Dream Home © 2020 InspectApedia.com

- POST a QUESTION or COMMENT about how to identify the architectural style of buildings and building components
Chapter 16 of BUILD YOUR DREAM HOME
This article series provides an updated version of Hubbard Cobb's Your Dream Home, illustrated by Sigman-Ward, first published by Wm. H. Wise & Co. New York, 1950.
From site selection and obtaining financing through each step in construction of a single family home the simple procedures and drawings in this book are still useful for anyone building or repairing a home or other small structure.
InspectAPedia tolerates no conflicts of interest. We have no relationship with advertisers, products, or services discussed at this website.
- Daniel Friedman, Publisher/Editor/Author - See WHO ARE WE?
BUILT-IN FURNITURE
When it comes to covering the studding and joists to make the inside walls and ceilings, there is a wide selection of materials to choose from.
Types of Material
First of all, there is plaster. In the building trades, a plaster wall or ceiling is often referred to as “wet wall” construction because of the fact that plaster must be mixed with w'ater before it can be applied to the wall and ceiling surfaces. Plaster provides a smooth and unbroken surface that is ideal for paint, paper or any other type of wall covering. The finish or top coat of plaster can be smooth or have a rough-texture effect.
The main disadvantage to plaster is its high cost. Plastering is not a skill that can be quickly or easily acquired, and for this reason, if you select plaster for the inside wall material, you should figure on calling in a professional to do the job for you. Of course, you can cut down the cost considerably by doing your own lath work, installing the grounds and beads and acting as a helper to the plasterer, but the job is still going to run your total costs up.
Another very definite drawback to plaster is that the job must be done perfectly from the lathing to the final coat. If the plaster is not properly mixed, applied and cured, it will crack, blister and cause no end of trouble. And still another disadvantage is that because of the large amount of water used in mixing, the wet plaster can be a source of damage to woodwork, which absorbs moisture from the plaster and expands. This moisture in the plaster also holds back decorating jobs such as painting or papering.
Also see BATTER BOARDS LAYOUT METHOD The other method of making interior walls and ceilings is called “dry wall” construction.
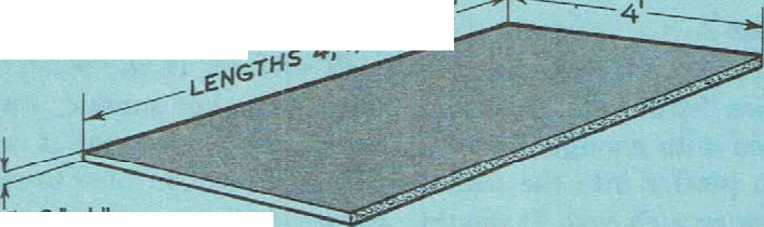
The materials used in this method are plywood, plaster board, composition board, insulating hoard, etc., often all lumped under the general heading of “wallboard.” These boards come in all sizes, ranging from the large building boards that measure 4' by 12' to the ceiling tiles that are only 1 foot square.
With a few exceptions, building boards are nailed right to the wall studding. See Fig. 1. The exceptions are the ceiling tile and wall planks, which require additional furring nailed to the studding to serve as a nailing base. Walls and ceilings built out of wallboard can be papered and painted. These materials are, as a rule, very easy to work with. The only tools required are a hammer and saw. For someone who
PLASTER BASES
Those who prefer to stick with plaster should certainly have no great difficulty in installing the laths or plaster base. There are several materials used for the base. First of all, there are wood laths, which have been used for years but are now gradually being replaced by materials that can be installed in less time, are more resistant to fire and contain certain insulating properties.
Wood laths come in bundles of 100 laths each. The lath is 48" long, so it will fit on studding that is either 16", 18" or 24" on center. The laths are about 1/4" wide.
Plasterboard, gypsum lath or rock lath is made with a core of plaster encased in paper. The size of a sheet varies from 16" x 32" up. The surface of the boards may be smooth, rough or perforated with holes that serve as keys to hold the plaster. Plasterboard is fire resistant.
Another plaster base is metal lath. There are expanded metal laths, expanded corrugated laths and Avire laths. See Fig. 2. Metal lath comes in sheets 27" x 96" or thereabouts. In addition to the metal laths, there are also metal reinforcements for inside and outside comers, door arches and other
points where extra strength is needed.
Installing Wood Laths
Wood laths should be soaked in water for a day before they are nailed
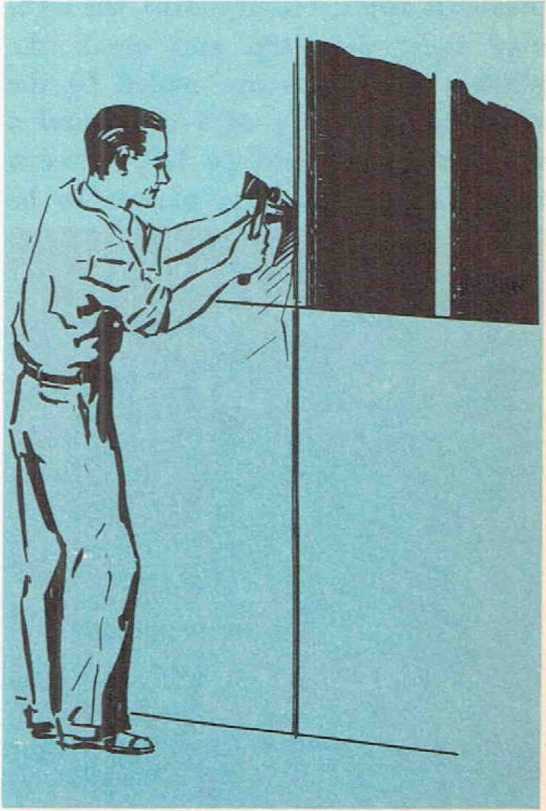
Fig. 1. Installing wallboard. Dry wall construction of this type offers many advantages over a plaster wall. The most important factor is the ease with which such a wall can be covered.
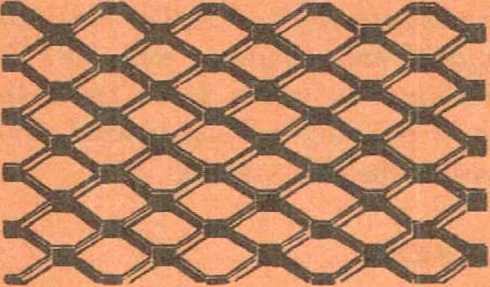
Fig. 2. Expanded metal lath.
to the studding and joists. This allows them to dry out with the plaster. If the plaster is applied to dry laths, the laths may twist or warp and crack the plaster. The laths are nailed to the studding in groups of 7 or 8, and a space of %" should be left between them. This allows the plaster to be
OUTSIDE WALL
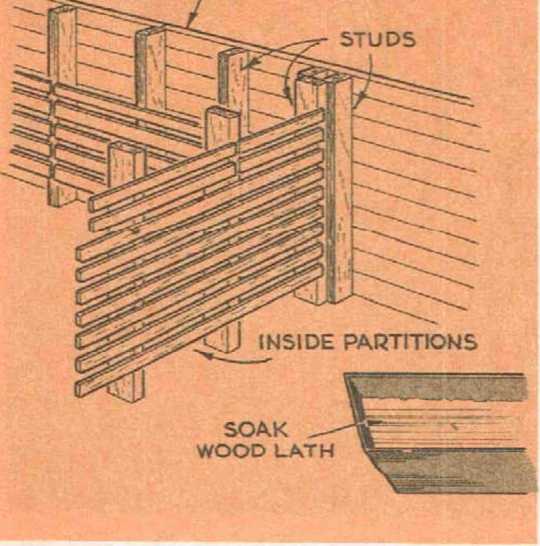
Fig. 3. Installing wood laths. Note that the vertical joint is broken every seventh course. Special partition studding enables the ends of the laths to be nailed securely.
Forced in back of the laths, where it forms “keys” that hold all the plaster to the laths. Each lath should be nailed with a 3d nail whenever it crosses a piece of studding. Leave a space of Vi" where the ends of laths meet, and leave a similar space when a lath reaches a corner.
If, for some reason, the laths do not extend far enough for the ends to be nailed to a solid base, nail odd pieces of 2" x 4" to the base to bring it out until it reaches them. Do not allow the ends of the laths to go unsupported.
After a group of 7 or 8 laths has been nailed on, stagger the next group so that the vertical joints do not overlap. Avoid using short lengths of laths around openings such as window or door frames, or where there are going to be openings for heating, plumbing lines or electrical fixtures. See Fig. 3.
Installing Plasterboard or Insulating Board Laths
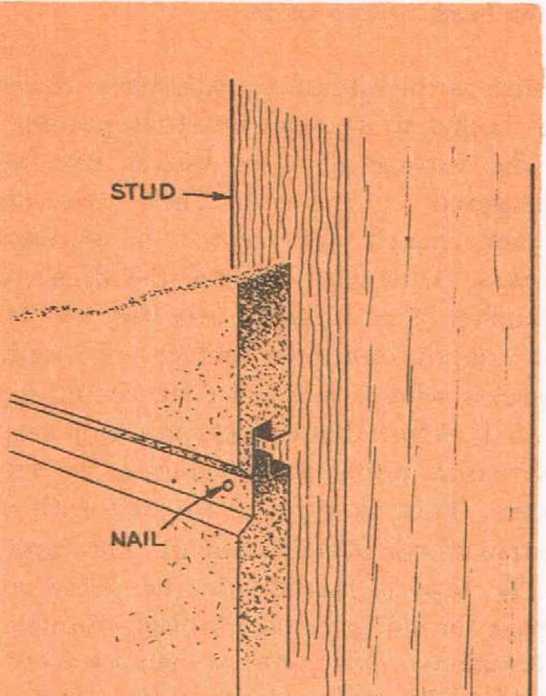
Each of these two types of lath is installed in exactly the same manner. The laths are nailed directly to the studding and ceiling joists. As a general rule, 3d nails are the proper size. They should be spaced 6" apart at the studding and 3" where two sections of board meet.
All joints between sections must come over studding or joists, and vertical joints should he staggered so that one does not come directly over the one below. Each sheet should be butted tightly against the next. Sheets should not be dampened before they are installed or before the plaster is applied.
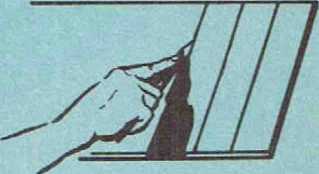
Gypsum plasterboard can be cut by scoring it on one side with a sharp tool and then pressing down along this line, first on one side and then on the other. This will produce a clean break. Insulating lath can be cut with a handsaw.
Metal Lath
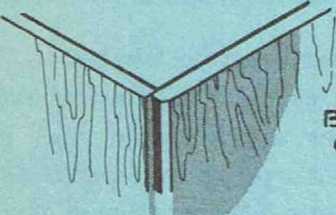
Metal lath of all types is nailed to the studding or joists. It goes on horizontally and should be staggered so as to avoid long vertical joints. Do not allow a joint to occur at a comer. Bring the sheet of lath around so that it extends for at least one stud past the corner. If you allow joints to form at the corners, you are going to be troubled with cracking plaster. See Fig. 4.
Corner Beads and Reinforcements
Regardless of how well a wall or ceiling has been lathed, there are bound to be certain weak areas where the plaster is easily damaged or is likely to crack unless some additional rein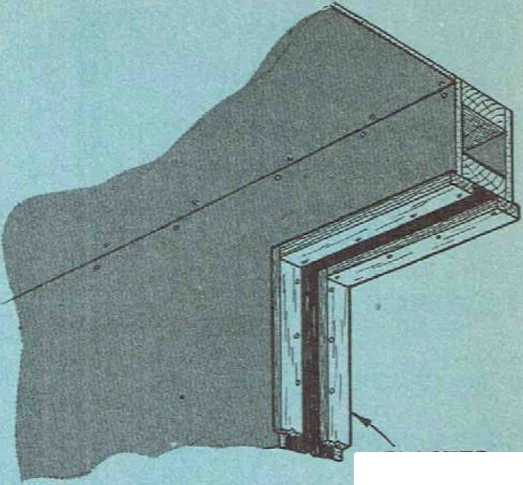 forcement is used.
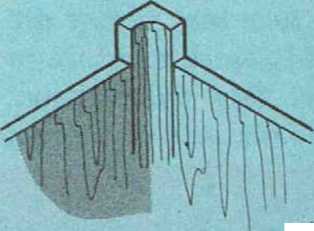
First of all, there are all the outside wall corners. To protect the plaster at these points from being chipped or cracked, a metal corner bead is used. These beads are made with a rounded corner and they serve as a ground or guide for the plasterer as well as protecting the plaster itself. See Fig. 5. Corner beads must be perfectly plumb, and care must be taken not to damage the thin metal bead when it is being nailed to the corner.
lath. Note the overlap at joint and where ceiling and wall meet.
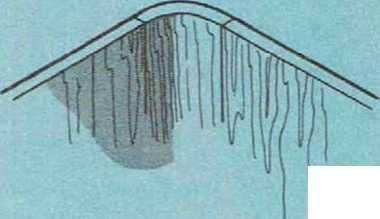
Inside corners, such as those formed by adjacent walls or by the walls and ceilings, must be reinforced too, because this is a spot where the plaster is especially likely to crack. Metal corner without any bead is used in these areas. See Fig. 6.
Additional reinforcement is also required on the face of the lath at the corners of any window, door or other openings in walls or ceilings. Small strips of metal lath will do for these spots. See Fig. 7.
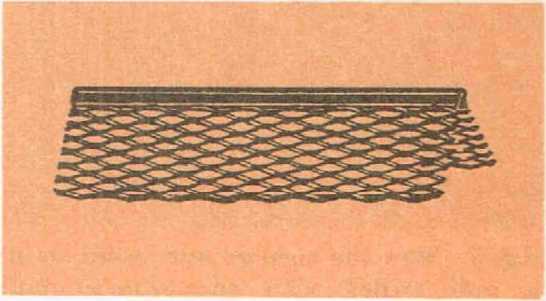
Fig. 5. Corner head used for exterior corners.
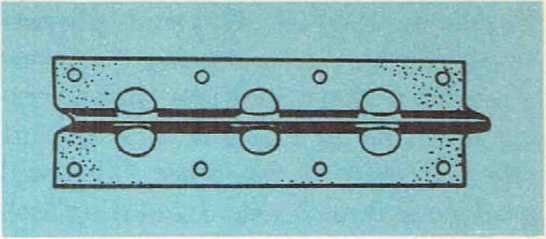
Fig. 8. Picture molding.
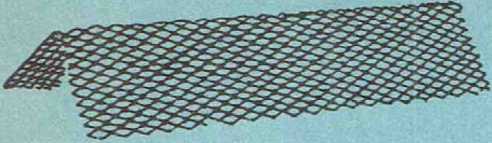
Fig. 6. Metal lath without beading should be used for all interior corners.
If you plan to have an archway or similar opening, metal forms are available that should be used around the entire opening unless, of course, you plan to use wood trim.
Picture molding, which comes in long sheets, not only serves as a means to hang pictures on the wall without
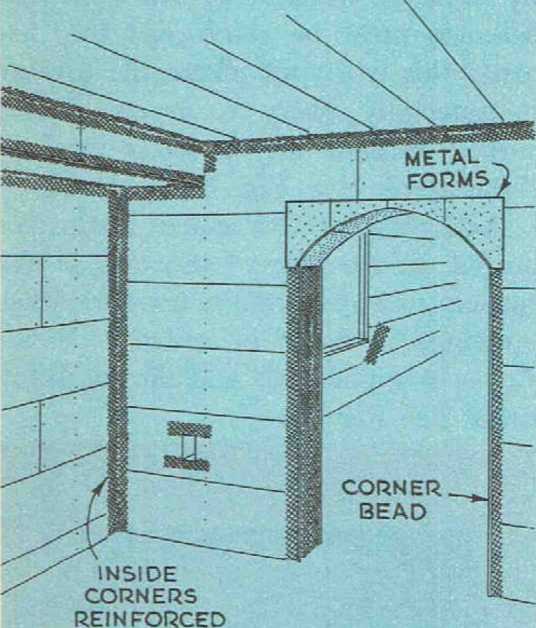
Fig. 7. How the corners and openings in a wall lathed with plasterboard lath should be reinforced with metal lath and metal beading.
having to drive in nails, but it also provides a guide for the plasterer. See Figs. 8 and 9. Be sure that this molding is level and see that joints at corners are carefully mitered.
*
Plaster Grounds
Plaster grounds are strips of wood that are attached along the base of the walls and around door, window and other openings where wood trim is to fit over the edges of the plaster The reason for using them is that the plaster at these points must be perfectly true and level; if it is not, the wood trim, when installed, will hit the high spots in the plaster, causing unsightly cracks between plaster and trim. In other words, the grounds serve
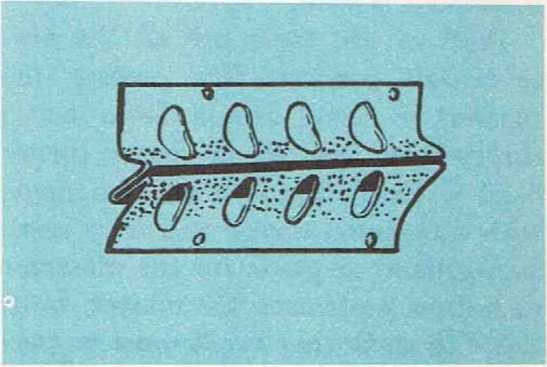
Fig. 9. A type of picture molding that makes an excellent base from which to hang articles.
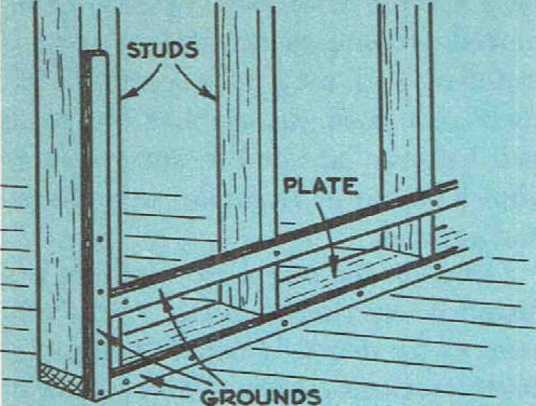
PLASTER GROUNDS APPLIED TO DOOR OPENING

Fig. 10. Another method of applying grounds around door and window openings. As the grounds are the same thickness as the plaster and lath, they can be left in place and will serve as a nailing base for the door and window trim.
as a guide to the plasterer and help him to put the plaster on correctly.
Grounds are usually made out of< 1" x 2" dressed lumber. This brings their actual thickness down to 2% 2 ", which is the thickness of the finished plaster surface, including the laths. Grounds for the base of the wall should be tacked to wall plate.
Usually two grounds are used in this location so that the plaster, running the entire width of the baseboard, will be of uniform thickness. These grounds can be left in place to be covered up by the baseboard.
See Fig. 10. It is a good idea to mark on the sub-floor, either with chalk or nails, the location of the studding so thLt after the plaster is applied, the position of the studding
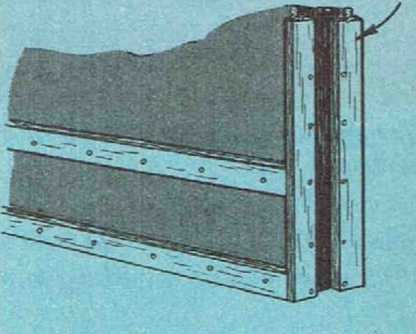
Fig. 11. Plaster grounds at baseboard and around door opening. The grounds at the baseboard are left in place and serve as a nailing base for the baseboard.
Grounds around the door opening are removed before the door frame is installed.
will still be clear. When it comes to the grounds for doorways, they can be tacked to the sides of the studding that frame the opening. See Fig. 11. Another method is to tack the grounds to the inside of the studding and make them extend out the required distance. They are removed later, after the
be left in place to serve as a nailing base for the trim, or they can be removed. In some cases, the door jamb is installed and used as a ground, but there is a good chance that the jamb will become damaged in some way or absorb moisture from the wet plaster and expand.
PLASTERBOARD
SCRATCH
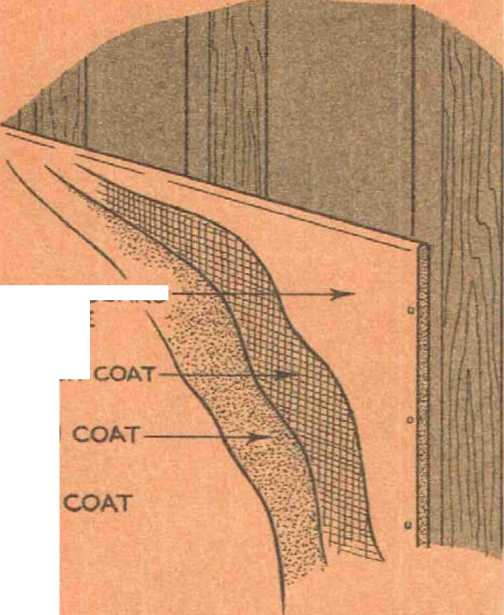
BROWN
FINISH
Fig. 12. The three coats of plaster applied over plasterboard lath.
Grounds for casement windows are installed on the studding frame the same as for doors. If double-hung windows are used, their frames usually
* W
provide the necessary ground. Grounds should also be used in all other cases where plaster is to be covered with trim.
In view of the fact that the grounds serve to establish the thickness of both plaster and plaster base, it may be simpler to install them before the plaster base. This will eliminate the necessity of cutting back on the base at certain points in order to provide plaster has been applied. Grounds the necessary nailing base for the nailed to the sides of the studding can grounds.
t
PLASTERING
Plaster is applied to the lath in three coats—scratch coat, brown coat and finish. See Fig. 12.
The Scratch Coat
The scratch coat can be made with 2 parts sharp sand and 1 part gypsum plaster. These should be mixed thoroughly together in a clean mixing box with sufficient water added to give the plaster the proper consistency. The water should be clean and perfectly free from oil or grease. In fact, it is especially important to avoid getting dirt or any odd bits of hardened plaster into the fresh plaster. Have a separate container on hand so that vour tools can be washed clean after each batch of plaster has been applied.
Heady-mixed plaster is also available. It comes in 100-lb. bags and requires only the addition of water before it can be applied.
Before the first coat of plaster is applied to wood laths, the laths should be dampened. If the plaster is going to be applied over metal or gypsum-board lath, this is not necessary. The scratch coat should be applied to the lath with sufficient force to push the fresh plaster through the openings between laths. The plaster that gets in back of the lath will harden and form a key, which will bond the plaster to the lath. One of the causes for sagging plaster walls and ceilings is that a sufficient amount of plaster did not get in back of the lath to make this bond. With some types of gypsum lath there are no holes for the plaster to go through because of the fact that the plaster can make a mechanical bond with the lath itself. The first coat of plaster should cover the lath by about and it should be level and true.
Before the first coat has had a chance to set, score it horizontally and vertically. This is done so that the brown coat will make a good bond with the scratch coat.
The Brown Coat
The brown coat is applied after the scratch coat has hardened. This coat must be applied with enough force to work the fresh plaster into the scored lines made in the scratch coat. It should be thick enough to bring the surface of
the plastered wall out even with the
plaster grounds. The finish coat of plaster is so thin that it will have very little effect on the over-all thickness of the plaster. You will need a straightedge at this point to insure your getting the total area of the brown coat level with the grounds.
The Finish Coat
The finish coat can be made out of plaster and sand to produce a textured surface, or it can be trowel-finished, which is suitable for painting or papering. Plaster for the finish coat can be obtained ready-mixed and this is the best bet for the amateur since, if mixing directions are followed, there is little chance of failure.
The finish coat is applied in several very thin layers. The first application is ground in to make a suitable bond with the brown coat. Additional coats are applied over this to fill in any small depressions and take out irregularities. If a textured sand finish is desired, it can be obtained by working over the final coat with a piece of carpet attached to a float. A trowel finish is achieved by smoothing out the final coat perfectly evenly with a trowel.
Proper Conditions
Plaster requires very exacting conditions if it is to harden into a suitable wall surface. If the plastering is done during the hot summer months, there is the possibility that it will dry out before it has had time to set. This will cause chalky spots to appear, very often around the edges of the plaster,
and the plaster in these areas can he
rubbed off easily. This condition is known as “dry-outs;” you can prevent it from occuring by making sure that there are no hot drafts of air blowing’ over the fresh plaster. Another way of preventing it is to keep the plaster damp until it has time to set.
If you are working in cold weather, the exact opposite of dry-outs may appear. These are called “sweat-outs” and they are caused by the plaster having set before all the water in it has evaporated. This will cause the wall to have a dark appearance, and the plaster will be soft. The wall will have a damp musty odor. Sweat-outs can be avoided by being sure that there is ample ventilation in the rooms to carry off the moisture in the plaster. If the weather is cold or if it is damp, heat in the building will be necessary to remove the water content from the plaster.
DRYWALL CONSTRUCTION
As was stated earlier in this chapter, dry-wall construction refers to any interior wall or ceiling material that does not require mixing with water for application. Grouped under this general heading are any number of composition building boards made out of a variety of materials, such as gypsum plaster, wood and vegetable fibers, plywood, asbestos and cement. In fact,
there are so manv materials in this field
*
to choose from that it is quite possible to use a different one for each room in the house. As you will see, some are

TONGUE AND GROOVE
BEVELED EDGE V-JOINT
\ * 3/ V \/8 J 1
I -V ^
RECESSED JOINT
• * 7 ,
‘- -.v ? -. .* . • .
SQUARE EDGE
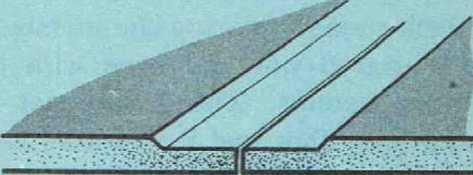
Fig. 13. The joints between sections of different ways, as depicted in the various plasterboard can he handled in several illustrations above.
definitely more suitable for certain rooms than others.
Dry walls are unquestionably the best for the amateur home-builder. They can be installed with success by anyone who possesses the normal amount of skill with hammer, saw, level and plumb line. When large sections are used over unbroken surfaces, it takes very little time to cover a large amount of wall area.
Many persons dislike the idea of anything other than plaster for walls and ceilings because they have seen dry walls with large seams between sections of board, cases where the boards have buckled or bulged out, or walls so flimsy that they seem little stronger than if they had been made out of cardboard. These conditions are the result of inferior-grade materials and poor workmanship. High-quality materials installed according to specifications will produce a surface that is free from joints or seams, and that is extremely rugged and will neither buckle nor sag.
Plasterboard
This type of building board is made out of a gypsum-plaster filler encased in heavy paper. It is sold under a great many different trade names. The standard-size sheet of plasterboard is 4' wide and will run from 6' to 12' in length. This particular type of building board does not absorb moisture readily and, therefore, unlike some of the other building boards that are more absorbent, can be used in rooms
SCORE BACK OP BOARD KEEPING FACE OF PANEL UNMARRED
Fig. 14. Plasterboard can be bent to form rounded corners by scoring the back of the board with a knife.
such as the kitchen or bath where there is bound to be some moisture present. The surface of these boards can be papered or painted. The edges of plasterboard are treated in various ways, depending on how the finished surface is to appear. See Fig. 13. If a smooth, unbroken surface is desired, sheets with a recessed edge should be used. After these sheets are in place, Swedish putty is forced into the recess.
This, in turn, is covered with a strip of perforated metal or cloth tape. The tape is forced into the putty so that the putty comes through the perforations. This putty is smoothed out and additional coats of putty are applied until the surface has been built up flush with the surface of the rest of the board. When the putty is dry, a sanding with rather light sandpaper will produce a smooth joint. Another
Fig. 15. The joints between the large sheets of insulating board can be covered
I

BUTT JOINT WITH DECORATIVE WOOD MOLDING
RECESSED JOINT WITH DECORATIVE WOOD MOLDING
Fig. 16. Joints of this type make it possible to install insulating board so that the nails are concealed.
with a strip of molding as indicated in the above illustrations.
way to treat the joints is to select boards with a beveled edge. When these are butted together, a v-joint is formed that is quite attractive. In fact, by arranging any type of building board in a pleasant pattern, the joints between sections can be put to good use as a decorative factor and not be a liability. Some brands of plasterboard have a factory-applied finish that resembles wood paneling. These sheets can be butted close together and the joints will appear as part of the wood grain.
Insulating Board
These boards, often referred to as wallboard, are made out of wood or vegetable fibers pressed into sheets of varying sizes. The large sheets measure 4' x 12'. These boards do have considerable value as insulation, but in cold climates thev should not be
counted on to provide all the wall and ceiling insulation that is necessary. (See the section on insulation.) This type of board is also somewhat more absorbent than plasterboard and, therefore, should not be used as a base for metal or plastic tile in the kitchen or bath. Because of its absorbing qualities, the large sheets should never be butted close together; if they are and if they should absorb moisture to any great degree, they will expand and bulge out. Joints between sections of
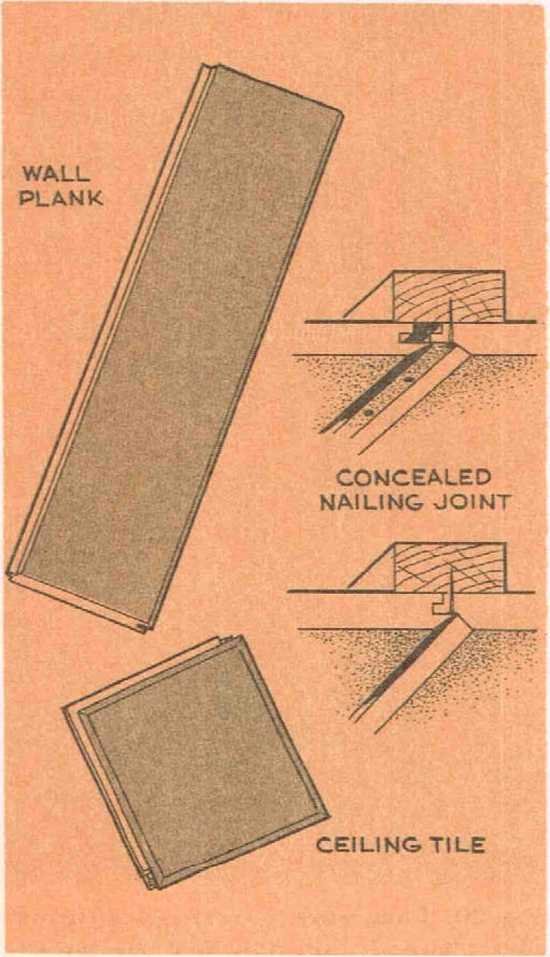
Fig. 17. Wall plank and ceiling tile showing joint for concealed nailing.
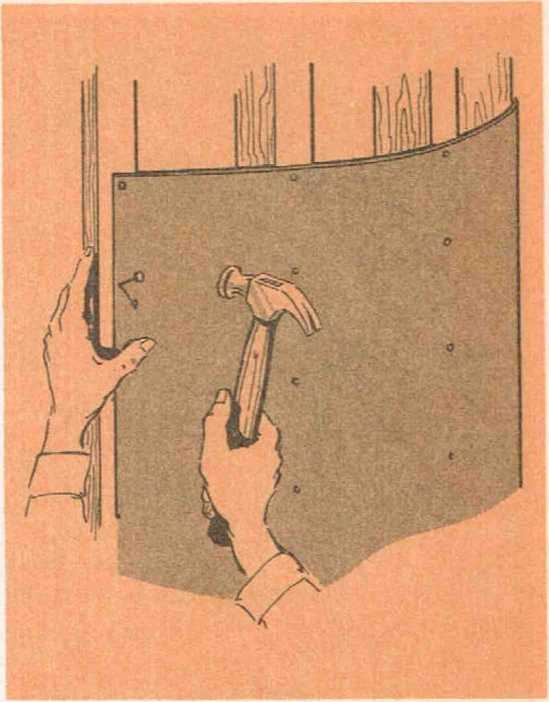
Fig. 18. Composition wood or hardboard is flexible to a considerable degree and therefore can be used on curved surfaces.
insulating board can be treated in the same fashion as those in plasterboard, that is, edges are recessed and the joint filled with putty and perforated reinforcing tape. Other types of board come with beveled, chamfered or ship-lap joints or with butt joints that can be covered with strips of molding. See Figs. 15 and 16. The molding can also be recessed into the board.
Insulating Tile and Planks
These materials are made out of the same substances as the large insul ating boards. They come in many sizes,
from the small tile that measures 8" x 8", to the wall plank that comes in random widths of from 6" up and in
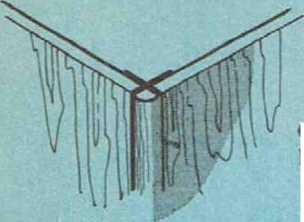
CORNER
MOLDING
MITERED
JOINT

CORNER WITH QUARTER ROUND
made out of wood fibers pressed into sheets that are somewhat thinner than the other types of building board so far mentioned, but that are also much more flexible. See Fig. 18. The standard size of a sheet is 4' x 12', but larger sheets are available or can be
INTERNAL CORNER COVE MOLDING
MOLDED
INTERNAL
CORNER
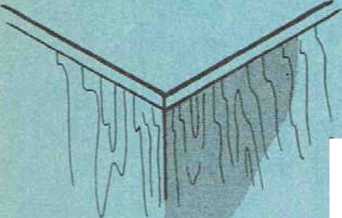
CORNER
Fig. 19. Four ways to treat outside corners of plywood.

CORNER
MOLDING
lengths of 12'. By means of overlapping joints, these tiles and planks can be nailed in such a way that the nail head is concealed, leaving a v-joint between the two sections. See Fig. 17.
Composition Board
Composition board is also called pressed-wood or hard-board. It is
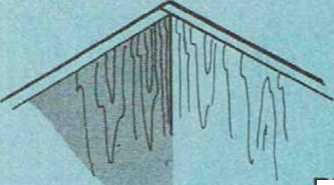
Fig. 20. Four ways to treat inside corners of a plywood wall. Note that the top two
methods require special corner-cover molding.
BUTT JOINT
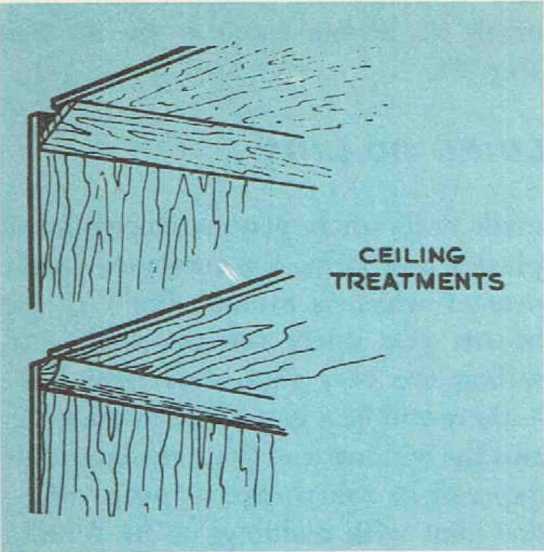
Fig. 21. Two simple methods of treating
the ceiling joint for plywood walls and ceilings. Note that in the top picture, a strip of regular wall plywood is used rather than special stock molding.
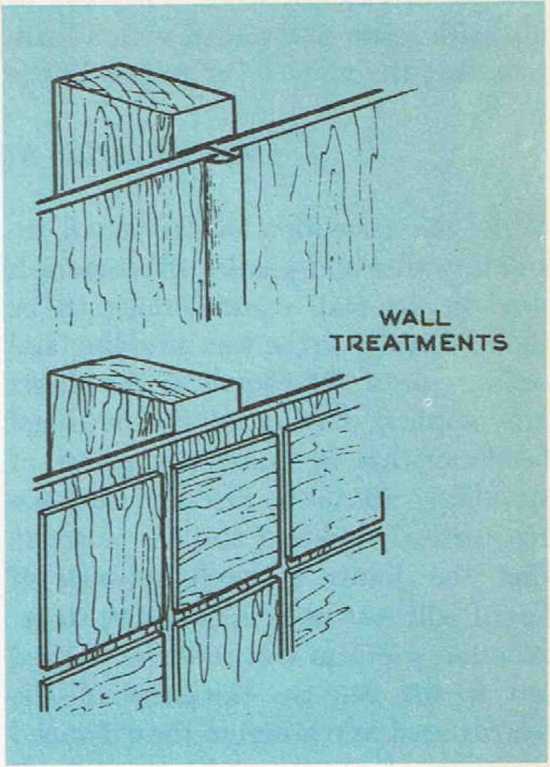
Fig. 22. Top figure shows a very simple method of covering the vertical joint between sections of plywood on walls. The lower figure shows a method that is more complicated but produces very attractive results.
ordered. This type of board, like plasterboard, does not absorb moisture readily and is ideal for the bath or kitchen. Some brands are given a finish so that they resemble a section of wall tile (see Wall and Ceiling Finishes.) The seams between sheets are covered with wood or metal strips.
Plywood
Plywood makes a very satisfactory interior wall material. There are inexpensive grades that should be used if you are going to paper or paint. The more expensive grades have a surface veneer made out of the more attractive
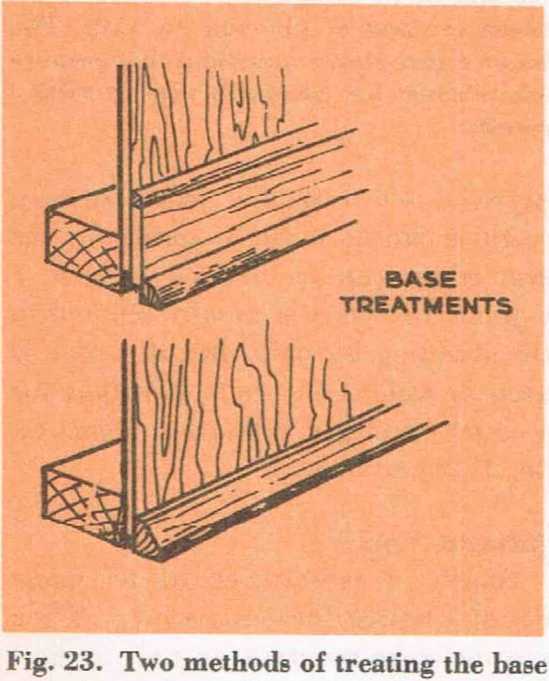
woods, or their outer surface is grained to make a very attractive wall finish in itself. The standard size of sheets of plywood is 4' by 8'. The joints between sections can be butted together or the two edges can be beveled to give a v-joint. Plywood is usually secured to the studding by nails, but if a glue is used as well as the nails, it makes for a much stronger wall. See Figs. 19, *20, 21, 22 and 23.
Asbestos Board
Sheets of asbestos board are made
out of asbestos fibers and cement. They are moisture-resistant as well as fire-resistant, and can be used for either
interior or exterior work. They can be and a misplaced hammer-blow may cut with a saw and nailed with a ham- crack it. Sheets come 4' by 8'. See mer, but the material is rather brittle Fig. 24.
INSTALLING BUILDING BOARDS
With the exception of the small insulating tiles and planks, the materials used in dry-wall construction can be nailed directly to the wall studding and ceiling joists. Of course, if the sheets are applied horizontally, additional headers (that is, horizontal pieces of studding) should be installed between the vertical studding and the joists so that the joints between sections of board will rest on a firm nailing base.
Another problem that must be worked out is the relative thickness of the boards used in relation to the combined thickness of plaster and laths. Standardized window and door jambs are
of a plywood interior wall.
made to fit where you use conventional plaster and laths, the combined thickness of which is around >2%2 >f'. If the boards you select for the walls and ceiling are very thin—less than —there will be a gap between the walls and the window’ and door casings. This gap can be taken care of by covering the joint with molding, or by furring out the studding so that the surface of the wall material is the same as if plaster arid laths had been used.
In the case of the small ceiling tiles or w'all planks, it is necessary to install additional nailing bases over the studding, for in most instances these tiles and planks will not be the right size to fit between either the studding or the joists. 1" x 3" stock can be used for
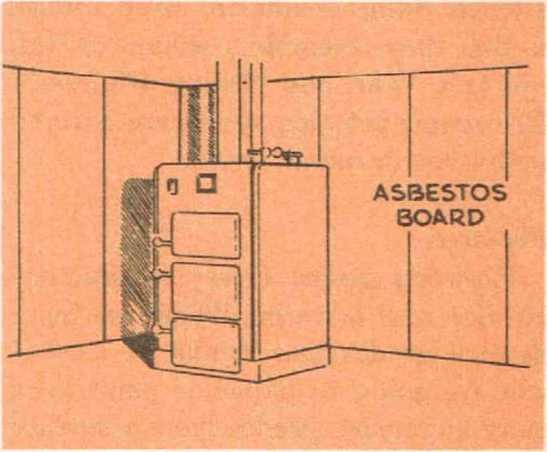
Fig. 24. Asbestos board, being fire-resistant, is ideal to use around the furnace or at any other location where there is a potential fire hazard.
used for dry walls, it is virtually impossible to give exact information on how all of them should be put up. The manufacturers, however, do provide very complete specifications as to how
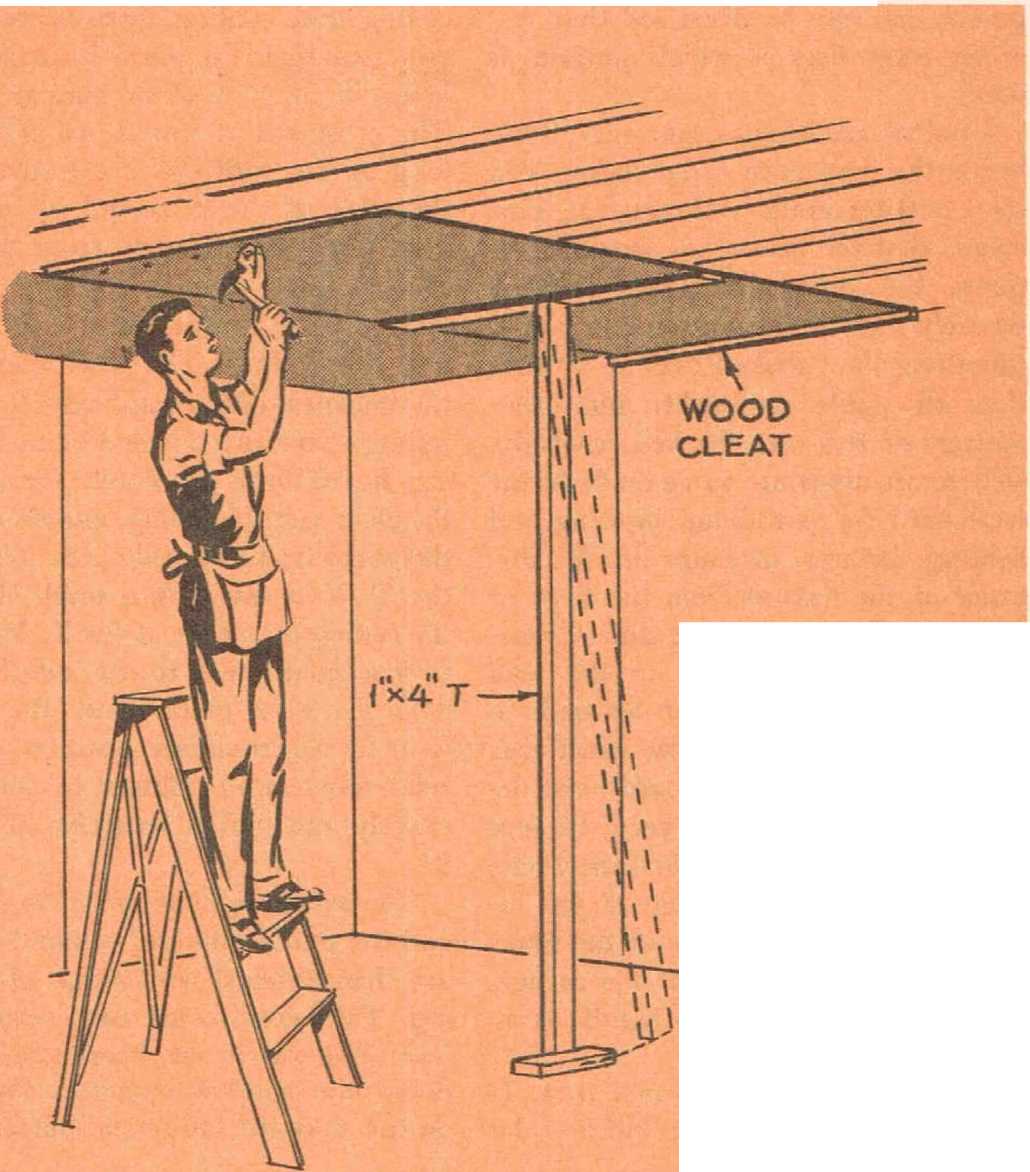
Fig. 25. A simple method of getting large sheets of wallboard up to the ceiling and
this job and it should be spaced according to the size of the materials you are working with.
Because of the wide assortment of types, brands and sizes of materials holding them in place until they nailed.

their own products should be installed, and these should be procured and carefully followed. Specifications can be obtained from your local dealer.
There are, however, a few general points that can be discussed that will apply regardless of which material is used.
First of all, be sure that everything inside the wall is in order before you start putting on the wall material. This means that the insulation should be in place, the various electrical fixtures securely fixed to the studding or joists, plumbing lines looked over to be sure that all joints are tight, and other matters of this sort checked carefully
Where openings are to be made in the wallboard for plumbing, lighting and heating fixtures, measure off the distance of the fixture from the floor or ceiling and to the nearest stud. Transfer these measurements to the wall board so that the hole can be made in the proper place and to the exact size.
When the building boards are delivered from the lumber yard, be sure you have a clean level surface where they can be placed. Some of the insulating boards or boards of the fiber-ous type will break off at the corners if treated too harshly, so handle them with care.
Ceilings should be covered first. If vou are working alone, it will be a lot easier if you stick to the small tile or smaller size of boards. Handling the large 4' x 8' sheets alone is rather difficult. One thing you can do to facilitate getting such large boards up to the ceiling and holding them there while you nail them in place is to build a large T of 1" x 4" or similar stock.
The crossarm of this T should be as long as the width of the boards, and the stem of the T should be an inch more than the distance from floor to ceiling. After the T has been made, tack a wood cleat to one of the walls near the ceiling.
The cleat should be the thickness of the wallboard from the ceiling. Now slip one end of the building board into the notch formed by the cleat and the ceiling, and then hoist the board up to the ceiling by means of the T. You can tack a small cleat to the ceiling by means of the T.
You can tack a small cleat to the sub-floor to hold the T in place. Once the board is in its approximate position, it is a relatively simple matter to center it exactly and nail it securely. SeeFig. 25.
The walls are done after the ceiling, and the joints between wall and ceiling are then covered with strips of molding. Take care to get each section on level and watch out when cutting for doors and window openings that you do not take off too much material.
STAIRS
If you wish to install stairs at this made stock stairs, or have your local time, you can either purchase ready- lumber yard or mill make you a set to meet your individual requirements, or you can build a flight yourself. There is nothing very difficult about it, and the type of stairs shown in Fig. 26 will prove perfectly adequate.
Stairs to the attic and stairs to the basement can be constructed in the same fashion. The floor joists around the stair opening are double and, at one side of the opening for the basement stairs, there is a bearing post or steel column under the girder.
The first thing to build is the landing at the bottom, which runs at right angles to the stairs. The base of this landing is made from two 2" x 8/4"s. In the case of the stairs to the attic, the 2" x 8%"s are notched out at the bottom edge so that the}1' will fit over the partition sole plate.
Each end must be notched, since there will be a sole plate on both sides of the stairs. At the back of the landing, the >2" x 8%"s should be flush with the far edge of the partition studding and sole plate. At the front of the landing, they should extend 9%" beyond the inside edge of the studding and sole plate to provide a step with a tread approximately 9" wide.
The next job is to cut a piece of >1" x 12" to the measure of the width of the landing and nail it in place to the partition studding at the back of the landing, as shown in Fig. 26. Another 1" x 12 ,/ is installed with the stair stringers, and both will serve as a base
molding between the finished wall of
the stair well and the stringers, treads and risers.
Now set four pieces of >2" x 8/4" over the landing to make both a second step and the top of the landing. The front piece is set so that it will be 9%" back of the ends of the >2" x 8%"s. An additional piece of >2” x 8%" is set at the midpoint to provide additional support for the top of the landing.
With the rough landing completed, cut two pieces of 1" x 12" to fit on each side of the stair stringers. These will extend beyond the top ends of the stringers, as indicated in Fig. 26. The piece of 1" x 12" on the inside will make a joint with the short strip put
down in the back of the landing. The outside piece will come flush with the lower end of the outside stringer.
After these two pieces have been cut to size, set them aside and go to work measuring and cutting the stringers. The stringers are made out of 2" x 12"s. At the bottom of the stairs, both stringers are notched so that they fit over the top of the 2" x >&V4 >" making the top of the landing. At the top, the stringers should be cut off flush to fit snugly under the bottom edge of the ceiling joists. The lower edge on this end-cut must be made vertical in order to form a suitable nailing surface for the >2" x 4" horizontal brace that is set at the top of the opening.
The next step is to cut the sawtooth pattern in the stringers so that the treads and risers can eventually be put in place. As you will note in the illustration, the risers are 8M" deep, the
treads are 934" wide. Use a steel framing square to mark out the dimensions of the treads and risers on the stringers.
As it is most important that both stringers be exactly the same, the best way to do the job is to cut one to fit and use it as a pattern for the second. Be sure that both stringers fit perfectly before you proceed to the next step. When the stringers are finished, the 1" x 12"s are nailed to them. These boards must be nailed to come between the stringers and the wall studding. They should extend 2" above the top edge of the stringer. Nail the 1" x 12,,s to the stringers with 8 >d nails.
Now the stringers are ready to go up, but they should not be secured in
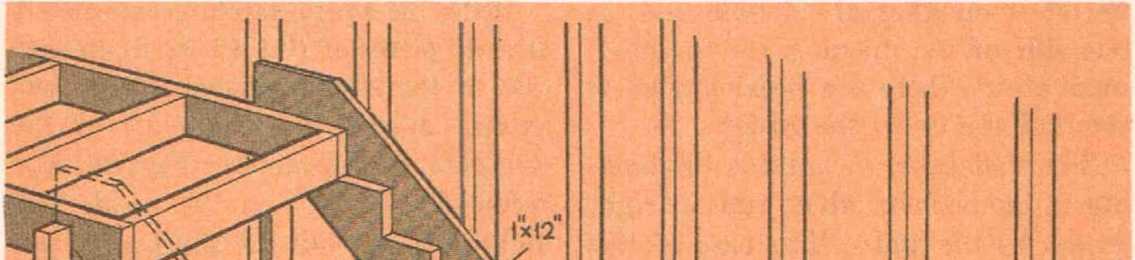
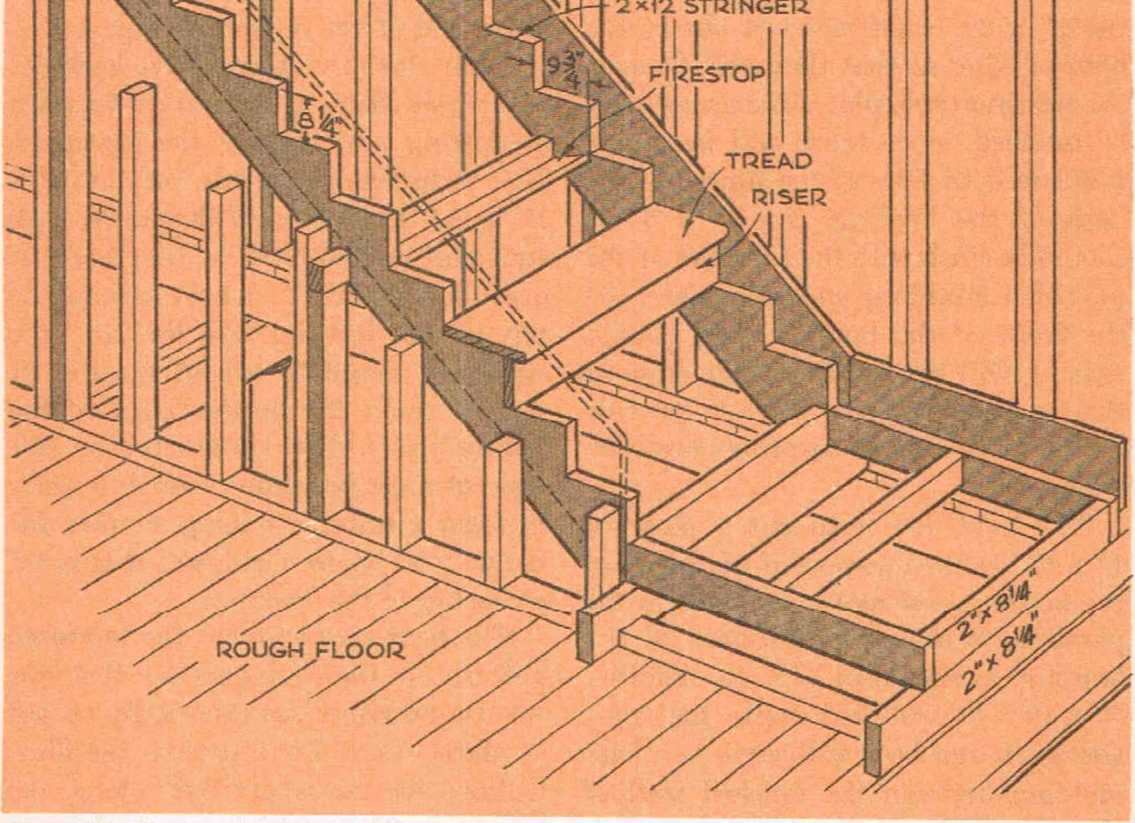
Fig. 26. Flight of stairs from first floor to be used for the basement stairs as well, attic. The same type of construction can with minor changes noted in the text.
any permanent fashion until the horizontal braces are in place and you have checked to be sure that each stringer is absolutely even with the other.
The horizontal braces at the top and middle of the stringers are supported by a vertical piece of 2" x 4", which is set directly under them and that is spiked to the sole plate and to the piece of studding next to the sole plate.
The horizontal braces—2" x 4"s—are placed on edge and recessed into the stringers. Notehes will have to be cut at the lower edge of the stringers to accommodate them. Nail them to the studding on each side but do not nail them to the stringers until you have checked them to be sure that they are level with each other.
If there is a slight error either way, you can probably get the stringers level with wedges driven in at the notch between the edge of the stringer and the horizontal brace. As soon as you are sure that you have the stringers level, you can go to work and nail them in place.
One 20 >d nail should be driven through the stringer and into each piece of wall studding that it intersects. Eight-penny nails are driven through the top portion of the 1" x 12" into the studding. At the top, the stringers can be secured with nails toe-nailed into the ceiling joists and into the horizontal support. At the bottom, the stringers can be toe-nailed into the base of the landing.
A firestop at the middle of the stringers (for stairs to the attic) should also be installed at this time. It should run the entire width of the stringers, as shown in the illustration.
The last job as far as the stairs are concerned is installing the treads and risers and the finish for the landing.
BUILT-IN FURNITURE
There are many advantages in using as much built-in furniture as you possibly can. In the first place, the cost of built-in furniture is just a fraction of what you would have to pay for the ready-made article. Another important feature of built-in furniture is that you can get exactly what you want and not have to put up with something that is not quite right.
Built-in furniture is ideal for the small homes because it requires less space than ordinary furniture and, as it is built in with fewer surfaces exposed, it requires less attention in the way of maintenance.
Cabinet and Worktable
Modern ready-made kitchen equipment, such as ranges, worktables and cabinets, is made to certain standards. These standards are well worth observing when it comes to completing your kitchen, even if you use your own built-in equipment.
The standards were arrived at after considerable research and they will, in spite of a few possible minor inconveniences, afford the maximum efficiency and comfort for the average person.
Fig. 27 shows the standard dimensions for a kitchen range and worktable
Fig. 27. Arrangement for cabinets over kitchen range and worktable.
with cabinets above. You will note that both the range and the worktable stand 36" above the floor. This is the standard height for kitchen-sink cabinets as well. The over-all width of the kitchen range including the oven doors is 28", and the width of the worktable is 25". The kitchen cabinets are installed 16" above the top of the table. Some types of mechanical kitchen aids are higher than this, and if you expect to set them up on the worktable, you should install
the cabinets a little higher up. It is not very practical to make the worktable any wider than 25".
Cabinets above the kitchen range should have a 22" clearance. The extra height is necessary to prevent heat and water vapor from damaging or staining the cabinets and their contents.
Fig. 28 shows a suggested layout
for kitchen cabinets above a worktable with a built-in sink. The cabinets can be made out of several different mate-rials. A frame can be built out of 1" x 2"s and covered on the sides, top and bottom with plywood. Batten
strips nailed on the inner faces of the two sides will support the shelves. The cabinets can also be made out of %"
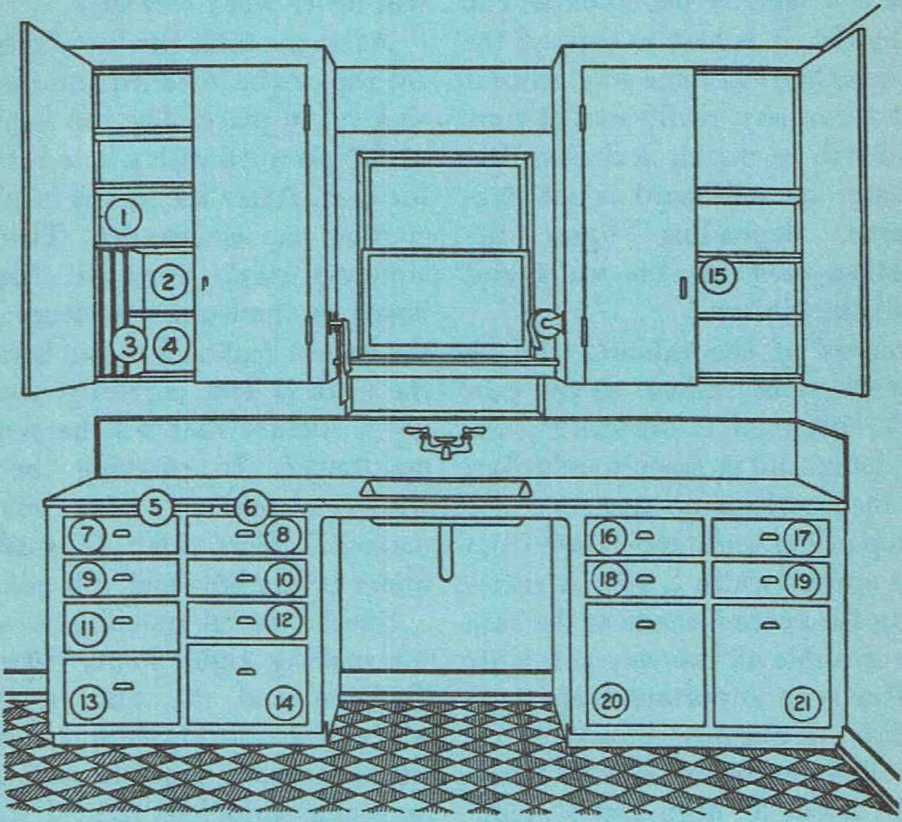
12* DISH TOWELS 13* BREAD 14*COOKIE AND MUFFIN TINS 15'STAPLES 16* UTENSILS 17* RECIPES 18* UTENSILS 19 * BULK CEREALS ,
(TWO COMRMUMENT^l 20* FLOUR 21 • SUGAR
22* ALTERNATE RIGHT-HANO BASE UNIT
I • GLASSES, SUGAR AND CREAMER 2* CEREAL AND SAUCE
DISHES, CUPS AND SAUCERS 3* PLATTERS 4* DISHES AND PLATES 5* BREAD-CUTTlNS BOARD 6* CUTTING BOARD 7* SILVER
8- SERVING UTENSILS 9* MISCELLANEOUS 10* HAND TOWELS II* CAKE
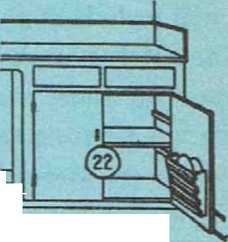
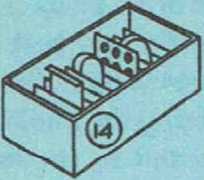
Fig. 28. Layout for kitchen cabinet over worktable with built-in sink.
plywood. If this material is used, no additional framework will be required. Boards of standard dimensions, such as 1" x 4", 1" x 6", or 1" x 12" will do nicely, if you have a sufficient number of them on hand.
If the cabinets are not to extend to ceiling height, it is best to conceal the top of the cabinet in some way, since it will not serve any really useful purpose and will be mainly a dust-collector. Plaster or wallboard is satisfactory here, depending upon the construction used for the walls and ceiling of the kitchen.
The doors of the cabinets can be made in the same fashion as the cabinets; plywood is especially suitable for doors, and its smooth unbroken surface makes cleaning easy.
The top of the worktable is 30" from the floor and its width is 25". A recess providing toe space is made at the base of the worktable all the way across its front. This is an important feature, so do not leave it out just because it requires a little extra work. The recess should be about 3" deep and 4" high.
You will note that the space directly under the kitchen sink is open. This is considered the most sanitary arrangement, since it permits easy cleaning under the sink and around the drain trap. It also provides leg room, so that you can sit down while working at the sink. If you wish, you can install doors across this area and use it for storage purposes, or hang a curtain across it so that the underside of the kitchen sink and the drain pipe and trap will not be exposed to view in an unsightly way.
The table frame can be made out of 1" x 2"s, or you can use %" plywood for the entire job. If the light 1" x 2" is used for the framework, be sure it is well seasoned; if it is not, the drawers will never work correctly.
After the table has been constructed, the top can be installed and the kitchen sink set in place. The top is made out of %" plywood with a hole cut in it for the sink. After the sink is in place, the counter top is installed. This can be stainless steel, porcelain tile, hard-board or linoleum. Linoleum is much the easiest material to use here, and if the work is done correctly, you should get a surface that will be very easily maintained. In covering the surface with linoleum, the main point is to make all joints tight. If water works under it, the linoleum will quickly rot.
Special metal molding is available for making tight joints between the linoleum and the sink, around the edges of the worktable and at the point where the table joins the wall. The latter point should be flashed with linoleum for a height of 8" or so. To insure getting a perfect fit, it is best to cut a pattern out of heavy paper and use it as a guide for cutting the linoleum. The linoleum is cemented to the base with linoleum cement. Any open seams between the linoleum and the metal molding should be packed with a watertight cement made especially for this type of work.
When the table and cabinets have been completed, they should be painted
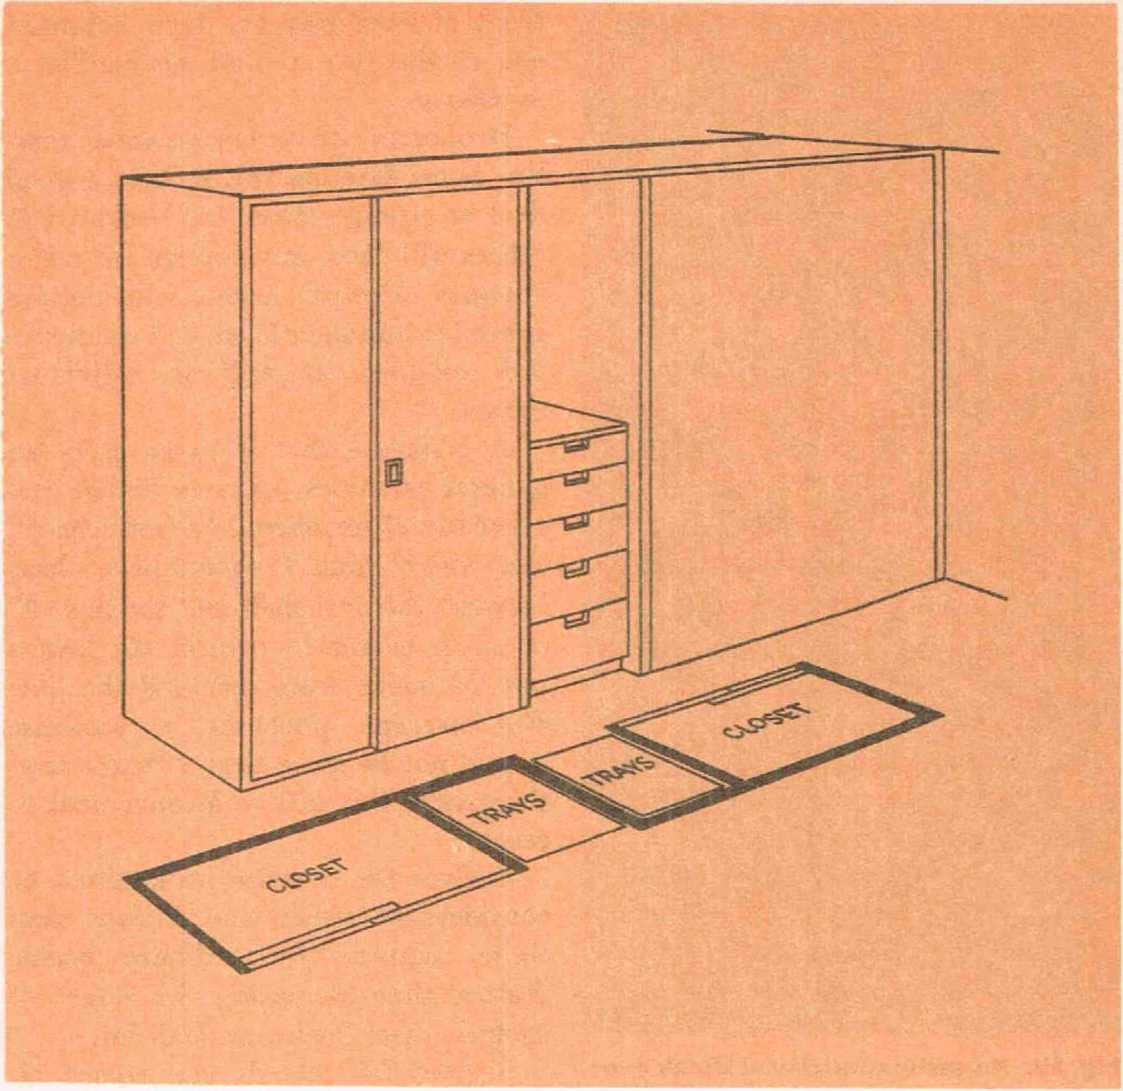
Fig. 29. Bedroom closet arrangement.
or given some other sort of protective finish. Enamel makes a very satisfac-
mf
torv finish for anv woodwork in the kitchen because its smooth surface does not readily collect dirt and grease and can be easily cleaned with a cloth.
If plywood is used for the cabinets, you may prefer to stain the wood and then give it a protective coating of varnish.
If the kitchen is to be equipped with ready-made cabinets, care should be taken in selecting them. These cabinets are made of either wood or metal; both are suitable provided that the construction is of high quality. Watch out for cabinets made of wood that is obviously too light to stand up for very long under normal day-to-day use. A good, solid, well built cabinet will last
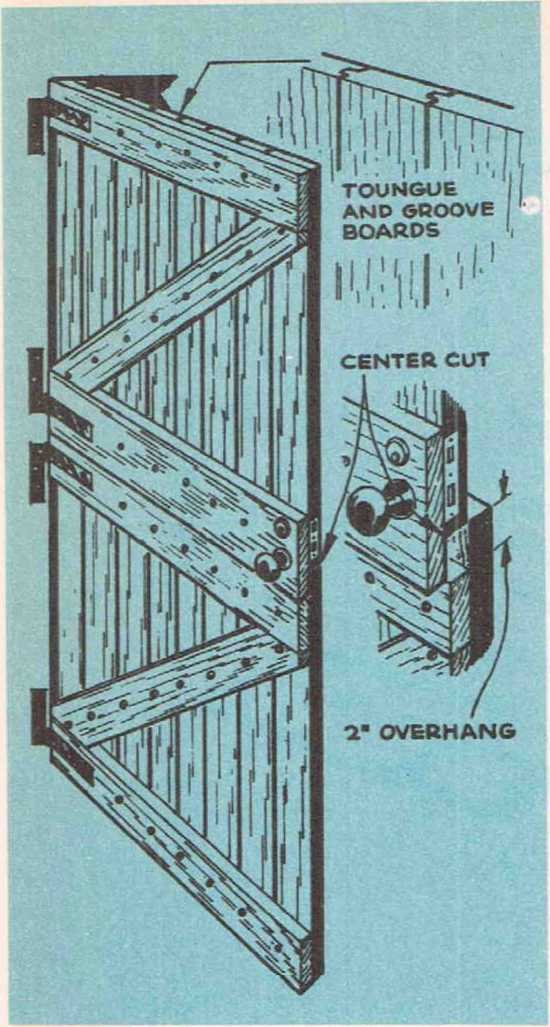
Fig. 30. An easily constructed Dutch door.
a lifetime, but a shoddy product will last only a season or two before the doors stick and the joints open up.
Closets and Bookcases
Fig. 29 shows the construction of the closet in the large bedroom. Shelves are made out of " stock and the doors out of %" plywood. The construction of the travs is the same as that for the kitchen cabinet. The front of each tray has been hollowed out at the top so that no handle is necessary.Bookcases are a very personal matter. Some families will require a good deal of storage space for books while others will need only enough for a few volumes. Record lovers will require space to store their large and small record volumes, as well as individual records.
A bookcase that is to be used for general purposes, such as fiction and other literature, should have shelves 8" deep and 8" high. It should have a base between the first shelf and the floor 6" or so in height to protect the lowest row of books from dirt and the like. For average purposes, a bookcase should not be more than 7' high; anything over this will be inconvenient to reach.
Shelves for oversize books must be considerably wider and higher than those required for ordinary books. Rather than increasing the height of shelves, these books are laid flat.
Shelves for records and record albums must be especially constructed so that the albums can stand upright. The measurements required here are 15" by 13" for the large-size albums, and 13"
by 11" for the standard size. Sections of plywood can be installed in this type of shelf to provide each album with a compartment of its own. This eliminates the possibility of having to move a lot of the albums out of the wav in order to take out one. The same type of arrangement can be used if you have
a lot of loose records. Individual compartments made out of plywood will protect the records from damage and make selection easy. The top of the record should come flush with or under the top of the plywood, and a small recess can be cut in the plywood to allow the record to be taken out easily.
mi
BUILDING A DUTCH DOOR
Fig. 30 shows a dutch door that can be made very easily. It is of batten construction and is made out of >1%" thick, tongue-and-groove boards. The width of the boards pictured in the illustration is roughly 4", but any size of board you have on hand or wish to use can be employed with equally good results.
Make the door up in one section at first. Put on the bottom and top ledge strips and run screws through these to hold the individual boards in place. Check your work with a square as you go along so that you are sure that the door is going to be level at both ends. When this much of the work has been completed, place the door in the frame to see if it fits properly. If any trimming has to be done, il should be done now.
When the door fits the frame perfectly, take it out and draw a line across it >2" above the mid-point. Be sure this line is level. Saw across this line. Now you can complete the work on the two halves of the door.
Start with the bottom half and draw a line >2" below the point that was sawed. Place the upper ledge strip for the bottom section so that its upper edge comes flush with this line. Screw the ledge strip into place. After this, cut a brace to run between the top and bottom ledge strips
on the lower half of the door. Now draw a line across the upper section of the door. The distance of this line from the bottom edge of the upper section should be >2" less than the width of the ledge piece to be installed. This is done so that the ledge piece on the top section of the door will overhang, and the seam between sections will be covered on the inside and not allow air to enter the house. Install the final ledge piece and put a brace between the two ledge strips on the upper half of the door.
The door is now ready to be hung. You should use two hinges on each location. They can be attached to the pledge strips.
BATHROOM AND KITCHEN WALLS
Because of the special requirements of the bathroom and kitchen, their walls are usually finished off in a somewhat different manner than those in the rest of the house.
The best type of wall surface for either of these two rooms is one that will not catch and hold dirt, can be easily cleaned without danger of dulling the finish, will resist staining, will
SPECIAL FOUNDATION BOARD
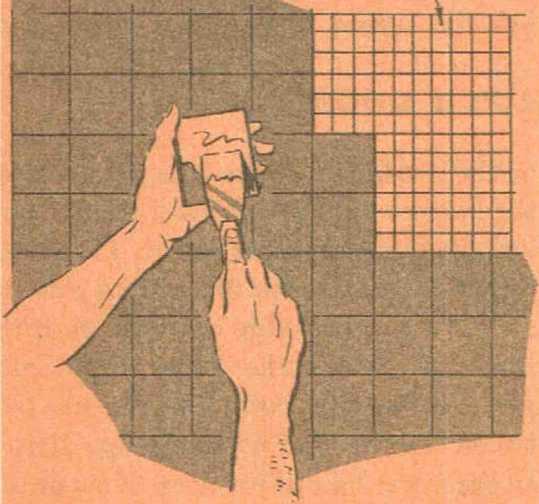
Fig. 31. Applying wall tile over a special foundation board.

not be damaged by moisture and yet will be attractive. There are several materials that you can select to fill this particular bill. Of course, if the walls are plaster, they can be painted with a good wall enamel and this will do nicely.
Metal Wall Tile
These are individual metal tiles. The standard size is by 4 V 2 ". They are made out of stainless steel or aluminum with a finish of baked enamel or porcelain. As the finish is fused to the metal, there is no danger of its cracking and chipping. These tiles are extremely light in weight. A square foot of tile will only weigh around three pounds. This means that the tile can be placed directly over a solid wall of plaster,
plasterboard or composition board without the need of any extra reinforcement.
The tiles are cemented to the wall base with a special liquid adhesive that is waterproof. The tile can be installed before or after the fixtures are in place. Of course, putting the tile on before the fixtures go up will save a good deal of cutting and fitting.
The first step in installing the tile is to check the base to which they are going to be attached. Only plaster, plasterboard, composition wood or a
level line
RULING EDGE
WJ\
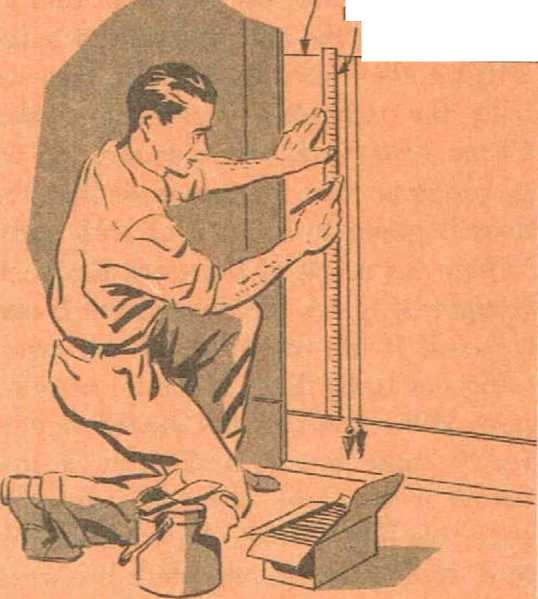
Fig. 32. Draw a level line across the wall before you start to apply either tile or tileboard so that you will be sure that the material is perfectly level at the top. A plumb line dropped from this level line will insure that the vertical joints between tile are straight.
special metal-tile foundation board is suitable. The more porous types of building board should not be used because they tend to expand too much when they absorb moisture.
If you are going to lay the tile up against plaster, plasterboard or composition board, you should check over the wall to be sure that it is perfectly level and true. If you find that it is not perfect, you can cover it with a grooved foundation board. This will supply the proper base for the tile. This type of board is marked off in 1%" squares, and the rounded corners of the tiles fit into the grooves between
the squares. See Fig. 31. The foundation board is nailed and cemented to the wall. Be sure that it is put on perfectly level, because if the foundation board is not right, you will not be able to get the tile on in a straight line. See Fig. 32. The usual treatment is to tile the lower half of the wall and then use some other type of covering for the upper half. Of course, you can tile the entire wall.
The back of each tile is given a coat of waterproof cement and then is placed up against the foundation board. Holes can be cut in the tile with special equipment made for this purpose, which you can probably rent
from your dealer, but the tile can also be cut with ordinary tin snips.
Special tiles are used where the wall meets the floor. They form a cove base and eliminate a crack at this point. Special tiles are also available for in side and outside comers.
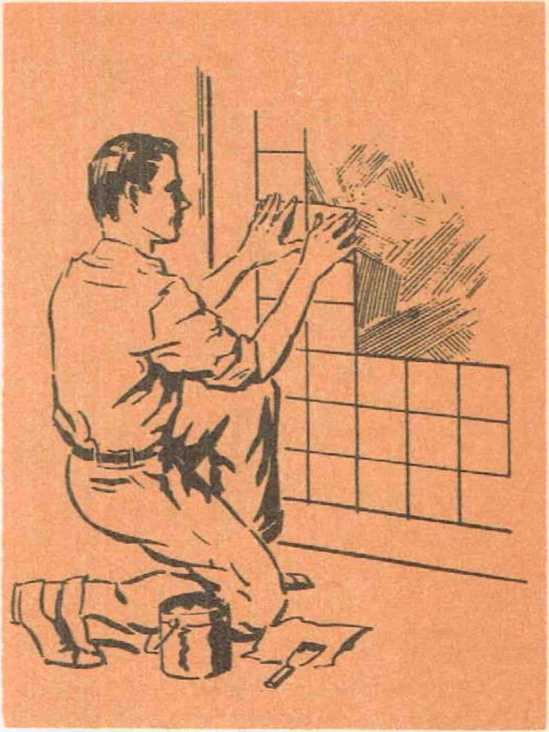
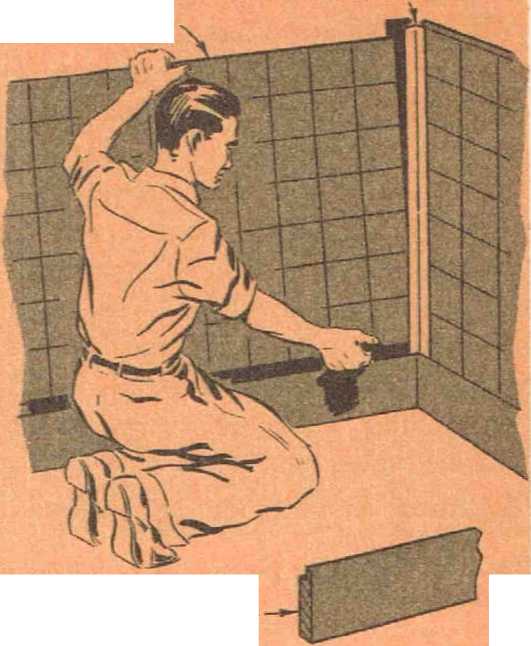
Fig. 33. Metal or plastic tile can be installed before or after the fixtures have been installed.
As you can get metal in many different colors, you can work out some very interesting wall patterns.
Once the wall has been tiled, a special waterproof grout is applied over the surface. Press this into the joints
and then wipe off the excess with a
squeegee. Additional pointing of the joints can be done with the fingers.
Other types of metal tile are attached directly to the plaster or plas terboard wall. They can be butted close together, or have a small gap between each tile that is later filled with a special waterproof cement. Filling the joint between the tile with cement requires more time than if the joints are
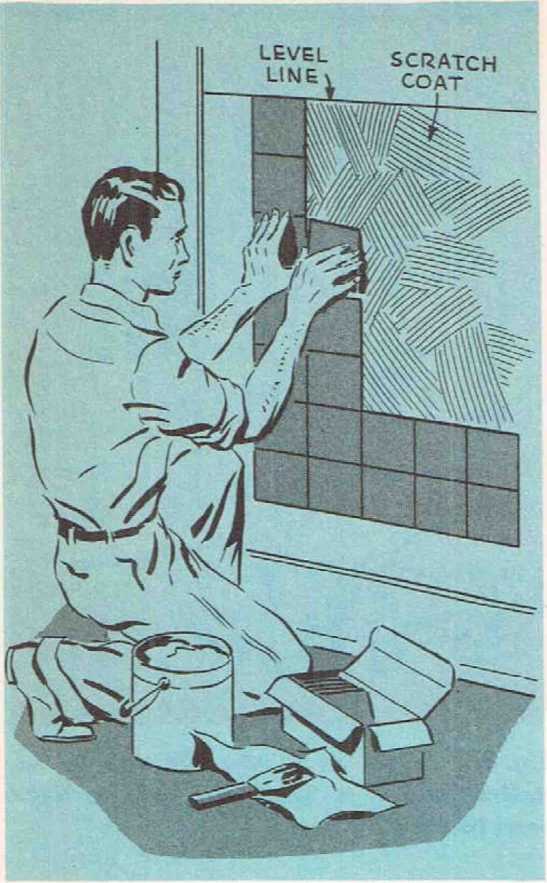
Fig. 34. Placing the tile on the wall.
butted close together, but it also pro duces a more watertight surface. See Fig. 33.
One point you have to be careful about is the seams where the tiles meet plumbing fixtures. As there is a possibility of moisture getting in hack of the tile at these points, special metal molding is used to form a waterproof joint.
If you are using tile without a foundation board, your first step is to make a line across the wall to indicate the top of the tilework. Make sure that this line is perfectly level. Do not try to lay the tile up from the floor without this line because you will probably find that, in spite of all your efforts, the floor line is not quite level and therefore the tile will not be level. It is best to strike this line across the wall and then work down from it. If you are going to tile the entire wTall, make a line midway up on the wall and then work up and down from it. See Fig. 34.
Plastic Tile
Plastic tiles are almost the same as metal ones, but are made of plastic instead of having a metal base. They are cemented to the wall with a special cement and can be fastened directly over either plaster or plasterboard. See Fig. 35.
The same general directions for application apply to this type of tile as to the metal type. Plastic tile can be cut with special cutters, but a fine-tooth saw will do the trick perfectly well. The color on the tile runs right through the plastic, so there is no danger of the finish chipping, cracking or becoming dull from cleaning.
Tileboard
This type of covering is a little different from the individual tile. It is made out of composition wood or pressed wood that is scored off so that
it resembles a section of tile wall. It has a finish of baked enamel. In one kind, the grooves between the squares are painted white. Another kind of tile-board has only horizontal lines, while
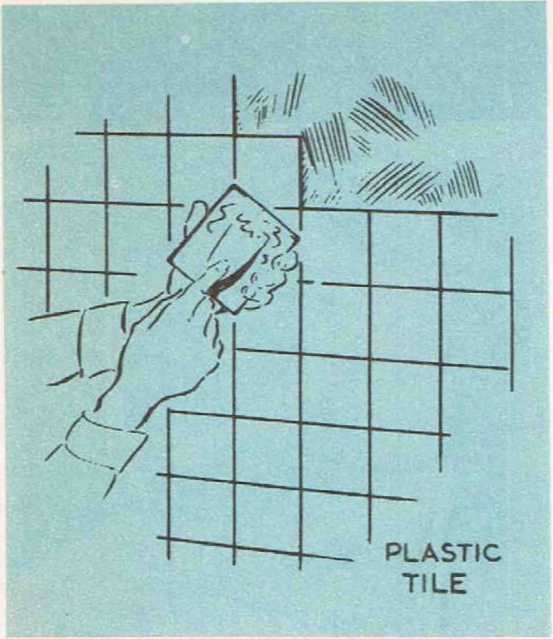
Fig. 35. Fastening plastic tile to a base of plasterboard.
a third is perfectly plain. A section of tileboard measures 4' wide and up to 8' in length. It can be cemented directly to a plaster or plasterboard base. Special metal trim is used for inside and outside corners, and for joints between sections and around plumbing fixtures. The base molding is made of pressed wood.
The best time to install tileboard is before the plumbing fixtures go into place; this will eliminate a good deal of cutting. Cutting and fitting tileboard accurately is a little more complicated than with individual tiles because you are working with a large sheet of material.
The first step in installing tileboard is to draw a line around the walls of the room to use as a guide in getting
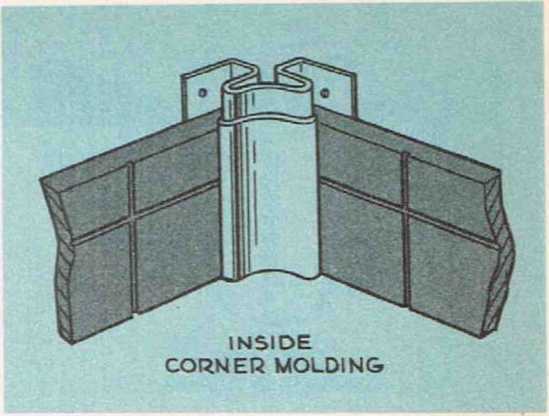
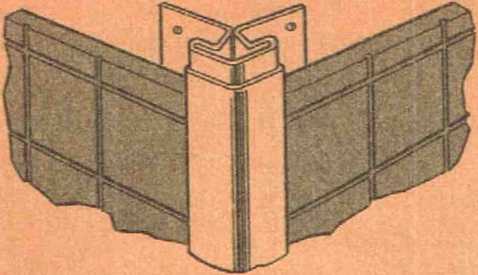
Fig. 36. Metal molding used for the inside corners around the kitchen sink and worktable.
each section of tileboard on level and even with the sections on the adjoining walls.
Now the sections of tileboard can be fitted and cut to size. A good, sharp, fine-tooth handsaw will do for cutting the material. Any holes required for fixtures can be made by first drilling a hole with a brace and bit and then cutting out the required amount with a keyhole saw.
The molding should now be installed, and be sure that it is absolutely plumb. Test each section of tileboard before you apply the adhesive to the back in order to be sure that it fits correctly. See Figs. 36, 37 and 38.
The tileboard is attached in place with a special liquid adhesive that is applied over the entire back of each
section. Use a special, notched spreader for this purpose and get the adhesive on evenly. Some brands of adhesive-must be applied to the wall as well as to the tileboard. As soon as the adhesive is on, put the section of tileboard into position and press it firmly against the wall so that the cement makes contact at all points. If you get any of the adhesive on the outside face of the tile-board or on the molding, wipe it off before it has a chance to harden.
OUTSIDE CORNER MOLDING
Fig. 37. Metal outside molding for lino* leum kitchen gink and counter tops.
The adhesives used for all types of tile and linoleum are very difficult to get off your hands. Coating your hands with soap before you start to work will make it easy to wash off any cement that you might pick up along the way.
Linoleum
A special light-weight linoleum is used for wall coverings. Ordinary floor linoleum is too heavy. This type of covering makes a very satisfactory finish for either the bathroom or kitchen, but it should not be used inside shower stalls or around built-in tubs because of the danger of moisture getting in back of it.
TILEBOARD
INSIDE CORNER MOLDING
BASE MOLDING
Fig. 38. Installing a sheet of tileboard in the kitchen. Note the special base molding that is put in place before the tileboard goes on.
Wall linoleum can be installed over walls made of plaster or plasterboard (after several additions have been made in the framing). It cannot be installed over any other wall material.
If the wall is made of plaster, it must be smooth and dry and, of course, perfectly plumb. There should be no metal beading on outside corners and, in fact, there should be no square comers at all. All outside corners should be rounded to a radius of V'. The reason for this is to allow the linoleum to be bent around corners without cracking.
If the corners were square, this would be impossible, and you would have to have a joint.
When it comes to hanging linoleum on a plasterboard wall, you have quite a little work to do. In the first place, 5rou need header studs at the top and bottom of the wall as well as every 24" between the top and bottom. The plasterboard should be joined with butt joints and these should be reinforced with perforated tape. All nails should be coimtersunk and the holes filled with a plastic filler, which, when dry, should be sanded down smooth.
Fixtures should not be installed until the linoleum is in place.
The walls should be coated with a special size to prevent their absorbing the adhesive used to hang the linoleum. A metal strip of cap-molding should be nailed in place on the wall before the linoleum is hung.
The adhesive is now applied and the linoleum is hung in vertical sections from the cap strip down to the floor. All seams must be vertical, and you should not have any seams closer to the corners than 6".
Of course, you are by no means limited to just one type of wTall material for the entire bathrooom or kitchen. You can use several together to very good advantage, such as tile for the lower half of the wall and linoleum for the upper portion.
You will need 2,200 sq. ft. of plasterboard for the interior walls and ceilings of the basic house. You should also get 20 lbs. of finishing nails. This amount will be enough not only for the walls and ceilings, but also for other jobs.
MATERIALS LIST FOR WALLS, CEILINGS AND CLOSETS
FOR THE BASIC HOUSE
Walls and ceilings..................2,200 sq. ft. plasterboard
20 lbs. finishing nails
Closet doors....................... 10 pieces %" plywood 4' x 8'
Closet door trim................... 110' 1" x 3"
Shelves........................... 100' 1" x 6"
Cabinet hinges..................... 33span>
Latches .......................... 7
Medicine cabinet................... 1
Towel racks....................... 2
Soap dish......................... 1
Toothbrush holder................. 1
...
Continue reading at BUILDING WITH GLASS - next chapter in this book, or go to book contents at BUILD YOUR DREAM HOME, or select a topic from the closely-related articles below, or see the complete ARTICLE INDEX.
Or see these
Recommended Articles
- ARCHITECTURE & BUILDING COMPONENT ID - home
- ARCHITECTURE DICTIONARY of BUILDINGS & COMPONENTS
- ARCHITECTURAL STYLE & BUILDING AGE
- BUILD YOUR DREAM HOME
- CONSTRUCTION DICTIONARY
- GLOSSARY of BUILDING TERMS
- HOME CONSTRUCTION CATALOGS 1950
- KIT HOMES, Aladdin, Sears, Wards, Others
Suggested citation for this web page
INTERIOR WALLS & CEILINGS; BUILT-IN FURNITURE at InspectApedia.com - online encyclopedia of building & environmental inspection, testing, diagnosis, repair, & problem prevention advice.
Or see this
INDEX to RELATED ARTICLES: ARTICLE INDEX to BUILDING ARCHITECTURE
Or use the SEARCH BOX found below to Ask a Question or Search InspectApedia
Or see
INDEX to RELATED ARTICLES: ARTICLE INDEX to BUILDING DAMAGE, DISASTER, REPAIRS
Or use the SEARCH BOX found below to Ask a Question or Search InspectApedia
Ask a Question or Search InspectApedia
Share this article:Questions & answers or comments about how to identify the architectural style of buildings and building components
Try the search box just below, or if you prefer, post a question or comment in the Comments box below and we will respond promptly.
Search the InspectApedia website
Note: appearance of your Comment below may be delayed: if your comment contains an image, photograph, web link, or text that looks to the software as if it might be a web link, your posting will appear after it has been approved by a moderator. Apologies for the delay.
Only one image can be added per comment but you can post as many comments, and therefore images, as you like.
You will not receive a notification when a response to your question has been posted.
Please bookmark this page to make it easy for you to check back for our response.
IF above you see "Comment Form is loading comments..." then COMMENT BOX - countable.ca / bawkbox.com IS NOT WORKING.
In any case you are welcome to send an email directly to us at InspectApedia.com at editor@inspectApedia.com
We'll reply to you directly. Please help us help you by noting, in your email, the URL of the InspectApedia page where you wanted to comment.
Citations & References
In addition to any citations in the article above, a full list is available on request.
- In addition to citations & references found in this article, see the research citations given at the end of the related articles found at our suggested
CONTINUE READING or RECOMMENDED ARTICLES.
- Carson, Dunlop & Associates Ltd., 120 Carlton Street Suite 407, Toronto ON M5A 4K2. Tel: (416) 964-9415 1-800-268-7070 Email: info@carsondunlop.com. Alan Carson is a past president of ASHI, the American Society of Home Inspectors.
Thanks to Alan Carson and Bob Dunlop, for permission for InspectAPedia to use text excerpts from The HOME REFERENCE BOOK - the Encyclopedia of Homes and to use illustrations from The ILLUSTRATED HOME .
Carson Dunlop Associates provides extensive home inspection education and report writing material. In gratitude we provide links to tsome Carson Dunlop Associates products and services.
 |
HOME | ABOUT | ASK a QUESTION | CONTACT | CONTENT USE POLICY | DESCRIPTION | POLICIES | PRIVACY | |
| © 2026 - 1985 Publisher InspectApedia.com - Daniel Friedman | |||||||||