 Window & Door Peel & Stick Flashing Tape Details
How to install flashing tape around, over, & under windows or doors
- POST a QUESTION or COMMENT about how to buy & apply peel and stick flashing tape around window & doors or at housewrap joints or holes.
Window & door details when using peel and stick flashing tape or membranes:
What is are best position & sequence for installing stick-on flashing tape over, under and along the sides of a window or door? This article gives recommended & best practices for using flashing tape around window openings. We explain why you should not stick the tape right onto housewrap over or under a window.
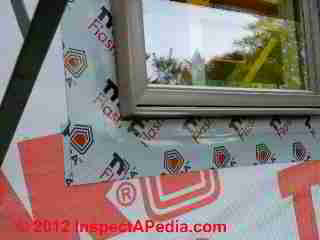
This article series describes the selection and installation of peel-and-stick flashing membranes used on building exteriors to seal housewrap joints and to seal against air or water leaks around windows, doors, or other openings. Our photo at page top shows Typar® flashing tape installed above a new window. A better practice laps the housewrap over rather than under the stick-on flashing tape, a better detail but one omitted by many builders.
InspectAPedia tolerates no conflicts of interest. We have no relationship with advertisers, products, or services discussed at this website.
- Daniel Friedman, Publisher/Editor/Author - See WHO ARE WE?
Details for Installing Peel and Stick Flashing Tape at Windows & Doors
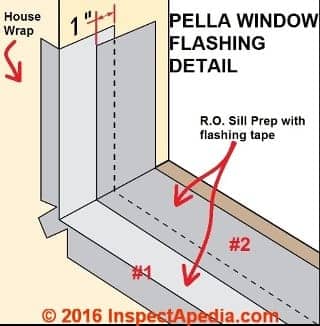 We like to install flashing tape in the same sequence or overlap pattern as if it were metal flashing - that is, the upper horizontal flashing tape overlaps the vertical tape installed (first) at the sides of the window.
To assure that we respect that water runs downhill, we install housewrap, window and then peel and stick flashing tape around a window in this order:
- The rough openings (RO) for windows and doors are cut before the housewrap is installed. This permits the housewrap to lap inside and be stapled to the frame of the rough opening. In our photo (left) you can see Tony preparing to install an exterior door in the rough opening.
- The housewrap product (Weather Resistant Barrier or WRB) is stapled over the building sides from the bottom run up, so that upper runs of wrap lap over the lower sections.
- Install the sill pan or RO bottom flashing: Best practice is to use a pre-fabricated sill pan under windows or doors; the sill plate is set into the RO as directed by the window or door manufacturer.
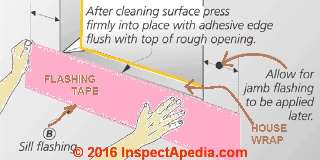
Install the sill pan or fabricated sill pan flashing using flashing tape around and under the window or door R.O. bottom. Add a second course of flashing tape on the sill surface as shown in the example at above/left, adapted from Pella® Window installation instructions cited later in this article.
In all cases, the RO Bottom flashing pan or tape are installed before the window is set into the opening.
- Above the RO the housewrap is cut and lifted over the window or door opening so that flashing tape installed in this location will be under the housewrap. You can use snippets of flashing tape or masking tape to hold the housewrap "up" out of the way while setting the window and while applying head flashing tape over the window.
- The window or door is set into the rough opening, squared, shimmed, and nailed in place through the flanges.
- Then set the window. See our notes below about window shims & interior & exterior WINDOW SEALANTS.
- Second flashing tape course: along the window left and right sides, with the bottom of the flashing tape lapping over the top of the horizontal tape that runs below the window. Our photo at below left just above shows these two flashing tapes have been installed. Details are shown below.
- Finally third flashing tape course across the window top: the horizontal top of the window is sealed with peel and stick flashing tape, with its ends lapping over the top of the flashing tape that ran along the window sides.
The top flashing tape should extend at least 1" past the vertical side flashing tape. Our page top photo shows a common peel-and stick-on flashing product installed around a window during new construction. There the flashing tape was installed on top of the housewrap - not the best practice.
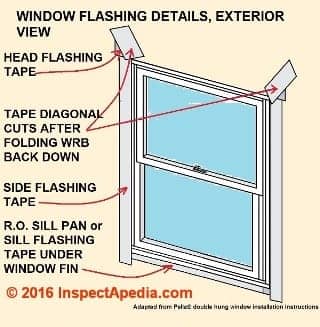 Best practice, as described by Pella® instructs the installer to place the window top flashing tap under the housewrap or WRB (weather-resistant barrier), achieved by cutting the house wrap above the window corners diagonally, folding the house-wrap up, installing the head flashing tape, then folding the housewrap back down and taping the diagonal cuts.
 We illustrate this here, adapted from Pella's window installation & flashing instruction manual.
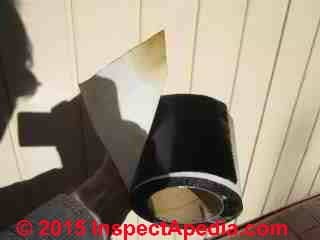
This flashing tape is very sticky on one side (peel off the waxed paper as we show). The other side of this product is covered with aluminum foil to improve its performance. This sticky flashing membrane tape will also seal nails that may penetrate its surface after installation.
But Pella® is smart for recommending this under-the WRB detail. As we found in the field, even very sticky flashing tape does not always bond well to some housewrap products. Eric Galow recommends additional staples through the flashing tape to be sure it remains in place during initial curing of the bonding adhesive. The window and flashing tape manufacturers recommend using plastic coated / capped nails or staples. Try and find them!
Also see FLASHING WALL DETAILS
and FLASHING ROOF WALL DETAILS.
If you are building a deck
see DECK FLASHING at BUILDING.
Peel-and-stick eaves membranes have been used for nearly 20 years to prevent roof leaks from ice dams and other roofing trouble spots.
These are typically available in 36-inch widths and are used to protect eaves, shallow-pitch roofs, and other problem roof areas. Over the past few years, a new family of related products has been introduced to help seal walls against water intrusion.
Question: which is the right way to install peel and stick flashing below a window
Can someone please clarify this issue? Most everywhere I've read about window flashing tape, it states to never apply it to the bottom of the window on the outside so water can exit to the house wrap instead of under the house wrap.
My siding crew taped the bottom of the window like shown in this article but I'm less worried about it because there's an open flap of house wrap below the window where water can eventually exit. Also, I insisted on a rain screen and the house wrap should let water escape so it should get stuck inside. Either way, I don't think taping the bottom is hardly ever recommended.
This question was posted originally
at FLASHING MEMBRANES PEEL & STICK
[Click to enlarge any image] This photo of flashing tape installed below a window and over the window's bottom flange or fin does not show the very best installation practice. Photos by D Friedman & Eric Galow, Galow Homes.
Reply:
Pat:
You're quite correct. The first example in the WR Grace Vycor Plus window flashing details, shown for a flanged window in new work, includes the use of a sill pan fabricated from flashing tape.
That's a good installation procedure if a pre-fabricated sill pan has not been provided. Other manufacturers simply run a full width of flashing tape just below the R.O. for the window before the window is set.
Watch out: Pella warns: DO NOT tape or seal the bottom nailing fin of the window itself - as was done here. Presumably we leave this window or door bottom fin open so that should water from above leak into the window or door R.O. it might find its way out onto the outer surface of the building's WRB (weather resistant barrier or "housewrap").
Flashing tape below the window at the sill should be installed over the housewrap or weather-resistant barrier (WRB) and before the window has been set into the R.O. A better detail from Fortifiber and still better details using a sill pan or fabricating one are both shown in more detail below.
[Click to enlarge this WR Grace Vycor Plus illustration sent along by Pat - Ed.]
Above: Flashing tape installed as sill flashing below the window R.O. before the window is set. This detail is from Fortifiber's® Window Flashing Installation Guide cited in this article. Other manufacturers recommend installing a sill pan or fabricating one from flashing tape before the window is set.
As for our photo of Typar® flashing tape used under new work windows shown above in this article, you will see that same detail in the Typar® flashing tape manual found at FLASHING TAPE INSTALLATION MANUALS. As my much-admired building instructor Bernie Campbalik said, "follow the water, boys, follow the water!" Typar says also that installation methods are approved by the American Architectural Manufacturers Association (AAMA) are also acceptable for TYPAR products and system warrantee.
Be afraid, be very afraid, of "experts" who insist, willy-nilly, that you should never ever use flashing tape below a window or door at all - that's not correct. But be just as afraid too (as you are) lest you install the flashing tape incorrectly in that location. In sum, flashing tape used as a window or door pan or installed below a window or door goes on before the window is set.

While there may be some window designs and some siding installation guides that recommend omitting window bottom flashing tape to permit window draining, virtually all of
the FLASHING TAPE INSTALLATION MANUALS
cited below describe some sort of window bottom stick-on flashing installation.
When a window pan or door pan is not used, many guides recommend fabricating one out of flashing tape. Some of the guides show two passes with flashing tape, one as a window or door pan and a second later in the window or door installation.
For example, the Flashing Tape Manual, Berry Plastics & Polyken Nashua Tape Products clearly shows the use of flashing tape under the window sill in different details depending on the type of window and sill and depending on whether or not a sill pan was used.
Similar advice is in the the Zip Wall Installation Manual and in the Dupont Flashing Systems Guide. There you'll also see flashing tape used across the bottom side of the window. Dupont® also suggests carrying the tape up over the RO sill before the window is set.
Here is an excerpt from Typar's® instructions for window sealing and flashing. I've made minor corrections to spelling, grammar and clarity.
- Install the window sill pan according to the manufacturer's instructions. Alternatively, you can create a sill pan using Typar Flashing Flex. Cut a piece that is 12" longer than the length of the rough opening window sill.
Carefully pull off the release liner. Center the Flashing in the center of the rough opening and work your way toward the corners and then up the sides. Note: the flex flashing should overlap the outside of the wall by 2-3". Only stretch the flashing in the corners.
Alternatively to above you, you can create a sill pan by installing TYPAR Straight Flashing along the bottom sill and installing Typar Flex on the corners only.
If needed, secure the fanned edges of the TYPAR Flashing Flex with a plastic capped nail/plastic capped staple. [We always do this]. - Apply a continuous bead of sealant to the back of the window or on the wall. Do not apply the sealant across the bottom of the sill or on the bottom of the window. [THIS is where more confusion probably arises about the use of flashing tape as we want any water that is on the window sill or on the sill RO to be able to drain out.- Ed.]
Install the window according to the manufacturer's installation instructions. - Cut two pieces of Typar Flashing long enough to extend 1" above the window head flange and 1" below the window sill flange. Carefully peel off the release liner and apply the flashing on both sides of the window. Make sure to cover the entire window flange; press firmly by hand or using a J-roller. Ensure that there are no wrinkles or bubbles.
Cut a piece of Typar Flashing for the head flashing. Ensure that the piece is long enough to extend 1" on both sides of the jamb flashing. Remove the release liner and carefully install the flashing. Cover the window flange and press firmly by hand or using a J-roller. - Release the upper flap of the WRB [Weather Resistant Barrier, aka "housewrap"] that you cut earlier. Tape the 45 degree cuts using Typar construction Tape or Typar Flashing. DO NOT tape the WRB along the top of the window flange.
Window Shims & Sealants
Watch out: don't forget to use your window shims and spacers at this step to be certain that the window is plumb and level, and to prevent movement of the window within the R.O.
Don't over-jam shims or spacers as you don't want to bow the window frame. Pella's window installation instructions for inserting the window into the rough opening do not specify any use of sealant under the window fins nor around the interior of its jamb.
Sealant is used at the exterior of the window such that " ... the exterior sealant line will cover the exterior edge of the [flashing] tape. Later, from the building interior, insulating foam sealant is later applied in the space between the window frame and the rough-opening sides. Pella warns DO NOT completely fill the space from the back of the fin to the interior face of the opening.
Check the window operation when the foam sealant has cured. If the window does not operate correctly, check that it has remained plumb, level, and that its sides are not bowed.
If necessary, but away foam sealant with a serrated knife and adjust the shims. We use a bread knife or a Japanese carpenter's saw for this purpose.
Typically a backer rod and sealant are used between siding J-channel or wood trim and the window head.
Because I don't want water to run behind horizontal wood trim where it will then get trapped by the sealant used at the trim underside, I also use sealant along the back side of my horizontal wood trim at the trim top edge, and I add sealant at the juncture of wood siding and horizontal wood trim as well.
Installation Manuals for Flashing Tapes and Membranes
- BERRY PLASTICS FLASHING TAPE MANUAL [PDF] Berry Plastics & Polyken Nashua Tape Products, distributed by various sources including Best Materials, retrieved 2016/09/13, original source:
www.bestmaterials.com/PDF_Files/flashing-tapes-manual.pdf - DUPONT FLASHING SYSTEMS MANUAL, prior, [PDF] retrieved 2016/09/13, original source:
www.dupont.com/content/dam/assets/products-and-services/construction-materials/assets/K17933-FlashingGuidelinesBEFORE-10-30-11.pdf - DUPONT FLASHING SYSTEMS MANUAL - CURRENT, PDF] retrieved 2016/09/13
- FORTIFIBER FLASHING TAPE MANUAL, [PDF] retrieved 2016/09/13, original source: http://www.fortifiber.com/pdf/install_guides/IG_window_flashing_method_a1.pdf
- PELLA WINDOW FLASHING DETAILS, [PDF], retrieved 2016/09/13
- TYPAR FLASHING TAPE MANUAL, [PDF] retrieved 2016/09/13, original source: www.typar.com/assets/downloads/pdf/TYPAR_WPS_Install_Instructions_5-19-15.pdf
- ZIP WALL INSTALLATION MANUAL, [PDF] retrieved 2016/09/13, original source: sweets.construction.com/swts_content_files/102935/821515.pdf
- See FLASHING TAPE BRANDS, SOURCES, MANUALS for a list of sources & producers of peel and stick tapes and flashing products
...
Continue reading at FLASHING MEMBRANES PEEL & STICK - topic home, or select a topic from the closely-related articles below, or see the complete ARTICLE INDEX.
Or see these
Recommended Articles
- CAULKS & SEALANTS, EXTERIOR
- FLASHING for METAL ROOFS
- PEEL & STICK FLASHING MEMBRANES
- WINDOW FLASHING & SEALING Guide
- WINDOW TYPES - Photo Guide
Suggested citation for this web page
WINDOW & DOOR FLASHING TAPE DETAILS at InspectApedia.com - online encyclopedia of building & environmental inspection, testing, diagnosis, repair, & problem prevention advice.
Or see this
INDEX to RELATED ARTICLES: ARTICLE INDEX to BUILDING FLASHING
Or use the SEARCH BOX found below to Ask a Question or Search InspectApedia
Ask a Question or Search InspectApedia
Try the search box just below, or if you prefer, post a question or comment in the Comments box below and we will respond promptly.
Search the InspectApedia website
Note: appearance of your Comment below may be delayed: if your comment contains an image, photograph, web link, or text that looks to the software as if it might be a web link, your posting will appear after it has been approved by a moderator. Apologies for the delay.
Only one image can be added per comment but you can post as many comments, and therefore images, as you like.
You will not receive a notification when a response to your question has been posted.
Please bookmark this page to make it easy for you to check back for our response.
IF above you see "Comment Form is loading comments..." then COMMENT BOX - countable.ca / bawkbox.com IS NOT WORKING.
In any case you are welcome to send an email directly to us at InspectApedia.com at editor@inspectApedia.com
We'll reply to you directly. Please help us help you by noting, in your email, the URL of the InspectApedia page where you wanted to comment.
Citations & References
In addition to any citations in the article above, a full list is available on request.
- Best Practices Guide to Residential Construction, by Steven Bliss. John Wiley & Sons, 2006. ISBN-10: 0471648361, ISBN-13: 978-0471648369, Hardcover: 320 pages, available from Amazon.com and also Wiley.com. See our book review of this publication.
- Paul Galow [Website galowconsulting.com ] - technical consultant on networking, LAN design, applications support. Galow Consulting Services [Website galowconsulting.com ] , 914-204-1749, email: paulgalow@galowconsulting.com
- John Rudy, Advantage Home Inspections, Flemington N.J. 08822 home inspector, 908-806- 6364, Home, Radon & Termite Inspections, Central & Parts of North New Jersey, email: jonadvantage1@yahoo.com
- In addition to citations & references found in this article, see the research citations given at the end of the related articles found at our suggested
CONTINUE READING or RECOMMENDED ARTICLES.
- Carson, Dunlop & Associates Ltd., 120 Carlton Street Suite 407, Toronto ON M5A 4K2. Tel: (416) 964-9415 1-800-268-7070 Email: info@carsondunlop.com. Alan Carson is a past president of ASHI, the American Society of Home Inspectors.
Thanks to Alan Carson and Bob Dunlop, for permission for InspectAPedia to use text excerpts from The HOME REFERENCE BOOK - the Encyclopedia of Homes and to use illustrations from The ILLUSTRATED HOME .
Carson Dunlop Associates provides extensive home inspection education and report writing material. In gratitude we provide links to tsome Carson Dunlop Associates products and services.


