
InspectAPedia® FREE Encyclopedia of Building & Environmental Construction, Diagnosis, Maintenance & Repair |
Question? Just ask us! InspectAPedia
|
 Joist Hangers & Post & Beam Framing Connectors
Guide to Choosing & Using Porch & Deck Structural Connector Brackets & Plates

- POST a QUESTION or COMMENT about what types of joist & beam hangers & connectors are required for wood framing & deck construction: joist hangers, connectors, steel tie plates, etc.
Framing connectors - Joist Hangers, Brackets, Connectors: this article explains the proper selection and installation of structural connectors, brackets & tie plates used to connect deck or porch framing and support members.
USP connectors such as joist hangers, joist angles, joist supports, stud shoes, skew hangers, and face mount hangers used for connecting these hangers and connectors are described, their uses explained, and their applications and specifications linked.
Both galvanized steel and stainless steel joist hangers, connectors, & brackets may be applied.
InspectAPedia tolerates no conflicts of interest. We have no relationship with advertisers, products, or services discussed at this website.
- Daniel Friedman, Publisher/Editor/Author - See WHO ARE WE?
Choose the Correct Structural Connectors for Decks & Porches
 A Photo Guide to Metal Joist Hangers, Bolts, & other Connectors Used in Deck, Porch & other Building Framing Construction

At minimum, all structural hardware for decks should be hot-dipped galvanized steel. For the best protection, use stainless steel (see “Joist Hangers and Connectors,” below).
At connections carrying structural loads, such as deck ledgers or railing posts, use through-bolts or lag screws.
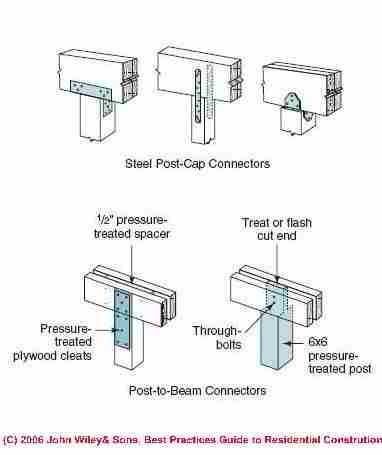
We review the following: connectors used in Wood Framing & Deck & Porch Construction, Structural Joist Hangers, Brackets, & Connectors for posts, beams, joists, railings, ledgers, etc. Deck & Porch Post & Beam Connectors: steel post cap connectors, plywood post to beam cleats, scabs, other connectors.
We explain how to toe-nail wood framing connections and include a key illustration showing what makes toe-nailing work very well as a strong connection.
Details of installing Simpson Strong Tie framing connectors for I-Joists.
Installation Details for Steel Framing Connectors for I-Joists. Details for using through-bolting or lag bolts for wood framing, deck & porch construction
How to Make Secure Post to Beam or Girder Connections for Decks & Porches
As described in Best Practices Guide to Residential Construction, Chapter Four, Best Construction Guide for Building Decks and Porches [web version of that chapter]]
For the strongest connection of beam to post, place the
support beam directly on top of the posts (photo at left), rather than bolting them to the side, so the full load is transferred to the
posts.
To keep the post in place and to prevent any twisting or shifting, the connection should be reinforced with
steel strapping, a steel connector, or a treated plywood cleat. In general, notching a 4x4 post will leave too little
wood for an adequate connection [but notching a 6x6 post can work, as illustrated below]..
For a more streamlined appearance, joist hangers are acceptable.
Make sure the hangers and nails are approved by the manufacturer for use with the new types of pressure- treated wood (ACQ or ACZA) and fill all the holes in the hangers with properly sized nails.
In general, nail into the joists with 1 1/2-inch joist-hanger nails and nail into the beam with 10d to 16d common nails, as specified by the hanger manufacturer.
Notching a 6x6 Post to Support & Connect to a Deck Beam
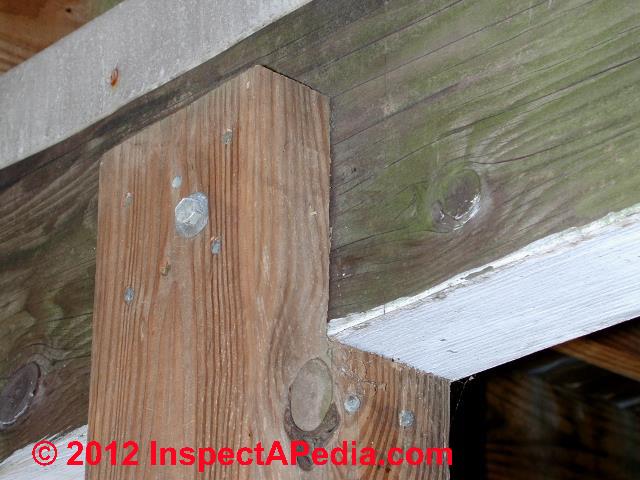
A double 2x beam can rest on a notched 6x6 post, as shown.
For the strongest connection of joists to the support beam, the joists should sit on top of the beam
In our photo the 6x6 post was notched to leave a thick component that could be through-bolted (or lag bolted) to the girder.
You'll also see toe-nails up through the post top into the girder bottom, and additional common framing nails securing the post to the beam.
Don't cut the notch out of the center of the 6x6 post for a double 3x beam
- the remaining lumber on the post top will be too thin and risks splitting and failure.
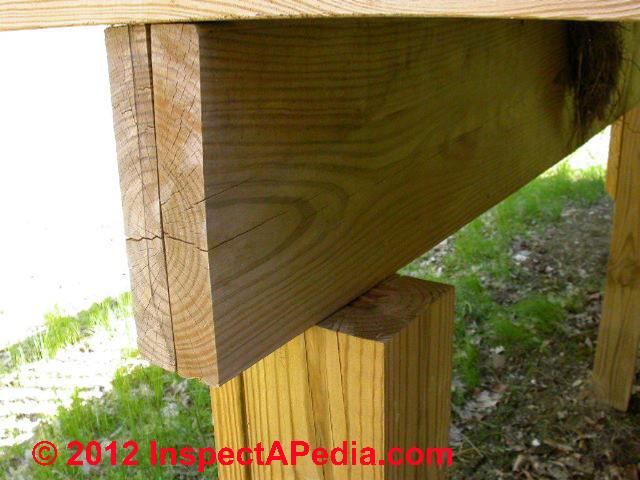
Using a scab to tie deck posts to girders
An alternative to using steel framing connectors to tie a post to a beam is shown
in our photo just above.
A scab using 2x lumber is secured to one side the girder and to the supporting post below.
But in our photo the installer put the scab on just one side of the post, and used just 10d common nails for fasteners.

To be secure, the scab should be bolted to the girder and through the post as well.
Our red circles mark about where a builder would through bolt the scab to the girder and post.
Our green circles mark where I think we see little 10d common nails driven straight into the girder and post.
Through-bolts (illustrated below) are stronger and should be used where possible.
For the heaviest connections on a deck, such as where ledgers attach to the house or to posts, use 1/2-inch bolts or lags.
A look at the other side of the deck girder (beam) above shows that the builder must have been short on nails.
We don't see ANY nails securing the two 2x10's together - at least none on this side (a weaker construction method),
and we see NO fasteners making any attempt to tie the girder to the post top.
Everything relies on that 2x6 scab that was ticky-tacked to one face of the post and beam.
We recommended the addition of through bolts.
When drilling holes through a scab or other framing member, and if multiple bolts are to be installed (red circles on the scab in the photo at above left),
I [DJF] like to stagger the bolt hole positions in order to assure that no two bolts run through the same vertical grain in the wood.
That's the strongest connection as it reduces the chances of splitting of the wood between two holes drilled in the same grain section of the lumber.
You'll also notice that we don't place the bolts too close to the end of the scab nor too close to the top or bottom edge of the girder nor too close to the top of the post
- locations where splitting may be more likely.
The two 2x10's comprising the deck girder in our photo above have not been bolted together.
That may be OK if the girder was toe-nailed from opposing sides.
Some builders who want a stiffer girder add structural adhesive and even a treated plywood plate between the 2x lumber to build the girder.
Especially where a plywood stiffener is installed,
be sure to provide flashing over the top of the girder to protect the structure from water and frost damage.
Place large washers under the heads of lags and at both ends of through-bolts.
Re tighten bolts and lags after the first year and check periodically for tightness.
Joist Hangers and Steel Connectors Used for Wood Framing & Deck Construction
 at a minimum,
use hot-dipped galvanized hardware. With pressure treated
wood, hot-dipped galvanized steel should conform
to ASTM A153 (for fasteners) or ASTM A653, G185 (for
connectors).
at a minimum,
use hot-dipped galvanized hardware. With pressure treated
wood, hot-dipped galvanized steel should conform
to ASTM A153 (for fasteners) or ASTM A653, G185 (for
connectors).
Stainless steel offers the best protection. Type 304 or higher stainless steel is recommended for very wet environments such as poolside decks; or Type 326 for exposure to salt or saltwater.
Watch out: Also, do not mix metals: Use stainless-steel fasteners with stainless-steel connectors and galvanized fasteners with galvanized connectors.
And at FRAMING FASTENERS, NAILS, SCREWS, & HIDDEN we include examples of fasteners that should not be used in joist hangers, such as drywall screws and other non-structural screws. or roofing nails.
Also see NEW PRESERVATIVES & CORROSION where we describe structural fasteners designed for use in pressure-treated lumber.
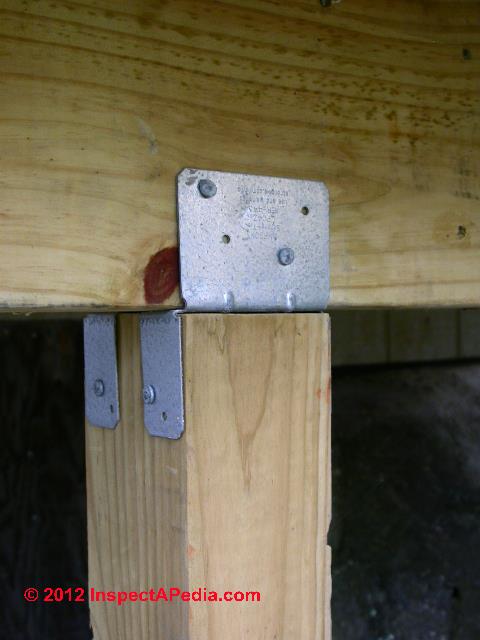
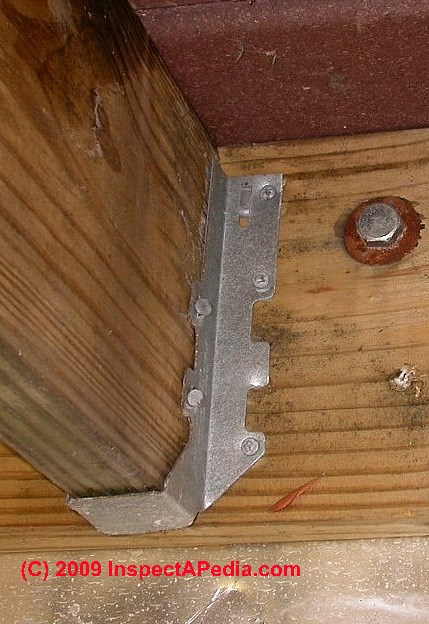
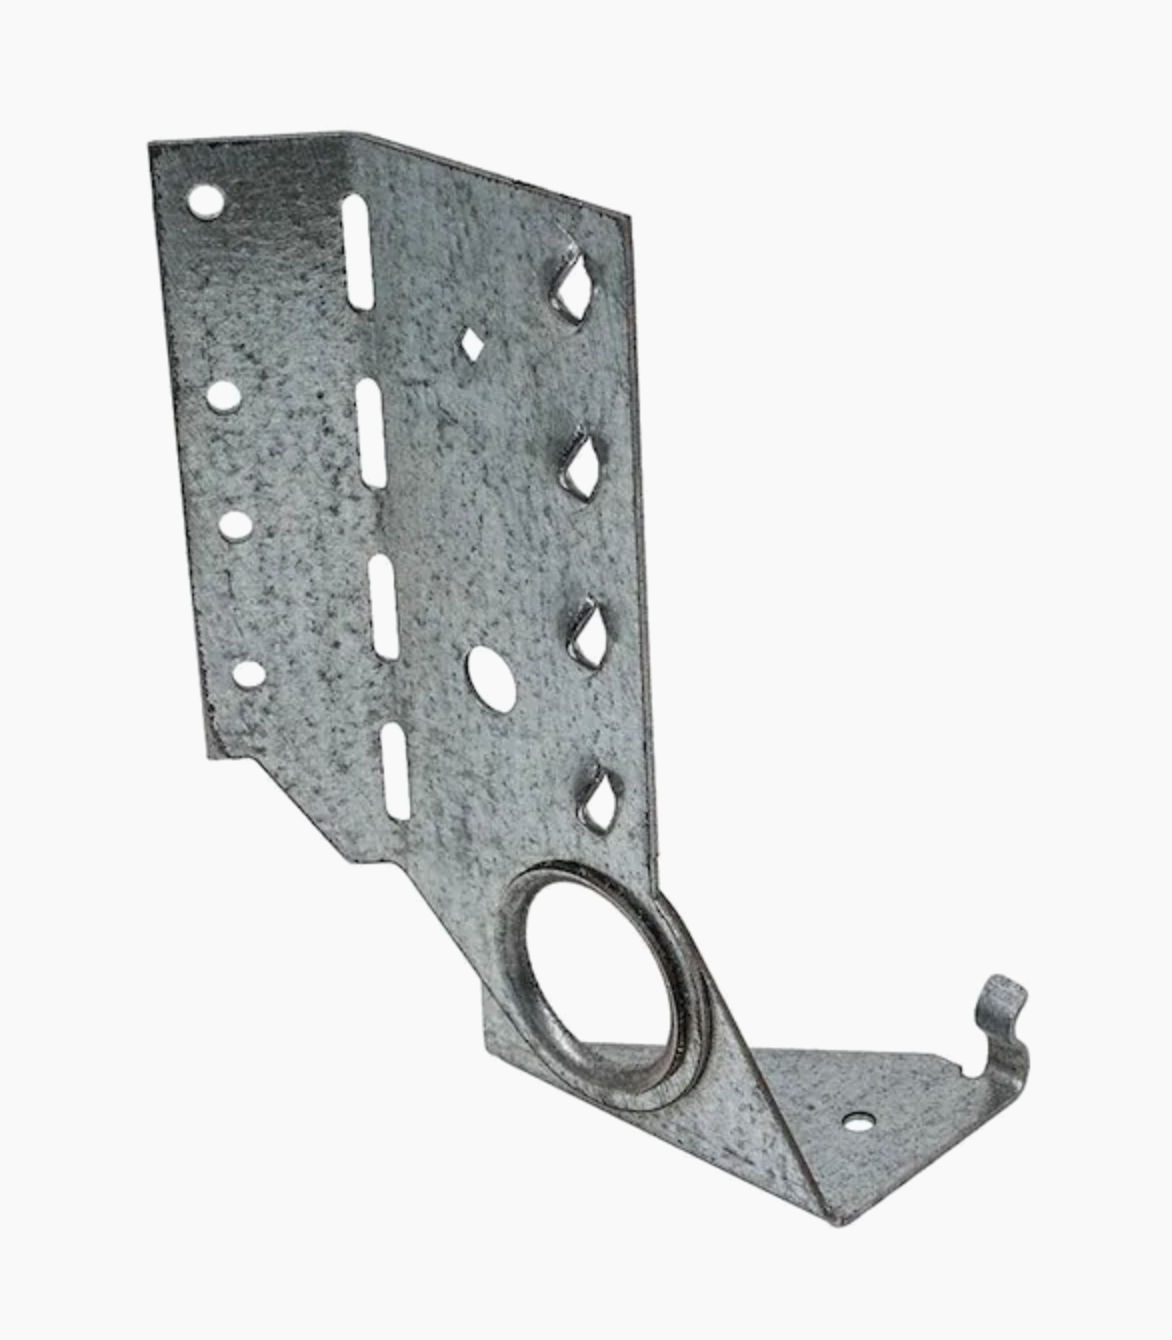
Our photo (above left) shows a typical steel joist hanger used to speed and aid the construction of a deck. Notice that the height of the steel hanger is matched to the depth of the joist.
Continuing from from Best Practices Guide to Residential Construction (Steve Bliss, J Wiley & Sons) :
Like other deck components, metal fasteners are subject to numerous stresses.
The sealers and stains typically used
on decks provide little protection to fasteners, and the copper-based chemicals used in most waterborne preservatives
accelerate corrosion in many metals.
When the fasteners corrode, they contribute to decay in the surrounding wood, further weakening the connection.
Also notice that the proper galvanized steel joist hanger nails were used, not roofing nails or other fasteners.
If you select the proper depth of joist hanger to match the depth of the deck joists, the manufacturer is giving you a clue about the number of nails required to make a safe and secure connection - every hole in the hanger gets a nail.
Watch out: choose the right joist hanger for the size of joist being supported. Don't use a joist hanger intended for 3x4's to hang a 2x6 or larger framing member - the number of nails won't be sufficient.
If you encounter a structure already built with this mistake, fixing the connections is usually easy:
add the required number of additional fasteners by toe-nailing the joist or rafter from opposing sides, using an appropriately sized framing nail or galvanized framing nail if outdoors.
(Typically 12d common galvanized).
How Many Nails or Screws do I Need to Connect Two Framing Members?
The architect or engineer who designs a building specifies the number and type of framing connectors to be used for each type of connection.
But there are also good sources of connector information from the manufacturers of framing connectors (right in the catalog or in installation sheets), as well as in various engineering and carpentry texts.
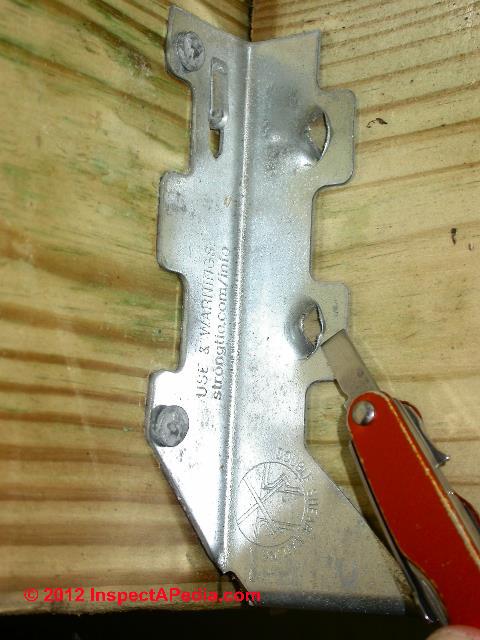
A still more basic clue is the number of holes in the framing connector itself.
Watch out: the number of holes in a typical joist hanger is a clue to the number of nails that the manufacturer expected you to use to make a secure connection.
Our pocket-knife is pointing to missing framing nails in the 2x4-sized framing-connector above.
There were no nails into the butting framing member.
Toe Nailing Wood Framing Connections

Toe-Nails Instead of Joist Hangers are OK for Framing Lumber Butt-Joint Connections, but Don't Over-Nail
It is not necessary to use steel joist hangers if the joist is properly toe-nailed from either side into the ledger board, provided that the proper size and number of nails are used.
Our illustration (left, adapted from a Double-Shear stamping on a steel joist hanger) explains why toe-nailed lumber connections can be very strong.
Use of toe-nailing, or angled opposed framing nails (Double-Shear in Simpson Strong-Tie's patented[10] joist hanger such as the item adapted above), can permit the use of fewer total nails in a wood frame construction.
Details about how to use toe-nailing in wood frame construction are
at TOE NAILED FRAMING CONNECTIONS
Installation Details for Steel Framing Connectors for I-Joists
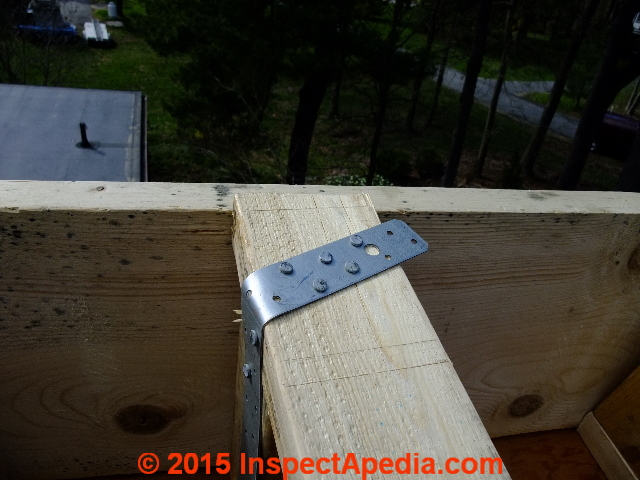
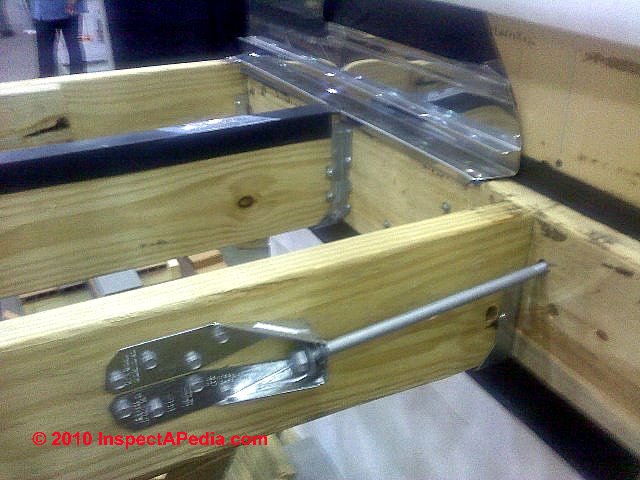
Our photographs illustrate use of a Simpson Strong Tie connector specified for use on a range of I-Joist sizes.
As we illustrate its installation here, the connector is nailed over the side of the I-Joist, then to the wall top plate, then to the wall stud below, forming a very strong connector where these I-Joists were used as roof supports.
Our first photograph (left) shows ;that we installed the specified number of joist-hanger nails (minimum of five) through the connector end and into the top of the I-Joist.
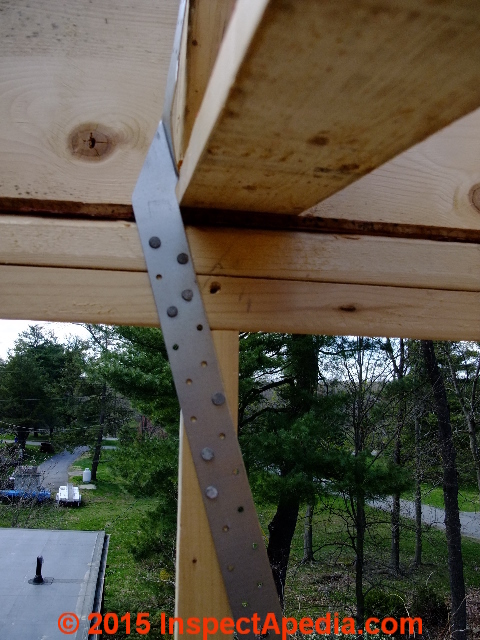
Our two photos below illustrate the required position and number of nails for the extended connector strap as it passes over the wall top plate and along the side of the I-Joist where it was nailed to the top chord tie and to the block inserted at the end of the I-Joist (below left)
and then over the top plate (4 nails) and finally along a wall stud inner face (3 more nails) giving us 7 fasteners in the I-Joist itself.
An additional 4 nails into the top plate and at least 3 (depending on how the strap aligns) into the wall stud) give us 7 fasteners into the structural wall below.
If additional nails are needed into the wall stud the strap can be bent around the stud side for that purchase point.

This I-joist installation was for framing a low-slope roof in new construction.
The layout required some planning and thought to assure that the I-joists were placed over wall studs in a location to permit the strapping of I-Joist to both the wall top plate and the wall stud using a single strap.
If your plans don't work out quite so precisely you will still be OK but if your I-Joist connector straps don't line up to tie all three wall components together at once,
you may be required to install additional ties to connect certain wall studs to the building top plate.
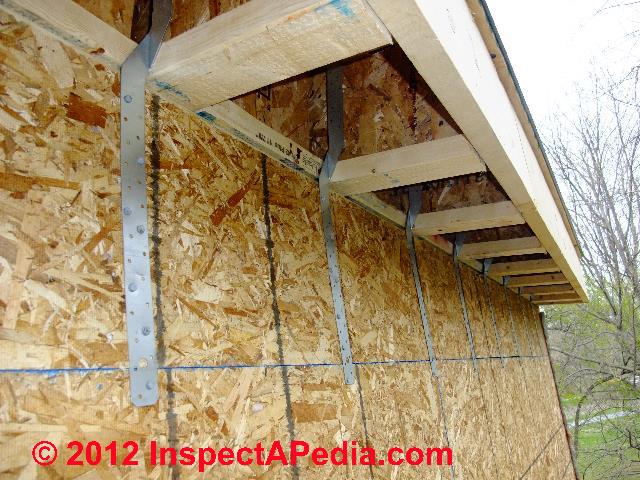
At left we illustrate installation of the same utility framing connector strap at the opposite side of the same building as the structure above. In this location the lower ends of the framing connectors were nailed from the exterior of the building, through the OSB structural sheathing and into wall studs below.
[In my [DJF] OPINION, nailing the strapping to OSB alone, that is, not also through it into the wall studs, is not so strong.]
Photos courtesy of Daniel Friedman & Galow Homes.
I-Joist Hangers for Flat or Angled Framing Between Walls Rather than On Top of Walls
Above we illustrated using steel framing connectors to tie I-Joists to a wall top plate and stud for the case of I-joists that run on top of the building walls.
Simpson Strong Tie and other manufacturers provide straight (for floors) or angled I-Joist hangers for framing I-Joists between building walls such as for installation of a floor, a flat roof, or a roof with no overhang.
Machine-Threaded Bolts Used for Deck Construction
Where both sides of the joint are accessible, bolts offer the strongest connections.
Drill pilot holes 1/32 to 1/16 inch larger than the diameter of the bolt so it will slide through easily.
After drilling, saturate the hole with preservative.
Use large washers under both the head and nut.
Re tighten after the first year, since the wood may have shrunk.
Photo at left courtesy of Mark Morsching., EverFlashing.
Lag Bolts Used for Deck Construction
For lag bolted deck connections, drill a full-diameter pilot hole for the unthreaded portion and a smaller hole (65 to 75% of the lag’s diameter) for the threaded portion.
So, for example, a 1/2-inch lag would get a 5/16-inch pilot hole for the threaded portion; a 3/8-inch diameter lag would get a 1/4-inch diameter pilot hole.
After drilling, saturate the pilot hole with wood preservative. It is also important that at least half the length of the lag is threaded into solid wood.
For example, driving a 5-inch lag through a 4x4 post into a 2x joist will produce a weak connection with only 1 1/2 inches of anchoring. Instead, the lag screw should go through the 2x and be threaded into the thicker 4x4.
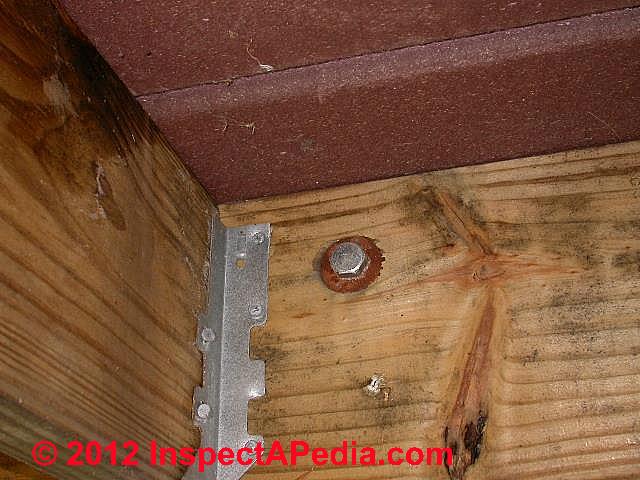
Use a large washer under the head, and re tighten after the first year in case materials have shrunk. Our photo (above left) illustrates use of a lag bolt to connect the deck ledger to the building structure by bolting to the rim joist.
Notice that the installer seems to have omitted flashing over the ledger board.
Suppliers of Joist, Post & Beam Hangers & Connectors & the Nails or Fasteners used With Them
 Stainless steel or galvanized steel joist hangers, connectors and similar products are produced by Simpson Strong Tie, Incom, Schuler Manufacturing, State Metals, Daytona Bolt & Nut, Hutchinson, Cleveland Steel, Tamlyn, U.S. Lumber, Hohmann & Barnard, and Direct Tools & Fasteners as well as Paslode, Grip Rite joist hanger nails and other specialty nails.
- Cleveland Steel Structural Fasteners, 26001 Richmond Rd., Bedford Heights, OH 44146,| Phone: 216.464.9400, Fax: 216.464.9404, E-mail: info@clevelandsteel.com, Website: http://clevelandsteel.thomasnet.com/category/construction-hardware-division?
- Daytona Bolt & Nut, 815 N. Beach Street, P.O. Box 1391, Daytona, FL 32114, P: 386-255-0248, F: 386-257-5985, E-mail:Daytona@DaytonaBolt.com
- Schuler Mfg. & Equip. Co. Inc., 63724 Richland Road, Griswold, Iowa 51535, Tel: (712) 774-2228 Website: http://www.schulermfg.net/
- Silva Timber Products, Unit 4, Albright Road Widnes, Cheshire, WA8 8FY, Tel: 0151 495 3111, Fax: 0151 495 2255, Website: http://www.silvatimber.co.uk/, Email: enquiries@silvatimber.co.uk
- Simpson Strong Tie®, P.O. Box 10789, Pleasanton, CA 94588 USA, Tel:1-800-999-5099, Website: http://www.strongtie.com/
- Simpson Strong-tie DECK CONNECTION and FASTENING GUIDE [PDF] (2019) Recommendations for the construction of building-code-compliant decks, Simpson Strong Tie®, retrieved 2020/11/23, original source: https://www2.strongtie.com/catalog_order.asp?site=SST where you can download any of a large collection of reference documents, catalogs, and product guides from Simpson Strong-Tie.
- Simpson Strong-tie FASTENING SYSTEMS CATALOG & TECHNICAL GUIDE [PDF] (2019) , Simpson Strong Tie®, retrieved 2020/11/23, original source: https://www2.strongtie.com/catalog_order.asp?site=SST where you can download any of a large collection of reference documents, catalogs, and product guides from Simpson Strong-Tie.
Description
The C-F-2019 is a 228-page product catalog including new product information as well as applicable specification and installation instructions for wood-to-wood, -metal and -engineered wood structural fasteners. This catalog also provides product information for Simpson Strong-Tie® deck products, as well as Quik Drive® auto-feed screw driving systems.
The piece includes both new and updated product information and material specifications. - Simpson Strong-tie C-F-2019TECHSUP [PDF] is a 164-page technical document featuring engineering data, illustrations, diagrams and tables for structural fasteners featured in the C-F-2019 Fastening Systems Catalog listed just above.
- Simpson Strong-tie WOOD CONSTRUCTION CONNECTORS [PDF] (2020) , Simpson Strong Tie®, retrieved 2020/11/23, original source: https://www2.strongtie.com/catalog_order.asp?site=SST where you can download any of a large collection of reference documents, catalogs, and product guides from Simpson Strong-Tie.
- Tamlyn, 13623 Pike Road, Stafford, TX 77477, USA Toll Free 800-334-1676, Phone: 281-499-9604, Fax: 281-499-8948, (photo, above left), Website: http://tamlyn.com/
- Incom Distributor Supply, PO Box 868, Fort Wayne IN 46801, Tel: 260-748, 5469, Website: http://shop.incomsupply.com/shop/, "... a growing nationwide network of over 500 Commercial Industrial Distributors" Incom Inc, 73-5600 Kauhola St Ste C, Kailua Kona, HI 96740, Tel: (808) 329-1311

- Deck Lok® framing connectors, produced by Screw Products, Inc., 9401 Bujacich Rd, Bldg 1B Gig Harbor, WA 98332 include models that can be used with stair stringers to attach the stringer to the deck rim joist using through-bolts.
DeckLok®, Tel: 1-877-844-8880 Website: http://www.deck-lok.com and http://www.screw-products.com/ E-mail: info@screw-products.com
DECKLOK INSTALLATION INSTRUCTIONS [PDF] retrieved 2018/04/13, original source: http://www.deck-lok.com/wp-content/uploads/2015/07/decklok-diagram.pdf
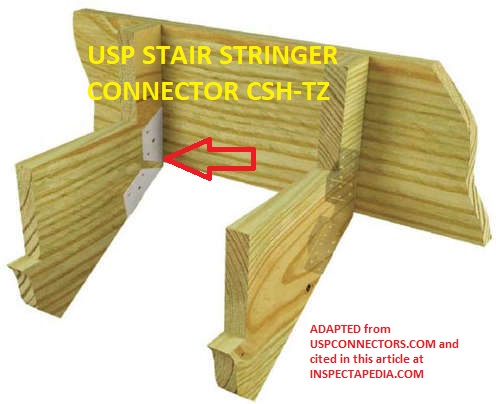
- USP Stair stringer connector CSH-TZ where "CSH" refers to "Concealed Stringer Hanger". MiTek Industries, Inc, Website: http://www.uspconnectors.com Tel: 1-800-328-5934 Email: uspcustomerservice@mil.com USP Structural Connectors®, Tel: 1-800-328-5934
These USP CSH-TZ stair stringer connectors are approved by the company for use with Lumberlok™ structural connector screws [PDF] sold in two sixes #9 x 1 3/8" and #9 x 2 7/8" lengths. Typically for connecting to a rim joist the shorter screws are used.
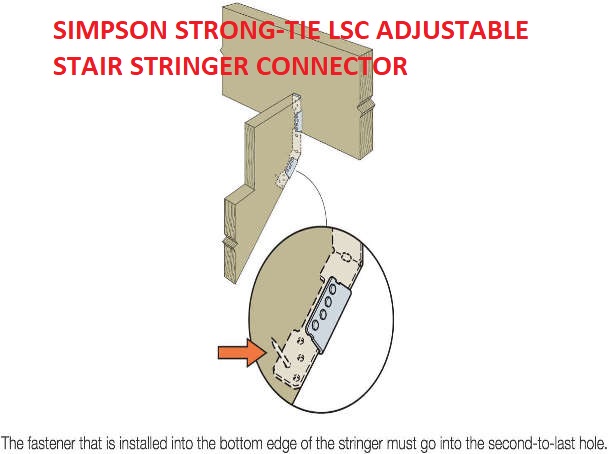
- Simpson Strong Tie LSCZ ZMAX Galvanized 18-gauge adjustable stringer connector. Simpson Strong-Tie, - Retrieved 2018/04/13, original source: https://www.strongtie.com/deckconnectors_decks/lsc_connect/p/lsc
-- Adapted with permission from Best Practices Guide to Residential Construction (Steve Bliss, J Wiley & Sons) .
This article series discuss best porch & deck construction practices, including choice of framing materials, decking or flooring choices & installation, how to select and use deck and porch structural and flooring fasteners, actual deck & porch framing construction details & connections, deck joist & beam span tables, how to build leak-proof rooftop decks, construction of covered & screened porches, deck & porch railing construction & materials, choices of finishes and stains for decks & porches, and past & current deck lumber preservative treatments with related health & environmental concerns.
Structural Fasteners Rsearch for Wood Framing
- [3] Cleveland Steel Structural Fasteners, 26001 Richmond Rd., Bedford Heights, OH 44146,| Phone: 216.464.9400, Fax: 216.464.9404, E-mail: info@clevelandsteel.com, Website: http://clevelandsteel.thomasnet.com/category/construction-hardware-division?
- [4] Daytona Bolt & Nut, 815 N. Beach Street, P.O. Box 1391, Daytona, FL 32114, P: 386-255-0248, F: 386-257-5985, E-mail:Daytona@DaytonaBolt.com
- [5] Schuler Mfg. & Equip. Co. Inc., 63724 Richland Road, Griswold, Iowa 51535, Tel: (712) 774-2228 Website: http://www.schulermfg.net/
- [6] Simpson Strong Tie®, Tel:1-800-999-5099, Website: http://www.strongtie.com/
- [7] "Tamlyn Structural Lumber Connectors, Masonry / Concrete Products, Pest Control, [catalog & reference guide]", Tamlyn, 13623 Pike Road, Stafford, TX 77477, USA Toll Free 800-334-1676, Phone: 281-499-9604, Fax: 281-499-8948, (photo, above left), Website: http://tamlyn.com/ [copy on file as /structure/Framing/Connectors Framing/Tamlyn_Structural_Connector_Cat.pdf]
- [8] Incom Distributor Supply, PO Box 868, Fort Wayne IN 46801, Tel: 260-748, 5469, Website: http://shop.incomsupply.com/shop/, "... a growing nationwide network of over 500 Commercial Industrial Distributors" Incom Inc, 73-5600 Kauhola St Ste C, Kailua Kona, HI 96740, Tel: (808) 329-1311
- [9] USP Structural Connectors®, Tel: 1-800-328-5934, Email: uspcustomerservice@mii.com, Website: http://www.uspconnectors.com/
- [10] Double Shear Joist hangers include a cut-out/stamping that provides distributed, and properly-angled 45-degree nailing positions (load points) in the joist hanger. The angles assure proper toe-nailing of the hanger nails. Double shear nailing hangers are a patented [since 1984] feature of Simpson Strong-Tie ZMAX galvanized joist hangers. Other companies such as Silva Timber Products (in the U.K.) produce similar double-shear joist and truss hanger products.
- [11] Silva Timber Products, Unit 4, Albright Road Widnes, Cheshire, WA8 8FY, Tel: 0151 495 3111, Fax: 0151 495 2255, Website: http://www.silvatimber.co.uk/, Email: enquiries@silvatimber.co.uk
This article includes excerpts or adaptations from Best Practices Guide to Residential Construction (Steve Bliss, J Wiley & Sons) , by Steven Bliss, courtesy of Wiley & Sons.
Also see our BOOK REVIEW of that book.
...
Reader Comments, Questions & Answers About The Article Above
Below you will find questions and answers previously posted on this page at its page bottom reader comment box.
Reader Q&A - also see RECOMMENDED ARTICLES & FAQs
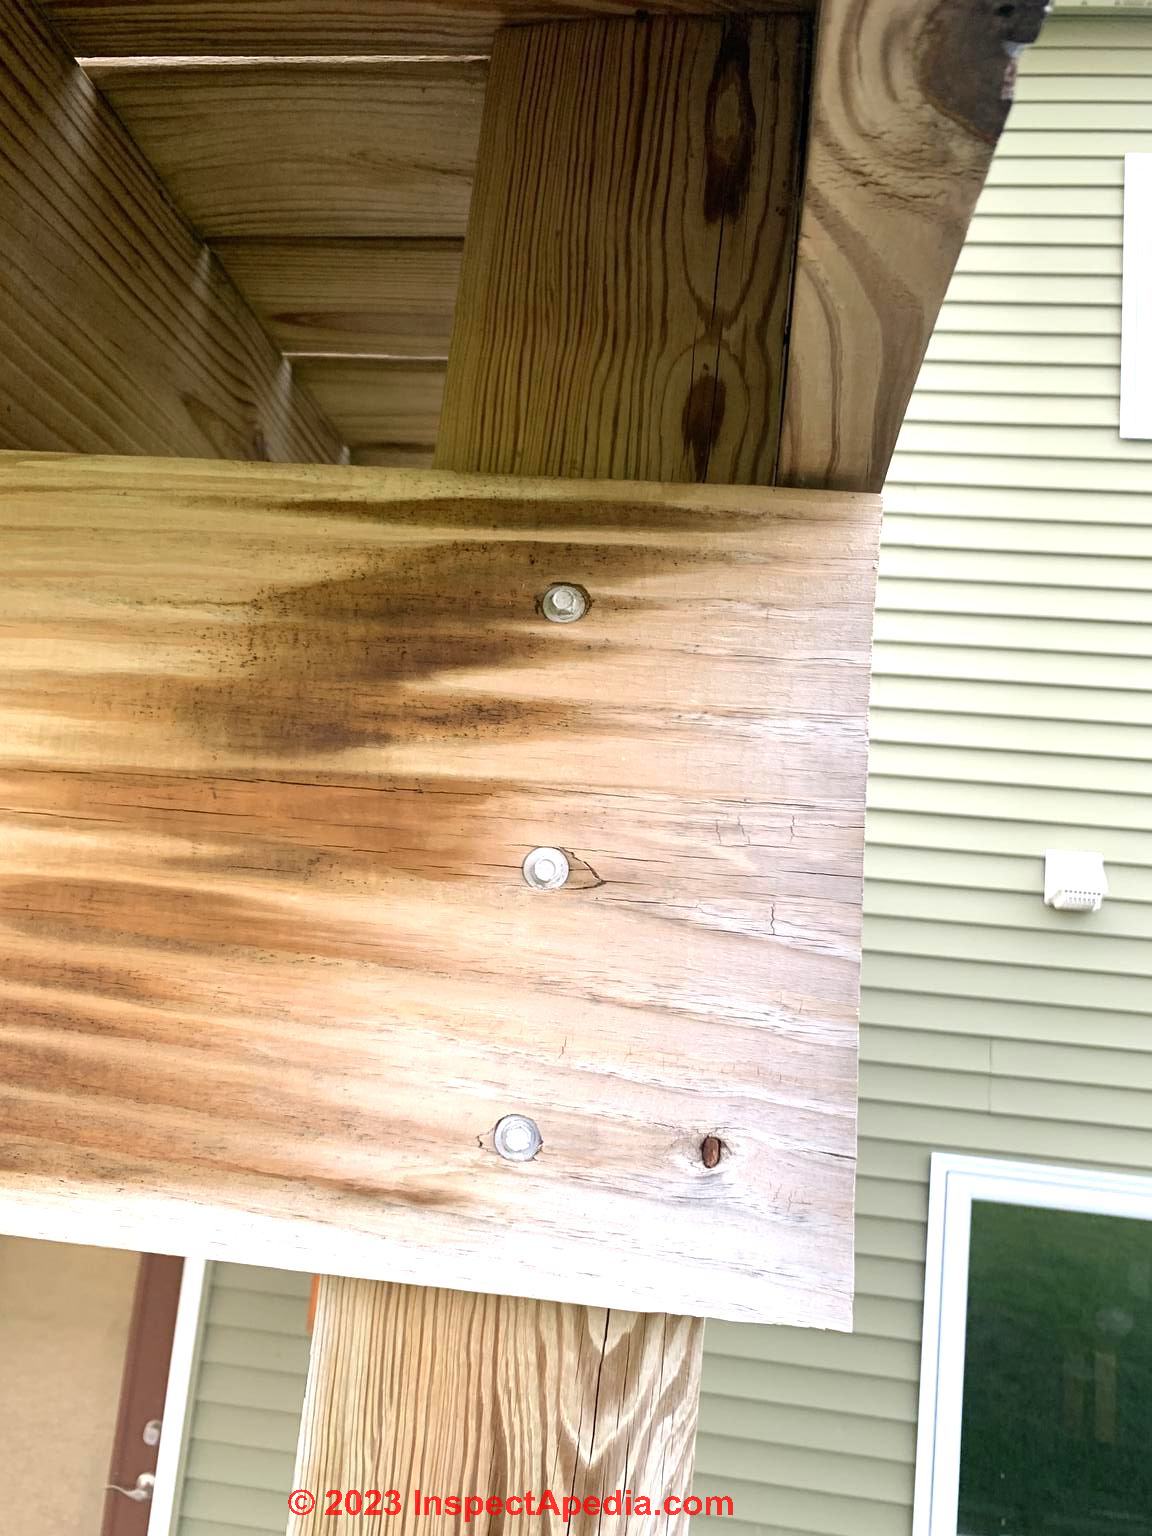
How do I fix a bad beam-to-post connection?
How do I go about fixing the beam and post connection? If you look at the image, there's a 4x6 post sandwiched by two beams with carriage bolts.
The searches I've done either this is completely wrong or I've found some it's okay but there is a deck joint ties.
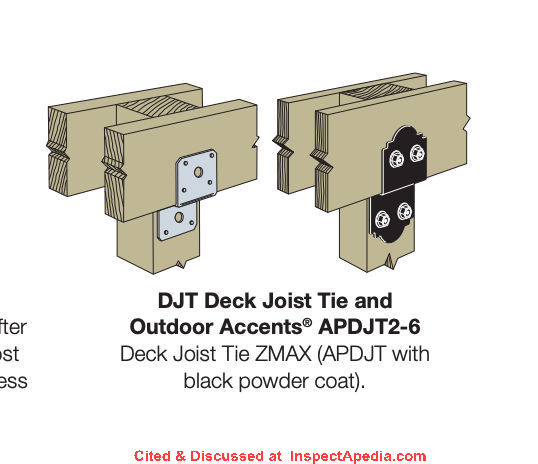
Is adding deck joist ties (like Simpson DJT14Z Deck Joist Tie - Zmax Finish) enough? Or should I go the route of cutting the posts and adding post to beam connectors?
- On 2023-06-10 by Jess
Reply by InspectApedia DF (mod) - How to fixing the beam-post connection
@Jess,
You're right that some texts show that the deck girder is built of two 2x's of sufficient depth, nailed together and supported atop a post or two 2x's incorporating a 1/2" spacer so that the total width is the same as the width of the post top.
But Simpson's Deck Connection and Fastener Guide shows connectors specifically designed for separated 2x's used to form a deck girder - as we'll show below.
If you or your building inspector don't like the carriage bolts (that I suspect are fine if adequately sized) then to proceed,
I'd like to avoid dis-assembling the existing structure, and I'd like to avoid having to pay a structural engineer to re-design a "fix" for this girder considering that the cost of her fee would be greater than the cost to re-build the whole girder assembly (cutting off post tops, making a typical girder, using steel connectors as you suggest. ) .
There are two concerns:
1. the bending force (or deck load) resistance of two separated 2x members may be less than two of them nailed together, (an invented "solution" filling-in the gap is discussed below).
2. the connections of beam to post must be sufficient. (Usually through bolts of adequate number and size is perfectly adequate). What's the size of your though bolts?
So: If I were concerned with bending forces that deck girder whose two members are separated by the 4x4 posts, (actual outer dimension is 3 1/2") I'd consider adding an in-fill and angle-nailing from opposite sides to create a built-up beam.
To fill the 3 1/2" space you'd use two 2x members of the same depth as the beam members and an additional 1/2" exterior plywood piece in the center, cut to fit.
Then if your through bolts are adequately sized in diameter that's a very strong beam with good structural connections.
See also this
Deck Connection and Fastening Guide - from Simpson Strong Tie
inspectapedia.com/structure/Simpson-Strong-Tie-Deck-Connections-F-DECKCODE20.pdf

How to fix basement stairway framing that is shifting
This is the framing around the basement stairwell. There is a staircase above this on the first floor of the home. It shows signs of moving from the original position when the home was built. In order to correct this I looked at the framing below it.
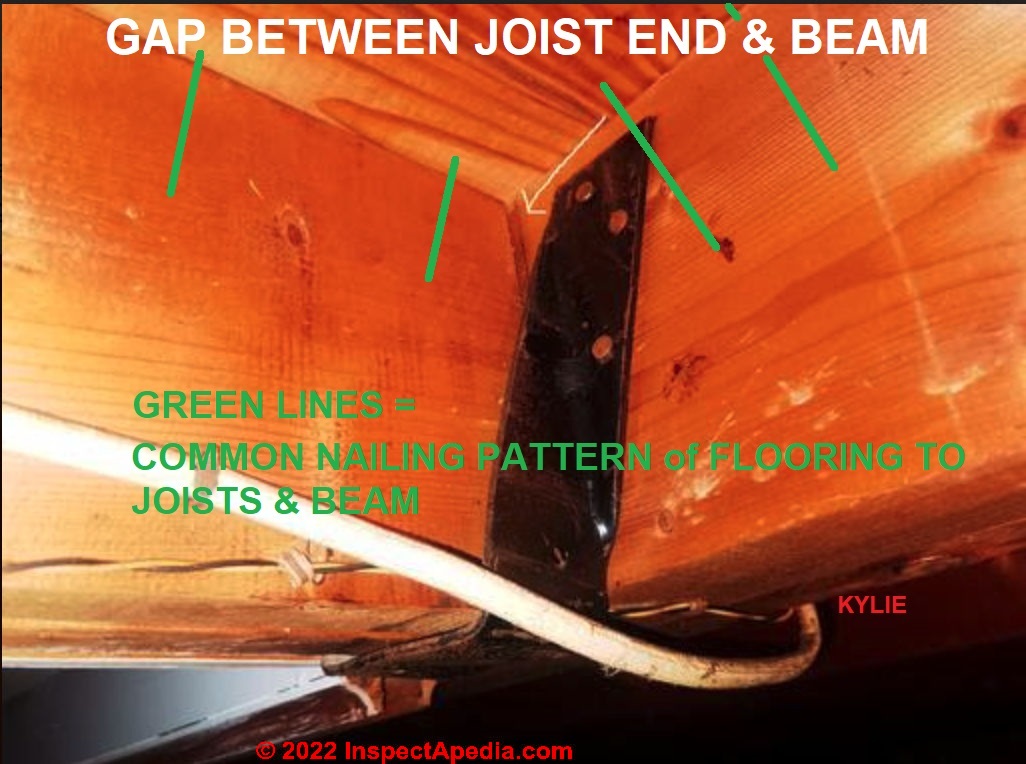
I noticed that there are old joist hangers, likely original to the 50's home. However, the joists do not actually touch the hangers which seem to be doing nothing in terms of support. The two header joists have shifted about 1/8-1/4 inch on one side.
There are some small gaps between the joists and headers indicating it had pulled away from the header slightly. I'm wondering how we can shore this up better. Generally I'd use joist hangers but the large steel hangers are in the way and do not seem to be removable.
I think they are the type that hang over the leader board. Any ideas? Thanks. I have more photos but could not upload more than one so this one shows the ends of the double header beam that has fallen below the main headers around the floor opening.

I wanted to show the stairwell framing in more detail. The steel joist hangers which the joists do not rest on are only nailed on the header board. There is a gap under each joists and it does not rest on the hangers.
I believe this is what allowed for movement in the first place. The double header shows gaps on both ends when it should meet tightly to the triple joist header beams. I do see nails in the gaps so it was at least nailed. Thanks. - On 2022-06-23 by Kylie
Reply by InspectApedia-911 (mod) -
@Kylie,
As a general rule of thumb, if a factory-fabricated framing connector has a hole in it, the design engineer expected the installer to use it to send a structural fastener - nail or screw - into the wood framing member(s).
That said, sometimes a joist hanger is added after a joist was already cross-nailed into the header or ledger board. Properly-placed, that fastener method can be adequate and quite strong; after all, it was used for a century before we had joist hangers.
Look closely at framing gaps, asking: was it framed this way or is something moving.
Often we may see a gap because of imperfect saw cuts; for example if you see a gap but all of the abutting framing members are also nailed down into from subflooring overhead, then unless that flooring has torn or split, there's no movement going on.
Follow-up by Kyliw
@InspectApedia-911, Thank you for explaining the joist hangers. I examined things closely, and they all show evidence of movement. I believe the movement happened some years ago based on the caulk job someone did on the stringer board upstairs.
You can see that the last few steps on the staircase have moved a bit away from the wall. I checked the floor and stair treads with a level.
This reflects the same drop I see with the double header (show in the first image) below the steps. The double header needs to be lifted about 1/8 inch to resolve the staircase issues.
Any ideas on keeping it from moving again once the header is back to it's original position? I included a photo of the end of the header to show the gap I see at the top. Thanks.Reply by InspectApedia (Editor) - structural connectors options for framing separation
Kylie
It's possible that you're seeing movement in the framing, or prior movement. It looks like about 1/8" in width though from the photo I can but guess.
It's also possible that there was no actual framing separation or movement, simply sloppy cutting and framing, and also possible that someone previously added joist hangers out of concern for that same gap.
Do we know if those steel hangers are used throughout the basement or just in some areas?
Do we know if the steel hangers date from original construction.
I attach an edited version of your photo with green lines showing the typical pattern of down-nailing of the subfloor that would most-often have nailed through the sub floor and into both the joists and that main center girder or beam.
If that was done, then there can't really have been actual separation after the initial framing - not without having to rip the subfloor (as we might encounter in an earthquake-damaged building).
What now?
Options to add structural connectors and peace of mind:
1. Toe-nail joists to girder from opposite sides, using 10d or 12d common nails at appropriate angles, 2-4 nails on each side, angled into the beam or girder.
2. if there is a hole in the bottom of those steel hangers and if there is not already a common nail sent up through the bottom of the hanger into the bottom edge of each joist, add those nails. 10d common is fine.
3. If upstairs above this floor you don't have expensive ceramic tile, you could remove existing carpet or vinyl flooring, then nail down the subfloor along and to the length of that center girder.
Or you could use structural (framing) screws rather than nails.
Follow-up by Kylie
@InspectApedia (Editor), Thank you. To answer your questions, there are no other joist hangers in the basement. Other homes on the street, (same exact floor plan/model/builder/year) do not have these joist hangers.
I think these were added at a later day. I will check the nailing of the subfloor when we remove the 90s vinyl sheet flooring above it.
I appreciate the suggestions to add peace of mind. I will look at toe nailing if space allows around those joist hangers. There is a hole in the bottom of each joist hangers which were not nailed so that can be fixed also.Reply by InspectApedia (Editor)
@Kylie,
Great;
So indeed it sounds as if joist hangers were added by someone who had the same concerns as you but at an earlier date.
Now when you pull up the flooring, measure as needed to find where that center girder is below your floor, then look to see if the flooring is nailed into-it.
Post a photo showing me the nail pattern.By the way you can always post as many photos as you need, but unfortunately a limitation of the Comment Box design is that you can only post one photo per comment.
So to post two photos you make two comments.
How to install an I joist on the roof underside with an adjustable Lally Column at each end just for added support.
 Have an existing garage 22’ wide and has been a light storage area for 37 years.
I want to install an I joist on the underside with an adjustable lolly at each end just for added support.
The I joist will run perpendicular to the 2x8 joists spanning the 22’ direction 19’ long in the center of the 22’ span.
Can anyone tell me the name of the hardware I need to receive the I joist with the ability to jack it up underneath and a flange or an adjustable lolly that can be bolted to the concrete floor below.
I’ve seen this kind of installation but can’t remember where.
- On 2021-10-28 by Jeff Sentry
Reply by inspectapedia.com.moderator
@Jeff Sentry,
You may be able to use a tele-post or jack post (like the Tiger Brand adjustable post shown below) or another adjustable post or screw jack - those are all synonyms, to level up your beam to its proper position.
However in many if not most building code jurisdictions you will find that it is neither adequate nor safe and is also perhaps a code violation to leave those adjustable posts in place as permanent structural members.
Instead, at the right locations and intervals for the beam size, span, and load, you will want to install permanent, properly sized, concrete-filled steel Lally columns set on appropriate peers and with proper connections to the beam overhead.
Also see COLUMNS & POSTS, DEFECTS https://inspectapedia.com/structure/Column-Defects.php
How to extend a wood post upwards for a roof
I want to extend a 6 by 6 wood post on a deck by 6' to support a beam for the patio cover. Any suggestions - On 2021-10-01 by Darrell Green
Reply by Mod - how to extend a 6 by 6 wood post on a deck by 6' to support a beam for the patio cover
@Darrell Green,
I would never simply stack up a post to extend its height, and I'm nervous about stacking posts and connecting them by nailing 2x lumber around the post sides;
but your local building inspector will probably accept a second post whose bottom is anchored (structural connector) to the deck surface (over the girder or beam) and anchored at its top to the new roof structure. You may also need some cross bracing.
I've seen engineered steel flitch plates through bolted used, or even wood scabs - much longer than steel plates - through bolted on either side of the post.
OPINION: because a structurally secure post extension, to have sufficient bending resistance, is likely to be heavy and large and cost more than a new post, I'd replace the entire post with one of proper length.
Don't spend a dime on these ideas before you find out what your local building code official is going to accept.
Example of Improper Joist Hanger - flying free along side a post
 We are having a house build, and notice this joist hanger was not secured to the ledger board, but a extra piece of wood nailed to it without any support under it.
The owner of the company says it looks perfectly fine to him and does not think it will cause any issues (our concern, sagging).
We have a new Project Manger (with 20 years of framing experience) who just started with the company yesterday, and the owner said he will have him look at it.
If the Project Manger says it is ok, they do not plan to make any changes.
Any advise? - On 2021-06-02 by Trista Johnson
Reply by inspectapedia.com.moderator (mod)
@Trista Johnson,
I agree that that use of a joist hanger looks pretty unusual, as does a sill plate that's canti-levered out over a foundation wall.
What is that joist hanger going to carry?
Who designed this?
When a new home is being constructed there must be a set of architectural plans, including a framing plan, provided by the architect or engineer who designed the project.
You might start by reviewing this detail with that design expert; that ought to be a more reliable approach than is afforded by our very limited view here and our complete lack of any information about the building and its framing plan.Certainly the photo shows an unusual use of a joist hanger and one that in my OPINION is dubious. But we don't know what other structural support the builder has in mind nor what is the purpose of this hanger.
How can we connect our metal posts to wooden beams
We have 5cm metal posts that we want to create a wooden framed roof to. It is a car port for our caravan.
No 1 question is how can we connect our metal posts to wooden beams to start the framework? No 2 question is would we need to have cross beams as well to keep the structure stronger?
The area to be covered is 12.5 x 26 feet. - On 2021-01-16 by Kim Hart
Reply by (mod) -
Kim you will perhaps best be served by asking a welder to weld-on appropriate steel connecting brackets, perhaps site-fabricated, to the tops of your metal columns and to connect to appropriate horizontal joists or ties as well as to the top plate that will support your roof.
Looking for a joist hanger that will allow me to connect two angle cut (30 degree) beams (4" X12") together at a single 6"X6" post
Looking for a joist hanger that will allow me to connect two angle cut (30 degree) beams (4" X12") together at a single 6"X6" post - On 2020-09-22
by Mark
Reply by (mod) - joist hanger to connect two angle cut (30 degree) beams (4" X12") together at a single 6"X6" post
Mark
It's easier than you might think; there are several steel hanger and framing connectors that are specifically designed to be bent to the exact angle required at the jobsite.
One example of many is shown below; this is a Simpson Strong Tie product.
Watch out, however: I've found that at some angled framing connections it's only physically possible to nail the hanger face to the supporting ledger or beam on the obtuse angle side of the connection. On the acute angle side of the connection you may not be able to get a hammer in to nail nor, on sharply acute angles, even an extended construction screw and driver.
For this reason Simpson also sells products like this Jack Rafter hanger, the Simpson Strong-Tie LSSJ ZMAX® Face-Mount Adjustable Light Slopable/Skewable Jack Hanger for 2x6, Right - sold in both "right" and "left" side models.
How do I attach 2x8 joist to a vertical 4x4 post at the joist end?
Due to some poor planning on my part, if I space my joists at 16", one of the ends of my 2x8 joist will have to be attached to the vertical 4x4 post instead of the outer band.
Can I still attach the joist to the post with a joist hanger or should I adjust the spacing between the joists to make sure the joist meets the outer band? This is my first deck in 20 years. Thank you. - On 2020-06-28 by Bill
Reply by (mod) -
Bill
I don't quite have the full picture, but you'll find a steel framing connector that will work perfectly-well. SeeSimpson sells this Simpson Strong-Tie LSSJ ZMAX® Face-Mount Adjustable Light Slopable/Skewable Jack Hanger for 2x6, Right - sold in both "right" and "left" side models that may work for you.
How do I attach 2x8 beams to the sides of my 6x6posts?
I need to attach my 2x8 beams to the side of my 6x6 posts ( 12" piers 48" deep with J-Bolts and galvanized standoff post holders ) because my posts need to continue through to carry a shed style roof above my deck.
Span between posts is 6' for the beams, and 11' to the next beam for the 2x8 joist spans which I was planning to do on 12" centres.
( This is my first deck and I'm prepared to overbuild it so I only have to do it once
It seems I have no alternative by to side mount my beams. what's the safest way to do this? - On 2020-05-18 1 by Mike
Reply - by (mod) -
Mike
Typically a building inspector won't accept through-bolted joists or beams to posts as the sole connector and will want either blocking below the horizontal joist or use of structural connectors.
Take a look at
DECK CONSTRUCTION BEST PRACTICES - home
and the other articles in that series.
How is the Header Connected to the Underside of the Top Plate?
If a header is installed flush to the bottom of a double top plate, what is the best way to connect it to the top plate(s)? I can't find any nailing pattern descriptions that match.
I want to make sure the lateral brace requirement [2308.4.1.1.(2) footnote 'f') is met. Thanks! - On 2020-01-20 by wiseguy
Reply by (mod) - toenail up into the top plate from both sides of the header
Wise
If I've got this right, we're installing a header (doubled 2x10s for example) to frame over a wall opening, and the top of the header is up under the wall top plate.
I was taught to toe-nail between the header and the plate, from both sides, but frankly the critical connection strength is elsewhere:
1. nailing from the header to the vertical studs, pref. through the stud's other side if accessible - as those horizontal nails will be in shear.
2. jack studs under the header guarantee it's securely in place.3. We toe-nail every 4-6 inches along both sides of the underside of the header, up into the top plate. We also nail through the studs into the ends of the header.
Have I got this right?Reader follow-up
For items 1 and 2, I used a Simpson HH4 header hanger due to access and space (retrofit). So the header is secured pretty well to provide support. I can toe-nail between the header and plate - 16d every 16" OC, both sides? On 2020-01-21 by wiseguy -
Reply:
I'd double check your nail size. 16d may be a bit big and if you're too close to the header top you'll split the wood. My carpentry teacher, Bernie Campbalik, had us use 12d and sometimes even smaller nails when toenailing.
When you cross-toe-nail from opposite sides of a framing member into its destination connection framing member, that's a very strong connection.
Question: Missing nails in joist hangers, framing separation, unsafe?

I noticed these joist hangers installed. The joist hangers appear to be a retrofit to provide support from joists that were detaching.
The house per MLS 1960.
It's basement framing near the staircase. The other portion of the framing appeared fine.
Please let me know what your think. - DovBer Kahn 2019/09/18
- Dov Ber Kahn, a home inspector in Rockland County, NY has contributed photographs of various building features. Mr. Kahn is a licensed home inspector in New York and New Jersey, and can be reached at Website: Kahnbhomeinspectors, Tel: 845-445-8234, Email: kdovber@googlemail.com
Moderator reply:
Dov:
This older type of joist hanger relies on a flat "hook" that hangs over the top of the ledger board - there are no provisions for nails or fasteners to secure the hanger to the ledger nor to the joist.
These hangers might not be a "retrofit" in that it would be difficult to slip the top of the hanger over the top edge of the ledger board once the deck boards are nailed in place.
Where these nail-less hangers are used, the construction "assumption" is that the the framer will include appropriate nails through the sides of the joist end into the ledger board, toe-nailing from either side.
If those nails are omitted there is in my opinion no adequate structural connection of joist to ledger except perhaps for the first deck board that is (or might be) nailed down into the top of the ledger board and into the top of the joist - details that we can't see in your photos.
I agree that this looks like a concern and it appears to me that your photos are showing some actual evidence of the joists having pulled away from the ledger board, which they wouldn't have done if the deck or floor board at the far edge of the deck above had been nailed both to the rim joist and to the top of the joists.
The strapping or joist hangers that you are showing have no visible connections to the ledger other than hanging over the top and no connection to the joists.
That's rather different from the modern ones that we see listed and sold by companies such as Simpson Strong-Tie.
I also saw what looks like just two nails through the side what I think is a 2 by 6 and into the ledger joist.
Even if there's two more on the other side that's less than the number of Fasteners that would have been used in that location.
I stay away from terms like structurally engineered. I don't want someone to argue that I am not qualified to say whether something is engineered correctly or not. So I just stick to the physical observations and what they mean.
But I think it's very important to use the word safety concern or unsafe. The whole point is that if the deck pulls away from the house and collapses people can be hurt or killed. It's important to make that clear. Talking around it is dangerous for everybody.
Proper name for a zig-zag hidden joint connection between pieces of wood?
What is the term for a zig-zag shape hidden joint connection that connects one one piece to another as found in some carpentry, woodworking.
I've seen my father use them to connect door frame joints - On 2019-05-26 by Katherine Adams -
Reply by (mod) -
I'm guessing that you were talking about a dovetail joint.
Is every nail or screw hole to be used in steel framing connectors?
Simpsons ties makes approved nails and/or screws for use, and in front range Colorado where we see 75+ mph gusts nearly every year, "hurricane strap" code was strengthened to doubling straps at each corner roof joist after an entire roof blew 1/4 mile down and across a major road.
Inspectors note that every single nail hole be used, only by the spec nails which have clear markings on the head, never just any old galvanized nail where shear and brittleness are unknown -
Especially in this day of grossly inferior imported construction materials.
Shortcuts and /or non-spec approved fasteners may sneak by especially when DIY ers don't think it makes a difference, but materials costs are never that great compared to labor, and using stuff that may fail a year or five or ten down the line is never worth it. - On 2018-03-23 by Oldzheimers
Reply by (mod) - use proper fasteners with framing connectors.
Thanks Oldz for reiterating the important point about using proper fasteners with framing connectors.
I've seen some ugly failures where people used roofing nails, drywall screws and other improper fasteners.
The requirement for a nail in EVERY hole in the connector depends and is not always the case. For example where we used very long strapping to tie wooden I-joists to a top plate and to the wall sheathing below, the code inspector told us how many nails her wanted in each framing component.That makes sense when we realize that some strap connectors might contain 40 or 60 holes so that the nails can be placed in the exactly right location.
Above is an example from
Which Predrilled lag toenail holes to use?
When installing 4 nail 2" x 6" joist hangers with predrilled lag toenail holes which lag should I use if any ? - On 2017-05-06 by Rich Johns -
Reply by (mod) -
We don't use lag bolts in typical steel joist hangers, Rich, we use joist hanger nails: basically galvanized 10d common nails of the proper length, sold by the box for that purpose.
Stainless or galvanized construction screws of an equivalent size and length may also work fine. Over-sized fasteners (like a "lag bolt" or larger common nails) will over-split the ends of the joists.
Question: nails not holding roof decking in place
my roof decking was put on with nails and is pulling up for art 18 inches can I screw that down with screws - (May 20, 2014) sunshine pope
Reply:
Sun
Often by using a coarse-thread self-tapping construction screw you can pull back decking or framing into position. Sometimes we also have to assist with clamps.
Watch out: don't drive screws right through shingles - making penetrations and future leaks. But you may be able to lift a shingle tab, run screws and washers in to the rafter below, and cover the new fastener top with flashing cement before dropping the tab back in place.
Question: 6x6 post to double 2x6 beam connection
Building fence with 13 5/4 deck boards screw to 2x6 @ 2x8 cross supports HANGING this frame(or section) to 6x6 post with 2x6 and 2x8 hangers WILL THIS WORK! - (Aug 19, 2014) john
For a 6x6 post to double 2x6 beam connection, what similar connector or other choice can be used instead of the treated plywood cleat as shown on the diagram?
Is there a model or part number so I can view it, and/or what local dealer may carry it (Home Depot, Lowes, McCoys, etc).
Also, is the treated plywood cleat sold as shown on the diagram or is it something one would make? Thank you. - (Dec 8, 2014) JoAnn
Reply:
JoAnn I think we saw and replied to this on another of our pages - in short, you will find pre-fab steel framing connectors of huge variety at your building supplier such as a local lumber yard or Home Depot or Lowes.
You can select the connector based on simple framing descriptions: You want a Post to Beam connector that matches a doubled 2x6 (about 3" in width) to a 6x6 post top (about 5.5" square) - you'll see connectors labelled accordingly and easier to find than by a manufacturer's part number.
If you still want part numbers, e.g. for an architect's or engineer's use, they will doubtless consult a more detailed product catalog such as those offered by Simpson Strong Tie. There you'll find
BC/BCS Post Caps of various dimensions along with installation instructions.
The BCS allows for the connection of 2-2x's to a 4x post or 3-2x's to a 6x post. Double-shear nailing between beam and post gives added strength! The BC series offers dual purpose post cap/base for light cap or base connections.
Question: 1950's home makes popping sounds
I' trying to find a double 2 by 10 joist hanger that I can secure to a metal post that is strong enough for an inside deck. It will have on it about 3000 lbs. The deck is 10ft wide and 28ft long. - (Jan 15, 2015) tonysawyers@att.net
...
I'my a new owner of my 1950 home that is doing a lot of popping both during the day and at night. My crawlspace has a couple 4x4 supports that "APPEAR" to be doing their job. how do i know if my home is settling and should i adjust these supports (lower them) along with the settling? - (Mar 22, 2015) John a
Johnrocksteady@gmail.com
Reply:
John abd Tony
we don't know from your question what is making the popping sounds. For example, ice on a flat roof, metal ductwork, other things can make popping sounds.
If there are signs of building movement such as cracks or sticking windows/doors or things out of level, then you need an onsite expert.
Question: what size beam do I need for my covered porch
Thank you for all the info but I am still a little confused. We are building a covered porch, roofed with a basic shingled roof. It will be 9 feet out from the house and 20 feet in length, (length parallel to the house).
At the 8 1/2 feet at the corners we are putting a 6x6 foot post (2, one at each corner). the other side will be attached to the house. My question is, what size should the cross beam, going from one post to the other, be? Any other recommendations or suggestions? Thank you!
I <8 1/2'> X--6x6 post
I
house I
I
I X--6x6 post
sorry, diagram came out wrong. The lower X that marks the lower post should be right under the top X, 8 1'2 feet away from the house. - (Apr 5, 2015) Zohra said
Reply:
Zohra
Take a look at the beam and joist sizing tables at
It sounds as if you need to check with a design professional or your building inspector as well.
...
Continue reading at FRAMING FASTENERS, NAILS, SCREWS or select a topic from the closely-related articles below, or see the complete ARTICLE INDEX.
Or see these
Recommended Articles
- CONNECTORS, FASTENERS, TIES
- DECK BEAM CONSTRUCTION
- DECK BUILDING & CARPENTRY TOOLS
- DECK CONSTRUCTION BEST PRACTICES - home
- DECK DESIGN & BUILD - home
- DECK FASTENER CHOICES
- DECK FRAMING TABLES, SPANS
- FRAMING DAMAGE, INSPECTION, REPAIR - home
- FRAMING FASTENERS, NAILS, SCREWS - best construction practices.
- FRAMING CONNECTORS & JOIST HANGERS - best construction practices.
- HURRICANE TIE DOWN CONNECTORS & FASTENERS - are screws ok to use instead of nails? Maybe.
- STAIR STRINGER to FRAMING CONNECTORS
- TOE NAILED FRAMING CONNECTIONS - traditional framing without steel connectors
Suggested citation for this web page
FRAMING CONNECTORS & JOIST HANGERS at InspectApedia.com - online encyclopedia of building & environmental inspection, testing, diagnosis, repair, & problem prevention advice.
Or see this
INDEX to RELATED ARTICLES: ARTICLE INDEX to BUILDING DECKS & PORCHES
Or use the SEARCH BOX found below to Ask a Question or Search InspectApedia
Or see
INDEX to RELATED ARTICLES: ARTICLE INDEX to BUILDING STRUCTURES
Or use the SEARCH BOX found below to Ask a Question or Search InspectApedia
Ask a Question or Search InspectApedia
Try the search box just below, or if you prefer, post a question or comment in the Comments box below and we will respond promptly.
Search the InspectApedia website
Note: appearance of your Comment below may be delayed: if your comment contains an image, photograph, web link, or text that looks to the software as if it might be a web link, your posting will appear after it has been approved by a moderator. Apologies for the delay.
Only one image can be added per comment but you can post as many comments, and therefore images, as you like.
You will not receive a notification when a response to your question has been posted.
Please bookmark this page to make it easy for you to check back for our response.
IF above you see "Comment Form is loading comments..." then COMMENT BOX - countable.ca / bawkbox.com IS NOT WORKING.
In any case you are welcome to send an email directly to us at InspectApedia.com at editor@inspectApedia.com
We'll reply to you directly. Please help us help you by noting, in your email, the URL of the InspectApedia page where you wanted to comment.
Citations & References
In addition to any citations in the article above, a full list is available on request.
- Our recommended books about building & mechanical systems design, inspection, problem diagnosis, and repair, and about indoor environment and IAQ testing, diagnosis, and cleanup are at the InspectAPedia Bookstore. Also see our Book Reviews - InspectAPedia.
- Steve Bliss's Building Advisor at buildingadvisor.com helps homeowners & contractors plan & complete successful building & remodeling projects: buying land, site work, building design, cost estimating, materials & components, & project management through complete construction. Email: info@buildingadvisor.com
Steven Bliss served as editorial director and co-publisher of The Journal of Light Construction for 16 years and previously as building technology editor for Progressive Builder and Solar Age magazines. He worked in the building trades as a carpenter and design/build contractor for more than ten years and holds a masters degree from the Harvard Graduate School of Education. Excerpts from his recent book, Best Practices Guide to Residential Construction, Wiley (November 18, 2005) ISBN-10: 0471648361, ISBN-13: 978-0471648369, appear throughout this website, with permission and courtesy of Wiley & Sons. Best Practices Guide is available from the publisher, J. Wiley & Sons, and also at Amazon.com - Decks and Porches, the JLC Guide to, Best Practices for Outdoor Spaces, Steve Bliss (Editor), The Journal of Light Construction, Williston VT, 2010 ISBN 10: 1-928580-42-4, ISBN 13: 978-1-928580-42-3, available from Amazon.com
- Manual for the Inspection of Residential Wood Decks and Balconies, by Cheryl Anderson, Frank Woeste (Forest Products Society), & Joseph Loferski, October 2003, ISBN-13: 978-1892529343,
- [1] Eric Galow, Galow Homes, Lagrangeville, NY. Mr. Galow can be reached by email: ericgalow@gmail.com or by telephone: 914-474-6613. Mr. Galow specializes in residential construction including both new homes and repairs, renovations, and additions.
- In addition to citations & references found in this article, see the research citations given at the end of the related articles found at our suggested
CONTINUE READING or RECOMMENDED ARTICLES.
- Carson, Dunlop & Associates Ltd., 120 Carlton Street Suite 407, Toronto ON M5A 4K2. Tel: (416) 964-9415 1-800-268-7070 Email: info@carsondunlop.com. Alan Carson is a past president of ASHI, the American Society of Home Inspectors.
Thanks to Alan Carson and Bob Dunlop, for permission for InspectAPedia to use text excerpts from The HOME REFERENCE BOOK - the Encyclopedia of Homes and to use illustrations from The ILLUSTRATED HOME .
Carson Dunlop Associates provides extensive home inspection education and report writing material. In gratitude we provide links to tsome Carson Dunlop Associates products and services.
 | HOME | ABOUT | ASK a QUESTION | CONTACT | CONTENT USE POLICY | DESCRIPTION | POLICIES | PRIVACY | |
| © 2025 - 1985 Publisher InspectApedia.com - Daniel Friedman | |||||||||