 Carpentry, Deck, & Stair Building Tool Guide
A Photo Catalog of Modern & Antique Carpentry & Woodworking Tools You'll Want, Use, or Just Enjoy
- POST a QUESTION or COMMENT about deck construction
Carpentry tool guide - recommended hand tools & power tools for deck & stair building.
This article describes and illustrates tools useful for layout, measuring, cutting, and building exterior decks & stairs as well as for general carpentry & framing of floors, walls & roofs.
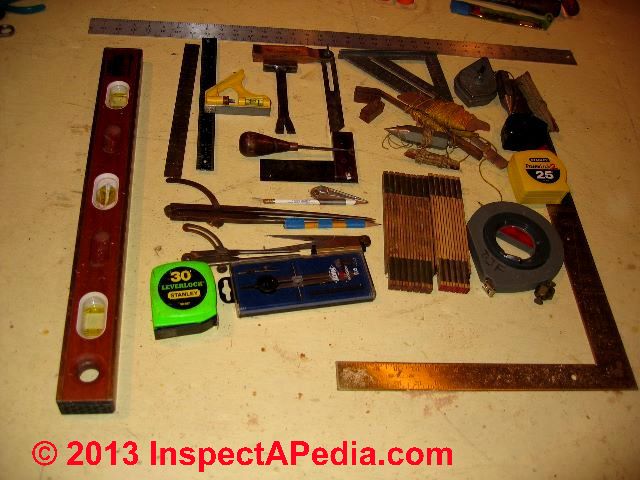
Shown here is a wide variety of new and antique carpentry tools collected over 60 years of building experience.
Just about every hand tool used by carpenters is illustrated. This article series describes the steps in design & construction of exterior decks, deck railings, stairs & stair railings.
InspectAPedia tolerates no conflicts of interest. We have no relationship with advertisers, products, or services discussed at this website.
- Daniel Friedman, Publisher/Editor/Author - See WHO ARE WE?
Carpentry, Deck & Stair Building & General Carpentry or Woodworking Tool Recommendations
Tips for Choosing Hand Tools for Deck Building
You do not need a lot of tools to build a deck.
And since all of the tools you do need are standard construction tools, you can be certain that any purchases you make now will be put to use on later
Article Contents
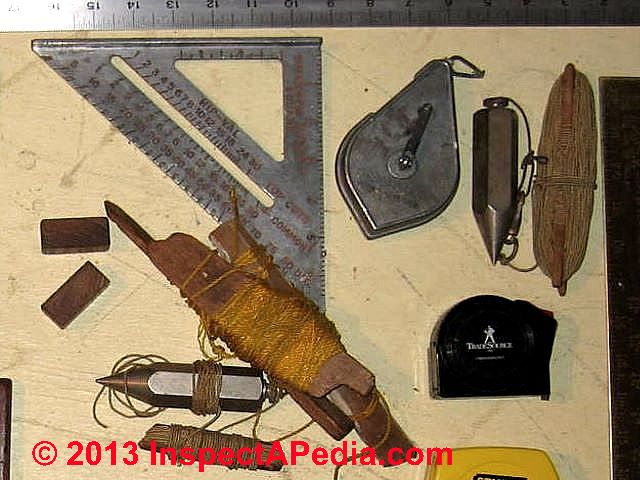
Don't feel bad if you don't have all of the tools shown here - you don't need them all. A simple hammer, saw, and string and weight have been the fundamental tools used for centuries. Many of my tools were bought used, at yard sales.
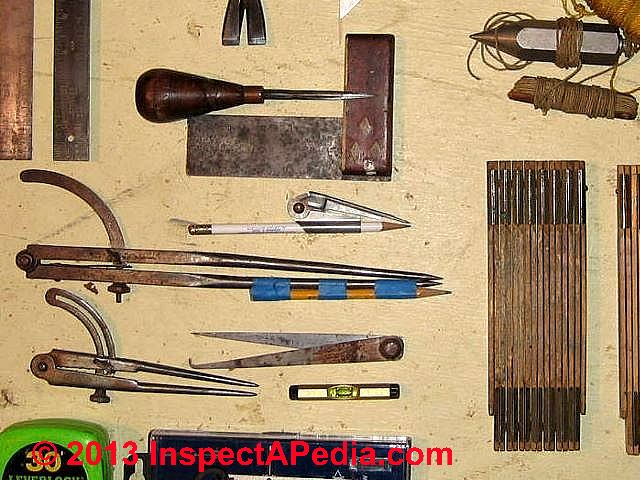
Watch out: buying used hand tools can be a bargain, and you can on occasion find a beautiful antique rosewood try square or walnut handled scribe (upper center in our photo) that will last and give pleasure throughout your life or that of your heirs.
But don't shop at an antique store for tools you plan to use for actual work, and even at a yard sale or auction, you need to know what the same tool would cost new. I've seen a nail puller at auction sell for four times what the identical tool (still available) cost new.
The four compasses shown in the lower left of the photo above were purchased together for less than $4.00, were antique, and are still useful for scribing cuts to fit perfectly, such as the bottom cut on a stair stringer landing on an irregular platform. You'll notice I just taped a pencil to the larger compass I use for that purpose.
One accessory that you will want to have at just about every step of the way is a tool belt (not shown here, mine is filthy). Carpenters without a tool belt often spend more time looking for a tool than doing their work. Keeping basic framing tools and fasteners at hand makes deck building or other framing jobs go faster and frankly, more fun.
A Photo Catalog of Carpentry Tools You'll Want, Use, or Just Enjoy
Layout Tools for Deck & Exterior Stair Building
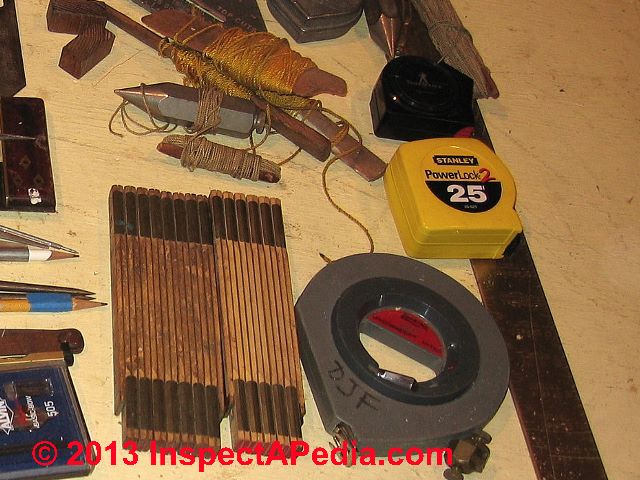
A tape measure that spans 25 or 30 feet is the best all-purpose choice. If you are building a large deck, you may also want to have a 50' or 100-foot model.
A large framing square (photo at page top and illustrated in detail at DECK STAIR BUILDING DETAILS) quickly checks corners for square and is ideal for marking stair stringers.
See FRAMING SQUARE USER'S GUIDE for details about how to use a framing square.
A sliding bevel is useful for duplicating non-standard angles.
Colored mason’s line (yellow, in the photo at below left) is the best material to use when laying out your deck, as it is strong and easy to see, and a chalk line can be used to quickly mark a long, straight line.
A smaller angle square (pocket framing square, shown at upper left in the photo) is handy for marking cut lines on lumber, guiding the base of a circular saw, and marking precise angle cuts.
We use that pocket square when making cuts with the circular saw, as it helps guide the saw quickly while keeping the cut straight and square.
But an old-timer expert carpenter would scoff - you're supposed to learn how to follow your cut line, Bernie would say.
Nevertheless, for folks who don't work as full time carpenters, making cuts straight, square, and plumb is so critical for sound framing connections that it's perfectly excusable to use this aid for making good cuts.
Carpenter's Saw Types

A handsaw is always nice to have around for quick cuts. We use the hand saw for finishing stair tread cuts, cutting to prepare notches in lumber, and in locations where a power saw just won't reach such as making a flush cut.
The Japanese carpenter's saw (bottom left) is superb for making flush cuts and substitutes for a handsaw in stair stringer finish cuts.
The hacksaw (shown at right in our photo) is useful for trimming off excessive lengths of through-bolted connectors.
Types of Nail Sets & Chisels for General Carpentry
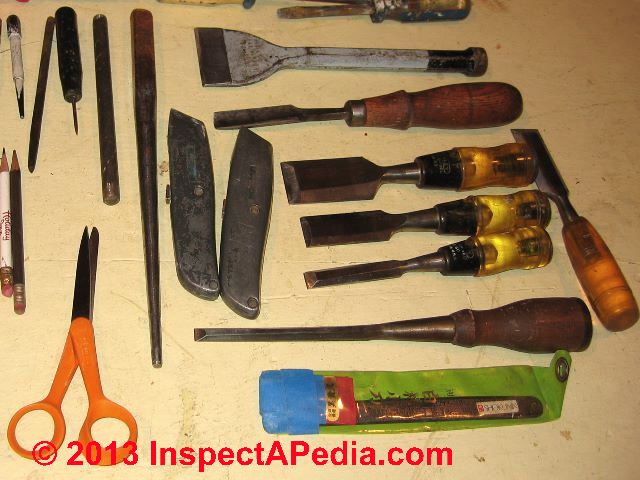
At left the photo illustrates large nail sets that can reduce smashed knuckles during that chore.
At upper right is a flooring chisel that I find great for rough framing work such as clearing out notches. If you keep a sharp edge on your chisels, even this one, they can be easily used both for notch cuts and to smooth the bottom of a notch.
Wood chisels (center right in the photo) clean out notches cut in posts, square the corners when removing siding for ledger installation, and can even be used to pry crooked deck boards into place before fastening.
I use the more robust flooring chisel for rough work, saving my wood chisels for work where the sharpest edge is important. Sharp tools are both easier and safer to use. A dull tool will skip and stab into a leg or thigh with surprising ease.
Guide to Types of Carpentry Hammers
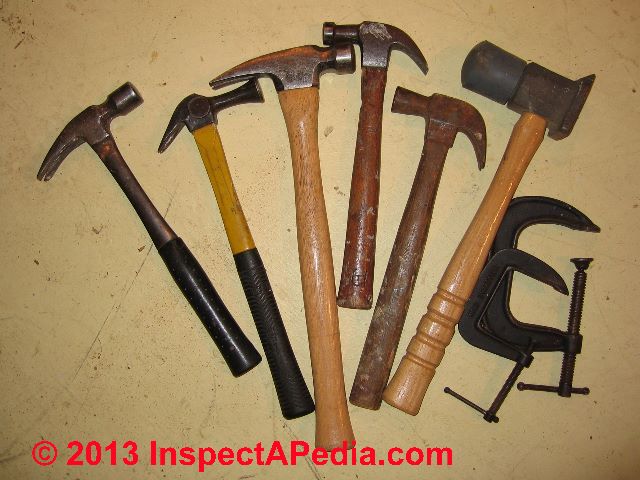
A curved claw hammer will get lots of use on most projects, including a deck. Sixteen-ounce models are popular, but a heavier hammer will drive nails quicker.
From left to right in the photo is this catalog of types of carpenter's hammers:
- Steel-shaft framing hammer - I use this robust tool for demolition
- Japanese carpenter's hammer - surprisingly powerful when you get used to it, and its extended driving face can reach places other hammers don't.
- A framing hammer with straight claw.
- A traditional and lighter-weight carpenter's hammer with a more curved claw that makes pulling smaller nails easy.
- An antique carpenter's hammer I rarely use.
- A flooring hammer
Not shown is a mechanic's ball peen hammer. You won't want to show up with one of those for carpentry work - others will make fun of you.
Carpentry Clamps
Several types of clamps come in handy for a variety of purposes such as temporary holding of stair stringers or other components during construction and bringing recalcitrant stair treads into place before fastening them to the stringers. For pulling stair treads into position you'll want longer bar-type clamps.
I use both bar clamps made from galvanized pipe and Jorgensen or other brands of woodworking clamps.
Clamping tip to avoid marking your wood
When making furniture or something else nice you will want to avoid leaving clamp jaw marks on your project.
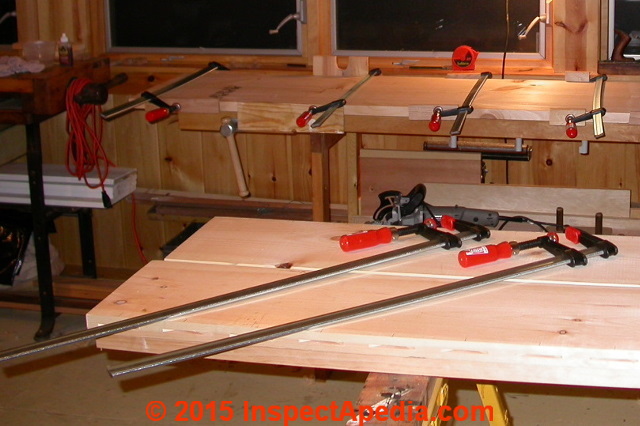
I keep small scraps of thin hardwood of various sizes that I place as pads under the biting face of my clamps when making "furniture". In the upper area of the photo above you'll see I've got wood stripsunder the jawas of my bar clamps during a gluing project.
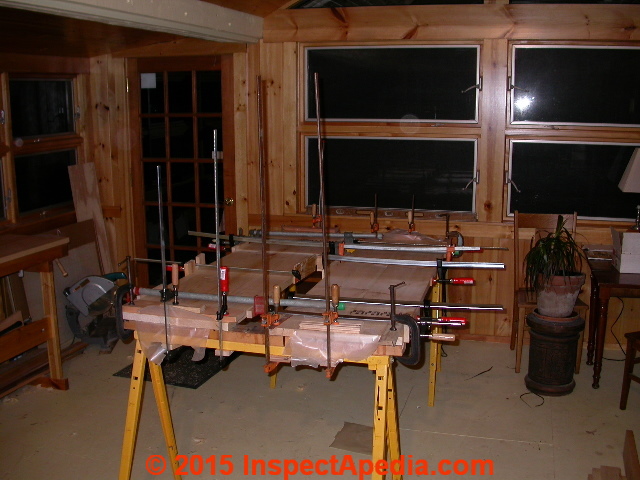
I also use longer and wider hardwood strips to distribute the clamping force over a wider area when gluing up woodworking projects such as the bench tops shown below. But more clamps is better.
Buy more woodworking clamps
A woodworker can never have enough clamps, and using too few risks crooked glued-up projects or saw cuts run amok. As illustrated below where I'm constructing some wooden bench tops, for some projects you'll need more clamps than you ever imagined.
At the right side of our tool photo at HAMMERS you can see simple iron C-clamps we use for temporary holding of framing members in place.
For gluing small projects I also use spring clamps that simply pinch pieces of wood together.
Types of Pliers & Snips for Carpentry Work
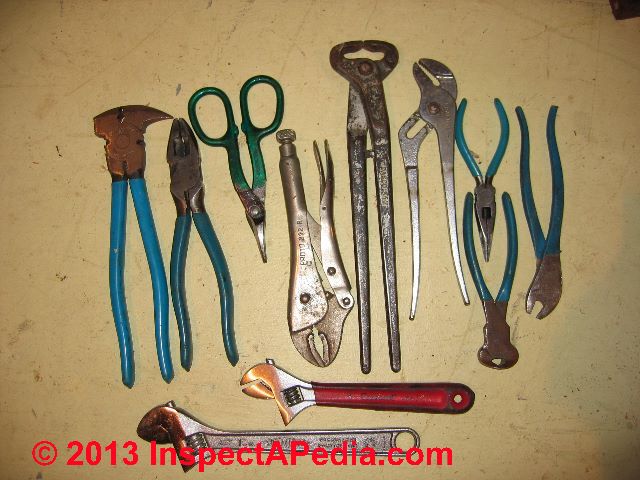
At left the photo shows various types of grabbing, pinching, and cutting tools
From left to right we see this catalog of nippers and pliers types
- A fencing tool that doubles as a (horrible) hammer, powerful heavy wire cutters, and a useful pry too9l
- Lineman's electrical pliers
- Tin Snips. Tin snips are necessary if you will be cutting flashing.
- Vise-Grip
- Horse-shoe nail cutting nippers I've used since 1957 and helpful for nipping off nails
- Slip joint pliers
- Needle nose pliers and below them a very useful smaller nail nipper we use for pulling finishing nails through removed trim
- Automobile battery connector pliers, a nearly useless antique
- At the photo bottom are two adjustable wrenches suitable for carpentry use tightening carriage bolts or through bolts. For securing bolts, nuts, and lag screws, you will want to have an adjustable wrench as well as a socket wrench with suitable sockets.
That red-handled adjustable wrench was free - picked up in my favorite spot to find lost tools: highway exit ramps.
Motorcycle riders know that pickup trucks bouncing around an exit ramp often lose a few tools in just that location.
Types of Carpenter's Hand Planes
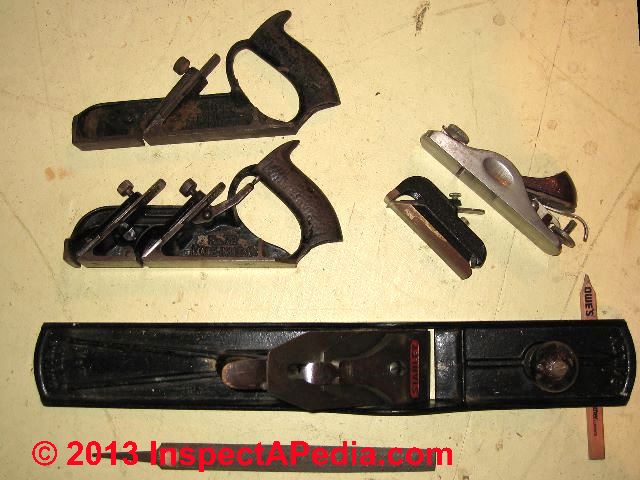
Shown at left from top left are two antique molding panes. The lower plane mounts two cutting blades. The forward blade permits planing close to an intersecting board but the last 1/4" will need to be finished with a hand chisel.
At the bottom of the photo is our joining plane, useful for straightening the edge of longer boards after a sloppy saw cut, and rarely used in framing construction.
At the right of our photo are a block plane and a tiny trim plane. Either of these planes is a perfect tool for chamfering off the edges of deck guardrail tops or rough spots on handrailings.
Toolboxes for Carpenters' Hand Tools
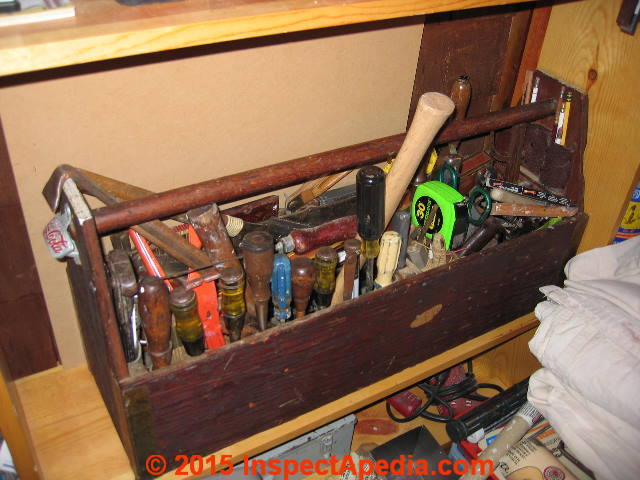
There are of course enough plastic and steel toolboxes on the market to bury any house or deck you might be thinking of building. But here we take a look at two wooden tool carriers.
Above is an antique carpenters' toolbox made of wood and filled with antique hand tools. The toolbox itself was a gift from Dick Marsh and came out of a barn on Dick's property. The toolbox probably belonged to Dick's grandfather. The tools in this tool box are my own. Thanks again to Dick Marsh for this wonderful toolbox.
- Marsh Scuba Dive Center, 93 Lauer Rd., Poughkeepsie, NY 12603, Tel: 845-452-8994, email: marshscuba@optonline.net, Website: http://www.marshscuba.com/
Below is one of many far more crude but handy open wooden carpenters' toolboxes that I made during and after carpentry school.
Goldilocks and the Three Carpenters
I made several versions of this toolbox of various sizes, after learning that bigger is not better.
The first toolbox was too small and too short. I had trouble fitting a full-sized carpenters' hand saw into it and I wanted to be able to carry most of my carpenters' tools in one box.
The second toolbox was longer and wider and held most of my hand tools.
On the next framing job it was immediately apparent that this toolbox was too big and too heavy to carry up a ladder or even up stairs.
The third toolbox was "just right", giving room for a lot of most-frequently-used hand tools but shrinking in size enough that when loaded I could still lift it. I used old leather belts to form tool slips along the box sides.
Cloth Toobags
There are some beautiful heavy nylon cloth toolbags in an enormous range of sizes, compartmentalization, and features. Below is a very simple cotton canvas toolbag that I used for years to lug around my drywall tools.
More recently, a battery-operated Skil saw circular saw that we purchased in Minnesota came with its own heavy cloth toolbag that is large enough to carry the circular saw, charger, batteries, and with some shoving, a battery operated 3/8" drill along with its charger and a couple of batteries. (not shown ... yet).
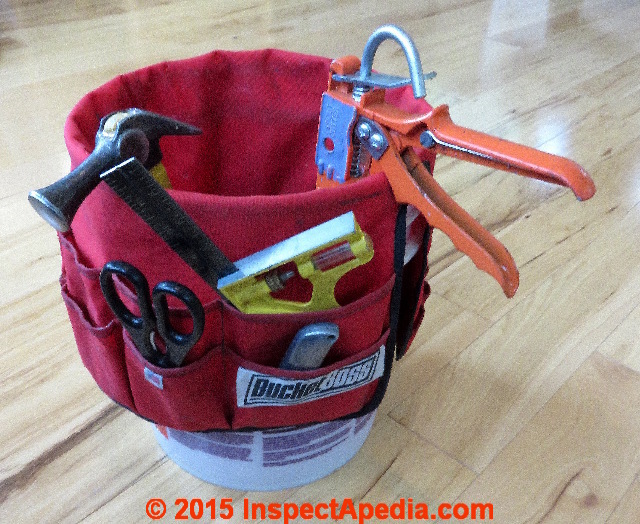
Quick-and-dirty tool carrier: Joint Compound Bucket with the Bucket Boss tool organizer
A popular and quick-and dirty tool carrier that I often use now is a plastic joint compound bucket, or a joint compound bucket outfitted with a heavy nylon tool carrier. One just tosses in the hand tools immediately needed before climbing up the ladder. BucketBoss provides a variety of tool bags and totes that you'll find at your local building supplier or hardware store.
- BucketBoss, PullR Holdings, 415 East State Parkway, Schaumburg IL 60173, Tel: 888-797-7855, Website: http://www.bucketboss.com/
Tips for Selecting Power Tools for Deck & Exterior Stair Construction

Unless you are looking for a long, physically demanding project, you will want to have a few power tools available when you build a deck.
Along with the hand tools discussed on the previous two pages, you should have a circular saw and a drill when you start building your deck.
Writers often suggest that for occasional work around the house, you certainly do not need to buy top-of-the-line professional-grade tools. But it is best to stay away from low-cost power tools, which are frequently underpowered and may be poorly constructed. In my (DF) experience these budget tools have a short life.
Buy the best tools you can afford or simply borrow or rent what you need. Renting a tool you will only use once makes sense, though we have on occasion found that renting a tool three times cost more than buying our own.
Modern 18-V battery operated circular saws and drills have significantly improved in power and battery life in the last decade. I've had good luck with the De Walt tools shown at above-left but opinions run strong among carpenters when it comes to tools and tool brands.
Tool manufacturers these days make mid-priced products aimed at experienced and demanding do-it-yourselfers that are usually quite satisfactory. Before you buy, read reviews in consumer and construction-related publications. Seek out advice and recommendations from pros and others with experience in building projects.
Circular Saw Suggestions for Deck & Stair Building
In deck building and most carpentry tasks, no power tool sees more use than a circular saw. If you do not already own one, this might be a good time to buy one.
The most common style takes a 7 1/4-inch blade, which will cut to a depth of about 2 1/2 inches.
Carbide-tipped blades are best for making smooth cuts, and they last much longer than blades with steel tips. A range of blades is available for specific cutting needs. From left in the photo are three carbide-tipped blade and a simple steel circular saw blade intended for cutting vinyl siding, trim, soffits.
Among carbide-tipped blades, more teeth means smoother cuts across the grain (the most-common saw cut direction when framing), but that second from left blade with fewer teeth may be better for ripping a board (along the grain).
For your deck work, it’s best to look for a good all-purpose framing blade.
Circular saws are not difficult to use, but they do demand respect. As with any power tool, be sure to read the owner’s manual carefully. If you have never used a circular saw before, buy some inexpensive lumber and practice a variety of cuts before you begin building.
Using a Circular Saw
With the saw unplugged, adjust the depth of cut so that the blade clears the bottom of the board you plan to cut by about 1/4 Inch. This adjustment is easiest to make with the blade alongside the board. But If you have trouble making square cuts, use an angle square to guide the saw.
Watch out: a circular saw will cut through a finger, foot, or leg like butter. Follow the saw manufacturer's safety recommendations. Pay particular attention to careful and proper use of the saw blade guard. Never set a circular saw down with its blade still spinning. If the blade guard is not in place the saw will "run away" and can run right up your leg. Always pay careful attention to the location of power cords, snags, fingers and hands. Protect your eyes from sawdust.
See POWER TOOL USE TIPS - separate article
Other Stuff you'll Need for Deck or Stair Building
A caulking gun is required for sealing joints with caulk.
As you work, a pair of sawhorses allows for easy cutting and can serve as the legs for a temporary workbench
Excavation and Concrete Tools & Supplies for Building Decks & Exterior Stairs
If you plan to dig holes by hand, you will need a posthole digger. Even if you are using a power auger, this manual tool will come in handy for removing dirt from the hole. Concrete needs to be mixed in a large mortar tub or a wheelbarrow; a mortar hoe is the best tool for mixing the dry ingredients with water.
Delivered-Concrete For a Hot Tub or Other Projects Requiring Lots of Deck Piers
 If you are building a large deck, with many deep holes to fill, it is probably best to have ready-mixed concrete delivered by truck. Check with local suppliers for costs and minimum order requirements.
For smaller decks, you can mix your own concrete.
Although dry concrete is a mixture of Portland cement, sand, and gravel, you are usually better off buying bags with the ingredients already combined. Add water as directed on the package.
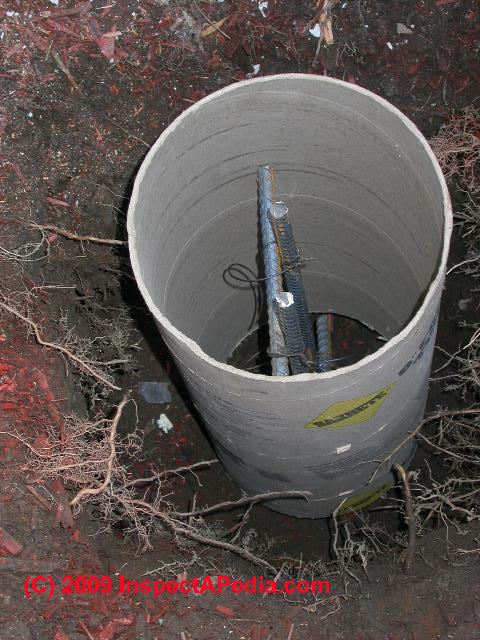
Use Sono Tubes - Cardboard Cylinders For Creating Concrete Piers
Inexpensive cylindrical tubes (photo at left) are an excellent choice, and they may be required by your building code.
The tubes are available in various diameters and can be cut to the necessary length with a handsaw or a circular saw.
SonoTubes (www.sonotube.com/) are a specific brand name for concrete pier and column forms provided in a variety of sizes.
Wood Finishes for Decks & Exterior Stairs
The essential ingredients for deck longevity include thoughtful design, careful construction, and routine coatings with a good- quality finish.
All wood decks perform better with routine finishing. And even if you are using composite decking and railings, you will need to apply a finish to the deck’s substructure.
Finishes are available in a variety of colors and formulas. Choose the type of finish you will use when you design the deck.
The best time to apply a finish is as soon as possible after the deck is built, so it is a good idea to buy your finish along with other deck materials.
See PAINT & STAIN GUIDE, EXTERIOR and WALL SIDING TRIM & FINISHES or select a topic from the closely-related articles below, or see the complete ARTICLE INDEX.
...
Continue reading at DECK DESIGN & BUILD or select a topic from the closely-related articles below, or see the complete ARTICLE INDEX.
Or see these
Recommended Articles
Suggested citation for this web page
DECK BUILDING & CARPENTRY TOOLS at InspectApedia.com - online encyclopedia of building & environmental inspection, testing, diagnosis, repair, & problem prevention advice.
Or see this
INDEX to RELATED ARTICLES: ARTICLE INDEX to BUILDING DECKS & PORCHES
Or use the SEARCH BOX found below to Ask a Question or Search InspectApedia
Or see
INDEX to RELATED ARTICLES: ARTICLE INDEX to BUILDING STRUCTURES
Or use the SEARCH BOX found below to Ask a Question or Search InspectApedia
Ask a Question or Search InspectApedia
Try the search box just below, or if you prefer, post a question or comment in the Comments box below and we will respond promptly.
Search the InspectApedia website
Note: appearance of your Comment below may be delayed: if your comment contains an image, photograph, web link, or text that looks to the software as if it might be a web link, your posting will appear after it has been approved by a moderator. Apologies for the delay.
Only one image can be added per comment but you can post as many comments, and therefore images, as you like.
You will not receive a notification when a response to your question has been posted.
Please bookmark this page to make it easy for you to check back for our response.
IF above you see "Comment Form is loading comments..." then COMMENT BOX - countable.ca / bawkbox.com IS NOT WORKING.
In any case you are welcome to send an email directly to us at InspectApedia.com at editor@inspectApedia.com
We'll reply to you directly. Please help us help you by noting, in your email, the URL of the InspectApedia page where you wanted to comment.
Citations & References
In addition to any citations in the article above, a full list is available on request.
- [2] Decks and Porches, the JLC Guide to, Best Practices for Outdoor Spaces, Steve Bliss (Editor), The Journal of Light Construction, Williston VT, 2010 ISBN 10: 1-928580-42-4, ISBN 13: 978-1-928580-42-3, available from Amazon.com
- [3] Prescriptive Residential Wood Deck Construction Guide, based on the 2009 International Residential Code, American Forest & Paper Association, Inc., provided by reader Mark Morsching from Everflashing.
- [5] Claudia Hudson, Asheville NC, Tel: 828-252-0644 Email: claudiahudson@charter.net . Ms. Hudson is an SEO copyrighter / content writer. She has provided background research and text for InspectApedia's articles on deck and porch construction methods & procedures. April 2013.
- In addition to citations & references found in this article, see the research citations given at the end of the related articles found at our suggested
CONTINUE READING or RECOMMENDED ARTICLES.
- Carson, Dunlop & Associates Ltd., 120 Carlton Street Suite 407, Toronto ON M5A 4K2. Tel: (416) 964-9415 1-800-268-7070 Email: info@carsondunlop.com. Alan Carson is a past president of ASHI, the American Society of Home Inspectors.
Thanks to Alan Carson and Bob Dunlop, for permission for InspectAPedia to use text excerpts from The HOME REFERENCE BOOK - the Encyclopedia of Homes and to use illustrations from The ILLUSTRATED HOME .
Carson Dunlop Associates provides extensive home inspection education and report writing material. In gratitude we provide links to tsome Carson Dunlop Associates products and services.


