 Deck Beam or Girder Construction, Installation & Connections
Deck Design-Build Online Guide
- POST a QUESTION or COMMENT about deck construction
How to build & install a built-up structural beam for decks, porches, & similar structures. This article describes how to build a beam used to support a deck or porch floor or similar structure. We describe building the beam out of 2x lumber in four easy-to-follow steps.
The article concludes with a description of different methods used to make a secure structural connection between posts and beams in wood-framed structures. This deck design-build article series describes construction details for decks and porches, including avoiding deck or porch collapse and unsafe deck stairs and railings.
InspectAPedia tolerates no conflicts of interest. We have no relationship with advertisers, products, or services discussed at this website.
- Daniel Friedman, Publisher/Editor/Author - See WHO ARE WE?
Deck Beam Construction & Installation Guide
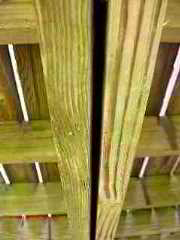
The beam, or girder, is the structural member that spans from post to post.
Modest-sized decks typically are built with a single beam, but larger decks may require two or more.
[Click to enlarge any image]
There are several ways to make and mount a beam.
Regardless of the style of beam you use, you can be sure that it will be heavy. Plan to have a helper or two available when you need to lift a beam into place.
How to Construct a Built-up Deck Beam
When the design calls for placing a beam made of two 2 x boards over 4x4 posts, a very common arrangement, many deck builders like to construct the beam with Vi-inch spacers between the boards. This produces a beam that fits perfectly on top of the post, since 2X lumber is 1 1/2inches thick.
Additionally, the spacers allow water to drain through the boards, which prolongs the life of the beam. Use pressure-treated plywood for the spacers.
 Note, however, that if your plans call for a single 4X beam, which would be 3 ½ inches thick, this built-up beam will not be sufficient. Structurally, it amounts only to a 3-inch-thick beam.
You can also make a built-up beam without spacers. Attach boards to each other with l0 d nails driven through both sides at least every 16 inches.
Apply a bead of silicone caulk to the joint between the boards to keep any moisture from penetrating.
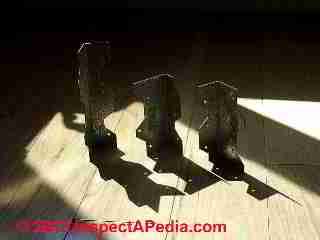
The structural connectors shown at left are used at inside corners where a joist hanger or post & beam connector doesn't work - for example at the inside corner formed by the side rim joists and the ledger board or the inside of side rim joists and the front rim joist.
When Constructing a Built-Up Supporting Beam, Center Joints over Posts
When buying stock to use as beams, plan to have each joint fall directly on the center of a post.
The adjoining sections of the beam should be cut as squarely as possible to provide maximum bearing on the post. With built-up beams, stagger the joints between boards, still making sure that each joint falls on the center of a post.
When Building Up a Beam Set All Lumber Crown Side Up
Lumber that is used for beams and joists nearly always has a visible crown, or arch, as shown below. Install both beams and joists with the crown facing up.
That way, once the deck load begins pressing down on the crown, it will level itself out. In constructing a built-up beam, make sure the crown on both boards faces the same way
4-Steps to Build & Install the Deck Support Beam
Step 1: Find the Framing Lumber Crown
Locate and mark the crown for the beam. You can usually spot the crown by sighting down the edges of the board. Alternatively, set the board on edge on a flat surface, such as a concrete driveway or garage floor. You might want to mark the board with an arrow clearly indicating the crown.
Framing Note: Always install the board crown side up. When building a built-up beam, sight down each board, mark for the crown, and attach the boards with both crowns up.
Step 2: Assemble the Deck Beam
It is smart to build a beam that is a bit longer than needed. That way you can shift the joists slightly to square up the frame if necessary.
Once that is done, the beam can be cut to finished length. Assemble a built-up beam on a pair of sawhorses. Attach spacers to one board every 12 inches, then set the other board on top and drive three 12d nails at each spacer location.
Flip the two boards over and repeat the nailing pattern. Stagger joints between boards, and secure each joint with a spacer and nails.
Step 3: Set the Deck Beam in Place
If possible, position or reattach string lines representing the sides of the deck.
Align the beam with the string lines at each end. If you made the beam a bit longer than needed, overlap the string an equal distance on each end.
Lifting a typical deck beam overhead may require three or more relatively strong workers.
The safest way to install a high beam is to use scaffolding, which will also make joist installation much easier.
If you are concerned about a heavy beam tipping over as you try to set it in place, temporarily attach 2 x 4s to a couple of posts so that the 2 x 4s stick up by 8 to 10 inches.
Set post caps on the other posts and fasten them to the posts with a single nail each. Remember to install the beam with the crown side up.
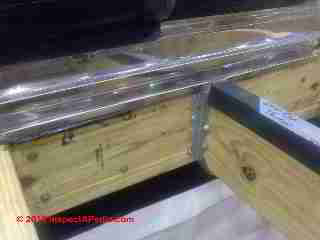
Deck girder flashing tip: In our photo the deck beam and some deck joist top surfaces have been protected by additional flashing. Keeping water out from between the segments of built-up deck beams can substantially increase the life of the structure.
Obviously the time to make this decision is before nailing the deck flooring in place.
Since the deck fasteners will puncture flashing you might ask what good it's doing. Water enters an un-flashed deck girder at the gaps between the deck boards.
Step 4: Attach the Deck Beam to the Posts
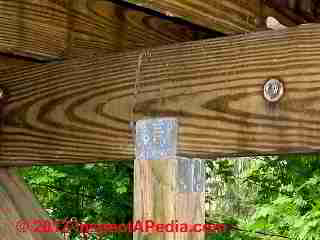
With the beam safely in place, add post caps to any additional posts that need them.
Check the beam’s alignment with the string lines.
You can also check the alignment by measuring the diagonals; provided that the beam is equally spaced from the ledger on both sides, the beam will be properly positioned when the diagonals are identical.
Once you are confident that the beam is squared up with the ledger, attach the post caps to the posts and the beam with nails as recommended by the post cap manufacturer.
Our photo (left) illustrates a typical steel post-to-beam connector that ties a 4x4 post to a built-up deck girder. Other sizes of post and beam connectors are available for virtually every combination of post dimension and beam dimensions.
Post-To-Beam Connection Methods for Decks & Similar Structures
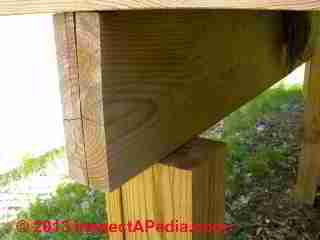
The strongest and most secure way to install a beam is directly on top of the posts. In most cases, the easiest way to connect the beam to the posts is with galvanized post caps.
Post caps are available to fit most typical post-and-beam configurations, even where the beam is narrower than the post. The top three illustrations at right show some of the more common connections.
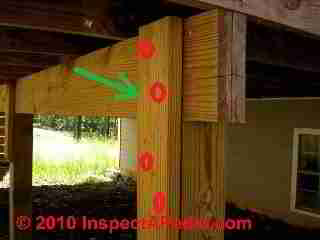
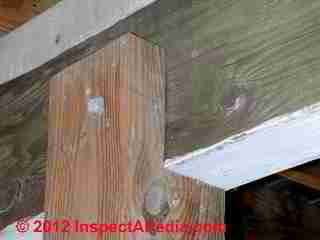
Beams and posts can also be fastened together with wood cleats made from framing lumber, which must be bolted to both members.
Although the cleat method requires a bit more work, some people prefer the look of wood to less attractive metal caps, especially when the connection will be fairly visible.
Examples of Deck Post-to-Beam Connection Errors
Question:
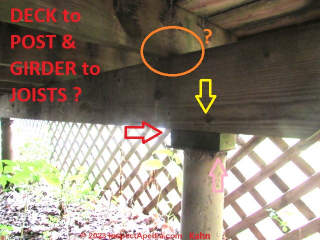
Did this inspection and am concerned that the wood shim above the columns are incorrect. What is your opinion on this?
- DovBer Kahn
Moderator reply:
Fellow home inspector Evan Grugett (egrugett@yahoo.com) puts it directly: The connection you show is incorrect and the wood will rot.
We add:
- There is no visible structural connection between the girder and the post top (Yellow arrow)
- There is no visible structural connection between the post top and the "too-thick" shim (Pink arrow)
- There is a thicker wood shim than standards allow and some shimming looks like stones or junk - can't see - (Red Arrow)
- There are no visible connections between the deck joists and the girder top (Orange oval)
- There is no visible above-ground pier - looks as if the steel Lallys (if that's what they really are) are run into the dirt ?
So, no, that deck support is incorrect and could be unsafe (deck collapse?)
Our OPINION is that especially where a building defect is in the judgment of the inspector likely to be unsafe or to involve significant cost to repair, it is critical to make that clear to the building owner/occupant/buyer.
- Dov Ber Kahn, a home inspector in Rockland County, NY has contributed photographs of various building features to InspectApedia. Mr. Kahn is a licensed home inspector in New York and New Jersey, and can be reached at Website: Kahnbhomeinspectors, Tel: 845-445-8234, Email: kdovber@googlemail.com
...
Reader Comments, Questions & Answers About The Article Above
Below you will find questions and answers previously posted on this page at its page bottom reader comment box.
Reader Q&A - also see RECOMMENDED ARTICLES & FAQs
On 2021-07-06 by (mod)
 @Pamela Neiman,
Thanks that's an interesting and unusual question; it's really a structural engineering question - (not us) -
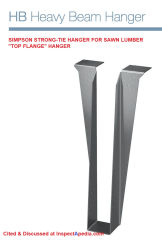
[Click to enlarge and see details about the Simpson HB Heavy Beam Hanger shown here]
If I understand your question correctly, you've got a "beam" (of un-specified dimension) that in turn is carrying joists that in turn are carrying a deck - boards, railings, dead load, + people, furniture, etc - live load. (of un-specified total load)
A simple thin steel joist hanger to a ledger connected (we don't know how) to the building? No.
But as we illustrate below, Simpson StrongTie and similar manufacturers do provide steel hangers and also other heavier steel hangers specificalliy designed for structural beams. Picking the right one, using the right connectors, and connecting it properly to the building structure are absolutely critical safety steps in construction of your deck.
I'd want that approved by a licensed design professional like an architect or a structural or civil engineer.
The engineer, if she agrees that the design is structurally sound, will specify a specific heavy steel beam hanger, not a conventional thinwall steel joist hanger, along with the specific fasteners - type, size, number - for the connection to be safe.
Or I'd put posts under the beam rather than risk a deck collapse.
Also see
FRAMING CONNECTORS & JOIST HANGERS
On 2021-07-06 by Pamela Neiman
My deck is to be contiguous around three sides of my house.
The design calls for (3) 2x10 beams that are running perpendicularly to the house on two sides, with joists attached on top of the beams.
What is best practice to attach the beams to the house?
Is using Simpson hangers attached to a ledger acceptable?
On 2021-06-03 by jag70 - deck posts supporting 2 levels of decking
@inspectapedia.com.moderator, thank you!
On 2021-06-03 by inspectapedia.com.moderator (mod)
@jag70,
Yes, post notching seems to have fallen from favor for a number of cases.
Through bolting can be perfectly adequate without a cleat, but where I use cleats I like to bolt those to the post as well.
It's very strong combination.
You end up essentially having at least two bolts that are securing the beam or joist directly against the post and you have another two bolts at a bearing surface beneath that which pretty much eliminates any worry about a splitting break.
As you probably know, know, even without being a structural or civil engineer, all of us who frame decks have learned that fasteners in sheer force are very strong.
And through bolts of course have more than adequate strength against withdrawal forces.
On 2021-06-03 by jag70
@inspectapedia.com.moderator, thank you for your time. Definitely will be getting a permit and have worked with my city in NC a lot on past permits. I don't have a sketch drawn up that really reflects what I'm describing well, but did find this one image online so attaching it.
Was not planning to notch the post at the lower attachment though. Chapter M in the 2018 NC Residential Code for wood decks does not show or discuss that option.
Instead I was planning to through bolt the lower two beams and am wondering if I should then add a cleat and if so how long I should strive for it to run along the 6x6 post. Def using strong-ties everywhere. thank you!
On 2021-06-03 by inspectapedia.com.moderator (mod) - OK to share deck posts w/ abutting decks at 2 different levels
@jag70,
I'd like to be helpful but I'm not confident that I understand the situation.
You might try attaching a sketch or drawing.
Also keep in mind that you're going to need a building permit in almost any jurisdiction and that depending on the size of your deck you're probably going to need a plan signed off by Design professional such as an architect or engineer who return can make sure that your structure is sound.
In very general terms, it's feasible to share posts at the point at which decks of two different elevations are meeting.
Everything depends on using the right structural connectors.
If you are using listed joist hangers and structural connectors such as those made by Simpson Strong-Tie or through bolt connections installed and space according to the manufacturer's design recommendations that will help your implementation.
On 2021-06-01 by jag70
Hi. Great article. Question please.
I'm creating two smallish multilevel decks (11x7 and 8x7) connected on the 7' side.
Top deck is about 54" above grade (on a slight slope.) Height difference between the decks will be about 29" so stairs will be required between them.
Question is about sharing the posts on the outer 7' side with both decks and the various beam/girder attachment approaches.
Top deck girder attachment is planned to be top mount with strong-tie brackets. For the lower 8x7 girder it looks like NC deck code would allow for a side mount dropped girder w 2 -5/8" through bolts. Wondering if it would be good to sister on a 2x connector to the post under the girder? If so what minimum length would be recommended as a general rule? 1/3 length of post?
I want good stability, but also keeping lumber use in check due to sky-high prices. Are there better/other approaches besides the approach of having distinct posts? Thank you.
On 2019-02-04 - by (mod) - spport for plastic deck - permit needed
Laura
As a permit is needed to build a deck in most jurisdictions, before assuming the construction is incorrect (which I agree could be UNSAFE - stay OFF the deck unitl this is answered) - why not ask for an inspection by your local building code compliance inspector?
On 2019-02-03 by LAURA
I have a plastic deck. They did not put
A support beam to support it———who do I call to do this? What will it cost?
Laura (616) 443 1205
On 2016-09-24 - by (mod) - use diagonal cross braces
The brace is drilled and through-bolted to the post.
The bottom edge of the brace is cut on a suitable angle such as 45 deg. to give plenty of contact area with the post when the brace is set in position.
I also bolt the braces at the center of the X where they cross.
On 2016-09-23 by Roger Hatlen
If NC requires me to use diagonal cross braces bolted in the center and also bolted to the post on the low end and top girder on the top end, how can that be done without just toe-nailing the bottom one?
...
Continue reading at DECK JOIST LAYOUT or select a topic from the closely-related articles below, or see the complete ARTICLE INDEX.
Or see these
Recommended Articles
- DECK & PORCH CONSTRUCTION - home
- DECK BEAM CONSTRUCTION
- DECK JOIST LAYOUT
- DECK PIER CONSTRUCTION
- DECK POST CONSTRUCTION
- DEFLECTION in WOOD BEAMS ROOFS FLOORS
- FRAMING CONNECTORS & JOIST HANGERS
- PIER FOUNDATION PROBLEMS for a description of common structural pier types, inspection, defects
Suggested citation for this web page
DECK BEAM CONSTRUCTION at InspectApedia.com - online encyclopedia of building & environmental inspection, testing, diagnosis, repair, & problem prevention advice.
Or see this
INDEX to RELATED ARTICLES: ARTICLE INDEX to BUILDING DECKS & PORCHES
Or use the SEARCH BOX found below to Ask a Question or Search InspectApedia
Or see
INDEX to RELATED ARTICLES: ARTICLE INDEX to BUILDING STRUCTURES
Or use the SEARCH BOX found below to Ask a Question or Search InspectApedia
Ask a Question or Search InspectApedia
Try the search box just below, or if you prefer, post a question or comment in the Comments box below and we will respond promptly.
Search the InspectApedia website
Note: appearance of your Comment below may be delayed: if your comment contains an image, photograph, web link, or text that looks to the software as if it might be a web link, your posting will appear after it has been approved by a moderator. Apologies for the delay.
Only one image can be added per comment but you can post as many comments, and therefore images, as you like.
You will not receive a notification when a response to your question has been posted.
Please bookmark this page to make it easy for you to check back for our response.
IF above you see "Comment Form is loading comments..." then COMMENT BOX - countable.ca / bawkbox.com IS NOT WORKING.
In any case you are welcome to send an email directly to us at InspectApedia.com at editor@inspectApedia.com
We'll reply to you directly. Please help us help you by noting, in your email, the URL of the InspectApedia page where you wanted to comment.
Citations & References
In addition to any citations in the article above, a full list is available on request.
- [1] Steve Bliss's Building Advisor at buildingadvisor.com helps homeowners & contractors plan & complete successful building & remodeling projects: buying land, site work, building design, cost estimating, materials & components, & project management through complete construction. Email: info@buildingadvisor.com
Steven Bliss served as editorial director and co-publisher of The Journal of Light Construction for 16 years and previously as building technology editor for Progressive Builder and Solar Age magazines. He worked in the building trades as a carpenter and design/build contractor for more than ten years and holds a masters degree from the Harvard Graduate School of Education. Excerpts from his recent book, Best Practices Guide to Residential Construction, Wiley (November 18, 2005) ISBN-10: 0471648361, ISBN-13: 978-0471648369, appear throughout this website, with permission and courtesy of Wiley & Sons. Best Practices Guide is available from the publisher, J. Wiley & Sons, and also at Amazon.com - [2] Decks and Porches, the JLC Guide to, Best Practices for Outdoor Spaces, Steve Bliss (Editor), The Journal of Light Construction, Williston VT, 2010 ISBN 10: 1-928580-42-4, ISBN 13: 978-1-928580-42-3, available from Amazon.com
- [3] Prescriptive Residential Wood Deck Construction Guide, based on the 2009 International Residential Code, American Forest & Paper Association, Inc., provided by reader Mark Morsching from Everflashing.
- [4] Mark Morsching, Everflashing, Tel: 800-550-1667, Email: everflashing@gmail.com. The Everflashing product comes in G-185 and Stainless Steel and is intended for use with treated lumber with copper in it. Everflashing produces a variety of specialty flashing products including flashings for use with decks at deck ledgers and deck perimeters.
- [2] Manual for the Inspection of Residential Wood Decks and Balconies, by Cheryl Anderson, Frank Woeste (Forest Products Society), & Joseph Loferski, October 2003, ISBN-13: 978-1892529343,
- Our recommended books about building & mechanical systems design, inspection, problem diagnosis, and repair, and about indoor environment and IAQ testing, diagnosis, and cleanup are at the InspectAPedia Bookstore. Also see our Book Reviews - InspectAPedia.
- In addition to citations & references found in this article, see the research citations given at the end of the related articles found at our suggested
CONTINUE READING or RECOMMENDED ARTICLES.
- Carson, Dunlop & Associates Ltd., 120 Carlton Street Suite 407, Toronto ON M5A 4K2. Tel: (416) 964-9415 1-800-268-7070 Email: info@carsondunlop.com. Alan Carson is a past president of ASHI, the American Society of Home Inspectors.
Thanks to Alan Carson and Bob Dunlop, for permission for InspectAPedia to use text excerpts from The HOME REFERENCE BOOK - the Encyclopedia of Homes and to use illustrations from The ILLUSTRATED HOME .
Carson Dunlop Associates provides extensive home inspection education and report writing material. In gratitude we provide links to tsome Carson Dunlop Associates products and services.


