 Well Piping Repair

- POST a QUESTION or COMMENT about diagnosing problems with the well water pressure tank or water storage tank that show up as pump operating problems
This article describes how to diagnose and fix problems with the piping used bring well water to a building - from the bottom of the well to the pump to the pressure tank to the building water supply.
We start with a readers step-by-step replacement of leaky galvanized iron well piping and continue with additional reader Q&A diagnosing well water pipe problems.
InspectAPedia tolerates no conflicts of interest. We have no relationship with advertisers, products, or services discussed at this website.
- Daniel Friedman, Publisher/Editor/Author - See WHO ARE WE?
Well Piping Repairs
Article Contents
- HOW DO I PULL MY SUBMERSIBLE PUMP & PIPING UP OUT OF THE WELL?
- HOW DO I GET THE SUBMERSIBLE PUMP PAST THE PITLESS ADAPTER? - when pulling the pump and piping out of the well
- WELL PIPE REPLACEMENT PROCEDURE - step by step replacement of a leaky well pipe
- WELL PIPE CONNECTIONS: PVC to PITLESS ADAPTER
- WELL PIPE LEAK or PRESSURE TROUBLESHOOTING
...
How do I get my submersible pump out of the well for inspection or repair?
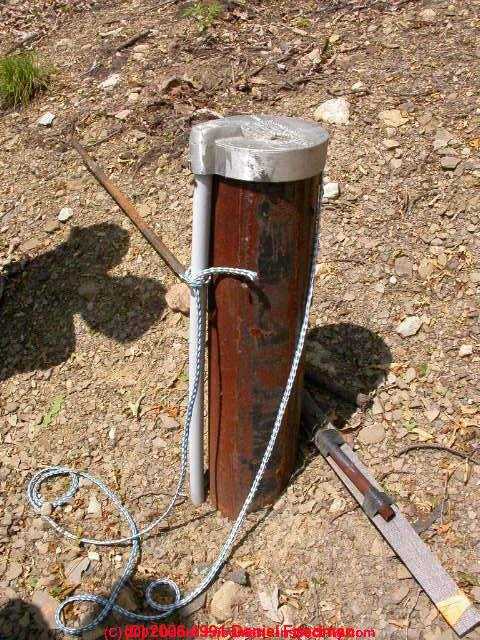 Our reader asked:
I have a Franklin submersible pump, 3 wire, 1/2 hp and lost all pressure. After checking determined most likely problem is pump. How do I lift pump out of casing past pitless adapter or remove adapter when it is 7-8 ft down casing?
Can I pull the pump by hand or do I need a winch or come-along? - Frank 5/23/12
Reply:
Frank,
In modern drilled well installations the well riser pipe (the vertical pipe rising inside the well casing from the well pump or foot valve upwards) has to make a right-turn at its top in order to exit the side of the well casing and thence to be connected to a horizontal well pipe that connects the well to the building.
This connection through the side of the steel well casing is made by the pitless adapter that you named.
Note: some well riser pipes exit straight up through the top of the well casing cap - without a pitless adapter. In that case the issue of releasing the well pipe riser from the pitless adapter doesn't pertain, but the risk of dropping components back into the well and the possible need for a winch or crane still apply.
If you stop by a plumbing supplier to take a look at pitless adapters you'll see that the fittings include both horizontal parts that bolt through and seal a hole cut in the side of the well casing and a slip-connector that marries a fitting atop the well pipe riser to the pitless adapter.
Using a Simple Rope to Pull Piping & Well Pump Out of a Well
To remove the well pump from the well the well driller or plumber ties a rope or wire around the top of the well pipe riser just below its slide-fitting that connects the top of the riser to the pitless adapter. The rope is then pulled vertically to lift the well pipe and of course the submersible pump attached to it up past the pitless adapter (that remains bolted through the side of the well casing) and out of the well.
For a shallow well - 25 feet or less - it's reasonable to pull the well pipe and foot valve or submersible pump by hand.
Our photo above illustrates a polypropylene rope someone left tied to the well piping for this purpose.
Watch out: Some experts advise removing the rope out of concern that it may wick contaminants into the well.
Using a Lift Winch & Clamp to Pull Piping & Submersible Pump Out of a Well
But for a deep well the weight of all of the piping and pump may be too great to lift by hand, not to mention the risk that you drop the whole shebang back down into the well - leading to an embarrassing call to a well professional.
So for deep wells and for wells with heavy steel piping, experts use a manual winch or a power winch attached to a tower or to a crane mounted on the well service truck.
In our photo above the Rasmussen Well Company (Two Harbors MN) is pulling the well pipe out of a deep well that uses a submersible pump.
Notice the red clamp affixed to the well pipe just at the top of the well casing?
The clamp holds the lower pipe against being dropped back into the well while the technician removes the upper pipe section being held by the lift crane.
Section by section the pipe is pulled up out of the well, clamped below the next joint, then removed.
Below is a closer look at the well pipe clamp

...
How do I get the well pump past the pitless adapter
Getting the well pump past the pitless adapter is not normally an issue.
Once we unhook the top of the well riser pipe from the pitless adapter assembly and begin to lift the well piping and pump out of the well (by hand or by winch or crane), the pump will have clearance to pass by the portion of the pitless adapter that is bolted to the side of the well casing.
Look at these details of this Merril brand pitless adapter sold by AquaScience.net.

Once you've used the lift pipe to pull part No. 1 up and out of the well, only the thinner part No. 2 remains inside the casing, and of course parts 3, 4, and 5 remain on the outside of the well casing holding the pitless adapter in place and connecting to the water pipe that extends from the well casing to the building it serves.
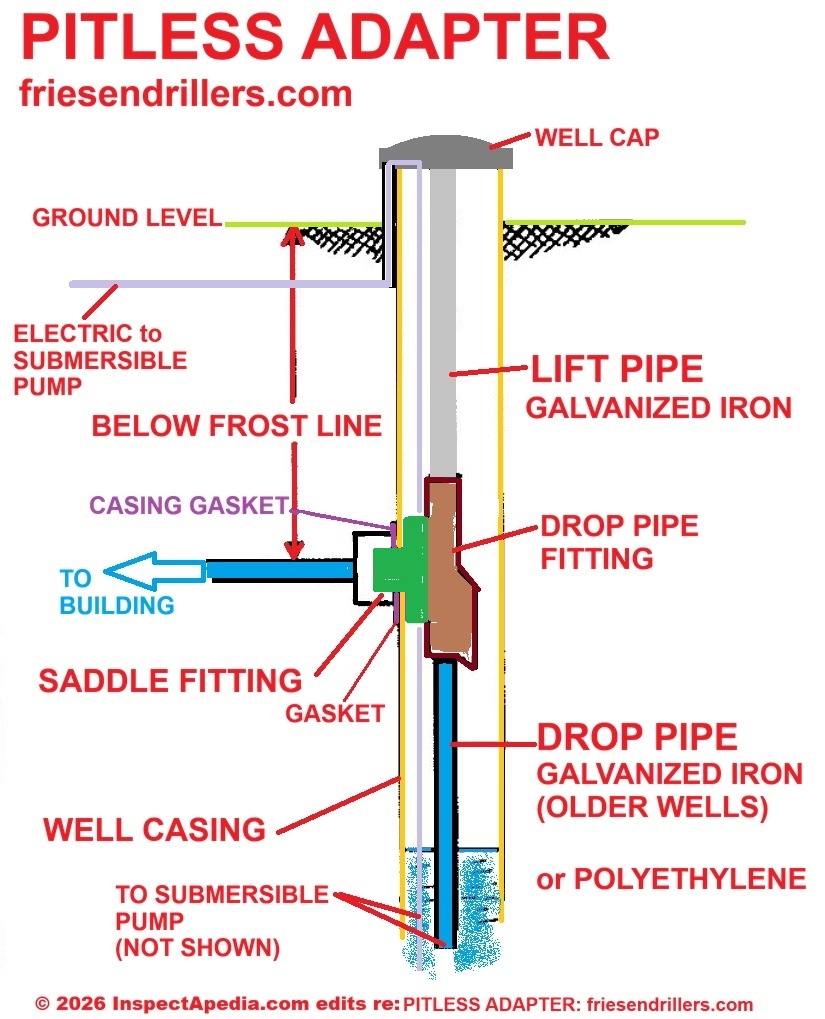
Below, using an edited/enhanced version of a pitless adapter as installed in a well casing by Friesen Drillers, Ltd. cited in detail below, we've added details to illustrate just what portion of the pitless adapter remains attached to the well casing when you lift up and remove the well pipe by pulling the lift pipe up.
The green saddle fitting remains attached to the well casing. The tan drop pipe fitting lifts out when the lift pipe is raised, bringing with it the drop pipe and submersible pump. (These colors are ours added for clarification. The actual physical parts will be stainless or galvanized or brass.
If the pump is jammed in the well casing - tools to solve the problem
Normally it would be be odd to be unable to get the pump past the pitless adapter, since to get the submersible pump into the well in the first place it had to be lowered past the pitless adapter.
Watch out: On occasion however a pump or other components can become stuck in a well, particularly if piping has become bent, the well casing has collapsed or been damaged, or the pump has fallen off of the bottom of the well piping.
Alternatively, the torque effect of starting and stopping a submersible pump as well as other in-well conditions can sometimes cause piping damage or wiring damage that might foul up a pump as might dropping something down into the well.
If you encounter that trouble, it's time to call a well drilling professional who has tools and experience for retrieving stuff that's been dropped into the well.
So to sort out this problem we might need to use one of the for hire WELL BORE CAMERA SYSTEMS as well as one of the many WELL PIPE RETRIEVAL TOOLS available to Retrieve Stuff from Drilled Steel Casing or Other Water Wells.
And if the well casing itself has been damaged, then at PUMP, SUBMERSIBLE we discuss repair sleeves for damaged well casings.
The drawing above was adapted and expanded from a simpler original version at Friesen Drillers:
- Friesen Drillers, Ltd., PITLESS ADAPTER for SUBMERSIBLE PUMPS, Installation Instructions [PDF] (Friessen Drillers Website, Winnipeg, Manitoba, Canada) - Friesen Drillers Ltd., 307 PTH 12 N Steinbach, MB R5G 1T8 Phone: 204-326-2485 Toll Free: 1-888-794-WELL (9355) - retrieved 2026/07/29, local backup saved as Pitless-Adapter-Friesendrillers.com.pdf
- More suppliers are at CITATIONS & REFERENCES
...
Well Piping Replacement Procedure
A leaky, damaged, or improperly-installed well pipe can leak water out, air in, dirt in, or can cause partial or complete loss of building water pressure & flow.
Problems with the well piping can also show up as weak water, no water, dirty water, or water pump problems such as well pump clogging, loss of pressure, or even pump motor burn-up.
Well pipe problems can also mean weird pump problems, intermittent or unexplained loss of loss of pump prime, lost water pressure, and other SNAFUs.
The following step by step description of replacing old well piping that was in poor condition is provided courtesy of an InspectApedia.com reader Paul.
Posted first at WELL PITS, the the reader said, and we replied, as below:
Step by Step Procedure for Replacing Badly-Rusted Leaky Galvanized Well Piping
The following photos and description of steps in replacing a leaky galvanized iron well pipe are provided courtesy of reader Paul.
We completed the job I mentioned earlier (WELL PITS "On 2021-03-27 by Paul"). You responded ("On 2021-03-27 by (mod)...") by saying, "If you can stand it, post some photos of the job - one per comment - as that will both help other readers and may permit some useful comment or suggestion." (Altogether I took around 240 photos.)
The ¾" galvanized water service line, from the old concrete well casing, to its emergence into the basement under the parallel basement stair inside the added-on porch, is about 25 feet long, and was in two coupled pieces.
My family bought the farm in 1960. It had an open-pit well with a removable concrete cap (4-pc., I think).
There were two lines emerging underground from the well: one to the barn, and the other to the house.
The barn line began leaking soon after the 4"-steel-case pitless system was installed (I'm thinking around 10-30 years ago), and the installer returned to disconnect that line (how, I don't know; maybe they had installed TWO pitless adapters, and simply removed one of them?).
We know the porch and its basement stair were added after the house was originally built (around 100 years ago?). Any further history is mostly unknown (so far...).
We ended up hand-digging two pits, leaving the middle 8 feet, and the area under the inside porch stair, not dug up.
I needed to know whether the water line went through a concrete porch foundation; fortunately there was NO concrete foundation there (which might have required hammer-drilling to free the pipe).
Interestingly, the pipe was only 4-1/2 feet below grade in that area.

1. The old galvanized water line
In the photo above on this page the pipe, lower left, which entered the concrete pit at a location lower than the larger hole pictured), and the elbow coming out of the newer pitless adapter (PA), which is about 6-1/2 feet below grade (the obviously-rectangular hole in the concrete case was original; I enlarged it upwards w/my hammer-drill for better access)\
2. The old service line after I cut it, [photo below ] and before threading; the piece to the right easily broke off at the unexposed/buried fitting.

3. My "slide hammer puller" [photo below] (a 7-ft. nipple, whose opposite I coupled to the detached inside end of the old line in the basement;

the slider is a 5-ft. piece of 1-1.2" electrical conduit, reinforced-tip), showing 1-1/2 inches of movement.
I soon-after welded a plate to the inboard end of that black-pipe coupler to make a better "bash plate":
4. Above-ground temporary water line attached to the pitless adapter (PITLESS ADAPTER ) [photo below] at the well casing, [photo above] using a 1" tee fitting, other PEX end installed into the system inside the house.

5. Temporary above-ground line [blue PEX in the photo below] providing water service to the building while permanent piping is being prepared.

6. Cutting a thread [photo below] on the old galvanized iron water pipe line. This will permit an iron to brass to PEX adapter to be connected to the old galvanized pipe.

7. New PEX line (blue) coupled with a beveled electrical conduit coupler to the old service line, [photo below]and new electrical-ground wire inserted into a drilled hole, ready for pulling through the 20-plus foot ground ("sandy-gravel-rocky-loam," much of it wet), into the basement.

This pipe pulling procedure won't work in all soils, but here it enabled us to run new PEX piping from the well into the nearby building without having to dig a trench to expose that entire route.

8. Final hookup of the new PEX line to the galvanized iron pipe fittings
and tee and connected to the pitless adapter at the well casing; I Teflon-taped, then Teflon-pasted, all fittings.
9. I found two holes in the old galvanized iron water service line [above], plus I think it was leaking at the well's attachment point because after I cut the line it broke off easily at that point (per photo #2):

Above and below: holes found in the old well water service line.

...
PVC Connections at the Pitless Adapter
What connector can I use to connect a new PEX waterline to our submersible well pipe pitless adapter
Our reader Paul also asked:
Our well pit water system was replaced 40-50 years ago with a metal-case pitless system, which was placed inside of the now back-filled, circular, concrete-wall well pit.
The original (i.e., "pre-pitless") 3/4-inch galvanized service line into the basement of the house needs replacing, as it is leaking, and will not hold pressure.
That service line pipe is a little over 20 feet long, and we plan to hand dig and replace it with PEX ourselves.
What kind of connector can I expect to find for connecting the new PEX line to the pitless pump?
Would the installer have extended the pitless adapter to the outside of the poured concrete pit wall, to make it easily-accessible (i.e. OUTside of the pit) for the then-distant future, yet imminent, service line replacement?
If not, then what can I expect? On 2021-03-27 by Paul
Answer by (mod) - how to connect PEX to older galvanized or copper piping systems for water supply
@Paul,
You could doubtless dig just to the concrete old-well-pit wall and use a rubber hub and clamp connection there to go to PEX, but I'd hate to have to do the job over again when the remaining galvanized pipe goes;
Best would be to expose the PITLESS ADAPTER and connect there.
Unfortunately this is an example of the old house spaghetti problem: you can't pull just one strand of sticky spaghetti out of the colander; once you start pulling a lot of strands are going to want to come along.

So you could end up having to
- break through the concrete to give adequate working space to get to the pitless adapter (I won't mention how much better it would have been and how much easier if the concrete had been removed at the time of installation of the closed pitless casing.)
- replace the pitless adapter - meaning a bit of well pipe pulling
- then connect your ABS or PEX line
If you can stand it, post some photos of the job - one per comment - as that will both help other readers and may permit some useful comment or suggestion.
For the PEX to Galvanized, IF you can get to a threaded fitting AND if it's still possible to unscrew to expose, for example, a galvanized NPT nipple, you'd simply use the brass NPT to PEX tubing like the one shown above, a Bluefin product.

to join to a cut-off, un-threaded galvanized pipe there are compression fittings like this B&K product (above).
...
Well Piping Problems, Bad Water Pressure, Leaks, Air
 Water pressure problems after replacing the well lines, pump doesn't seem to deliver water

Our reader Bill asked:
I have a plumbing problem that I cannot seem to solve. I have a shallow well (41 ft. to the water line) with a 1 hp. jet pump with 1 1/4" and 1" black plastic supply lines leading to a jet assembly and a 1 1/4" foot valve but I cannot get the system to draw water from the well continuously.
The system was working fine until last winter when the PVC supply lines leading from the pump head to the water pressure tank froze and busted.
So, I replaced the PVC and primed the pump but when I turned it on, it would not draw water from the well. So, thinking that the freeze might have damaged the impellers, I replaced the pump.
However, after priming the new pump, it would not draw water from the well either.
So, I then pulled the supply lines out of the well and replaced the jet assembly (which was badly corroded) and the foot valve as well.
Now, when I prime the system, close the pressure regulator valve, turn the pump on, wait for the pressure to come up, and then open the pressure regulator valve a bit, water will exit from the side of the pressure regulator valve and out of the supply line but the volume of the flow fluctuates back and forth from a trickle to a jet for a little while and then suddenly ceases to flow altogether.
In addition, my spotter tells me that he can hear water rising up the pipes until just before it reaches the elbows where the supply lines make the turn from vertical to horizontal and then it suddenly falls back down the pipes. So, could you please tell me what you think the problem is?
Thanks,
Bill Bernhardt
Reply: Check for well piping leaks first
Bill,
I don't fully understand the details in your message but I'm wondering from your description of fluctuating pressure if the pump is not picking up water at the foot valve. It sounds as if you're looking for water flow BEFORE the water reaches the pressure tank, right?
If not, I'd look for a water logged pressure tank or a tank with a stuck bladder.
From your description I wonder if there is a bad connection made during your well line replacement, possibly leaking water back into the well.
New plastic water line from pump to tank, but now water flow is stopped and water pressure lost
I have a 60' water well which I am sure has water due to the rain. I installed a new 1" x 20' plastic water line from the pump to the bladder tank. When I started it back up the water flows out of the spigots for approximately 1 minute and then stops flowing.
The pump is still trying to build but takes a while. If I shut the spigots off and let the pump build it eventually builds back up. How do I trouble shoot this?
By the way I have a submersible pump. When checking water I have an outlet prior to the bladder tank and the same thing happens. - Gary
Reply:
Gary if you are sure the pump itself is OK I'd start looking for a well piping leak.
Turn off water into the building at the end of a pump cycle and watch the pressure gauge. If pressure drops there is probably a piping leak or a bad foot valve or check valve. Also be sure that the water pump itself is undamaged and working properly.
Follow-Up: improper pump electrical wiring connections can cause well water pump to lose power
Everything is fixed now but I wanted to share my experience which caused me to replace a steel 1" water line with a plastic 1" line.
That's only the beginning. I replaced that plastic line as I thought I had a kink in it.
After each of these changes disappointment set in as nothing changed the results of 30 secs of water and then nothing for 5 minutes or so. Next was the pressure switch and all new piping from the pressure tank.
Next was pulling the 65' deep pump and changing it out. Pump went back down in and I was certain things would be looking up. Disappointment...disappointment....frustration on and on. I'll prep you here a little.
Early on like a couple of weeks ago when I replaced the line the first time I disconnected the pump connections and since this is a lake house from the mid 60's the wiring is not up to my type of wiring although it is sound.
Anyway the 3 wire connection was marked with colored tape so I could get back to the correct hook up. I made an assumption that one of the wires was the ground since later it was un taped the first time that it was a ground wire.
When I replace the line the first time and re-connected it I must have gotten the wiring backwards by using the ground as one of the voltage legs. Yes. I have done all of this work taking 2 weekends because I had the wiring wrong.
On a good note I have learned and I have shared this experience. Look at the wiring if the pump turns on and shuts off. Thanks Dan for your attempt to help. It is much appreciated.
Gary
Comment:
Gary, thanks so much for the follow-up on your loss of water pressure diagnosis and repair process.
We learn an important diagnostic clue from your description: a well pump might be improperly wired electrically but still "run" only it may not run normally and its power may be cut and thus water pressure may be low to nil.
Ruling out piping leaks and pressure switch problems helps focus in on another item to check out: the pump wiring connections. A similar problem can occur in older fused wiring systems - the fuse on one leg of the 240V circuit can blow, leaving the other side hot or live.
A too-quick check for electrical power can miss that problem.
I see water around my well casing and a fountain of water in the yard
I have a question. Yesterday I noticed that around my well there was a lot of water on the ground. My first thought was that the pipe either cracked or has a leak. I started to dig to see if I could find the culprit. Here in CT the zoning states that the pipe should be around 48 inches deep.
I dug to that amount, but still didn’t hit the pipe so I need to go deeper. When I run the water in the house, I can see a small fountain not far from the well casing.
The weird thing is when I turn off the water the fountain stops. I left it for a few hours and all of the water was gone. (Seeped into the soil because the ground is not frozen) I then turned the water on inside and the hole started to fill up again.
I was told if there was a crack or hole in the pipe that the water would constantly flow. I was told that the feed line going to the house is always charged. I also do not have any water flow drop or air coming from the faucets when I turn them on. I was told that you would have these issues if there was a cracked pipe.
I called to plumbers and was told that it would be around 1200.00 to fix this. I am a handy person and can fix just about anything. Does anyone have any suggestions? If it just a cracked or broken pipe I could fix this. - Bill C 1/30/12
Reply:
Bill, it sounds as if you are describing a leaky well pipe between the well and the house. When your well pump runs it pressurizes the water line to the house, squirting water out of the point of leakage. Dig at that "fountain in the yard" first.
When we turn on a faucet air spits out
We have a bored 24 in. well dug in 1987. It has a submersible pump which was installed when the well was first dug and the tank was placed inside the well to protect it from freezing. The original tank was replaced about 5 years ago.
We checked the water level in the well, and we have 18 feet of water. The pressure gauge on the tank indicates between 40-70. Other than replacing the tank, we have had virtually no problems with this well. When we turn on the faucet, it spits and sputters from air in the lines.
What would be the causes (how many ways) for air in the lines? - Terry 3/24/12
Reply:
Terry, about air spitting out of faucets, see AIR DISCHARGE at FAUCETS, FIXTURES - that's the diagnostic procedure you want to read.
...
Reader Comments, Questions & Answers About The Article Above
Below you will find questions and answers previously posted on this page at its page bottom reader comment box.
Reader Q&A - also see RECOMMENDED ARTICLES & FAQs
How do I break up some kind of mineral or dirt blockage in my well casing?

Would be the bit I could use if I was to rod
I removed a 1" PVC feed pipe of my 2" galvanized pipe well head and am trying to replace it with 1 1/4" PVC well point.
It is being stopped at about 12' down. Could this due to mineral build up and should I use a rodding machine with proper bit or camera first? On 2021-06-14 by Kurt
Solution by inspectapedia.com.moderator (mod)
@Kurt,
Watch out: I appreciate that it's a bit more trouble but I would always prefer to look by camera before drilling past a well blockage when I don't know exactly what has caused the block.
For example if your casing is cracked, bent, or damaged in such a way that it is bulged into the opening the space, drilling isn't going to be a good repair because you could end up simply allowing dirt to fall into or collapse your well.The ClogChopper pipe cleaning tool you show (as sold on eBay) is available from plumbing suppliers in sizes from 1" to 4" and is used with connecting rods to clean drain clogs. It might work in a well casing.
I'd check with the manufacturer:
General Pipe Cleaners, division of General Wire Spring CO.., 1101 Thompson Ave., McKees Rocks PA 15136 USA 800245-6200, Web: www.drainbrain.com email: info@drainbrain.com
Here is a ClogChopper™ CATALOG [PDF] (2013) - original source: https://drainbrain.com/app/uploads/2017/08/ClogChoppers.pdf
by Kurt
@inspectapedia.com.moderator, Thank You for your input. Very helpful.
...
Continue reading at WELL CASING LEAK REPAIRS or select a topic from the closely-related articles below, or see the complete ARTICLE INDEX.
Or see WELL PIPING REPAIR FAQs - questions & answers about well pipe repair methods posted originally on this page.
Or see these
Recommended Articles
- WATER PRESSURE LOSS DIAGNOSIS & REPAIR
- WELL CASING LEAK REPAIRS
- WELL PIPE RETRIEVAL TOOLS
- WELL PIPING CHECK VALVES
- WELL PIPING FOOT VALVES
- WELL PIPING LEAK DIAGNOSIS
- WELL PIPING PITLESS ADAPTER
- WELL PIPING REPAIRS
- WELL PIPING TAIL PIECE
- WELL PITS
Suggested citation for this web page
WELL PIPING REPAIRS at InspectApedia.com - online encyclopedia of building & environmental inspection, testing, diagnosis, repair, & problem prevention advice.
Or see this
INDEX to RELATED ARTICLES: ARTICLE INDEX to WATER SUPPLY, PUMPS TANKS WELLS
Or use the SEARCH BOX found below to Ask a Question or Search InspectApedia
Ask a Question or Search InspectApedia
Share this article:Search the InspectApedia website
Need to make a private comment? Email editor@inspectApedia.com. We welcome email with your website content critique, corrections, suggestions or questions. Email is monitored daily but our workload may prevent an immediate reply. For immediate results, we hope you'll first try asking your question using the search box just above.
Citations & References
In addition to any citations in the article above, a full list is available on request.
- In addition to citations & references found in this article, see the research citations given at the end of the related articles found at our suggested
CONTINUE READING or RECOMMENDED ARTICLES.
- Carson, Dunlop & Associates Ltd., 120 Carlton Street Suite 407, Toronto ON M5A 4K2. Tel: (416) 964-9415 1-800-268-7070 Email: info@carsondunlop.com. Alan Carson is a past president of ASHI, the American Society of Home Inspectors.
Thanks to Alan Carson and Bob Dunlop, for permission for InspectAPedia to use text excerpts from The HOME REFERENCE BOOK - the Encyclopedia of Homes and to use illustrations from The ILLUSTRATED HOME .
Carson Dunlop Associates provides extensive home inspection education and report writing material. In gratitude we provide links to tsome Carson Dunlop Associates products and services.
 |
HOME | ABOUT | ASK a QUESTION | CONTACT | CONTENT USE POLICY | DESCRIPTION | POLICIES | PRIVACY | |
| © 2026 - 1985 Publisher InspectApedia.com - Daniel Friedman | |||||||||