 Cinderella Incinerating Toilet Installation Details - Topic HOME page
Photo Guide to Details of Steps to Install the Cinderella Toilet
- POST a QUESTION or COMMENT about the installation of incinerating toilets
Here we provide photos and notes giving details of a successful installation of the Cinderella Incinerating Toilet.
This is article #1 of seven articles in this series.
The full list of seven is included just below on this page in our Article Series Contents list.
This article series describes the brands, properties, installation, and maintenance of incinerating toilets - a waterless system for onsite waste disposal where a septic system cannot be installed. Incinerating toilets use electricity or gas to produce heat which literally incinerates the waste.
InspectAPedia tolerates no conflicts of interest. We have no relationship with advertisers, products, or services discussed at this website.
- Daniel Friedman, Publisher/Editor/Author - See WHO ARE WE?
Cinderella Incinerating Toilet Installation Details

Above: the cover of the instruction manual for the Cinderella Comfort incinerating toilet.
The manufacturer provides excellent instruction manuals for the installation of each Cinderella incinerating toilet model. Be sure to obtain and read and follow those instructions. Failure to do so could mean that your installation doesn't work properly or worse, that the installation is unsafe. Always start by reading the instructions.
[Click to enlarge any image]
In this article we provide detailed photos and notes that expand on the manufacturer's instructions to show how we implemented them in a specific case. These added "how to" details explain and illustrate exact details of every step in the installation of an incinerating toilet.
We include a few tricks of the trade that solve special problems such as how to mount a flat vent cover on a curved log exterior wall, and how to set up chimney sections to measure the correct lengths to which you should cut the material.
We also include details on adding additional chimney/vent bracing at the roof edge to solve what in our OPINION was a very wobbly and potentially problematic exterior vent installation.
Article Series Contents
For ease of page loading and reading we have divided the entire incinerating toilet installation procedure into a series of web pages listed below.
If you prefer to have all of this information together in a single printable document simply download CINDERELLA TOILET INSTALLATION INSTRUCTIONS - ALL [PDF]
Cinderella Installation: DELIVERY
- CINDERELLA TOILET: CHOOSE MODEL, INSTALLATION KIT, ACCESSORIES
- CINDERELLA TOILET DELIVERY: CHECK PACKAGING for DAMAGE
- CINDERELLA TOILET DELIVERY: RECORD MODEL & SERIAL NO.
- COLLECT TOOLS & SUPPLIES for TOILET INSTALLATION
Cinderella Installation: LOCATION
Cinderella Installation: CLEARANCES & WALL CUTS
- CHECK INCINERATING TOILET CLEARANCE DISTANCES
- CINDERELLA TOILET VENT OPENINGS: CUT LOCATIONS
- CINDERELLA TOILET CUT VENT OPENINGS - AIR INLET & EXHAUST VENT
Cinderella Installation: AIR INLET & EXHAUST VENT INSTALLATION
- CINDERELLA TOILET HORIZONTAL AIR INLET & EXHAUST VENT PIPE INSTALL
- CINDERELLA AIR INLET PIPE COVER INSTALLATION
- CINDERELLA VENT PIPES: SEAL & INSULATE INSIDE
Cinderella Installation Page - CHIMNEY INSTALLATION Part 1
- CINDERELLA VENT TEE & LOWER VERTICAL CHIMNEY & BRACKETS
- CINDERELLA VENT INSTALL ANGLED CHIMNEY SECTION - PART 1 - ELBOW
- CINDERELLA VENT INSTALL ANGLED CHIMNEY SECTION - PART 2
Cinderella Installation Page - CHIMNEY INSTALLATION Part 2
- CINDERELLA CHIMNEY CLEARANCE FROM ROOF EDGE
- CINDERELLA CHIMNEY ROOFTOP CLEARANCE
- CINDERELLA VENT TOP CHIMNEY SECTION & CAP
- CINDERELLA CHIMNEY TOTAL HEIGHT CHECK
Cinderella Installation Page - FINAL STEPS
- CINDERELLA CHIMNEY TOP BRACKETS / SUPPORTS
- CINDERELLA CHIMNEY BRACKET OFFSET BENDS
- CINDERELLA CHIMNEY PAINT
...
Choose & Order an Incinerating Toilet Model, Fuel or Electrical Supply & Chimney / Vent Installation Plan
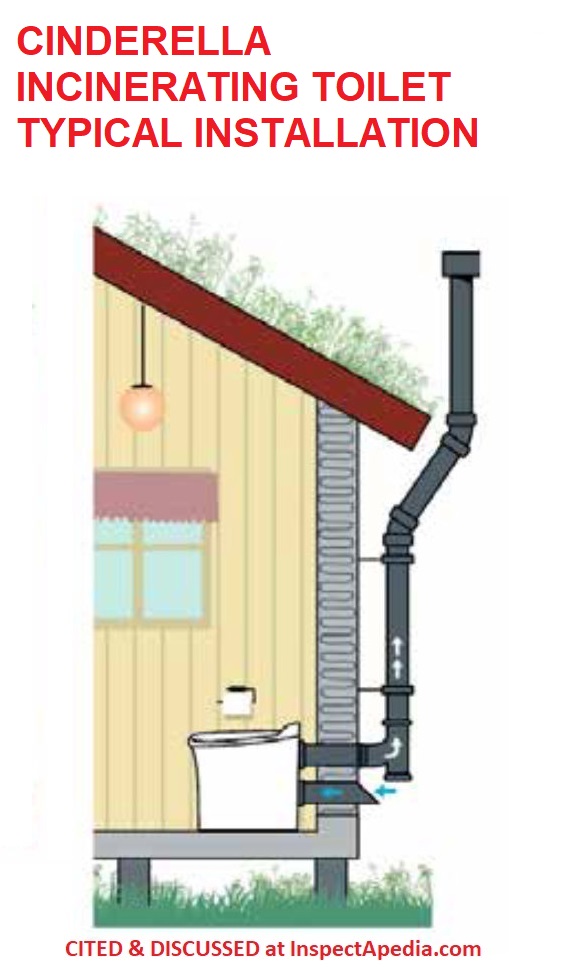
Above: a sketch illustrating the third option listed below: a typical through-wall installation of a Cinderella incinerating toilet showing its air intake and exhaust piping extending outdoors and around the roof overhang.
This is the installation that we illustrate in detail in this article and is appropriate for the Cinderella Comfort model electric incinerating toilet installation that we illustrate in detail on this page.
The company provides instructions for several alternative chimney installations including:
- routing the chimney out through an exterior wall and up through the building roof overhang
- routing the chimney up through the building interior and out through the roof (the toilet will have to be spaced further out from the wall interior surface)
- routing the chimney out through an exterior wall and up with an angled jog to clear the roof overhang.

Notice in the sketch above, adapted from the Cinderella Comfort IO manual, that to develop sufficient draft for the vertical vent to assist the power vent used in the Cinderella Comfort model toilet, the company will specify a minimum total vertical rise (8 ft). as well as specifying a minimum 2 ft. clearance above the roof surface.
At the time of ordering a Cinderella incinerating toilet, you can, and in our opinion usually should, also order the company's installation kit that includes additional parts that you will need to complete the chimney vent system for the toilet.
Be sure to review your installation plan with the company's sales department so that when Cinderella and the installation kit arrive at your home you'll have all of the installation parts needed.
For example, if you are planning to install the toilet vent as illustrated in option #3 just above you will need to add two 45 degree angled pipe elbows to your order.
Watch out: if you are installing the Cinderella Freedom (GAS) toilet model, no bends are allowed: your chimney/vent must be routed straight up from the tee attached to the toilet outlet.
The Cinderella toilet installation kit described and used here includes four chimney vent sections and three threaded rod brackets.
If your chimney installation plan is taking the vent straight up from a tee through the roof or outdoors but without a bend or jog around a soffit that may be all that's needed. To avoid having to penetrate the building roof for this installation we added two angled elbows to permit routing the chimney/vent around the roof overhang.
Cinderella Comfort Order Details
To install, use and maintain the Cinderella toilet described here, we ordered the following:
- Cinderella Comfort toilet
- Vent kit with roof feed
- Ivory electrical receptacle (240VAC)
- 45 degree elbow pair
- Bowl liner holder (steel)
- Maintenance Kit (brush and cleaning equipment including a chimney cleaning brush) illustrated just below

The order total cost was $5,879.22. That seems quite expensive, right?
Well no, not if you compare the cost of the toilet and its installation with the cost of a traditional water-operated toilet that you can buy for under $200. However, to that you have to add the cost of a septic tank and drainfield that typically starts at around $15,000 and can top $30,000 at a difficult site. In addition, you must also add a portion of the cost of a building water supply system to supply the flush toilet with water.
...
Check the Cinderella Toilet Packaging and Contents On Arrival

Notice that the tight strapping used by the freight company has crushed the boxes packaged atop of the Cinderella toilet's main package.
Watch out: at the time of delivery be sure to check all of the packaging of your Cinderella toilet for damage. If you do find damage be sure to contact the company right away.

Above: a deep gouge and rip in the packaging of our Cinderella toilet raised a concern but as you can see below, when we unpacked the unit, other than a minor scuff on the toilet's face, it was undamaged.

...
Unpack Toilet & Record Serial Number
One reason for taking time to record the serial number and model number of your Cinderella toilet now is that once it has been installed it is nearly impossible to read this label without first uninstalling or pulling the toilet away from the wall.

This information is on a sticker on the upper back of the toilet.
Below: contents of the Chimney Installation Package that we ordered along with the toilet itself.
We recommend these parts, though you may not use all of them. For example if your chimney is going to go directly outside and up the outside of the building you won't use the chimney flashing boot.

The four straight lengths of pipe will be more than enough to provide the required minimum chimney height required for the Cinderella toilet.
Watch out: if you plan to install your chimney with a bend around a roof overhang or soffit, you'll need to request two 45 degree angle bends of the same chimney material - shown below.

Watch out: don't forget to follow the instructions to remove the plastic tie strap that secures the ash pan in place.

Simply open the cover at the front of the toilet base by pressing the buttons (under my finger).

Below: removing the plastic tie.
 ...
...
We used a utility knife to cut the strapping

but it was so tight that the easiest way to remove it was by tugging with a pair of pliers.

The power cord for the Cinderella toilet will be strapped to the back of the unit and will simply plug into a wall receptacle.
This is a 240VAC unit that connects to a 240VAC electrical receptacle shown below to the left of the framed-in wall opening through which we'll vent this toilet.
The wall plug is a 15-Amp 250VAC NEMA -15P wall plug. The plug can not be connected to a conventional 120VAC wall receptacle. We'll show the proper wall electrical receptacle later in this article.
...
Collect Necessary Tools & Supplies for Toilet Installation
Below and throughout this article are shown all of the tools you'll need to measure the location of and then cut the round holes needed for air supply and venting for this toilet and to perform other tasks given in the installation instructions. You'll see that we've included the framing square, a try square, a box knife.

To install this toilet you'll need
- A power drill and a 4 3/8" hole saw for vent outlet and air inlet pipes, and if a wall vent is required, a 6 5/8" hole saw as well (not used in this installation).
- A hand or power saw; we used a reciprocating saw to make fast straight cuts through our pipes
- A tape measure and marking pen
- A rasp file to smooth and chamfer pipe edges

We found helpful to have on hand and also used
- A framing square and/or set square and a small C-clamp that we use to clip these together - useful if you need to extend a measurement from the floor to the inner surface of exterior wall sheathing
- Sealant to seal around the wall penetrations outside
- Spray paint if you plan to paint the chimney and vent outside
- Additional chimney brace material: steel plumbing strapping that we will describe below
- Installation kit:
While an experienced installer might purchase wall vent and chimney piping materials elsewhere, for private individuals who are skilled enough to cut holes in a wall, measure and mark cut lines, and assemble a chimney and outdoor chimney support brackets, you'll be fine if you simply add the company's chimney vent installation kit that includes lengths of 4" pipe and chimney support brackets and clamps.
Please continue reading the next article in this series on installing a Cinderella incinerating toilet - the link is just below.
© 2023 - 2024 InspectApedia.com
...
Continue reading at CINDERELLA INCINERATING TOILET INSTALLATION - LOCATION or select a topic from the closely-related articles below, or see the complete ARTICLE INDEX.
Or see these
Recommended Articles
- INCINERATOR TOILET SYSTEMS
- INCINERATOR TOILET CODES
- INCINERATOR TOILET SOURCES & BRANDS
- CINDERELLA INCINERATING TOILET - home
- CINDERELLA INCINERATING TOILET INSTALLATION - you are on this page
- Cinderella Installation: DELIVERY
- Cinderella Installation: LOCATION
- Cinderella Installation: CLEARANCES & WALL CUTS
- Cinderella Installation: AIR INLET & EXHAUST VENT INSTALLATION
- Cinderella Installation Page - CHIMNEY INSTALLATION Part 1
- Cinderella Installation Page - CHIMNEY INSTALLATION Part 2
- Cinderella Installation Page - FINAL STEPS
- CINDERELLA INCINERATING TOILET INSTALLATION [PDF] copy of entire Cinderella installation process
- CINDERELLA INCINERATING TOILET USE GUIDE
- CINDERELLA INCINERATING TOILET CLEANING GUIDE
- ECO-JOHN INCINERATING TOILET
- EcoJohn OPERATING TROUBLES
- INCINERATING TOILET RESEARCH STUDIES
- INCINOLET TOILET
- DESTROILET INCINERATING TOILETS
- STORBURN SCANLET INCINERATING TOILETS
- SUN BIO INCINERATING TOILET
- OTHER INCINERATING TOILET COMPLAINTS
Suggested citation for this web page
CINDERELLA INCINERATING TOILET INSTALLATION - at InspectApedia.com - online encyclopedia of building & environmental inspection, testing, diagnosis, repair, & problem prevention advice.
Or see this
INDEX to RELATED ARTICLES: ARTICLE INDEX to TOILET INFORMATION
Or use the SEARCH BOX found below to Ask a Question or Search InspectApedia
Ask a Question or Search InspectApedia
Share this article:Questions, answers, FAQs, and reader comments about incinerating toilets.
Try the search box just below, or if you prefer, post a question or comment in the Comments box below and we will respond promptly.
Search the InspectApedia website
Note: appearance of your Comment below may be delayed: if your comment contains an image, photograph, web link, or text that looks to the software as if it might be a web link, your posting will appear after it has been approved by a moderator. Apologies for the delay.
Only one image can be added per comment but you can post as many comments, and therefore images, as you like.
You will not receive a notification when a response to your question has been posted.
Please bookmark this page to make it easy for you to check back for our response.
IF above you see "Comment Form is loading comments..." then COMMENT BOX - countable.ca / bawkbox.com IS NOT WORKING.
In any case you are welcome to send an email directly to us at InspectApedia.com at editor@inspectApedia.com
We'll reply to you directly. Please help us help you by noting, in your email, the URL of the InspectApedia page where you wanted to comment.
Citations & References
In addition to any citations in the article above, a full list is available on request.
- Comparing Toilets a brief comparison of Composting, Low-flow, Incinerating, and Chemical Portable toilets from the National Small Flows Clearinghouse nesc.wvu.edu/NSFC/frd-10/alternativetoilets.htm
- In addition to citations & references found in this article, see the research citations given at the end of the related articles found at our suggested
CONTINUE READING or RECOMMENDED ARTICLES.
- Carson, Dunlop & Associates Ltd., 120 Carlton Street Suite 407, Toronto ON M5A 4K2. Tel: (416) 964-9415 1-800-268-7070 Email: info@carsondunlop.com. Alan Carson is a past president of ASHI, the American Society of Home Inspectors.
Thanks to Alan Carson and Bob Dunlop, for permission for InspectAPedia to use text excerpts from The HOME REFERENCE BOOK - the Encyclopedia of Homes and to use illustrations from The ILLUSTRATED HOME .
Carson Dunlop Associates provides extensive home inspection education and report writing material. In gratitude we provide links to tsome Carson Dunlop Associates products and services.
 |
HOME | ABOUT | ASK a QUESTION | CONTACT | CONTENT USE POLICY | DESCRIPTION | POLICIES | PRIVACY | |
| © 2026 - 1985 Publisher InspectApedia.com - Daniel Friedman | |||||||||