
InspectAPedia®FREE Encyclopedia of Building & Environmental Construction, Diagnosis, Maintenance & Repair |
Question? Just ask us! InspectAPedia
|
 Cinderella Incinerating Toilet Installation Details -
FINAL STEPS
Photo Guide to Details of Steps to Install the Cinderella Toilet
- POST a QUESTION or COMMENT about the installation of incinerating toilets
Here we provide photos and notes giving details of a successful installation of the Cinderella Incinerating Toilet.
This is article #7 of seven articles in this series.
The full list of seven is included in the Recommended Articles list at the end of this page.
This article series describes the brands, properties, installation, and maintenance of incinerating toilets - a waterless system for onsite waste disposal where a septic system cannot be installed. Incinerating toilets use electricity or gas to produce heat which literally incinerates the waste.
InspectAPedia tolerates no conflicts of interest. We have no relationship with advertisers, products, or services discussed at this website.
- Daniel Friedman, Publisher/Editor/Author - See WHO ARE WE?
Cinderella Incinerating Toilet Installation Details

Above: the cover of the instruction manual for the Cinderella Comfort incinerating toilet.
The manufacturer provides excellent instruction manuals for the installation of each Cinderella incinerating toilet model. Be sure to obtain and read and follow those instructions. Failure to do so could mean that your installation doesn't work properly or worse, that the installation is unsafe. Always start by reading the instructions.
[Click to enlarge any image]
In this article series we provide detailed photos and notes that expand on the manufacturer's instructions to show how we implemented them in a specific case.
Watch out: We include a few tricks of the trade that solve special problems.
Using just the chimney brackets provided by Cinderella, and without our added support strapping at the roof edge (detailed below and trivially easy), the chimney was as wobbly as all get-out!
We include details on adding additional chimney/vent bracing at the roof edge to solve that fiasco.
We also show how to bend an offset chimney support bracket rod to get around the problem of a window or other obstruction in the vertical path of the chimney.
These added "how to" details explain and illustrate exact details of every step in the installation of an incinerating toilet.
Article Series Contents
Please visit the above link to this topic's home page for a complete list of all the steps included in the installation of a Cinderella incinerating toilet.
For ease of page loading and reading we have divided the entire incinerating toilet installation procedure into a series of web pages listed there.
If you prefer to have all of this information together in a single printable document simply download CINDERELLA TOILET INSTALLATION INSTRUCTIONS - ALL [PDF]
Article Contents
- CINDERELLA CHIMNEY TOP BRACKETS / SUPPORTS
- CINDERELLA CHIMNEY BRACKET OFFSET BENDS
- CINDERELLA CHIMNEY PAINT
...
Install Upper Chimney Support Brackets
Below: the threaded rod chimney vent support brackets provided in the Cinderella installation kit provide a maximum support distance between the center of the vent and the bracket base mounting point of 18 inches.

Below we're cutting the threaded rod to the proper length for our installation. Remember to leave sufficient rod length to thread into both the chimney clamp and the wall mount support hardware.

Below: this Cinderella vent bracket rod has been cut to mount between the roof edge fascia board and the chimney clamp.
This was our shortest bracket but even this one allowed considerable side wobble in the chimney, perhaps worse in an installation where the vent angles through two 45 degree elbows to jog around the roof overhang.

Watch out: in our OPINION these chimney braces using a threaded rod are strong and secure the chimney from movement towards or away from the building, but the chimney was very wobbly from left to right.
We found that even a slight push was enough to set the chimney askew, particularly along its angled elbows.
We didn't think the vent system was going to collapse but to us it looked fragile and when askew, like a sloppy installation that might, over time, compromise the seal of the hub gaskets.
For that reason and to avoid damage that might be caused by windy conditions or prowling bears, we added what is conceptually a stronger angular brace between the chimney and the fascia board.
Below are the tools and supplies you'll need to add a chimney brace against lateral movement.

Important Tip: One of these braces, using steel plumbing strapping, was sufficient to stop any side to side chimney movement.

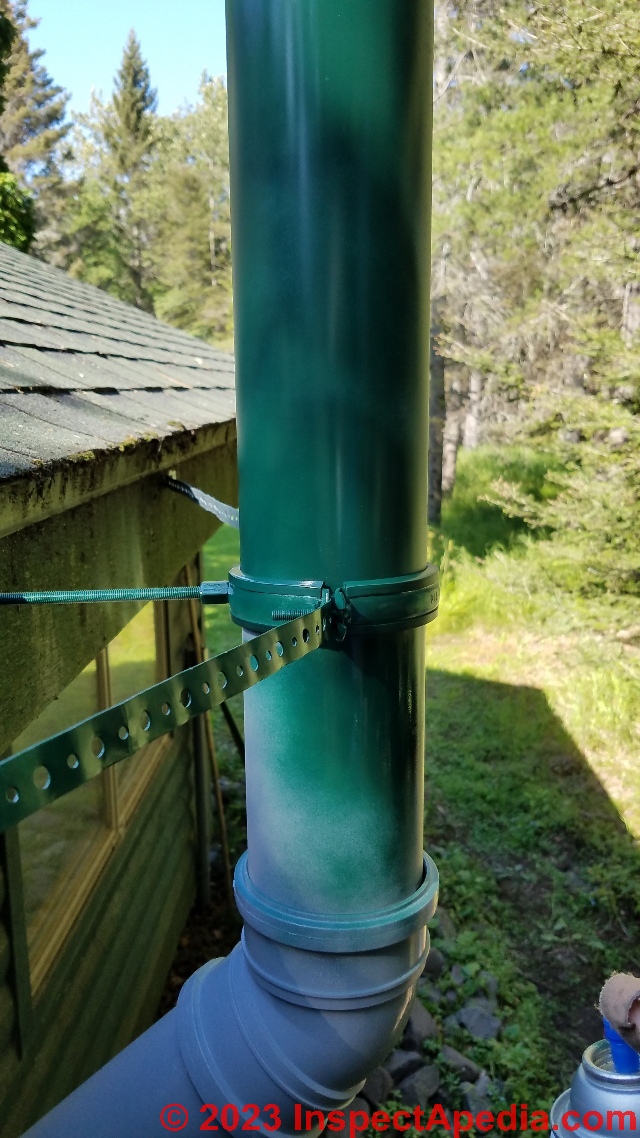
It's easy to integrate the steel plumbing strap support with the OEM chimney bracket, as we show here. Simply dis-assemble the bracket and re-route its tightening screw through the hole in the steel strapping.
I bent over the end of the strapping for neatness and to give good strength against breakage, but kept the length of strapping steel beyond the hole short so that the end fits nicely within the chimney bracket itself.

Below our strapping has been connected to the Cinderella chimney bracket but left loose.
It's critical that you install and adjust the OEM threaded rod chimney brace to the fascia first, setting the chimney plumb before continuing with the add-on steel strapping that will prevent lateral movement of the chimney.

Below: before securing our lateral-movement preventing bracket we make sure that we've got the chimney plumb in both directions.

Then we first tack in place the steel strapping to the fascia board and when we're confident the chimney is still vertical and the strapping snug, we can bolt it in place.
Below, and before final painting, the Cinderella incinerating toilet exhaust chimney and cap and supporting brackets have been installed and the combustion air inlet cover has also been fitted to the building wall.
Note that the chimney installation is completed by a factory-kit-provided top cap or "ventilator cowl" that helps to prevent downdrafts and so assists in effective ventilation.

...
Bending an Off-Set into a Chimney Support Bracket Rod
Below: the two lower threaded rod chimney support brackets were installed as shown. The upper of the two had to be positioned a bit to the left of the chimney's center line where we could bolt it to vertical trim on the building, so we had to bend the rod to accommodate this offset.
The lower chimney support bracket is mounted to horizontal trim and is in direct line with the centerline of the chimney.

Measure the amount of offset needed and simply make a pair of 45 degree angled Zee bends in the threaded rod to achieve that necessary distance - see the bends in the rod above the yellow arrow in our photo.
...
Paint the Cinderella Exhaust Vent & Air Inlet to Match Building Siding

While the manufacturer assures us that the chimney of a Cinderella toilet never reaches high temperatures, we still chose a high temperature spray paint in a color to match the building exterior walls.

Before painting the plastic exhaust venting and inlet vent piping it's important to clean it thoroughly of any surface oil, grease, soap or debris. Otherwise your paint job will fail in short order.
We used alcohol wipes to clean the plastic and metal surfaces before painting.
Below: after painting the materials with a heat-resistant green paint to match the building.
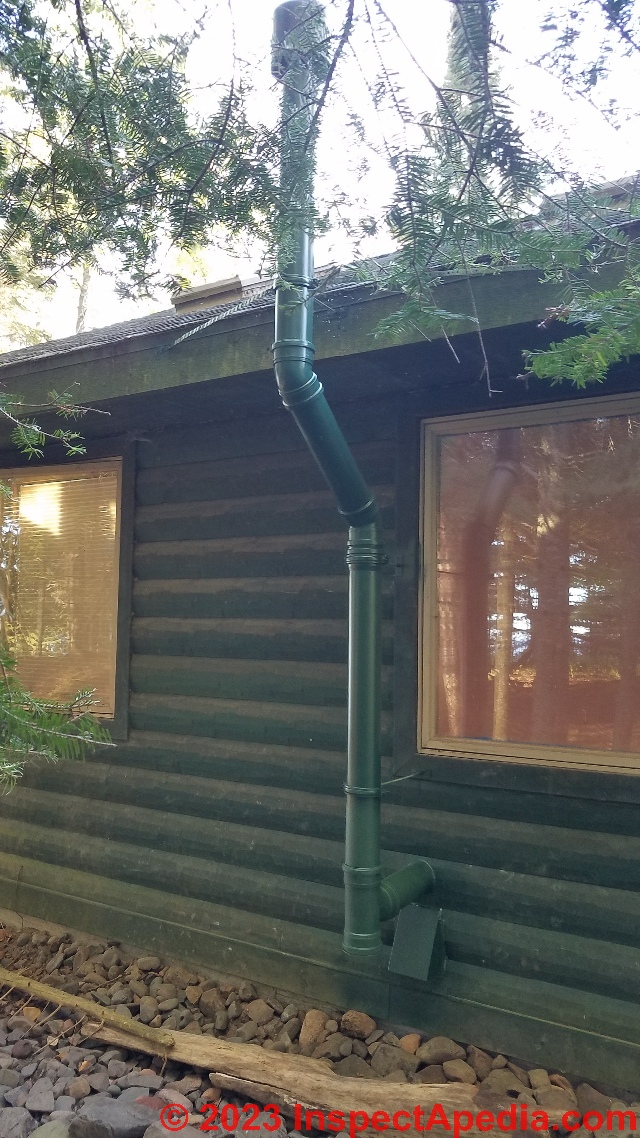
Below: the Cinderella toilet installation is complete, with finished wall surface in place, the toilet is plugged-in and ready for use.

Please continue reading the next article in this series on installing a Cinderella incinerating toilet - the link is just below.
© 2023 - 2024 InspectApedia.com
...
Continue reading at CINDERELLA INCINERATING TOILET USE GUIDE or select a topic from the closely-related articles below, or see the complete ARTICLE INDEX.
Or see these
Recommended Articles
- INCINERATOR TOILET SYSTEMS
- INCINERATOR TOILET CODES
- INCINERATOR TOILET SOURCES & BRANDS
- CINDERELLA INCINERATING TOILET
- CINDERELLA INCINERATING TOILET INSTALLATION - topic home page
- Cinderella Installation: DELIVERY
- Cinderella Installation: LOCATION
- Cinderella Installation: CLEARANCES & WALL CUTS
- Cinderella Installation: AIR INLET & EXHAUST VENT INSTALLATION
- Cinderella Installation Page - CHIMNEY INSTALLATION Part 1
- Cinderella Installation Page - CHIMNEY INSTALLATION Part 2
- Cinderella Installation Page - FINAL STEPS - you are on this page
- CINDERELLA INCINERATING TOILET INSTALLATION [PDF] copy of entire Cinderella installation process
- CINDERELLA INCINERATING TOILET USE GUIDE
- CINDERELLA INCINERATING TOILET CLEANING GUIDE
- ECO-JOHN INCINERATING TOILET
- EcoJohn OPERATING TROUBLES
- INCINERATING TOILET RESEARCH STUDIES
- INCINOLET TOILET
- DESTROILET INCINERATING TOILETS
- STORBURN SCANLET INCINERATING TOILETS
- SUN BIO INCINERATING TOILET
- OTHER INCINERATING TOILET COMPLAINTS
Suggested citation for this web page
CINDERELLA INCINERATING TOILET INSTALLATION - FINAL STEPS - at InspectApedia.com - online encyclopedia of building & environmental inspection, testing, diagnosis, repair, & problem prevention advice.
Or see this
INDEX to RELATED ARTICLES: ARTICLE INDEX to TOILET INFORMATION
Or use the SEARCH BOX found below to Ask a Question or Search InspectApedia
Ask a Question or Search InspectApedia
Questions, answers, FAQs, and reader comments about incinerating toilets.
Try the search box just below, or if you prefer, post a question or comment in the Comments box below and we will respond promptly.
Search the InspectApedia website
Note: appearance of your Comment below may be delayed: if your comment contains an image, photograph, web link, or text that looks to the software as if it might be a web link, your posting will appear after it has been approved by a moderator. Apologies for the delay.
Only one image can be added per comment but you can post as many comments, and therefore images, as you like.
You will not receive a notification when a response to your question has been posted.
Please bookmark this page to make it easy for you to check back for our response.
IF above you see "Comment Form is loading comments..." then COMMENT BOX - countable.ca / bawkbox.com IS NOT WORKING.
In any case you are welcome to send an email directly to us at InspectApedia.com at editor@inspectApedia.com
We'll reply to you directly. Please help us help you by noting, in your email, the URL of the InspectApedia page where you wanted to comment.
Citations & References
In addition to any citations in the article above, a full list is available on request.
- In addition to citations & references found in this article, see the research citations given at the end of the related articles found at our suggested
CONTINUE READING or RECOMMENDED ARTICLES.
- Carson, Dunlop & Associates Ltd., 120 Carlton Street Suite 407, Toronto ON M5A 4K2. Tel: (416) 964-9415 1-800-268-7070 Email: info@carsondunlop.com. Alan Carson is a past president of ASHI, the American Society of Home Inspectors.
Thanks to Alan Carson and Bob Dunlop, for permission for InspectAPedia to use text excerpts from The HOME REFERENCE BOOK - the Encyclopedia of Homes and to use illustrations from The ILLUSTRATED HOME .
Carson Dunlop Associates provides extensive home inspection education and report writing material. In gratitude we provide links to tsome Carson Dunlop Associates products and services.
 |
HOME | ABOUT | ASK a QUESTION | CONTACT | CONTENT USE POLICY | DESCRIPTION | POLICIES | PRIVACY | |
| © 2026 - 1985 Publisher InspectApedia.com - Daniel Friedman | |||||||||