
 How to Replace a Toilet
Step by step procedure to remove an old and install a new toilet
- POST a QUESTION or COMMENT about how to install a toilet
This article describes the procedure we follow to remove an existing but damaged toilet and to replace it with a new toilet. We include tips to avoid plumbing leaks and building damage that can occur if a toilet is cracked, broken, or damaged such that it leaks into the structure.
InspectAPedia tolerates no conflicts of interest. We have no relationship with advertisers, products, or services discussed at this website.
- Daniel Friedman, Publisher/Editor/Author - See WHO ARE WE?
Step by step guide to Install a Replacement Toilet

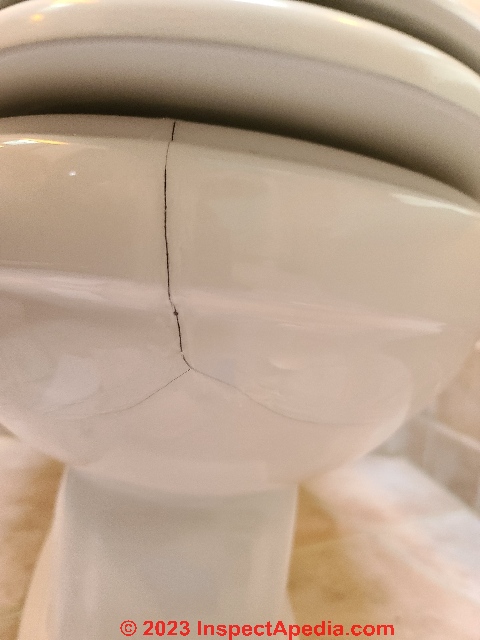
Above: this low profile Kohler toilet bowl, installed in 1998, was cracked, probably by a heavy toilet seat that fell or was slammed down.
[Click to enlarge any image]
A temporary "patch" was made of the crack using silicone (we could have also used epoxy but silicone sealant, if less strong, is also more flexible).
But we know from experience that a cracked toilet may burst or fall apart at any time, perhaps when no one is around to respond to what can be a building flood that in turn results in costly mold or water damage to the structure.
In some cases a cracked toilet might break while someone is sitting on it - risking injury.
The owner agreed that it was time to replace this iffy toilet, selected a replacement model, bought also a toilet mounting kit and new toilet water supply riser, and so was ready for the new toilet to be installed.
9 Steps to Remove an Old Toilet & Prepare for Installing its Replacement

- Turn off the water supply to the toilet (above).
We turn the toilet water control valve clockwise (to the right) to close it, then check it for drips or leaks.
If there is no shut-off to the water supply right at the toilet, you will need to turn off the nearest valve in the cold water line bringing water to the bathroom where the toilet is installed.
 Daniel Friedman at InspectApedia.com")
- Remove all of the water that you can from both the flush tank and from the toilet bowl.

Start by flushing the toilet. Hold the flush lever down so that as much water as possible empties from the toilet's flush tank.
Then you will need to bail the remaining water out of both the toilet's flush tank and the toilet bowl. Remove the toilet tank top and set it aside carefully (often people are looking for hard-to-find toilet tank tops after having broken the original).
We use a flexible paper or plastic cup as a bailer, followed by a sponge or rag.

Bail out the toilet tank first, as it's convenient and fastest to simply dump that water into the toilet bowl (Photos above).
When your plastic or paper cup can't pick up enough water to be sueful, finish bailing out the toilet flush tank by using a sponge.
Squeeze your sponge or rag water directly into the toilet bowl (photos below).

Watch out: the reason we're so fussy about getting all of the water out of the toilet flush tank is that if we leave any water in the bottom of the tank, when we disconnect the toilet water supply riser later the water in the tank is going to spill out onto the floor - making more of a water cleanup chore at a inconvenient time.
When the toilet flush tank is completely empty we can move on to emptying the toilet bowl itself.

I use my sponge as a hand-operated "plunger" to push as much water as I can down the toilet's main drain (photo below).

Then I use the sponge to pick up the small amount of water that I can't push out down the toilet drain and I squeeze that into a nearby bucket or sink or tub for disposal (Photo below).

Watch out: Again, like our effort to remove all of the water from the toilet flush tank, removing all of the water from the toilet bowl means that when we un-bolt the toilet from the floor in preparation to carrying it outside, we won't be sloppng water all over ourselves and the building floor.
- Disconnect the toilet water supply
When the toilet tank and bowl are empty, we can then disconnect the water supply riser to the toilet (photos below).
You'll have a small bit of water that runs out of the riser tube to the toilet, so be prepared with a cup to catch that water or with a towel to mop it up promptly.

If your toilet water supply valve does not shut off fully, you'll see water dripping out of the supply valve opening and you'll need to turn off water at the closest point of cold water supply to this bathroom.

If that's the case, this is a good time to replace the toilet shut-off valve too. That will make future toilet repairs easier and faster.
- Remove any bottom caulk or sealant at the floor
With the toilet now empty of water we're ready to remove it.
If the toilet has been caulked around its base, you'll need to first cut the caulk. I use a utility knife to cut the bead of sealant down to the floor (photos below),

but
Watch out: that works fine if the floor is ceramic tile, but if the floor is vinyl tile you should not use a knife as you may cut flooring that later might be exposed, depending on the dimensions and footprint of the replacement toilet.

Instead use a putty knife to break the glued seal between the sealant bead and the floor surface (photo below).

You may have to make three passes with the putty knife, the last one with the corner of the putty knife extending between the underside of the toilet base and the floor surface (photo below) to completely free the toilet from the floor surface so that once its toilet base bolts or cap nuts have been removed, the toilet can be lifted out of place.

- Remove the Old Toilet mounting cap nuts that bolt the toilet to the floor (or to a metal ring or flange that is attached to the top of the toilet waste pipe)

You'll see that a deep 9/16" socket (or other size) or an adjustable wrench will work to loosen and then unscrew these cap nuts (photos below).

Now with the toilet dry and its sealant removed and its mounting bolt cap nuts removed we are ready to actually lift up the toilet.
- Remove the toilet from the floor by grasping the sides of the bowl and lifting it up off of its mounting bolts.
You might have to rock the toilet gently side to side, because its bottom wax ring is usually quite sticky and may want to hold the toilet "glued" to the waste pipe flange.
Lift the toilet straight up and then set it aside (photo below).

Watch out: immediately stuff a large towel or rage into the waste pipe opening. If you fail to do this, the chances are nearly 100% that you're going to accidentally kick or drop something into the waste pipe where you'll have a devil of a time retrieving it. A washer or a bit of debris might not be a disaster but if you kick your adjustable wrench down the drain you'll be sorry. (Photo below).

- Disassemble the toilet tank from bowl if the toilet is too heavy for you to carry it easily out of the building.

We found that this Kohler toilet was quite heavy so we unbolted the two bolts that mount the tank to the bowl so that we could separate them and carry each half of the toilet (flush tank and bowl) outdoors separately (photos below).

Now carry the toilet parts outside to get them out of the way.
Watch out: don't bring the new toilet into the bathroom yet: we have some preparation work to do first.
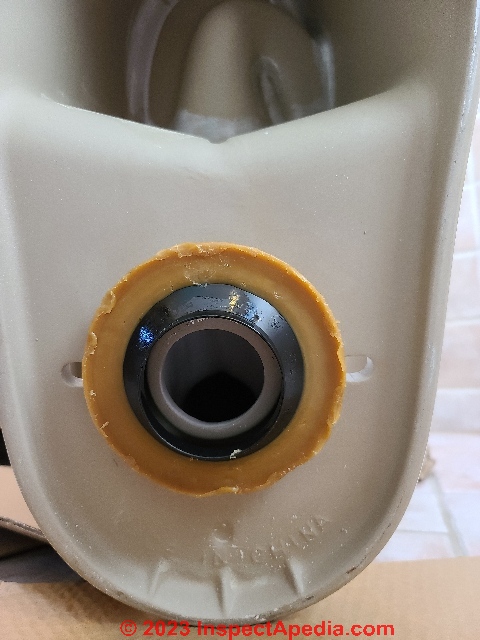
- Clean the floor around the toilet waste pipe and remove any remains of the wax ring that sealed the toilet to the waste pipe opening.
We used Windex glass cleaner but you can also use any household cleaner such as a spray bathroom cleaner to clean the floor surface.

Then, moving our "safety rag" into the center of the drain opening we are ready to remove the wax ring itself (below).

Watch out: don't leave the old wax ring remains in place when installing a new toilet. Too much wax (old ring remains plus new wax ring) can result in squeezing wax into the toilet waste pipe opening, blocking or slowing toilet flush drainage.
We use a putty knife to separate the wax ring from the toilet waste pipe mounting flange. You 'll notice that we have stuffed our rag into the waste pipe opening since this is exactly when otherwise we'd accidentally drop one of those mounting bolts into the toilet drain.

Next we make a final pass at cleaning up the floor around the waste pipe and also we've removed as much wax from the wax ring as we can from the toilet mounting flange.

- Prepare the toilet mounting bolts
If the toilet mounting bolts are in perfect condition you might keep them for re-use.
If the bolts threads are damaged you should remove them (don't drop them into the waste pipe) by sliding them through the slot in the mounting flange to the larger opening that permit the bolt head to pass out. Then put new bolts into their approximate position.

Above: the toilet mounting flange itself has been cleaned of excess wax from the old wax ring toilet seal and the mounting bolts are in their approximate position for re-use with the new toilet.
Notice that this toilet mounting flange has been screwed down through the ceramic tiles and into the subfloor for a more secure mount than is afforded by the simple location of the mounting flange below the flange of the waste pipe itself (those silver colored galvanized Phillips head structural screws). If the flange were damaged we might have to replace it before proceeding.
Those arced slots at the toilet flange bolts permit the bolts to be moved to just where they're needed to seat the new toilet.
Finally we're ready to bring in the new toilet and install it onto the bathroom floor.
11 Steps to Install the New Toilet
- Bring the new toilet and toilet wax ring into the bathroom.
We're going to install a Glacier Bay one-piece toilet, the McClure dual flush model that has a high above floor height to meet current disability access requirements.
[Click to enlarge any image]

- Install the toilet wax ring seal to the toilet base.

Above is our new toilet wax ring: a critical part that seals the toilet to the floor. There are alternative toilet seal products using foam or other materials instead of the traditional sticky wax product. I trust the wax ring.
Toilet wax rings are also sold in extra thick models that may be needed to fit some toilets whose under-surface will be higher above the finish floor.
Toilet sealing wax rings are also sold with or without the round black funnel-shaped insert that you see in our product above. That insert helps direct flushed water down into the waste pipe - a feature offered by the manufacturer to reduce the risk of leaks around the toilet base if the installer doesn't do the best job placing the wax ring and toilet into place properly.
Watch out: read the instructions. If you don't install the toilet wax ring properly, the toilet may leak into the floor, causing costly building damage and even forming a mold or other health risk for building occupants.

The wax ring is to be installed NOT to the floor or waste pipe opening, but rather, it will be pressed onto the underside of the toilet base. This assures that the ring will be positioned properly on the toilet to give a proper seal against leaks each time the toilet is flushed.
Watch out: The bottom of the toilet base must be clean and free of debris - else the wax ring may not seal properly (photo above).

We remove the wrapper from the upper surface of the wax ring and press it carefully around the flush opening in the bottom of the toilet base, then we finish removing the protective wrapper (photo above) so that the underside of the wax ring is bare and ready to have its sticky surface pressed to the toilet waste pipe and flange (photo below).
Watch out: notice that if you're using a wax ring that includes a plastic funnel like feature, that part is installed facing down so that it will insert into the drain opening, NOT up into the toilet.
- Watch out: first remove your stuff -rag from the toilet waste pipe opening. If you forget this detail you'll be really sorry.
Then place the toilet into position over the waste pipe, taking care to set its waste opening and wax ring directly over the waste pipe opening.

...

Watch out: Lift the toilet up, taking care not to set it down on the floor again until you're ready to lower into its proper location, then place the toilet so that the two mounting bolts appear through the holes in the toilet base - that's a clue that you are also placing it properly right over the waste pipe opening.

That cardboard you see under my foot is what we use to set the toilet onto the floor in preparation and to avoid scratching the floor surface with the rough toilet underside.

Above you can see that I'm lowering the toilet so that the mounting bolt is going to pass through the mounting hole. Lower first one side then the second side onto the bolts. That gives you a chance to align each toilet bolt and opening individually.

Above you can see that the toilet mounting bolt is poking up nicely through the toilet base mount opening.
- Center the toilet with respect to the rear wall before installing and tightening the mounting bolt cap screws.
Watch out: don't rush to bolt the toilet into position. Below I'm showing the precision measurement method that I use to center the toilet and square it to the wall: I simply use my finger to feel the gap between wall and the back of the toilet tank at each side of the tank.

I rotate the toilet (do not lift it) gently to right or left so that the gaps are identical between tank and wall at both sides of the toilet.
- Bolt the toilet in place - gently.
Notice that before installing the cap nut to the toilet mount bolt we install a new factory-provided plastic snap washer that will hold in place the plastic dome that will cover the cap bolt, and atop that we install a metal washer against which the cap nut will be tightened (photos below).

I'm using the plastic snap washer, metal washer, and cap nut but not those new toilet bolts as the old ones were in perfect shape and already in place.

Below you can see the plastic snap ring (be sure to place it right-way up or it won't hold the plastic dome in place), and the metal washer, and the cap bolt all in place on the toilet mounting bolt.

I start the toilet bolt cap screws by hand, then using hand pressure only, I use a deep socket of the right size to snug down the cap nuts just hand tight.
Watch out: do not over-tighten the toilet mounting bolt cap screws or you risk breaking the toilet base - a very expensive mistake.

Check that the toilet has been installed level on the floor, and stop there.
- Connect the toilet water supply riser & check for leaks

Screw the small end of the toilet water supply riser to the toilet supply valve (we use an adjustable wrench) and the larger (white nut) by hand to the underside of the toilet tank.
The contemporary flexible stainless-steel jacketed toilet risers are sold in various lengths: buy one that's as short as fits, or a bit longer - this one makes a partial loop as it passes up to the toilet tank. Too long, too many loops risks kinking and poor water flow into the toilet.

Don't over-tighten these fittings lest you cause damage, but snug them up hand tight, taking care not to cross-thread your fittings (or they'll leak)
and then wipe the connections thoroughly dry so that you can

Turn on the water supply to the toilet (below)

check for leaks (photo below). If there's a small leak, you should be able to stop it by gently tightening the fitting a bit more.

- Prepare / Install the toilet flush tank top

As this is a dual-flush toilet, some assembly was required to install the push-button assembly into the top of the toilet cistern (tank) lid.

I use a bit of silicone spray to ease the installation as the mounting washer has to rotate against a rubber or plastic gasket surface.

The plungers on the dual flush buttons are adjustable in length. Their ends push down flush control surfaces that are already factory-mounted inside the toilet tank. If the flush water is inadequate, these can later be adjusted (to push down further by making the plunger longer). I found no adjustment was needed for this toilet installation.
- Install the Toilet Seat
If it was not already factory-installed, mount the toilet seat to the toilet base using the (usually plastic) seat bolts and mounting nuts (photos below).

Before snugging the toilet seat bolts up tight (by hand), center the seat on the toilet bowl (photo below).
Watch out: again, these fittings should be made just hand tight, to avoid damaging or breaking the toilet base.

If you have trouble with the toilet seat, see details at
TOILET SEAT / SEAT-LID REPLACEMENT & BOLT SPREADS
- Test flush the toilet
With the toilet fully assembled, flush the toilet and observe that the bowl empties properly and the flush tank refills properly.

The toilet should flush cleanly (try flushing some toilet paper if you want to get fancy) and refill adequately. You should see no water leaking out around the toilet base.
If the flush is inadequate, you may need to adjust the tank fill level or the dual flush push button plungers.
If you're having trouble see details
- Use sealant around the toilet base at the floor
Since we're not over-tightening the toilet mounting bolt cap screws (to avoid breaking the toilet), there is some risk that the toilet might wobble or be turned from its position on the floor by careless (or normal) toilet users. But it's easy to avoid trouble here.

I use a bead of sealant, silicone caulk that's white or color-matched to the toilet or to the floor, both as an "insurance policy" against leaks and more importantly (since my wax ring seals don't leak), this sealant "glues" the toilet to the floor.
- Place a "DO NOT USE" sign on the toilet temporarily

We left a note on the toilet that it was not ready for use, to allow our sealant to dry and harden overnight. Then when we removed the warning note, we were confident that the toilet would not move out of position on the floor.
By morning your new, perfectly installed dual-flush toilet is ready for use.
...
Continue reading at TOILET INSTALLATION PROCEDURE - Clearances, Spacing & Other Guidelines, or select a topic from the closely-related articles below, or see the complete ARTICLE INDEX.
Or see these
Recommended Articles
- TOILETS, INSPECT, INSTALL, REPAIR - home
- FLUSHOMETER VALVES for TOILETS URINALS
- LEAKY TOILET SEAL REPAIR
- LOOSE TOILET REPAIRS
- LOW WATER USAGE / POWER FLUSH TOILETS
- TOILET DESIGN CHOICES
- TOILET CLEARANCE DISTANCES
- TOILET CLOG REPAIR, UN-BLOCK
- TOILETS, DON'T FLUSH LIST - home
- TOILET FLUSH OPERATION
- TOILET FLUSH HANDLE LEVER REPLACEMENT
- TOILET INSTALLATION PROCEDURE
- TOILETS, DON'T FLUSH LIST
- TOILET FLUSHES POORLY
- TOILET LEAK CATASTROPHES
- TOILET OVERFLOW EMERGENCY
- TOILET PLUGS, SEWER BACKUP
- TOILET REPLACEMENT PROCEDURE
- TOILET RUNS CONTINUOUSLY
- TOILET SEAT / SEAT-LID REPLACEMENT & BOLT SPREADS
- TOILET TANK / CISTERN LID REPLACEMENTS
- TOILET TANK SWEATS
- TOILET WON'T FLUSH
- WATER DAMAGED BATHROOM FLOOR REPAIR
- TOILET TYPES, CONTROLS, PARTS - home
Suggested citation for this web page
TOILET REPLACEMENT PROCEDURE at InspectApedia.com - online encyclopedia of building & environmental inspection, testing, diagnosis, repair, & problem prevention advice.
Or see this
INDEX to RELATED ARTICLES: ARTICLE INDEX to TOILET INFORMATION
Or use the SEARCH BOX found below to Ask a Question or Search InspectApedia
Ask a Question or Search InspectApedia
Share this article:Try the search box just below, or if you prefer, post a question or comment in the Comments box below and we will respond promptly.
Search the InspectApedia website
Note: appearance of your Comment below may be delayed: if your comment contains an image, photograph, web link, or text that looks to the software as if it might be a web link, your posting will appear after it has been approved by a moderator. Apologies for the delay.
Only one image can be added per comment but you can post as many comments, and therefore images, as you like.
You will not receive a notification when a response to your question has been posted.
Please bookmark this page to make it easy for you to check back for our response.
IF above you see "Comment Form is loading comments..." then COMMENT BOX - countable.ca / bawkbox.com IS NOT WORKING.
In any case you are welcome to send an email directly to us at InspectApedia.com at editor@inspectApedia.com
We'll reply to you directly. Please help us help you by noting, in your email, the URL of the InspectApedia page where you wanted to comment.
Citations & References
In addition to any citations in the article above, a full list is available on request.
- In addition to citations & references found in this article, see the research citations given at the end of the related articles found at our suggested
CONTINUE READING or RECOMMENDED ARTICLES.
- Carson, Dunlop & Associates Ltd., 120 Carlton Street Suite 407, Toronto ON M5A 4K2. Tel: (416) 964-9415 1-800-268-7070 Email: info@carsondunlop.com. Alan Carson is a past president of ASHI, the American Society of Home Inspectors.
Thanks to Alan Carson and Bob Dunlop, for permission for InspectAPedia to use text excerpts from The HOME REFERENCE BOOK - the Encyclopedia of Homes and to use illustrations from The ILLUSTRATED HOME .
Carson Dunlop Associates provides extensive home inspection education and report writing material. In gratitude we provide links to tsome Carson Dunlop Associates products and services.
 |
HOME | ABOUT | ASK a QUESTION | CONTACT | CONTENT USE POLICY | DESCRIPTION | POLICIES | PRIVACY | |
| © 2026 - 1985 Publisher InspectApedia.com - Daniel Friedman | |||||||||