
 Toilet Flush Handle & Lever Replacement
Step-by-step how-to remove the old and install a new toilet flusher
This article describes the steps in replacing the handle and lever assembly that flushes a conventional front-handle or side-handle flush toilet.
InspectAPedia tolerates no conflicts of interest. We have no relationship with advertisers, products, or services discussed at this website.
- Daniel Friedman, Publisher/Editor/Author - See WHO ARE WE?
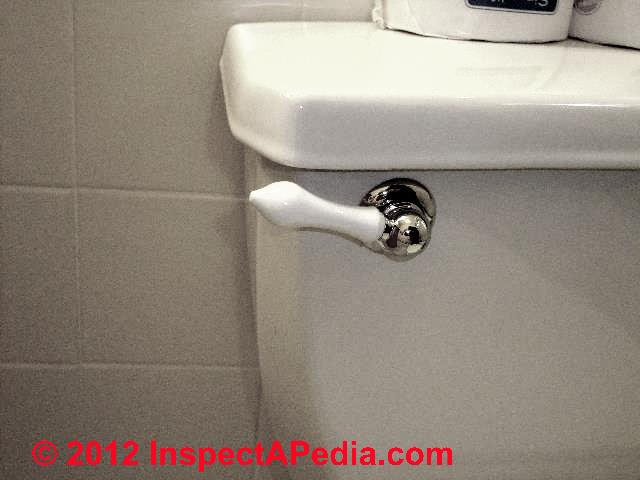
How to replace a Toilet Flush Handle & Lever
 How do I change the flush mechanism on my toilet?
How to change side low flush mechanis? 2021/02/02 Eugene Nalli
Moderator reply: here are the steps in replacing a toilet flush handle and lever
Eugene:
At TOILET FLUSH HANDLE LEVER REPLACEMENT [this page] we describe to replace a toilet flush handle and lever.
Separately at TOILET FLUSH OPERATION & REPAIR you'll see a description of how toilet flush mechanisms work and an illustration of the major parts and assemblies of a flush toilet..
If all you need to do is replace the flush lever itself and the flush handle, those are simple bolt-on parts that are pretty generic across toilets, or, of course, you can buy from the manufacturer of your specific toilet brand and model.
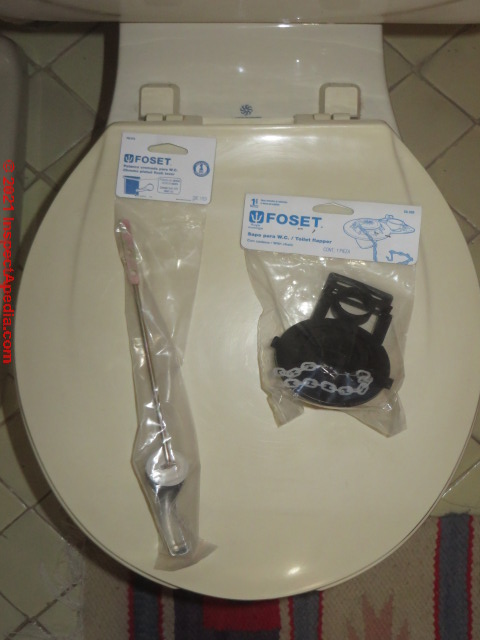
Below we show a toilet tank flush lever and arm replacement kit from Fluidmaster; because the length of the flush lever is adjustable this flush lever will work on most toilets.
The procedure to replace the flush lever assembly is simple, except for taking note that on some designs the threads may be reverse to standard - so take note, when un-bolting the lock nut on the lever, to be sure you are actually loosening it.
- Before buying a new toilet flush handle and lever assembly
take a look at your specific toilet, as a few, especially low-profile side-mount flush handles may be manufacturer and model specific while on most toilets a generic lever will fit.
What I do is remove the old flush lever assembly and take it to my building supplier so that I can compare it with replacement options available there
TIP: this is a great time to replace the flush valve flapper itself with a new one - an inexpensive part that helps insure a good seal between valve and toilet cistern. Details of how to do that are in this article series. So you might want to buy a new flush valve or “flapper” at the same time as buying the replacement toilet flush handle assembly.
If your existing flush valve handle and arm assembly works only on the left or right side of the toilet, match that LEFT or RIGHT side mount when you buy the replacement flush lever assembly
- To remove the old flush handle:
first remove the toilet tank lid and set it aside.
Watch out: Set the toilet tank lid on a safe surface - I put it on a towel on the floor - since if you drop and break it the toilet flush handle replacement will suddenly become a more odious repair job.
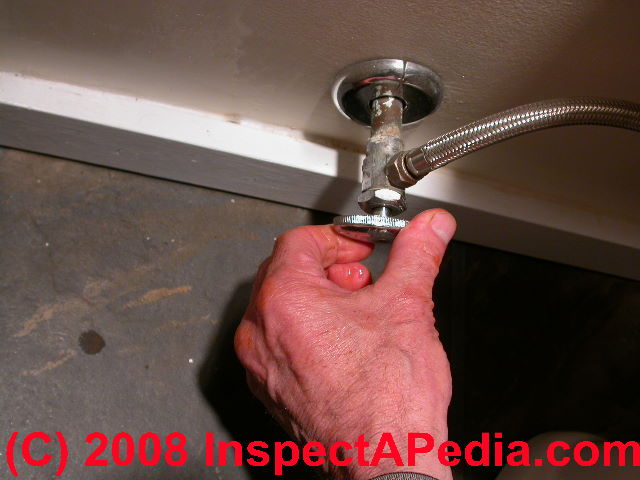
TIP: this whole job will be easier if you work with a toilet tank that has been emptied. That means
- turn off the water valve supplying water to the toilet [Photo below]
- flush the toilet and hold the flush lever down or hold the flapper valve up inside the tank to drain it as fully as possible
...
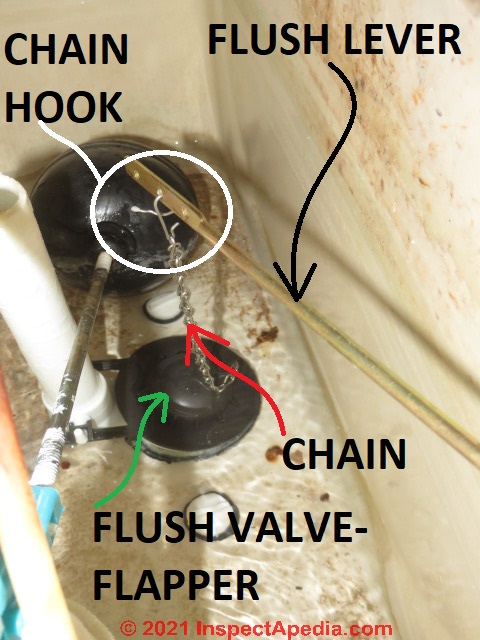
- Disconnect the flush lever arm from the flush valve pull chain (in some toilets it’s a plastic strap)
Inside the toilet cistern (tank) you'll see an arm attached to the flush lever and near the end of the arm a chain connected to it - the chain lifts the flush valve when, by pushing the toilet flush lever down its arm lifts inside the cistern. You'll want to disconnect the chain from the end of the flush lever.
Watch out: before disconnecting the flush valve lift chain, make a note of its length so that when you re-assemble the chain to the new lever on the new toilet flush handle the length of the chain and thus the lift of the flush valve will be correct.
A common SNAFU in repairing toilets is leaving the chain too long - causing inadequate lift and inadequate flush, or making it too short - causing the flush valve flapper to not close fully that in turn means the toilet will run forever;
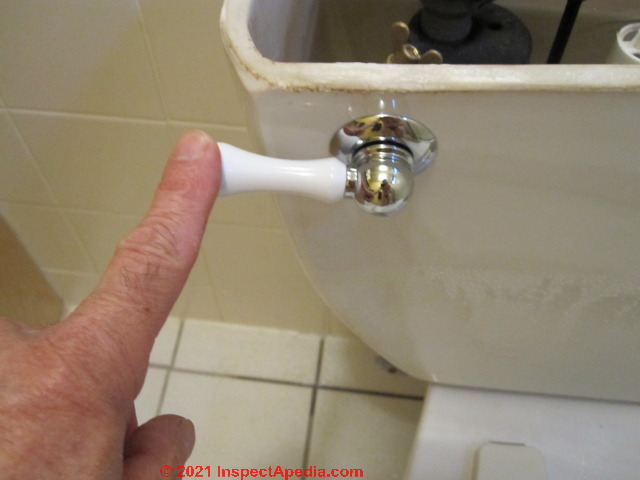
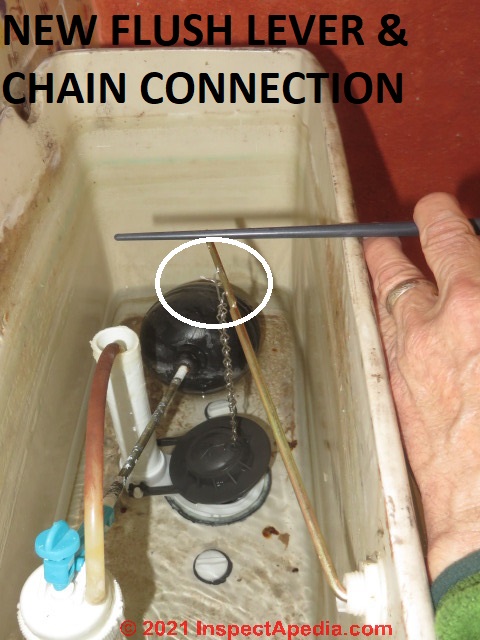
Watch out: also notice just how far along the length of the flush lever, from the center of the flush valve towards the end of the lever the lift chain or strap was connected. You’ll want to connect the new flush lever to the lift chain at about the same point along the length of the new lever.
In my photo above we see that the chain is hooked to the center of three holes (white circle) along the length of the flush arm. On your replacement flush arm assembly you may need to adjust the arm length to match the old part.
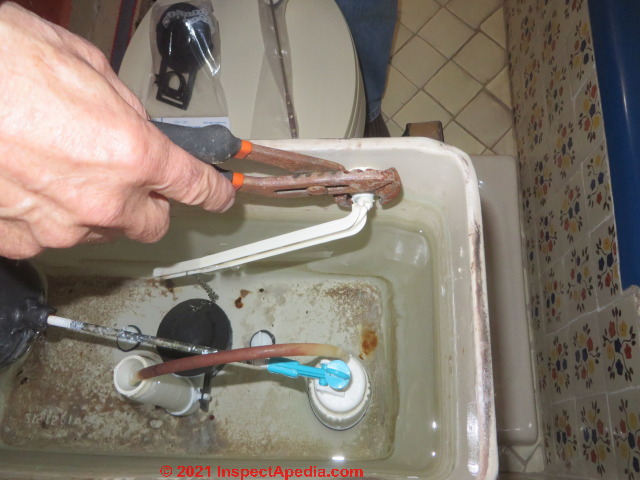
Above: using slip joint pliers to loosen the toilet flush lever lock nut inside the toilet flush tank.
Watch out: often the threads on this lock nut are reversed from usual screws or bolts. On this part turn the nut to the right to loosen it.
Below:
- Unscrew the toilet flush lever mounting nut and slide it over the flush arm so that you can then remove the whole flush lever assembly from the toilet tank.
Watch out: most toilet lever mounting nuts are "reverse-threaded" so you turn the nut to the RIGHT (clockwise) to LOOSEN it (opposite of standard) .
TIP: the flush valve or flapper itself should be in the closed position when working on the toilet tank. That way if you drop the flush lever nut, or a washer or other part into the tank it won't be lost.
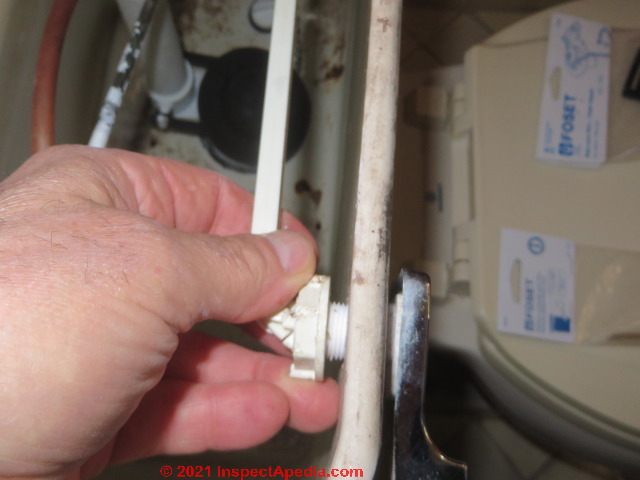
Above and below: remove the lock nut (seen in the upper photo) and insert the flush lever arm through the opening in the toilet tank (below)
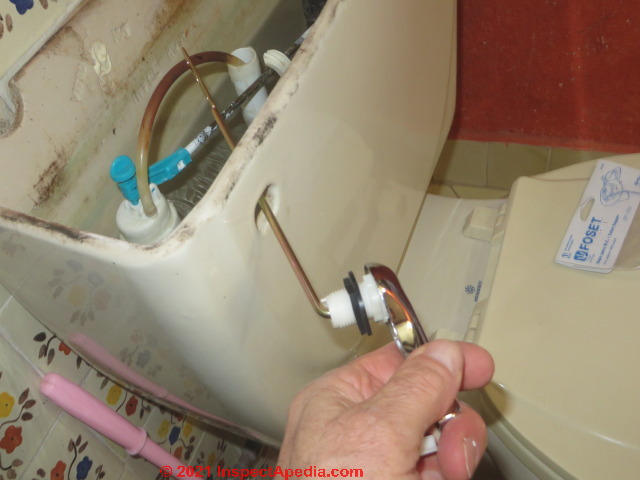
- Insert the new toilet flush handle into the hole of the toilet cistern, positioning it in the cistern opening so that its plastic or metal body orients the handle properly.
Usually the mounting hole in the toilet tank is a rectangle or triangle that prevents the whole assembly from rotating on the tank.
Most replacement toilet flush handles and levers will work on either left or right side of the toilet cistern or tank by simply flipping the handle over, BUT not all: some will be marked as LEFT-SIDE or RIGHT-SIDE.
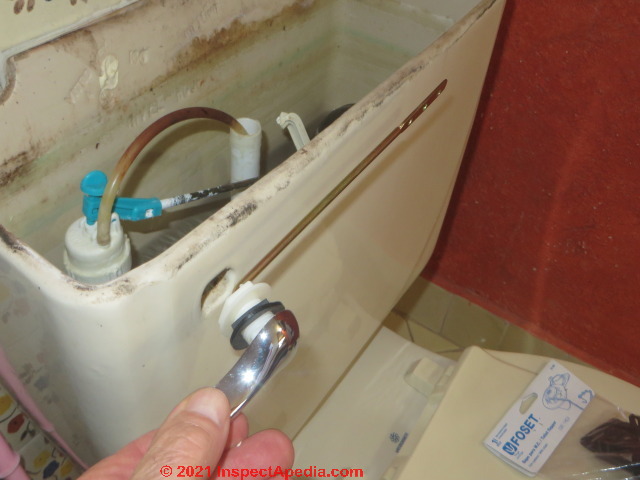
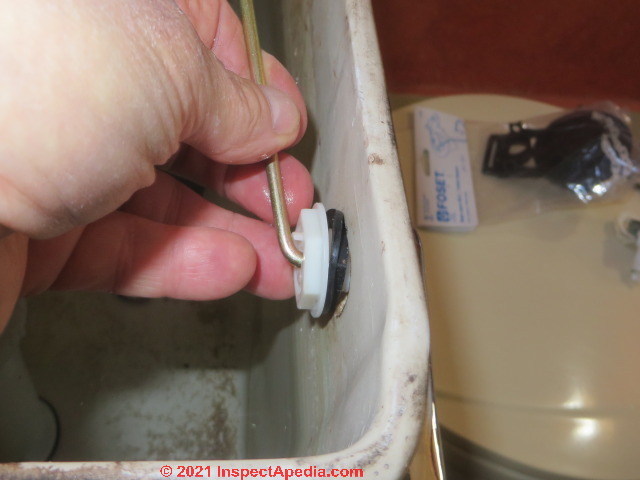
Above: insert the washer and lock nut over the end of the toilet flush lever arm and slide it up and around the bend in the arm so that you can screw the lock nut onto the threads of the toilet flush lever body.
Really? rubber washer can mount on either side of the wall of the toilet flush tank. I prefer to put it on the inside, as shown in my photo below.
Below: tighten the lock nut and washer against the inside of the toilet cistern or flush tank.
- Slide the mounting nut over the flush lever and onto the threaded body of the flush lever assembly and tighten it.
Most are reverse threaded so you’ll turn LEFT to TIGHTEN - opposite of the usual direction.
Watch out: DO NOT over-tighten the mounting nut; doing so risks cracking the toilet cistern or tank - leading to a far more costly repair. Tighten it just enough that the flush lever is secure on the tank side.
 ...
...
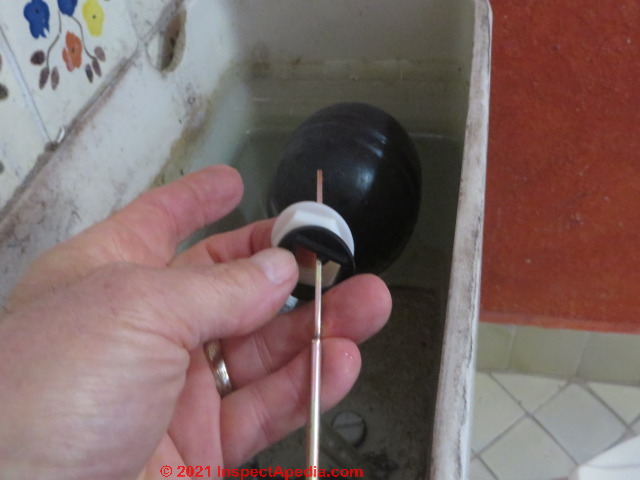
- Connect the flush valve lift-chain or strap to the proper position along the flush lever arm as I described earlier.
Watch out: if you leave too much slack in the flush valve lift chain, the chain may get caught under the flush valve lip when the valve tries to close: the result will be a constantly running toilet.
In my photo I'm holding a tool about level with the top of th toilet cistern, figuring that the flush arm is going to lift just a bit higher than this when the toilet tank lid is installed. I wanted to see how far the chain would open the flapper valve (black flush valve).
Watch out: also if there is too much slack in the flush valve chain the flush arm won't open the flapper high enough, and the toilet flush volume will be too small and the duration too brief.
I like the length of the pull chain to be as short as I can make it while leaving just enough slack that there is no danger of causing the flush valve to remain open.
Watch out: but if the flush chain is too tight the flush valve may not seat fully - if the chain and flush lever hold the flapper open - and the toilet will run continuously.
It's trivially easy to adjust the length of the flush chain - just change the point at which the hook, used to connect chain to flush arm, is connected into links in the chain. - Turn water back on & test the toilet flush operation
With the flush valve installed and chain re-connected, open the toilet water supply valve and allow the toilet cistern (tank) to re-fill.
Then test the flush to be sure that the valve opens, allows the toilet to flush adequately, and then closes neatly.
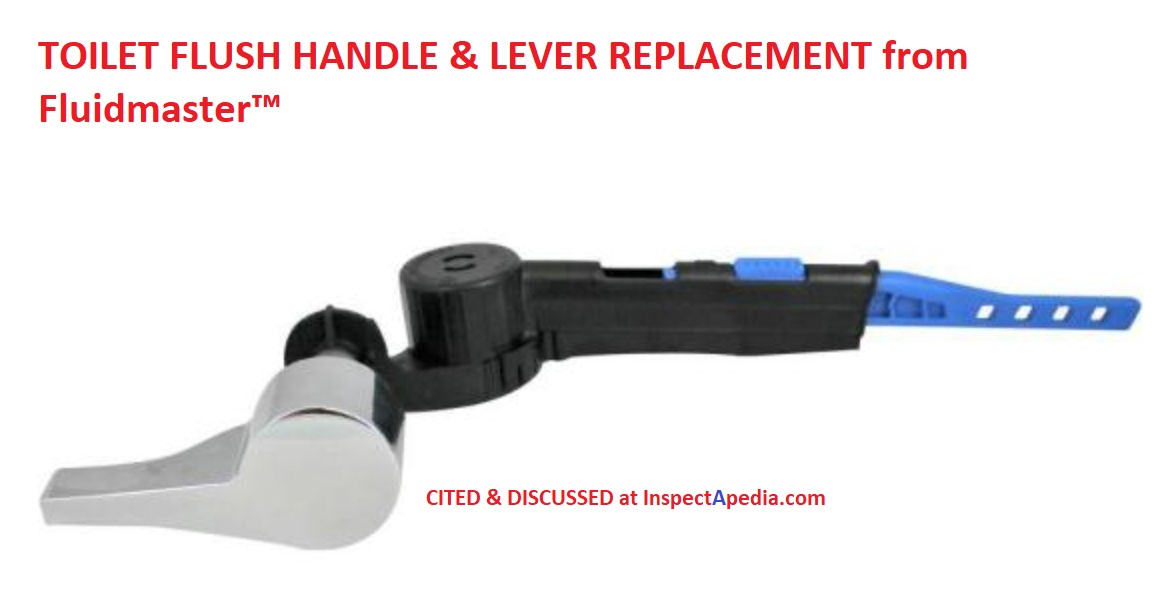
Below: a replacement toilet flush handle and lever replacement from Fluidmaster™.
Home Depot provides a nice simple illustrated sequence of steps in HOW TO REPLACE A TOILET FLUSH HANDLE & LEVER [PDF] retrieved 2021/02/02 original source: Home Depot at www.homedepot.com/c/ah/how-to-replace-a-toilet-handle/9ba683603be9fa5395fab901192bbc6a
...
...
Continue reading at TOILETS, INSPECT, INSTALL, REPAIR - home, or select a topic from the closely-related articles below, or see the complete ARTICLE INDEX.
Or see these
Recommended Articles
- CLOGGED DRAIN DIAGNOSIS
- FLUSHOMETER VALVES for TOILETS URINALS
- TOILET FLUSH OPERATION & REPAIR - how toilet flush mechanisms work & illustration of the major parts & assemblies of a flush toilet..
- TOILET FLUSH VOLUME - how to adjust the water volume or flush strength
- TOILET FLUSHES POORLY - clogs or inadequate flush volume or poor venting
- TOILETS, INSPECT, INSTALL, REPAIR - home - this toilet buy, install or repair guide article series discusses the cause, diagnosis, and repair of toilet problems (water closet problems) such as a toilet that does not flush well, clogged toilets, slow-filling toilets, running toilets, loose wobbly toilets, and odors at leaky toilets.
- TOILET OVERFLOW EMERGENCY - how to stop an overflowing toilet
- TOILET RUNS CONTINUOUSLY - fix or replace the flush valve or adjust the flush lever chain
- TOILET SEAT / SEAT-LID REPLACEMENT & BOLT SPREADS
- TOILET TANK / CISTERN LID REPLACEMENTS
- TOILET TANK SWEATS
- TOILET TYPES, FLUSH METHODS variations in toilet flush mechanisms & methods
- TOILET WON'T FLUSH
Suggested citation for this web page
TOILET FLUSH HANDLE LEVER REPLACEMENT at InspectApedia.com - online encyclopedia of building & environmental inspection, testing, diagnosis, repair, & problem prevention advice.
Or see this
INDEX to RELATED ARTICLES: ARTICLE INDEX to TOILET INFORMATION
Or use the SEARCH BOX found below to Ask a Question or Search InspectApedia
Ask a Question or Search InspectApedia
Share this article:Try the search box just below, or if you prefer, post a question or comment in the Comments box below and we will respond promptly.
Search the InspectApedia website
Note: appearance of your Comment below may be delayed: if your comment contains an image, photograph, web link, or text that looks to the software as if it might be a web link, your posting will appear after it has been approved by a moderator. Apologies for the delay.
Only one image can be added per comment but you can post as many comments, and therefore images, as you like.
You will not receive a notification when a response to your question has been posted.
Please bookmark this page to make it easy for you to check back for our response.
IF above you see "Comment Form is loading comments..." then COMMENT BOX - countable.ca / bawkbox.com IS NOT WORKING.
In any case you are welcome to send an email directly to us at InspectApedia.com at editor@inspectApedia.com
We'll reply to you directly. Please help us help you by noting, in your email, the URL of the InspectApedia page where you wanted to comment.
Citations & References
In addition to any citations in the article above, a full list is available on request.
- In addition to citations & references found in this article, see the research citations given at the end of the related articles found at our suggested
CONTINUE READING or RECOMMENDED ARTICLES.
- Carson, Dunlop & Associates Ltd., 120 Carlton Street Suite 407, Toronto ON M5A 4K2. Tel: (416) 964-9415 1-800-268-7070 Email: info@carsondunlop.com. Alan Carson is a past president of ASHI, the American Society of Home Inspectors.
Thanks to Alan Carson and Bob Dunlop, for permission for InspectAPedia to use text excerpts from The HOME REFERENCE BOOK - the Encyclopedia of Homes and to use illustrations from The ILLUSTRATED HOME .
Carson Dunlop Associates provides extensive home inspection education and report writing material. In gratitude we provide links to tsome Carson Dunlop Associates products and services.
 |
HOME | ABOUT | ASK a QUESTION | CONTACT | CONTENT USE POLICY | DESCRIPTION | POLICIES | PRIVACY | |
| © 2026 - 1985 Publisher InspectApedia.com - Daniel Friedman | |||||||||