 Leaky Oil Tank Filler or Vent Piping Repair Procedures
Diagnose & repair leaky oil storage tank fill or vent pipe
- POST a QUESTION or COMMENT about how to diagnose & repair leaks at the oil tank fill or vent pipe
Oil tank leaks at the fill or vent piping:
This article discusses the causes of leaks at oil tank fill or vent piping, what the leak and other hazards are, and what to do about oil tank piping leaks.
We explain what to do about leaky oil tank vent or filler piping; oil tank piping sources of leaks and oil odors or smells.
We illustrate the places where both minor and more significant oil leaks can occur and we describe and illustrate how to repair those leaks using any of several methods ranging from trivial leak control (using a rag) to permanent leak repairs using an epoxy sealant or by re-making the pipe joints using an oil-resistant pipe thread joint sealant compound.
We give examples of stopgap and then permanent measures to control small oil tank fill and vent pipe leaks, permanent oil seepage leak repairs using epoxy, and proper oil tank piping repairs by re-making the pipe joints using a proper thread sealant.
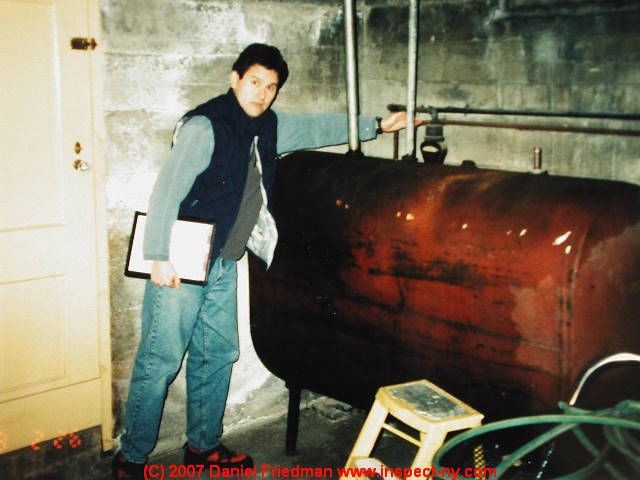
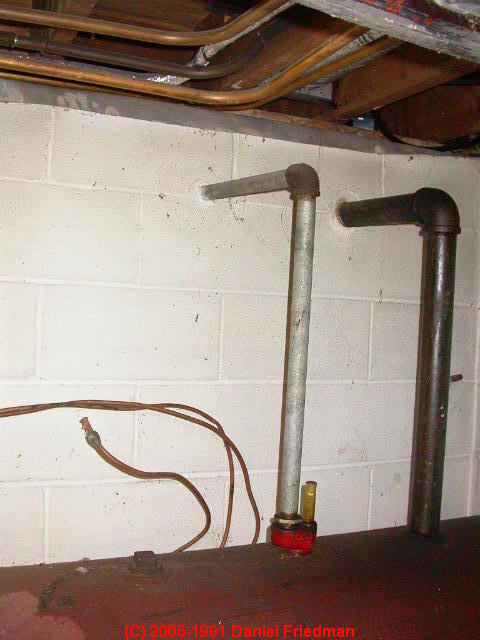
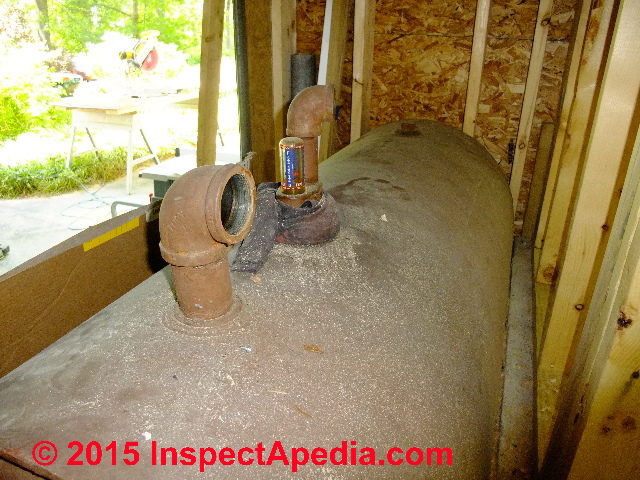
Page top photo: fill and vent pipes at an aboveground oil tank.
InspectAPedia tolerates no conflicts of interest. We have no relationship with advertisers, products, or services discussed at this website.
- Daniel Friedman, Publisher/Editor/Author - See WHO ARE WE?
Why Oil Storage Tank Piping Leaks & How to Fix Leaky Oil Storage Tank Filler or Vent Piping

This article discusses the causes & cures of leaks at the oil storage tank fill or vent pipes.
It is very common for there to be leakage around the oil filler pipe or vent pipe where they are connected to the top of an oil tank.
[Photo just above].
If the tank is buried these leaks may go undetected for some time, but on an above ground oil tank, inside or outside, the seepage is quickly visible and also can be smelled by most owners shortly after an oil delivery.
Article Contents
- OIL FILL / VENT PIPE LEAK CAUSES
- OIL FILL / VENT PIPE SMALL LEAK REPAIR
- OIL FILL / VENT PIPE BIG LEAK REPAIR
A separate article found
at OIL SUPPLY LINE PIPING LEAKS
discusses leaks in the smaller-diameter piping between the oil storage tank and the oil burner(s) it serves.
Diagnose the Causes of Oil Tank Fill or Vent Pipe Leaks
Here are reasons for the leakage at the oil tank fill and vent piping or at the oil tank gauge.
Heating oil leak problems at oil tank fittings and pipe threads
The pipe threads (NPT) which are cut into an oil tank top tapping intended to accept the filler pipe or vent pipe are not precisely machined - they are a bit rough.
So are the threads on most large-diameter iron piping used to screw into the tapping.
Having installed a few of these, we can testify that it requires some very careful workmanship to make a leak-tight joint, combining cleaning of the threads, use of a high quality pipe dope rated for use on petroleum products, and turning the pipe into the tapping with sufficient force to seal it without damaging threads.
In sum, often the connection is simply not very tight.
Because disassembling and re-assembling oil tank fill and vent pipes can be a chore, especially where those pipes are partly buried or where they are cemented into a foundation wall, people often live with these oil tank seeps and leaks until the oil leaks become more than a small nuisance.
Below we describe in-place efforts to seal such leaks using a combination of cleaning and surface sealant epoxy.
Heating oil leak problems due to pressurized oil storage tank fill procedures
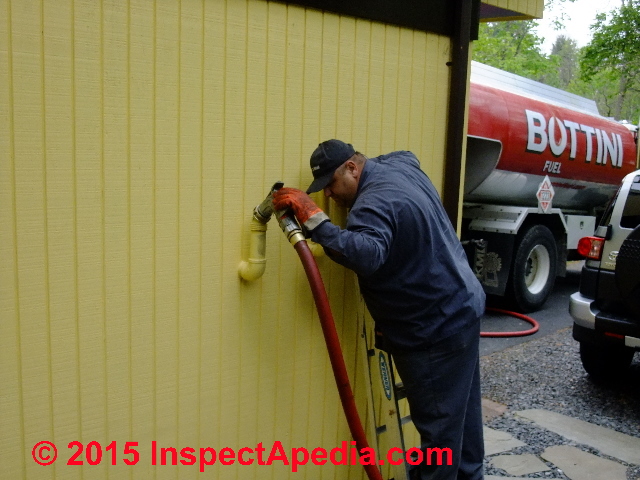 In the mind of the installer, "What the hey, after all, the tank is just going to be at atmospheric pressure and filled by gravity from above, right?"
Wrong. Oil companies recognize that the time needed to complete an oil delivery is part of their profit or loss picture. Modern oil delivery trucks are designed to pump heating oil into the tank under pressure in order to speed the delivery process.
At a recent oil delivery we filmed and timed the oil tank fill process.
The delivery driver (Bottini Oil December 2017) pumped 225 gallons of heating oil into a nearly empty oil tank in a bit over four minutes. That was fill rate of about 50 gpm. Some delivery trucks pump oil at up to 70 gpm.
Photo: the Bottini oil delivery operator is demonstrating the correct and thoughtful way to fill an indoor or buried oil storage tank.
During oil tank filling the driver is listening to the tank whistle or tank alarm to avoid over-filling the tank - a common source of seepage and occasional heating oil or fuel oil spills.
If the plumber or installer locates oil fill and vent pipes where they are difficult to access, don't expect such careful oil deliveries.
In fact most modern oil tank filler caps have a special fitting, often different from one oil company to the next, that permits the installer to "lock" the filler hose to the filler pipe during the fill-up procedure.
Usually an oil storage tank is filled right to its top during an oil delivery. This is because the way that the delivery driver knows that the tank is full is that s/he is (supposed to be) listening at the filler pipe.
Tank fill or vent valves are (supposed to be) equipped with a whistling noisemaking device that indicates when the tank is full as the heating oil reaches the sounding device.
So if, unlike the driver in our photo above, the oil delivery pumper is not listening, say s/he went aside to smoke a cigarette or make a cell call, or if the tank top fittings are not absolutely tight, it is common to see some leakage around the tank top after a fill-up.
We discuss details of oil tank pressures created during the oil tank filling operation
Oil Tank Fill/Vent Pipe Leak Diagnosis
When and what should you do something about a leak at the top fittings of an oil tank?
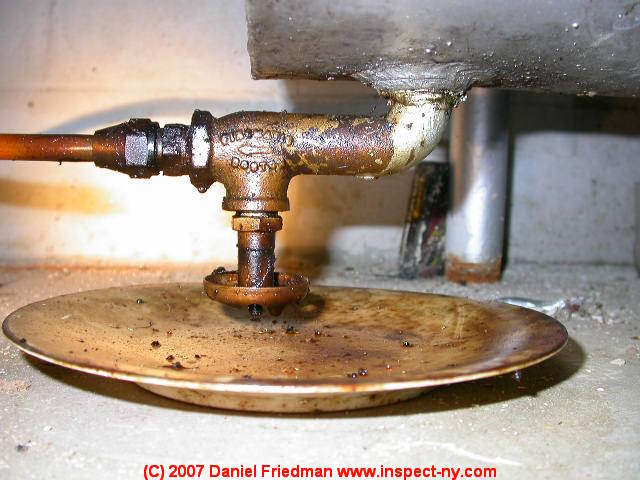
- Find the exact point of oil leakage:
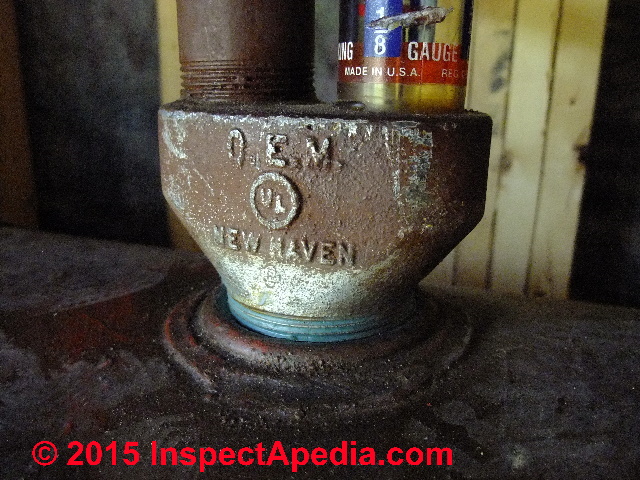
If you see oil on the floor, check the bottom of the tank, sides and welded seams, and be sure to check the oil lines to the boiler and in particular, check the oil tank safety valve or other tank bottom fittings as there are often leaks at these valves, as shown in this photograph.
Before addressing tank top filler pipe fittings as a leak source, make sure the oil leakage is from the top of the oil tank.
Other tank leaks such as at a seam or at perforations indicating a rusted tank need immediate evaluation by an expert, since these could spell major trouble like a big and costly oil spill should the tank break or a fitting blow off. - Check for more than one leak point:
Make sure that you know where the seepage is coming from. There may be separate spillage outside at the filler pipe from that occurring inside at the tank top or other fill or vent pipe fittings.
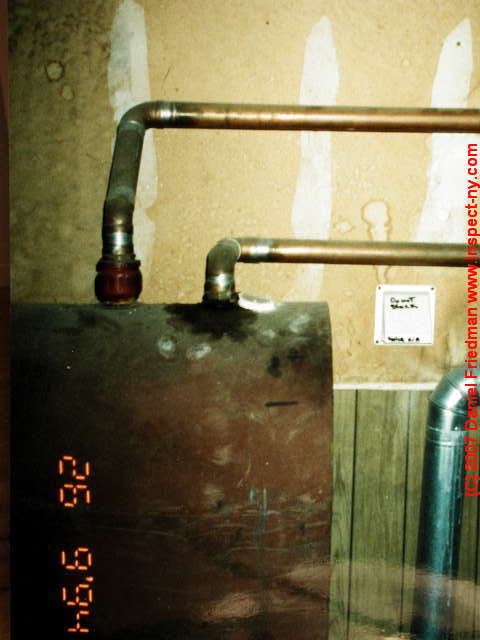
- Check condition of oil piping:
Make sure that the piping you're using is proper in material (steel is safer against rupture than plastic), and in diameter (2" or larger) for both vent and fill pipes.
[The soldered copper fill and vent piping at the oil tank in the photo just above was unusual and may not be permitted. At the top of this page, the silver-colored (galvanized steel) oil tank vent pipe in the tank is probably too small for modern tank fill methods.]
An older-installed small diameter vent or fill pipe [like the one shown at the page top photo] risks over pressuring the tank during fill-up, and risks a costly oil spill should an old tank or fill or vent line rupture. Ask your oil company to review the condition of the piping and the condition of the tank.
How to Repair Seepage or Small Oil Tank Fill or Vent Pipe Leaks
- Small oil leaks at the heating oil storage tank:
If the seepage is trivial in amount, say simply a light stain just a few inches around the tank top, clean it off and live with it.
Or re-make the joints when other plumbing work is planned.
(It's quite a bit of trouble to re-make these joints, especially if the filler and vent piping have been routed through and cemented into a masonry wall.)
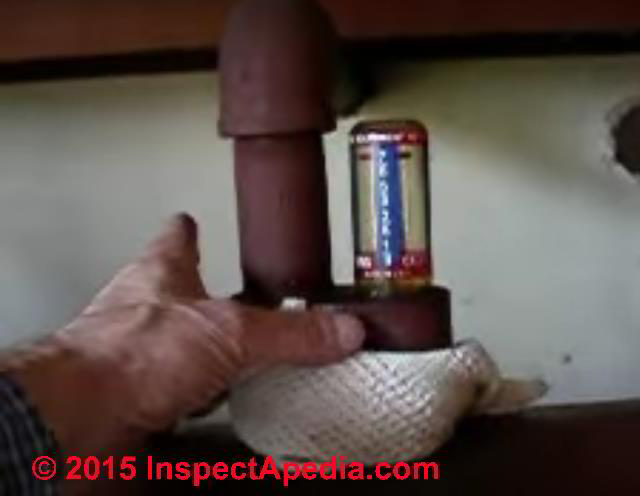
On an oil tank which recently "developed" a seep after our oil company bought a new, improved, higher pumping pressure delivery truck, I cleaned the tank surface and tied a rag around the filler pipe at the top of the tank to try intercepting the leak before it spreads over the tank and smells up our garage (photo below). I was doubtful that this will be effective long term but changing the rag after each tank fill was easier than scrubbing off the whole side of the tank.
- Control small oil tank fill or vent pipe seepage leaks with a rag or paper towels:
this VIDEO: An Easy Cure for Small Oil Tank Fill or Vent Pipe Leaks & Odors - illustrates a "stopgap" to contain oil seepage and smells from leaks at the pipe fittings at the top of an oil tank using a rag or paper towel.
Later we made a proper repair of the tank gauge by removing the gauge glass (actually it's plastic), cleaning the threads on the glass and on the gauge mounting point, then wrapping the gauge glass threads with teflon tape.
Watch out: a leaky oil tank gauge can be mistaken for an oil vent piping leak. Ultimately we traced this leak to seepage at the plastic-threaded oil tank gauge cover. The repair required making a new rubber gasket used at the bottom of the plastic oil tank gauge cover.
See OIL TANK GAUGE LEAK REPAIR
Other videos: VIDEO GUIDES at InspectAPedia.com
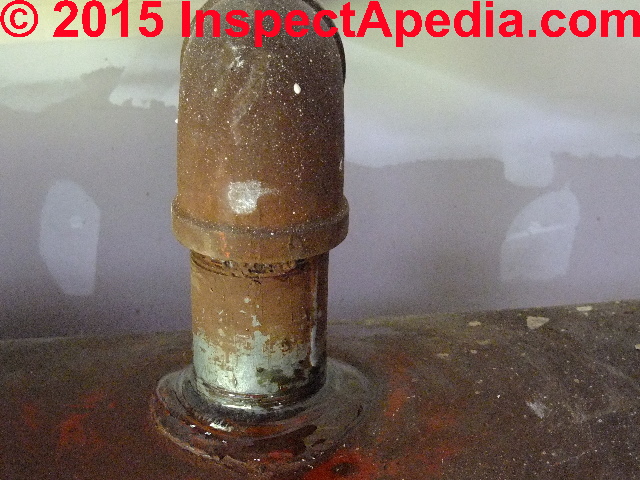
Subsequently we made a permanent repair by cleaning and sealing those threads using alcohol, then epoxy to stop the seepage without having to disassemble the piping - shown below. - Seal small to modest oil tank filler or vent pipe oil leaks using an epoxy sealant - shown below
How to use epoxy to stop seepage at an oil tank fill or vent pipe
 Watch out: this oil tank seepage-leak repair is suitable for sealing threaded fittings on an otherwise sound oil storage tank. If your oil tank is rusted, cracked, perforated, or leaking at the gauge or at a shutoff valve, an epoxy repair is not useful.
- Timing:
Start your repair when there is no active seepage at the oil tank fill or vent line or other tank fitting.
For fittings at the top of the tank this means waiting for your oil burner to use a few gallons of oil if in fact the oil tank was over-filled to its very top.
- Cleaning step A.
Use a grease-cutting spray cleaner and paper towels or rags to clean off heating oil from the area of repair at the oil tank.
In fact to reduce heating oil smells in the area, I prefer to clean off all of the accessible oil-wet areas on the oil tank. - Cleaning step B.
Use alcohol or lacquer thinner or a similar oil-free solvent-cleaner to complete cleaning the area of the toil tank top and surface to be sealed.
I use a toothbrush to clean rust and oil debris from the exposed pipe threads and crevices around the fill or vent pipe where epoxy sealant is to be applied - Cleaning step C.
Wipe off debris and cleaner and let the surfaces dry fully. I use paper towels or a low-lint rag as I don't want to leave a lot of lint stuck to surfaces where it may interfere with good bonding of the epoxy. - Apply sealant:
Mix and apply any conventional two-part epoxy. Why epoxy to seal this oil tank seepage leak? I was not confident that a flexible sealant would remain in place.
We used the Gorilla brand clear epoxy shown in the photo. But any clear epoxy product should work perfectly well on an indoor oil storage tank. If your oil tank is outdoors, choose an epoxy that is rated for outdoor weather exposure.
- Smooth the epoxy in place: [Photo below]
Use a disposable bit of wood, cardboard, or even a screwdriver that you wipe clean of epoxy, smooth the epoxy in place.
Take care that the adhesive/sealant is uniform, with no gaps or openings in the epoxy coating around the oil pipe and the surface of the tank. We extend the epoxy up about 1/4" on the pipe and out about 3/4" onto the oil tank surface.
This sealant was completely effective against leaks at the oil tank fill and vent pipes in this location yet it remains easy to later remove the pipes should the oil tank later need to be moved or changed in any way.
In fact this oil storage tank was later replaced completely, solving a problem of accumulated sludge and a completely specious and incorrect claim by an inspector that the tank was leaking. (It was not.).
Those details are at OIL TANK REPLACEMENT PROCEDURE
How to Repair a Significant Oil Fill or Vent Pipe Leak
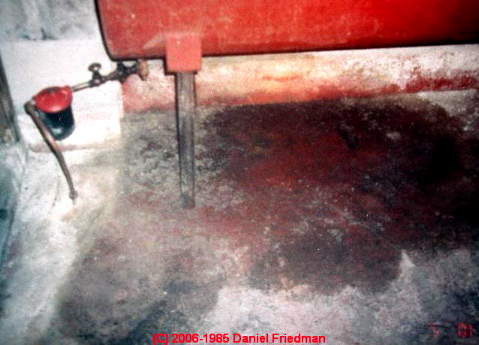
- Significant oil piping leaks:
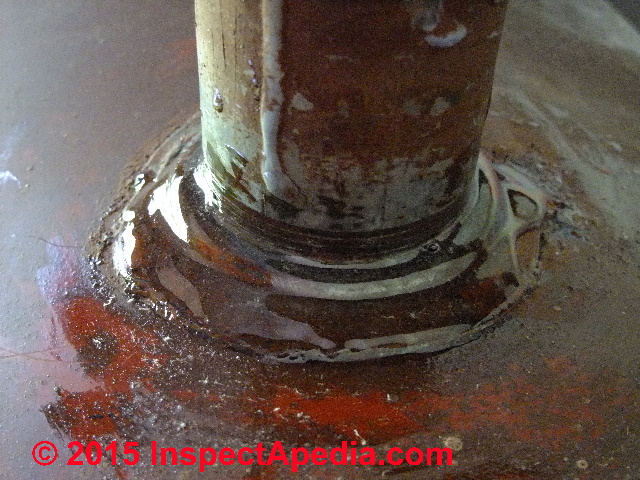
If the seepage is enough to wet the tank or run down the whole tank and drip onto the floor (above) this is an unacceptable condition that needs correction.
At above left the oil tank has been soaked by recurrent spills around oil piping connections and there is heating oil on the floor below the tank as well. It's likely that the piping will have to be removed and (possibly new) piping installed.
I am doubtful that any "band-aid" approach like pushing epoxy putty or other sealers around the existing fitting is going to work. The surfaces will be rough, rusty, and oily.
Above and continuing with more photographs below we illustrate an oil tank whose fill and vent piping has been removed to permit tank relocation and re-piping.
That is a convenient time to take extra care that the oil piping connections are well sealed when they are re-made.
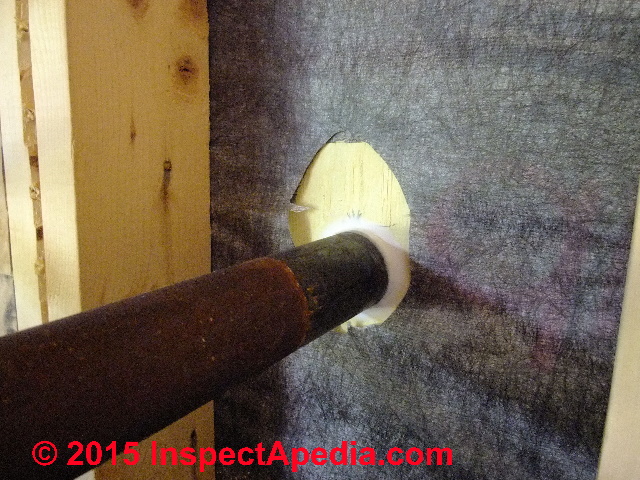
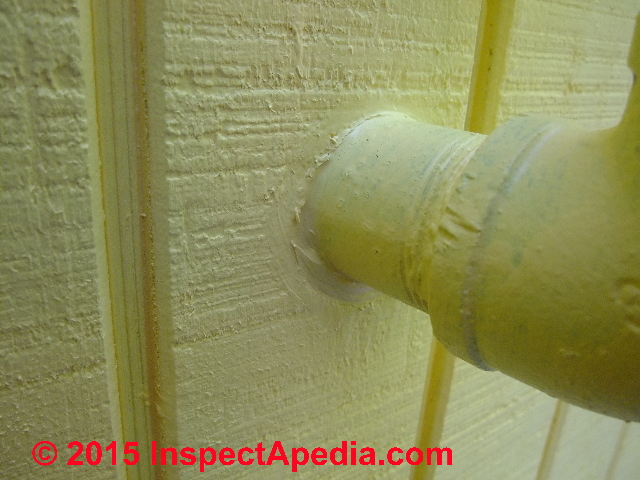
At above right we illustrate taking care to seal the oil vent or fill piping where it passes through the building wall, avoiding water entry, drafts, and insect damage by keeping these wall penetrations well-sealed.
Shown at above left is the outside view of the oil fill or vent pipe - well-sealed at the building wall: we caulked on both sides of the exterior wall sheathing in this installation.
If a reader or product manufacturer has a sealant that is actually effective in this application, dealing with the rust, oil, surface shapes, and fill pressure, I'll be glad to report on that product here. It would indeed be less trouble than re-piping the tank.
Make sure the new piping is properly sealed and secured. If heating oil has been dripped on the floor, ask your oil company to clean it up and deodorize the area.
- Repair significant oil tank fill or vent pipe leaks by disassembly, cleaning, and re-sealing
the pipe joints using an oil-resistant pipe joint thread compound / sealant
Above we show re-made and properly-sealed oil fill and vent piping connections using an oil-resistant pipe joint thread compound.
We have had good success sealing even the rough threaded pipe joints in large diameter oil tank fill and vent piping using "Brush-on/Blue Block", a pipe thread and gasket sealant compound provided by Hercules / Oatey Block pipe joint and gasket sealer.
An 8-ounce container retails for less than $7.00 U.S.D. and is available from your local plumber supplier or building supply store such as Davies Hardware in Poughkeepsie, NY or at Home Depot and Loews building suppliers.
A similar Oatey product, Oatey SCS 15707 Hercules Block Greenish-Blue Thread and Gasket Sealant is also effective for sealing oil tank fill and vent pipes. Oatey's Great Blue® pipe joint sealing compound is also rated for use with diesel fuel oil, gasoline and many other liquids.
- Actual oil spills:
If there is an actual oil spill, indoors or out, most state departments of environmental protection require that they be notified within 24 hours of the spill, an inspection is performed, and an expert specifies the amount of cleanup needed.
- Remove un-used oil filler and vent piping:
Never ever leave an oil and vent pipe installed at a home where the oil tank has been removed.
There is a risk that a mistaken oil delivery driver will attempt to deliver to the wrong pipes, flooding and ruining the home with heating oil. - Enclosing indoor oil tanks:
Don't try simply enclosing a tank that is leaking - you prevent inspection of it, can miss a deteriorating condition, may interfere with service procedures for the heating equipment, and you won't control the odors. If an oil tank is going to be covered for aesthetic reasons, make the covering easily removable for inspection and service.
...
...
Continue reading at OIL FILL / VENT PIPE RUST-CAUSED LEAKS or select a topic from the closely-related articles below, or see the complete ARTICLE INDEX.
Or see OIL TANK FILL / VENT PIPE LEAK REPAIR FAQs for questions & answers oil tank fill and vent pipe leak repair and that were posted originally on this page.
Or see these
Recommended Articles
- OIL TANK PIPING & PIPING DEFECTS - home
- OIL TANK GAUGES - home
- OIL TANK PIPING & PIPING DEFECTS - home
- OIL TANK LEAKS & SMELLS - home
- OIL TANK LEAK POINTS
- OIL TANK PRESSURE - what role does the fill-pressure play in oil storage tank leaks?
Suggested citation for this web page
OIL TANK FILL / VENT PIPE LEAK REPAIRS at InspectApedia.com - online encyclopedia of building & environmental inspection, testing, diagnosis, repair, & problem prevention advice.
Or see this
INDEX to RELATED ARTICLES: ARTICLE INDEX to HEATING OIL, OIL BURNERS, OIL FIRED HEATERS, OIL TANKS
Or use the SEARCH BOX found below to Ask a Question or Search InspectApedia
Ask a Question or Search InspectApedia
Try the search box just below, or if you prefer, post a question or comment in the Comments box below and we will respond promptly.
Search the InspectApedia website
Note: appearance of your Comment below may be delayed: if your comment contains an image, photograph, web link, or text that looks to the software as if it might be a web link, your posting will appear after it has been approved by a moderator. Apologies for the delay.
Only one image can be added per comment but you can post as many comments, and therefore images, as you like.
You will not receive a notification when a response to your question has been posted.
Please bookmark this page to make it easy for you to check back for our response.
IF above you see "Comment Form is loading comments..." then COMMENT BOX - countable.ca / bawkbox.com IS NOT WORKING.
In any case you are welcome to send an email directly to us at InspectApedia.com at editor@inspectApedia.com
We'll reply to you directly. Please help us help you by noting, in your email, the URL of the InspectApedia page where you wanted to comment.
Citations & References
In addition to any citations in the article above, a full list is available on request.
- [1] Fuel Storage] Tank Corrosion Study, U.S. EPA report on gasoline and oil tank corrosion, James H. Pim, P.E., John M. Searing, Suffolk County DOHS, 15 Horseblock Place, Farmingville Long Island, NY 11728, November 1988, for the Office of Underground Storage Tanks, U.S. EPA. ATTN: David O'Brien. The report presents a study of 500 underground storage tanks spanning 24 February 1987 and September 1 1988 and summarizes earlier reports on this same study. Tank sizes ranged from 175 gallons to 50,000 gallons, and oil tank ages ranged from two years to 70 years old. All 500 oil storage tanks were constructed of welded steel, and 12 other tanks that were other than plain steel were also examined. Summary [with minor edits for clarity by DJF]
Five hundred plain steel [underground fuel storage] tanks plus twelve corrosion protected [under ground oil] storage tanks were removed from the ground over an eighteen month period in Suffolk County, Long Island, New York.
The oil tanks were examined carefully before disposal to gather statistics on the nature and extent of steel oil storage tank corrosion that had attacked them.
Information was gathered on the number, type, location, and size of oil storage tank perforations [oil storage tank leak points] the general interior and exterior corrosion condition of the oil storage tank, soil, backfill, and groundwater conditions; the presence of leaked product [heating oil], and oil storage tank statistics such as tank volume, steel plate thickness, location, product [type of heating oil stored], tank age, etc.
The statistics were compiled and compared, observations made, and conclusions developed.
The major conclusions [were] summarized as follows:- Size is more important than age in predicting oil storage tank failures
- In general, small tanks are much more likely to perforate than large tanks due to thinner walls found in smaller oil storage tanks
- Compared to external corrosion, internal corrosion is insignificant [in the underground oil storage tanks examined - warning from DF: the opposite is probably the case regarding above ground storage tanks].
- Fuel oil tanks are just as susceptible to leak perforation as gasoline tanks of the same size
- Existing fuel storage tanks are in worse shape than is demonstrated by storage tank testing
- Storage tanks to not always leak immediately on perforation
- [2] Thanks to Arlene Puentes for for technical edits on oil tank leak advice- 12/2005. Arlene Puentes is a licensed home inspector, educator, and building failures researcher in Kingston, NY.
- [3] "A Case Study of a Large Scale Precision [oil or fuel] Tank Testing Program", Diane H. Heck, Tetra Tech Richardson, Newark, Delaware, web search 4/27/12, original source: info.ngwa.org/GWOL/pdf/870143411.PDF, copy on file as /heating/OIl Tanks UST/Tank_Test_Heck_870143411.pdf
- [4] Fuel Oil and Oil Heat Magazine, August 1985 p.18. Fuel Oil & Oil Heating Magazine, 3621 Hill Rd., Parsippany, NJ 07054, 973-331-9545
- [5] Standards of the National Board of Fire Underwriters, as referenced by "Domestic and Commercial Oil Burners,", Charles H. Burkhardt, 1961, 3rd Ed., McGraw Hill Book Company, p. 172
- [6] NFPA - the National Fire Protection Association can be found online at www.nfpa.org
- [7] "The Interim Prohibition Guidance for Design and Installation of Underground Oil Storage Tanks", U.S. EPA, EPA/530-SW-85203, Office of Underground Storage Tanks, Washington D.C.
- [9] US EPA "How do you Properly Close a UST?" is summarized at epa.gov/OUST/fsprevnt.htm These details for temporary and permanent closing of underground oil storage tanks are provided by the US EPA as well.
- [10] "How do you choose the right tank testing method?", Cynthia Johnson, Fuel Oil & Oil Heat Magazine, November 1995
- [11] National Association of Oil Heat Service Managers, PO Box 380, Elmwood Park, NJ 07407
- [12] "Homeowners Guide to Fuel Storage," Agway Energy Products, Verbank, NY, November 1990
- [13] "Causes of Underground Corrosion", Harco Corporation, Paper HC-36, Median OH
- [14] "Toxicological profile for fuel oils", U.S. Department of Health and Human Services, Public Health Service, Agency for Toxic Substances and Disease Registry (ATSDR) Atlanta, GA 1995. - http://www.atsdr.cdc.gov/toxprofiles/tp75.html
- [15] Public Health Statement for Fuel Oils, ATSDR, (the full document original source can be found at http://www.atsdr.cdc.gov/toxprofiles/phs75.html). An excerpt from this document is just below. ATSDR,
Division of Toxicology, 1600 Clifton Road NE, Mailstop F-32, Atlanta, GA 30333 888-422-8737. - [16] Heating Oil Exposure Health Effects - The ATSDR section on health effects of exposure to heating oil see-ATSDR
- [17] Heating Oil Chemical Properties - ATSDR
- [18] Potential for Human Exposure to Heating Oil - ATSDR - 1.5 How can fuel oils affect my health?
- [19] "Home Heating Oil Spills, Fact Sheet", Connecticut Department of Public Health
- [20] "Home Heating Oil Spills", Wisconsin Department of Health, at http://dhs.wisconsin.gov/eh/Air/fs/Oilspill.htm
- [21] MSDS for No. 2 Home Heating Oil - provided by Hess Oil Company
- In addition to citations & references found in this article, see the research citations given at the end of the related articles found at our suggested
CONTINUE READING or RECOMMENDED ARTICLES.
- Carson, Dunlop & Associates Ltd., 120 Carlton Street Suite 407, Toronto ON M5A 4K2. Tel: (416) 964-9415 1-800-268-7070 Email: info@carsondunlop.com. Alan Carson is a past president of ASHI, the American Society of Home Inspectors.
Thanks to Alan Carson and Bob Dunlop, for permission for InspectAPedia to use text excerpts from The HOME REFERENCE BOOK - the Encyclopedia of Homes and to use illustrations from The ILLUSTRATED HOME .
Carson Dunlop Associates provides extensive home inspection education and report writing material. In gratitude we provide links to tsome Carson Dunlop Associates products and services.


